Doing a table join in Android without using rawQuery

The Open Event Android App, downloads data from the API (about events, sessions speakers etc), and saves them locally in an SQLite database, so that the app can work even without internet connection.

Since there are multiple entities like Sessions, Speakers, Events etc, and each Session has ids of speakers, and id of it’s venue etc, we often need to use JOIN queries to join data from two tables.


Android has some really nice SQLite helper classes and methods. And the ones I like the most are the SQLiteDatabase.query, SQLiteDatabase.update, SQLiteDatabase.insert ones, because they take away quite a bit of pain for typing out SQL commands by hand.

But unfortunately, if you have to use a JOIN, then usually you have to go and use the SQLiteDatabase.rawQuery method and end up having to type your commands by hand.

But but but, if the two tables you are joining do not have any common column names (actually it is good design to have them so – by having all column names prefixed by tablename_ maybe), then you can hack the usual SQLiteDatabase.query() method to get a JOINed query.

Now ideally, to get the Session where speaker_id was 1, a nice looking SQL query should be like this –

SELECT * FROM speaker INNER JOIN session
ON speaker_id = session_speaker_id
WHERE speaker_id = 1

Which, in android, can be done like this –

String rawQuery = "SELECT * FROM " + SpeakerTable.TABLE_NAME + " INNER JOIN " + SessionTable.TABLE_NAME
        + " ON " + SessionTable.EXP_ID + " = " + SpeakerTable.ID
        + " WHERE " + SessionTable.ID + " = " +  id;
Cursor c = db.rawQuery(
        rawQuery,
        null
);

But of course, because of SQLite’s backward compatible support of the primitive way of querying, we turn that command into

SELECT *
FROM session, speaker
WHERE speaker_id = session_speaker_id AND speaker_id = 1

Now this we can write by hacking the terminology used by the #query() method –

Cursor c = db.query(
        SessionTable.TABLE_NAME + " , " + SpeakerTable.TABLE_NAME,
        Utils.concat(SessionTable.PROJECTION, SpeakerTable.PROJECTION),
        SessionTable.EXP_ID + " = " + SpeakerTable.ID + " AND " + SpeakerTable.ID + " = " +  id,
        null,
        null,
        null,
        null
);

To explain a bit, the first argument String tableName can take table1, table2 as well safely, The second argument takes a String array of column names, I concatenated the two projections of the two classes. and finally, put by WHERE clause into the String selection argument.

You can see the code for all database operations in the android app here  https://github.com/fossasia/open-event-android/blob/master/android/app/src/main/java/org/fossasia/openevent/dbutils/DatabaseOperations.java

Continue ReadingDoing a table join in Android without using rawQuery

Getting code coverage in a Nodejs project using Travis and CodeCov

We had set up unit tests on the webapp generator using mocha and chai, as I had blogged before.

But we also need to get coverage reports for each code commit and the overall state of the repo.

Since it is hosted on Github, Travis comes to our rescue. As you can see from our .travis.yml file, we already had Travis running to check for builds, and deploying to heroku.

Now to enable Codecov, simply go to http://codecov.io and enable your repository (You have to login with Github so see your Github repos) .

Once you do it, your dashboard should be visible like this https://codecov.io/github/fossasia/open-event-webapp

We use istanbul to get codecoverage. To try it out just use

istanbul cover _mocha

On the root of your project (where the /test/ folder is ) . That should generate a folder called coverage or lcov. Codecov can read lcov reports. They have provided a bash file which can be run to automatically upload coverage reports. You can run it like this –

bash <(curl -s https://codecov.io/bash)

Now go back to your codecov dashboard, and your coverage report should show up.

Screenshot from 2016-08-29 21-23-00

If all is well, we can integrate this with travis so that it happens on every code push. Add this to your travis.yml file.

script:
  - istanbul cover _mocha
after_success:
- bash <(curl -s https://codecov.io/bash)

This will ensure that on each push, we run coverage first. And if it is successful, we push the result to codecov.

We can see coverage file by file like this

Screenshot from 2016-08-29 21-23-35

And we can see coverage line by line in a file like this

Screenshot from 2016-08-29 21-26-55


Continue ReadingGetting code coverage in a Nodejs project using Travis and CodeCov

GSoC 2016 Summary of work done – Improving sTeam

To understand my project you first need to understand what sTeam is. For that you can refer to the blog I wrote https://blog.fossasia.org/what-is-steam/

FOSSASIA_Logo.svggsoc2016-sun-373x373

I started off small by fixing already existing bugs. There were multiple bugs with the edit command in the command line interface of sTeam. I extended the edit command to allow opening of multiple files as tabs in a vim editor. To provide users with more options and to make working on sTeam client easier I added the feature to open new files in steam directly from inside vim. I wrote a vim script to do this and communicated with the sTeam server through this script. My first major task was to implement a TLS connection between the sTeam command line client and the server. For this I had to understand the COAL protocol, which is a home grown protocol for sTeam. I improved the tooling for sTeam by adding in commandso work with groups from the steam-shell and to allow re-login from debug.pike. After this I did some cleaning up work by removing repeated code. The code for login was being repeated in different tools so I made a separate file containing all the common code and imported this in all the tools. I wrote an extensive help command describing every command for steam-shell and giving their syntax. There was some conceptual error in the steam-shell. Rooms and gates are the same but gothrough command was allowing the users to enter a gate but not a room, this was changed to enter command supporting both gates and room, I also changed the output of look command to not show gates and rooms as separate entities.

The next two tasks were entirely new additions to the project. First I wrote a test suite to test the calls to COAL functions. Pike does not have any kind of testing framework so I had to design my own testing framework and write test cases to test the COAL function calls. This will help further development of sTeam as testing of new code becomes easier. The next addition was to write a linux command for sTeam. Steam tools were accessible only from the tools folder that got copied to a particular location on installation. Now on installation users can use the steam command from anywhere to access all the tools.

1. We have combined all the work into two branches.

The commits made by me in each branch can be seen here.

2. I wrote weekly blogs summarizing the work done during the week.

All the blogs can be found at blog.fossasia.org.

The list in reverse chronological order is as follows.

3. A list of tasks covered and all the Pull requests related to each can be seen here

Tasks

Issue

PR

Fix the edit script.

Issue-34

PR-36

Extend edit command for multiple files. Each file opens in its own tab

Issue-38

PR-40

Implementing TLS for COAL to make it COALS.

Issue-47

PR-50

Add the functionality to open files from inside vim

Issue-53

PR-61

Write a plugin to make closing of files easier by closing the logs automatically.

Issue-62

PR-65

Add the command to create groups to steam-shell.

Issue-68 Issue-97

PR-77 PR-98

Add login command to allow relogin in debug.pike

Issue-87

PR-89

Remove repeated code used for login

Issue-91

PR-92

Add a detailed help command to make sTeam easier to use for new users.

Issue-30

PR-95

Change gothrough to enter and allow them to enter rooms as well.

Issue-96

PR-99

Change the output of look command and show rooms and gates under the same section

Issue-100

PR-101

Make steam tools accessible from everywhere

Issue-126 Issue-128 Issue-130Issue-134

PR-127 PR-129 PR-131 PR-135

Write test cases to keep the software error free.

Issue-104 Issue-107 Issue-109Issue-110 Issue-111 Issue-113Issue-116 Issue-118 Issue-122 Issue-124

PR-105 PR-108 PR-112 PR-114 PR-115PR-117 PR-119 PR-123 PR-125

Documentation.

Issue-144

PR-145

4. Scrum Reports

Daily scrum reports have been posted and discussed on #steam-devel on irc.freenode.net and a backup can be found on the mailing list

5. Further Enhancements

  • The testing framework needs to be improved
  • More test cases needs to be added


6. Conclusion

In the end I would like to thank Google and FOSSASIA for providing me this wonderful opportunity to learn and collaborate. I would like to thank my mentors Martin and Trilok for guiding me through all the difficult times and helping me solve bugs whenever I got stuck. I would continue contributing to open source and try joining more projects under FOSSASIA to improve my skill set and to get new experience. I will also be taking active part in Google Code In and will love to be a mentor.

Continue ReadingGSoC 2016 Summary of work done – Improving sTeam

Building Android preference screen


Some days ago, I started building a Setting Screen for my Android app. Everything was fine, until I opened it on an older Android version. The overview screen had no material design, a thing I would have accepted, if there weren’t those completely destroyed dialogs: Android’s internal preferences are using Android’s internal app.AlertDialogs. Those dialogs in combination with the AppCompat Dialog Theme, which I had applied to them, resulted in a dialog with two frames on older devices (One system default dialog and a material frame around it).
So I decided to switch to the android.support.v7.preference library, only to face a lot more issues.


Including the Library

In order to use the new preferences, we need to import a library. To do so, we add this line to our gradle dependencies (You should change the version number to the latest).

compile 'com.android.support:preference-v7:23.4.0'

Building The Preference Screen

Creating the Preferences

At first, we need to create our preference structure: We create a new XML Android resource file as xml/app_preferences.xml. Now we can add our preference structure to this file. Make sure to add a unique android:keyattribute for each preference. More information: How to build the XML

<android.support.v7.preference.PreferenceScreen
    xmlns:android="http://schemas.android.com/apk/res/android"> 
    <android.support.v7.preference.PreferenceCategory
        android:title="Category 1">          
    <android.support.v7.preference.SwitchPreferenceCompat
            android:key="key1"
            android:title="Switch Preference"
            android:summary="Switch Summary"
            android:defaultValue="true" />
    <android.support.v7.preference.EditTextPreference
            android:key="key2"
            android:title="EditText Preference"
            android:summary="EditText Summary"
            android:dialogMessage="Dialog Message"
            android:defaultValue="Default value" /> 
    <android.support.v7.preference.CheckBoxPreference
            android:key="key3"
            android:title="CheckBox Preference"
            android:summary="CheckBox Summary"
            android:defaultValue="true"/></android.support.v7.preference.PreferenceCategory></android.support.v7.preference.PreferenceScreen>

The v7.preference library provides some preferences we can use: CheckBoxPreference, SwitchPreferenceCompat, EditTextPreference and a ListPreference (and a basic Preference). If we need more than these predefined preferences, we have to build them on our own.

Creating the Preference Fragment

Now we need to create our Preference Fragment, where we can show the preferences from our XML file. We do this by creating a new class, called SettingsFragment, which extends PreferenceFragmentCompat. Since the onCreatePreferences is declared as abstract in the source code of the library, we are forced to include our own implementation to tell the fragment to load our just created app_preferences.xml.

import android.support.v7.preference.PreferenceFragmentCompat;
public class SettingsFragment extends PreferenceFragmentCompat {
@Override
    public void onCreatePreferences(Bundle bundle, String s) {
        // Load the Preferences from the XML file
        addPreferencesFromResource(R.xml.app_preferences);
    }
}

We can add this SettingsFragment (v4.app.Fragment), like any other Fragment (e.g. with a FragmentTransaction) to an Activity.

Applying the Preference Theme

Finally we need to specify a preferenceTheme in our Activity’s theme. If we don’t do so, the App will crash with an IllegalStateException.
The v7.preference library provides only one Theme: PreferenceThemeOverlay(You may have a look at its source code). We add this with the following line in our Activity’s theme:

<item name="preferenceTheme">@style/PreferenceThemeOverlay</item>

After we have done this, our result should now look like this.
(The Activity’s parent theme is Theme.AppCompat and the background is set with android:windowBackground)

Settings Screen with PreferenceThemeOverlay

As you can see, it has an oversized font and a horizontal line below the category title. This is definitely not material design.

It more looks like a mixture of material design for the CheckBoxand Switch widgets on the right and an old design for everything else.

This leads us to the next point: Applying the material theme to our settings.

Applying the Material Design Theme

Since there is no material theme in our current preference library, we need to import the v14.preference library. It is strange that Google splitted up these two libraries, because the v14 version is obviously only an addition to the v7.preference library. However, this means for us, that we have to add one more line to our gradle dependencies (You should change the version number to the latest).

compile 'com.android.support:preference-v14:23.4.0'

Now we have access to two more themes: PreferenceThemeOverlay.v14 and PreferenceThemeOverlay.v14.Material (You may have a look at their source code). To use the material theme, we simply change the preferenceTheme in our Activity’s theme.

<item name="preferenceTheme">
    @style/PreferenceThemeOverlay.v14.Material
</item>

A side effect of including the v14.preference library is that we can use a new preference called MultiSelectListPreference (it requires the v7.preference library to work).

Settings Screen with PreferenceThemeOverlay.v14.Material

Our result should look like this. And this time it is full material design.

The font is not oversized anymore and also the horizontal line below the category title has disappeared.

We can change the color of the CheckBox, the Switch and the PreferenceCategory title by changing the colorAccent in our Activity’s theme.


This was only the first step to create a material design Settings Screen. As soon as you open the Alert Dialog of the EditText preference, you will find more design issues.

Continue ReadingBuilding Android preference screen

Using Partial in Handlebars and Reusing Code

Open Event Webapp uses handlebar partials for optimizing code. We can reuse a template using Handlebars partial.

How to use Handlebars partial ?

To use Handlebars partial, we have to follow some easy steps:

Step 1: In the .hbs file containing code, register your partial by using function Handlebars.registerPartial 

Handlebars.registerPartial('myPartial', '{{name}}')

Step 2: Calling the partial

{{> myPartial }}

In Open-Event Webapp we have made partials for common templates like navbar and footer.

1. // Navbar template (navbar.hbs)

  
 <!-- Fixed navbar -->
 <nav class="navbar navbar-default navbar-fixed-top">
  <div class="container">
   <div class="navbar-header navbar-left pull-left">
    <a class="navbar-brand" href="{{ eventurls.main_page_url }}">
    {{#if eventurls.logo_url}}
    <img alt="{{eventurls.name}}" class="logo logo-dark" src="{{  eventurls.logo_url }}">
    {{else}}
    {{ eventurls.name }}
    {{/if}}
    </a>
   </div>
 <div class="navbar-header navbar-right pull-right">
   <ul style="margin-left:20px" class="nav navbar-nav pull-left">
   {{#sociallinks}}
   {{#if show}}
    <li class="pull-left"><a href="{{link}}" style="padding-right:0; padding-left:0;margin-left:15px"><i class="fa fa-lg fa-{{icon}}" aria-hidden="true" title="{{{icon}}}"></i></a></li>
   {{/if}}
   {{/sociallinks}}
   </ul>
 <button type="button" class="navbar-toggle" data-toggle="collapse" data-target=".navbar-collapse" style="margin-left:1em;margin-top:1em;">
   <span class="sr-only">Toggle navigation</span>
   <span class="icon-bar"></span>
   <span class="icon-bar"></span>
   <span class="icon-bar"></span>
 </button>
 </div>

 <div class="hidden-lg hidden-md hidden-sm clearfix"></div>
   <div class="collapse navbar-collapse">
    <ul class="nav navbar-nav navbar-right">
     <li class="navlink"><a id="homelink" href="index.html">Home</a>
     {{#if timeList}}
     <li class="navlink">
     <a id="schedulelink"href="schedule.html">
     Schedule</a>
     </li>
     {{/if}}
     {{#if tracks}}
     <li class="navlink">
      <a id="trackslink" href="tracks.html">Tracks</a>
    </li>
  {{/if}}
     {{#if roomsinfo}}
     <li class="navlink">
      <a id="roomslink" href="rooms.html">Rooms</a>   
     </li>
    {{/if}}
    {{#if speakerslist}}
    <li class="navlink">
      <a id="speakerslink" href="speakers.html">Speakers</a>
     </li>
    {{/if}}
   </ul>
     </div>
   </div>
 </nav>
//Compiling Template by providing path

2. const navbar = handlebars.compile(fs.readFileSync(__dirname + '/templates/partials/navbar.hbs').toString('utf-8'));
// Register Partial

3. handlebars.registerPartial('navbar', navbar);
Continue ReadingUsing Partial in Handlebars and Reusing Code

sTeam GSoC 2016 Windup

(ˢᵒᶜⁱᵉᵗʸserver) aims to be a platform for developing collaborative applications.
sTeam server project repository: sTeam.
sTeam-REST API repository: sTeam-REST

An overview of the work done by ajinkya007 during Google Summer of code 2016 with FOSSASIA on its project sTeam.

The community bonding period saw the creation of a docker image and a debian package for the sTeam server. The integration of the sTeam shell into vi, improvements in the export and import to git scripts, user and group manipulation commands, sending mails through the commandline, viewing logs and the edit script modifications were done subsequently. The later part of GSOC saw that the sTeam-rest repository was restructured, unit and api-end point tests were performed. The new web interface developed was tested.
The code written during this period by me and siddhant was merged and the conflicts were resolved. The merged code was tested thoroughly as no automated test integration tool supports pike programming language. Documentation was generated using Doxygen and deployed in the gh-pages of the sTeam server repository.

A trello board was maintained throughout the course of GSOC 2016.

Trello Board: sTeam

Accomplishments

Issues Reported and Resolved

A list of tasks covered and all the Pull requests related to each:

Tasks Issue PR
Make changes in the Makefile for installation of sTeam. Issue-25 Issue-27 PR-66 PR-67
Edit script modifications Issue-20 Issue-29 Issue-43 PR-44 PR-48
Indentation of output in steal-shell. Issue-24 PR-42
Integrate steam-shell into vim or emacs. Issue-37 Issue-43 Issue-49 PR-41 PR-48 PR-51
Improve the import and export from git scripts. Issue-9 Issue-14 Issue-16 Issue-18 Issue-19 Issue-46 PR-45 PR-54 PR-55 PR-76
Create, Delete and List the user through commandline Issue-58 Issue-69 Issue-72 PR-59 PR-70 PR-78
Sending Mails through commandline Issue-74 PR-85
Generate error logs and display them in CLI Issue-83 PR-86
Create a file of any mime type from command line. Issue-79 PR-82
Add more commands for group operations. Issue-80 PR-84
Add more utility to the steam-shell Issue-56 Issue-71 Issue-73 PR-57 PR-75 PR-81
Restructure the sTeam-rest repository List of Issue’s List of PR’s
Write test cases to test sTeam-rest api List of Issue’s List of PR’s
Create a debian package and a docker image for easy deployment Create docker image Docker Image
Document the work done Issue 149 sTeam Server Structure, sTeam Server Documentation
Test the web-interface

Commits Merged

During the course of GSOC 2016, work was done on the sTeam and sTeam-rest repositories.

1. The work done on the sTeam repository.

We have combined all the work into two branches for the ease of creating a debian package. The commits made by me in each branch can be seen here.

2. The work done on the sTeam-rest repository

The push request’s sent for the issue’s are yet to be merged in the main repository. The list of PR’s for the sTeam-rest repository.

sTeam-rest PR’s

The weekly blogs

The blogs summarizing the work done during the week were published on my personal website. These can be found on Weekly Blogs
All the blogs can also be found on the Fossasia blog.
The list in reverse chronological order is as follows.

Scrums

Scrum reports were posted on the #steam-devel on irc.freenode.net and sTeam google group. The sTeam trello board also has everyday scrum reports.

Further Improvements

  1. sTeam command line lacks the functionality to read and set the object access permissions. sTeam function analogous to getfacl() to change the sTeam server object permisssions.
  2. sTeam debian package for easy installation of the sTeam server. The debian package is yet to be fully packaged.

Special Thanks

  • I would like to thank my mentors Mario Behling, Hong Phuc Dang, Martin Bahr, Trilok Tourani and my peers for being there to help me and guide me.
  • I would like to thank FOSSASIA, sTeam and Pike Community for giving me this opportunity and guiding me in this endeavour.
  • I would also like to thank Google Summer of Code for this experience.

Feel free to explore the repository. Suggestions for improvements are welcomed.

Checkout the FOSSASIA Idea’s page for more information on projects supported by FOSSASIA.

Continue ReadingsTeam GSoC 2016 Windup

Writing mime-type handlers in Angular

week15gsoc1

Developing a collaboration platform like sTeam web interface requires careful introspection while rolling out features that involve dealing with media. Any collaboration platform must support as many mime-types as possible, The REST API for sTeam written in pike offers us with the feasibilty of knowing the type of file or mime-type in the response object.
sTeam inbuilt has a mechanism which helps in detecting the mime-type of the file. So the same concept has been extended to the rest api in order to get the mime-type combined in the response object.

The first question that arrives at any user’s mind is what are the mime-types should i support, well basically there are couple of mime-types that can or could be considered in the category of compulsory mime-types that are ought to be supported if you wish to have media content on your application. Let us have a look at the popular or well known mime-types :

  • Text
  • PDF’s
  • Image
  • Audio
  • Video

What if we donot catch the mime-type ?
This is basically a classic question that has the most easiest answer, just ensure that the mime-types which your handler is unable to catch pass them with a flag saying that it is an unknown mime-type. So let us have a look at how it is done :


angular.module('steam')

.controller('workspaceDetailedCtrl', ['$http', '$scope', 'handler', 'localStorageService', 'PDFViewerService', '$sce',
 function ($http, $scope, handler, localStorageService, pdf, $sce) {
  $scope.dataSrc = localStorageService.get('baseurl') + 'home/' + localStorageService.get('currentObjPath')

  $scope.mimeTypeHandler = function () {
    if(localStorageService.get('currentObjMimeType') == 'application/x-unknown-content-type') {
      return 'unknown'
    } else if (localStorageService.get('currentObjMimeType').match(/image\/*/)) {
      return 'image'
    } else if (localStorageService.get('currentObjMimeType') == 'application/pdf') {
      return 'pdf'
    } else if (localStorageService.get('currentObjMimeType').match(/audio\/*/)) {
      return 'audio'
    } else if (localStorageService.get('currentObjMimeType').match(/video\/*/)) {
      return 'video'
    } else if (localStorageService.get('currentObjMimeType').match(/text\/*/) ||
      localStorageService.get('currentObjMimeType') == 'application/x-javascript' ||
      localStorageService.get('currentObjMimeType') == 'application/x-pike') {
      return 'text'
    } else { return 'notfound' }
  }


The best approach for writing a mime-type handler for your application would be :

  • Have a controller that has a function declared for doing the specific operation and pass the mimetype for the object that which you identify, so that the handler can simplify your job in just returning the type of your file
  • Ensure that as many well known mime-types are supported and for the case of new mime-types that depend for specific application just add them to the if...else block
  • Make it a point to catch all the unknown mime-types because when an unknown mime-type is not declared in your handler the browser tends to download the file directly instead of opening the same in your application

NOTE : The service provider localStorageService is very helpful if you have an application that needs to store some data on the user’s/client’s end. So while the user logs into the web interface , localStorageService sets the userpath, objectmimepath and everything else in order to complete the functionality of the application. So gotcha here is that when you have a situation like this localStorageService0 can be useful, since we can both set the data and get the data. Once the user logs out the data is cleared.

Thats it folks,
Happy Hacking !!


Continue ReadingWriting mime-type handlers in Angular

PIL to convert type and quality of image

Image upload is an important part of the server. The images can be in different formats and after applying certain javascript modifications, they can be changed to different formats. For example, when an image is uploaded after cropping in open event organizer server, it is saved in PNG format. But PNG is more than 5 times larger than JPEG image. So when we upload a 150KB image, the image finally reaching the server is around 1MB which is huge. So we need to decide in the server which image format to select in different cases and how to convert them.

Continue ReadingPIL to convert type and quality of image

File upload progress in a Node app using Socket.io

If you look at the webapp generator, you’ll see that there is an option to upload a zip file containing event data. We wanted to give visual cue to the user when he is uploading to see how much file has uploaded.

We are uploading the file, and giving the generate start command via socket.io events instead of POST requests here.

To observe file upload progress on socket (when sending file using a Buffer), there is an awesome node module available called socketio-upload-progress.

In our webapp you can see we implemented it on the frontend here in the form.js and here in the backend in app.js

Basically on the backend you should add the socketio-file-upload module as a middleware to express

var siofu = require("socketio-file-upload");
var app = express()
    .use(siofu.router)
    .listen(8000);

After a socket is opened, set up the upload directory and start listening for uploads

io.on("connection", function(socket){
    var uploader = new siofu();
    uploader.dir = "/path/to/save/uploads";
    uploader.listen(socket);
});

On the frontend, we’ll listen for an input change on an file input type element whose id is siofu_upload

var socket = io.connect();
var uploader = new SocketIOFileUpload(socket);
uploader.listenOnInput(document.getElementById("siofu_input"));

One thing to note here is that, if you observe percentage of upload on frontend, it’ll give you false values. The correct values of how much data is actually transferred can be found in the backend. So observe progress in backend, and send percentage to frontend using the same socket.

  uploader.on('progress', function(event) {
    console.log(event.file.bytesLoaded / event.file.size)
    socket.emit('upload.progress', {
      percentage:(event.file.bytesLoaded / event.file.size) * 100
    })
});


Continue ReadingFile upload progress in a Node app using Socket.io

Engelsystem GSoC 2016 Summary

This blog post I would like to share my work done during the GSoC period (May – August). Doing GSoC has been one of the most wonderful experience in my life.

Introduction

ENGELSYSTEM – Engelsystem is a volunteer management application for events written in PHP. It is used for coordination among different angels who want to volunteer.

END USERS FOR ENGELSYSTEM

SYSTEM ADMINS

  • It will make it easy for them to coordinate with the volunteers by the product we developed.

VOLUNTEERS /USERS

  • Those who want to volunteer finds it difficult to coordinate, contact admins. This platform helps all those who want to help.
  • Volunteers can register and can allot their shifts. A better User Interface, Integration with different Asian languages will allow the system to be used globally and in their local languages and ease for the volunteers to use.

As a part of the project I developed many new features for engelsystem. Implemented a workflow similar to wordpress, Implemented MVC model, Importing user data to database directly through script, Implemented a copy function for shifts, sending messages to entire group/ AngelType, Implemented a search for all Angels View, Date Picker for shifts, New Settings Page for admin where we can write event related information, Deployed the system on different platforms, Added Documentation, Re-factor the code, Improved the code standards, Blog Post tutorials on various technologies.

I am really happy with the outcome of the project. I learnt lot of new technologies and was improving day by day.

My initial proposal, time line of the project

My GSOC 2016 Proposal.

I have proposed a many UI changes for the system, Improving Documentation, Refactoring. All of these are done during the period. And I have implemented extra features and surpassed the proposal.

I have finished most of the proposed features before the Mid Evaluation. There was a shift in the timeline but I am very happy that the outcome was excellent. I was able to finish all the issues assigned to me on time.

What I have done to make Engelsystem better?

Overview of my contributions

Commits: 172

Additions: 87,528

Deletions: 80,555

Issue Completed: 60

Pull Requests Merged: 36

Scrum Reports: 99

Blog Posts: 15

Screenshot from 2016-08-23 13:17:53

Daily Timeline during GSOC.

Everyday we need to write a scrum report about our progress and submit it before 10 AM local time. Scrum consists of the following information.

1.What did you do yesterday? (which areas, issues you worked on, links)

2.What do you plan to do today? (which areas, issues you want to work on, links)

3.What is currently preventing you from achieving your goals? What blockers do you encounter?

I have written total of 99 scrum reports from May 10 – August 23. I have never missed a scrum report.

My Activity on Engelsystem Google Group : https://groups.google.com/forum/#!forum/engelsystem

Working Environment

All the issues for engelsystem are available on github. Whenever we need to implement a new feature or resolve a bug we need to make a issue and start working on it.

There are 15 milestones for the project starting from May 10 – August 28th.

For discussions we need to use slack and google groups.

Development: https://github.com/fossasia/engelsystem/

Issues: https://github.com/fossasia/engelsystem/issues/

Engelsystem Features

Implemented work flow similar to wordpress.

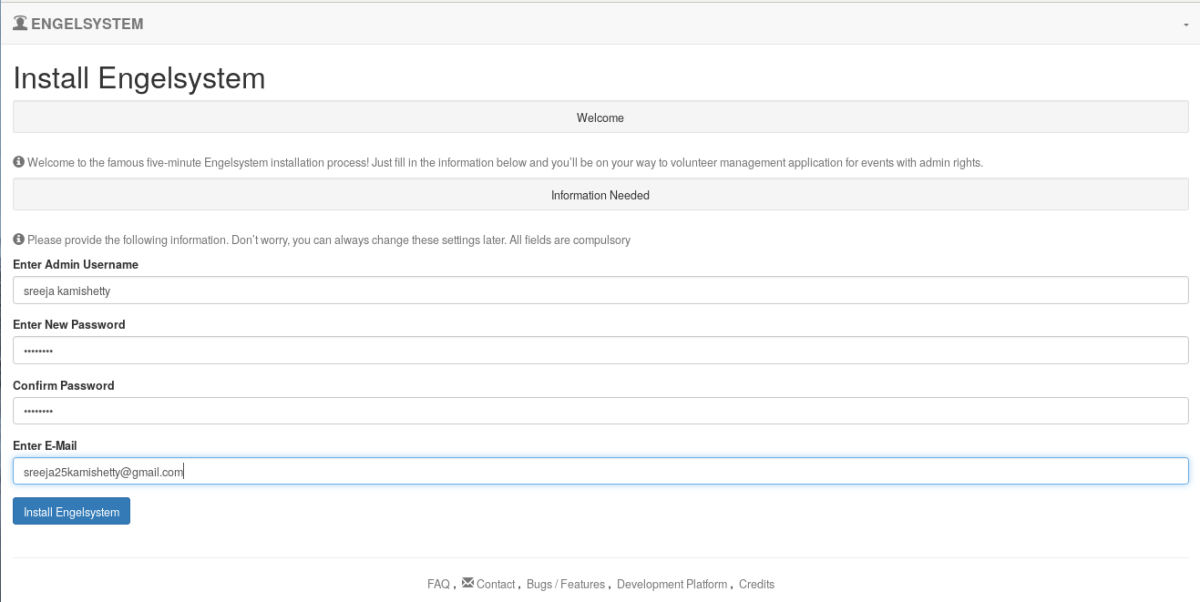
wordpress has a famous 5 minute installation flow. We need to implement it for our project engelsystem.

Implemented the following tasks as a part of the workflow:

  • Changed engelsystem/config/config.default.php to engelsystem/config/config-sample.default.php.
  • Installation script where admin can define name and email at the beginning
  • Script to import tables directly
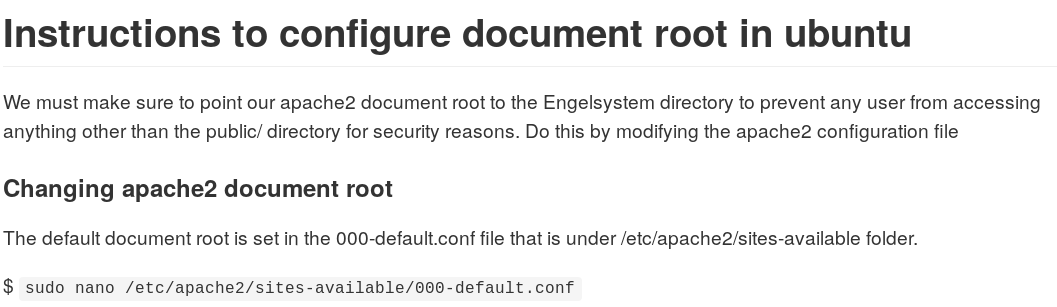
  • Instructions to Configure document root.
  • Documented the new flow in a blog post and in all installation readme’s

As part of flow similar to wordpress. I have created a script which directly imports the tables. Initially user need to do it through mysql.

Screenshot from 2016-08-23 11:23:28

Parent Issue: https://github.com/fossasia/engelsystem/issues/161

Sub Issues:

  • https://github.com/fossasia/engelsystem/issues/212
  • https://github.com/fossasia/engelsystem/issues/213
  • https://github.com/fossasia/engelsystem/issues/216

Pull Requests:

  • https://github.com/fossasia/engelsystem/pull/211
  • https://github.com/fossasia/engelsystem/pull/197

Implemented script to install all the dependencies

  • To setup engelsystem on local server. User need to install LAMP, clone the repository, configure document root, create database.
  • My script allows to do that all in one command.

Screenshot from 2016-08-23 11:40:25.png

Issue: https://github.com/fossasia/engelsystem/issues/209

Pull Request: https://github.com/fossasia/engelsystem/pull/211

Implement MVC Model

  • Initially the code has no clear MVC model. There were code in pages which is a mix of model and controller.
  • We need to remove the pages directory and move them to controller and model.
  • There were 26 pages. Created model files and controller files for the pages. Now the code structure is in clear MVC model.

Screenshot from 2016-08-23 11:35:41

Parent Issue: https://github.com/fossasia/engelsystem/issues/163

Sub Issues:

  • https://github.com/fossasia/engelsystem/issues/168
  • https://github.com/fossasia/engelsystem/issues/169
  • https://github.com/fossasia/engelsystem/issues/170
  • https://github.com/fossasia/engelsystem/issues/171
  • https://github.com/fossasia/engelsystem/issues/172
  • https://github.com/fossasia/engelsystem/issues/173
  • https://github.com/fossasia/engelsystem/issues/174
  • https://github.com/fossasia/engelsystem/issues/175

Pull Request:

  • https://github.com/fossasia/engelsystem/pull/176
  • https://github.com/fossasia/engelsystem/pull/178
  • https://github.com/fossasia/engelsystem/pull/185
  • https://github.com/fossasia/engelsystem/pull/192

Import user data from a spreadsheet

  • For FOSSASIA events we will be having lots of user data. If we can import the user data to engelsystem then it will very useful.
  • Implemented a script where admin just needs to browse a csv file containing data and information will be imported successfully

Screenshot from 2016-08-23 11:26:59

Issue: https://github.com/fossasia/engelsystem/issues/20

Pull Request:

Configuring Document Root

To avoid security issues. User need to configure Document Root. Added instruction to configure document root.

Screenshot from 2016-08-23 11:56:29

Issue: https://github.com/fossasia/engelsystem/issues/213

Pull Request: https://github.com/fossasia/engelsystem/pull/211

Implemented Search in All Users View

  • In All Users Page admin can view all the user information. If there are many users and admin wants to search for a particular name/field it becomes difficult.
  • I Implemented a search which makes it easy for admin to search any user.
  • We can search an user by any field like name, organisation, github username etc.

Screenshot from 2016-08-23 11:44:33

Issue: https://github.com/fossasia/engelsystem/issues/3

Pull Request: https://github.com/fossasia/engelsystem/pull/126

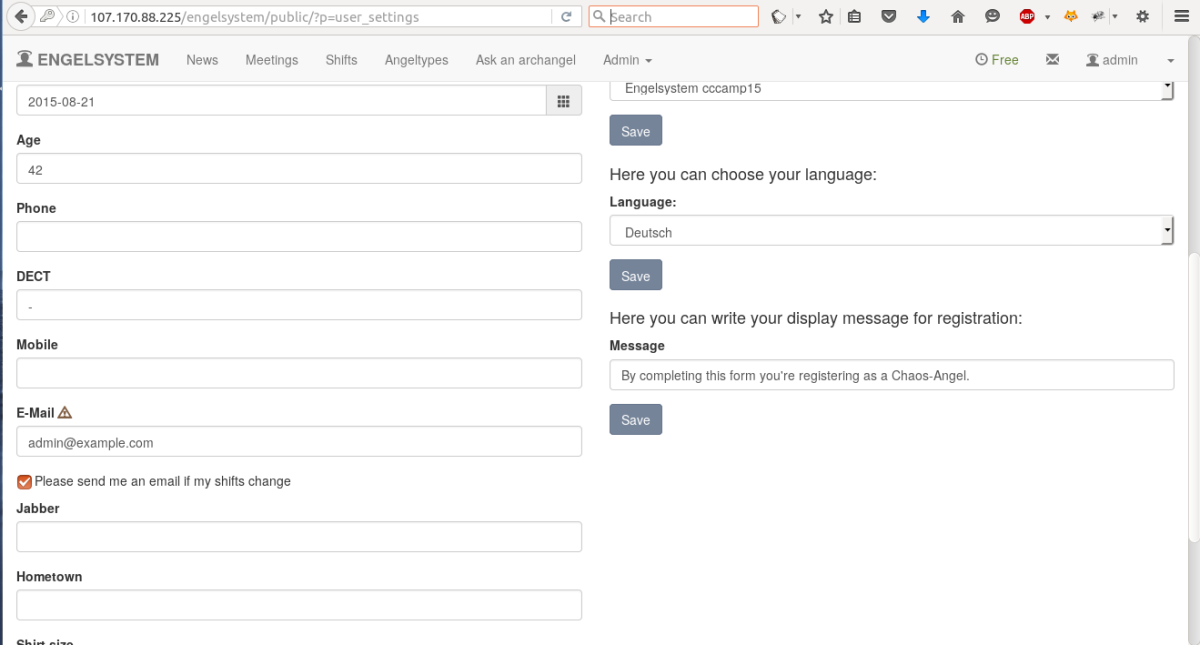
Design New Settings Page

Admin Settings Page: Here admin can enter event related information which will be shown on the login page to the all Angels and the welcome message is displayed near the registration page.

Screenshot from 2016-08-23 12:20:02

Issues:

  • https://github.com/fossasia/engelsystem/issues/218
  • https://github.com/fossasia/engelsystem/issues/145

Pull Request:

  • https://github.com/fossasia/engelsystem/pull/224
  • https://github.com/engelsystem/engelsystem/pull/264

Deployed Engelsystem to Heroku

  • Heroku: Heroku is a cloud application platform – it is used to build and deploy web apps.
  • We need not worry about dependencies and testing. We can directly deploy a branch to heroku and test code whenever there is a new feature or new code added.
  • An automatic test deployment for engelsystem from the development branch is http://volunteersys.herokuapp.com

Screenshot from 2016-08-23 11:30:55

Issues:

  • https://github.com/fossasia/engelsystem/issues/136
  • https://github.com/fossasia/engelsystem/issues/156

Worked on Improving the Codacy Project Grade

Screenshot from 2016-08-23 19:15:09

Issue: https://github.com/fossasia/engelsystem/issues/158

Viewing the shifts in respective time zone

  • Initially the user views all the shifts in server timezone.
  • Shifts should be shown to the volunteers/ angels in their respective time zone to avoid confusion.
  • Now User gets an option to select a time zone and view it in the respective time zone.
  • User needs to select the timezone while registering or change it in the settings page.

Screenshot from 2016-08-23 11:46:47

Issues:

  • https://github.com/fossasia/engelsystem/issues/120
  • https://github.com/fossasia/engelsystem/issues/119
  • https://github.com/fossasia/engelsystem/issues/111
  • https://github.com/fossasia/engelsystem/issues/108

Pull Request: https://github.com/fossasia/engelsystem/pull/138

Database migrations with Phinx

  • Database migrations can transform your database in many ways such as creating new tables, inserting rows, adding indexes and modifying columns.
  • It avoids the use of writing MYSQL by hand and instead offers a powerful API for creating migrations using PHP code.
  • Implemented database migrations for update.sql file.

88114b3e-4753-11e6-9afa-207e55650c1e

Issues: https://github.com/fossasia/engelsystem/issues/137

Pull Request: https://github.com/fossasia/engelsystem/pull/160

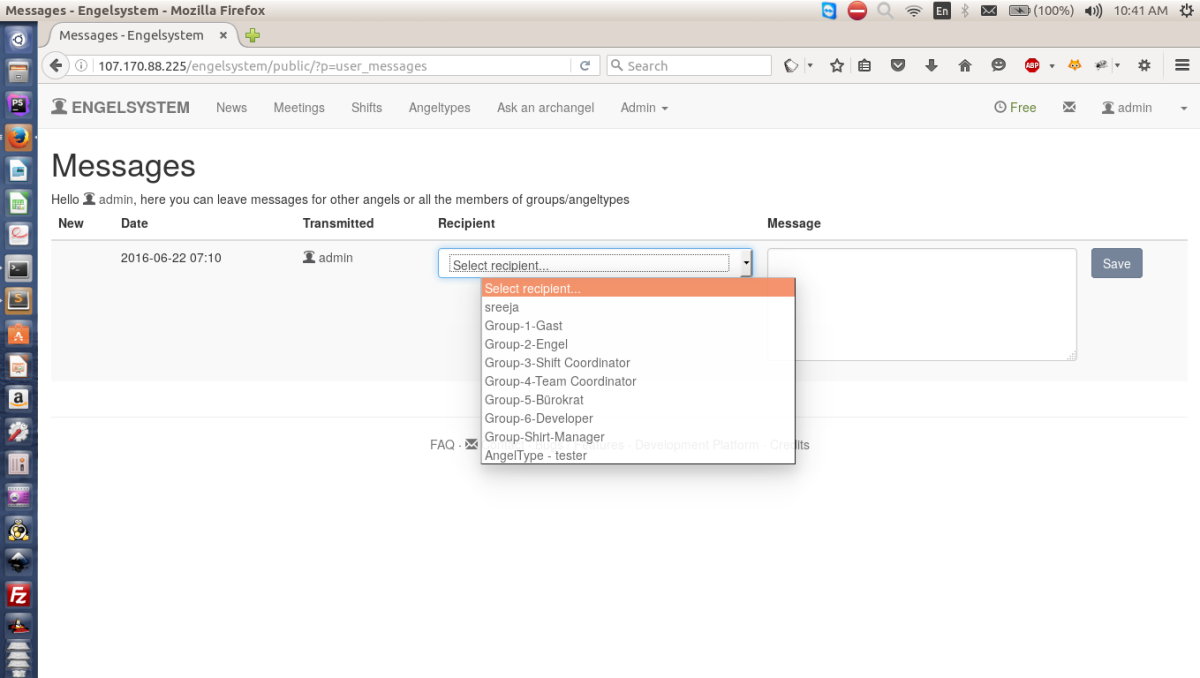
Sending message to entire group/AngelType

Initially admin was able to send messages to individual angels. Implemented Admin Feature where admin can send messages to entire group/ AngelType

54e62618-3866-11e6-8869-4ebde48ee964

Issue: https://github.com/fossasia/engelsystem/issues/13

Pull Request: https://github.com/fossasia/engelsystem/pull/116

Unit Tests for php files

Writing unit tests

I have written unit test for PHP files using PHPUnit. With PHPUnit, the most basic thing you’ll write is a test case. A test case is just a term for a class with several different tests all related to the same functionality.This is an example unit test for AngelType_model.php

cd4276d2-1e19-11e6-9a04-2f8ab4510656

fcee0612-1e19-11e6-85b7-aade025f1e9f

0b131d04-1e1a-11e6-9225-48455914e885

Issue: https://github.com/fossasia/engelsystem/issues/1

Pull Request: https://github.com/fossasia/engelsystem/pull/138

Localization – Viewing your site in different languages

Advantages of Localisation : It will also allow the system to be used globally on a large scale. As a part of this project I have implemented localisation in couple of languages.User can select I of the languages and the total information will be available in that language.

Issue: https://github.com/fossasia/engelsystem/pull/8

Pull Request: https://github.com/fossasia/engelsystem/pull/48

Admin User View : Added email and mobile fields

Added important fields to the view of users by admin. Added email and mobile fields so that admin can contact users easily.

Screenshot from 2016-05-28 13:18:27

Issue: https://github.com/fossasia/engelsystem/issues/11

Pull Request: https://github.com/fossasia/engelsystem/pull/38
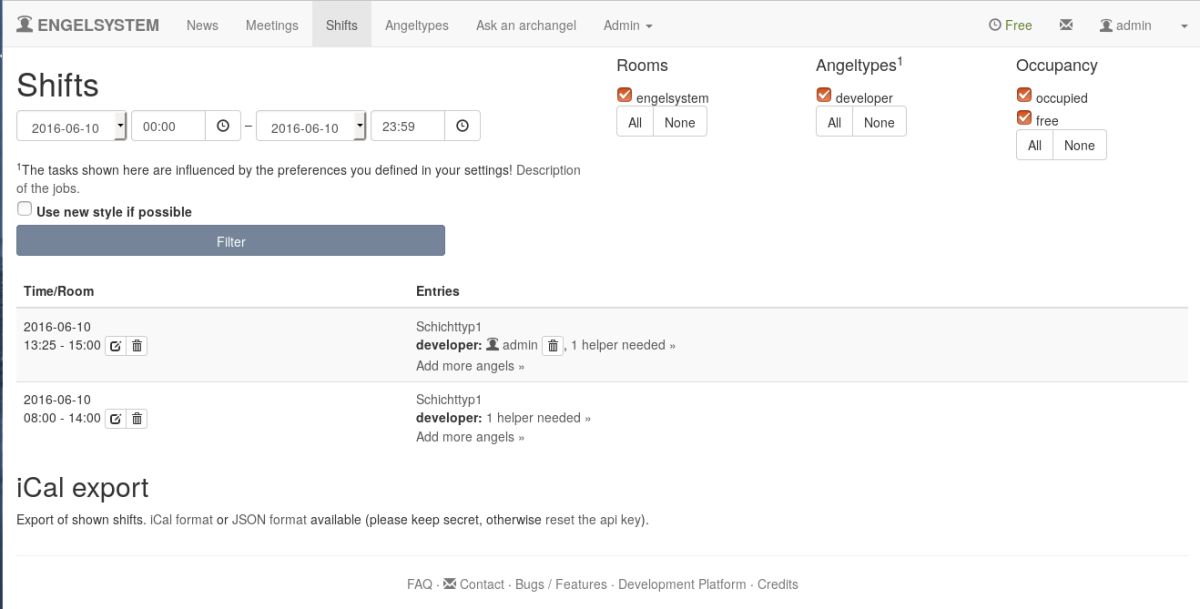
Shifts: Map View

Viewing the shifts in map view form which makes user easy to find and sign up for shifts.

d6c77bd6-2f61-11e6-9464-60f4c098d392

Issue: https://github.com/fossasia/engelsystem/issues/91

Pull Request: https://github.com/fossasia/engelsystem/pull/106

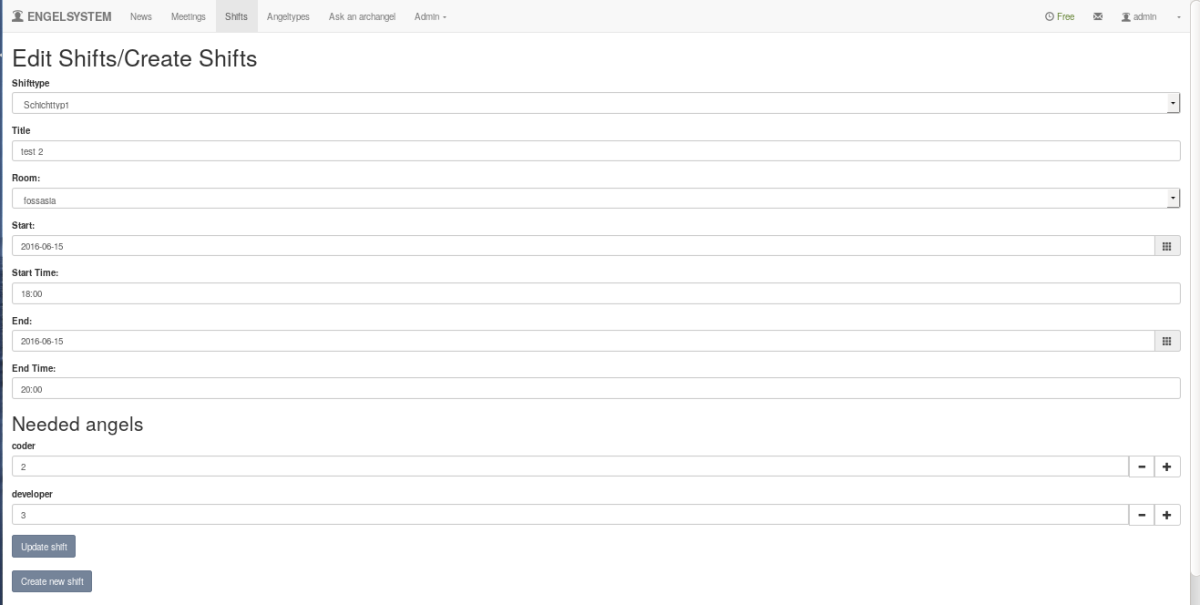
Admin Feature – Create New Shift From Existing Shift

Admin can create new shift from existing shift or update the shift by selecting the shift.

Screenshot from 2016-06-18 20:29:46

Issue: https://github.com/fossasia/engelsystem/issues/15

Pull Request: https://github.com/fossasia/engelsystem/pull/112

Admin Features – Edit Display Message

As this system is used by different organisations for different purposes . New feature has been added where admin can change the display message in registration.

05ef86f8-3195-11e6-91a7-2f468efa0bb2

Issue: https://github.com/fossasia/engelsystem/issues/97

Pull Request: https://github.com/fossasia/engelsystem/pull/98

Admin Features – Date/Time Picker For Edit Shifts

Date Picker – While editing shifts also Date picker is implemented For Edit shifts view.

Issue: https://github.com/fossasia/engelsystem/issues/77

Pull Requests: https://github.com/fossasia/engelsystem/pull/106

Admin Features – Date/Time Picker For Shifts

Date Picker – Where User and admin Can easily Pick date for shifts.

Issue: https://github.com/fossasia/engelsystem/issues/16

Pull Request: https://github.com/fossasia/engelsystem/pull/41

Features – Register Page UI/UX

Before GSOC Design of register page doesn’t follow any pattern.

After changing the UI. Design looks like this.

Issue: https://github.com/fossasia/engelsystem/issues/54

Pull Request: https://github.com/fossasia/engelsystem/pull/69

Fixed different bugs

  • Different Timestamp error for shifts.
  • Initially we were unable to view the shifts in map view form. Fixed the error.
  • Fixed Different Timestamp Error in Log Page.
  • Fixed Name Error in User Page.
  • Heroku Deployment.
  • Codacy errors and travis CI errors.
  • Content in german

Issues:

  • https://github.com/fossasia/engelsystem/issues/36
  • https://github.com/fossasia/engelsystem/issues/44
  • https://github.com/fossasia/engelsystem/issues/78
  • https://github.com/fossasia/engelsystem/issues/84
  • https://github.com/fossasia/engelsystem/issues/91
  • https://github.com/fossasia/engelsystem/issues/121

Code Quality and Refactoring

Refactoring:

  • Refactoring is very important to maintain code standards.
  • After implementing MVC model all the model files have duplicate and unorganised code. Refactored the code based on table it is accessing.
  • It will make any user easily find the function and create in the respective table.

Maintaining code quality:

  • When we add new code we need to explain what a particular variable is and what are the parameters of a function.Added comments to the code and function created. It will help new developers to easily understand the code.

Issues:

  • https://github.com/fossasia/engelsystem/issues/99
  • https://github.com/fossasia/engelsystem/issues/135
  • https://github.com/fossasia/engelsystem/issues/223

Documentation

As much as we code we need to document. For good software we need to have good documentation also. Added several documentation about installation, setup, configuration, features.

Added the following Documents during May-August

Blog Posts

It’s very important for us to share our knowledge to entire world. The easiest way to do this is by blog posts.

I have written 15 blogs posts during May-August on wide variety of topics.


Technologies Used

PHP: Most of the code written is in PHP. I used PHP for implementing new features.

MYSQL: Tables and database are written in mysql. For any new addition or deletion of queries is done in sql.

HTML: The layout is rendered in HTML. To change the layout or add new layout style is done in html.

CSS: Bootstrap code for styling, Fonts etc.

JS: Forms, datepicker, multi select dropdown.

Phinx: For database migrations

Bash: For dependencies script.

Markdown: For Documentation.

Drupal: Coding Standards.

After GSOC

Contributing to FOSSASIA After GSOC

  • This is the beginning of my contributions to open source. There is lot more to come.
  • Will really miss Writing scrums, Discussions with mentors, issues, Pull requests, Travis CI. GSOC has been an amazing experience for me.
  • I will create new issues, allow new developers to contribute to our project. Will help them in fixing bugs. I will be continuing contributing to FOSSASIA after my gsoc to engelsystem and other projects as well.

Participate in Google Code In and Fossasia Summit.

  • I will participate in Google Code In. I would like to be a mentor for young developers if given a chance.
  • I will be conducting meetups and explain about GSOC and FOSSASIA for young developers in college.
  • I am very interested in attending summits and meeting new developers.I will surely attend the Fossasia summit in 2017 and present my work.

Special Thanks

  • I would like to Thank my mentors Mario Behling, Hong Phuc Dang, Quan Nguyen, Vu Hung Nguyen for being there to help me and guide me.
  • I have worked very hard and sincerely during this period. I have gained a lot of knowledge from you all. Yours suggestions and support have helped me a lot.
  • I would like to Thank FOSSASIA Community for giving me this opportunity and believing in me.
  • I would like to Thank Google Summer of Code for this experience.
Continue ReadingEngelsystem GSoC 2016 Summary