Pike

(ˢᵒᶜⁱᵉᵗʸserver) aims to be a platform for developing collaborative applications.
sTeam server project repository: sTeam.
sTeam-REST API repository: sTeam-REST

The project is written in Pike programming language. Many of us would not be aware of it. Let’s take a dive into Pike and learn more about it.

What is pike?

Pike is a general purpose programming language, which means that you can put it to use for almost any task. Its application domain spans anything from the world of the Net to the world of multimedia applications, or environments where your shell could use some spicy text processing or system administration tools. Your imagination sets the limit, but Pike will probably extend it far beyond what you previously considered within reach. Pike is a dynamic programming language with a syntax similar to Java and C. It is simple to learn, does not require long compilation passes and has powerful built-in data types allowing simple and really fast data manipulation. Pike is released under the GNU GPL, GNU LGPL and MPL; this means that you can fetch it and use it for almost any purpose you please.

Who made pike?

We will not bother you here with the entire history of Pike, but in a quick summary we should credit Fredrik Hübinette, who started writing Pike (at that time called µLPC), Roxen Internet Software, who funded the Pike development during its first years, the Pike development team that continues its development at present and the Software and Systems division of the Department of Computer and Information Science (IDA for short) at Linköping University, who currently provides funding for some Pike research and development, as well as this site. Also, without the participation of the friendly community of Pike users and advocates all over the world, Pike would hardly be the same either; we are grateful for your commitment.

Who uses pike?

Besides those already mentioned (Roxen IS and SaS, IDA, LiU), there are many other people scattered throughout the world who have put Pike to good use. Read some of their testimonials and find out more about how they value Pike.

…and for what?

Roxen Internet Software wrote the free web servers Spinner, Roxen Challenger and Roxen WebServer in Pike, as well as the highly appraised commercial content management system Roxen Platform / Roxen CMS. SaS uses Pike for their research, currently concentrated on the field of compositioning technology and language connectors. Other noteworthy applications include the works of Per Hedbor, who among other things has written AIDO, a nifty network aware peer-to-peer client/server media player and a distributed jukebox system, both in Pike.

Why use pike?

Pike is Powerful – Being a high-level language, Pike gives you concise, modular code, automatic memory management, flexible and efficient data types, transparent bignum support, a powerful type system, exception handling and quick iterative development cycles, alleviating the need for compiling and linking code before you can run it; on-the-fly modifications are milliseconds away from being put to practice.
Pike is Fast – Most of the time critical parts of Pike are heavily optimized; Pike is really, really fast and uses efficient, carefully handcrafted algorithms and data types. Visit The Computer Language Shootout Benchmarks for more facts and figures on Pike’s performance.
Pike is Extendable – with modules written in C for speed or Pike for brevity. Pike supports multiple inheritance and most other constructs you would demand from a modern programming language.
Pike is Scalable – as useful for small scripts as for bigger and more complex applications. Where some other scripting languages aim for providing unreadable language constructs for minimal code size, Pike aims for a small orthogonal set of readable language elements that encourage good habits and improve maintainability.
Pike is Portable – Platform independence has always been our aim with Pike, and it compiles on most flavors of Unix, as well as on Windows (both ia32 and ia64 versions) and Mac OS X. To see the present status of how well the stable and development branches of Pike work on some of the many hardware architectures and operating systems Pike supports, visit the pikefarm pages.
Pike is Free – Pike is released under multiple licenses; the GNU licenses GPL and LGPL, as well as the Mozilla license, MPL.
Paradigms – Pike supports most programming paradigms, including (but not limited to) object orientation, functional programming, aspect orientation and imperative programming.
Pike is Constantly Improving – While already being a great language, Pike is actively developed and backed by both an active Pike community and the computer science scientific research community. This means that Pike will stay the razorsharp tool that Pike people over the world expect it to be, while assimilating recent findings from the scientific forefront of research, spanning fields such as compositioning, regexp technology and the world of ontologies, also known as the Semantic Web.
Pike is available via git – To help you get your hands on the very latest development versions of Pike, we provide Pike to anyone and everyone who knows his/her way around git. Stay as updated as you like on recent activity in the repository with our on-site repository browser.
You Too are Invited – We welcome contributions to pike, and it is our intention to provide write access to our repositories for those of you who want to join us in improving Pike, be it by contributing code, documentation, work with the web site or making tools and applications of general interest.

Example:


int main() {
  write("Hello world!\n");
  return 0;
}

Pike Resources

Documentation and other resources about the project can be found on the official website of Pike.

Installing Pike

Pike can be installed in the debian based distro’s by running the command

sudo apt-get install pike

Feel free to explore more about this programming language.

(source: http://pike.lysator.liu.se/)

Suggestions for improvements are welcomed.

Checkout the FOSSASIA Idea’s page for more information on projects supported by FOSSASIA.

Continue ReadingPike

Continuous Integration and Automated Testing for Engelsystem

Every software development group tests its products, yet delivered software always has defects. Test engineers strive to catch them before the product is released but they always creep in and they often reappear, even with the best manual testing processes. Using automated testing is the best way to increase the effectiveness, efficiency and coverage of your software testing.

Manual software testing is performed by a human sitting in front of a computer carefully going through application screens, trying various usage and input combinations, comparing the results to the expected behavior and recording their observations. Manual tests are repeated often during development cycles for source code changes and other situations like multiple operating environments and hardware configurations.

Continuous integration (CI) has emerged as one of the most efficient ways to develop code. But testing has not always been a major part of the CI conversation.

In some respects, that’s not surprising. Traditionally, CI has been all about speeding up the coding, building, and release process. Instead of having each programmer write code separately, integrate it manually, and then wait until the next daily or weekly build to see if the changes broke anything, CI lets developers code and compile on a virtually continuous basis. It also means developers and admins can work together seamlessly since the programming and build processes are always in sync.

Continuous Integration (CI) is a development practice that requires developers to integrate code into a shared repository several times a day. Each check-in is then verified by an automated build, allowing teams to detect problems early.

By integrating regularly, you can detect errors quickly, and locate them more easily.

Solve problems quickly

Because you’re integrating so frequently, there is significantly less back-tracking to discover where things went wrong, so you can spend more time building features.

Continuous Integration is cheap. Not continuously integrating is costly. If you don’t follow a continuous approach, you’ll have longer periods between integrations. This makes it exponentially more difficult to find and fix problems. Such integration problems can easily knock a project off-schedule, or cause it to fail altogether.

Continuous Integration brings multiple benefits to your organization:

  • Say goodbye to long and tense integrations
  • Increase visibility which enables greater communication
  • Catch issues fast and nip them in the bud
  • Spend less time debugging and more time adding features
  • Proceed with the confidence you’re building on a solid foundation
  • Stop waiting to find out if your code’s going to work
  • Reduce integration problems allowing you to deliver software more rapidly

“Continuous Integration doesn’t get rid of bugs, but it does make them dramatically easier to find and remove.”

– Martin Fowler, Chief Scientist, ThoughtWorks

Continuous Integration is backed by several important principles and practices.

Practices in Continuous Integration:

  • Maintain a single source repository
  • Automate the build
  • Make your build self-testing
  • Every commit should build on an integration machine
  • Keep the build fast
  • Test in a clone of the production environment
  • Make it easy for anyone to get the latest executable
  • Everyone can see what’s happening
  • Automate deployment

How to do Continuous Integration:

  • Developers check out code into their private workspaces.
  • When done, commit the changes to the repository.
  • The CI server monitors the repository and checks out changes when they occur.
  • The CI server builds the system and runs unit and integration tests.
  • The CI server releases deployable artifacts for testing.
  • The CI server assigns a build label to the version of the code it just built.
  • The CI server informs the team of the successful build.
  • If the build or tests fail, the CI server alerts the team.
  • The team fixes the issue at the earliest opportunity.
  • Continue to continually integrate and test throughout the project.

The CI implemented in Engelsystem are as follows:

  • Travis-CITravis CI is a hosted, distributed continuous integration service used to build and test software projects hosted on GitHub. It is integrated using the .travis.yml file in the root folder.
    language: php
    php:
    - '5.4'
    - '5.5'
    - '5.6'
    - '7.0'
    script: cd test && phpunit
  • Nitpick-CI:Automatic comments on PSR-2 violations in one click, so your team can focus on better code review. It requires one click for integratting with the repository.
  • Circle-CI: CircleCI was founded in 2011 with the mission of giving every developer state-of-the-art automated testing and continuous integration tools. It is integrated using a circle.yml file in the root folder of the repository.
    machine:
    php:
    version: 5.4.5
    deployment:
    master:
    branch: master
    owner: fossasia
    commands:
    - ./deploy_master.sh
    dependencies:
    pre:
    - curl -s http://getcomposer.org/installer | php
    - php composer.phar install -n
    - sed -i 's/^;//' ~/.phpenv/versions/$(phpenv global)/etc/conf.d/xdebug.ini
    
    test:
    post:
    - php test/
    - bash <(curl -s https://codecov.io/bash)
  • Codacy: Check code style, security, duplication, complexity and coverage on every change while tracking code quality throughout your sprints.

Development: https://github.com/fossasia/engelsystem Issues/Bugs:https://github.com/fossasia/engelsystem/issues

Continue ReadingContinuous Integration and Automated Testing for Engelsystem

PSLab Code Repository and Installation

PSLab  is a new addition to FOSSASIA Science Lab. This tiny pocket science lab  provides  an array of necessary equipments for doing science and engineering experiments. It can function like an oscilloscope, waveform generator, frequency counter, programmable voltage and current source and also as a data logger.

pslabdesign
New Front Panel Design
psl2
Size:62mmx78mmx13mm

The control and measurement functions are written in Python programming language. Pyqtgraph is used for plotting library. We are now working on Qt based GUI applications for various experiments.

The following are the code repositories of PSLab.

Installation

To install PSLab on Debian based Gnu/Linux system, the following dependencies must be installed.

Dependencies
============
PyQt 4.7+, PySide, or PyQt5
python 2.6, 2.7, or 3.x
NumPy, Scipy
pyqt4-dev-tools          #for pyuic4
Pyqtgraph                #Plotting library
pyopengl and qt-opengl   #for 3D graphics
iPython-qtconsole        #optional
Now clone both the repositories pslab-apps and pslab .

Libraries must be installed in the following order

1. pslab-apps

2. pslab

To install, cd into the directories

$ cd <SOURCE_DIR>

and run the following (for both the repos)

$ sudo make clean
$ sudo make 

$ sudo make install

Now you are ready with the PSLab software on your machine 🙂

For the main GUI (Control panel), you can run Experiments from the terminal.

$ Experiments

If the device is not connected the following splash screen will be displayed.

SplashNotConnected
Device not connected

After clicking OK, you will get the control panel with menus for Experiments, Controls, Advanced Controls and Help etc. (Experiments can not be accessed unless the device is connected)

controlPanelNotConnected

The splash screen and the control panel, when PSLab is connected to the pc.

SplashScreen
PSLab connected
controlpanel
Control Panel – Main GUI

From this control panel one can access controls, help files and various experiments through independent GUI’s written for each experiment.

You can help
------------

Please report a bug/install errors here 
Your suggestions to improve PSLab are welcome :)

What Next:

We are now working on a general purpose Experimental designer. This will allow selecting controls and channels and then generate a spread sheet. The columns from this spreadsheet can be selected and plotted.


Continue ReadingPSLab Code Repository and Installation

CommonsNet – WiFi Standards

Introduction

There is no doubt that WiFi is a crucial technology that most of us use every day. But have you ever  noticed on wifi router that there are a few different number and letter tagged on the end?  These designations present different properties of the WiFi like speed, allowed devices, range and frequency and they create WiFi standards. If you know what standard you have, you can tell much about your wireless connection, and use it in the way you want. CommonsNet team focuses on providing users with transparent wifi information so let’s talk today about them.

WIFI Standards

802 – this strange number means naming system which is used by networking standards. WiFi uses 802.11. All WiFi varieties has this number, followed by a letter or two which, is very useful for consumers, because as mentioned above it helps to identify wifi properties life maximum speed, range and required devices.

Specific router may support not only single, but multiple standards at the same time. It happens in order to ensure compatibility with different pieces of hardware and network.


802.11

This standard was created In 1997 by the Institute of Electrical and Electronics Engineers (IEEE).  It was used for medicine and industrial purposes. Unfortunately, 802.11 supported a maximum network bandwidth up to 1 or 2 Mbps – not fast enough for applications. Therefore this standard was rapidly supplanted and is no longer used.

802.11b

This standard became the most commonly adopted in consumer devices, especially because of its low-cost. It supports bandwidth up to 11 Mbps. 802.11b uses radio signaling frequency  – 2.4 GHz, and due to this, its signal has good range – about 100m – and is not easily obstructed, but due to the fact that it works on 2, GHz it may interfere with home appliances.

802.11a

This standard bandwidth is up to 54 Mbps and has signals in a regulated frequency  around 5 GHz. There is no doubt that this higher frequency shortens the range, and needs more power to work correctly. This also means that signal has more difficulties while penetrating obstructions like walls, doors, windows. This standard due to working on different frequency is incompatible with 802.11b standard.

802.11g

In 2002 products supporting a new standard emerged on the market.I t’s actually the most popular WiFi standard. It focuses on combining the best of both 802.11a and 802.11b. It supports bandwidth up to 54Mbps, and it uses the 2.4 Ghz frequency for greater range. It is compatible with other standards. But it’s impossible to use it in older devices. If you try to do it, the speed will be 4 times slower.

802.11n

This standard was designed  to improve  802.11g  by utilizing multiple wireless signals and antennas (called MIMO technology) instead of one. It provides up to 600 Mbps  of network bandwidth, but in reality it usually reaches up to 150 Mbps. 802.11n also offers  better range over earlier Wi-Fi standards due to its increased signal intensity, and it is backward-compatible with 802.11b/g gear.

802.11ac

The newest generation of Wi-Fi signaling in popular use, utilizes dual band wireless technology, supporting simultaneous connections on both the 2.4 GHz and 5 GHz. It offers compatibility to 802.11b/g/n and bandwidth  up to 1300 Mbps on the 5 GHz band plus up to 450 Mbps on 2.4 GHz.

Summary

As you can see based on above description there are different wifi standard which differ from each other in their speed, range and devices’ support. Some of them are not actual anymore, but some of them can be still used simultaneously. You can choose this one , which is best suitable to your needs.

As a CommonsNet team we believe that we will create a great CommonsNet website which helps users to be aware of wifi’s properties they have or use, and if necessary improve it to provide and share with other people the transparent wireless connection of the best quality.

With support of http://compnetworking.about.com/cs/wireless80211/a/aa80211standard.htmhttp://www.androidauthority.com/wifi-standards-explained-802-11b-g-n-ac-ad-ah-af-666245/

Continue ReadingCommonsNet – WiFi Standards

Code Quality in the knittingpattern Python Library

In our Google Summer of Code project a part of our work is to bring knitting to the digital age. We is Kirstin Heidler and Nicco Kunzmann. Our knittingpattern library aims at being the exchange and conversion format between different types of knit work representations: hand knitting instructions, machine commands for different machines and SVG schemata.

Cafe instructions
The generated schema from the knittingpattern library.
Cafe
The original pattern schema Cafe.


The image above was generated by this Python code:

import knittingpattern, webbrowser
example = knittingpattern.load_from().example("Cafe.json")
webbrowser.open(example.to_svg(25).temporary_path(".svg"))

So far about the context. Now about the Quality tools we use:

Untitled

Continuous integration

We use Travis CI [FOSSASIA] to upload packages of a specific git tag  automatically. The Travis build runs under Python 3.3 to 3.5. It first builds the package and then installs it with its dependencies. To upload tags automatically, one can configure Travis, preferably with the command line interface, to save username and password for the Python Package Index (Pypi).[TravisDocs] Our process of releasing a new version is the following:

  1. Increase the version in the knitting pattern library and create a new pull request for it.
  2. Merge the pull request after the tests passed.
  3. Pull and create a new release with a git tag using
    setup.py tag_and_deploy

Travis then builds the new tag and uploads it to Pypi.

With this we have a basic quality assurance. Pull-requests need to run all tests before they can be merge. Travis can be configured to automatically reject a request with errors.

Documentation Driven Development

As mentioned in a blog post, documentation-driven development was something worth to check out. In our case that means writing the documentation first, then the tests and then the code.

Writing the documentation first means thinking in the space of the mental model you have for the code. It defines the interfaces you would be happy to use. A lot of edge cases can be thought of at this point.

When writing the tests, they are often split up and do not represent the flow of thought any more that you had when thinking about your wishes. Tests can be seen as the glue between the code and the documentation. As it is with writing code to pass the tests, in the conversation between the tests and the documentation I find out some things I have forgotten.

When writing the code in a test-driven way, another conversation starts. I call implementing the tests conversation because the tests talk to the code that it should be different and the code tells the tests their inconsistencies like misspellings and bloated interfaces.

With writing documentation first, we have the chance to have two conversations about our code, in spoken language and in code. I like it when the code hears my wishes, so I prefer to talk a bit more.

Testing the Documentation

Our documentation is hosted on Read the Docs. It should have these properties:

  1. Every module is documented.
  2. Everything that is public is documented.
  3. The documentation is syntactically correct.

These are qualities that can be tested, so they are tested. The code can not be deployed if it does not meet these standards. We use Sphinx for building the docs. That makes it possible to tests these properties in this way:

  1. For every module there exists a .rst file which automatically documents the module with autodoc.
  2. A Sphinx build outputs a list of objects that should be covered by documentation but are not.
  3. Sphinx outputs warnings throughout the build.

testing out documentation allows us to have it in higher quality. Many more tests could be imagined, but the basic ones already help.

Code Coverage

It is possible to test your code coverage and see how well we do using Codeclimate.com. It gives us the files we need to work on when we want to improve the quality of the package.

Landscape

Landscape is also free for open source projects. It can give hints about where to improve next. Also it is possible to fail pull requests if the quality decreases. It shows code duplication and can run pylint. Currently, most of the style problems arise from undocumented tests.

Summary

When starting with the more strict quality assurance, the question arose if that would only slow us down. Now, we have learned to write properly styled pep8 code and begin to automatically do what pylint demands. High test-coverage allows us to change the underlying functionality without changing the interface and without fear we may break something irrecoverably. I feel like having a burden taken from me with all those free tools for open-source software that spare my time to set quality assurance up.

Future Work

In the future we like to also create a user interface. It is hard, sometimes, to test these. So, we plan not to put it into the package but build it on the package.

Continue ReadingCode Quality in the knittingpattern Python Library

AngularJS makes coding CommonsNet easy

Wizard form

Have you seen a wizard form? I am sure you have.  I think the usage of it is very common these days. I like it very much, too. I think its structure is extremely user-friendly, because it can help us to avoid discouraging users from filling the form with all data. As a user I don’t want to be pushed to fill long forms. It’s annoying. But while you use the wizard no matter how long the form is, firstly you can quickly see the progress of you work and then,  don’t see it at once, just fill one field at a time.

That’s the result why have I decided to use it in CommonsNet project, too.

CommonsNet wizard

Angular JS

To implement this on CommonsNet website I have decided to use AngularJS which makes it easy.

I have used Model View Controller which  is a software design pattern for developing web applications. A Model View Controller pattern is made up of the following three parts

Model − It is the lowest level of the pattern responsible for maintaining data

View − It is responsible for displaying all or a portion of the data to the user

Controller − It is a software Code that controls the interactions between the Model and View.

This model helps us to isolate the application logic from the user interface layer and supports separation of concerns.

The ng-controller directive defines the application controller. A controller is a JavaScript Object

Steps to create AngularJS app

1. Load AngularJS on your webiste.

 src = "http://ajax.googleapis.com/ajax/libs/angularjs/1.3.14/angular.min.js">

2. Define AngularJS app using ng-app.

<body ng-app = "app">
   ...
</body>

3. Then I have created views – five different html files for each wizard step. Please take a look at partials folder where you can find them. partials.png

4. Next, I have created a .Controller –  WizardController in AngularJS.

var WizardController = app.controller("WizardController", function ($scope) {
// controller logic goes here
}
);
wizard controller.png


It is a JavaScript function. I have defined which  view has to be displayed by .controller on each step. As you can see it’s quite easy and clear. You can quickly define and see which step is it , how is its name and which template should be used. It definitely enables you to maintain your app easier, because changes can be made quickly and does not influence on other part of code so you can take control over your code.

5. Then I have used  this line of code to call to my WizardController to display and maintain my views and that’s it.  See the progress on CommonsNet

<div id="wizard-container" ng-controller="WizardController as vm">
Continue ReadingAngularJS makes coding CommonsNet easy

Knitting Pattern Conversion

conversion_273cdef7c-3747-11e6-8ece-a573d396521917-diag

We can convert knitting patterns to svg (middle) which proves the concept but is still a different from the original (right)

Our goal is to create a knit-work exchange format. This includes the conversion to a scematic view of the knittting pattern as svg – to make it endlessly scalable and allow conversions to png, pdf and paper.

This week we ended the prototype of the SVG conversion. The positions are a bit off and instructions are placed above eachother. Most of the work is done.

We are also able to load and save knitting patterns a png files.

(1)a34e6d2c-372d-11e6-9bbd-71c846ead7f9 (2)f6a6bf82-372e-11e6-9467-8bab0e07c099

(3)39e5a556-380b-11e6-8999-726fea9b6078

We loaded them (1), converted them to a knitting pattern and then saved them again as png (2). This way we path our way towards using the ayab software and actually knitting the pattern. Also we can convert the knitting pattern to an svg consisting all of knit instructions (3). Here is the code for it in version 0.0.8.

>>> import knittingpattern
>>> from knittingpattern.convert.image_to_knittingpattern import *
>>> convert_image_to_knitting_pattern.path("head-band.png").temporary_path(".json")
"head-band.json"
>>> k = knittingpattern.load_from_path("head-band.json")
>>> k.to_svg(10).temporary_path(".svg")
"head-band.svg"

Here you can see a proof of concept video:


Continue ReadingKnitting Pattern Conversion

Towards a unified digital aproach to knitting

Our idea is to create a knitting library for a format that allows conversion of knitting projects, patterns and tutorials. Usually, communities will only focus on the knitting format for their machines. Our approach should be different and be able to support any knitting communities efforts.

Here is our strategy to achieve this:

  • We connect to different communities to get a broader view on what their needs are.
  • Our knitting format is based on knitting instructions like knit, purl, yarn over, skp. We found a comprehensive list on Wikipedia.

Other Communities

From time to time we meet with other people who also knit and could use our software.

First, we met with Viktoria from ETIB Berlin. She taught us a lot about knitting, how she does it, that almost everything could be created from one peace with the machine. Also, that AYAB is used for lace patterns. We saw examples where she let meshes fall so that larger holes were created. Our goal is to support laces in the file format.  Color patterns should be possible across sewing edges.

We are also in touch with Valentina Project. With their software we would be able to connect to yet another community and use their sewing patterns for custom-fit clothes.

We got in touch with Kniterate. They and we share a lot of goals. Because they create a startup, they are very cautious what they release. They focus on their open-source knitting machine first and later on the software. They already created an editor much like we imagined ours to be, but as a web application. A way of collaboration could be that we understand their file format and see how we can support it.

Only talking about our GSoC project is worth it as other people may have seen alike at Maker Faires and other hacky places. We have the chance to bring communities and efforts together.

Knitting Format

A universal knitting format has many concerns:

  • Languages of users differ
  • It should be possible to knit by hand
  • Mesh sizes and wool differ
  • Different knitting machines with different abilities
  • A knitting format for exchange is never complete. A knitting format for machines must be complete.

In contrast to a knitting format for a automatic machine, it is possible, to have machines operate in semi-automatic modes or just to knit by hand. In both cases, meshes could be changed in a way that was never foreseen. This is why we did not base it on meshes and mesh types but rather on instructions – closer to the mental model of the knitters who perform instructions with their hand.

Some of the instructions are understood by the machines, some could be adapted a bit so the machine can do it automatically or faster and some are still necessary to be done by hand. We created a Python module for that, “knittingpattern“. We work on it in a test-driven way.


Continue ReadingTowards a unified digital aproach to knitting

New Color Schemes in Engelsystem

Engelsystem is a well-built MVC application. It seems to have everything an event manager could want. During the Week 2 of my Summer of Code, I worked on creating new color schemes/themes for the system. Engelsystem initially had 4 color schemes:

  1. Engelsystem cccamp15
    01

  2. Engelsystem 32C3

    02

  3. Engelsystem Dark

    03

  4. Engelsystem Light

    04

Color wields enormous sway over our attitudes and emotions. When our eyes take in a color, they communicate with a region of the brain known as the hypothalamus, which in turn sends a cascade of signals to the pituitary gland, on to the endocrine system, and then to the thyroid glands. The thyroid glands signal the release of hormones, which cause fluctuation in mood, emotion, and resulting behavior.

Research from QuickSprout indicates that 90% of all product assessments have to do with color. “Color,” writes Neil Patel, is “85% of the reason you purchased a specific product.” It’s a no-brainer fact of any website that color affects conversions. Big time.

So, the bottom line is: use the right colors, and you win.

Color schemes lets the user to set the system looks (i.e how the system will appear) which the user likes. During the week 2 of my Summer of Code, I worked on implementing 2 new color schemes for the system:

  1. Engelsystem color scheme-1

    05

  2. Engelsystem color scheme-2

    06

In the later weeks, other developers and I would be working on creating more themes and enhancing them. Anyone who would like to work in the project are welcome. Developers can feel free to take up any issues they would like to work on just like any other open source projects.

Development: https://github.com/fossasia/engelsystem                                           Issues/Bugs:https://github.com/fossasia/engelsystem/issues

Continue ReadingNew Color Schemes in Engelsystem

One step at a time – The beginnings of CommonsNet

The beginnings

If you have been accepted to a serious project like Google Summer of Code is, you can feel lost and scared. I think it’s nothing special and probably everyone experiences it. You can feel that pressure because you want to fulfill all expectations, follow your obligations and to do your best, but working in such project is something different from working on your own, private and small one.  Your organisation and mentors require something from you, and they can even provide you with a detailed guideline how to behave but doubts may occur anyway.

My advice is not to give up and go through that tought period in order to experience the joy of results and sense of satisfaction, and to learn something to be better in the future. I am going to tell about my beginnings and to provide you with some tips  from my own experience

CommonsNet

CommonsNet (feel free to see it) is a new project of FOSSASIA. It focuses on providing users with transparent information about WiFi they may use in public places like hotels, restaurants, stations. The thing is that for now, if you go to a new place, and want to connect to Internet, you look for a free WIFI sign and as soon as you find it you try to connect. But think about it, how much do you know about this connection? Is is safe for your private data? How fast is it? Does the Internet connection have any legal restrictions?  I suppose that you answer ‘no’ to all these questions. But what if you know? Or if you can compare details of different WIFI available in a specific public place and connect to more suitable for your needs. I am sure you will appreciate it. I hope to run this project successfully and I am going to tell you more about it in next posts.

How to start?

Due to the fact that CommonsNet is a new project as I have mentioned before, and for now apart from mentor @agonarch and FOSSASIA leaders @mariobehling @hpdang, I am an only contributor, I am in a good position to tell you what are my steps. Remember not to think about all at once. It will make you crazy.

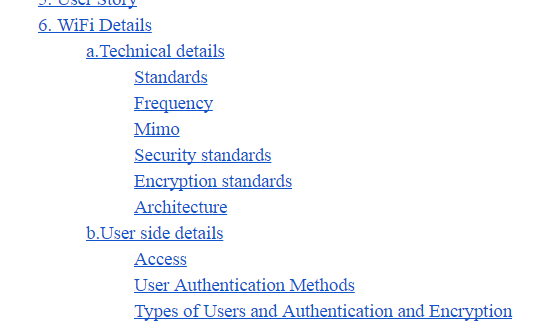
So first of all – prepare your work. Try to get to know about your project as much as possible. Follow group chat, GitHub repositories, do research in Internet about the subject of area of your project or don’t be afraid to ask your team member. That’s what I have done at first. I have prepared a Google Doc about all WiFi details. I  have tried to get to know as much as possible and to gather this information in a clear, easy-to-understand way.

project details

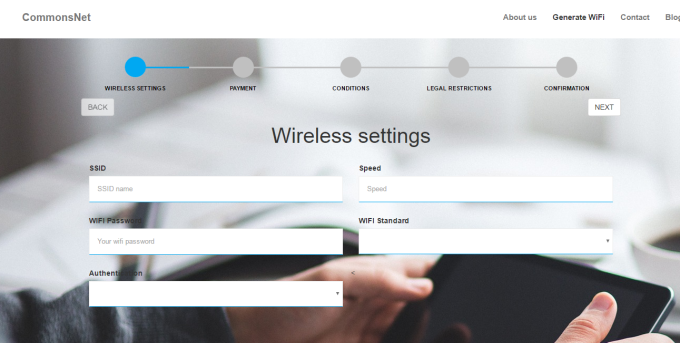
I need it because I will be preparing a wizard form for users to let them provide all important details about their WiFi. I need to think seriously which data are important and have to be used to do it. It is not finished yet and will be changing (yes, I am going to share it with you and update you about changes!) but for now I want you to follow my view about it, how am I going to use the gathered information. wizard-ui

Next step is to prepare user stories. I think it’s a crucial point before you start to implement your project. I think there is no point of developing something until you think who will your user be. You need to imagine him/her and try to predict what he or she may expect from your app. Remeber – even if app is well coded it’s useless until somebody wants to use it. You can find many tutorials how to write a good user story in Internet. Just type ‘user stories’ in Google search. Some of them are here;

http://www.romanpichler.com/blog/10-tips-writing-good-user-stories/

https://www.mountaingoatsoftware.com/agile/user-stories

You can also see my user stories created for CommonsNet .

Furthermore, I have prepared a mockups to visualize my ideas. I think it’s also an important part of running your project. It will help you to express and concretize your ideas and let the whole team discuss about it. And there is no doubt that it’s easier to change a simple draft of mockups than coded views. You can see my mockups here: CommonsNet MockupsScreen Shot 2016-06-23 at 12.38.20

As soon as you finish all these activities is a high time to start creating issues on GitHub. Yes, of course, you probably have already started, so have I, but I am talking about further issues which help you to take control over your progress and work, discuss on specific subject and share it with other.

Lost on GitHub?

Is is possible at all? I suppose we all know and use GitHub. It’s a perfect place of working to all programmers. Its possibilities seems to be unlimited. But maybe some of you experience the difficulties which I have experienced at first, because just like me you have used GitHub so far only for your private aims and simply just pushed code and have not worried about creating issues, following discussions and  organizing your work step by step . Let me to explain you why and how to follow GitHub flow.

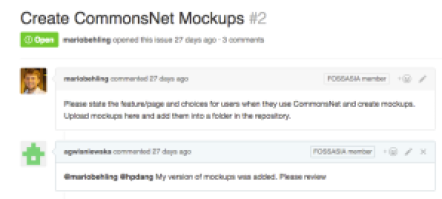
GitHub issues let you and your team take control over your work. It’s really important to create bigger, let’s say main issues, and then subissues, which help you to divide your work into small parts. Remember – only one step at a time! Using my mockups first I have created some issues which present main tasks like ‘deploying app to Heroku’ or different pages in my app like ‘Home’, ‘About us’. And then I have created many smaller issues – subissues to present what tasks I have to do in each section like ‘Home’ -> ‘Impementing top menu’, ‘Implementing footer’, ‘Implementing big button’. It helps me to control where I am, what have been done, and what do I need to do next. And I think the smaller the tasks are, the more fruitful the discussion and work can be, because you can simply refine each detail. Please feel free to see CommonsNet issues. It’s not finished yet, and while working I am going to add further issues but it presents the main idea I am talking about.

Screen Shot 2016-06-23 at 12.57.48.png

I hope these tips help you to run your work and to go through harder time – easier. And remember even the longest journey starts from the first step!

Please follow CommonsNet webiste https://commonsnet.herokuapp.com/ to be updated about progress, latest news and tips how to resolve programming problems you may experience.

Feel free to follow us on social media Facebook https://web.facebook.com/CommonsNetApp/  Twitter https://twitter.com/Commons_Net

Continue ReadingOne step at a time – The beginnings of CommonsNet