Developing a pdf viewer in AngularJs

week11gsoc1

Handling different mime types and giving support to them is quite important when a collaboration platform is being developed. Previously sTeam web UI had essential components like :

  • image viewer
  • audio player
  • video player

So in the process of developing new components and adding support for different mime types a PDF viewer grew out as a possibility. So the concept of a PDF viewer is quite simple, it just helps you to display, control all the files that come with the mime-type application/pdf.

The process as a whole is quite simple in developing the pdf viewer. Let us have a look at the process;

  • We have to utilize the PDFViewerService in order to build the PDF viewer
  • The configuration variables are pretty much few in number, although it is very necessary to look after what URI is being passed to the pdfURL variable as it is solely responsible for loading the content from the file.
  • Using the pdf viewer instance is pretty much simple as we have to declare the instance viewer first and then use the same $scope.instance for performing operations like :
    1. Going to the next page
    2. Going to the prev page
    3. Going to a particular page
    4. Displaying the total number of pages loaded
    5. Displaying the progress of the loaded files
  • Lastly there is one important thing to be noted, ngPDFViewer is comparitively a light weight library that could be used for development of a PDF viewer although when the application is bloated with large sized PDF’s it takes couple of seconds to load the PDF. A smart move here would be using the $scope.currentPages and $scope.totalPages in order to make a small calculation and display it at the users end as to how much percentage of the file is loaded.

angular.module('steam', [ 'ngPDFViewer' ])
.controller('workspaceDetailedCtrl', [ '$scope', 'PDFViewerService', function($scope, pdf) {
  $scope.pdfURL = "test.pdf"
  $scope.instance = pdf.Instance("viewer")

  $scope.nextPage = function() {
    $scope.instance.nextPage()
  }
  $scope.prevPage = function() {
    $scope.instance.prevPage()
  }
  $scope.gotoPage = function(page) {
    $scope.instance.gotoPage(page)
  }
  $scope.pageLoaded = function(curPage, totalPages) {
    $scope.currentPage = curPage
    $scope.totalPages = totalPages
  }
  $scope.loadProgress = function(loaded, total, state) {
    console.log('loaded =', loaded, 'total =', total, 'state =', state)
  }
}]);

Here is the final outcome of it:

week11gsoc2

week11gsoc3

Source : click here

Thats it folks,
Happy Hacking !!

Continue ReadingDeveloping a pdf viewer in AngularJs

Setting up Nginx, Gunicorn and Flask-SocketIO

One of my previous posts was on User Notifications (another blog). There I discussed a possible enhancement to notifications by using WebSocket API. This week I worked on the same using Flask-SocketIO library. Its development required setting up the backend, this post is about the same.

Flask-SocketIO and Gunicorn

From the Flask-SocketIO page itself:

Flask-SocketIO gives Flask applications access to low latency bi-directional communications between the clients and the server.

On the client-side the developer is free to use any library that works on the Socket.io protocol. Flask-SocketIO needs an asynchronous service to work with and gives a choice from the three: Eventlet (eventlet.net), Gevent (gevent.org) and Flask development server. I used it with Eventlet.

pip install flask-socketio
pip install eventlet

We were already using Gunicorn as our webserver, so integrating Eventlet only required specifying the worker class for Gunicorn.

gunicorn app:app --worker-class eventlet -w 1 --bind 0.0.0.0:5000 --reload

This command would start the gunicorn webserver, load the Flask app and bind it to port 5000. The worker class has to be specified as eventlet, using only one worker (-w 1). --reload option helps during development, it restarts the server if the python code changes.

The problem with Gunicorn occurs when working with static files. Gunicorn is not made to serve static assests like CSS stylesheets, JS scripts, etc. It should only be used to serve requests that require the Python application. We were serving static assets with Gunicorn and you could see the static files not changing at the browser during development (even if the server is restarted). The correct way to handle this was to use Nginx as a proxy server that serves static files, and passes other requests to the Flask application (running at Gunicorn).

Nginx

We use Vagrant for development. To test our application, a port in the host machine has to be forwarded to another port in the guest machine. We forward 8001 Host port to 5000 in Guest.

config.vm.network "forwarded_port", guest: 5000, host: 8001

To serve requests with Nginx we need it listening to port 5000 in our Virtualbox. It should serve the static files itself and should pass other requests to the Gunicorn server running the python application. The Gunicorn server should be running on another port, 5001 let’s assume. The following Nginx configuration does this:

server {
    listen       5000;

    location /static {
        alias /vagrant/app/static;
        autoindex on;
    }

    location / {
        proxy_pass http://127.0.0.1:5001;

        proxy_redirect http://127.0.0.1:5001/ http://127.0.0.1:8001/;
    }
}

You can see the static files (which are served at /static in out application) are being served directly. /vagrant/app/static is the directory where our static assets reside inside vagrant. autoindex on lets you browse static file directories in the browser.

For other locations (URIs) the request is passed onto port 5001 where our Gunicorn server is running. Many responses from the Gunicorn server might contain URLs in the headers, like the Location header. This URL is going to have the domain and port of the Gunicorn server, since Flask is running on this server. This response is then grabbed by Nginx to send it to the user. Nginx will convert such URLs to the domain and port that it itself is running on. So if a response from Gunicorn has a header: Location: http://127.0.0.1:5001/blah it would be converted to Location: http://127.0.0.1:5000/blah. Since we were running our application inside a virtualbox, on the outside (host) we needed our application to be available at port 8001. So the response header Location: http://127.0.0.1:5000/blah needed to be Location: http://127.0.0.1:8001/blah. proxy_redirect does this job.

To add support for WebSockets at Nginx some other config parameters need to be defined. You can get them at https://flask-socketio.readthedocs.io/en/latest/.

Continue ReadingSetting up Nginx, Gunicorn and Flask-SocketIO

Handling images inside ZIP or with URL’s

The Open-event webapp generator now provides the user a facility to upload the speakers and sponsors images inside the ZIP as images/speakers and images/sponsors.  After that the user will just have to specify the path of the images inside JSON such as /images/speakers/photoname.jpg  instead of URL’s.

How It Works ?

Whenever a user uploads a ZIP containing different files, it is extracted in dist/ folder according to the filename inside ZIP.

//fold.js... function to extract files according to folder name

var admZip = require('adm-zip');
const distPath = __dirname + '/../../../dist';
const uploadsPath = __dirname + '/../../../uploads';
const mockPath = __dirname + '/../../../mockjson'

copyUploads: function(appFolder, uploadedFile) {
 const appPath = distPath + '/' + appFolder;
 fs.mkdirpSync(appPath + '/json');
 var zip = new admZip(uploadedFile);
 var zipEntries = zip.getEntries(); 

 zipEntries.forEach(function(zipEntry) {
 
 switch(zipEntry.entryName){
 case 'images/speakers/':
 zip.extractEntryTo("images/speakers/", appPath ); 
 break;
 case 'images/sponsors/':
 zip.extractEntryTo("images/sponsors/", appPath ); 
 break;
 case 'audio/':
 zip.extractEntryTo("audio/", appPath);
 break;
 case 'sessions':
 zip.extractEntryTo("sessions", appPath +'/json/');
 break;
 case 'speakers':
 zip.extractEntryTo("speakers", appPath +'/json/');
 break;
 case 'microlocations' :
 zip.extractEntryTo("microlocations", appPath+'/json/');
 break;
 case 'event' :
 zip.extractEntryTo("event", appPath +'/json/');
 break;
 case 'sponsors' :
 zip.extractEntryTo("sponsors", appPath +'/json/');
 break;
 case 'tracks':
 zip.extractEntryTo("tracks", appPath +'/json/');
 break;
 default:
 }

This will send all the speaker images to images/speakers in dist and all sponsors images to images/sponsors in dist ( dist is the folder served to the user).


const appFolder = reqOpts.email + '/' + slugify(reqOpts.name);
 speakers.forEach((speaker) => {
  if ((speaker.photo !== null) && (speaker.photo.substring(0, 4) ===     'http')) {
 speaker.photo = urlencode(distHelper.downloadSpeakerPhoto(appFolder,    speaker.photo));
 }
 else {
 var reg = speaker.photo.split('');
 if(reg[0] =='/'){
 speaker.photo =    urlencode(speaker.photo.substring(1,speaker.photo.length));
 }
 
 }

 });
//dist.js

downloadSpeakerPhoto: function(appFolder, photoUrl) {
 const appPath = distPath + '/' +appFolder;
 const photoFileName = photoUrl.split('/').pop();
 const photoFilePath = 'images/speakers/' + photoFileName;

 console.log('Downloading photo : ' + photoFileName);
 downloadFile(photoUrl, appPath + '/' + photoFilePath);
 return photoFilePath;
 },

The code above shows how the image URL’s are split on the basis of ‘/’ to get the last element of the URL that is photoFileName. After that the image can be written inside the folder.

images/speakers/' + photoFileName

This code also handles the case when the images are downloaded by taking URL paths from JSON. If the photo in JSON has a string matched with ‘HTTP’ .Then it is downloaded in images/speakers/ . Finally, the image is downloaded with the same path as specified in JSON which can then be easily related in HTML image tag.

//dist.js Function to download files

const downloadFile = function(url, filePath) {
 const fileStream = fs.createWriteStream(filePath);

 fileStream.on('error', function(err) {
 console.log(err);
 });
 try {
 request(url).pipe(fileStream);
 } catch (err) {
 console.log(err);
 }
};

That’s how the images inside the ZIP and the image URL’s inside JSON files are handled in Open-event webapp generator.

Continue ReadingHandling images inside ZIP or with URL’s

Using Heroku pipelines to set up a dev and master configuration

The open-event-webapp project, which is a generator for event websites, is hosted on heroku. While it was easy and smooth sailing to host it on heroku for a single branch setup, we moved to a 2-branch policy later on. We make all changes to the development branch, and every week once or twice, when the codebase is stable, we merge it to master branch.

So we had to create a setup where  –

master branch –> hosted on –> heroku master

development branch –> hosted on –> heroku dev

Fortunately, for such a setup, Heroku provides a functionality called pipelines and a well documented article on how to implement git-flow


First and foremost, we created two separate heroku apps, called opev-webgen and opev-webgen-dev

To break it down, let’s take a look at our configuration. First step is to set up separate apps in the travis deploy config, so that when development branch is build, it pushed to open-webgen-dev and when master is built, it pushes to opev-webgen app. The required lines as you can see are –

https://github.com/fossasia/open-event-webapp/blob/master/.travis.yml#L25

https://github.com/fossasia/open-event-webapp/blob/development/.travis.yml#L25

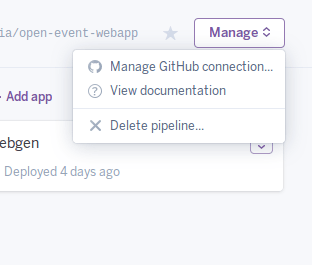
Now, we made a new pipeline on heroku dashboard, and set opev-webgen-dev and opev-webgen in the staging and production stages respectively.

Screenshot from 2016-07-31 04-33-30 Screenshot from 2016-07-31 04-34-41

Then, using the “Manage Github Connection” option, connect this app to your github repo.

Screenshot from 2016-07-31 04-36-17

Once you’ve done that, in the review stage of your heroku pipeline, you can see all the existing PRs of your repo. Now you can set up temporary test apps for each PR as well using the Create Review App option.

Screenshot from 2016-07-31 04-37-38

So now we can test each PR out on a separate heroku app, and then merge them. And we can always test the latest state of development and master branches.

Continue ReadingUsing Heroku pipelines to set up a dev and master configuration

sTeam REST API Unit Testing

(ˢᵒᶜⁱᵉᵗʸserver) aims to be a platform for developing collaborative applications.
sTeam server project repository: sTeam.
sTeam-REST API repository: sTeam-REST

Unit Testing the sTeam REST API

The unit testing of the sTeam REST API is done using the karma and the jasmine test runner. The karma and the jasmine test runner are set up in the project repository.

The karma test runner : The main goal for Karma is to bring a productive testing environment to developers. The environment being one where they don’t have to set up loads of configurations, but rather a place where developers can just write the code and get instant feedback from their tests. Because getting quick feedback is what makes you productive and creative.

The jasmine test runner: Jasmine is a behavior-driven development framework for testing JavaScript code. It does not depend on any other JavaScript frameworks. It does not require a DOM. And it has a clean, obvious syntax so that you can easily write tests.

The karma and jasmine test runner were configured for the project and basic tests were ran. The angular js and angular mocks version in the local development repository was different. This had resulted into a new error been incorporated into the project repo. The ‘angular.element.cleanData is not a function’ error is thrown in the local development repository. This error happens when the local version of the angular.js and angular-mocks.js doesn’t match. The testing framework would test you if the versions f the two libraries is not the same.

The jasmine test runner can be accessed from the browser. The karma tests can be performed from the command line.

To access the jasmine test runner from the web browser, go to the url

http://localhost:7000/test/unit/runner.html

To run the karma test suite, run the following command

$ karma start

The unit tests of the sTeam REST service were done using jasmine. The unit tests were written in coffee script. The preprocessor to compile the files from coffee script to javascript is defined in the karma configuration file.

Jasmine Test RunnerJasmineRunner
Jasmine Test Failure

JasmineRunnerFailure

First a dummy pass case and a fail case is tested to check there are no errors in the test suite during the test execution.

The localstoragemodule.js which is used in the steam service is injected in the test module. Then the steam service version is tested.

describe 'Check version of sTeam-service', -> 
 		it 'should return current version', inject (version) -> 
 			expect(version).toEqual('0.1') 

steam service should be injected in a global variable as the same service functions shall be tested while performing the remaining tests.
Then the steam service is injected and checked whether it exists or not.

beforeEach inject (_steam_) -> 
 		steam= _steam_ 
 	describe 'Check sTeam service injection', ->  
 		it 'steam service should exist', -> 
 			expect(steam).toBeDefined() 

The sTeam service has both private and public functions. The private functions cannot be accessed from outside. The private functions defined in the sTeam service arehandle_request and headers.

describe 'Check sTeam service functions are defined.', ->  
 		describe ' Check the sTeam REST API private functions.', -> 
 			it 'steam service handle request function should exist', -> 
 				expect(steam.handle_request).toBeDefined() 
 			it 'steam service headers function should exist', -> 
 				expect(steam.headers).toBeDefined() 

The public functions of the sTeam service are then tested.

describe 'Check sTeam service functions are defined.', ->  
 		describe ' Check the sTeam REST API public functions.', -> 
 			it 'steam service login function should exist', -> 
 				expect(steam.login).toBeDefined() 
 			it 'steam service loginp function should exist', -> 
 				expect(steam.loginp).toBeDefined() 
 			it 'steam service logout function should exist', -> 
 				expect(steam.logout).toBeDefined() 
 			it 'steam service user function should exist', -> 
 				expect(steam.user).toBeDefined() 
 			it 'steam service get function should exist', -> 
 				expect(steam.get).toBeDefined() 
 			it 'steam service put function should exist', -> 
 				expect(steam.put).toBeDefined() 
 			it 'steam service post function should exist', -> 
 				expect(steam.post).toBeDefined() 
 			it 'steam service delete function should exist', -> 
 				expect(steam.delete).toBeDefined() 

The test suite written by Siddhant for the sTeam server was tested. The merging of the code from different branches which includes the work done during the course of GSoC 2016 will be merged subsequently.

Karma test runner

KarmaTestCase

Feel free to explore the repository. Suggestions for improvements are welcomed.

Checkout the FOSSASIA Idea’s page for more information on projects supported by FOSSASIA.


Continue ReadingsTeam REST API Unit Testing

Creating a Widget for your Android App

Having a widget for your app, not only helps it to stand out among its alternatives but also provides user information on the go without having to open the app. Keeping this thought in mind, I decided to make a widget for my GSoC project. Let’s go through the steps involved.

Step 1:

Creating a new widget from Android Studio.

Open up your project for which you need a widget and navigate to the project’s Java source. Create a new sub-package there named widget. Right click on the newly created sub-package and select the New->Widget option from there.

new_widget

Follow the instructions on the next screen.

screenshot-area-2016-07-30-002554
Most of the fields here are pretty much self explanatory. After doing this and running the app in your device, you will be able to see a widget for your app in the widget picker.
Screenshot_20160730-003515_01


Just kidding, this was the easy part, off to more harder things now!

Step 2:

Populating the widget with data.

Now, there can be 2 broad type of widgets Information Widgets and Collection Widgets.

Information widgets are simple widgets that are used to display an information that changes with time, for example Weather Widget or a Clock Widget.

Whereas, collection widgets are widgets which display a collection of data, for example the GMail widget is a collection widget.
These are relatively complex and harder than the Information Widgets.

In this post, we will focus on making a Collection Widget.

For Collection widgets, we need two layout files, one for the widget and one for each item in the widget collection.

Go ahead and create the two layout files. The wizard automatically generates the widget_layout.xml for you, you just need to edit it up.

stock_layout.xml
<LinearLayout xmlns:android="http://schemas.android.com/apk/res/android"
    android:layout_width="match_parent"
    android:layout_height="match_parent"
    android:orientation="vertical">

    <LinearLayout
        android:layout_width="match_parent"
        android:id="@+id/widget_toolbar"
        android:layout_height="?android:attr/actionBarSize"
        android:background="@color/colorPrimary">

        <ImageView
            android:layout_width="wrap_content"
            android:layout_height="match_parent"
            android:layout_gravity="center"
            android:src="@drawable/stock_up"
            android:contentDescription="@string/stock_widget" />

        <ImageView
            android:layout_width="wrap_content"
            android:layout_height="match_parent"
            android:layout_gravity="center"
            android:src="@drawable/stock_down"
            android:contentDescription="@string/stock_widget" />

        <TextView
            android:layout_width="0dp"
            android:layout_height="match_parent"
            android:layout_weight="1"
            android:layout_marginStart="32dp"
            android:gravity="center_vertical"
            android:text="@string/your_stocks"
            android:textAppearance="@android:style/TextAppearance.DeviceDefault.Widget.ActionBar.Title"
            android:layout_marginLeft="32dp" />
    </LinearLayout>

    <ListView
        android:id="@+id/widget_listView"
        android:layout_width="match_parent"
        android:layout_height="wrap_content"
        android:background="@color/backGround"></ListView>

</LinearLayout>
list_item.xml
<?xml version="1.0" encoding="utf-8"?>
<LinearLayout xmlns:android="http://schemas.android.com/apk/res/android"
    xmlns:tools="http://schemas.android.com/tools"
    android:layout_width="match_parent"
    android:layout_height="72dp"
    android:gravity="center_vertical"
    android:orientation="horizontal"
    android:paddingLeft="16dp"
    android:paddingRight="16dp"
    >
  <TextView
      android:id="@+id/stock_symbol"
      style="@style/StockSymbolTextStyle"
      android:layout_width="wrap_content"
      android:layout_height="wrap_content"
      android:gravity="start|center_vertical"
      tools:text="List Item"
      />
</LinearLayout>

Next up, having a look at the modified files, we can see that the Widget creation wizard added some stuff into out AndroidManifest.xml and created a new java file.

Upon taking a closer look at the manifest, we can see that the widget’s java class has been registered as a <receiver/>

Next, opening up the NewAppWidget.java, we will see that it extends AppWidgetProvider and some methods are already overridden for you.

Time to edit up this file to reference to the layouts we have just created.

import android.annotation.TargetApi;
import android.app.PendingIntent;
import android.appwidget.AppWidgetManager;
import android.appwidget.AppWidgetProvider;
import android.content.Context;
import android.content.Intent;
import android.os.Build;
import android.support.annotation.NonNull;
import android.widget.RemoteViews;

/**
 * Implementation of App Widget functionality.
 */
public class StockWidgetProvider extends AppWidgetProvider {

    private static void updateAppWidget(Context context, AppWidgetManager appWidgetManager,
                                        int appWidgetId) {
        // Construct the RemoteViews object which defines the view of out widget
        RemoteViews views = new RemoteViews(context.getPackageName(), R.layout.widget_layout);
        // Instruct the widget manager to update the widget
        if (Build.VERSION.SDK_INT >= Build.VERSION_CODES.ICE_CREAM_SANDWICH) {
            setRemoteAdapter(context, views);
        } else {
            setRemoteAdapterV11(context, views);
        }
        /** PendingIntent to launch the MainActivity when the widget was clicked **/
        Intent launchMain = new Intent(context, MainActivity.class);
        PendingIntent pendingMainIntent = PendingIntent.getActivity(context, 0, launchMain, 0);
        views.setOnClickPendingIntent(R.id.widget, pendingMainIntent);
        appWidgetManager.notifyAppWidgetViewDataChanged(appWidgetId,R.id.widget_listView);
        appWidgetManager.updateAppWidget(appWidgetId, views);
    }

    @Override
    public void onUpdate(Context context, AppWidgetManager appWidgetManager, int[] appWidgetIds) {
        // There may be multiple widgets active, so update all of them
        for (int appWidgetId : appWidgetIds) {
            updateAppWidget(context, appWidgetManager, appWidgetId);
        }

        super.onUpdate(context, appWidgetManager, appWidgetIds);
    }

    @Override
    public void onEnabled(Context context) {
        // Enter relevant functionality for when the first widget is created
    }

    @Override
    public void onDisabled(Context context) {
        // Enter relevant functionality for when the last widget is disabled
    }

  /** Set the Adapter for out widget **/

    @TargetApi(Build.VERSION_CODES.ICE_CREAM_SANDWICH)
    private static void setRemoteAdapter(Context context, @NonNull final RemoteViews views) {
        views.setRemoteAdapter(R.id.widget_listView,
                new Intent(context, StockWidgetService.class));
    }

    
    /** Deprecated method, don't create this if you are not planning to support devices below 4.0 **/
    @SuppressWarnings("deprecation")
    private static void setRemoteAdapterV11(Context context, @NonNull final RemoteViews views) {
        views.setRemoteAdapter(0, R.id.widget_listView,
                new Intent(context, StockWidgetService.class));
    }

}

Now, create a WidgetDataProvider which will provide us with data to be displayed inside the widget.

You can use a static data for now (like a prefilled ArrayList, but make sure that this data should be dynamic for making the widget meaningful)

import android.content.Context;
import android.content.Intent;
import android.database.Cursor;
import android.os.Binder;
import android.widget.RemoteViews;
import android.widget.RemoteViewsService;

/**
 * Created by the-dagger on 24/7/16.
 */

public class WidgetDataProvider implements RemoteViewsService.RemoteViewsFactory {

    private Context context;
    private Cursor cursor;
    private Intent intent;

    //For obtaining the activity's context and intent
    public WidgetDataProvider(Context context, Intent intent) {
        this.context = context;
        this.intent = intent;
    }

    private void initCursor(){
        if (cursor != null) {
            cursor.close();
        }
        final long identityToken = Binder.clearCallingIdentity();    
        /**This is done because the widget runs as a separate thread 
        when compared to the current app and hence the app's data won't be accessible to it
        because I'm using a content provided **/
        cursor = context.getContentResolver().query(QuoteProvider.Quotes.CONTENT_URI,
                new String[]{QuoteColumns._ID, QuoteColumns.SYMBOL, QuoteColumns.BIDPRICE,
                        QuoteColumns.PERCENT_CHANGE, QuoteColumns.CHANGE, QuoteColumns.ISUP},
                QuoteColumns.ISCURRENT + " = ?",
                new String[]{"1"},null);
        Binder.restoreCallingIdentity(identityToken);
    }

    @Override
    public void onCreate() {
        initCursor();
        if (cursor != null) {
            cursor.moveToFirst();
        }
    }

    @Override
    public void onDataSetChanged() {
        /** Listen for data changes and initialize the cursor again **/
        initCursor();
    }

    @Override
    public void onDestroy() {
    cursor.close();
    }

    @Override
    public int getCount() {
        return cursor.getCount();
    }

    @Override
    public RemoteViews getViewAt(int i) {
        /** Populate your widget's single list item **/
        RemoteViews remoteViews = new RemoteViews(context.getPackageName(), R.layout.list_item_quote);
        cursor.moveToPosition(i);
        remoteViews.setTextViewText(R.id.stock_symbol,cursor.getString(cursor.getColumnIndex(QuoteColumns.SYMBOL)));
        remoteViews.setTextViewText(R.id.bid_price,cursor.getString(cursor.getColumnIndex(QuoteColumns.BIDPRICE)));
        remoteViews.setTextViewText(R.id.change,cursor.getString(cursor.getColumnIndex(QuoteColumns.CHANGE)));
        if (cursor.getString(cursor.getColumnIndex(QuoteColumns.ISUP)).equals("1")) {
            remoteViews.setInt(R.id.change, "setBackgroundResource", R.drawable.percent_change_pill_green);
        } else {
            remoteViews.setInt(R.id.change, "setBackgroundResource", R.drawable.percent_change_pill_red);
        }
        return remoteViews;
    }

    @Override
    public RemoteViews getLoadingView() {
        return null;
    }

    @Override
    public int getViewTypeCount() {
        return 1;
    }

    @Override
    public long getItemId(int i) {
        return i;
    }

    @Override
    public boolean hasStableIds() {
        return true;
    }
}

Let’s also create a service that invokes the WidgetDataProvider after a fixed interval

import android.content.Intent;
import android.widget.RemoteViewsService;

/**
 * Created by the-dagger on 24/7/16.
 */

public class StockWidgetService extends RemoteViewsService {
    @Override
    public RemoteViewsFactory onGetViewFactory(Intent intent) {
        return new WidgetDataProvider(this,intent);
    }
}

Phew.. almost done with this now.

Finally edit up the widget_info.xml located inside /res/values/xml/ of your project.

Edit it to reference the time after which your widget will be updated, the preview image which should show up in the widget picker and minimum width and height of the widget.

<?xml version="1.0" encoding="utf-8"?>
<appwidget-provider xmlns:android="http://schemas.android.com/apk/res/android"
    android:initialKeyguardLayout="@layout/app_widget"
    android:initialLayout="@layout/app_widget"
    android:minHeight="110dp"
    android:minWidth="170dp"
    android:previewImage="@drawable/example_appwidget_preview"
    android:resizeMode="horizontal|vertical"
    android:updatePeriodMillis="86400000"
    android:widgetCategory="home_screen"></appwidget-provider>

Well, once this is done, go ahead and fire up your app. You will be able to see the newly created and updated widget in your homescreen.

 widget

Pretty awesome right!
Congratulations on making your first widget.

For now the app only opens a specific activity on clicking it, but you can read up a bit on how to execute a separate task on clicking each item on the list by using a pendingIntent.

Continue ReadingCreating a Widget for your Android App

Communicating with Pocket Science Lab via USB and capturing and plotting sine waves

Design of PSLab combines the flexibility of Python programming language and the real-time measurement capability of micro-controllers.

PSLab, with its simple and open architecture allows users to use the tool for various measurements and to develop new experiments with simple functions written in python.

PSLab is interfaced and powered by USB port of the computer. For connecting external signals it has several input/output terminals as shown in the figure.

pslabdesign

Interfacing with the real world

Connecting to PSLab is as simple and straight forward as this…

>>> from PSL import sciencelab
>>> I = sciencelab.connect()     #Returns None if device isn't found
# An example function that measures voltage present at the specified analog input
>>> print I.get_average_voltage('CH1')

Various sensors can be connected to PSLab and data can be fetched with a simple python code as shown below…

>>> from PSL.SENSORS import HMC5883L #A 3-axis magnetometer
>>> M = HMC5883L.connect()
>>> Gx,Gy,Gz = M.getRaw()

The module sciencelab.py contains all the functions required for communicating with PSLab hardware. It also contains some utility functions. The class ScienceLab() contains methods that can be used to interact with the PSLab. The connect() function returns an object of this class if PSLab hardware is detected.

The initialization process does the following

* connects to tty device

* loads calibration values.

>>> from PSL import sciencelab
>>> I = sciencelab.connect()
>>> print I
<PSL.sciencelab.ScienceLab instance at 0x7fe9a7bf0e18>

After initiating this class, its various function calls will allow access to all the features built into the device. Some examples showing the use of few function calls are given below…

Example 1: Capturing and plotting a sine wave

The function call used,

capture1(self,ch,ns,tg,*args,**kwargs)

Arguments

  • ch  : Channel to select as input. [‘CH1′..’CH3′,’SEN’]
  • ns  :  Number of samples to fetch. Maximum 10000
  • tg   :  Time gap between samples in microseconds

Example Program

Connect WG1 to CH1 and run the following code.

>>> from pylab import *
>>> from PSL import sciencelab
>>> I=sciencelab.connect()
>>> I.set_gain('CH1', 3) # set input CH1 to +/-4V range
>>> I.set_sine1(1000) # generate 1kHz sine wave on output W1
>>> x,y = I.capture1('CH1', 1000, 10) # digitize CH1 1000 times, with 10 usec interval
>>> plot(x,y)
>>> show()

For running the script in IDE, one should define source code encoding, add this to the top of your script:

# -*- coding: utf-8 -*-

The output of the program is here…

sine1

Example 2 : Capturing two sine waves and plotting

The function call used,

capture2(self,ns,tg,TraceOneRemap='CH1')

Arguments

  • ns :  Number of samples to fetch. Maximum 5000
  • tg  :  Time gap between samples in microseconds
  • TraceOneRemap :   Choose the analogue input for channel 1 (Like MIC OR SEN). It is connected to CH1 by default. Channel 2 always reads CH2.

Example Program

Connect WG1 to CH1, WG2 to CH2 and run the following code.

# -*- coding: utf-8 -*-

from pylab import *
from PSL import sciencelab
I=sciencelab.connect()
I.set_gain('CH1', 2) # set input CH1 to +/-4V range
I.set_gain('CH2', 3) # set input CH2 to +/-4V range
I.set_sine1(1000) # generate 1kHz sine wave on output W1
I.set_sine2(1000) # generate 1kHz sine wave on output W2

x,y1,y2 = I.capture2(1600,1.75,'CH1') 
plot(x,y1) #Plot of analog input CH1
plot(x,y2) #plot of analog input CH2
show()

The output of the program is here…sine2

Example 3 : Capturing four traces and plotting

The function call used,

capture4(self,ns,tg,TraceOneRemap='CH1')

Arguments

  • ns:   Number of samples to fetch. Maximum 2500
  • tg :   Time gap between samples in microseconds. Minimum 1.75uS
  • TraceOneRemap :   Choose the analogue input for channel 1 (Like MIC OR SEN). It is connected to CH1 by default. Channel 2 always reads CH2.

Example Program

Connect WG1 to CH1, WG2 to CH2, SQR1 to CH3 and transducer mic to MIC (CH4) and run the following code.

# -*- coding: utf-8 -*-

from pylab import *
from PSL import sciencelab
I=sciencelab.connect()
I.set_gain('CH1', 2) # set input CH1 to +/-4V range
I.set_gain('CH2', 3) # set input CH2 to +/-4V range
I.set_sine1(1000) # generate 1kHz sine wave on output W1
I.set_sine2(1000) # generate 1kHz sine wave on output W2
I.sqr1(2000,duty_cycle=50) # generate 1kHz square wave on output SQR1

x,y1,y2,y3,y4 = I.capture4(800,1.75)
plot(x,y1) #Plot of analog input CH1
plot(x,y2) #plot of analog input CH2
plot(x,y3) #plot of analog input CH3
plot(x,y4) #plot of analog input CH4 : MIC
show()

The output of the program is here…waves

Next To Do for GSoC-16

A detailed User manual and programmers manual with description of all function calls. ( Work in progress 🙂  )

Read:
  1. Post about installing PSLab
  2. PSLab and ExpEYES and GSoC-16 work
Continue ReadingCommunicating with Pocket Science Lab via USB and capturing and plotting sine waves

Can solving lint bugs be interesting?

Today I am going to present you how we’ve changed monotonous solving bugs into motivating process.

PEP

Most developers need to improve their code quality. To do  that they can use style guide for e.g for Python code (PEP). PEP contains an index of all Python Enhancement Proposals.

Below you can find which logs PEP returned in a command line.

Do you think that this logs’ presentation is  good enough to interest a developer? Will he solve these  thousands of bugs?

Undoubtedly, there are much information about errors and warnings so PEP returns long logs. But developer can not even know how to start solving bugs. And even if she/he finally starts, after each commit he/she needs to run that script again to check if quantity of bugs are increased or decreased. It seems to be endless, exhausting and very monotonous.  Nobody is encouraged to do it.

logi.png

Quality monitoring

Open Event team wants to increase our productivity and code quality. Therefore we use a tool which allow us to check code style, security, duplication complexity and test coverage on every commit. That tool is Codacy and it fulfils our requirements in 100%. It is very helpful because it adds comments to pull requests and enables developer quickly find where a bug is located. It’s very comfortable, because you don’t need to check issues in above awful logs results. Take a look how it looks in Codacy.

-DO NOT MERGE  Ticketing Flow by niranjan94 · Pull Request  1927 · fossasia open event orga server.png

Isn’t it clear? Of course that it’s. Codacy shows in which line issue ocurres and which type of issue it’s.

Awesome statistics dashboard

I’d like to give an answer how you can engage your team to solve issues and make this process more interesting. On the main page codacy tool welcomes you with great statistics about your project.

open event orga server   Codacy   Dashboard

You can see number of issues, category like code complexity, code style, compatibility, documentation, error prone, performance, security and unused code. That params show in which stage of code quality your project is. I think that every developer’s aim is to have the highest code quality and increasing these statistics. But if project has many issues, developer sees only a few changes in project charts.

Define Goals

Recently I’ve discovered how you can motivate yourself more. You can define a goal which you’d like achive. It can be goal of category or goal of file. For example Open Event team has defined goal for a specific file to achieve. If you define small separate goals, you can quicker see the results of your work.

open event orga server_2   Codacy   Goals

On the left sidebar you can find a item which is named “Goals”. In this area you can easily add your projects goals. Everything is user friendly so you shouldn’t have a problem  to create own goals.

Continue ReadingCan solving lint bugs be interesting?

Collecting information. What to choose?

Internet legal restrictions

Our idea in CommonsNet project is to make a  wireless connection transparent. Apart from typical details like ssid, password, security, speed, time limit etc. we think to make also clear  legal restrictions which vary across the world. Because we all know permanent value of the famous maxim ‘Ignorantia iuris nocet’,  we want to provide a great, widespread tool, and make complex law easy-to-understand for an average Internet user. In today’s world more and more people travel a lot, and visit different countries. As Internet is a main part of our life we want to use it everywhere. And we do it, but it may sometimes happen that we use the Internet , thoughtlessly without realizing that somewhere in the world something normal for us may be banned. In this case, we are even exposure to unpleasant consequences . Therefore we believe that access to understandable information is a fundamental human right and can influence on our life much.

Collecting is not an easy task, and it is a place where we need your help. If we want to create a huge database of law restrictions in different countries all over the world we need your support, because you are who understands your country and your language best. And you are able to ask people who are engaged in a law. We simply need information what is the law related to Internet and/or wireless connection, and mainly – what is forbidden.

Poland example

Let me explain it based on Poland example. We are going to focus on downloading music, movies, books from the Internet. In Poland you are allowed to do that for your personal use. It means that you can do it to use them in privacy, but on condition that movie, song or a book has been already made available to the public. If not – it’s illegal. A private use means also that you can share that resources with your family or friends and that you can do single copies of what you download. Very popular peer to peer networks which enable to share our resources with other users at the time we download a file, are unfortunately not defined as private use and are illegal either.

When it comes to uploading files, if we are authors of a song, or a movie, or a book and so on, we can share what and how we only want. But if we want to share our downloaded resources, we have to be very careful. We can do it only in our private area – for our friends and family but we cannot share it in public.

Law is unfortunately silent in regards of downloading files illegaly available in Internet (when someone shares a song, or a book before it has been make available to the public), but many lawyers claim that in the light of law it is permitted only for a personal use.

One of the most protected under polish law group of resources are computer games and various programs. They cannot be downloaded, copied, shared even for a personal use. It’s defined as a criminal offense and is strictly forbidden. Possible punishment are a fine, restriction of liberty and even imprisonment.

As you can see, it’s not difficult to gather all these details. You can do the same in your country, translate it in English and write to us  on Facebook, and become a member of our open source community to build big things together!

Database

The technical question here is how to collect all of these information. This week, i have had many ideas how to solve that problem ranging from PostgreSQL database, through MongoDB (since we use NodeJS) to JSON file. Now, I am going to provide you with a quick and valuable overview each of these options.

PosgreSQL

PostgreSQL is a powerful, open source object-relational database system.It runs on all major operating systems. It is fully ACID compliant, has full support for foreign keys, joins, views, triggers, and stored procedures (in multiple languages). It includes most SQL:2008 data types, including INTEGER, NUMERIC, BOOLEAN, CHAR, VARCHAR, DATE, INTERVAL, and TIMESTAMP.

I have implemented it to CommonsNet project because I thought that if I want to collect all of details provided above I need it. That’s how I have done it. Because I work on Vagrant I have added all these lines of code to my install.sh (provision.sh file)

  1.  sudo apt-get install -y postgresql postgresql-contrib
  2. sudo apt-get install -y libffi-dev

and then I have defined database name, user name and password


APP_DB_USER=user
APP_DB_PASS=pass
APP_DB_NAME=dbname

and then I have created a database

cat << EOF | sudo -u postgres psql
— Create the database user:
CREATE USER $APP_DB_USER WITH PASSWORD ‘$APP_DB_PASS’;

— Create the database:
CREATE DATABASE $APP_DB_NAME WITH OWNER=$APP_DB_USER§
LC_COLLATE=’en_US.utf8′
LC_CTYPE=’en_US.utf8′
ENCODING=’UTF8′
TEMPLATE=template0;
EOF

echo “exporting database url for app”
export DATABASE_URL=postgresql://$APP_DB_USER:$APP_DB_PASS@localhost:5432/$APP_DB_NAME

echo “export DATABASE_URL=$DATABASE_URL” >> /home/vagrant/.bashrc

sudo chown -R $(whoami) ~/.npm

Then i have added a new dependency to my package.json file.

“devDependencies”: {
“pg”: “~6.0.3”
}

And that’s it. My database works. But then, I have realised – thanks to my mentor’s – Mario Behling help – that’s not a good solution for my needs, because CommonsNet is not a huge project and we don’t need to complicate it. What’s more, we need to remember that if database exists it needs to be updated and maintained. I don’t know who can care about it especially if our team is not extended yet. That’s why I have got interested in MongoDB, especially because I use NodeJS in my project, but happily enough my mentor has suggested me take a look at JSON file.

JSON file

Finally I have made the best decision. I have chosen a JSON file, which seems to be enough for my needs. It’s a perfect solution, easy to implement. Take a look at my steps:

  1. First of all I have created a simple .txt file – legalrestrictions.txt. It looks like this: [{ “country”:”Poland”, “restrictions”:[“Poland restrictions1”, “Poland restrictions 2”] }]  It’s of course only a sample of my file. You can extend it as you want to. As you can see ‘restrictions’ are an array, so it helps us to put here a list of legal restrictions. It is simple, isn’t it ?
  2. Then I have written my code and put it in a website.js file. Because I use AngularJS I have had to do it like that. I am sure it is easy to understand.
    $scope.countries = [
    {name:’France’ },
    {name:’Poland’ },
    {name:’Germany’ },
    {name:’USA’ },
    {name:’Russia’ }
    ];// getting data from JSON file on ng-change select
    $scope.update = function() {
    var country = vm.countries.name;
    console.log(country);var table = [];
    $http.get(‘restrictions.txt’).success(function(data) {
    table=data
    for (var i=0; i<table.length; i++) {
    console.log(table[i].country);
    if (country === table[i].country) {
    vm.legalrestrictions = table[i].restrictions;
    }
    }
    });

    The HTML file looks like that:

    <select type=”text” class=”form” ng-model=”vm.countries” ng-options=”x.name for x in countries” ng-change=”update()”>
    <!– <option ng-repeat=”x.name for x in countries” value=”{{x.name}}”>{{x.name}</option> –>
    </select>
    <label for=”male”>Does your country have any legal restrictions? Type them.</label>
    <!– form group start –>

    <textarea name=”message” id=”legalarea” class=” form textarea” ng-model=”vm.legalrestrictions” placeholder=”You are not allowed to…”></textarea>


And that’s all. Easy to maintain and very transparent solution. I recommend you to use it as well. A perfect tutorial you can find  here:  http://www.w3schools.com/json/

Continue ReadingCollecting information. What to choose?

Downloading Files from URLs in Python

This post is about how to efficiently/correctly download files from URLs using Python. I will be using the god-send library requests for it. I will write about methods to correctly download binaries from URLs and set their filenames.

Let’s start with baby steps on how to download a file using requests –

import requests

url = 'http://google.com/favicon.ico'
r = requests.get(url, allow_redirects=True)
open('google.ico', 'wb').write(r.content)

The above code will download the media at http://google.com/favicon.ico and save it as google.ico.

Now let’s take another example where url is https://www.youtube.com/watch?v=9bZkp7q19f0. What do you think will happen if the above code is used to download it ? If you said that a HTML page will be downloaded, you are spot on. This was one of the problems I faced in the Import module of Open Event where I had to download media from certain links. When the URL linked to a webpage rather than a binary, I had to not download that file and just keep the link as is. To solve this, what I did was inspecting the headers of the URL. Headers usually contain a Content-Type parameter which tells us about the type of data the url is linking to. A naive way to do it will be –

r = requests.get(url, allow_redirects=True)
print r.headers.get('content-type')

It works but is not the optimum way to do so as it involves downloading the file for checking the header. So if the file is large, this will do nothing but waste bandwidth. I looked into the requests documentation and found a better way to do it. That way involved just fetching the headers of a url before actually downloading it. This allows us to skip downloading files which weren’t meant to be downloaded.

import requests

def is_downloadable(url):
    """
    Does the url contain a downloadable resource
    """
    h = requests.head(url, allow_redirects=True)
    header = h.headers
    content_type = header.get('content-type')
    if 'text' in content_type.lower():
        return False
    if 'html' in content_type.lower():
        return False
    return True

print is_downloadable('https://www.youtube.com/watch?v=9bZkp7q19f0')
# >> False
print is_downloadable('http://google.com/favicon.ico')
# >> True

To restrict download by file size, we can get the filesize from the Content-Length header and then do suitable comparisons.

content_length = header.get('content-length', None)
if content_length and content_length > 2e8:  # 200 mb approx
	return False

So using the above function, we can skip downloading urls which don’t link to media.

Getting filename from URL

We can parse the url to get the filename. Example – http://aviaryan.in/images/profile.png.

To extract the filename from the above URL we can write a routine which fetches the last string after backslash (/).

url = 'http://aviaryan.in/images/profile.png'
if url.find('/'):
	print url.rsplit('/', 1)[1]

This will be give the filename in some cases correctly. However, there are times when the filename information is not present in the url. Example, something like http://url.com/download. In that case, the Content-Disposition header will contain the filename information. Here is how to fetch it.

import requests
import re

def get_filename_from_cd(cd):
    """
    Get filename from content-disposition
    """
    if not cd:
        return None
    fname = re.findall('filename=(.+)', cd)
    if len(fname) == 0:
        return None
    return fname[0]


url = 'http://google.com/favicon.ico'
r = requests.get(url, allow_redirects=True)
filename = get_filename_from_cd(r.headers.get('content-disposition'))
open(filename, 'wb').write(r.content)

The url-parsing code in conjuction with the above method to get filename from Content-Dispositionheader will work for most of the cases. Use them and test the results.

These are my 2 cents on downloading files using requests in Python. Let me know of other tricks I might have overlooked.

{{ Repost from my personal blog http://aviaryan.in/blog/gsoc/downloading-files-from-urls.html }}


Continue ReadingDownloading Files from URLs in Python