CommonsNet’s main features are ready

Main CommonsNet features are generating a file and  generating a code script. Today I would like to provide you with a simple and short guideline how I have managed to implement them.

Generate a file

Generating a file is the most important feature of our website, and it is not only a condition of its existance but also a basis to find stakeholders – in general people who want to use CommonsNet webiste.  It is the most complicated CommonsNet feature as well even if it is not so difficult as you may think.

To implement this feature a pure JavaScript is used and for now we have chosen the simplest solution to build it, mainly because we need to have a working webiste now to start a real promotion and find many customers.

Important steps here are:

  1. Manually prepare a .fodt file
  2. Get .fodt file and modify it
  3. Generate a pdf file from a ready .fodt file
  4. Write function to download a pdf file.


Preparing .fodt file

My mentor Andre Rebentisch has recommended me to use .fodt file because it’s very user-friendly and let you to prepare a file’s structure very easy. Actually that’s it! I have prepared manually in Libre Office a default doc file, and then save it in .fodt extension. .Fodt is a great option because it behaves as .xml file and let you modify this file using any programming language.

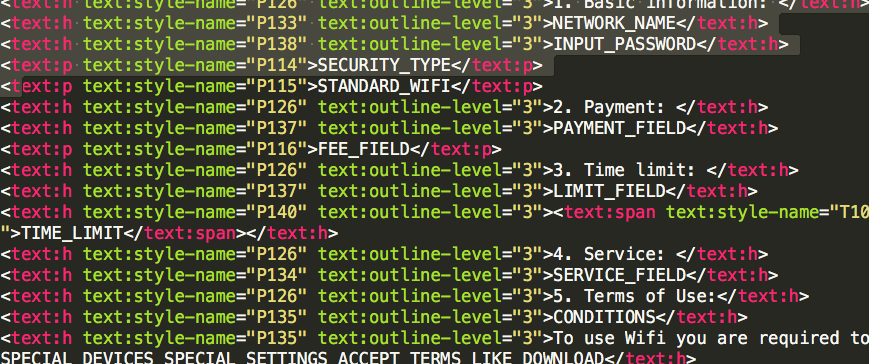
So, as I have already mentioned above I have created a simple doc file and prepare the structure. It is very clear and looks like a default Libre Office file. Only thing is that it has .fodt extension which means that you can open it in a code editior like for e.g. Sublime and start modifying easily.

If you open your .fodt file in a Sublime, it looks like this. Isn’t it simply? And above all it helps you to easily manipulate your data using for e.g a JavaScript.

Screen Shot 2016-08-13 at 17.19.06

Screen Shot 2016-08-13 at 17.18.00Get .fodt file to manipulate it

In my AngularJS Wizard Controller I write a function to get data from my .fodt file

$http({
 method: 'GET',
 url: 'http://commonsnet.herokuapp.com/generatefile.fodt',
 }).success(function(data){}) .error(function(){
 alert("error");
 });

It’s very easy code sample and you can find it in many Internet resources. I hope it is understandable to you as well. I have written a function which get a .fodt file and return data. Inside .success I have written my whole code to manipulate a .fodt file.  To use it I have decided to use a simple JavaScript replace method and if-else conditions, and in dependence on user’s inputs in a wizard form create different file’s structures. Let me show you a small section :

result = result.replace("NETWORK_NAME", "The owner provides" + " " + vm.ssid + "network connection")

if ((vm.password !== "") && (typeof vm.password !== "undefined")) {
 result = result.replace("INPUT_PASSWORD", "The owner informs that password is" + " " + vm.password);

}

Generate a pdf file from a ready .fodt file

It is still in progress! I will update it as soon as I manage to successfully implement it!

Write function to save it

To save my ready file I have used save function() and put in my AngularJS Wizard Controller.

$scope.save = function() {}

Generate a code script

We have decided to implement a generating code feature, because we want our users to be able to simply fill a wizard form with all Wifi details, then copy  a generated code  and be able to simply  paste it to their website.

We believe it is a very convenient solution to them because all they need to do it is to go through a form and it is ready. Besides, we have already decided to get rid of a database and use only a JSON file to not complicate our website’s working. So, that’s also the reason why we want to make it as simple as possible.

That’s why I have decided to create a link snd store there all wizard form’s values Undoubtedly it causes to build a very long link, but in the same time I believe that it is a good solution if we don’t use a database. I have also already found some ways to shorten and encrypt the generated link.

In my WizardController AngularJS I have write a function with a condtion

$scope.gotoStep = function(newStep) {
 currentStep = newStep;
 if ( currentStep === 3) {
 var link = "commonsnet.herokuapp.com/#/file?ssid=" + vm.ssid + "&password=" + vm.password + "&security=" + vm.securitytypes + "&standard=" + vm.wifistandards + "&payment=" + vm.paymentfieldyes + "&fee=" + vm.paymentfield + "&timelimit=" + vm.timelimityes + "&limit=" + vm.timelimitfield + "&service=" + vm.serviceyes + "&specialdevices=" + vm.specialdevices + "&devices=" + vm.specialdevicesfield + "&specialsettings=" + vm.specialsettings + "&settings=" + vm.specialsettingsfield + "&acceptterms=" + vm.acceptterms + "&liking=" + vm.socialprofile + "&downloading=" + vm.downloading + "&restrictions=" + vm.country + "&country=" + vm.countries + "&law=" + vm.legalrestrictions
 vm.code = '<a href="' + link + '">CommonsNet</a>'
 }
 }

If my currentStep === 3 (actually it’s a  confirmation.html templateUrl) I create a link (a code) which is available to users to copy and paste to their website.

Then I have also created a new FileController (FileCtrl) which is called when users enter a commonsnet.herokuapp.com/#/file (if they paste in an url a copied generated link)

app.controller('FileCtrl',['$scope', '$routeParams', function ($scope, $routeParams) { $scope.ssid = $routeParams.ssid; $scope.password = $routeParams.password; }])

Finally I have created a .html structure to post data from a wizard from which are all stored in our link. It’s a normal html structure but in order to adjust the html’s content to user’s wizard inputs I have used an Angular ng-if . A little example looks like this:

ng-if="ssid && ssid != 'undefined'

And that’s it. It still needs some improvements and fixing bugs but main features work according to my plan!!!

It’ time to intensively extend the idea of CommonsNet and find stakeholders! Are you interested too? I am sure you are, because CommonsNet is a great tool which helps us to build a transparent Wifi networks!

Feel free to write your comments and suggestion!

Continue ReadingCommonsNet’s main features are ready

Twitter Oauth

Oauth_logo.svg.png

What is Oauth?

It’s an open protocol which allows to secure an authorization in a simple and standard method from web, mobile and desktop applications.Facebook, Google Twitter, Github and more web services use this protocol to authenticate user. Using Oauth is very convenient, because it delegates user authentication to the service which host user account. It allows us to get resources from another web service without giving any login or password. If you have a service and want to prepare a authentication via Twitter, the best solution is to use OAuth. Recently Open Event team met a problem in an user profile page. We’d like to automatically fill information about user. Of course, to solve it we use Oauth protocol, to authenticate with Twitter After a three-steps authentication we can get name and profile picture.If you need another information from Twitter profile like recent tweets or followers’ list. You have to visit Twitter API site to see more samples of resource which you can get

How do Open event team implement communication between Orga-server and Twitter?

All services have a very similar flow. Below i will show you how it looks in our case.

Before starting you need to create your own twitter app. You can create app in Twitter apps site https://apps.twitter.com/. If  create an app you will see a CONSUMER KEY and CONSUMER SECRET KEY which shouldn’t be human-readable, so remember not to share these keys.

Below example shows how to get basic information about twitter profile

We use oauth2 python library https://github.com/joestump/python-oauth2

consumer = oauth2.Consumer(key=TwitterOAuth.get_client_id(),

                          secret=TwitterOAuth.get_client_secret())

client = oauth2.Client(consumer)

TwitterOAuth.get_client_id() CONSUMER KEY

TwitterOAuth.get_client_secret()  – CONSUMER SECRET KEY

Then we send GET request to request_token endpoint to get oauth_token

client.request('https://api.twitter.com/oauth/request_token', "GET")
Response: oauth_token=Z6eEdO8MOmk394WozF5oKyuAv855l4Mlqo7hhlSLik&
oauth_token_secret=Kd75W4OQfb2oJTV0vzGzeXftVAwgMnEK9MumzYcM&
oauth_callback_confirmed=true

Next step is to redirect user to Twitter Authentication site

twitter-oauth.png

You can see in an url a redirect_uri. So after sign in Client will get a callback from Twitter with oauth_verifier and oauth_token params

https://api.twitter.com/oauth/authenticate?oauth_token=RcYGqAAAAAAAwdbbAAABVoM1UMo&oauth_token_secret=wZfpPpCugAmdF3AuohEnvBTRxdCmllxu&oauth_callback_confirmed=true&redirect_uri=http://open-event-dev.herokuapp.com/tCallback

The last step is to get an access token. If we have an oauth_verifier and an oauth_token it’s pretty easy

def get_access_token(self, oauth_verifier, oauth_token):

   consumer = self.get_consumer()

   client = oauth2.Client(consumer)

   return client.request(

       self.TW_ACCESS_TOKEN_URI + 'oauth_verifier=' + oauth_verifier + 
       "&oauth_token=" + oauth_token, "POST")

Where TW_ACCESS_TOKEN_URI is https://api.twitter.com/oauth/access_token

Final step is to get our user information

resp, content = client.request("https://api.twitter.com/1.1/users/show.json?
                               screen_name=" + access_token["screen_name"] +
                               "&user_id=" + access_token["user_id"] , "GET")

user_info = json.loads(content)

In an user_info variable you can get a profile picture or a profile name.

Summarizing, oauth protocol is very secure and easy to use by developer. At the beginning an oauth flow can seem to be a little hard to  understand but if you spend some time trying tp understand it, everything becomes easier.  And it’s secured. because you don’t need to store a login or a password, and an access token has an expired time. This is the main feature of Oauth protocol.

Continue ReadingTwitter Oauth

Handling data in android

So this week I was working with getting some data from the sqlite database in android and someone who was a beginner in android also asked me to help him with the same. I asked him what he knew and he said that even after reading up a lot he wasn’t able to figure out what exactly to do with the data he wants to save and use in his app. I have seen that this is a problem with a lot of people starting to develop android apps. So, I decided to write a blog on how can you handle your data in your android apps.

Most of the android apps need to save data even if only to save some user preferences. So primarily there are 3 ways to save your data :

  1. In form of key values (SharedPreferences)
  2. Reading/Writing to files
  3. Writing to a database

So let’s go step by step. When we need to store just some preferences of the users like if they want notifications or what kind of theme they want : light or dark etc. So basically if we want to store a key value in the persitant storage of the app we can do that using SharedPreferences. To use sharedpreferences, we initialise the sharedpreference object like

SharedPreferences sharedPreferences = PreferenceManager.getDefaultSharedPreferences(this);

in oncreate and cache it. Then we just need to add or retrieve what we want using this cached SharedPreferences object. To Add a key value pair :

sharedPreferences.edit().putString("someKey", "someValue").apply();

Also you can put all kinds of stuff here. For example right now we added a string with key “someKey” and Value “someValue”. We can also add Booleans, Floats, Ints, Longs, StringSets etc.

To retrieve the same value we do something like this

sharedPreferences.getString("someKey", "DefaultValue");

Now if you want some logs or some values that can be exported and sent to your server, you should write them to files and maybe read some json inputs etc. as well.

Basically android has a File system similar to other platforms. All android devices have two file storage areas : “Internal” and “external” storage. The difference between them is as follows :

Internal :

  • Always available
  • Files saved here are accesible by only your app
  • When user uninstalls the app, system removes all your app’s files from internal storage

Best to use this when you want to be sure that neither the user nor the other app’s can access your files

External :

  • It’s not always available because user can mount external storage as USB storage and remove it as well
  • It’s readable by anything(Other apps, users etc.)
  • When you uninstall, system removes your app’s files from here only if you save them in the directory from getExternalFilesDir()

Now to read and write files, you need extra permissions

  • android.permission.WRITE_EXTERNAL_STORAGE
  • android.permission.READ_EXTERNAL_STORAGE

So now let’s get down to it. How do I save and read files in my app?

You first initialise the File object

File file = new File(context.getFilesDir(), filename);

This will create a file with filename in the internal storage. For external storage

first check if the storage is available, then just create a file using getExternalStoragePublicDirectory

File file = new File(Environment.getExternalStoragePublicDirectory(
            Environment.DIRECTORY_PICTURES), albumName);
    if (!file.mkdirs()) {
        Log.e(LOG_TAG, "Directory not created");
    }
    return file;

This is for writing public files.

Now we move onto the most used part in an android app which is a database.Android has a built in SQLite database package which helps us in writing databases in files with syntax similar to SQL.

You need to add 2 classes which are mandatory and another class which basically helps you get organised. So the first is a Contract. This is where you actually write statements that will be executed later on to initialise or create the tables we want. For this make an a static abstract inner class that implements BaseColums like

public static abstract class Microlocation implements BaseColumns {
    public static final String TABLE_NAME = "microlocation";

    public static final String ID = "id";

    public static final String NAME = "name";

    public static final String LATITUDE = "latitude";

    public static final String LONGITUDE = "longitude";

    public static final String FLOOR = "floor";

    public static final String[] FULL_PROJECTION = {
            ID,
            NAME,
            LATITUDE,
            LONGITUDE,
            FLOOR

    };

    public static final String CREATE_TABLE =
            "CREATE TABLE " + TABLE_NAME
                    + " ("
                    + ID + INT_TYPE + PRIMARY_KEY + COMMA_SEP
                    + NAME + TEXT_TYPE + COMMA_SEP
                    + LATITUDE + REAL_TYPE + COMMA_SEP
                    + LONGITUDE + REAL_TYPE + COMMA_SEP
                    + FLOOR + INT_TYPE
                    + " );";

    public static final String DELETE_TABLE = "DROP TABLE IF EXISTS " + TABLE_NAME;


}

Here we are making static final Strings for column names and then creating a static final String CREATE_TABLE which is basically a statement that creates the table Microlocation with the specified key, columns, data types etc.

After adding this structure for all the tables we want to have in our database, we move on to adding a DbHelper class that extends SQLiteOpenHelper which basically has two Abstract methods called onCreate(SQLiteDatabase db) and onUpgrade(SQLiteDatabase db) which are called when the database is created and database version is changed respectively. We call all our CREATE_TABLE static Strings in onCreate which in turn creates all the tables. Something like this :

@Override
public void onCreate(SQLiteDatabase db) {
    db.execSQL(DbContract.Speakers.CREATE_TABLE);
    db.execSQL(DbContract.Sponsors.CREATE_TABLE);
    db.execSQL(DbContract.Sessions.CREATE_TABLE);
    db.execSQL(DbContract.Tracks.CREATE_TABLE);
    db.execSQL(DbContract.Sessionsspeakers.CREATE_TABLE);
    db.execSQL(DbContract.Event.CREATE_TABLE);
    db.execSQL(DbContract.Microlocation.CREATE_TABLE);
    db.execSQL(DbContract.Versions.CREATE_TABLE);
    db.execSQL(DbContract.Bookmarks.CREATE_TABLE);
    db.execSQL(DbContract.EventDates.CREATE_TABLE);
}

You can also call DELETE_TABLE Strings in onUpgrade and the call onCreate again if you like but it’s not compulsory.

Now that you’re database is initialised, let’s add some records into it. For example I have to add a new Micrlocation I’d create a method in my data model where I’ll add a basic structure for the query and then format it with the values for a particular object of the model. Something, like this

public String generateSql() {
    String insertQuery = "INSERT INTO %s VALUES ('%d', %s, '%f', '%f', '%d');";
    return String.format(Locale.ENGLISH,
            insertQuery,
            DbContract.Microlocation.TABLE_NAME,
            id,
            DatabaseUtils.sqlEscapeString(StringUtils.optionalString(name)),
            latitude,
            longitude,
            floor);
}

and then I’d execute the string returned by the call

String query = model.generateSql();

by this

public void insertQuery(String query, DbHelper mDbHelper) {
    SQLiteDatabase db = mDbHelper.getWritableDatabase();
    db.beginTransaction();
    db.execSQL(query);
  
    db.setTransactionSuccessful();
    db.endTransaction();
}

Where db is just a SQLiteDatabase instance.

Now that we have records we want to retrieve them according to usage and for that we create helper methods. This is an example of the retrieving all the microlocations added to the database in ASCENDING order of NAME

public ArrayList<org.fossasia.openevent.data.Microlocation> getMicrolocationsList(SQLiteDatabase mDb) {
    String sortOrder = DbContract.Microlocation.NAME + ASCENDING;
    Cursor cursor = mDb.query(
            DbContract.Microlocation.TABLE_NAME,
            DbContract.Microlocation.FULL_PROJECTION,
            null,
            null,
            null,
            null,
            sortOrder
    );

    ArrayList<org.fossasia.openevent.data.Microlocation> microlocations = new ArrayList<>();
    org.fossasia.openevent.data.Microlocation microlocation;

    cursor.moveToFirst();
    while (!cursor.isAfterLast()) {
        microlocation = new org.fossasia.openevent.data.Microlocation(
                cursor.getInt(cursor.getColumnIndex(DbContract.Microlocation.ID)),
                cursor.getString(cursor.getColumnIndex(DbContract.Microlocation.NAME)),
                cursor.getFloat(cursor.getColumnIndex(DbContract.Microlocation.LATITUDE)),
                cursor.getFloat(cursor.getColumnIndex(DbContract.Microlocation.LONGITUDE)),
                cursor.getInt(cursor.getColumnIndex(DbContract.Microlocation.FLOOR))
        );
        microlocations.add(microlocation);
        cursor.moveToNext();
    }
    cursor.close();
    return microlocations;
}

First we create a cursor and then just iterate of the cursor to get microlocation objects and add them to an Arralist and return the Arraylist to the calling method.

So This are most of the things that are there to handling data in Android. Should be sufficient to get you started.

Sorry for the long post but the content couldn’t be made any smaller but I hope you gain something from this post. You can checkout implementations I have followed for the Open event project in the github repo https://github.com/fossasia/open-event-android. You can also write to me anytime on FB, Twitter, Email etc. and I’ll be happy to answer any queries. Adios!

References : 1) developers.android.com

2) https://github.com/fossasia/open-event-android

Continue ReadingHandling data in android

Responsive Image Overlay

Image overlay is a very common concept in front-end development. It is easy to implement but difficult when we deal it with different screen sizes, where we need to cover the image with the overlay each time the screen size is changed. I have gone through various blog posts when I need to implement the same for Open-event webapp and researched a solution that works for all screen sizes without any media query.

1234

How to add an overlay to an image ?

If we need four images in a single row nearly 300*300px.  The code below shows the markup.

image-holder : The parent class to take the image and overlay inside it.

background-image: This class takes image source.

responsive-overlay: This is the key point to make it responsive. Responsive-overlay contains a class hover-state to add overlay absolutely and a class social-links.

social-links: It adds content to hover-state.


<div class="image-holder">
  <img class="background-image" alt="" src="">
   <div class="responsive-overlay">
     <div class="hover-state text-center preserve3d">
       <div class="social-links vertical-align">

       </div>
     </div>
   </div>
 </div>

The styling is written with SASS in .scss file as shown below.

//overlayimage and backgroundshade can be set in config.scss

 .image-holder {
   position: relative;
   overflow: hidden;
   margin-bottom: 12px;

   .background-image {
     height: 300px;
     width: 300px;
     display: block;
     margin: 0 auto;
     background-color: $background-shade;
    }
 
   .responsive-overlay {
     @include responsiveoverlay;

    .preserve3d {
       height: 300px;
      }

    .hover-state {
     @include hoverstate;
     height: 300px;
     width: 300px;
    }

  @mixin responsiveoverlay {
     height: 100%;
     position: absolute;
     top: 0;
     width: 100%;
}

   @mixin hoverstate {
     background: $overlayimage;
     display: block;
     height: 300px;
     left: 0;
     margin: 0 auto;
     opacity: 0;
     position: relative;
     top: 0;
     -moz-transition: all 0.3s ease-out;
     -webkit-transition: all 0.3s ease-out;
     transition: all 0.3s ease-out;
     width: 300px;
     z-index: 2;
   }

This code will work for responsiveness as well. The main catch here is the responsive-overlay class which is made 100% in width but set to position absolute. The images which are 300 * 300 px in size will take an overlay of the same size because of hover-state class. Instead, if we adjust sizes of images in small screens the above code will adjust overlay on the image automatically.

Like, on tablets we can have an overlay like this.

345

And on mobile screen output is like that :

23

Conclusion

Responsiveness is easy if we follow correct concepts. Here, the concepts of absolute and relative positioning in CSS have done the magic. Now we can play by adding different contents and effect on hover following the same basics.

Continue ReadingResponsive Image Overlay

Multiple Tickets: Back-end

In my previous post I talked about approach for Multiple Ticket feature’s user-interface [Link]. In this post I’ll discuss about Flask back-end used for saving multiple tickets.

HTML Fields Naming

Since the number of Tickets a user creates is unknown to the server, details of tickets were needed to be sent as an array of values. So the server would accept the list of values and iterate over them. To send data as an array the naming had to include brackets. Below are some input fields used in tickets:

<tr>
    <td>
        <input type="hidden" name="tickets[type]">
        <input type="text" name="tickets[name]" class="form-control" placeholder="Ticket Name" required="required" data-uniqueticket="true">
        <div class="help-block with-errors"></div>
    </td>
    <td>
        <input type="number" min="0" name="tickets[price]" class="form-control"  placeholder="$" value="">
    </td>
    <td>
        <input type="number" min="0" name="tickets[quantity]" class="form-control" placeholder="100" value="{{ quantity }}">
    </td>
    <!-- Other fields -->
</tr>

At the server

When the POST request reaches the server, any of the above fields (say tickets[name]) would be available as a list. The Flask Request object includes a form dictionary that contains all the POST parameters sent with the request. This dictionary is an ImmutableMultiDict object, which has a getlist method to get array of elements.

For instance in our case, we can get tickets[name] using:

@expose('/create', methods=('POST', 'GET'))
def create_view(self):
    if request.method == 'POST':
        ticket_names = request.form.getlist('tickets[name]')

    # other stuff

The ticket_names variable would contain the list of all the Ticket names sent with the request. So for example if the user created three tickets at the client-side, the form would possibly look like:

<form method="post">
  <!-- Ticket One -->
  <input type="text" name="tickets[name]" class="form-control" value="Ticket Name One">
  <!-- Ticket Two -->
  <input type="text" name="tickets[name]" class="form-control" value="Ticket Name Two">
  <!-- Ticket Three -->
  <input type="text" name="tickets[name]" class="form-control" value="Ticket Name Three">

</form>

After a successful POST request to the server, ticket_names should contain ['Ticket Name One', 'Ticket Name Two', 'Ticket Name Three'].

Other fields, like tickets[type], tickets[price], etc. can all be extracted from the Request object.

Checkbox Fields

A problem arose when a checkbox field was needed for every ticket. In my case, a “Hide Ticket” option was needed to let the user decide if he wants the ticket to be shown at the public Events page.

Screenshot from 2016-08-13 12:39:29

The problem with checkboxes is that, for a checkbox of a particular name attribute, if it is not selected, POST parameters of the request made by the client will not contain the checkbox input field parameter. So if I define an input field as a checkbox with the following naming convention, and make a POST request to the server, the server will receive blah[] parameter only if the input element had been checked.

<input type="checkbox" name="blah[]" >

This creates a problem for “Hide ticket” checkboxes. For instance, at the client-side the user creates three tickets with the first and last tickets having their checkboxes selected, the server would get an array of two.

<form>
  <!-- Ticket One -->
  <input type="checkbox" name="tickets[hide]" checked>
  <!-- Ticket Two -->
  <input type="checkbox" name="tickets[hide]">
  <!-- Ticket Three -->
  <input type="checkbox" name="tickets[hide]" checked>

</form>
ticket_hide_opts = request.form.getlist('tickets[hide]')

ticket_hide_opts would be an array of length two. And there is no way to tell what ticket had its “Hide ticket” option checked. So for the hide checkbox field I had to define input elements with unique names to extract them at the server.

There is also a hack to overcome the unchecked-checkbox problem. It is by using a hidden field with the same name as the checkbox. You can read about it here: http://www.alexandrejoseph.com/blog/2015-03-03-flask-unchecked-checkbox-value.html.

Continue ReadingMultiple Tickets: Back-end

AYABInterface – a Python Module for the AYAB shield

In the Google Summer of Code effort on knitting machines with AYAB, we created the AYABInterface module. This module allows us to control machines like the Brother KH-910. Click here to see it in action.

The development process for small changes worked like this:

  1. Talk about uncertainty in the issue.
  2. Write the specification.
  3. Write the tests.
  4. Write the code.

Of cause these steps were mixed but the objective is clear to first specify and then let the implementation follow.

From my perspective this made sure that other people can implement this protocol, too. After all, it should be specific enough now, to write source code for it.

The underlying Communication relies on a byte stream to communicate. This abstracts from the serial protocol and enables us to plug in e.g. sockets if someone wants to communicate via WIFI or LAN.

The communication walks through several states. They are documented in the states module. Here you can see an overview over the different states:

CommunicationStateDiagram

If you click it, you are redirected to an interactive documentation web page where you can click the different states and messages to view their implementation.

Summary

After all, communication is important, not only between the shield and the computer but also for the developers. Since the Shield is around for a while, this protocol is now documented in a way that allows us to use it also for other applications. A specification driven implementation allows us both:

  • a complete specification where we know what is possible to implement
  • an implementation that follows the specification and as such is exchangeable and a reference for other library developers.


Continue ReadingAYABInterface – a Python Module for the AYAB shield

Configuring Document Root Apache2 Ubuntu

In this post I will explain how to setup document root for apache server.

Initially the document root is set to /var/www/html by default. We need to change it when we have web applications in /var/www/html/folder.

I will show an example how to configure document root for our project engelsystem. Engelsystem is downloaded to /var/www/html/ . We must make sure to point our apache2 document root to the Engelsystem directory to prevent any user from accessing anything other than the public/ directory for security reasons.

Changing apache2 document root

The default document root is set in the 000-default.conf file that is under /etc/apache2/sites-available folder.

$ cd /etc/apache2/sites-available
$ sudo nano 000-default.conf

While the file is opened change DocumentRoot /var/www/ with your new folder e.g DocumentRoot /var/www/html/engelsystem/public where your index.php file resides

Set the right Apache configuration

The configuration of the /var/www folder is under /etc/apache2/apache2.conf. Edit this file to add the configuration of your new document root.

$ sudo nano/etc/apache2/apache2.conf

Copy the following:

<Directory /var/www/>
Options Indexes FollowSymLinks
AllowOverride None
Require all granted
</Directory>

and change the directory path:

<Directory /var/www/html/engelsystem/public>
Options Indexes FollowSymLinks
AllowOverride None
Require all granted
</Directory>

Restart Apache

Now we can view the engelsystem at localhost/ or http://[i.p.address]/

$ sudoservice apache2 restart
Continue ReadingConfiguring Document Root Apache2 Ubuntu

Installing Engelsystem in Five Minutes

Here are the instructions to install engelsystem on your local server in just five minutes.

Prerequisites

1.1 PHP 5.4.x (cgi-fcgi)

1.2 MySQL-Server 5.5+ or MariaDB

1.3 Webserver ( Apache/Nginx/lighttpd)

Step 1: Download or Clone the repository

git clone --recursive https://github.com/fossasia/engelsystem.git

Download and unzip the engelsystem from here

Step 2: Create a Database and a User

Using the MySQL Client

You can create MySQL/MariaDB user and database quickly and easily by running mysql from the shell. The syntax is shown below and the dollar sign is the command prompt:

$ mysql -u adminusername -p
Enter password:
mysql> CREATE DATABASE databasename;
Query OK, 1 row affected (0.00 sec)

Step 3: Set up config.php

Renname config/config-sample.php to config/config.php, and add your database information.

// MySQL-Connection Settings
$DB_HOST = "localhost";
$DB_USER = "username_here";
$DB_PASSWORD = "password_here";
$DB_NAME = "database_name_here";

Step 4: Upload the files and configure Document Root

Now you will need to decide where on your domain you’d like your engelsystem to appear:

Upload the engelsystem files to the desired location on your web server. For Apache server we need to upload to /var/www/html/

Now we need to configure document root. Change the document root in /etc/apache2/sites-available/000-default.conf from /var/www to /var/www/html/engelsystem/public. Now we can view engelsystem at localhost or http://[i.p.address].

Following command will change the document root from /var/www/ to /var/www/html/engelsystem/public.

$ sudo sed -i -e ‘s/DocumentRoot \/var\/www\/html/DocumentRoot \/var\/www\/html\/engelsystem\/public/g’ /etc/apache2/sites-available/000-default.conf

Step 5: Run the Install Script

Point a web browser to start the installation script.

We will be redirected to install page where we need to fill in the information for installation. Once we fill the information and press install engelsystem. All the tables will be imported and we are redirected to login page.

In this way we can install engelsystem using installation script in just five minutes. For more information visit here

Development: https://github.com/fossasia/engelsystem

Issues/Bugs:https://github.com/fossasia/engelsystem/issues


Continue ReadingInstalling Engelsystem in Five Minutes

Nested views and templates in Angular

week13gsoc1

sTeam web interface is a perfect example of an Angular application that has multiple views to deal with. The router for sTeam is built using ui.router, which is a classic library for dealing with applications that might have a combination of both parent and child routes that are ought to be reused.

What is the difference between ui-view and ng-view ?
Generally we often get confused with the concept of view when it is used with a router and when it is used inside for injecting templates. The concept of view is simple, it acts like a small placeholder so that we can co-relate or place particular piece of DOM in a required location.
So to understand this better and clear the confusion we must first know how views and templates work. So the web interface for sTeam uses ui.router as a result the concept of ui-view differs from ng-view.
Both of these afore mentioned have different service provides while ui-view belongs to ui.router, ng-view belongs to the default angular’s ngRouter

How do we implement them ?
We must understand that we have three things involved while writing views using ui.router. Let us look at them carefully

  • router
  • template
  • view

Let us suppose the below is an example of the view that contains the configuration in the router


.state('workarea.list', {
  url: '^/room/:path',
  requireLogin: true,
  views: {
    'options': {
      templateUrl: '/views/options.html',
      controller: 'optionsCtrl'
    },
    'workspaceList': {
      templateUrl: '/views/workspaceList.html',
      controller: 'workspaceListCtrl'
    },
    'comments': {
      templateUrl: '/views/comments.html',
      controller: 'commentsCtrl'
    }
  }
})

Let us now have a look at the html


  div class="row"
    div class="col-lg-2"
    div
    div class="col-lg-10"
      legend class="text-left">Comments
      legend
      form class="form-horizontal"
        div class="form-group"
          div class="col-sm-10"
            input class="form-control" type="text" ng-model="commentContent" required id="searchMe"
            span
            span
          div
          div class="col-sm-2"
            button type="button" class="btn btn-primary" ng-click="addComment();">Submit
            button
          div
          div
            ul id="comments"
          
        ul
      div
    div
  form
div
div

Now since we have the html written, we can use the same in the same state that which we have declared in the router we are ready to use the view. Let us observe how should the route be used :


div ui-view="comments" div

So if we carefully observe the ui-view attribute we can see that the name of the view is being written, so accordingly we must declare the name in that place in order to use that view.

Thats it folks,
Happy Hacking !!

Continue ReadingNested views and templates in Angular

Writing your first Dockerfile

In this tutorial, I will show you how to write your first Dockerfile. I got to learn Docker because I had to implement a Docker deployment for our GSoC project Open Event Server.

First up, what is Docker ? Basically saying, Docker is an open platform for people to build, ship and run applications anytime and anywhere. Using Docker, your app will be able to run on any platform that supports Docker. And the best part is, it will run in the same way on different platforms i.e. no cross-platform issues. So you build your app for the platform you are most comfortable with and then deploy it anywhere. This is the fundamental advantage of Docker and why it was created.

So let’s start our dive into Docker.

Docker works using Dockerfile (example), a file which specifies how Docker is supposed to build your application. It contains the steps Docker is supposed to follow to package your app. Once that is done, you can send this packaged app to anyone and they can run it on their system with no problems.

Let’s start with the project structure. You will have to keep Dockerfile at the root of your project. A basic project will look as follows –

- app.py
- Dockerfile
- requirements.txt
- some_app_folder/
-   some_file
-   some_file

Dockerfile starts with a base image that decides on which image your app should be built upon. Basically “Images” are nothing but apps. So for example you want your run your application in Ubuntu 14.04 VM, you use ubuntu:14.04 as the base image.

FROM ubuntu:14.04
MAINTAINER Your Name <your@email.com>

These are usually the first two lines of a Dockerfile and they specify the base image and Dockerfile maintainer respectively. You can look into Docker Hub for more base images.

Now that we have started our Dockerfile, it’s time to do something. Now think, if you are trying to run your app on a new system of Ubuntu, what will be the first step you will do… You update the package lists.

RUN apt-get update

You may possibly want to update the packages too.

RUN apt-get update
RUN apt-get upgrade -y

Let’s explain what’s happening. RUN is a Docker command which instructs to run something on the shell. Here we are running apt-get update followed by apt-get upgrade -y on the shell. There is no need for sudo as Docker already runs commands with root user previledges.

The next thing you will want to do now is to put your application inside the container (your Ubuntu VM). COPY command is just for that.

RUN mkdir -p /myapp
WORKDIR /myapp
COPY . .

Right now we were at the root of the ubuntu instance i.e. in parallel with /var, /home, /root etc. You surely don’t want to copy your files there. So we create a ‘myapp’ directory and set it as WORKDIR (project’s directory). From now on, all commands will run inside it.

Now that copying the app has been done, you may want to install it’s requirements.

RUN apt-get install -y python python-setuptools python-pip
RUN pip install -r requirements.txt

You might be thinking why am I installing Python here. Isn’t it present by default !? Well let me tell you that base image ‘ubuntu’ is not the Ubuntu you are used with. It just contains the bare essentials, not stuff like python, gcc, ruby etc. So you will have to install it on your own.

Similarly if you are installing some Python package that requires gcc, it will not work. When you are struck in a issue like that, try googling the error message and most likely you will find an answer. :grinning:

The last thing remaining now is to run your app. With this, your Dockerfile is complete.

CMD python app.py

Building the app

To build the app run the following command.

docker build -t myapp .

Then to run the app, execute docker run myapp.

Where to go next

Refer to the official Dockerfile reference to learn more Dockerfile commands. Also you may find my post on using Travis to test Docker applications interesting if you want to automate testing of your Docker application.

I will write more blog posts on Docker as I learn more. I hope you found this one useful.


{{ Repost from my personal blog http://aviaryan.in/blog/gsoc/dockerfile-basic.html }}

Continue ReadingWriting your first Dockerfile