In the open-event-webapp generator we need to perform a lot of asynchronous tasks in the background like –
Downloading images and audio assets
Downloading the jsons from the endpoints
Generating the html from handelbar templates
and so on . .
Sometimes tasks depend on previous tasks, and in such cases we need to perform them serially. Also there are tasks like image downloads, that would be better if done parallelly.
To achieve both these purposes, there is an awesome node.js library called async that helps achieve this.
To perform asynchronous tasks serially (one task, then another task), we can use something like this –
Basically async takes an array of functions. Each function contains a callback that you need to call when the internal task is finished. The 2nd task starts, only after the done() callback of first task is executed.
An example of it’s usage can be seen in the open-event-webapp project here
Now, FOSSASIA has a new landing page for the different knitting projects, knitting.fossasia.org.
The objective of this page is to ease starting development on knitting projects. As such, it is listed on the labs site of FOSSASIA. The FOSSASIA labs give you the opportunity to get into development of open-source projects in the FOSSASIA community.
The site features a list of projects related to knitting – software and hardware projects. They all have Github issues attached and you can access them via a waffle link. There is a unified view on all issues for convenience.
In the section below, you can see how you can contribute. For translations, no coding is required but it is useful to know the Github pull-request workflow.
The next step is to start coding without understanding much of the inner workings of the project. This can be done by optimizing some metrics like code quality, health and coverage. This way, new developers setup the code base, get familiar with the code and have an easy first contribution.
To start implementing features, we have a list of issues attached. they are organized in waffle projects. They have tags like “easy” or “hard” to guide the choice. Easy issues can be worked on by developers who want to get into the code base and do not require much knowledge of the inner workings of the project.
In the bottom, there is also a community section that shows how to get in touch and a section for related work. This sections is extremely important as it allows us to expand the community to users, get inspiration. This can be seen as a repository for human interconnections. If a developer leaves the project, all commits remain. However, the connections to the people leave. In order to keep these connections, this section is created. It features a list of other sites, wiki pages and places t read and inform oneself.
Summary
Creating a community around project is new to me. I did this the first time in the Flappy-SVG project. With the knitting.fossasia.org site, I hope to see a community evolve around the knitting projects in FOSSASIA.
Express Checkout is a fast, easy way for buyers to pay with PayPal. Express Checkout eliminates one of the major causes of checkout abandonment by giving buyers all the transaction details at once, including order details, shipping options, insurance choices, and tax totals.
The basic steps for using express checkout to receive one-time payments are:
Getting the PayPal API credentials.
Making a request to the API with the transaction details to get a token
Using the token to send the users to the PayPal payment page
Capturing the payment and charging the user after the user completes the payment at PayPal.
We will be using PayPal’s Classic NVP (Name-value pair) API for implementing this.
Getting PayPal API Credentials
To begin with, we’ll need API Credentials.
We’ll be using the Signature API credentials which consists of
You’ll be getting two sets of credentials. Sandbox and Live. We’ll just stick to the Sandbox for now.
Now, we need sandbox test accounts for making and receiving payments. Head over to Creating Sandbox Test Accounts – PayPal Developer and create two sandbox test accounts. One would be the facilitator and one would be the buyer.
PayPal NVP Servers
All the API actions will take place by making a request to the PayPal server. PayPal has 4 different NVP servers for 4 different purposes.
https://api-3t.sandbox.paypal.com/nvp – Sandbox “testing” server for use with API signature credentials.
https://api-3t.paypal.com/nvp– PayPal “live” production server for use with API signature credentials.
https://api.sandbox.paypal.com/nvp – Sandbox “testing” server for use with API certificate credentials.
https://api.paypal.com/nvp – PayPal “live” production server for use with API certificate credentials.
We’ll be using the Sandbox “testing” server for use with API signature credentials.
Creating a transaction and obtaining the token
To create a transaction, we’ll need to make a request with all the transaction details. We can use Python requests library to easily make the requests. All requests are POST.
We’ll be calling the SetExpressCheckout method of the NVP API to obtain the token.
We’ll have to send the user to that URL. Once the user completes the transaction at PayPal, he/she will be returned to the RETURNURL where we’ll further process the transaction.
Obtaining approved payment details and capturing the payment
Once the user completes the transaction and gets redirected back to RETURNURL, we’ll have to obtain the confirmed payment details from PayPal. For that we can again use the token ID that we obtained before.
We’ll now be making a request to the GetExpressCheckoutDetails method of the API.
A URL-Encoded, Name-value pair response would be obtained. We can decode that into a dict by using Python’s urlparse modules.
This will provide us with information about the transaction such as transaction time, transaction amount, charges, transaction mode, etc.
But, we’re more interested in the PAYERID which we’ll need to capture/collect the payment. The money is not transferred to the facilitators account until it is captured/collected. So, be sure to collect it.
To collect it, we’ll be making another request to the DoExpressCheckoutPaymentmethod of the API using the token and the PAYERID.
import requests
import urlparse
data ={'USER': credentials['USER'],'PWD': credentials['PWD'],'SIGNATURE': credentials['SIGNATURE'],'SUBJECT': credentials['FACILITATOR_EMAIL'],'METHOD':'DoExpressCheckoutPayment','VERSION':93,'TOKEN': TOKEN,'PAYERID': payerID,'PAYMENTREQUEST_0_PAYMENTACTION':'SALE','PAYMENTREQUEST_0_AMT':100,'PAYMENTREQUEST_0_CURRENCYCODE':'USD',}
response = requests.post('https://api-3t.sandbox.paypal.com/nvp', data=data)
result =dict(urlparse.parse_qsl(response.text))
status = result['ACK']
All the details have to be the same as the ones provided while obtaining the token. Once we make the request, we’ll again get a URL-Encoded, Name-value pair response. We can decode that into a dict by using Python’s urlparsemodules.
From the response, ACK (Acknowledgement status) will provide us with the status of the payment.
Success — A successful operation.
SuccessWithWarning — A successful operation; however, there are messages returned in the response that you should examine.
Failure — The operation failed; the response also contains one or more error messages explaining the failure.
FailureWithWarning — The operation failed and there are messages returned in the response that you should examine.
And, we have completed the PayPal transaction flow for Express Checkout. These are just the basics and might miss a few stuff. I suggest you go through the following links too for a better understanding of everything:
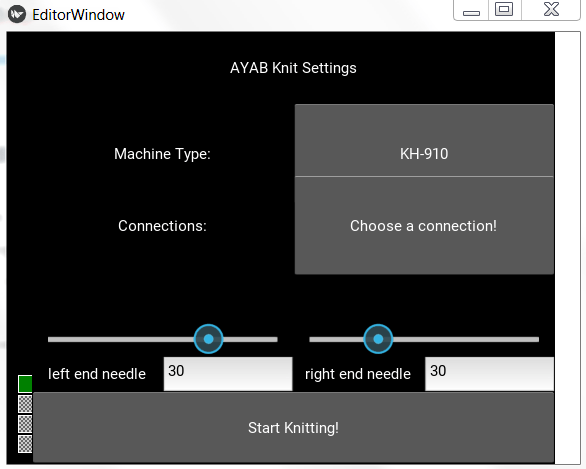
With AYAB we are working on an editor which also has the ability to control a knitting machine. Here is the progress we made: one can control the needles and get some instructions on what to do:
Views of the Editor
The editor has several view. To begin with, you can either load or save patterns as knitting patterns or images:
This is the incomplete editor view, where you are able to add and remove instructions and rows and build your knit work:
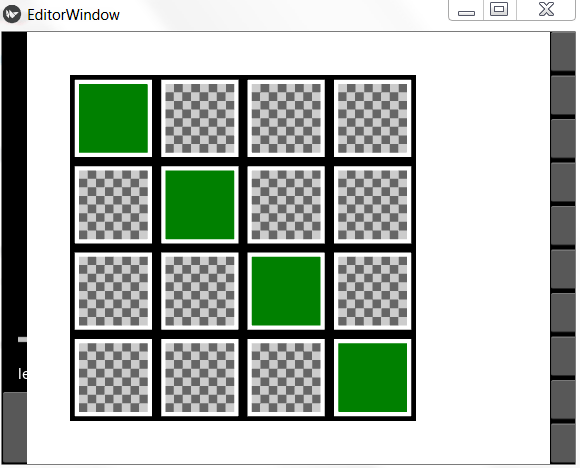
Once, your pattern is done, you go over to the knit settings. Currently, there is only one ability to knit, knitting with the AYAB hack. You can choose your machine type and the connection and start knitting.
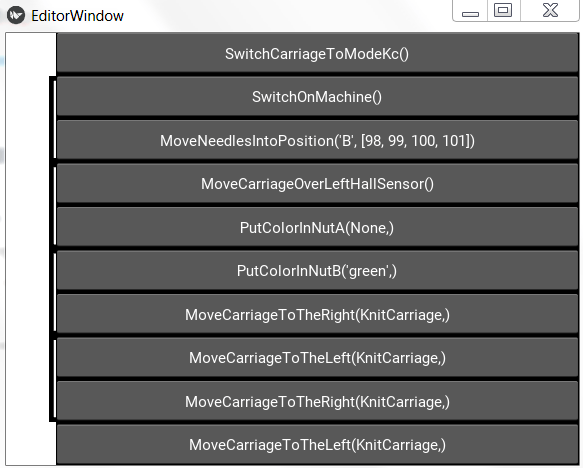
After you started knitting, you see the pattern which you want to knit.
Right next to the pattern, you can see the instructions for you. You can follow these to create the knit peace.
You can also open the settings menu by pressing F1. There you can choose your language:
At the current state, all this is rather sketchy. The basics work. For the best user experience, there is still a lot to do.
An Event can have multiple tickets for different purposes. For instance an Arts Exhibition can have multiple Galleries. The Organizer might be interested in assigning a ticket (let’s assume paid) for each Gallery. The user can then buy tickets for the Galleries that he wishes to attend. The feature that Multiple Tickets really provide is exclusiveness. Let’s say Gallery1 has a shorter area (by land) than others. Obviously the Organizer would want fewer people to be present there than other Galleries. To do this, he can create a separate ticket for Gallery1 and specify a shorter sales period. He can also reduce the Maximum number of order that a user can make (max_order). If we would have implemented single ticket per event, this wouldn’t have been possible.
Tickets at Wizard
To handle multiple tickets at the wizard, proper naming of input tags was required. Since the number of tickets that can be created by the user was unknown to the server we had to send ticket field values as lists. Also at the client-side a way was required to let users create multiple tickets.
User Interface
A ticket can be of three types: Free, Paid and Donation. Out of these, only the Paid tickets need a Price. The Tickets holder could be a simple table, with every ticket being a table row. This became more complex afterwards, when more details about the ticket needed to be displayed. A ticket would then be two table rows with one of them (details) hidden.
To make ticket creation interactive, three buttons were needed to create the above three tickets. The type-name doesn’t not necessarily have to be shown to the user. It could be specified with the Price. For Paid ticket, the Price input element would be a number. For Free and Donation tickets, a Price input element wasn’t required. We could specify an element displaying one of the two types: Free or Donation.
Here’s the holder table with a Free Ticket and a Donation Ticket:
Since only the Price field is changing in the three types of tickets, I decided to create a template ticket outside of the form and create a JavaScript function to create one of the tickets by cloning the template.
A Free Ticket with its edit options opened up. You can see other details about the ticket in the second table row.
This is a simplified version of the template. I’ve removed common bootstrap elements (grid system) including some other fields.
<div id="ticket-template">
<tr>
    <td>
        <input type="hidden" name="tickets[type]">
        <input type="text" name="tickets[name]" class="form-control" placeholder="Ticket Name" required="required" data-uniqueticket="true">
        <div class="help-block with-errors"></div>
    </td>
    <td>
        <!-- Ticket Price -->
    </td>
    <td>
        <input type="number" min="0" name="tickets[quantity]" class="form-control" placeholder="100" value="{{ quantity }}">
    </td>
    <td>
        <div class="btn-group">
            <a class="btn btn-info edit-ticket-button" data-toggle="tooltip" title="Settings">
                <i class="glyphicon glyphicon-cog"></i>
            </a>
            <a class="btn btn-info remove-ticket-button" data-toggle="tooltip" title="Remove">
                <i class="glyphicon glyphicon-trash"></i>
            </a>
        </div>
    </td>
</tr>
<tr>
    <td colspan="4">
        <div class="row" style="display: none;">
            <!-- Other fields including Description, Sales Start and End time,
              Min and Max Orders, etc.
            -->
        </div>
    </td>
</tr>
</div>
Like I said, the Price element of ticket will make the type obvious for the user, so a type field does not need to be displayed. But the type field is required by the server. You can see it specified as hidden in the template.
The function to create a Ticket according to the type:
I’ve commented snippets to make it easy to understand.
function createTicket(type) {
    /* Clone ticket from template */
    var $tmpl = $("#ticket-template").children().clone();

    var $ticket = $($tmpl[0]).attr("id", "ticket_" + String(ticketsCount));
    var $ticketMore = $($tmpl[1]).attr("id", "ticket-more_" + String(ticketsCount));

    /* Bind datepicker and timepicker to dates and times */
    $ticketMore.find("input.date").datepicker();
    $ticketMore.find("input.time").timepicker({
        'showDuration': true,
        'timeFormat': 'H:i',
        'scrollDefault': 'now'
    });

    /* Bind iCheck to checkboxes */
    $ticketMore.find("input.checkbox.flat").iCheck({
        checkboxClass: 'icheckbox_flat-green',
        radioClass: 'iradio_flat-green'
    });

    /* Bind events to Edit (settings) and Remove buttons */
    var $ticketEdit = $ticket.find(".edit-ticket-button");
    $ticketEdit.tooltip();
    $ticketEdit.on("click", function () {
        $ticketMore.toggle("slow");
        $ticketMore.children().children(".row").slideToggle("slow");
    });

    var $ticketRemove = $ticket.find(".remove-ticket-button");
    $ticketRemove.tooltip();
    $ticketRemove.on("click", function () {
        var confirmRemove = confirm("Are you sure you want to remove the Ticket?");
        if (confirmRemove) {
            $ticket.remove();
            $ticketMore.remove();
        }
    });

    /* Set Ticket Type field */
    $ticket.children("td:nth-child(1)").children().first().val(type);

    /* Set Ticket Price field */
    var html = null;
    if (type === "free") {
        html = '';
    } else if (type === "paid") {
        html = '';
    } else if (type === "donation") {
        html = '';
    }
    $ticket.children("td:nth-child(2)").html(html);

    /* Append ticket to table */
    $ticket.hide();
    $ticketMore.children().children(".row").hide();
    $ticketsTable.append($ticket, $ticketMore);
    $ticket.show("slow");

    ticketsCount += 1;
  }
The flow is simple. Clone the template, bind events to various elements, specify type and price fields and then append to the ticket holder table.
We use the Datepicker and Timepicker JavaScript libraries for date and time elements. So fields using these widgets need to have methods called on the elements. Also, we use iCheck for checkboxes and radio buttons. Apart from these, the Edit-Ticket and Remove-Ticket buttons also need event handlers. Edit-Ticket button toggles the Ticket Details segment (second tr of a ticket). Remove-Ticket deletes the ticket. After the Price and Type fields are set, the ticket is appended to the holder table with slow animation.
sTeam includes a number of tools namely steam-shell, debug, edit, import and export from git. These tools are only accessible from the tools folder in the sTeam installation. My task is to make a steam command for linux so that all these tools can be accessible from anywhere just like any other linux application.
The command structure decided is that we have a global sTeam command and sub commands for each of the tools. This structure can be though of as similar to the structure of the git command. The central git command has many sub commands like branch, checkout, reset, merge, etc. I started with making a pike executable and then changing the installation files to copy this executable to /usr/bin. Now this pike executable becomes accessible from anywhere in the system and acts like a linux command.
I wrote the main function to accept the command line arguments and passed them to a function named resolveParam. In this function I am using an if-else structure to segregate the different sub commands. For shell and debug I started a child process to execute the file for these tools present in /usr/local/lib/steam/tools. The following code snippet gives an example.
void resolveParam(int argc,array(string) argv)

{

if(argv[1]=="shell")

{

array command =({"/usr/local/lib/steam/tools/steam-shell.pike"});

object shell = Process.create_process(command, (["stdin":Stdio.stdin,"stdout":Stdio.stdout,"stderr":Stdio.stderr]));

shell->wait();

}

}
I had some problem when I had to accept more arguments than just the sub command. Foe example the edit command works as ./edit <filename1> <filename2> <filename3>… Using the global command it becomes steam edit <filename1> <filename2> <filename3>… I had to pass all the rest of the arguments to the edit scripts. I had to add them in the command array. The first solution would be to loop through the arguments array and add them all, however pike has a very easy and elegant way of doing it in one sentence.
array command = ({"/usr/local/lib/steam/tools/edit.pike"})+argv[2..];
This gets our global command up and running. Rest of the time I spend on resolving merge conflicts while merging all my previous Pull Requests.
We are using kivy for the GUI of the knit editor. It can be used to create Android, Windows, Linux, Mac and IOS apps. You can divide UI-design and code by using the kv language. In this blog post, I want to share some revelations I had when using kivy. This includes showing you how you can update translations automatically when the configuration changes and subtracting values. This awaits you:
Automatic Update of Translated Text in the Kivy UI
In projects like Django, there is the “_” function that allows translations of text. The implementation usually look calls a “gettext” function of some sort, which takes a string and returns its translation as a string. What we have in the kniteditor, is an observable translation, with the same interface:
def _(string):
    """Translate a string using the current language.
    :param str string: the string to translate
    :return: the translated string
    :rtype: str
    """
    return _locales.gettext(string)
_ = ObservableTranslation(_)
The difference is that the observable translation can be used like the “_” function but has additional methods that allow the UI to register and be notified when the language changes. When the language is changed, the global “gettext” is replaced by the “gettext” in the new language and, inthe last line, the observers are notified about the change.
def change_language_to(new_language):
    """Change the language to a language from the translations folder.

    :param str new_language: the language code of the new language
    """
    global _locales, _current_language
    _locales = gettext.translation(DOMAIN, _locale_dir,
                                   languages=[new_language])
    _current_language = new_language
    _.language_changed()
To see what this does, we can look at the whole implementation. I would like to give the whole picture, first, as it clarifies the context and discuss them below.
"""Observable Translations for kivy that change when the language changes.
The functionality of this module is highly inspired by
`kivy-gettext-example <https://github.com/tito/kivy-gettext-example>`.
"""
from kivy.lang import Observable


class ObservableTranslation(Observable):

    """This class allows kivy translations to be updated with the language."""

    def __init__(self, translate):
        """Create a new translation object with a translation function.
        :param translate: a callable that translates the text.
          Even when the language is changed,
          it returns the text for the current language.
        """
        super().__init__()
        self._translate = translate
        self._observers = []

    def __call__(self, text):
        """Call this object to translate text.
        :param str text: the text to translate
        :return: the text translated to the current language
        """
        return self._translate(text)

    def fbind(self, name, func, args, **kwargs):
        """Add an observer. This is used by kivy."""
        self._observers.append((name, func, args, kwargs))

    def funbind(self, name, func, args, **kwargs):
        """Remove an observer. This is used by kivy."""
        key = (name, func, args, kwargs)
        if key in self._observers:
            self._observers.remove(key)

    def language_changed(self):
        """Update all the kv rules attached to this text."""
        for name, func, args, kwargs in self._observers:
            func(args, None, None)

__all__ = ["ObservableTranslation"]
The constructor takes the “_” function. When the object is called like a function, the “__call__” method is invoked, translating like “_”. If we only have these two methods, the observable translation works just like the “_” function.
“fbind” and “funbind” are the methods that are called when a translation is used in the kv language. They add and remove the observes from the list of observes.
“language_changed” walks through the observers and tells everyone of then to update. With this, you already have a updated translations when “change_language_to” is called.
Here is how you create a button in the kv language that uses the translation function:
Ultimately, you want the translations to be changed, when the built-in kivy configuration changed. In the video, seconds, you have seen what it can look like.
LANGUAGE_SECTION = "language"
LANGUAGE_CODE = "current"
LANGUAGES = ["English", "Deutsch"]

class EditorWindow(App):

    """The editor window."""

    def build_config(self, config):
        """Build the configuration.

        :param kivy.config.ConfigParser config: the configuration parser
        .. seealso:: `Application Configuration
         <https://kivy.org/docs/api-kivy.app.html#application-configuration>`__
        """
        config.setdefaults(LANGUAGE_SECTION, {
            LANGUAGE_CODE: LANGUAGES[0]
        })

    def build(self):
        """Build the application."""
        self.update_language_from_config()

    def update_language_from_config(self):
        """Set the current language from the configuration.
        """
        config_language = self.config.get(LANGUAGE_SECTION, LANGUAGE_CODE)
        change_language_to(config_language)

    def build_settings(self, settings):
        """Create the applications settings dialog.

        :param  kivy.uix.settings.Settings settings: the settings
          for this app
        .. seealso:: `Create a settings panel
          <https://kivy.org/docs/api-kivy.app.html#create-a-settings-panel>`__,
          :meth:`kivy.uix.settings.Settings.add_json_panel`,
          :mod:`kivy.uix.settings`
        """
        settings.add_json_panel(_('KnitEditor'), self.config,
                                data=self.settings_specification)

    @property
    def settings_specification(self):
        """The settings specification as JSON string.

        :rtype: str
        :return: a JSON string
        """
        settings = [
            {"type": "title",
             "title": _("KnitEditor")},

            {"type": "options",
             "title": _("Language"),
             "desc": _("Choose your language"),
             "section": LANGUAGE_SECTION,
             "key": LANGUAGE_CODE,
             "options": LANGUAGES},
        ]
        return json.dumps(settings)

    def on_config_change(self, config, section, key, value):
        """The configuration was changed.

        :param kivy.config.ConfigParser config: the configuration that was
          changed
        :param str section: the section that was changed
        :param str key: the key in the section that was changed
        :param value: the value this key was changed to
        """
        if section == LANGUAGE_SECTION and key == LANGUAGE_CODE:
            change_language_to(new_language)
“build_config” is calls when the application starts to fill the empty configuration with useful values.
“build” is called when the application creates its window, at this point in time, the translation is updated.
“build_settings” is called when the F1 key is pressed or the Android settings menu is activated. “settings_sepcification” is a JSON string used by kivy to build the settings.
“on_config_change” is called, when the configuration is updated. Through e.g. the settings dialog.
With these components together, you can have a updated language every time the language is changed. The video shows an application which uses this code.
Bonus Material: Kivy’s Update is Mighty
In the kv language, variables are accessed via identifiers and not via global variables. As such, the kv language can register every time a Property (like “StringProperty” and “ObjectProperty”) is used. It an register when they change. Thus you can automatically update formulas whenever a value changes.
in this example you can see how a value is subtracted but still, an automatic update is possible:
PSLab, with its simple and open architecture allows programmers, hobbyists to use the tool for various measurements and to develop new experiments with simple python code.
One of the main target group, the PSLab is aimed at, is high-school science teachers and students, who may or may-not be familiar with the computer programming. For such users it is difficult to design or develop new experiments on their own. They may also find it difficult to fetch the data and plot required graphs, if a ready-made GUI is not available for that particular experiment.
To enable such users to quickly design a simple experiment for studying various phenomena, we have developed a simple Experiment Designer GUI. This incorporates few controls, read-back elements and easy functions to select parameters and plot graphs.
The screen shot of the ‘Design Your Own Experiment’ GUI along with the App-window is here..
Experiment Designer allows the user to define the control and read-back sequences of parameters and execute them.
Features of “Design Your Own Experiment” GUI
Configure Experiment : Here user can select the required channels ( manual / sweep / read-back). One can also add a derived channel for measuring some physical quantity, for example ‘current’.
Make Measurements : Selected channels are displayed. User can make measurements individually for each step or can sweep in auto mode.
Plot and View Plots: Enables user to plot selected parameters. Acquired plots can be selectively displayed or deleted.
Save Plots: Data acquired can be save in a spreadsheet.
Save Profile : Experiment profile can be saved for repeating the experiment in future. Saved profiles can be loaded from “Load Profile” tab.
Example : Diode IV Characteristics Experiment
For this experiment one needs the following…
A variable voltage source : Needs to be swept from Voltage A to B (say from 0V to 5V)
Current Monitoring : Needs to be read for every value of Voltage
Plotting and analytics : Tools to plot the parameters and save data
Schematic Circuit diagram:
CH3 monitors the voltage drop across the diode. PV1 is varied in steps, and for each step the current is calculated from the difference between voltages at PV1 and CH3, and the known value of the resistor. For example for 1K resistor, current through the diode is given by
I = (PV1-CH3)/1K
Procedure :
Step 1. Connect Fossasia PSLab to the pc. Connect the components – Diode from CH3 to Ground and 1k resistor from PV1 to CH3
Step 2. From the terminal Run
Experiments
The App-window will pop-up. Click on ‘Design your own Experiment’ button to get the experiment designer GUI.
Step 3: Select channels
Sweep Channel PV1 – Sweep from 0.00V -5.00V in 200 steps
Read-back Channel CH3 – for monitoring voltage across the diode
Derived Channel – To measure Current. Type the equation to calculate the current, (PV1()-CH3())/1000
Step 4. Click on ‘Prepare Experiment‘ to get measurements screen. Click on ‘Evaluate All Rows‘ to make the measurements.
Step 5. Select the required columns and click on ‘Plot Selected Columns‘, a message window will pop-up, here user can select the Axes for plotting the graph. On clicking ‘Plot‘, view plots screen will be displayed.
One can repeat the experiment and plot multiple curves and save them in a spreadsheet. Acquired plots can be selectively displayed or deleted.
Step 6. The entire design ( Experiment Profile) of the experiment can be saved for repeating the experiment in future. Saved profiles can be loaded from “Load Profile” tab.
This is a very important value add to PSLab Apps. It has enabled PSLab to reach out and help users, who do not have any background in programming. Now ‘designing your own experiments’ has become super easy 🙂 🙂 🙂
If you wonder how to get or update page resource, you have to read this article.
It’s trivial if you have basic knowledge about HTTP protocol. I’d like to get you little involved to this subject.
So GET and POST are most useful methods in HTTP protocol.
What is HTTP?
Hypertext transfer protocol – allow us to communicate between client and server side. In Open Event project we use web browser as client and for now we use Heroku for server side.
Difference between GET and POST methods
GET – it allows to get data from specified resources
POST – it allows to submit new data to specified resources for example by html form.
You can often find this action in a contact page or in a login page.
How does request look in python?
We use Requests library to communication between client and server side. It’s very readable for developers. You can find great documentation and a lot of code samples on their website. It’s very important to see how it works.
I know that samples are very important, but take a look how Requests library fulfils our requirements in 100%. We have decided to use it because we would like to communicate between android app generator and orga server application. We have needed to send request with params(email, app_name, and api of event url) by post method to android generator resource. It executes the process of sending an email – a package of android application to a provided email address.
data = {
    "email": login.current_user.email,
    "app_name": self.app_name,
    "endpoint": request.url_root + "api/v2/events/" + str(self.event.id)
}
r = requests.post(self.app_link, json=data)
(ˢᵒᶜⁱᵉᵗʸserver) aims to be a platform for developing collaborative applications.
sTeam server project repository: sTeam.
sTeam-REST API repository: sTeam-REST
Peer Review
Peer review is done to ensure that the work performed by one’s peers meets specific criteria. Peer review is used while working in groups because of the belief that one’s peers are able to identify each others errors easily and thus speeding up the time it takes to identify the bugs and get them rectified. The goal of peer review is to ensure that the work satisfies the specifications and identify the aberrations from the standards, help in enhancing, modifying and providing suggestions for improvements. The Review process doesn’t involve management participation.
A lot of work was done in the sTeam server repository during the course of GSoC 2016. There is no support for continuous code integration and testing tools like Code Coverage, Travis CI, Circle CI or Landscape IO as the pike language is not supported by these tools. The project heavily relies on the peer reviews and feedbacks from the members of the community.
The work done by Siddhant on the testing framework and the steam subshell commands was reviewed and tested for bugs. The work which was tested can be found below:
sTeam Server testing framework:
https://github.com/societyserver/sTeam/pull/125
sTeam Server sub shell commands:
https://github.com/societyserver/sTeam/pull/135
sTeam Server structure
The steam project files are segregated into various directories depending upon the tasks performed by them. For an individual to be productively working on the project, the understanding of the directory structure is utmost. The structure needs to be documented. The documentation for the sTeam server was done to facilitate easy understanding of the project structure.
Issue’s reported were addressed in individual branches in the fork repositories of the collaborators. The changes made were sent in PR’s to the societyserver-devel and societyserver-source repo. These needed to be merged in the source repository. For resolving the conflicts during merging these, the PR’s were merged into gsoc2016 branch in the societyserver repo.
The merge conflicts between the two PR’s must be resolved and then merged into the main societyserver branches.
Also the issue for setting the permissions for sTeam objects would be addressed in the coming days.
Feel free to explore the repository. Suggestions for improvements are welcomed.
Checkout the FOSSASIA Idea’s page for more information on projects supported by FOSSASIA.


 A lot of work was done in the sTeam server repository during the course of GSoC 2016. There is no support for continuous code integration and testing tools like Code Coverage, Travis CI, Circle CI or Landscape IO as the pike language is not supported by these tools. The project heavily relies on the peer reviews and feedbacks from the members of the community.
You must be logged in to post a comment.