CommonNet – how to set up tests

Setting up tests’ environment wasn’t easy

Have you ever tried to set up your tests’ environment using Protractor on Vagrant?

I must admit that it was a very difficult task for me. I have recently spent almost three days trying to prepare my tests’ environment for CommonsNet project, and read many different resources. Fortunately, I have finally done it, so now I want to share with you my experience and give you some tips how to do it.

Protractor

Firstly, I will explain you why I have decided to use Protractor. It is mainly because Proractor is especially designed for end-to-end testing  AngularJS application. Protractor runs tests against your application running in a real browser, interacting with it as a user would.

Writing tests using Protractor is quite easy because you can find working examples in AngularJS docs. Each sample of AngularJS code is enriched by Protractor’s test. It’s amazing.

Selenium

Selenium is a browser automation library. It is most often used for testing web-applications, and may be used for any task that requires automating interaction with the browser. You can download it from here. You have to choose Selenium for a language you use. I have used Selenium for NodeJS.

Vagrant

You don’t have to necessary use Vagrant to run your tests, but I have implemented it, because I run my local environment on Vagrant and it’s more comfortable for me to use it.

Setting up testing environment

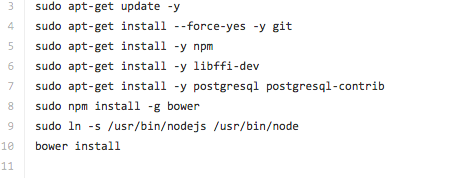
Now I will share with you how to run tests. So first all of, I have created a file called install.sh and put all necessary commends there. I have put there several commands. Please take a look at this file.  It helps you to install all of these necessary dependencies using only one command instead of several ones. 

install

Next, I have prepared provision folder, where I put files to install selenium standalone and chromium driver. You can copy these file from here

Then I have created a simple test case. It’s quite easy at the beginning. You just need two files first – conf. js and next- todo_spec.js  Below, I will provide you with my conf.js As you can see it’s not complicated and really short. It’s a basic configuration file and of course you can adjust it to your needs. You can find many examples of conf.js file in Internet.

conf

And finally a simple test, which I have placed in todo_spec.js file. It’s a ProtracotrJS example available on their website

todo-spec.png

Now, let me to write a step by step todo list now.

  • Install Vagrant in your folder
vagrant up
  • Connect to Vagrant
vagrant ssh
  • Open your Vagrant folder
cd /vagrant 
  • Then run selenium file
sh selenium_install.sh 
  • Next open provision folder
cd provision
  • Install java-jar
DISPLAY=:1 xvfb-run java -jar selenium-server-standalone-2.41.0.jar 

Your selenium server should be up and running

  • Then open a new terminal – remember not to close the first one!
  • Open your CommonsNet repository again
cd CommonsNet
  • Connect to Vagrant again
vagrant ssh
  • Open Vagrant folder again
cd /vagrant
  • Then open tests folder
cd tests
  • And finally run Protractor test
protractor conf.js 

That’s it. You should see a result of your test in a terminal.


Continue ReadingCommonNet – how to set up tests

Creating New Groups in Engelsystem

User roles determine the access level or permissions of a person authorized (by an Administrator) to use the Engelsystem. If a user (other than admin) have access to only a specific set of pages and features that are assigned to the Group to which the user belongs.

Summary

In Engelsystem, the Privileges to specific pages and features can be set through GroupRights. There are initially 7 groups present in the Engelsystem namely:

  1. Guest
  2. Engel
  3. Shift Coordinator
  4. Team Co-ordinator
  5. Burokrat
  6. Developer
  7. Shirt Manager

Each user role is capable of everything that a less powerful role is capable of. All of these 7 groups have different Privileges assigned to them. When a user registers on Engelsystem, it is initially assigned to Group-2 i.e Engel by default, then admin can add a user to different groups according to the requirements.

Problem

There was a problem with this feature.

Bug: https://github.com/fossasia/engelsystem/issues/22

If the user was added to the group with some Admin Privileges, he/she was able to sign up for restricted shifts as well.

Solution

Added a new page to Engelsystem for creating new Groups with specific privileges which can be that can be provided by the Admin to that group.

01
Create Groups page


New groups can be created by Admin, with default Privileges set to privileges as provided to the Engel group.These Privileges can be set while creating a group or can be edited in the GroupRights shown as follow:

02
Edit Privileges in GroupRights

The group is successfully created and can be viewed in GroupRights page, where the Admin can edit the Privileges of this and the other groups.

03
New group in GroupRights

Providing Privileges to user other than Admin is important as it ease the workload of admin, plus there’ll be other users who’ll be handling different tasks in an Event which is important in managing an Event.

We are developing new feature for Engelsystem and we will be applying this WordPress like update system toEngelsystem in the upcoming weeks. Developers who are interested in contributing can work with us.

Development: https://github.com/fossasia/engelsystem             Issues/Bugs:https://github.com/fossasia/engelsystem/issues

Continue ReadingCreating New Groups in Engelsystem

Integrating Stripe in the Flask web framework

{ Repost from my personal blog @ https://blog.codezero.xyz/integrating-stripe-in-flask }

Stripe is a developer and a user-friendly payment infrastructure provider. Stripe provides easy to use SDKs in different programming languages allowing us to easily collect payments on our website or mobile application.

Flask is a web microframework for Python based on Werkzeug, Jinja 2. Flask makes building web applications in python a breeze.

Make sure you have your Flask app ready. Let’s start with installing the required dependency. The Stripe python SDK. You can get it by running.

pip install stripe

Don’t forget to add the same in your requirements.txt. (if you have one that is.)

Now, head over to Stripe: Register and create a new Stripe account to get your test keys. If you don’t wish to create an account at this time, you can use the following test keys, but you’ll not be able to see the payments in the stripe dashboard.

  • Publishable Key: pk_test_6pRNASCoBOKtIshFeQd4XMUh
  • Secret Key: sk_test_BQokikJOvBiI2HlWgH4olfQ2

We’ll need to set the secret key in the SDK.

import stripe

STRIPE_PUBLISHABLE_KEY = 'pk_test_6pRNASCoBOKtIshFeQd4XMUh'  
STRIPE_SECRET_KEY = 'sk_test_BQokikJOvBiI2HlWgH4olfQ2'

stripe.api_key = STRIPE_SECRET_KEY

Let’s create a page with a form for us to handle the Stripe payment.

<!DOCTYPE html>  
<html>  
<head>  
    <title>Pay now</title>
</head>  
<body>  
    <h4>Pay $250.00 by clicking on the button below.</h4>
    <form action="/payment" method="POST">
        <script src="https://checkout.stripe.com/checkout.js" 
                class="stripe-button"
                data-key="pk_test_6pRNASCoBOKtIshFeQd4XMUh"
                data-description="A payment for the Hello World project"
                data-name="HelloWorld.com"
                data-image="/images/logo/hw_project.png"
                data-amount="25000"></script>
    </form>
</body>  
</html>

We’re using Stripe’s Checkout library to get the payment details from the user and process. Also, keep in mind that the checkout library has to be loaded directly from https://checkout.stripe.com/checkout.js. Downloading it and serving locally will not work.

The script tag, accepts a lot of parameters. A few important ones are,

  • data-key – The Publishable Key.
  • data-amount – The amount to be charged to the user in the lowest denomination of the currency. (For example, 5 USD should be represented as 500 cents)
  • data-name – The name of your site or company that will be displayed to the user.
  • data-image – The path to an image file (maybe a logo) that you’d like to be displayed to the user.

More configuration options can be seen at Stripe: Detailed Checkout Guide.

This script would automatically create a Pay with Card button which would open the stripe Checkout lightbox when clicked by the user.

Once the payment process is completed the following parameters are submitted to the form’s action endpoint (the form inside which this script is located), along with any other elements that were in the form.

  • stripeToken – The ID of the token representing the payment details
  • stripeEmail – The email address the user entered during the Checkout process

Along with the Billing address details and Shipping address details if applicable and enabled

We’ll need to write a Flask method to handle the input that were submitted by Stripe to proceed with the transaction and charge the user.

Let’s add a new Flask route to respond when submitting the form.

@app.route('/payment', methods=['POST'])
def payment_proceed():  
    # Amount in cents
    amount = 25000

    customer = stripe.Customer.create(
        email=request.form['stripeEmail'],
        source=request.form['stripeToken']
    )

    charge = stripe.Charge.create(
        amount=amount,
        currency='usd',
        customer=customer.id,
        description='A payment for the Hello World project'
    )

    return render_template('payment_complete.html')

We’re now creating a new Stripe customer along with the stripeToken as the source parameter. The card details are stored by stripe as a token. And using this token ID, Stripe will be able to retrieve it to make the charge.

We’re creating a charge object with the amount in the lowest denomination of the currency, the currency name, the customer ID, and an optional description. This will charge the customer. On a successful transaction, a charge object would be returned. Else, an exception will be thrown.

For more information regarding the Charge object and the various other APIs available fro consumption in Stripe, checkout the Stripe API Guide.

Continue ReadingIntegrating Stripe in the Flask web framework

PSLab Communication Function Calls

Prerequisite reading:

Interfacing with the hardware of PSLab, fetching the data and plotting it is very simple and straight forward. Various sensors can be connected to PSLab and data can be fetched with a simple python code as shown in the following example…

>>> from PSL import sciencelab
>>> I = sciencelab.connect()     # Initializing: Returns None if device isn't found. The initialization process connects to tty device and loads calibration values.
# An example function that measures voltage present at the specified analog input
>>> print I.get_average_voltage('CH1')
# An example to capture and plot data
>>> I.set_gain('CH1', 3) # set input CH1 to +/-4V range 
>>> I.set_sine1(1000) # generate 1kHz sine wave on output W1 
>>> x,y = I.capture1('CH1', 1000, 10) # digitize CH1 1000 times, with 10 usec interval 
>>> plot(x,y) 
>>> show()
# An example function to get data from magnetometer sensor connected to PSLab
>>> from PSL.SENSORS import HMC5883L #A 3-axis magnetometer >>> M = HMC5883L.connect() >>> Gx,Gy,Gz = M.getRaw() 

The module sciencelab.py contains all the functions required for communicating with PSLab hardware. It also contains some utility functions. The class ScienceLab() contains methods that can be used to interact with the PSLab.

After initiating this class, all the features built into the device can be accessed  using various function calls.


Capture1 : for capturing one trace

capture1(ch, ns, tg)

Arguments

  • ch  : Channel to select as input. [‘CH1′..’CH3′,’SEN’]
  • ns  :  Number of samples to fetch. Maximum 10000
  • tg   :  Time gap between samples in microseconds
#Example >>> x,y = I.capture1('CH1', 1000, 10) # digitize CH1 1000 times, with 10 usec interval

Returns : Arrays X(timestamps),Y(Corresponding Voltage values)


Capture2 : for capturing two traces

capture2(ns, tg, TraceOneRemap='CH1')

Arguments

  • ns :  Number of samples to fetch. Maximum 5000
  • tg  :  Time gap between samples in microseconds
  • TraceOneRemap :   Choose the analogue input for channel 1 (Like MIC OR SEN). It is connected to CH1 by default. Channel 2 always reads CH2.
#Example 
>>> x,y1,y2 = I.capture2(1600,1.75,'CH1') # digitize CH1 and CH2, 1600 times, with 1.75 usec interval

Returns: Arrays X(timestamps),Y1(Voltage at CH1),Y2(Voltage at CH2)


Capture4 : for capturing four taces

capture4(ns, tg, TraceOneRemap='CH1')

Arguments

  • ns:   Number of samples to fetch. Maximum 2500
  • tg :   Time gap between samples in microseconds. Minimum 1.75uS
  • TraceOneRemap :   Choose the analogue input for channel 1 (Like MIC OR SEN). It is connected to CH1 by default. Channel 2 always reads CH2, channel 3 always reads CH3 and MIC is channel 4 (CH4)
#Example
>>> x,y1,y2,y3,y4 = I.capture4(800,1.75) # digitize CH1-CH4, 800 times, with 1.75 usec interval

Returns: Arrays X(timestamps),Y1(Voltage at CH1),Y2(Voltage at CH2),Y3(Voltage at CH3),Y4(Voltage at CH4)


Capture_multiple : for capturing multiple traces

capture_multiple(samples, tg, *args)

Arguments

  • samples:   Number of samples to fetch. Maximum 10000/(total specified channels)
  • tg :   Time gap between samples in microseconds.
  • *args :   channel names
# Example 
>>> from pylab import * 
>>> I=interface.Interface() 
>>> x,y1,y2,y3,y4 = I.capture_multiple(800,1.75,'CH1','CH2','MIC','SEN') 
>>> plot(x,y1) 
>>> plot(x,y2) 
>>> plot(x,y3) 
>>> plot(x,y4) 
>>> show()

Returns: Arrays X(timestamps),Y1,Y2 …


Capture_fullspeed : fetches oscilloscope traces from a single oscilloscope channel at a maximum speed of 2MSPS

capture_fullspeed(chan, amples, tg, *args)

Arguments

  • chan:   channel name ‘CH1’ / ‘CH2’ … ‘SEN’
  • tg :   Time gap between samples in microseconds. minimum 0.5uS
  • *args :   specify if SQR1 must be toggled right before capturing. ‘SET_LOW’ will set it to 0V, ‘SET_HIGH’ will set it to 5V. if no arguments are specified, a regular capture will be executed.
# Example
>>> from pylab import *
>>> I=interface.Interface()
>>> x,y = I.capture_fullspeed('CH1',2000,1)
>>> plot(x,y)               
>>> show()

Returns: timestamp array ,voltage_value array


Set_gain : Set the gain of selected PGA

set_gain(channel, gain)

Arguments

  • channel:   ‘CH1’ , ‘CH2’
  • gain :   (0-7) -> (1x,2x,4x,5x,8x,10x,16x,32x)

Note: The gain value applied to a channel will result in better resolution for small amplitude signals.

# Example
>>> I.set_gain('CH1',7)  #gain set to 32x on CH1


Get_average_voltage : Return the voltage on the selected channel
get_average_voltage(channel_name, **kwargs)
Arguments

  • channel_name:    ‘CH1’,’CH2’,’CH3’, ‘MIC’,’IN1’,’SEN’
  • **kwargs :   Samples to average can be specified. eg. samples=100 will average a hundred readings
# Example 
>>> print I.get_average_voltage('CH4')
1.002

Get_freq : Frequency measurement on IDx. Measures time taken for 16 rising edges of input signal. returns the frequency in Hertz

get_average_voltage(channel='Fin', timeout=0.1)
Arguments

  • channel :    The input to measure frequency from. ‘ID1’ , ‘ID2’, ‘ID3’, ‘ID4’, ‘Fin’
  • timeout :   This is a blocking call which will wait for one full wavelength before returning the calculated frequency. Use the timeout option if you’re unsure of the input signal. returns 0 if timed out
# Example
>>> I.sqr1(4000,25)
>>> print I.get_freq('ID1')
4000.0

Return float: frequency


Get_states : Gets the state of the digital inputs. returns dictionary with keys ‘ID1’,’ID2’,’ID3’,’ID4’
get_states()
#Example
>>> print get_states()
{'ID1': True, 'ID2': True, 'ID3': True, 'ID4': False}

Get_state : Returns the logic level on the specified input (ID1,ID2,ID3, or ID4)
get_state(input_id)
Arguments

  • input_id :    The input channel ‘ID1’ -> state of ID1 ‘ID4’ -> state of ID4
#Example
>>> print I.get_state(I.ID1)
False

Set_state : Set the logic level on digital outputs SQR1,SQR2,SQR3,SQR4
set_state(**kwargs)
Arguments

  • **kwargs :    SQR1,SQR2,SQR3,SQR4 states(0 or 1)
#Example
>>> I.set_state(SQR1=1, SQR2=0) #sets SQR1 HIGH, SQR2 LOw, but leave SQR3,SQR4 untouched.


Continue ReadingPSLab Communication Function Calls

Integrating textAngular to Angular applications

week12gsoc1

In the previous article we have seen how handling different mime types is important, So while extending that discussion one might think what is the case of files that come under a completely different aspect, As in scripts, documents etc have dynamic operations that are performed over them.
sTeam's old web interface gave the user the provision for creating and editing the documents within the interface. So in short the user had complete control over the documents as he didn’t have to go through complex process for altering documents that which are stored in his/her playground.

The sTeam web interface has a controller in the workspace called workspaceDetailedCtrl which basically comprises of a function called mimeTypeHandler that helps in matching the mime-type and performing the required action if it matches a particular mime type. So let us have a look as to how should one design such things;


$scope.mimeTypeHandler = function () {
	if(localStorageService.get('currentObjMimeType') == 'application/x-unknown-content-type') {
		return 'unknown'
	}
	else if (localStorageService.get('currentObjMimeType').match(/image\/*/)) {
		return 'image'
	}
	else if (localStorageService.get('currentObjMimeType') == 'application/pdf') {
		return 'pdf'
	}
	else if (localStorageService.get('currentObjMimeType').match(/audio\/*/)) {
		return 'audio'
	}
	else if (localStorageService.get('currentObjMimeType').match(/video\/*/)) {
		return 'video'
	}
	else if (localStorageService.get('currentObjMimeType').match(/text\/*/) ||
		localStorageService.get('currentObjMimeType') == 'application/x-javascript' ||
		localStorageService.get('currentObjMimeType') == 'application/x-pike') {
		return 'text'
	}
	else { return 'notfound' }
}

So before we go and understand about developing a text editor let us understand the library that is used for developing it. textAngular is the library that which is used for developing the text editor, although there are many options textAngular proves to be a minimal text editing development source that can be easily setup and broadly configured.

We all know that a text editor must have the following things necessarily :

  • It must support basic formatting options and must extend feasibility to make changes to the document in a easier way
  • Enabling live preview in order to see the changes made to the document instantly
  • Supporting indentation options for documents which are identified as scripts

We might feel that the technicalities are important apart from these notions, but it is important to have these in place along with the technicalities.

Let us observe the syntax and usage of text angular.


angular.module('steam')

  .controller('workSpaceEditorCtrl', ['$scope', 'handler', 'localStorageService', 'textAngularManager', '$document',
   function ($scope, handler, localStorageService, textAngularManager, $document) {
    $scope.data = {
      empty: 'Please enter text',
      full: ''
    }
    $scope.editable = true;
    $scope.content = $scope.data.empty;

    $scope.allh1 = function() {
      textAngularManager.updateToolDisplay('h1', {
        buttontext: 'Heading 1'
      });
    }

    $scope.allh2 = function() {
      textAngularManager.updateToolDisplay('h2', {
        buttontext: 'Heading 2'
      });
    }

    $scope.allh3 = function() {
      textAngularManager.updateToolDisplay('h3', {
        buttontext: 'Heading 3'
      });
    }

    $scope.allh4 = function() {
      textAngularManager.updateToolDisplay('h4', {
        buttontext: 'Heading 4'
      });
    }

    $scope.allh5 = function() {
      textAngularManager.updateToolDisplay('h5', {
        buttontext: 'Heading 5'
      });
    }

    $scope.allh6 = function() {
      textAngularManager.updateToolDisplay('h6', {
        buttontext: 'Heading 6'
      });
    }

    $scope.submit = function () {
      console.log("The document has been submitted");
    }
    $scope.clear = function () {
      console.log("The document has been reset");
      $scope.data = {
        orightml: $scope.content
      }
    }
    $scope.resetEditor = function () {
      textAngularManager.resetToolsDisplay();
    }
  }])

So if we observe we can see that there is a service called textAngularManager which is needed for customizing the text editor. There are a few things that are to be looked upon while customizing the editor.

  • We can totally customize the text editor’s options as well as the appearence of the text editor
  • We can give scope for customized functions that could be part of the controller. Observe the above code snippet where functions like resetEditor etc are customized to the needs of the application
  • Finally We can add more options to the text editor using the textAngular service in order to make it better

After all the customizations and changes Here is how it looks:

week12gsoc2

Source : click here

Thats it folks,
Happy Hacking !!

Continue ReadingIntegrating textAngular to Angular applications

Sending mails using Sendgrid on Nodejs

The open-event webapp generator project needs to send an email to the user notifying him whenever generating the webapp is finished, containing the links to the preview and zip download.

For sending emails, the easiest service we found we could use was SendGrid  which provides upto 15000 free emails a month for students who have a Github Education Pack. (It anyway provides 10000 free emails to all users).

To use sendgrid, it’s best to use the sendgrid npm module that SendGrid officially builds. To get that installed just use the following command –

npm install --save sendgrid

Also, once you have made an account on Sendgrid, create an API key, and save it as an environment variable (so that your API key is not exposed in your code). For example in our project, we save it in the environment variable SENDGRID_API_KEY
To make it permanent you can add it to your ~/.profile file

export SEDGRID_API_KEY=xxxxxxxxxxxxxxxxxxx

The actual sending takes place in the mailer.js script in our project.

Basically we are using the mail helper class provided in the sendgrid module, and the bare minimum code required to send a mail is as follows

  var helper = require('sendgrid').mail
  from_email = new helper.Email('test@example.com')
  to_email = new helper.Email('test@example.com')
  subject = 'Hello World from the SendGrid Node.js Library!'
  content = new helper.Content('text/plain', 'Hello, Email!')
  mail = new helper.Mail(from_email, subject, to_email, content)
 
  var sg = require('sendgrid')(process.env.SENDGRID_API_KEY);
  var request = sg.emptyRequest({
    method: 'POST',
    path: '/v3/mail/send',
    body: mail.toJSON()
  });
 
  sg.API(request, function(error, response) {
    console.log(response.statusCode)
    console.log(response.body)
    console.log(response.headers)
  })

You need to replace the to and from emails to your requirements.

Also as you can see in our project’s code, if you want to send HTML formatted data, you can change the content type from text/plain to text/html and then add any html content (as a string) into the content.

Continue ReadingSending mails using Sendgrid on Nodejs

Testing Docker Deployment using Travis

Hello. This post is about how to setup automated tests to check if your application’s docker deployment is working or not. I used it extensively while working on the Docker deployment of the Open Event Server. In this tutorial, we will use Travis CI as the testing service.

To start testing your github project for Docker deployment, first add the repo to Travis. Then create a.travis.yml in the project’s root directory.

In that file, add docker to services.

services:
  - docker

The above will enable docker in the testing environment. It will also include docker-compose by default.

Next step is to build your app and run it. Since this is a pre-testing step, we will add it in the install directive.

install:
  - docker build -t myapp .
  - docker run -d -p 127.0.0.1:80:4000 --name myapp myapp

The 4000 in the above text is assuming your app runs on port 4000 inside the container. Also it is assumed that Dockerfile is in the root of the repo.

So now that the docker app is running, it’s time to test it.

script:
  - docker ps | grep -i myapp

The above will test if our app is in one of the running docker processes. It is a basic test to see if the app is running or not.

We can go ahead and test the app’s functionality with some sample requests. Create a file test.py with the following contents.

import requests

r = requests.get('http://127.0.0.1/')
assert 'HomePage' in r.content, 'No homepage loaded'

Then run it as a test.

script:
  - docker ps | grep -i myapp
  - python test.py

You can make use of the unittest module in Python to bundle and create more organized tests. The limit is the sky here.

In the end, the .travis.yml will look something like the following

language: python
python:
  - "2.7"

install:
  - docker build -t myapp .
  - docker run -d -p 127.0.0.1:80:4000 --name myapp myapp

script:
  - docker ps | grep -i myapp
  - python test.py

So this is it. A basic tutorial on testing Docker deployments using the awesome Travis CI service.

Feel free to share it and comment your views.


{{ Repost from my personal blog http://aviaryan.in/blog/gsoc/docker-test.html }}

Continue ReadingTesting Docker Deployment using Travis

Flask-SocketIO Notifications

In the previous post I explained about configuring Flask-SocketIO, Nginx and Gunicorn. This post includes integrating Flask-SocketIO library to display notifications to users in real time.

Flask Config

For development we use the default web server that ships with Flask. For this, Flask-SocketIO fallsback to long-polling as its transport mechanism, instead of WebSockets. So to properly test SocketIO I wanted to work directly with Gunicorn (hence the previous post about configuring development environment). Also, not everyone needs to be bothered with the changes required to run it.

class DevelopmentConfig(Config):
    DEVELOPMENT = True
    DEBUG = True

    # If Env Var `INTEGRATE_SOCKETIO` is set to 'true', then integrate SocketIO
    socketio_integration = os.environ.get('INTEGRATE_SOCKETIO')
    if socketio_integration == 'true':
        INTEGRATE_SOCKETIO = True
    else:
        INTEGRATE_SOCKETIO = False

    # Other stuff

SocketIO is integrated (in development env) if the developer has set the INTEGRATE_SOCKETIO environment variable to “true”. In Production, our application runs on Gunicorn, and SocketIO integration must always be there.

Flow

To send message to a particular connection (or a set of connections) Flask-SocketIO provides Rooms. The connections are made to join a room and the message is sent in the room. So to send message to a particular user we need him to join a room, and then send the message in that room. The room name needs to be unique and related to just one user. The User database Ids could be used. I decided to keep user_{id} as the room name for a user with id {id}. This information (room name) would be needed when making the user join a room, so I stored it for every user that logged in.

@expose('/login/', methods=('GET', 'POST'))
    def login_view(self):
        if request.method == 'GET':
            # Render template
        if request.method == 'POST':
            # Take email and password from form and check if 
            # user exists. If he does, log him in.
            login.login_user(user)

            # Store user_id in session for socketio use
            session['user_id'] = login.current_user.id

            # Redirect

After the user logs in, a connection request from the client is sent to the server. With this connection request the connection handler at server makes the user join a room (based on the user_id stored previously).

@socketio.on('connect', namespace='/notifs')
def connect_handler():
    if current_user.is_authenticated():
        user_room = 'user_{}'.format(session['user_id'])
        join_room(user_room)
        emit('response', {'meta': 'WS connected'})

The client side is somewhat similar to this:

<script src="{{ url_for('static', filename='path/to/socket.io-client/socket.io.js') }}"></script>
<script type="text/javascript">
$(document).ready(function() {
    var namespace = '/notifs';

    var socket = io.connect(location.protocol + "//" + location.host + namespace, {reconnection: false});

    socket.on('response', function(msg) {
        console.log(msg.meta);
        // If `msg` is a notification, display it to the user.
    });
});
</script>

Namespaces helps when making multiple connections over the same socket.

So now that the user has joined a room we can send him notifications. The notification data sent to the client should be standard, so the message always has the same format. I defined a get_unread_notifs method for the User class that fetches unread notifications.

class User(db.Model):
    # Other stuff

    def get_unread_notifs(self, reverse=False):
        """Get unread notifications with titles, humanized receiving time
        and Mark-as-read links.
        """
        notifs = []
        unread_notifs = Notification.query.filter_by(user=self, has_read=False)
        for notif in unread_notifs:
            notifs.append({
                'title': notif.title,
                'received_at': humanize.naturaltime(datetime.now() - notif.received_at),
                'mark_read': url_for('profile.mark_notification_as_read', notification_id=notif.id)
            })

        if reverse:
            return list(reversed(notifs))
        else:
            return notifs

This class method is used when a notification is added in the database and has to be pushed into the user SocketIO room.

def create_user_notification(user, action, title, message):
    """
    Create a User Notification
    :param user: User object to send the notification to
    :param action: Action being performed
    :param title: The message title
    :param message: Message
    """
    notification = Notification(user=user,
                                action=action,
                                title=title,
                                message=message,
                                received_at=datetime.now())
    saved = save_to_db(notification, 'User notification saved')

    if saved:
        push_user_notification(user)

def push_user_notification(user):
    """
    Push user notification to user socket connection.
    """
    user_room = 'user_{}'.format(user.id)
    emit('response',
         {'meta': 'New notifications',
          'notif_count': user.get_unread_notif_count(),
          'notifs': user.get_unread_notifs()},
         room=user_room,
         namespace='/notifs')
Continue ReadingFlask-SocketIO Notifications

Writing Installation Script for Github Projects

I would like to discuss how to write a bash script to setup any github project and in particular PHP and mysql project. I would like take the example of engelsystem for this post.

First, we need to make a list of all environments and dependencies for our github project. For PHP and mysql project we need to install LAMP server.

The script to install all the dependencies for engelsystem are

echo "Update your package manager"
apt-get update

echo "Installing LAMP"
echo "Install Apache"
apt-get install apache2

echo "Install MySQL"
apt-get install mysql-server php5-mysql

echo "Install PHP"
apt-get install php5 libapache2-mod-php5 php5-mcrypt

echo "Install php cgi"
apt-cache search php5-cgi

We can even add echo statements with instructions.

Once we have installed LAMP. We need to clone the project from github. We need to install git and clone the repository. Script for installing git and cloning github repository are

echo "Install git"
apt-get install git
cd /var/www/html
echo "Cloning the github repository"
git clone --recursive https://github.com/fossasia/engelsystem.git
cd engelsystem

Now we are in the project directory. Now we need to set up the database and migrate the tables. We are creating a database engelsystem and migrating the tables in install.sql and update.sql.

echo "enter mysql root password"
# creating new database engelsystem
echo "create database engelsystem" | mysql -u root -p
echo "migrate the table to engelsystem database"
mysql -u root -p engelsystem < db/install.sql
mysql -u root -p engelsystem < db/update.sql

Once we are done with it. We need to copy config-sample.default.php to config.php and add the database and password for mysql.

echo "enter the database name username and password"
cp config/config-sample.default.php config/config.php

Now edit the config.php file. Once we have done this we need to restart apache then we can view the login page at localhost/engelsystem/public

echo "Restarting Apache"
service apache2 restart
echo "Engelsystem is successfully installed and can be viewed on local server localhost/engelsystem/public"

We need to add all these instructions in install.sh file.

Now steps to execute a bash file.

Change the permissions of install.sh file

$ chmod +x install.sh

Now run the file from your terminal by executing the following command

$ ./install.sh

Developers who are interested in contributing can work with us.

Development: https://github.com/fossasia/engelsystem

Issues/Bugs:https://github.com/fossasia/engelsystem/issues

Continue ReadingWriting Installation Script for Github Projects

Creating an API in PHP

One of the key components of my GSoC Project was to have a POST API for the Android App generator.

This was required so that the app generator could be plugged into the server and can be called directly instead of someone manually visiting the webpage and entering his/her details.

It takes in a JSON input and compiles and emails the app to the organizer based on his email address in the input JSON.

The input to the API will look something like this :

{
“email”: “harshithdwivedi@gmail.com”,
“app_name”: “MyApp”,
“endpoint”: “https://open-event-dev.herokuapp.com/api/v2
}

Once the data is sent, on the server I have a php file which intercepts the requests and performs an action based on the request.

<?php
function sendResponse($data) {
    header('Content-type: application/json');
    echo json_encode($data);
    die();
}
/* If the request isn't a POST request then send an error message*/
if ($_SERVER['REQUEST_METHOD'] != 'POST') {
    sendResponse([
        "status"=>"error",
        "code"=>405,
        "message"=>"Method Not Allowed",
    ]);
}
/* Store the input received in a variable named body */
$body = json_decode(file_get_contents('php://input'), true);
/* If the user is nissing any important input parameters, don't process the request */
if (!array_key_exists('email', $body) || !array_key_exists('app_name', $body) || !array_key_exists('endpoint', $body)) {
    sendResponse([
        "status"=>"error",
        "code"=>422,
        "message"=>"Unprocessable entity",
    ]);
}
$uid = mt_rand(1000,9999). "_" .time();  //A random User ID
/* Extracting variables from the body */
$email = escapeshellcmd($body['email']);
$appName = escapeshellcmd($body["app_name"]); 
$endpoint = escapeshellcmd($body["endpoint"]);

/* Run a script based on the input parameters */
exec("sudo python /var/www/html/api/appgenserver.py $email $appName $endpoint");

The code above is pretty much self explanatory.

So basically, first we check for a valid request (GET/POST) and throw an error if it is invalid.

Next up, for a valid request we store the body into a variable and then execute a followup script as per our needs using data from this response.

This PHP file should be located in the public-html (/var/www/data) of the server so as to be accessible from outside of the server.

You can test out this API by calling it directly by prepending the server’s ip address to the name of php file containing this code.

Something like :

domain-name.com/api/api.php

You can also use Postman for Chrome or RESTClient for Firefox for making API calls easily.

Well, that’s it then!

You can easily modify the PHP code provided and modify it to suite your needs for making you own API.

Let me know your thoughts and your queries in the “response” 😉 below.

Until next time.

Continue ReadingCreating an API in PHP