Adding Fallback Images in SUSI.AI Skill CMS

SUSI.AI Skill CMS shows image of a every skill. Here we are going to talk about a special case, where we handle the case when image is not found. We will be discussing the author’s skill component(all the skills by an author) and how we added fallback image in order to handle all the cases. For displaying image in table displaying all skills of author, we provide the path of image in SUSI Skill Data repository. The path is provided as follows :

let image = 'https://raw.githubusercontent.com/fossasia/susi_skill_data/master/models/general/'+ parse[6]+'/'+parse[7]+'/images/'+parse[8].split('.')[0];

Explanation:
parse is the array which contains the models, language ISO code, and the name of the skill. This is obtained after parsing JSON from this endpoint :

"http://api.susi.ai/cms/getSkillsByAuthor.json?author=" + author;
  • parse[6]: This represents a model of the skill. There are currently six models Assistants, Entertainment, Knowledge, Problem Solving, Shopping and Small Talks.
  • parse[7]: This represents ISO language code of the skill.
  • parse[8]: This represents the name of the skill.

Now the image variable just needs the file extension. We have .jpg and .png extensions in images in our skill data repository. So we made two images :

let image1 = image + '.png';
let image2 = image + '.jpg';

The img tag only takes one attribute in src and we can only add a string in alt tag. Now we needed to check which image exists and add proper src. This can be solved by following methods:

We can use Jquery to solve this:

$.get(image_url)
        .done(function() { 
                // image exists
        }).fail(function() { 
                // Image doesn't exist
    })

This will result in more code and and also this does not handles the case where no image is found and we need to show the Circle Image component which takes first two letters of skill and make a circular component. After researching the internet we found a perfect solution to our problem. There is an npm package named react-image, which is an alternative to default img tag. Features of react-image package helpful to us are:

  • We can provide multiple fallback images in an array as source which will be used in order of index of array. This feature solves our problem of extensions, we add provide image with all extensions.
  • We can show a fallback element in case no images are loaded. This solves our second problem where we needed to show Circle Image component.

Code looks like this:

<Img
  style={imageStyle}
  src={[
       image1,
       image2
      ]}
  unloader={<CircleImage name={name} size="40"/>}
 />

Resources:

Continue ReadingAdding Fallback Images in SUSI.AI Skill CMS

Displaying Blog Posts on SUSI AI Web Chat’s Blog Page and Share Posts

FOSSASIA is maintaining a superior blog and it contains blog posts about projects and programs run by FOSSASIA. While we were implementing SUSI Web Chat Application we got a requirement to implement a blog page. Speciality of this blog page is it is not a separate blog page, it fetches blog posts and other related data by filtering the FOSSASIA’s main blog.

In this blog post I’ll discuss how we fetched and managed those data on front-end and how we made the appearance same as the FOSSASIA main blog.

First we get blog posts as a JSON. For that we used rss2json API. we can get the RSS feed as a JSON by sending our RSS feed URL to the rss2json API. Check the rss2json API documentation here.

It produces all posts as items array. Next we store this array of responses in our application as a state.

This response contains blog post titles featured images’ details and post content and other metadata such as tags, author name and published date.

We had few requirements to fulfill. First one is to show full content of the blogpost in a new blog page.

We can take the full content from response like this,

this.state.posts.slice(this.state.startPage, this.state.startPage + 10).map((posts, i) => {
        let content = posts.content;
})

We can use “cintent” variable to show content but it contains the featured image. We have to skip that image. For that,

let htmlContent = content.replace(/<img.*?>/, '');

Now we have to render this string value as HTML. For that we have to install “test-to-html” package using below command.

npm install html-to-text --save

Now we can convert text into html like this

htmlContent = renderHTML(htmlContent);

We used this HTML content inside the “CardText” tag.

<CardText> {htmlContent}
</CardText>

At the bottom of the post we needed to show author name, tags list and categories list.
Since tags and categories come in one array, we have to separate them.
First we defined an array which contains all the categories in Fossasia blog. Then we compared that array with the categories we got like this.

       const allCategories = ['FOSSASIA','GSoC','SUSI.AI']

Compare two arrays,

          posts.categories.map((cat) => {
                let k = 0;
                for (k = 0; k < allCategories.length; k++) {
                              if (cat === allCategories[k]) {
                                  category.push(cat);
                              }
              	}
          });

we defined this “arrDiff” simple function to get the difference of two arrays.

     var tags=arrDiff(category,posts.categories)

Make the list of categories

let fCategory=category.map((cat) =>
<span key={cat} ><a className="tagname" href={'https://blog.fossasia.org/category/' + cat.replace(/\s+/g, '-').toLowerCase()} rel="noopener noreferrer">{cat}</a></span>
   );

We can use above step to make tags list.

Then after used it in the “CardActions”

<span className='categoryContainer'>
    <i className="fa fa-folder-open-o tagIcon"></i>
    {fCategory}
</span>


According to the final requirement we needed to add social media share buttons for Facebook and Twitter.

If we need to make a twitter share button we have to follow up this method. But we can use “react-share” npm package to make these kind of share buttons.

This is how we made Facebook and Twitter share buttons. First of all we have to install “react-share” package using below command.

npm install react-share --save

Then we have to import the installed package.

import { ShareButtons, generateShareIcon } from 'react-share';

Then after we defined Button and Icon like this.

      const {FacebookShareButton,TwitterShareButton} = ShareButtons;
      const FacebookIcon = generateShareIcon('facebook');
      const TwitterIcon = generateShareIcon('twitter');

Now we can use these components.

<TwitterShareButton url={posts.guid} title={posts.title} via='asksusi' hashtags={posts.categories.slice(0, 4)} >                                                                                <TwitterIcon size={32} round={true} />
</TwitterShareButton>
<FacebookShareButton url={posts.link}>
     <FacebookIcon size={32} round={true} />
</FacebookShareButton>

We have to send URL and title of the post with the tweet and tags as hashtags. So we have to pass them into the component as above.
Above code produces this model of tweets.

That’s how “text-to-htm”l and “react-share” works on react. If you would like to contribute to SUSI project or any other FOSSASIA project please fork our repositories on github.

Resources:

Continue ReadingDisplaying Blog Posts on SUSI AI Web Chat’s Blog Page and Share Posts

Adding Sticky Headers for Grouping Sponsors List in Open Event Android App

The Open Event Android project has a fragment for showing sponsors of the event. Each Sponsor model has a name, url, type and level. The SponsorsFragment shows list according to type and level. Each sponsor list item has sponsor type TextView. There can be more than one sponsors with the same type. So instead of showing type in the Sponsor item we can add Sticky header showing type at the top which will group the sponsors with the same type and also gives the great UI. In this post I explain how to add the Sticky headers in the RecyclerView using StickyHeadersRecyclerView library.

1. Add dependency

In order to use Sticky Headers in your app add following dependencies in your app module’s build.gradle file.

dependencies {
	compile 'com.timehop.stickyheadersrecyclerview:library:0.4.3'
}

2. Create layout for header

Create recycler_view_header.xml file for the header. It will contain LinearLayout and simple TextView which will show Sponsor type.

<?xml version="1.0" encoding="utf-8"?>
<LinearLayout xmlns:android="http://schemas.android.com/apk/res/android"
    android:layout_width="match_parent"
    android:layout_height="wrap_content"
    android:orientation="vertical">

    <TextView
        android:id="@+id/recyclerview_view_header"
        android:layout_width="match_parent"
        android:layout_height="wrap_content"
        android:padding="@dimen/padding_medium" />

</LinearLayout>

Here you can modify layout according to your need.

3.  Implement StickyRecyclerHeadersAdapter

Now implement StickyRecyclerHeadersAdapter in the List Adapter. Override getHeaderId(), onCreateHeaderViewHolder(), onBindHeaderViewHolder
() methods of the StickyRecyclerHeadersAdapter.

public class SponsorsListAdapter extends BaseRVAdapter<Sponsor, SponsorViewHolder> implements StickyRecyclerHeadersAdapter {
    ...

    @Override
    public long getHeaderId(int position) {...}

    @Override
    public RecyclerView.ViewHolder onCreateHeaderViewHolder(ViewGroup parent) {...}

    @Override
    public void onBindHeaderViewHolder(RecyclerView.ViewHolder holder, int position) {...}
}


The getHeaderId() method is used to give an id to the header. It is the main part of the implementation here all the sponsors with the same type should return the same id. In our case we are returning sponsor level because all the sponsor types have corresponding levels.

String level = getItem(position).getLevel();
return Long.valueOf(level);


The onCreateHeaderViewHolder() returns Recycler ViewHolder for the header. Here we will use in the inflate() method of  LayoutInflater to get View object of recycler_view_header.xml file. Then return new RecyclerView.ViewHolder object using View object.

View view = LayoutInflater.from(parent.getContext())
                .inflate(R.layout.recycler_view_header, parent, false);
return new RecyclerView.ViewHolder(view) {};


The onBindHeaderViewHolder() binds the sponsor to HeaderViewHolder. In this method we sets the sponsor type string to the TextView we have created in the recycler_view_header.xml file.

TextView textView = (TextView) holder.itemView.findViewById(R.id.recyclerview_view_header);
textView.setGravity(Gravity.CENTER_HORIZONTAL);

String sponsorType = getItem(position).getType();
if (!Utils.isEmpty(sponsorType))  
   textView.setText(sponsorType.toUpperCase());

Here you can also modify TextView according to your need. We are centering text using setGravity() method.

4.  Setup RecyclerView

Now create RecyclerView and set adapter using setAdapter() method. Also as we want the linear list of sponsors so set the LinearLayoutManager using setLayoutManager() method.

SponsorsListAdapter sponsorsListAdapter = new SponsorsListAdapter(getContext(), sponsors);
sponsorsRecyclerView.setAdapter(sponsorsListAdapter);
sponsorsRecyclerView.setLayoutManager(new LinearLayoutManager(getActivity()));


Create StickyRecyclerHeadersDecoration object and add it in the RecyclerView using addItemDecoration() method.

final StickyRecyclerHeadersDecoration headersDecoration = new StickyRecyclerHeadersDecoration(sponsorsListAdapter);

sponsorsRecyclerView.addItemDecoration(headersDecoration);
sponsorsListAdapter.registerAdapterDataObserver(new RecyclerView.AdapterDataObserver(){
    @Override
    public void onChanged {
            headersDecoration.invalidateHeaders();
    }
});

Now add AdapterDataObserver using registerAdapterDataObserver() method. The onChanged() method in this observer is called whenever dataset changes. So in this method invalidate headers using invalidateHeaders() method of HeaderDecoration.

Now we are all set. Run the app it will look like this.

Conclusion

Sticky headers in the App gives great UI and UX. You can also add a click listener to the headers. To know more about Sticky Headers follow the links given below.

Continue ReadingAdding Sticky Headers for Grouping Sponsors List in Open Event Android App

Customising URL Using Custom Adapters in Open Event Front-end

Open-Event Front-end uses Ember data for handling Open Event Orga API which abides by JSON API specs. The API has relationships which represent models in the database, however there are some API endpoints for which the URL is not direct. We make use of custom adapter to build a custom URL for the requests.
In this blog we will see how to Implement relationships which do not have a model in the API server. Lets see how we implemented the admin-statistics-event API using custom adapter?

Creating Order-statistics model
To create a new model we use ember-cli command:

ember g model admin-statistics-event

The generated model:

export default ModelBase.extend({
  draft     : attr('number'),
  published : attr('number'),
  past      : attr('number')
})

The API returns 3 attributes namely draft, published & past which represent the total number of drafted, live and past event in the system. The admin-statistics-event is an admin related model.
Creating custom adapter
To create a new adapter we use ember-cli command:

ember g adapter event-statistics-event

If we try to do a GET request the URL for the request will be ‘v1/admin-statistics-event’ which is an incorrect endpoint. We create a custom adapter to override the buildURL method.

buildURL(modelName, id, snapshot, requestType, query) {
  let url = this._super(modelName, id, snapshot, requestType, query);
  url = url.replace('admin-statistics-event', 'admin/statistics/event');
  return url;
}

We create a new variable url which holds the url generated by the buildURL method of the super adapter. We call the super method using ‘this._super’. We will now replace the ‘admin-statistics-event’ with ‘admin/statistics/event’ in url variable. We return the new url variable. This results in generation of correct URL for the request.
Thank you for reading the blog, you can check the source code for the example here.
Resources

Continue ReadingCustomising URL Using Custom Adapters in Open Event Front-end

Using Firebase Test Lab for Testing test cases of Phimpme Android

As now we started writing some test cases for Phimpme Android. While running my instrumentation test case, I saw a tab of Cloud Testing in Android Studio. This is for Firebase Test Lab. Firebase Test Lab provides cloud-based infrastructure for testing Android apps. Everyone doesn’t have every devices of all the android versions. But testing on all of them is equally important.

How I used test lab in Phimpme

  • Run your first test on Firebase

Select Test Lab in your project on the left nav on the Firebase console, and then click Run a Robo test. The Robo test automatically explores your app on wide array of devices to find defects and report any crashes that occur. It doesn’t require you to write test cases. All you need is the app’s APK. Nothing else is needed to use Robo test.

Upload your Application’s APK (app-debug-unaligned.apk) in the next screen and click Continue

Configure the device selection, a wide range of devices and all API levels are present there. You can save the template for future use.

Click on start test to start testing. It will start the tests and show the real time progress as well.

  • Using Firebase Test Lab from Android Studio

It required Android Studio 2.0+. You needs to edit the configuration of Android Instrumentation test.

Select the Firebase Test Lab Device Matrix under the Target. You can configure Matrix, matrix is actually on what virtual and physical devices do you want to run your test. See the below screenshot for details.

Note: You need to enable the firebase in your project

So using test lab on firebase we can easily test the test cases on multiple devices and make our app more scalable.

Resources:

Continue ReadingUsing Firebase Test Lab for Testing test cases of Phimpme Android

Showing Url, Location and Carousel Responses in Viber Bot

SUSI Webchat is capable of sending Url, location and carousel responses. In this blog, we will learn about implementing these same responses in SUSI viber bot. We can send text response instead of carousels but it doesn’t attract users and cause difficulties in understanding. In SUSI webchat for query “news” it sends a URL of an article from BBC news which looks like this:

If we send a query “Where is Singapore” it sends location using map response and it looks like this:

For web search SUSI sends carousels which look like this:


To implement these responses in SUSI Viber bot we will send a post request with specific types to the send_message endpoint of Viber chat API https://chatapi.viber.com/pa/send_message. Url, location and carousel responses will be implemented in following way:

  • Url:
    For receiving URL in Viber bot we will post a request with type:’url’ and media:’url to be sent here’. A request will look like code given below.
var options = {
                method: 'POST',
                url: 'https://chatapi.viber.com/pa/send_message',
                headers: headerBody,
                body: {
                    receiver: req.body.sender.id,
                    min_api_version: 1,
                    sender: {
                        name: 'Name of your public Account here',
                        avatar: 'Avatar url for your public account here'
                    },
                    tracking_data: 'tracking data',
                    type: 'url',
                    Media: 'http://www.website.com/go_here'
                },
                json: true
            };
request(options, function(err, res, body) {
                   if (err) throw new Error(err);
                   console.log(body);
               });
  • Location:
    For receiving location with a map on Viber bot we will post a request with type: ‘location’ and location: { lat: latitude, lon: longitude }. In location response, we have to send latitude and longitude values of location to be shown on the map. A request will look like code given below:
var options = {
                method: 'POST',
                url: 'https://chatapi.viber.com/pa/send_message',
                headers: headerBody,
                body: {
                    receiver: req.body.sender.id,
                    min_api_version: 1,
                    sender: {
                        name: 'Name of your public Account here',
                        avatar: 'Avatar url for your public account here'
                    },
                    tracking_data: 'tracking data',
                    type: 'location',
                    location: {
                           lat: latitude,
                           lon: longitude
                       }
                },
                json: true
            };
request(options, function(err, res, body) {
                   if (err) throw new Error(err);
                   console.log(body);
               });

Location response in Viber bot will look like this:

  • Carousel:
    Carousels are horizontal tiles which can be scrolled to view content on them. To receive carousels on Viber bot we will post a request with type: ‘rich_media’ and

    rich_media: {
                       Type: "rich_media",
                       ButtonsGroupColumns: 6,
                       ButtonsGroupRows: 6,
                       BgColor: "#FFFFFF",
                       Buttons: buttons
           }
    

    In rich media “ButtonsGroupColumns” is the number of columns per carousel content block,  “ButtonsGroupRows” is the number of rows per carousel content block and buttons is an array of buttons which contains content to be shown in carousels. A request will look like code given below.

    var options = {
                    method: 'POST',
                    url: 'https://chatapi.viber.com/pa/send_message',
                    headers: headerBody,
                    body: {
                        receiver: req.body.sender.id,
                        min_api_version: 1,
                        sender: {
                            name: 'Name of your public Account here',
                            avatar: 'Avatar url for your public account here'
                        },
                        tracking_data: 'tracking data',
                        type: 'rich_media',
                           rich_media: {
                               Type: "rich_media",
                               ButtonsGroupColumns: 6,
                               ButtonsGroupRows: 6,
                               BgColor: "#FFFFFF",
                               Buttons:{
                                   Columns: 6,
                                   Rows: 3,
                                   Text: 'text to be shown in carousel',
                                   "ActionType": "open-url",
                                   "ActionBody": 'link to be opened on clicking on carousel block',
                                   "TextSize": "medium",
                                   "TextVAlign": "middle",
                                  "TextHAlign": "middle"
                              }            
                           }
                    },
                    json: true
                };
    request(options, function(err, res, body) {
                       if (err) throw new Error(err);
                       console.log(body);
                   });
    

    Carousel response from Viber bot will look like this:

    We have successfully implemented URL, location and carousel response in Viber bot.

    If you want to learn more about Viber chat API refer to https://developers.viber.com/docs/api/rest-bot-api/

    Resources

    Viber Chat API: https://developers.viber.com/docs/api/rest-bot-api/
    Claudia bot builder platform to build Viber bot: https://claudiajs.com/tutorials/viber-chatbot.html
    Viber bot by using PHP: http://thedebuggers.com/build-viber-chat-bot-6-simple-steps/

Continue ReadingShowing Url, Location and Carousel Responses in Viber Bot

Basics behind school level experiments with PSLab

Electronics is a fascinating subject to most kids. Turning on a LED bulb, making a simple circuit will make them dive into much more interesting areas in the field of electronics. PSLab android application with the help of PSLab device implements a set of experiments whose target audience is school children. To make them more interested in science and electronics, there are several experiments implemented such as measuring body resistance, lemon cell experiment etc.

This blog post brings out the basics in implementing these type of experiments and pre-requisite.

Lemon Cell Experiment

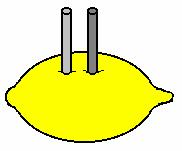
Lemon Cell experiment is a basic experiment which will make school kids interested in science experiments. The setup requires a fresh lemon and a pair of nails which is used to drive into the lemon as illustrated in the figure. The implementation in PSLab android application uses it’s Channel 1. The cell generates a low voltage which can be detected using the CH1 pin of PSLab device and it is sampled at a rate of 10 to read an accurate result.

float voltage = (float) scienceLab.getVoltage("CH1", 10);

2000 instances are recorded using this method and plotted against each instance. The output graph will show a decaying graph of voltage measured between the nails driven into the lemon.

for (int i = 0; i < timeAxis.size(); i++) {
   temp.add(new Entry(timeAxis.get(i), voltageAxis.get(i)));
}

Human Body Resistance Measurement Experiment

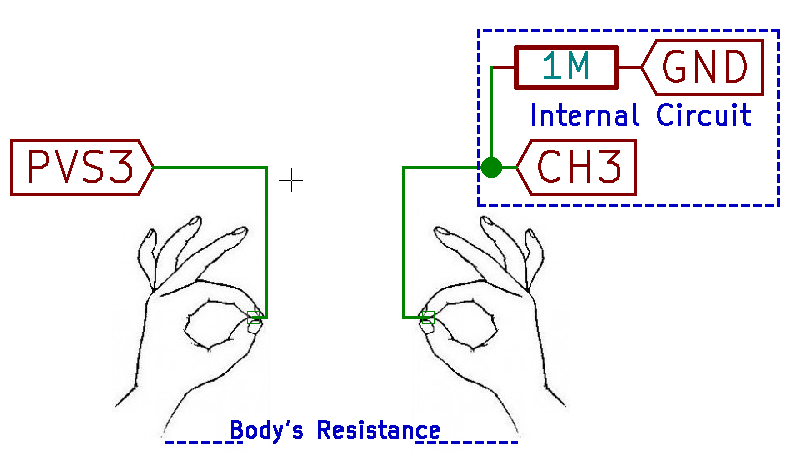
This experiment attracts most of the young people to do electronic experiments. This is implemented in the PSLab android application using Channel 3 and the Programmable Voltage Source 3 which can generate voltage up to 3.3V. The experiment requires a human with drippy palms so it makes a good conductance between device connection and the body itself.

The PSLab device has an internal resistance of 1M Ohms connected with the Channel 3 pin. Experiment requires a student to hold two wires with the metal core exposed; in both hands. One wire is connected to PV3 pin when the other wire is connected to CH3 pin. When a low voltage is supplied from the PV3 pin, due to heavy resistance in body and the PSLab device, a small current in the range of nano amperes will flow through body. Using the reading from CH3 pin and the following calculation, body resistance can be measured.

voltage = (float) scienceLab.getVoltage("CH3", 100);
current = voltage / M;
resistance = (M * (PV3Voltage - voltage)) / voltage;

This operation is executed inside a while loop to provide user with a continuous set of readings. Using Java threads there is a workaround to implement the functionalities inside the while loop without overwhelming the system. First step is to create a object without any attribute.

private final Object lock = new Object();

Java threads use synchronized methods where other threads won’t start until the first thread is completed or paused operation. We make use of that technique to provide enough time to read CH3 pin and display output.

while (true) {
   new MeasureResistance().execute();
   synchronized (lock) {
       try {
           lock.wait();
       } catch (InterruptedException e) {
           e.printStackTrace();
       }
   }
}

Once the pin readings and value updates are complete the lock is released to execute the method once again.

updateDataBox();
synchronized (lock) {
   lock.notify();
}

Capacitor Discharge Experiment

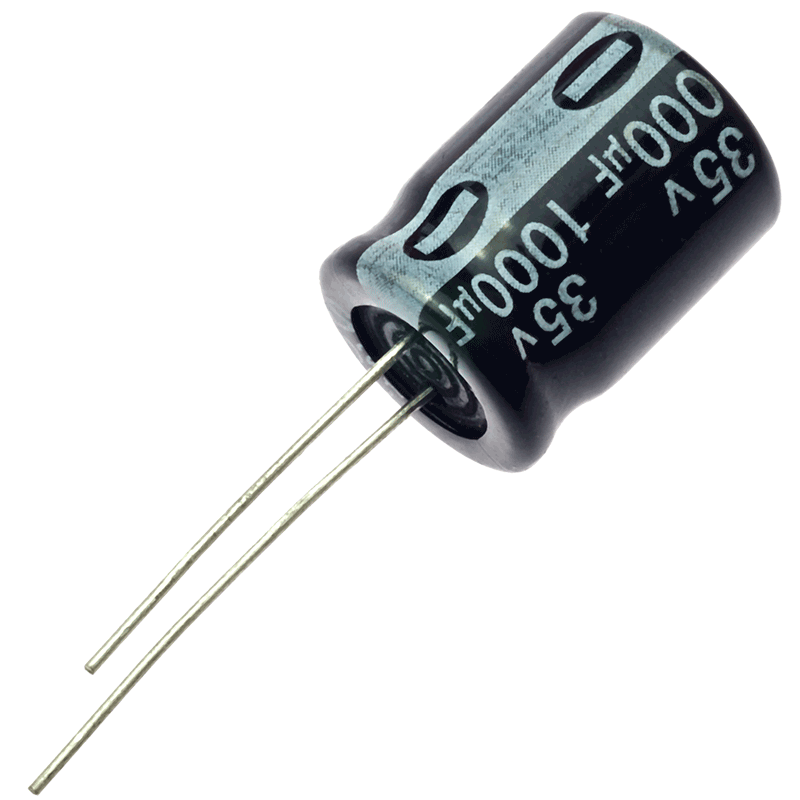
This experiment is somewhat similar to the Lemon Cell Experiment as this experiments on electron storage and discharge. The experiment is carried out using two bulky electrolyte capacitors. PSLab device is capable of generating PWM waveforms with any duty cycle. Refer to this article to learn more about how PWM waves are generated using PSLab device to implement more features like sine wave generation.

Using the SQR1 pin of the PSLab device, one capacitor is charged to its fullest capacity using a PWM wave with 100% duty cycle at a 100 Hz.

scienceLab.setSqr1(100, 100, false);

This capacitor is then connected in parallel with the other capacitor which is empty. The voltage transfer is measured using CH1 pin at a sampling rate of 10

float voltage = (float) scienceLab.getVoltage("CH1", 10);

To provide a continuous update in the voltage transfer, a similar implementation is used using an object in the thread to control the implementation inside a while loop.

Resources:

Continue ReadingBasics behind school level experiments with PSLab

Adding Push Wake Button to SUSI on Raspberry PI

SUSI Linux for Raspberry Pi provides the ability to call SUSI with the help of a Hotword ‘Susi’. Calling via Hotword is a natural way of interaction but it is even handier to invoke SUSI listening mode with the help of a Push button. It enables to call SUSI in a noisy environment where detection of Hotword is not that accurate.

To enable Push Wake button is Susi, we need access to Hardware Pins. Devices like Raspberry PI provides GPIO (General Purpose Input Output) Pins for interacting with Hardware Devices.

In this tutorial, we are adding support for Push Wake Button in Raspberry PI, though similar procedure can be extended to add Wake Button to Orange Pi, Beaglebone Black, and other devices. For adding push wake button, we require:

We now need to do wiring to connect button to Raspberry Pi. The button can be connected to Raspberry Pi following the connection diagram. 

After this, we need to install the Raspberry Pi GPIO Python Library. Install it using:

$ pip3 install RPi.GPIO

Now, we may detect the press of the button in our code. We declare an abstract class for implementing Wake Button. In this way, we can later extend our code to include Wake Buttons for more platforms.

import os
from abc import ABC, abstractclassmethod
from queue import Queue
from threading import Thread

from utils.susi_config import config


class WakeButton(ABC, Thread):
   def __init__(self, detection_callback, callback_queue: Queue):
       super().__init__()
       self.detection_callback = detection_callback
       self.callback_queue = callback_queue
       self.is_active = False

   @abstractclassmethod
   def run(self):
       pass

   def on_detected(self):
       if self.is_active:
           self.callback_queue.put(self.detection_callback)
           os.system('play {0} &'.format(config['detection_bell_sound']))
           self.is_active = False

We defined WakeButton class as a Thread. This is done to ensure that listening to Wake Buttons is done in background thread and it does not disturb the main thread. The callback to be executed on main thread after button press is detected is added to callback queue. Main Thread listens on the callback queue and executes any pending functions from other threads.

We also play an Audio File additionally on detection of a button press to confirm the activation of detection to the user.

Now, we define Raspberry Pi Wake Button class. This class extends from abstract WakeButton declared above.

from queue import Queue

import RPi.GPIO as GPIO
import time
from .wake_button import WakeButton


class RaspberryPiWakeButton(WakeButton):
   def __init__(self, detection_callback, callback_queue: Queue):
       super().__init__(detection_callback, callback_queue)
       GPIO.setmode(GPIO.BCM)
       GPIO.setup(18, GPIO.IN, pull_up_down=GPIO.PUD_UP)

   def run(self):
       while True:
           input_state = GPIO.input(18)
           if not input_state:
               self.on_detected()
               self.is_active = False
               time.sleep(0.2)

This class defines the Wake Button for Raspberry Pi. We continuously poll for the input value of GPIO Pin number 18 on which button is connected. If value is negative, it indicated that button was pressed.

Now, we need to add an option if configuration script to give users a choice to enable or disable wake button. We first need to check, if device is Raspberry Pi, since feature is available on Raspberry PI only. To do this, we try to import RPi.GPIO module. If module loading fails, it indicates that device does not support Raspberry Pi GPIO modes. We set the configuration parameters according to it.

def setup_wake_button():
   try:
       import RPi.GPIO
       print("Device supports RPi.GPIO")
       choice = input("Do you wish to enable hardware wake button? (y/n)")
       if choice == 'y':
           config['WakeButton'] = 'enabled'
           config['Device'] = 'RaspberryPi'
       else:
           config['WakeButton'] = 'disabled'
   except ImportError:
       print("This device does not support RPi.GPIO")
       config['WakeButton'] = 'not available'

Now, we simply use the Raspberry Pi wake button detector in our code.

if config['wake_button'] == 'enabled':
   if config['device'] == 'RaspberryPi':
       from hardware_components import RaspberryPiWakeButton

       wake_button = RaspberryPiWakeButton(callback_queue=callback_queue, detection_callback=start_speech_recognition)
       wake_button.start()

Now, when you need to invoke SUSI Listening Mode, instead of saying ‘SUSI’ as Hotword, you may also press the push button. Ask your query after hearing a small bell and get instant reply from SUSI.

Resources:

Continue ReadingAdding Push Wake Button to SUSI on Raspberry PI

Getting skills by an author in SUSI.AI Skill CMS

The skill description page of any skill in SUSI.AI skill cms displays all the details regarding the skill. It displays image, description, examples and name of author. The skill made by author can impress the users and they might want to know more skills made by that particular author.

We decided to display all the skills by an author. We needed an endpoint from server to get skills by author. This cannot be done on client side as that would result in multiple ajax calls to server for each skill of user. The endpoint used is :

"http://api.susi.ai/cms/getSkillsByAuthor.json?author=" + author

Here the author is the name of the author who published the particular skill. We make an ajax call to the server with the endpoint mentioned above and this is done when the user clicks the author. The ajax call response is as follows(example) :

{
 0:       "/home/susi/susi_skill_data/models/general/Entertainment/en/creator_info.txt",
 1: "/home/susi/susi_skill_data/models/general/Entertainment/en/flip_coin.txt",
 2: "/home/susi/susi_skill_data/models/general/Assistants/en/websearch.txt",
session: {
identity: {
type: "host",
name: "139.5.254.154",
anonymous: true
  }
 }
}

The response contains the list of skills made by author. We parse this response to get the required information. We decided to display a table containing name, category and language of the skill. We used map function on object keys to parse information from every key present in JSON response. Every value corresponding to a key represents a response of following type:

"/home/susi/susi_skill_data/models/general/Category/language/name.txt"

Explanation:

  • Category: There are currently six categories Assistants, Entertainment, Knowledge, Problem Solving, Shopping and Small Talks. Each skill falls under a different category.
  • language: This represents the ISO language code of the language in which skill is written.
  • name: This is the name of the skill.

We want these attributes from the string so we have used the split function:

let parse = data[skill].split('/');

data is JSON response and skill is the key corresponding to which we are parsing information. We store the array returned by split function in variable parse. Now we return the following table in map function:

return (
            <TableRow>
               <TableRowColumn>
                   <div>
                      <Img
                         style={imageStyle}
                         src={[
                              image1,
                              image2
                         ]}
                         unloader={<CircleImage name={name} size="40"/>}
                       />
                       {name}
                    </div>
                </TableRowColumn>
                <TableRowColumn>{parse[6]}</TableRowColumn>
                <TableRowColumn>{isoConv(parse[7])}</TableRowColumn>
             </TableRow>
          )

Here :

    • name: The name of skill converted into Title case by the following code :
let name = parse[8].split('.')[0];
name = name.charAt(0).toUpperCase() + name.slice(1);
  • parse[6]: This represents the category of the skill.
  • isoConv(parse[7]): parse[7] is the ISO code of the language of skill and isoConv is an npm package used to get full form of the language from ISO code.
  • CircleImage: This is a fallback option in case image at the URL is not found. This takes first two words from the name and makes a circular component.

After successful execution of the code, we have the following looking table:

Resources:

Continue ReadingGetting skills by an author in SUSI.AI Skill CMS

Implementation of React Routers in SUSI Web Chat

When we were developing the SUSI Web Chat application we wanted to implement set of static pages with the chat application. In the start we just wanted to navigate  through different static pages and move back to the web chat application. But it takes time to load a new page when user clicks on a link. Our goal was therefore to minimize the loading time by using lazy loading. For that we used react-route .It is standard library for react js.

From the docs:

“React Router keeps your UI synced with the URL. It has a simple API with powerful features like lazy code loading, dynamic route matching, and location transition handling built right in. Make the URL your first thought, not an after-thought.” (https://www.npmjs.com/package/react-router-plus)

We need react-route to be installed in our application first. We can install it using NPM by running this command on project folder.

npm install --save react-router-dom

Next we have to set up our routes. We have two types of headers in our application. One is chat application header, second one is static page header. In static page header we have a navigation to switch between static pages.
First we need to choose the router type because there are two types of routers in react. “” and “” we can use “” in our example because our server can handle dynamic requests. If we are requesting data from static page we should use “” .
We used that in “” and made another new component called “” and used it on “index.js” like this.

import { BrowserRouter as Router } from 'react-router-dom';
Import App from .App;
 ReactDOM.render(
  	<IntlProvider locale={defaultPrefLanguage}>
		<Router> <App /> </Router>
	</IntlProvider>,
  	document.getElementById('root')  );

In “App.js” we can set up routes like this.

        <Switch>
            <Route exact path='/' component={ChatApp}/>
            <Route exact path="/overview" component={Overview} />
            <Route exact path='/blog' component={Blog} />
            <Route exact path="/logout" component={Logout} />
            <Route exact path="/settings" component={Settings} />
            <Route exact path="*" component={NotFound} />
        </Switch>

We use elements to render component when they match with the corresponding path. We use “path” to add router location that we need to match width the component. We use “exact” property to render the component if location exactly matches with the “path”. If we do not use “exact” property it renders when we have child routes after the path like “/blog/1 “ .
We used “” element to group routes.
We can’t use anchor () tags to navigate pages without reloading. We have to use tags instead of that. We have to replace all the places we have used

<a href= ‘URL’>lable name </a>

with this,

<Link to=’URL’>Lable name</Link>   

After doing above changes application will perform faster and it will load all page contents soon after you click the navigation links.

If you would like to join with FOSSASIA and contribute to SUSI Web Chat Application please fork this repository on Github.

Resources

Continue ReadingImplementation of React Routers in SUSI Web Chat