Creating step designs from KiCAD for PSLab

PSLab hardware device is developed using KiCAD. It is an open source PCB designing tool which we can use for free and it has almost all the features needed to build a professional PCB. But it lacks one thing. It cannot generate and export 3D models. In fact there is a 3D viewer in KiCAD but there is no way to export it. When manufacturing PSLab devices, it was required by the manufacturers so that they can have a clear understanding how the components are placed. This step is necessary for them to design the production line.

Before we get started, there are few prerequisites to help us get this done. They are as follows;

  1. FreeCAD: Open source 3D modeling software
  2. KiCAD step up tools: External library to import KiCAD PCB layouts to FreeCAD

You may need to follow installation instructions to install FreeCAD from the link given. Once we are all set, extract the KiCAD Stepup tools. There we can find a set of python libraries and some bash scripts. We can either use the scripts or type commands ourselves. I found scripts having some issues configuring paths.

To fire up FreeCAD with KiCAD stepup tools enabled, type the following command on your console;

$ freecad kicad-StepUp-tools.FCMacro

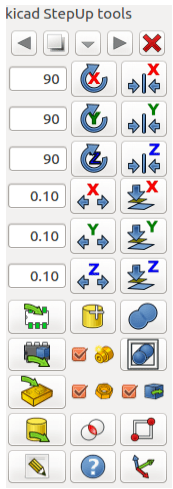
Make sure the console is pointing to the directory where the FCMacro file is located. This will open up FreeCAD and if you opened it already and saw the opening screen of FreeCAD, you’d notice a whole new toolbar is added.

Here you can see many tools related to import and export step files and 3D models from outside libraries and folders. Each tool is specific;

  • Load-kicad-footprint:

This tool is useful to generate a step file for an individual PCB component, say a resistor into a step file.

  • Export-to-kicad:

There are instances where when we design a custom foot print, and KiCAD doesn’t have the 3D model. In such a case we can export such a model to KiCAD

  • Load-kicad:

This is the tool we are using to export PSLab PCB board to step format. Before we move on to this tool there is one last configuration we have to do. FreeCAD doesn’t know where we have put KiCAD 3D models. This library simply transforms the available 3D models in KiCAD into step files and build the final output combining all of them together as in the featured image of this blog post. To setup the 3D model path, in KiCAD, there is a path configuration option. Copy the path under “KISYS3DMOD”.

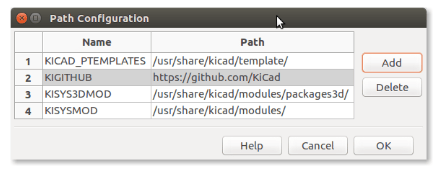
Figure 2: Path Configuration dialog box in KiCAD

And paste it into the ini file named “ksu-config.ini” which you can find in home folder.

Figure 3: Place to add 3D model path in ksu-config.ini file

Once that is done, click on the Load-KiCAD tool icon and browse to the repository where the PSLab hardware files are located at. Open the board file and FreeCAD will generate part by part and finally output the complete design. Now we can export the design in plenty of formats such as steps, stl another similar file format and many more.

Reference:

  1. https://www.freecadweb.org/wiki/Download
  2. http://kicad-pcb.org/external-tools/stepup/
Continue ReadingCreating step designs from KiCAD for PSLab

Use Travis to extract testing APKs for PSLab

Travis CI is a popular continuous integration tool built to test software and deployments done at GitHub repositories. They provide free plans to open source projects. PSLab Android is using Travis to ensure that all the pull requests made and the merges are build-bug frees. Travis can do this pretty well, but that is not all it can do. It’s a powerful tool and we can think of it as a virtual machine (with high specs) installed in a server for us to utilize efficiently.

There was a need in PSLab development that, if we want to test the functionalities of code at a branch. To fulfil this need, one has to download the branch to his local machine and use gradle to build a new apk. This is a tedious task, not to mention reviewers, even developers wouldn’t like to do this.

If the apk files were generated and in a branch, we can simply download them using a console command.

$ wget https://raw.github.com/fossasia/<repository>/<branch>/<file with extension>


With the help of Travis integration, we can create a simple script to generate these apks for us. This is done as follows;

Once the Travis build is complete for a triggering event such as a pull request, it will run it’s “after_success” block. We are going to execute a script at this point. Simply add the following code snippet.

after_success:
  - 'if [ "$TRAVIS_PULL_REQUEST" == "false" ]; then bash <script-name>.sh; fi'


This will run the script you have mentioned using bash. Here we will have the following code snippets in the specified bash script.

First of all we have to define the branch we want to build. This can be done using a variable assignment.

export DEVELOPMENT_BRANCH=${DEVELOPMENT_BRANCH:-development}


Once the build is complete, there will be new folders in the virtual machine. One of them is the app folder. Inside this folder contains the build folder where all the apk files are generated. So the next step is to copy these apk files to a place of our preference. I am using a folder named apk to make it much sense.

cd apk
\cp -r ../app/build/outputs/apk/*/**.apk .
\cp -r ../app/build/outputs/apk/debug/output.json debug-output.json
\cp -r ../app/build/outputs/apk/release/output.json release-output.json
\cp -r ../README.md .


Usually, the build folder has following apk files

  • app-debug.apk
  • app-release-unsigned.apk
  • app-release.apk

Release apks are usually signed with a key and it would cause issues while installation. So we have to filter out the debug apk that we usually use for debugging and get it as the output apk. This involves simple file handling operations in Linux and a bit of git.

First of all, rename the apk file so that it will be different from other files.

# Rename apks with dev prefixes
mv app-debug.apk app-dev-debug.apk


Then add and commit them to a specific branch where we want the output from.

git add -A
git commit -am "Travis build pushed [development]"
git push origin apk --force --quiet> /dev/null


Once it is all done, you will have a branch created and updated with the apk files you have defined.


Figure 1: UI of pslab-android apk branch

Reference:

  1. https://travis-ci.org/
Continue ReadingUse Travis to extract testing APKs for PSLab

I2C communication in PSLab Android

PSLab device is a compact electronic device with a variety of features. One of them is the ability to integrate sensors and get readings from them. One might think that why they should use PSLab device to get sensor readings and they can use some other hardware like Arduino. In those devices, user has to create firmware and need to know how to interface them with correct sampling rates and settings. But with PSLab, they all come in the whole package. User just have to plug the device to his phone and the sensor to device and he’s ready.

The idea of this blog post is to show how this sophisticated process is actually happening. Before that, let me give you a basic introduction on how I2C communication protocol works. I2C protocol is superior to UART and SPI protocols as they are device limited or requires many wires. But with I2C, you can literally connect thousands of sensors with just 4 wires. These wires are labeled as follows;

  • VCC – Power line
  • GND – Ground line
  • SDA – Data line
  • SCL – Signal clock

It is required that the SDA and SCL lines need to be connected to VCC line using two pull up resistors. But that’s just hardware. Let’s move on to learn how I2C communicate.

Here there is this communicating concept called master and slave. To start communication, master issues a global signal like a broadcast to all the devices connected to SCL and SDA lines. This signal contains the address of the slave, master needs to address and get data from. If the slave received this call to him, he will pull down the SDA line to signal the master that he heard him and ready to communicate with him. Here communication means reading or writing data. Then the communication happens and the link between master and slave breaks giving opportunity to other masters and slaves.

One might think this is a slow process. But these signals are transmitted at high frequencies. In PSLab it is at 100 kHz and that is one millisecond.

PSLab library has a special class to handle I2C communication. That is

public class I2C {/**/}


Once this class is initiated, one has to call the start function to start communication. This method requires the address we wish to communicate with and the mode of operation stating if it is a read or write operation

public int start(int address, int rw) throws IOException {
   packetHandler.sendByte(commandsProto.I2C_HEADER);
   packetHandler.sendByte(commandsProto.I2C_START);
   packetHandler.sendByte((address << 1) | rw & 0xff);
   return (packetHandler.getAcknowledgement() >> 4);
}


Once the address is sent out, protocol requires us to stop and wait for acknowledgement.

public void wait() throws IOException {
   packetHandler.sendByte(commandsProto.I2C_HEADER);
   packetHandler.sendByte(commandsProto.I2C_WAIT);
   packetHandler.getAcknowledgement();
}


If there are no congestion in the lines such as reading from multiple devices, the acknowledgement will be instantaneous. Once that is complete, we can start communication either byte-wise or bulk-wise

public int send(int data) throws IOException {
   packetHandler.sendByte(commandsProto.I2C_HEADER);
   packetHandler.sendByte(commandsProto.I2C_SEND);
   packetHandler.sendByte(data);
   return (packetHandler.getAcknowledgement() >> 4);
}


As an example, reading sensor values at a given interval can be done using the following method call.

public ArrayList<Byte> read(int length) throws IOException {
   ArrayList<Byte> data = new ArrayList<>();
   for (int i = 0; i < length - 1; i++) {
       packetHandler.sendByte(commandsProto.I2C_HEADER);
       packetHandler.sendByte(commandsProto.I2C_READ_MORE);
       data.add(packetHandler.getByte());
       packetHandler.getAcknowledgement();
   }
   packetHandler.sendByte(commandsProto.I2C_HEADER);
   packetHandler.sendByte(commandsProto.I2C_READ_END);
   data.add(packetHandler.getByte());
   packetHandler.getAcknowledgement();
   return data;
}


Once we get the data bundle, either we can save them or display in a graph whatever the way it’s convenient.

Reference:

  1. https://en.wikipedia.org/wiki/I%C2%B2C
Continue ReadingI2C communication in PSLab Android

Adding Data Point Markers to OSM

PSLab Android app supports multiple sensors external and internal. Users can view sensor readings and record them into a csv file for later use. They can also have their location embedded into the data set they are recording. Saving the location related to each sensor reading is important. Say in a school experiment teacher can ask the student to measure dust particle concentration in city and inside his house. If the data set didn’t have any reference to the location where it was recorded, it is just incomplete. To facilitate this feature, we have enabled location in data recordings.

Enabling location is just not enough. User should be able to view the locations. Probably on a map itself would be a good idea. With the use of Open Street Maps, we can add markers to specific locations. These markers can be used as a point to show on map where a specific data set had been recorded by the user. This can be implemented further to add additional features such as standardized labels to view which data set is at which location etc.

Figure 1: Markers on Map

Unlike Google Maps API, in Open Street Maps there is no direct implementation to add a marker. But it is not a hard implementation either. We can simply create a class extending map overlays and use that as a base to add markers.

We can start by creating a new class that extends ItemizedOverlay<OverlayItem> class as follows. In this class, it would be wise to have an array list full of markers we are using in the map to modularize the whole markers related tasks into this one class rather than implementing in every place where map is used.

public class MapOverlay extends ItemizedOverlay<OverlayItem> {

    private ArrayList<OverlayItem> overlayItemList = new   ArrayList<OverlayItem>();

}


Once the class is initiated, have the following methods implemented. The following method will add markers to the array list we have created at the beginning.

public void addItem(GeoPoint p, String title, String snippet){
  OverlayItem newItem = new OverlayItem(title, snippet, p);
  overlayItemList.add(newItem);
  populate(); 
}


This method will be used to handle focusing events related to map markers.

@Override
public boolean onSnapToItem(int arg0, int arg1, Point arg2, IMapView arg3){
  return false;
}


Following method is used by the map itself to generate markers from the marker list.

@Override
protected OverlayItem createItem(int arg0) {
  return overlayItemList.get(arg0);
}


This method is an overriden method we will have to include in the class body.

@Override
public int size() {
  return overlayItemList.size();
}


Once the overlay class is completed, we can move on to actual implementation of a map on Openstreetmap view.

From the main activity where the map is viewed, initiate the marker overlay class and pass the drawable that needs to be shown as the marker to the class constructor as follows:

MapOverlay mapoverlay = null;
Drawable marker=getResources().getDrawable(android.R.drawable.map_hand);
int markerWidth = marker.getIntrinsicWidth();
int markerHeight = marker.getIntrinsicHeight();
marker.setBounds(0, markerHeight, markerWidth, 0);

ResourceProxy resourceProxy = new DefaultResourceProxyImpl(getApplicationContext());
mapoverlay = new MapOverlay(marker, resourceProxy);
mapView.getOverlays().add(mapoverlay);
         
GeoPoint point = new GeoPoint(55.75, 37.616667);
mapoverlay.addItem(point, "Russia", "Russia");


We can add as many GeoPoints as we want to markers list and they all will be displayed on the map like this;

Figure 2: Final Output of Markers

Reference:

http://android-coding.blogspot.com/2012/06/example-of-implementing-openstreetmap.html

Continue ReadingAdding Data Point Markers to OSM

Adding Open Street Maps to PSLab Android

PSLab Android app is an open source app that uses fully open libraries and tools so that the community can use all it’s features without any compromises related to pricing or feature constraints. This will brings us to the topic how to implement a map feature in PSLab Android app without using proprietary tools and libraries. This is really important as now the app is available on Fdroid and they don’t allow apps to have proprietary tools in them if they are published there. In other words, it simply says we cannot use Google Maps APIs no matter how powerful they are in usage.

There is a workaround and that is using Open Street Maps (OSM). OSM is an open source project which is supported by a number of developers all around the globe to develop an open source alternative to Google Maps. It supports plenty of features we need in PSLab Android app as well. Starting from displaying a high resolution map along with caching the places user has viewed, we can add markers to show data points and locations in sensor data logging implementations.

All these features can be made available once we add the following dependencies in gradle build file. Make sure to use the latest version as there will be improvements and bug fixes in each newer version

implementation "org.osmdroid:osmdroid-android:$rootProject.osmVersion"
implementation "org.osmdroid:osmdroid-mapsforge:$rootProject.mapsforgeVersion"
implementation "org.osmdroid:osmdroid-geopackage:$rootProject.geoPackageVersion"


OSM will be functional only after the following permission states were granted.

<uses-permission android:name="android.permission.ACCESS_FINE_LOCATION"/>
<uses-permission android:name="android.permission.INTERNET" />
<uses-permission android:name="android.permission.ACCESS_NETWORK_STATE"  />
<uses-permission android:name="android.permission.WRITE_EXTERNAL_STORAGE" />


In a view xml file, add the layout org.osmdroid.views.MapView to initiate the map view. There is a known issue in OSM library. That is during the initiation, if the zoom factor is set to a small value, there will be multiple instances of maps as shown in Fig 1. The solution is to have a higher zoom value when the map is loaded.

Figure 1: Multiple map tiles in OSM

Once we initialize the map view inside an activity, a zoom level can be easily set using a map controller as follows;

map = findViewById(R.id.osmmap);
map.setTileSource(TileSourceFactory.MAPNIK);
map.setBuiltInZoomControls(true);
map.setMultiTouchControls(true);

IMapController mapController = map.getController();
mapController.setZoom((double) 9);
GeoPoint startPoint = new GeoPoint(0.00, 0.00);
mapController.setCenter(startPoint);


After successfully implementing the map view, we can develop the business logic to add markers and descriptions to improve the usability of OS Maps. They will be available in the upcoming blog posts.

Reference:

  1. https://github.com/osmdroid/osmdroid/wiki/How-to-add-the-osmdroid-library-via-Gradle
  2. https://www.openstreetmap.org/
Continue ReadingAdding Open Street Maps to PSLab Android

Capturing Position Data with PSLab Android App

PSLab Android app by FOSSASIA can be used to visualize different waveforms, signal levels and patterns. Many of them involve logging data from different instruments. These data sets can be unique and the user might want them to be specific to a location or a time. To facilitate this feature, PSLab Android app offers a feature to save user’s current location along with the data points.

This implementation can be done in two ways. One is to use Google Maps APIs and the other one is to use LocationManager classes provided by Android itself. The first one is more on to proprietary libraries and it will give errors when used in an open source publishing platform like Fdroid as they require all the libraries used in an app to be open. So we have to go with the latter, using LocationManager classes.

As first step, we will have to request permission from the user to allow the app access his current location. This can be easily done by adding a permission tag in the Manifest.xml file.

<uses-permission android:name="android.permission.ACCESS_FINE_LOCATION" />


Since we are not using Google Maps APIs, capturing the current location will take a little while and that can be considered as the only downfall of using this method. We have to constantly check for a location change to capture the data related to current location. This can be easily done by attaching a LocationListener as it will do the very thing for us.

private LocationListener locationListener = new LocationListener() {
   @Override
   public void onLocationChanged(Location location) {
       locationAvailable = true;
   }

   @Override
   public void onStatusChanged(String s, int i, Bundle bundle) {/**/}

   @Override
   public void onProviderEnabled(String s) {/**/}

   @Override
   public void onProviderDisabled(String s) {
       // TODO: Handle GPS turned on/off situations
   }
};


In case if the user has turned off GPS in his device, this method wouldn’t work. We will have to request him to turn the feature on using a simple dialog box or a bottom sheet dialog.

We can also customize how frequent the locationlistener should check for a location using another class named LocationManager. This class can be instantiated as follows:

locationManager = (LocationManager) getSystemService(Context.LOCATION_SERVICE);


Then we can easily set the time interval using requestLocationUpdates method. Here I have requested location updates in every one second. That is a quite reasonable rate.

locationManager.requestLocationUpdates(provider, 1000, 1, locationListener);


Once we have set all this up, we can capture the current location assuming that the user has turned on the GPS option from his device settings and the LocationManager class has a new location as we checked earlier.

if (locationAvailable) {
   Location location = locationManager.getLastKnownLocation(LocationManager.GPS_PROVIDER);
}


Each location will contain details related to its position such as latitudes and longitudes. We can log these data using the CSVLogger class implementation in PSLab Android app and let user have this option while doing his experiments.

Reference:

  1. An open source implementation : https://github.com/borneq/HereGPSLocation/blob/master/app/src/main/java/com/borneq/heregpslocation/MainActivity.java

Google Maps: https://developers.google.com/maps/documentation/android-sdk/intro

Continue ReadingCapturing Position Data with PSLab Android App

Setting up environment to build PSLab Android app using Fdroid Build

Fdroid is a place for open source enthusiasts and developers to host their Free and Open Source Software (FOSS) for free and get more people onboard into their community. In order to host an app in their repository, one has to go through a several steps of builds and tests. This is to ensure that the software provided by them are as quality and safe as they can ever be. They are not allowing proprietary libraries or tools to integrate into any app or they will  be published outside the Fdroid main repository (fdroid-data) so that the users will know what they are downloading.

In a normal Linux computer where we are developing Android apps and have setup Android Studio will not be able to run the build command using:

$ fdroid build -v -l org.fossasia.pslab

The reason behind this is that we have not installed gradle and build tools required by the “fdroid build” because they are not useful in our day today activities for standalone activities. First thing we need to do is, install gradle separately. This will include adding gradle to $PATH as well.

Download the latest gradle version zip file or the version your project is using with the following command. In PSLab Android app, we are using 4.5.1 version and the snippet below include that version.

$ wget https://services.gradle.org/distributions/gradle-4.5.1-bin.zip

Next step is to install this in a local folder. We can select any path we want, but /opt/ folder is generally used in such scenarios.

sudo mkdir /opt/gradle
sudo unzip -d /opt/gradle gradle-4.5.1-bin.zip

Then we can add gradle to our $PATH variable using the following command:

$ export PATH=$PATH:/opt/gradle/gradle-4.5.1/bin

Now we are all set with gradle settings. Next step is to verify that the fdroid server is properly configured and up to date. When you run the build command after setting up the gradle in PC, it will throw an error similar to “failed to find any output apks”. This causes if the installed fdroid server version is old.

Fdroid server is running on python 3 and it will require some additional libraries pre-installed to properly function.

$ sudo apt-get install vagrant virtualbox git python3-certifi python3-libvirt python3-requestbuilder python3-yaml python3-clint python3-vagrant python3-paramiko python3-pyasn1 python3-pyasn1-modules

Once these libraries are installed, remove the previous instance of fdroidserver by using the following command:

$ sudo apt-get remove fdroidserver

Then we can reinstall the latest version of fdroid server from git using the following command:

$ git clone https://gitlab.com/fdroid/fdroidserver.git
export PATH="$PATH:$PWD/fdroidserver"

Now we are all set to do a brand new lint build on our PC to make our app ready to be published in Fdroid repository!

Reference:

  1. Install gradle : https://www.vultr.com/docs/how-to-install-gradle-on-ubuntu-16-10
  2. Gradle versions : https://gradle.org/releases
  3. Setting up Fdroid-server : https://f-droid.org/en/docs/Build_Server_Setup/

Installing fdroidserver : https://gitlab.com/fdroid/fdroiddata/blob/master/README.md#quickstart

Continue ReadingSetting up environment to build PSLab Android app using Fdroid Build

Using external UART modules to debug PSLab operations

Pocket Science Lab by FOSSASIA is a compact tool that can be used for circuit analytics and debugging. To make things more interesting, this device can be accessed via the user interface using an Android app or also a desktop app. Both these apps use the UART protocol (Universal Asynchronous Receiver-Transmitter) to transmit commands to the PSLab device from mobile phone or PC and receive commands vice versa. The peculiar thing about hardware is that the developer cannot simply log data just like developing and debugging a software program. He needs some kind of an external mechanism or a tool to visualize those data packets travelling through the wires.

Figure 1: UART Interface in PSLab

PSLab has a UART interface extracted out simply for this reason and also to connect external sensors that use the UART protocol. With this, a developer who is debugging any of the Android app or the desktop app can view the command and data packets transmitted between the device and the user end application.

This  requires some additional components. UART interface has two communication related pins: Rx(Receiver) and Tx(Transmitter). We will need to monitor both these pin signals for input and output data packets. It should be kept in mind that PSLab is using 3.3V signals. This voltage level is important to mention here because if someone uses 5V signals on these pins, it will damage the main IC. There are FTDI modules available in market. FTDI stands for Future Technology Devices International which is a company name and their main product is this USB transceiver chip. These chips play a major role in electronic industry due to product reliability and multiple voltage support. PSLab uses 3.3V USB Tx Rx pins and modules other than FTDI wouldn’t support it.

Figure 2: FTDI Module from SparkFun

The module shown in Fig.2 is a FTDI module which you can simply plug in to computer and have a serial monitor interface. There are cheaper versions in shopping websites like eBay or Alibaba and they will also work fine. Both Tx and Rx pins will require two of these modules and connectivity is as follows;

PSLab [Rx Pin] → FTDI Module 1 [Rx Pin]
PSLab [Tx Pin] → FTDI Module 2 [Rx Pin]

This might look strange because everywhere we see a UART module is connected Rx → Tx and Tx → Rx. Notice that our idea is to monitor data packets. Not communicate with PSLab device directly. We want to see if our mobile phone Android app is sending correct commands to PSLab device or not and if PSLab device is transmitting back the expected result or not. This method helped a lot when debugging resistance measurement application in PSLab Android app.

Monitoring these UART data packets can be done simply using a serial monitor. You can either download and install some already built serial monitors or you can simply write a python script as follows which does the trick.

import serial

ser = serial.Serial(
    port='/dev/ttyUSB1',
    baudrate=1000000000
)

ser.isOpen()
while 1 :
    data = ''
    while ser.inWaiting() > 0:
        data += ser.read(1)

    if data != '':
        print ">>" + data

Once you are getting commands and responses, it will look like debugging a software using console.

References:

  1. PySerial Library : http://pyserial.readthedocs.io/en/latest/shortintro.html
  2. UART Protocol : https://en.wikipedia.org/wiki/Universal_asynchronous_receiver-transmitter
  3. FTDI : https://en.wikipedia.org/wiki/FTDI
Continue ReadingUsing external UART modules to debug PSLab operations

Saving Sensor Data in CSV format

PSLab Android app by FOSSASIA provides a variety of features to its users. One of them is accessing various types of sensors both built into mobile phone and external sensors connected with PSLab device. In earlier versions users were only able to view the captured data. Moving forward, adding improvements to the app, now there is a feature to save those data displayed in graphs in csv format.

This feature is important in many ways. One is educational. In a classroom, teachers can ask students to perform an experiment and prepare a report using the data collected. By just visualizing they cannot do this. Actual data points must be made available. Another use is sharing data sets related to say environmental data over different demographics.

CSV, or comma-separated values file is a text file where stored data are separated by commas. The file stores these tabular data (numbers and text) in plain text format. Each line of the file represents a data record. Each data record consists of one or more fields, separated by commas. CSV files are commonly used to store sensor data because of its easy use. This post is about how PSLab device uses CSV file to write sensor data in it.

In PSLab android source code, there is a dedicated class to handle read sensor data from different instruments called “CSVLogger”. Developers can easily instantiate this class wherever they want a data logging as follows;

CSVLogger logger = new CSVLogger(<SUBFOLDER>); 
logger .writeCSVFile("Heading1,Heading2,Heading3\n");

 
This will create a blank folder in “PSLab” folder in device storage.  The CSV file is generated with the following convention according to the date and time where data is saved in the file.

yyyymmdd-hhmmss.csv

A sample file would have a name like 20180710-07:30:28.csv inside the SUBFOLDER which is specific to each instrument. Folder name will be the one used when initiating the CSVLogger.

With this method, logging data is pretty easy. Simply create a string which is a comma seperated and ended with a new line character. Then simply call the writeCSVFile(data) method with the string as a parameter added to it. It will keep appending string data until a new file is created. File creation can be handled by developers at their own interests and preferences.

String data = String.valueOf(System.currentTimeMillis()) + "," + item.getX() + "," + item.getY() + "\n";
logger.writeCSVFile(data);


To bring out an example let’s view how it’s implemented in Lux Meter instrument. This is a good source one can refer to when adding this feature in fragments

inside a main activity. In Lux Meter, there is the parent activity named Lux Meter and inside that there are two fragments, one is fragmentdata and the other one is fragmentsettings. Data capturing and saving occurs inside fragmentdata.

Menu icon controlling happens in the parent activity and we have bound a variable across the main activity and child fragment as follows;

LuxMeterActivity parent = (LuxMeterActivity) getActivity();
if (parent.saveData) {/* Save Data */}

 
This makes it easier listening menu icon clicks and start/stop recording accordingly. How to handle menu icons is beyond the scope of this blog and you can find tutorials on how to do that in the Resources section at the bottom of this blog post.

Once these CSV files are available, users can easily integrate them with advanced software like Matlab or Octave to do further analysis and processing to captured data sets.

Resources:

  1. CSV Logger: https://github.com/fossasia/pslab-android/blob/development/app/src/main/java/org/fossasia/pslab/others/CSVLogger.java
  2. Android Menu options: https://stackoverflow.com/questions/27984041/android-correct-use-of-invalidateoptionsmenu
Continue ReadingSaving Sensor Data in CSV format

Building PSLab Android app with Fdroid

Fdroid is a place for open source enthusiasts and developers to host their Free and Open Source Software (FOSS) for free and get more people onboard into their community. Hosting an app in Fdroid is not a fairly easy process just like hosting one in Google Play. We need to perform a set of build checks prior to making a merge request (which is similar to pull request in GitHub) in the fdroid-data GitLab repository. PSLab Android app by FOSSASIA has undergone through all these checks and tests and now ready to be published.

Setting up the fdroid-server and fdroid-data repositories is one thing. Building our app using the tools provided by fdroid is another thing. It will involve quite a few steps to get started. Fdroid requires all the apps need to be built using:

$ fdroid build -v -l org.fossasia.pslab


This will output a set of logs which tell us what went wrong in the builds. The usual one in a first time app is obviously the build is not taking place at all. The reason is our metadata file needs to be changed to initiate a build.

Build:<versioncode>,<versionname>
    commit=<commit which has the build mentioned in versioncode>
    subdir=app
    gradle=yes


When a metadata file is initially created, this build is disabled by default and commit is set to “?”. We need to fill in those blanks. Once completed, it will look like the snippet above. There can be many blocks of “Build” can be added to the end of metadata file as we are advancing and upgrading through the app. As an example, the latest PSLab Android app has the following metadata “Build” block:

Build:1.1.5,7
    commit=0a50834ccf9264615d275a26feaf555db42eb4eb
    subdir=app
    gradle=yes


In case of an update, add another “Build” block and mention the version you want to appear on the Fdroid repository as follows:

Auto Update Mode:Version v%v
Update Check Mode:Tags
Current Version:1.1.5
Current Version Code:7


Once it is all filled, run the build command once again. If you have properly set the environment in your local PC, build will end successfully assuming there were no Java or any other language syntax errors.

It is worth to mention few other facts which are common to Android software projects. Usually the source code is packed in a folder named “app” inside the repository and this is the common scenario if Android Studio builds up the project from scratch. If this “app” folder is one level below the root, that is “android/app”, the build instructions shown above will throw an error as it cannot find the project files.

The reason behind this is we have mentioned “subdir=app” in the metadata file. Change this to “subdir=android/app” and run the build again. The idea is to direct the build to find where the project files are.

Apart from that, the commit can be represented by a tag instead of a long commit hash. As an example, if we had merge commits in PSLab labeled as “v.<versioncode>”, we can simply use “commit=v.1.1.5” instead of the hash code. It is just a matter of readability.

Happy Coding!

Reference:

  1. Metadata : https://f-droid.org/docs/Build_Metadata_Reference/#Build
  2. PSLab Android app Fdroid : https://gitlab.com/fdroid/fdroiddata/merge_requests/3271/diffs
Continue ReadingBuilding PSLab Android app with Fdroid