Introducing Stream Servlet in loklak Server

A major part of my GSoC proposal was adding stream API to loklak server. In a previous blog post, I discussed the addition of Mosquitto as a message broker for MQTT streaming. After testing this service for a few days and some minor improvements, I was in a position to expose the stream to outside users using a simple API.

In this blog post, I will be discussing the addition of /api/stream.json endpoint to loklak server.

HTTP Server-Sent Events

Server-sent events (SSE) is a technology where a browser receives automatic updates from a server via HTTP connection. The Server-Sent Events EventSource API is standardized as part of HTML5 by the W3C.

Wikipedia

This API is supported by all major browsers except Microsoft Edge. For loklak, the plan was to use this event system to send messages, as they arrive, to the connected users. Apart from browser support, EventSource API can also be used with many other technologies too.

Jetty Eventsource Plugin

For Java, we can use Jetty’s EventSource plugin to send events to clients. It is similar to other Jetty servlets when it comes to processing the arguments, handling requests, etc. But it provides a simple interface to send events as they occur to connected users.

Adding Dependency

To use this plugin, we can add the following line to Gradle dependencies –

compile group: 'org.eclipse.jetty', name: 'jetty-eventsource-servlet', version: '1.0.0'

[SOURCE]

The Event Source

An EventSource is the object which is required for EventSourceServlet to send events. All the logics for emitting events needs to be defined in the related class. To link a servlet with an EventSource, we need to override the newEventSource method –

public class StreamServlet extends EventSourceServlet {
    @Override
    protected EventSource newEventSource(HttpServletRequest request) {
        String channel = request.getParameter("channel");
        if (channel == null) {
            return null;
        }
        if (channel.isEmpty()) {
            return null;
        }
        return new MqttEventSource(channel);
    }
}

[SOURCE]

If no channel is provided, the EventSource object will be null and the request will be rejected. Here, the MqttEventSource would be used to handle the stream of Tweets as they arrive from the Mosquitto message broker.

Cross Site Requests

Since the requests to this endpoint can’t be of JSONP type, it is necessary to allow cross site requests on this endpoint. This can be done by overriding the doGet method of the servlet –

@Override
protected void doGet(HttpServletRequest request, HttpServletResponse response) throws ServletException, IOException {
     response.setHeader("Access-Control-Allow-Origin", "*");
    super.doGet(request, response);
}

[SOURCE]

Adding MQTT Subscriber

When a request for events arrives, the constructor to MqttEventSource is called. At this stage, we need to connect to the stream from Mosquitto for the channel. To achieve this, we can set the class as MqttCallback using appropriate client configurations –

public class MqttEventSource implements MqttCallback {
    ...
    MqttEventSource(String channel) {
        this.channel = channel;
    }
    ...
    this.mqttClient = new MqttClient(address, "loklak_server_subscriber");
    this.mqttClient.connect();
    this.mqttClient.setCallback(this);
    this.mqttClient.subscribe(this.channel);
    ...
}

[SOURCE]

By setting the callback to this, we can override the messageArrived method to handle the arrival of a new message on the channel. Just to mention, the client library used here is Eclipse Paho.

Connecting MQTT Stream to SSE Stream

Now that we have subscribed to the channel we wish to send events from, we can use the Emitter to send events from our EventSource by implementing it –

public class MqttEventSource implements EventSource, MqttCallback {
    private Emitter emitter;


    @Override
    public void onOpen(Emitter emitter) throws IOException {
        this.emitter = emitter;
        ...
    }

    @Override
    public void messageArrived(String topic, MqttMessage message) throws Exception {
        this.emitter.data(message.toString());
    }
}

[SOURCE]

Closing Stream on Disconnecting from User

When a client disconnects from the stream, it doesn’t makes sense to stay connected to the server. We can use the onClose method to disconnect the subscriber from the MQTT broker –

@Override
public void onClose() {
    try {
        this.mqttClient.close();
        this.mqttClient.disconnect();
    } catch (MqttException e) {
        // Log some warning 
    }
}

[SOURCE]

Conclusion

In this blog post, I discussed connecting the MQTT stream to SSE stream using Jetty’s EventSource plugin. Once in place, this event system would save us from making too many requests to collect and visualize data. The possibilities of applications of such feature are huge.

This feature can be seen in action at the World Mood Tracker app.

The changes were introduced in pull request loklak/loklak_server#1474 by @singhpratyush (me).

Resources

Continue ReadingIntroducing Stream Servlet in loklak Server

Giving Offline Support to the Open Event Organizer Android App

Open Event Organizer is an Android Application for Event Organizers and Entry Managers which uses Open Event API Server as a backend. The core feature of the App is to scan a QR code to validate an attendee’s check in. The App maintains a local database and syncs it with the server. The basic workflow of the attendee check in is – the App scans a QR code on an attendee’s ticket. The code scanned is processed to validate the attendee from the attendees database which is maintained locally. On finding, the App makes a check in status toggling request to the server. The server toggles the status of the attendee and sends back a response containing the updated attendee’s data which is updated in the local database. Everything described above goes well till the App gets a good network connection always which cannot be assumed as a network can go down sometimes at the event site. So to support the functionality even in the absence of the network, Orga App uses Job Schedulers which handle requests in absence of network and the requests are made when the network is available again. I will be talking about its implementation in the App through this blog.

The App uses the library Android-Job developed by evernote which handles jobs in the background. The library provides a class JobManager which does most of the part. The singleton of this class is initialized in the Application class. Job is the class which is where actually a background task is implemented. There can be more than one jobs in the App, hence the library requires to implement JobCreator interface which has create method which takes a string tag and the relevant Job is returned. JobCreator is passed to the JobManager in Application while initialization. The relevant code is:

JobManager.create(this).addJobCreator(new OrgaJobCreator());

Initialization of JobManager in Application class

public class OrgaJobCreator implements JobCreator {
   @Override
   public Job create(String tag) {
       switch (tag) {
           case AttendeeCheckInJob.TAG:
               return new AttendeeCheckInJob();
           default:
               return null;
       }
   }
}

Implementation of JobCreator

public class AttendeeCheckInJob extends Job {
   ...
   ...
   @NonNull
   @Override
   protected Result onRunJob(Params params) {
       ...
       ...
       Iterable<Attendee> attendees = attendeeRepository.getPendingCheckIns().blockingIterable();
       for (Attendee attendee : attendees) {
           try {
               Attendee toggled = attendeeRepository.toggleAttendeeCheckStatus(attendee).blockingFirst();
               ...
           } catch (Exception exception) {
               ...
               return Result.RESCHEDULE;
           }
       }
       return Result.SUCCESS;
   }

   public static void scheduleJob() {
       new JobRequest.Builder(AttendeeCheckInJob.TAG)
           .setExecutionWindow(1, 5000L)
           .setBackoffCriteria(10000L, JobRequest.BackoffPolicy.EXPONENTIAL)
           .setRequiredNetworkType(JobRequest.NetworkType.CONNECTED)
           .setRequirementsEnforced(true)
           .setPersisted(true)
           .setUpdateCurrent(true)
           .build()
           .schedule();
   }
}

Job class for attendee check in job

To create a Job, these two methods are overridden. onRunJob is where the actual background job is going to run. This is the place where you implement your job logic which should be run in the background. In this method, the attendees with pending sync are fetched from the local database and the network requests are made. On failure, the same job is scheduled again. The process goes on until the job is done. scheduleJob method is where the related setting options are set. This method is used to schedule an incomplete job.

So after this implementation, the workflow described above is changed. Now on attendee is found, it is updated in local database before making any request to the server and the attendee is flagged as pending sync. Accordingly, in the UI single tick is shown for the attendee which is pending for sync with the server. Once the request is made to the server and the response is received, the pending sync flag of the attendee is removed and double tick is shown against the attendee.

Links:
1. Documentation for Android-Job Library by evernote
2. Github Repository of Android-Job Library

Continue ReadingGiving Offline Support to the Open Event Organizer Android App

How Switch Case improve performance in PSLab Saved Experiments

PSLab android application contains nearly 70 experiments one can experiment on using the PSLab device and the other necessary circuit components and devices. These experiments span over areas such as Electronics, Electrical, Physical and High school level. All these experiments are accessible via an android adapter in the repository named “PerformExperimentAdapter”. This adapter houses a tab view with two different tabs; one for the experiment details and the other for actual experiment and resultant graphs.

The adapter extends an inbuilt class FragmentPagerAdapter;

public class PerformExperimentAdapter extends FragmentPagerAdapter

This class displays every page attached to its viewpager as a fragment. The good thing about using fragments is that they have a recyclable life cycle. Rather than creating new views for every instance of an experiment, the similar views can be recycled to use once again saving resources and improving performance. FragmentPagerAdapter needs to override a method to display the correct view on the tab select by user.

@Override
public Fragment getItem(int position) {

}

Depending on the value of position, relevant experiment documentation and the experiment implementation fragments are displayed determined using the experiment title. Performance can be critical in this place as if it takes too long to process and render a fragment, user will feel a lag.

The previous implementation was using consecutive if statements.

@Override
public Fragment getItem(int position) {
   switch (position) {
       case 0:
           if (experimentTitle.equals(context.getString(R.string.diode_iv)))
               return ExperimentDocFragment.newInstance("D_diodeIV.html");
           if (experimentTitle.equals(context.getString(R.string.zener_iv)))
               return ExperimentDocFragment.newInstance("D_ZenerIV.html");
           ...
       case 1:
           if (experimentTitle.equals(context.getString(R.string.diode_iv)))
               return ZenerSetupFragment.newInstance();
           if (experimentTitle.equals(context.getString(R.string.zener_iv)))
               return DiodeExperiment.newInstance(context.getString(R.string.half_wave_rectifier));
           ...
       default:
           return ExperimentDocFragment.newInstance("astable-multivibrator.html");
   }
}

This setup was suitable for applications where there is less than around 5 choices to chose between. As the list grows, the elements in the end of the if layers will take more time to load as each of the previous if statements need to be evaluated false in order to reach the bottom statements.

This is when this implementation was replaced using switch case statements instead of consecutive if statements. The theory behind the performance improvement involves algorithm structures; Hash Tables

Hash Tables

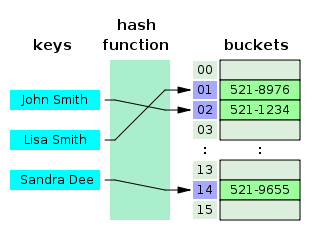
Hash tables use a hash function to calculate the index of the destination cell. This operation on average has a complexity of O(1) which means it will take the same time to access any two elements which are randomly positioned.

This is possible because java uses the hash code of the string to determine the index where the target is situated at. This way it is much faster than consecutive if statement calls where in the worst case it will take O(n) time to reach the statement causing a lag in the application.

Current application uses switch cases in the PerformExperimentAdapter;

@Override
public Fragment getItem(int position) {
   switch (position) {
       case 0:
           switch (experimentTitle) {
               case "Diode IV Characteristics":
                   return ExperimentDocFragment.newInstance("D_diodeIV.html");
               case "Zener IV Characteristics":
                   return ExperimentDocFragment.newInstance("D_ZenerIV.html");
               case "Half Wave Rectifier":
                   return ExperimentDocFragment.newInstance("L_halfWave.html");
           }
       case 1:
           switch (experimentTitle) {
               case "Diode IV Characteristics":
                   return ZenerSetupFragment.newInstance();
               case "Zener IV Characteristics":
                   return ZenerSetupFragment.newInstance();
               case "Half Wave Rectifier":
                   return DiodeExperiment.newInstance(context.getString(R.string.half_wave_rectifier));
           }
       default:
           return ExperimentDocFragment.newInstance("astable-multivibrator.html");
   }
}

There is one downfall in using switch case in the context. That is the inability to use string resources directly as Java requires a constant literals in the evaluation statement of a case.

Resources:

Continue ReadingHow Switch Case improve performance in PSLab Saved Experiments

Coloring Waveforms in PSLab Charts

Charts are used to display set of data in an analytical manner such that an observer can easily come to a conclusion by just looking at it without having to go through all the numerical data sets. Legends are used to differentiate a set of data set from another set. Generally, different colors and different names are used to form a legend in a chart.

MPAndroidChart is an amazing library with the capability of generating different types of graphs in an Android device. In PSLab several user interfaces are implemented using LineCharts to display different waveforms such as readings from channels attached to PSLab device, logic levels etc.

When several data sets are being plotted on the same graph area, legends are used. In PSLab Android application, Oscilloscope supports four different type of waveforms to be plotted on the same graph. Logic Analyzer implements one to four different types of logic level waveforms on the same plot. To identify which is which, legends with different colors can be used rather than just the names. For the legends to have different colors, it should be explicitly set which color should be held by which data set. Otherwise it will use the default color to all the legends making it hard to differentiate data lines when there are more than one data set is plotted.

Assume a data set is generated from a reading taken from a probe attached to PSLab device. The set will be added as an Entry to an array list as follows;

ArrayList<Entry> dataSet = new ArrayList<Entry>();

The next step will be to create a Line Data Set

LineDataSet lineData = new LineDataSet(dataSet, "DataSet 1");

This LineDataSet will contain sample values of the waveform captured by the microprocessor. A LineDataSet object support many methods to alter its look and feel. In order to set a color for the legend, setColor() method will be useful. This method accepts an integer as the color. This method can be accessed as follows;

lineData.setColor(Color.YELLOW);

MPAndroidChart provides different sets of colors under ColorTemplate. This class has several predefined colors with five colors in each color palette are added by the developers of the library and they can be accessed using the following line of code by simply calling the index value of the palette array list.

set1.setColor(ColorTemplate.JOYFUL_COLORS[0]);

Set of color palettes available in the ColorTemplate class are;

  1. LIBERTY_COLORS
  2. JOYFUL_COLORS
  3. PASTEL_COLORS
  4. COLORFUL_COLORS
  5. VORDIPLOM_COLORS
  6. MATERIAL_COLORS

The following demonstrates how the above activities produce a line chart with three different data sets with different colored legends.

This implementation can be used to enhance the readability of the waveforms letting user being able to differentiate between one waveform from another in PSLab Android application.

Resources:

PSLab official web site: https://pslab.fossasia.org/

Continue ReadingColoring Waveforms in PSLab Charts

How to Parse HTML Tags and Anchor Clickable Links in SUSI Android App

Html tags are used to define how contents of a webpage should be formatted and displayed. Sometimes the SUSI answer type response contains some html tags but showing these html tags without parsing would distort the normal text flow in SUSI Android.

For the query ‘Ask me something’ SUSI’s reply is

“data”: [
     {
      “question”: “Which soccer team won the Copa Am&eacute;rica 2015 Championship ? “,                                          
     }]

In SUSI Android this message looks like

As you can see that showing html tags without parsing distort the normal text flow. So we need to parse html tags properly. We use Html class for this purpose. Html class is present in android.text package and you can import it in the class where you want to use it.

import android.text.Html

fromHtml method of Html class is used to parse html tags. But for API level less than 24 and equal to or greater than 24 we use different parameters in fromHtml method.

For API level less than 24 we used

Html.fromHtml(model.getContent())

But for API level equal to or greater than 24 we have to use

Html.fromHtml(model.getContent(), Html.FROM_HTML_MODE_COMPACT)

Here the second parameter is legacy flags which decides how text inside a tag will be shown after parsing.

In case of Html.fromHtml(String string) legacy flag is by default FROM_HTML_MODE_LEGACY. It indicates that separate block-level elements with blank lines.

So after parsing html tags using fromHtml

But return type of fromHtml method is Spanned so if you need String then you have to convert it into string using toString() method.

Anchor action type in susi response contains link and text.

       “link”: “https://www.openstreetmap.org/#map=13/1.2896698812440377/103.85006683126556”,
       “text”: “Link to Openstreetmap: Singapore”

Here the text is the text we show in textview and link is used to show web content in the browser when user click on text. So first link and text are attached together like

“<a href=\”” +susiResponse.getAnswers().get(0).getActions().get(i).getAnchorLink() + “\”>”
+ susiResponse.getAnswers().get(0).getActions().get(1).getAnchorText() + “</a>”

Here text between the tag is description of link and after parsing we show this text in textview. It can be parsed using fromHtml method of Html class and textview is made clickable by

chatTextView.setMovementMethod(LinkMovementMethod.getInstance());

Resources

Continue ReadingHow to Parse HTML Tags and Anchor Clickable Links in SUSI Android App

Reset Password Option in SUSI Android App

Login and signup are an important feature for some android apps like chat apps because the user will want to save and secure personal messages from others. In SUSI Android app we provide a token to a logged-in user for a limit period of time so that once the user logs in and someone else gets access to the device, then he/she can’t use the user account for a long period of time. It is a security provided from our side but the user also has to maintain some security. Cyber security risks have increased and hacking technologies have improved a lot in the past 10 years. So, using the same password for a long period of time absolutely puts your account security at risk. So to keep your account secure you should change/reset your password regularly. In this blog post, I will show you how reset password option is implemented in SUSI Android app.

Layout design for reset password

Reset password option is added in the setting. When the user clicks on reset password option a dialog box pops up. There are three textinputlayout boxes – each for the current password, new password and confirm password. I have used textinputlayout instead of simple edittext box because it helps user to show first “hint” and when user taps on, hint will come up with text over it as floating label so that the user can understand what to add in that box and also in case of error we can show that error to user.

Reset Password implementation

On clicking reset password option a dialog box appears in which user inserts the current password, new password and confirm password to confirm the new password. Before sending new password to the server we perform two checks

  1. New password should not be empty and length of new password should be at least six.
  2. New password and confirm password must be same.
if (!CredentialHelper.isPasswordValid(newPassword)) {

settingView?.passwordInvalid(Constant.NEW_PASSWORD)

return

}

if (newPassword != conPassword) {

settingView?.invalidCredentials(false, Constant.NEW_PASSWORD)

return

}

And when these two checks are passed we send “new password” to server.

Endpoint use to reset password is

http://api.susi.ai/aaa/changepassword.json?changepassword=your mail id&password=current password&newpassword=newpassword

As you can see it needed three parameters

  • changepassword: Your email id
  • password : Your current password
  • newpassword: Your new password

When user logs in, we save user’s email id so that the user doesn’t have to provide it again and again when the user wants to change the password.

utilModel.saveEmail(email)

The user provides current password and new password through dialog box. We used resetPassword method to reset the password. We send these three parameters to the server using resetPassword method and if the password changed successfully then server sends a message.

override fun resetPassword(password: String, newPassword: String, listener: ISettingModel.onSettingFinishListener) {

  val email = PrefManager.getString(Constant.SAVE_EMAIL, null)

  resetPasswordResponseCall = ClientBuilder().susiApi

          .resetPasswordResponse(email,password,newPassword)

  resetPasswordResponseCall.enqueue(object : Callback<ResetPasswordResponse> {

  } )

}

We used retrofit library for network call and resetPasswordResponse is a model class using which we are retrieving server response.

Reference

Continue ReadingReset Password Option in SUSI Android App

Implementing Users API to Display the Users at Admin Route in Open Event Frontend

This article will illustrate how the users are displayed and updated on the /admin/users route, their roles, user links etc. using the users API in Open Event Frontend. The primary end point of Open Event API with which we are concerned with for fetching the users is

GET /v1/users

First, we need to create a model for the user, which will have the fields corresponding to the API, so we proceed with the ember CLI command:

ember g model user

Next, we need to define the model according to the requirements. The model needs to extend the base model class. As a user can have multiple notifications, orders and  sessions etc. so we have to use ember data relationships “hasMany”. Hence, the model will have the following format.

import ModelBase from 'open-event-frontend/models/base';
import { hasMany } from 'ember-data/relationships';

export default ModelBase.extend({
  email        : attr('string'),
  password     : attr('string'),
  isVerified   : attr('boolean', { readOnly: true }),
  isSuperAdmin : attr('boolean', { readOnly: true }),
  isAdmin      : attr('boolean', { readOnly: true }),
  firstName : attr('string'),
  lastName  : attr('string')
});

The complete code for the model can be seen here

Now, we need to load the data from the API using the above model, so we will send a GET request to the API to fetch the users. This can be easily achieved using this.

return this.get('store').query('user', {'page[size]': 10 });

The above line is querying for the users from the store which is place where cache of all of the records that have been loaded by our application is there. If a route asks for a record, the store can return it immediately if it is there in the cache and we want to display only 10 users in a page so defined how many number of users has to be loaded at a time.

Now we need to filter the users based on whether they are active or they have deleted their accounts. For this purpose, we need to pass filter to the query which will tell what type of users to be loaded at once.

The next thing we need to do is to display the above data fetched from the API into an ember table. Ember table helps in allowing us to render very large data sets by only rendering the rows that are being displayed. For this, we defined a controller class which will help in letting the table know what all columns will be required to display and the attribute values they correspond in the API. We can also define the template for each column. The code for the controller class looks like this.

import Ember from 'ember';

const { Controller } = Ember;
export default Controller.extend({
  columns: [
    {
      propertyName     : 'first-name',
      title            : 'Name',
      disableSorting   : true,
      disableFiltering : true
    },
    {
      propertyName     : 'email',
      title            : 'Email',
      disableSorting   : true,
      disableFiltering : true
     },
     {
      propertyName     : 'last-accessed-at',
      title            : 'Last Accessed',
      template         : 'components/ui-table/cell/admin/users/cell-last-accessed-at',
      disableSorting   : true,
      disableFiltering : true
    }
   ]
});

In the above code, we can see a field called ‘disableSorting’ which is true if we don’t want to sort the table based on that column. Since we want the last-accessed-at column to be customized, so we have separately added a template for the column which will ensure how it will look in the column. The complete code for the other columns which are there in table apart from these can be found here.

Now to display the ember table we will write the following code.

{{events/events-table columns=columns data=model
    useNumericPagination=true
    showGlobalFilter=true
    showPageSize=true
}}

In the above piece of code, we are calling the same ember table as we used in case of events to reduce the code duplication. We are passing the columns and data in the table which remains unique to the table. Next, we are ensuring that our page shows the amount of data we’re fetching at one go, allows the filtering the table based on the columns.

The UI of the users page for the above code snippets look like this.

Fig 1: The UI of the users table under admin/users route

The entire code for implementing the users API can be seen here.

To conclude, this is how we efficiently fetched the users using the Open-Event-Orga users API, ensuring that there is no unnecessary API call to fetch the data and no code duplication using the same ember table again.

Resources:

Continue ReadingImplementing Users API to Display the Users at Admin Route in Open Event Frontend

Implementing Sessions API for the event in Open Event Frontend

This article will illustrate how the sessions are displayed and updated on the events/{event_id}/sessions route to display the sessions available for a particular event using the sessions API in Open Event Frontend. The primary end point of Open Event API with which we are concerned with for fetching the sessions is

GET /v1/sessions/{session_id}

First, we need to create a model for the sessions, which will have the fields corresponding to the API, so we proceed with the ember CLI command:

ember g model session

Next, we need to define the model according to the requirements. The model needs to extend the base model class. As a session can have multiple speakers and a session always belongs to an event, so we have to use ember data relationships “hasMany” and “belongsTo”. Hence, the model will have the following format.

import ModelBase from 'open-event-frontend/models/base';
import { belongsTo, hasMany } from 'ember-data/relationships';

export default ModelBase.extend({
  title         : attr('string'),
  subtitle      : attr('string'),

  speakers      : hasMany('speaker'),
  event         : belongsTo('event')
});

Complete code for the model can be seen here

Now, we need to load the data from the API using the above model, so we will send a GET request to the API to fetch the sessions corresponding to a particular event. This can be easily achieved using this.

return this.modelFor('events.view').query('sessions');

The above line is asking for getting the current model that is on the route events.view and query for the sessions property from that model.

Now we need to filter the sessions based on their sessions whether they have been accepted or confirmed or pending or rejected and display them on different pages. For this purpose, we need to pass filter and pages to the query which will tell what type and now of sessions to be loaded at once. Also, we need to display the speakers associated with session and event details. For this case, the above query will be formatted like this.

return this.modelFor('events.view').query('sessions', {
      include      : 'event,speakers',
    filter       : filterOptions,
      'page[size]' : 10
    });  

In the above query, the filterOptions are designed in such a way which check for what type of sessions user is querying for. The code can be found here.

The next thing we need to do is to display the above data fetched from the API into an ember table. For this, we need to have a controller class which will help in letting the table know what all columns will be required to display and the attribute values they correspond in the API. We can also define the template for each column. The code for the controller class looks like this.

export default Controller.extend({
  columns: [
    {
      propertyName   : 'state',
      title          : 'State',
      disableSorting : true,
      template       : 'components/ui-table/cell/events/view/sessions/cell-session-state'
    },
    {
      propertyName : 'title',
      title          : 'Title'
    },
    {
      propertyName    : 'speakers',
      template       : 'components/ui-table/cell/cell-speakers',
      title          : 'Speakers',
      disableSorting  : true
     }]
});

In the above code, we can see a field called ‘disableSorting’ which is true if we don’t want to sort the table based on that column. Since we want the state column to be customized, so we have separately added a template for the column which will ensure how it will look in the column. The complete code for the other columns which are there in table apart from the state, title and speakers can be found here.

Now to display the ember table we will write the following code.

{{events/events-table columns=columns data=model
    useNumericPagination=true
    showGlobalFilter=true
    showPageSize=true
}}
I

In the above piece of code, we are calling the same ember table as we used in case of events to reduce the code duplication. We are passing the columns and data in the table which remains unique to the table. Next, we are ensuring that our page shows the amount of data we’re fetching at one go, allows the filtering the table based on the columns.

The UI of the sessions page for the above code snippets look like this.

Fig 1: The UI of the session table under events/{event_id}/session route

The entire code for implementing the sessions API can be seen here.

To conclude, this is how we efficiently fetched the sessions details using the Open-Event-Orga sessions API, ensuring that there is no unnecessary API call to fetch the data and no code duplication using the same ember table again.

Resources:

Continue ReadingImplementing Sessions API for the event in Open Event Frontend

Implementing SUSI Linux App as a Finite State Machine

SUSI Linux app provides access to SUSI on Linux distributions on desktop as well as hardware devices like Raspberry Pi. It is a headless client that can be used to interact to SUSI via voice only. As more and more features like multiple hotword detection support and wake button support was added to SUSI Linux, the code became complex to understand and manage. A system was needed to model the app after. Finite State Machine is a perfect approach for such system.

The Wikipedia definition of State Machine is

It is an abstract machine that can be in exactly one of a finite number of states at any given time. The FSM can change from one state to another in response to some external inputs; the change from one state to another is called a transition.”

This means that if you can model your app into a finite number of states, you may consider using the State Machine implementation.

State Machine implementation has following advantages:

  • Better control over the working of the app.
  • Improved Error handling by making an Error State to handle errors.
  • States work independently which helps to modularize code in a better form.

To begin with, we declare an abstract State class. This class declares all the common properties of a state and transition method.

from abc import ABC, abstractclassmethod
import logging

class State(ABC):
   def __init__(self, components):
       self.components = components
       self.allowedStateTransitions = {}

   @abstractclassmethod
   def on_enter(self, payload=None):
       pass

   @abstractclassmethod
   def on_exit(self):
       pass

   def transition(self, state, payload=None):
       if not self.__can_transition(state):
           logging.warning("Invalid transition to State{0}".format(state))
           return

       self.on_exit()
       state.on_enter(payload)

   def __can_transition(self, state):
       return state in self.allowedStateTransitions.values()

We declared the on_enter() and on_exit() abstract method. These methods are executed on the entering and exiting a state respectively. The task designated for the state can be performed in the on_enter() method and it can free up resources or stop listening to callbacks in the on_exit() method. The transition method is to transition between one state to another. In a state machine, a state can transition to one of the allowed states only. Thus, we check if the transition is allowed or not before continuing it. The on_enter() and transition() methods additionally accepts a payload argument. This can be used to transfer some data to the state from the previous state.

We also added the components property to the State. Components store the shared components that can be used across all the State and are needed to be initialized only once. We create a component class declaring all the components that are needed to be used by states.

class Components:

   def __init__(self):
       recognizer = Recognizer()
       recognizer.dynamic_energy_threshold = False
       recognizer.energy_threshold = 1000
       self.recognizer = recognizer
       self.microphone = Microphone()
       self.susi = susi
       self.config = json_config.connect('config.json')

       if self.config['hotword_engine'] == 'Snowboy':
           from main.hotword_engine import SnowboyDetector
           self.hotword_detector = SnowboyDetector()
       else:
           from main.hotword_engine import PocketSphinxDetector
           self.hotword_detector = PocketSphinxDetector()

       if self.config['wake_button'] == 'enabled':
           if self.config['device'] == 'RaspberryPi':
               from ..hardware_components import RaspberryPiWakeButton
               self.wake_button = RaspberryPiWakeButton()
           else:
               self.wake_button = None
       else:
           self.wake_button = None

Now, we list out all the states that we need to implement in our app. This includes:

  • Idle State: App is listening for Hotword or Wake Button.
  • Recognizing State: App actively records audio from Microphone and performs Speech Recognition.
  • Busy State: SUSI API is called for the response of the query and the reply is spoken.
  • Error State: Upon any error in the above state, control transfers to Error State. This state needs to handle the speak the correct error message and then move the machine to Idle State.

Each state can be implemented by inheriting the base State class and implementing the on_enter() and on_exit() methods to implement the correct behavior.

We also declare a SUSI State Machine class to store the information about current state and declare the valid transitions for all the states.

class SusiStateMachine:
   def __init__(self):
       super().__init__()
       components = Components()
       self.__idle_state = IdleState(components)
       self.__recognizing_state = RecognizingState(components)
       self.__busy_state = BusyState(components)
       self.__error_state = ErrorState(components)
       self.current_state = self.__idle_state

       self.__idle_state.allowedStateTransitions = \
           {'recognizing': self.__recognizing_state, 'error': self.__error_state}
       self.__recognizing_state.allowedStateTransitions = \
           {'busy': self.__busy_state, 'error': self.__error_state}
       self.__busy_state.allowedStateTransitions = \
           {'idle': self.__idle_state, 'error': self.__error_state}
       self.__error_state.allowedStateTransitions = \
           {'idle': self.__idle_state}

       self.current_state.on_enter(payload=None)

We also set Idle State as the current State of the System. In this way, State Machine approach is implemented in SUSI Linux.

Resources:


Continue ReadingImplementing SUSI Linux App as a Finite State Machine

Enhanced Skill Tiles in SUSI Skill CMS

The SUSI Skill Wiki is a management system for all the SUSI Skills and the Skill display screen ought to look attractive. The earlier version of the Skill Display was just a display with the skill name populated as cards as shown in the image.

image

So as we progressed over to add more metadata to the SUSI Skills, we had the challenge to show all details which were as follows –

An example of a skill metadata format-

"cricketTest": {
      "image": "images/images.jpg",
      "author_url": "skill.susi.ai",
      "examples": ["Testing Works"],
      "developer_privacy_policy": "na",
      "author": "cms",
      "skill_name": "cricket",
      "dynamic_content": true,
      "terms_of_use": "na",
      "descriptions": "testing",
      "skill_rating": null
    }

To embed the Skill metadata in the Tiles the following steps are to be followed –

  1. We first use the end point at the SUSI Server, http://api.susi.ai/cms/getSkillList.json with the following attributes –
    1. model – The skill follows a general model or maybe a tutorial model
    2. group -The category or group of the skill.
    3. language – The language of the skill output.

2.  An AJAX request to this end point gives us the following response.

{
accepted: true,
model: "general",
group: "Knowledge",
language: "en",
skills: 
{
capital: 
{
image: "images/capital.png",
author_url: "https://github.com/chashmeetsingh",
examples: 
[
"capital of Bangladesh"
],
developer_privacy_policy: null,
author: "chashmeet singh",
skill_name: "capital",
dynamic_content: true,
terms_of_use: null,
descriptions: "a skill to tell user about capital of any country.",
skill_rating: 
{
negative: "0",
positive: "1"
}
}

We use the descriptions, skill_name, examples, image from the skill metadata to create our Skill Tile.

  1. The styles of the cards follow a CSS flexbox structure. A sample mock up of the Skill Card looks as follows.

We first handle all the base cases and show “No name available”, “No description available” for data which does not exist or is found to be “null”. We then create the card mock-up in ReactJS which looks somewhat like this code snippet in the file BrowseSkill.js

                            <Card style={styles.row} key={el}>
                                <div style={styles.right} key={el}>
                                    {image ? <div style={styles.imageContainer}>
                                        <img alt={skill_name} src={image} style={styles.image}/>
                                    </div>:
                                    <CircleImage name={el} size="48"/>}
                                    <div style={styles.titleStyle}>"{examples}"</div>
                                </div>
                                <div style={styles.details}>
                                    <h3 style={styles.name}>{skill_name}</h3>
                                    <p style={styles.description}>{description}</p>
                                </div>
                            </Card>

  1. We then add the following styles to the Card and its contents which complete the look of the View.
imageContainer:{   
        position: 'relative',
        height: '80px',
        width: '80px',
        verticalAlign: 'top'
    },
    name:{
        textAlign: 'left',
        fontSize: '15px',
        color: '#4285f4',
        margin: '4px 0'
    },
    details:{
        paddingLeft:'10px'
    },
    image:{
        maxWidth: '100%',
        border: 0
    },
description:{
        textAlign:'left',
        fontSize: '14px'   
    },
row: {
        width: 280,
        minHeight:'200px',
        margin:"10px",
        overflow:'hidden',
        justifyContent: "center",
        fontSize: '10px',
        textAlign: 'center',
        display: 'inline-block',
        background: '#f2f2f2',
        borderRadius: '5px',
        backgroundColor: '#f4f6f6',
        border: '1px solid #eaeded',
        padding: '4px',
        alignSelf:'flex-start'
    },
titleStyle:{
    textAlign: 'left',
    fontStyle: 'italic',
    fontSize: '16px',
    textOverflow: 'ellipsis',
    overflow: 'hidden',
    width: '138px',
    marginLeft: '15px',
    verticalAlign: 'middle',
    display: 'block'
}

To see the SUSI Skills or to contribute to it, please visit http://skills.susi.ai

Resources

Continue ReadingEnhanced Skill Tiles in SUSI Skill CMS