Displaying Blog Posts on SUSI AI Web Chat’s Blog Page and Share Posts

FOSSASIA is maintaining a superior blog and it contains blog posts about projects and programs run by FOSSASIA. While we were implementing SUSI Web Chat Application we got a requirement to implement a blog page. Speciality of this blog page is it is not a separate blog page, it fetches blog posts and other related data by filtering the FOSSASIA’s main blog.

In this blog post I’ll discuss how we fetched and managed those data on front-end and how we made the appearance same as the FOSSASIA main blog.

First we get blog posts as a JSON. For that we used rss2json API. we can get the RSS feed as a JSON by sending our RSS feed URL to the rss2json API. Check the rss2json API documentation here.

It produces all posts as items array. Next we store this array of responses in our application as a state.

This response contains blog post titles featured images’ details and post content and other metadata such as tags, author name and published date.

We had few requirements to fulfill. First one is to show full content of the blogpost in a new blog page.

We can take the full content from response like this,

this.state.posts.slice(this.state.startPage, this.state.startPage + 10).map((posts, i) => {
        let content = posts.content;
})

We can use “cintent” variable to show content but it contains the featured image. We have to skip that image. For that,

let htmlContent = content.replace(/<img.*?>/, '');

Now we have to render this string value as HTML. For that we have to install “test-to-html” package using below command.

npm install html-to-text --save

Now we can convert text into html like this

htmlContent = renderHTML(htmlContent);

We used this HTML content inside the “CardText” tag.

<CardText> {htmlContent}
</CardText>

At the bottom of the post we needed to show author name, tags list and categories list.
Since tags and categories come in one array, we have to separate them.
First we defined an array which contains all the categories in Fossasia blog. Then we compared that array with the categories we got like this.

       const allCategories = ['FOSSASIA','GSoC','SUSI.AI']

Compare two arrays,

          posts.categories.map((cat) => {
                let k = 0;
                for (k = 0; k < allCategories.length; k++) {
                              if (cat === allCategories[k]) {
                                  category.push(cat);
                              }
              	}
          });

we defined this “arrDiff” simple function to get the difference of two arrays.

     var tags=arrDiff(category,posts.categories)

Make the list of categories

let fCategory=category.map((cat) =>
<span key={cat} ><a className="tagname" href={'https://blog.fossasia.org/category/' + cat.replace(/\s+/g, '-').toLowerCase()} rel="noopener noreferrer">{cat}</a></span>
   );

We can use above step to make tags list.

Then after used it in the “CardActions”

<span className='categoryContainer'>
    <i className="fa fa-folder-open-o tagIcon"></i>
    {fCategory}
</span>


According to the final requirement we needed to add social media share buttons for Facebook and Twitter.

If we need to make a twitter share button we have to follow up this method. But we can use “react-share” npm package to make these kind of share buttons.

This is how we made Facebook and Twitter share buttons. First of all we have to install “react-share” package using below command.

npm install react-share --save

Then we have to import the installed package.

import { ShareButtons, generateShareIcon } from 'react-share';

Then after we defined Button and Icon like this.

      const {FacebookShareButton,TwitterShareButton} = ShareButtons;
      const FacebookIcon = generateShareIcon('facebook');
      const TwitterIcon = generateShareIcon('twitter');

Now we can use these components.

<TwitterShareButton url={posts.guid} title={posts.title} via='asksusi' hashtags={posts.categories.slice(0, 4)} >                                                                                <TwitterIcon size={32} round={true} />
</TwitterShareButton>
<FacebookShareButton url={posts.link}>
     <FacebookIcon size={32} round={true} />
</FacebookShareButton>

We have to send URL and title of the post with the tweet and tags as hashtags. So we have to pass them into the component as above.
Above code produces this model of tweets.

That’s how “text-to-htm”l and “react-share” works on react. If you would like to contribute to SUSI project or any other FOSSASIA project please fork our repositories on github.

Resources:

Continue ReadingDisplaying Blog Posts on SUSI AI Web Chat’s Blog Page and Share Posts

Sensor Data Logging in the PSLab Android App

The PSLab Android App allows users to log data from sensors connected to the PSLab hardware device. The Connected sensors should support I2C, SPI communication protocols to communicate with the PSLab device successfully. The only prerequisite is the additional support for the particular sensor plugin in Android App. The user can log data from various sensors and measure parameters like temperature, humidity, acceleration, magnetic field, etc. These parameters are useful in predicting and monitoring the environment and in performing many experiments.

The support for the sensor plugins was added during the porting python communication library code to Java. In this post,  we will discuss how we logged real time sensor data from the PSLab Hardware Device. We used Realm database to store the sensor data locally. We have taken the MPU6050 sensor as an example to understand the complete process of logging sensor data.

Creating Realm Object for MPU6050 Sensor Data

The MPU6050 sensor gives the acceleration and gyroscope readings along the three axes X, Y and Z. So the data object storing the readings of the mpu sensor have variables to store the acceleration and gyroscope readings along all three axes.

public class DataMPU6050 extends RealmObject {

   private double ax, ay, az;
   private double gx, gy, gz;
   private double temperature;

   public DataMPU6050() {  }

   public DataMPU6050(double ax, double ay, double az, double gx, double gy, double gz, double temperature) {
       this.ax = ax;
       this.ay = ay;
       this.az = az;
       this.gx = gx;
       this.gy = gy;
       this.gz = gz;
       this.temperature = temperature;
   }

  // getter and setter for all variables
}

Creating Runnable to Start/Stop Data Logging

To sample the sensor data at 500ms interval, we created a runnable object and passed it to another thread which would prevent lagging of the UI thread. We can start/stop logging by changing the value of the boolean loggingThreadRunning on button click. TaskMPU6050 is an AsyncTask which reads each sample of sensor data from the PSLab device, it gets executed inside a while loop which is controlled by boolean loggingThreadRunning. Thread.sleep(500) pauses the thread for 500ms, this is also one of the reason to transfer the logging to another thread instead of logging the sensor data in UI thread. If such 500ms delays are incorporated in UI thread, app experience won’t be smooth for the users.

Runnable loggingRunnable = new Runnable() {
   @Override
   public void run() {
       try {
           MPU6050 sensorMPU6050 = new MPU6050(i2c);
           while (loggingThreadRunning) {
               TaskMPU6050 taskMPU6050 = new TaskMPU6050(sensorMPU6050);
               taskMPU6050.execute();
              // use lock object to synchronize threads
               Thread.sleep(500);
           }
       } catch (IOException   InterruptedException e) {
           e.printStackTrace();
       }
   }
};

Sampling of Sensor Data

We created an AsyncTask to read each sample of the sensor data from the PSLab device in the background thread. The getRaw() method read raw values from the sensor and returned an ArrayList containing the acceleration and gyro values. After the values were read successfully, they were updated in the data card in the foreground which was visible to the user. This data card acts as a real-time screen for the user. All the samples read are appended to ArrayList mpu6050DataList, when the user clicks on button Save Data, the collected samples are saved to the local realm database.

private ArrayList<DataMPU6050> mpu6050DataList = new ArrayList<>();

private class TaskMPU6050 extends AsyncTask<Void, Void, Void> {

   private MPU6050 sensorMPU6050;
   private ArrayList<Double> dataMPU6050 = new ArrayList<>();

   TaskMPU6050(MPU6050 mpu6050) {
       this.sensorMPU6050 = mpu6050;
   }

   @Override
   protected Void doInBackground(Void... params) {
       try {
           dataMPU6050 = sensorMPU6050.getRaw();
       } catch (IOException e) {
           e.printStackTrace();
       }
       return null;
   }

   @Override
   protected void onPostExecute(Void aVoid) {
       super.onPostExecute(aVoid);
       // update data card TextViews with data read.
       DataMPU6050 tempObject = new DataMPU6050(dataMPU6050.get(0), dataMPU6050.get(1), dataMPU6050.get(2),
               dataMPU6050.get(4), dataMPU6050.get(5), dataMPU6050.get(6), dataMPU6050.get(3));
       mpu6050DataList.add(tempObject);
       synchronized (lock) {
           lock.notify();
       }
   }
}
Source: PSLab Android App

There is an option for Start/Stop Logging, clicking on which will change the value of boolean loggingThreadRunning which stops starts/stops the logging thread.

When the Save Data button is clicked, all the samples of sensor data collected from the  PSLab device till that point are saved to the local realm database.

realm.beginTransaction();
for (DataMPU6050 tempObject : mpu6050DataList) {
   realm.copyToRealm(tempObject);
}
realm.commitTransaction();

Data can also be written asynchronously to the local realm database. For other methods to write to a real database refer write section of Realm docs.

Resources

Continue ReadingSensor Data Logging in the PSLab Android App

Enhancing the Functionality of User Submitted Scripts in the PSLab-remote framework

The remote-lab framework of the pocket science lab enables users to access their devices remotely via the internet. Its design involves an API server built with Python-Flask and a webapp that uses EmberJS. This post is the latest in a series of blog posts which have explored and elaborated various aspect of the remote-lab such as designing the API server and testing with Postman, remote execution of function strings, automatic deployment on various domains etc. It also supports creating and submitting python scripts which will be run on the remote server, and the console output relayed to the webapp.

In this post, we shall take a look at how we can extend the functionality by providing support for object oriented code in user submitted scripts.

Let’s take an example of a Python script where the user wishes to create a button which when clicked will read a voltage via the API server, and display the value to the remote user. Clearly, an interpreter that only provides the console output is not enough for this task. We need the interpreter to generate an app structure that also includes callbacks for widgets such as buttons, and JSON objects are an obvious choice for relaying such a structure to the webapp.

In a nutshell, we had earlier created an API method that could execute a python script and return a string output, and now we will modify this method to return a JSON encoded structure which will be parsed by the webapp in order to display an output.

Let’s elaborate this with an example : Example.py

print ('testing')
print ('testing some changes..... ')
print_('highlighted print statement')


JSON returned by the API [localhost:8000/runScriptById] , for the above script:

{"Date": "Tue, 01 Aug 2017 21:39:12 GMT", "Filename": "example.py", "Id": 4,
 "result": [
  {"name": "print", "type": "span", "value": "('testing',)"},
  {"name": "print", "type": "span", "value": "('testing some changes..... ',)"},
  {"class": "row well", "name": "print", "type": "span", "value": "highlighted print statement"}
  ],
"status": true}
Screenshot of the EmberJS webapp showing the output rendered with the above JSON

Adding Support for Widgets

In the previous section, we laid the groundwork for a flexible platform. Instead of returning a string, the webapp accepts a JSON object and parses it. We shall now add support for a clickable button which can be associated with a valid PSLab function.

An elementary JS twiddle has been made by Niranjan Rajendran which will help newbies to understand how to render dynamic templates via JSON objects retrieved from APIs. The twiddle uses two API endpoints; one to retrieve the compiled JSON output, and another to act as a voltmeter method which returns a voltage value.

To understand how this works in pslab-remote, consider a one line script called button.py:

button('get voltage',"get_voltage('CH1')")

The objective is to create a button with the text ‘get voltage’ on it , and which when clicked will run the command ‘get_voltage(‘CH1’)’ on the API server, and display the result.

When this script is run on the API server, it returns a JSON object with the following structure:

{"Date": "Tue, 01 Aug 2017 21:39:12 GMT", "Filename": "example.py", "Id": 4,
 "result": [  {"type":"button","name":"button-id0","label":"get_voltage","fetched_value":"","action":{"type":"POST","endpoint":"get_voltage('CH1')","success":{"datapoint":'result',"type":"display_number", "target":"button-id0-label"}}},
  {"name": "button-id0label", "type": "label", "value": ""},
  ],
"status": true}

The above JSON object is parsed by the webapp’s user-home template, and a corresponding button and label are generated. The following section of code from user-home.hbs renders the JSON object

{{#each codeResults as |element|}}
  {{#if (eq element.type 'label')}}
    <label  id="{{element.name}}" class="{{element.class}}">{{element.value}}</label>
  {{/if}}
  {{#if (eq element.type 'button')}}
    <button id="{{element.name}}" {{action 'runButtonAction' element.action}}>{{element.label}}</button>
  {{/if}}
{{/each}}    

An action was also associated with the the created button, and this is the “get_voltage(‘CH1’)” string which we had specified in our one line script.

For the concluding section, we shall see how this action is invoked when the button is clicked, and how the returned value is used to update the contents of the label that was generated as part of this button.

Action defined in controllers/user-home.js :

runButtonAction(actionDefinition) {
  if(actionDefinition.type === 'POST') {
    Ember.$.post('/evalFunctionString',{'function':actionDefinition.endpoint},this,"json")
      .then(response => {
        const resultValue = Ember.get(response, actionDefinition.success.datapoint);
        if (actionDefinition.success.type === 'display_number') {
           Ember.$('#' + actionDefinition.success.target).text(resultValue.toFixed(3));
        }
      });
  }
}

The action string is passed to the evalFunctionString endpoint of the API, and the contents are mapped to the display label.

Screencast of the above process
Resources:
Continue ReadingEnhancing the Functionality of User Submitted Scripts in the PSLab-remote framework

Adding Sticky Headers for Grouping Sponsors List in Open Event Android App

The Open Event Android project has a fragment for showing sponsors of the event. Each Sponsor model has a name, url, type and level. The SponsorsFragment shows list according to type and level. Each sponsor list item has sponsor type TextView. There can be more than one sponsors with the same type. So instead of showing type in the Sponsor item we can add Sticky header showing type at the top which will group the sponsors with the same type and also gives the great UI. In this post I explain how to add the Sticky headers in the RecyclerView using StickyHeadersRecyclerView library.

1. Add dependency

In order to use Sticky Headers in your app add following dependencies in your app module’s build.gradle file.

dependencies {
	compile 'com.timehop.stickyheadersrecyclerview:library:0.4.3'
}

2. Create layout for header

Create recycler_view_header.xml file for the header. It will contain LinearLayout and simple TextView which will show Sponsor type.

<?xml version="1.0" encoding="utf-8"?>
<LinearLayout xmlns:android="http://schemas.android.com/apk/res/android"
    android:layout_width="match_parent"
    android:layout_height="wrap_content"
    android:orientation="vertical">

    <TextView
        android:id="@+id/recyclerview_view_header"
        android:layout_width="match_parent"
        android:layout_height="wrap_content"
        android:padding="@dimen/padding_medium" />

</LinearLayout>

Here you can modify layout according to your need.

3.  Implement StickyRecyclerHeadersAdapter

Now implement StickyRecyclerHeadersAdapter in the List Adapter. Override getHeaderId(), onCreateHeaderViewHolder(), onBindHeaderViewHolder
() methods of the StickyRecyclerHeadersAdapter.

public class SponsorsListAdapter extends BaseRVAdapter<Sponsor, SponsorViewHolder> implements StickyRecyclerHeadersAdapter {
    ...

    @Override
    public long getHeaderId(int position) {...}

    @Override
    public RecyclerView.ViewHolder onCreateHeaderViewHolder(ViewGroup parent) {...}

    @Override
    public void onBindHeaderViewHolder(RecyclerView.ViewHolder holder, int position) {...}
}


The getHeaderId() method is used to give an id to the header. It is the main part of the implementation here all the sponsors with the same type should return the same id. In our case we are returning sponsor level because all the sponsor types have corresponding levels.

String level = getItem(position).getLevel();
return Long.valueOf(level);


The onCreateHeaderViewHolder() returns Recycler ViewHolder for the header. Here we will use in the inflate() method of  LayoutInflater to get View object of recycler_view_header.xml file. Then return new RecyclerView.ViewHolder object using View object.

View view = LayoutInflater.from(parent.getContext())
                .inflate(R.layout.recycler_view_header, parent, false);
return new RecyclerView.ViewHolder(view) {};


The onBindHeaderViewHolder() binds the sponsor to HeaderViewHolder. In this method we sets the sponsor type string to the TextView we have created in the recycler_view_header.xml file.

TextView textView = (TextView) holder.itemView.findViewById(R.id.recyclerview_view_header);
textView.setGravity(Gravity.CENTER_HORIZONTAL);

String sponsorType = getItem(position).getType();
if (!Utils.isEmpty(sponsorType))  
   textView.setText(sponsorType.toUpperCase());

Here you can also modify TextView according to your need. We are centering text using setGravity() method.

4.  Setup RecyclerView

Now create RecyclerView and set adapter using setAdapter() method. Also as we want the linear list of sponsors so set the LinearLayoutManager using setLayoutManager() method.

SponsorsListAdapter sponsorsListAdapter = new SponsorsListAdapter(getContext(), sponsors);
sponsorsRecyclerView.setAdapter(sponsorsListAdapter);
sponsorsRecyclerView.setLayoutManager(new LinearLayoutManager(getActivity()));


Create StickyRecyclerHeadersDecoration object and add it in the RecyclerView using addItemDecoration() method.

final StickyRecyclerHeadersDecoration headersDecoration = new StickyRecyclerHeadersDecoration(sponsorsListAdapter);

sponsorsRecyclerView.addItemDecoration(headersDecoration);
sponsorsListAdapter.registerAdapterDataObserver(new RecyclerView.AdapterDataObserver(){
    @Override
    public void onChanged {
            headersDecoration.invalidateHeaders();
    }
});

Now add AdapterDataObserver using registerAdapterDataObserver() method. The onChanged() method in this observer is called whenever dataset changes. So in this method invalidate headers using invalidateHeaders() method of HeaderDecoration.

Now we are all set. Run the app it will look like this.

Conclusion

Sticky headers in the App gives great UI and UX. You can also add a click listener to the headers. To know more about Sticky Headers follow the links given below.

Continue ReadingAdding Sticky Headers for Grouping Sponsors List in Open Event Android App

Sorting Users and Implementing Animations on SUSI Web Chat Team Page

While we were developing the chat application, we wanted to show details of Developers.  So we planned to build a team page for SUSI Web Chat Application. In this post I discuss few things we built there. Like sorting feature, animations of the page, usage of Material UI.

First we made an array of objects to store user details. In that array we grouped them in sub arrays so we can refer them in different sections separately. We stored following data in “TeamList.js” in an array.

var team = [{
 'mentors': [{
   'name': 'Mario Behling',
   'github': 'http://github.com/mariobehling',
   'avatar': 'http://fossasia.org/img/mariobehling.jpg',
   'twitter': 'https://twitter.com/mariobehling',
   'linkedin': 'https://www.linkedin.com/in/mariobehling/',
   'blog': '#'
 }]
},{ 'server': [{
    }]
}

There was a requirement to sort developers by their name so we had to build a way to sort out array data which are in main array. This is how we built that.
The function we are going to use for sorting.

   function compare(a, b) {
     if (a.name < b.name) { return -1; }
     if (a.name > b.name) { return 1; }
     return 0;
   }

This is how we have used it to sort developers.

import team from './TeamList';
team[1].server.sort(compare);

In this function we took values of object two by two and compared.
Now we have to show these sorted information on view.
Extract data that we want from array and we used material UI Cards to show these data on view.
This is how we extracted data from the array.

   team[1].server.sort(compare);
   let server = team[1].server.map((serv, i) => {
     return ( <Card className='team-card' key={i}>
         <CardMedia className="container" >
           <img src={serv.avatar} alt={serv.name} className="image" />
           <div className="overlay" >
             <div className="text"> <FourButtons member={serv} /> </div>
           </div>
         </CardMedia>
         <CardTitle title={serv.name} subtitle={serv.designation} />
       </Card>)   })

Now it shows data on the view.
“” contains an image of the member. We need to show social media links of the user on mouseover. We did that using simple CSS. I added a block comment around those particular styles. Check those styles here.

.overlay {
 position: absolute;
 bottom: 100%;
 left: 0;
 right: 0;
 background-color: #000;
 overflow: hidden;
 width: 100%;
 height:0;
 transition: .3s ease;
 opacity:0;
}
.container:hover .overlay {
 bottom: 0;
 height: 100%;
 opacity:0.7;
}

Above lines show that how we made the animation of the overlay animation.

Now we want to show social media buttons on the overlay. We made another separate component for buttons and return those like this.

render() {
       let member= this.props.member;
       return (<div>
         <CardActions>
           <IconButton href={member.github} target="_blank" >
  <CardActions>
		</div>)}

Finally we showed those data on Team page. We returned these JSX from render(){} method.

         <div className="team-header">
           <div className="support__heading">Developers</div>
         </div>
         <div className='team-container'>{server}</div>

I have mentioned few resources which I used to implement these features. If you are willing to contribute SUSI AI Web Chat application. Fork our repository on github.

Resources

Documentation of Array.sort https://developer.mozilla.org/en-US/docs/Web/JavaScript/Reference/Global_Objects/Array/sort

How to use Image overlay CSS effects: https://www.w3schools.com/howto/howto_css_image_overlay.asp

Continue ReadingSorting Users and Implementing Animations on SUSI Web Chat Team Page

Customising URL Using Custom Adapters in Open Event Front-end

Open-Event Front-end uses Ember data for handling Open Event Orga API which abides by JSON API specs. The API has relationships which represent models in the database, however there are some API endpoints for which the URL is not direct. We make use of custom adapter to build a custom URL for the requests.
In this blog we will see how to Implement relationships which do not have a model in the API server. Lets see how we implemented the admin-statistics-event API using custom adapter?

Creating Order-statistics model
To create a new model we use ember-cli command:

ember g model admin-statistics-event

The generated model:

export default ModelBase.extend({
  draft     : attr('number'),
  published : attr('number'),
  past      : attr('number')
})

The API returns 3 attributes namely draft, published & past which represent the total number of drafted, live and past event in the system. The admin-statistics-event is an admin related model.
Creating custom adapter
To create a new adapter we use ember-cli command:

ember g adapter event-statistics-event

If we try to do a GET request the URL for the request will be ‘v1/admin-statistics-event’ which is an incorrect endpoint. We create a custom adapter to override the buildURL method.

buildURL(modelName, id, snapshot, requestType, query) {
  let url = this._super(modelName, id, snapshot, requestType, query);
  url = url.replace('admin-statistics-event', 'admin/statistics/event');
  return url;
}

We create a new variable url which holds the url generated by the buildURL method of the super adapter. We call the super method using ‘this._super’. We will now replace the ‘admin-statistics-event’ with ‘admin/statistics/event’ in url variable. We return the new url variable. This results in generation of correct URL for the request.
Thank you for reading the blog, you can check the source code for the example here.
Resources

Continue ReadingCustomising URL Using Custom Adapters in Open Event Front-end

Preparing for Automatic Publishing of Android Apps in Play Store

I spent this week searching through libraries and services which provide a way to publish built apks directly through API so that the repositories for Android apps can trigger publishing automatically after each push on master branch. The projects to be auto-deployed are:

I had eyes on fastlane for a couple of months and it came out to be the best solution for the task. The tool not only allows publishing of APK files, but also Play Store listings, screenshots, and changelogs. And that is only a subset of its capabilities bundled in a subservice supply.

There is a process before getting started to use this service, which I will go through step by step in this blog. The process is also outlined in the README of the supply project.

Enabling API Access

The first step in the process is to enable API access in your Play Store Developer account if you haven’t done so. For that, you have to open the Play Dev Console and go to Settings > Developer Account > API access.

If this is the first time you are opening it, you’ll be presented with a confirmation dialog detailing about the ramifications of the action and if you agree to do so. Read carefully about the terms and click accept if you agree with them. Once you do, you’ll be presented with a setting panel like this:

Creating Service Account

As you can see there is no registered service account here and we need to create one. So, click on CREATE SERVICE ACCOUNT button and this dialog will pop up giving you the instructions on how to do so:

So, open the highlighted link in the new tab and Google API Console will open up, which will look something like this:

Click on Create Service Account and fill in these details:

Account Name: Any name you want

Role: Project > Service Account Actor

And then, select Furnish a new private key and select JSON. Click CREATE.

A new JSON key will be created and downloaded on your device. Keep this secret as anyone with access to it can at least change play store listings of your apps if not upload new apps in place of existing ones (as they are protected by signing keys).

Granting Access

Now return to the Play Console tab (we were there in Figure 2 at the start of Creating Service Account), and click done as you have created the Service Account now. And you should see the created service account listed like this:

Now click on grant access, choose Release Manager from Role dropdown, and select these PERMISSIONS:

Of course you don’t want the fastlane API to access financial data or manage orders. Other than that it is up to you on what to allow or disallow. Same choice with expiry date as we have left it to never expire. Click on ADD USER and you’ll see the Release Manager created in the user list like below:

Now you are ready to use the fastlane service, or any other release management service for that matter.

Using fastlane

Install fastlane by

sudo gem install fastlane

Go to your project folder and run

fastlane supply init

First it will ask the location of the private key JSON file you downloaded, and then the package name of the application you are trying to initialize fastlane for.

Then it will create metadata folder with listing information excluding the images. So you’ll have to download and place the images manually for the first time

After modifying the listing, images or APK, run the command:

fastlane supply run

That’s it. Your app along with the store listing has been updated!

This is a very brief introduction to the capabilities of the supply service. All interactive options can be supplied via command line arguments, certain parts of the metadata can be omitted and alpha beta management along with release rollout can be done in steps! Make sure to check out the links below:

Continue ReadingPreparing for Automatic Publishing of Android Apps in Play Store

Implementing Advanced Search Feature In Susper

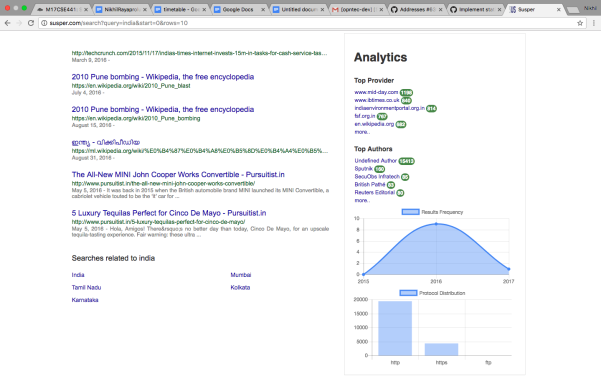
Susper has been provided ‘Advanced Search’ feature which provides the user a great experience to search for desired results. Advanced search has been implemented in such a way it shows top authors, top providers, and distribution regarding protocols. Users can choose any of these options to get best results.

We receive data of each facet name from Yacy using yacy search endpoint. More about yacy search endpoint can be found here:  http://yacy.searchlab.eu/solr/select?query=india&fl=last_modified&start=0&rows=15&facet=true&facet.mincount=1&facet.field=host_s&facet.field=url_protocol_s&facet.field=author_sxt&facet.field=collection_sxt&wt=yjson

For implementing this feature, we created Actions and Reducers using concepts of Redux. The implemented actions can be found here: https://github.com/fossasia/susper.com/blob/master/src/app/actions/search.ts

Actions have been implemented because these actually represent some kind of event. For e.g. like the beginning of an API call here.

We also have created an interface for search action which can be found here under reducers as filename index.ts: https://github.com/fossasia/susper.com/blob/master/src/app/reducers/index.ts

Reducers are a pure type of function that takes the previous state and an action and returns the next state. We have used Redux to implement actions and reducers for the advanced search.

For advanced search, the reducer file can be found here: https://github.com/fossasia/susper.com/blob/master/src/app/reducers/search.ts

The main logic has been implemented under advancedsearch.component.ts:

export class AdvancedsearchComponent implements OnInit {
  querylook = {}; // array of urls
  navigation$: Observable<any>;
  selectedelements: Array<any> = []; // selected urls by user
changeurl
(modifier, element) {
// based on query urls are fetched
// if an url is selected by user, it is decoded
  this.querylook[‘query’] = this.querylook[‘query’] + ‘+’ + decodeURIComponent(modifier);
  this.selectedelements.push(element);
// according to selected urls
// results are loaded from yacy
  this.route.navigate([‘/search’], {queryParams: this.querylook});
}

// same method is implemented for removing an url
removeurl(modifier) {
  this.querylook[‘query’] = this.querylook[‘query’].replace(‘+’ + decodeURIComponent(modifier), );

  this.route.navigate([‘/search’], {queryParams: this.querylook});
}


The changeurl() function replaces the query with a query and selected URL and searches for the results only from the URL provider. The removeurl() function removes URL from the query and works as a normal search, searching for the results from all providers.

The source code for the implementation of advanced search feature can be found here: https://github.com/fossasia/susper.com/tree/master/src/app/advancedsearch

Resources

Continue ReadingImplementing Advanced Search Feature In Susper

Implementation of Statistic Infobox for Susper

In Susper, we have implemented a statistic infobox to show analytics regarding Top authors, Top Providers and distribution regarding protocols and Results frequency by year.

Yacy also offers additional information for infoboxes such as files types, provider and authors. Using that information which we receive along with results we have implemented the infobox.

Implementation of Infobox:

1. For the distribution graphs, we have used angular library for chart.js https://www.npmjs.com/package/ng2-charts

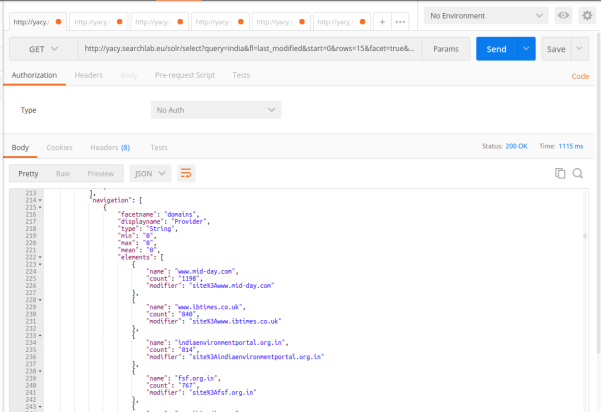
2. We receive required statistics of each facet name from Yacy using the yacy search endpoint

http://yacy.searchlab.eu/solr/select?query=india&fl=last_modified&start=0&rows=15&facet=true&facet.mincount=1&facet.field=host_s&facet.field=url_protocol_s&facet.field=author_sxt&facet.field=collection_sxt&wt=yjson

Screenshot from 2017-08-15 14-10-30.png

Screenshot from 2017-08-15 14-10-16.png

We have created a statbox component to display the data related to statistic infobox at https://github.com/fossasia/susper.com/tree/master/src/app/statsbox

It takes care about rendering the statistic infobox and styling it.

Statsbox.component.ts

this.navigation$.subscribe(navigation => {
   for (let nav of navigation) {
     if (nav.displayname === 'Protocol') {
       let data = [];
       let datalabels = [];
       for (let element of nav.elements){
           datalabels.push(element.name);
           data.push(parseInt(element.count, 10));
         }
       this.barChartData[0].data = data;
       this.barChartLabels = datalabels;

     }
   }
 });
});

navigation observable gives us the latest statistics information received from the yacy and we subscribe to it and update the component variables accordingly for displaying the data.

Later these values are used by statsbox.component.html to display the statsbox.

The whole implementation of this feature can be found at pull: https://github.com/fossasia/susper.com/pull/704/

References:

1.Using Postman for analysing an API Endpoint: https://www.getpostman.com/docs

2.Using ngrx store: https://github.com/ngrx/store

Continue ReadingImplementation of Statistic Infobox for Susper

Continuous Integration and Deployment of Yacy Grid

We have deployed Yacy Grid on Google cloud recently, and we have achieved this using kubernetes and Travis for auto deployment.

How we have deployed it:

Firstly, it is advised to have different containers for each service your application requires, and follow a multi container architecture. Using multi container architecture you can allocate fixed size of power to each application and also replicate individual services, whichever is required. Presently, Yacy has two main applications which are required to be deployed in separate containers – Yacy_grid_mcp and ElasticSearch.

We took the official kubernetes YAML files of ElasticSearch and followed the instructions at https://github.com/kubernetes/examples/blob/master/staging/elasticsearch/README.md for deployment of elastic search on the google cloud.

With this we are able to run pods, volumes required for elastic search and services for connecting Yacy with elastic search.

The pull request regarding deployment of separate elasticsearch component is at https://github.com/yacy/yacy_grid_mcp/pull/27/files

Below figure shows different services and external endpoints present pods use for elastic search.

Now elastic search can be accessed at 35.202.154.219:9300 and http://35.193.124.253:9200/

Continuous deployment of Yacy_grid_mcp:

Please make sure that you have created a cluster on google container engine for deploying our containers on it. Regarding starting a project and cluster please read https://cloud.google.com/container-engine/docs/

1.Initially, Travis.yml initiates and sets up the required environment for Yacy deployment by installing Google cloud cli and kubectl components.

Source code regarding the Travis setup could be found at https://github.com/yacy/yacy_grid_mcp/blob/master/.travis.yml

2.Later Travis runs the depoy_staging.sh file, which builds the docker image of yacy o the present build and pushes it to hub.docker.com

if [ "$TRAVIS_PULL_REQUEST" != "false" -o "$TRAVIS_BRANCH" != "$SOURCE_BRANCH" ]; then
    echo "Skipping deploy; The request or commit is not on master"
    exit 0
fi

set -e

docker build -t nikhilrayaprolu/yacygridmcp:$TRAVIS_COMMIT ./docker
docker login -u="$DOCKER_USERNAME" -p="$DOCKER_PASSWORD"
docker tag nikhilrayaprolu/yacygridmcp:$TRAVIS_COMMIT nikhilrayaprolu/yacygridmcp:latest
docker push nikhilrayaprolu/yacygridmcp

Later with service key, we authenticate with google cloud and set the required environments and variables

echo $GCLOUD_SERVICE   base64 --decode -i > ${HOME}/gcloud-service-key.json
gcloud auth activate-service-account --key-file ${HOME}/gcloud-service-key.json

gcloud --quiet config set project $PROJECT_NAME_STG
gcloud --quiet config set container/cluster $CLUSTER_NAME_STG
gcloud --quiet config set compute/zone ${CLOUDSDK_COMPUTE_ZONE}
gcloud --quiet container clusters get-credentials $CLUSTER_NAME_STG

And Later we push the docker image built to google cloud and deploy it

kubectl config view
kubectl config current-context

kubectl set image deployment/${KUBE_DEPLOYMENT_NAME} ${KUBE_DEPLOYMENT_CONTAINER_NAME}=nikhilrayaprolu/yacygridmcp:$TRAVIS_COMMIT

Presently Yacy runs on 5vCPUs

With the following pods and services:

Also one can use kubectl cli for getting information regarding the cluster and pods as shown below

Pull request regarding deployment of yacy on google cloud is available at: https://github.com/yacy/yacy_grid_mcp/pull/16/files

References:

1.A Medium Blog on CD to Google Container: https://medium.com/google-cloud/continuous-delivery-in-a-microservice-infrastructure-with-google-container-engine-docker-and-fb9772e81da7

2.Another Blog on CD to Google Container: https://engineering.hexacta.com/automatic-deployment-of-multiple-docker-containers-to-google-container-engine-using-travis-e5d9e191d5ad

3.Deploying ElasticSearch to Cloud using Kubernetes: https://github.com/kubernetes/examples/blob/master/staging/elasticsearch/README.md

Continue Reading