Deploying preview using surge in Yaydoc

In Yaydoc, we save the preview of the documentation in our local server and then we show the preview using express’s static serve method. But the problem is that Heroku doesn’t support persistent server, so our preview link gets expired within a few minutes. In order to solve the problem I planned to deploy the preview to surge so that the preview doesn’t get expired. For that I made a shell script which will deploy preview to the surge and then I’ll invoke the shell script using child_process.

#!/bin/bash

while getopts l:t:e:u: option
do
 case "${option}"
 in
 l) LOGIN=${OPTARG};;
 t) TOKEN=${OPTARG};;
 e) EMAIL=${OPTARG};;
 u) UNIQUEID=${OPTARG};;
 esac
done

export SURGE_LOGIN=${LOGIN}
export SURGE_TOKEN=${TOKEN}

./node_modules/.bin/surge --project temp/${EMAIL}/${UNIQUEID}_preview --domain ${UNIQUEID}.surge.sh

In the above snippet, I’m initializing the SURGE_LOGIN and SURGE_TOKEN environmental value, so that surge will deploy to the preview without asking any credentials while I am deploying the project. Then I’m executing surge by specifying the preview path and preview domain name.

exports.deploySurge = function(data, surgeLogin, surgeToken, callback) {
  var args = [
    "-l", surgeLogin,
    "-t", surgeToken,
    "-e", data.email,
    "-u", data.uniqueId
  ];

  var spawnedProcess = spawn('./surge_deploy.sh', args);
  spawnedProcess.on('exit', function(code) {
    if (code === 0) {
      callback(null, {description: 'Deployed successfully'});
    } else {
      callback({description: 'Unable to deploy'}, null);
    }
  });
}

Whenever the user generates documentation, I’ll invoke the shell script using child_process and then if it exits with exit code 0 I’ll pass the preview url via sockets to frontend and then the user can access the url.

Resource:

Continue ReadingDeploying preview using surge in Yaydoc

Using Firebase Test Lab for Testing test cases of Phimpme Android

As now we started writing some test cases for Phimpme Android. While running my instrumentation test case, I saw a tab of Cloud Testing in Android Studio. This is for Firebase Test Lab. Firebase Test Lab provides cloud-based infrastructure for testing Android apps. Everyone doesn’t have every devices of all the android versions. But testing on all of them is equally important.

How I used test lab in Phimpme

  • Run your first test on Firebase

Select Test Lab in your project on the left nav on the Firebase console, and then click Run a Robo test. The Robo test automatically explores your app on wide array of devices to find defects and report any crashes that occur. It doesn’t require you to write test cases. All you need is the app’s APK. Nothing else is needed to use Robo test.

Upload your Application’s APK (app-debug-unaligned.apk) in the next screen and click Continue

Configure the device selection, a wide range of devices and all API levels are present there. You can save the template for future use.

Click on start test to start testing. It will start the tests and show the real time progress as well.

  • Using Firebase Test Lab from Android Studio

It required Android Studio 2.0+. You needs to edit the configuration of Android Instrumentation test.

Select the Firebase Test Lab Device Matrix under the Target. You can configure Matrix, matrix is actually on what virtual and physical devices do you want to run your test. See the below screenshot for details.

Note: You need to enable the firebase in your project

So using test lab on firebase we can easily test the test cases on multiple devices and make our app more scalable.

Resources:

Continue ReadingUsing Firebase Test Lab for Testing test cases of Phimpme Android

Making SUSI.AI reach more users through messenger bots

SUSI.AI learns from the queries asked to it by the users. More are the number of queries asked, the better is the learning by SUSI.AI. More are the number of users involved with SUSI.AI, better is the amount of content available to SUSI to learn from. Now, the challenge in front of us is to indulge more users with SUSI.AI. In this blog post, SUSI Tweetbot and SUSI FBbot are used as examples to show how we increase our user base through messenger bots.

Twitter:

Twitter has a 328 million user base according to this article’s data. Integration of SUSI.AI to just Twitter makes it available to around 300 million users. Even if some percentage of these users start using SUSI.AI, increase in the user base of SUSI.AI could be exponential. Increasing the user base is advantageous as it provides with more training data for SUSI.AI to learn from.

Sharing by public tweet:

Integrating to it is just the first step towards increasing SUSI.AI’s user base. Next step is to reach the users and indulge them into chatting with SUSI.AI.

Suppose a user asked something to SUSI.AI and really liked the reply from it. He/she wants to share it with his/her followers. This can prove to be a golden opportunity for us, to increase the reach of SUSI.AI. This way we can indulge their friends to try SUSI.AI and have an amazing time with it.

It becomes clear that sharing messages is an indispensable feature and can help us a lot. Twitter doesn’t provide sharing with friends through direct messages but with a feature much better than it. We can share that message as a public tweet and cover more users including the followers of the user.


To show this button we use Call to action support by twitter:

"message_data": {
          "text": txt,
          "ctas": [{
                      "type": "web_url",
                      "label": "Share with your followers",
                      "url": ""
          }]
}

The url key in the above code must have a value that redirects to a U.I. that allows to publicly tweet this reply by SUSI.AI.

Using this “https://twitter.com/intent/tweet?text=” as the url value shows a new page with an empty tweet message, as the text query in the url has no value. We set the text field with a value such that we end up like this:

and after tweeting it:

Sending a direct message link with the tweet:

Twitter provides with a lot of features when sending direct messages. Shifting a user from tweets to direct messages is beneficial in a way that we can efficiently tell the user about the capabilities of SUSI.AI and show important links to him/her like of its repository, web chat client etc.

When a user tweets to the SUSI.AI page with a query, we reply with a tweet back to the user. Along with that, we provide a link to privately message SUSI.AI account if the user wants to.

This way if user ends up visiting SUSI.AI in a chat window:

To achieve this in SUSI Tweetbot, Twitter provides with a direct message url. This url – https://twitter.com/messages/compose?recipient_id= redirects us to the chat window of the account having that recipient id, passed as a query string. In our case the url turns out to be – https://twitter.com/messages/compose?recipient_id=871446601000202244 as “871446601000202244” is the recipient id of @SusiAI1 account on twitter.

If we send this url as a text in our “tweet back” to the user, Twitter beautifully shows it as a clickable button with the label as “send a private message” as shown above.

Hence we call the tweet function like this:

tweetIt('@' + from + ' ' + message + date +"\nhttps://twitter.com/messages/compose?recipient_id=871446601000202244");

Facebook:

As we all know Facebook is the giant of social networking sites. Integrating SUSI.AI to Facebook is beneficial for us.

Unlike Twitter, in Facebook we can share messages with other friends through direct messaging to them. The last topic of this blog post walks you through on adding sharing feature in SUSI FBbot:

We also take advantage from the SUSI FBbot to make SUSI.AI better. We can direct the users using SUSI messenger bots to SUSI.AI repository and show them all the required information on how to contribute to the project.

The best way to do this is by showing a “How to contribute” button when the user clicks on “Get started” in the messenger bot.

This blog post will help you showing buttons along with the replies (by SUSI.AI).

When the user clicks this button, we send two messages back to the user as shown:

This way through bots, we have somehow got the user to visit SUSI.AI repository and contribute to it or indulge him/her in the discussion, through our Gitter channel on what can be the next steps in improving SUSI.AI.

Resources:

  1. Link Ads to Messenger, Enhanced Mobile Websites, Payments and More by Seth Rosenberg from Facebook developers blog.
  2. Drive discovery of bots and other customer experiences in direct messages by  Travis Lull from Twitter blog.
Continue ReadingMaking SUSI.AI reach more users through messenger bots

Generating Map Action Responses in SUSI AI

SUSI AI responds to location related user queries with a Map action response. The different types of responses are referred to as actions which tell the client how to render the answer. One such action type is the Map action type. The map action contains latitude, longitude and zoom values telling the client to correspondingly render a map with the given location.

Let us visit SUSI Web Chat and try it out.

Query: Where is London

Response: (API Response)

The API Response actions contain text describing the specified location, an anchor with text ‘Here is a map` linked to openstreetmaps and a map with the location coordinates.

Let us look at how this is implemented on server.

For location related queries, the key where is used as an identifier. Once the query is matched with this key, a regular expression `where is (?:(?:a )*)(.*)` is used to parse the location name.

"keys"   : ["where"],
"phrases": [
  {"type":"regex", "expression":"where is (?:(?:a )*)(.*)"},
]

The parsed location name is stored in $1$ and is used to make API calls to fetch information about the place and its location. Console process is used to fetch required data from an API.

"process": [
  {
    "type":"console",
    "expression":"SELECT location[0] AS lon, location[1] AS lat FROM locations WHERE query='$1$';"},
  {
    "type":"console",
    "expression":"SELECT object AS locationInfo FROM location-info WHERE query='$1$';"}
],

Here, we need to make two API calls :

  • For getting information about the place
  • For getting the location coordinates

First let us look at how a Console Process works. In a console process we provide the URL needed to fetch data from, the query parameter needed to be passed to the URL and the path to look for the answer in the API response.

  • url = <url>   – the url to the remote json service which will be used to retrieve information. It must contain a $query$ string.
  • test = <parameter> – the parameter that will replace the $query$ string inside the given url. It is required to test the service.

For getting the information about the place, we used Wikipedia API. We name this console process as location-info and added the required attributes to run it and fetch data from the API.

"location-info": {
  "example":"http://127.0.0.1:4000/susi/console.json?q=%22SELECT%20*%20FROM%20location-info%20WHERE%20query=%27london%27;%22",
  "url":"https://en.wikipedia.org/w/api.php?action=opensearch&limit=1&format=json&search=",
  "test":"london",
  "parser":"json",
  "path":"$.[2]",
  "license":"Copyright by Wikipedia, https://wikimediafoundation.org/wiki/Terms_of_Use/en"
}

The attributes used are :

  • url : The Media WIKI API endpoint
  • test : The Location name which will be appended to the url before making the API call.
  • parser : Specifies the response type for parsing the answer
  • path : Points to the location in the response where the required answer is present

The API endpoint called is of the following format :

https://en.wikipedia.org/w/api.php?action=opensearch&limit=1&format=json&search=LOCATION_NAME

For the query where is london, the API call made returns

[
  "london",
  ["London"],
  ["London  is the capital and most populous city of England and the United Kingdom."],
  ["https://en.wikipedia.org/wiki/London"]
]

The path $.[2] points to the third element of the array i.e “London  is the capital and most populous city of England and the United Kingdom.” which is stored in $locationInfo$.

Similarly to get the location coordinates, another API call is made to loklak API.

"locations": {
  "example":"http://127.0.0.1:4000/susi/console.json?q=%22SELECT%20*%20FROM%20locations%20WHERE%20query=%27rome%27;%22",
  "url":"http://api.loklak.org/api/console.json?q=SELECT%20*%20FROM%20locations%20WHERE%20location='$query$';",
  "test":"rome",
  "parser":"json",
  "path":"$.data",
  "license":"Copyright by GeoNames"
},

The location coordinates are found in $.data.location in the API response. The location coordinates are stored as latitude and longitude in $lat$ and $lon$ respectively.

Finally we have description about the location and its coordinates, so we create the actions to be put in the server response.

The first action is of type answer and the text to be displayed is given by $locationInfo$ where the data from wikipedia API response is stored.

{
  "type":"answer",
  "select":"random",
  "phrases":["$locationInfo$"]
},

The second action is of type anchor. The text to be displayed is `Here is a map` and it must be hyperlinked to openstreetmaps with the obtained $lat$ and $lon$.

{
  "type":"anchor",
  "link":"https://www.openstreetmap.org/#map=13/$lat$/$lon$",
  "text":"Here is a map"
},

The last action is of type map which is populated for latitude and longitude using $lat$ and $lon$ respectively and the zoom value is specified to be 13.

{
  "type":"map",
  "latitude":"$lat$",
  "longitude":"$lon$",
  "zoom":"13"
}

Final output from the server will now contain the three actions with the required data obtained from the respective API calls made. For the sample query `where is london` , the actions will look like :

"actions": [
  {
    "type": "answer",
    "language": "en",
    "expression": "London  is the capital and most populous city of England and the United Kingdom."
  },
  {
    "type": "anchor",
    "link":   "https://www.openstreetmap.org/#map=13/51.51279067225417/-0.09184009399817228",
    "text": "Here is a map",
    "language": "en"
  },
  {
    "type": "map",
    "latitude": "51.51279067225417",
    "longitude": "-0.09184009399817228",
    "zoom": "13",
    "language": "en"
  }
],

This is how the map action responses are generated for location related queries. The complete code can be found at SUSI AI Server Repository.

Resources:

Continue ReadingGenerating Map Action Responses in SUSI AI

Create Event by Importing JSON files in Open Event Server

Apart from the usual way of creating an event in  FOSSASIA’s Orga Server project by using POST requests in Events API, another way of creating events is importing a zip file which is an archive of multiple JSON files. This way you can create a large event like FOSSASIA with lots of data related to sessions, speakers, microlocations, sponsors just by uploading JSON files to the system. Sample JSON file can be found in the open-event project of FOSSASIA. The basic workflow of importing an event and how it works is as follows:

  • First step is similar to uploading files to the server. We need to send a POST request with a multipart form data with the zipped archive containing the JSON files.
  • The POST request starts a celery task to start importing data from JSON files and storing them in the database.
  • The celery task URL is returned as a response to the POST request. You can use this celery task for polling purposes to get the status. If the status is FAILURE, we get the error text along with it. If status is SUCCESS we get the resulting event data
  • In the celery task, each JSON file is read separately and the data is stored in the db with the proper relations.
  • Sending a GET request to the above mentioned celery task, after the task has been completed returns the event id along with the event URL.

Let’s see how each of these points work in the background.

Uploading ZIP containing JSON Files

For uploading a zip archive instead of sending a JSON data in the POST request we send a multipart form data. The multipart/form-data format of sending data allows an entire file to be sent as a data in the POST request along with the relevant file informations. One can know about various form content types here .

An example cURL request looks something like this:

curl -H "Authorization: JWT <access token>" -X POST -F 'file=@event1.zip' http://localhost:5000/v1/events/import/json

The above cURL request uploads a file event1.zip from your current directory with the key as ‘file’ to the endpoint /v1/events/import/json. The user uploading the feels needs to have a JWT authentication key or in other words be logged in to the system as it is necessary to create an event.

@import_routes.route('/events/import/<string:source_type>', methods=['POST'])
@jwt_required()
def import_event(source_type):
    if source_type == 'json':
        file_path = get_file_from_request(['zip'])
    else:
        file_path = None
        abort(404)
    from helpers.tasks import import_event_task
    task = import_event_task.delay(email=current_identity.email, file=file_path,
                                   source_type=source_type, creator_id=current_identity.id)
    # create import job
    create_import_job(task.id)

    # if testing
    if current_app.config.get('CELERY_ALWAYS_EAGER'):
        TASK_RESULTS[task.id] = {
            'result': task.get(),
            'state': task.state
        }
    return jsonify(
        task_url=url_for('tasks.celery_task', task_id=task.id)
    )


After the request is received we check if a file exists in the key ‘file’ of the form-data. If it is there, we save the file and get the path to the saved file. Then we send this path over to the celery task and run the task with the
.delay() function of celery. After the celery task is started, the corresponding data about the import job is stored in the database for future debugging and logging purposes. After this we return the task url for the celery task that we started.

Celery Task to Import Data

Just like exporting of event, importing is also a time consuming task and we don’t want other application requests to be paused because of this task. Hence, we use a celery queue to execute this task. Whenever an import task is started, it is added to the celery queue. When it comes to the front of the queue it is executed.

For importing, we have created a celery task, import.event which calls the import_event_task_base() function that uses the import helper functions to get the data from JSON files imported and saved in the DB. After the task is completed, we update the import job data in the table with the status as either SUCCESS or FAILURE depending on the outcome of the celery task.

As a result of the celery task, the newly created event’s id and the frontend link from where we can visit the url is returned. This along with the status of the celery task is returned as the response for a GET request on the celery task. If the celery task fails, then the state is changed to FAILURE and the error which the celery faced is returned as the error message in the result key. We also print an error traceback in the celery worker.

@celery.task(base=RequestContextTask, name='import.event', bind=True, throws=(BaseError,))
def import_event_task(self, file, source_type, creator_id):
    """Import Event Task"""
    task_id = self.request.id.__str__()  # str(async result)
    try:
        result = import_event_task_base(self, file, source_type, creator_id)
        update_import_job(task_id, result['id'], 'SUCCESS')
        # return item
    except BaseError as e:
        print(traceback.format_exc())
        update_import_job(task_id, e.message, e.status if hasattr(e, 'status') else 'failure')
        result = {'__error': True, 'result': e.to_dict()}
    except Exception as e:
        print(traceback.format_exc())
        update_import_job(task_id, e.message, e.status if hasattr(e, 'status') else 'failure')
        result = {'__error': True, 'result': ServerError().to_dict()}
    # send email
    send_import_mail(task_id, result)
    # return result
    return result


Save Data from JSON

In import helpers, we have the functions which perform the main task of reading the JSON files, creating sqlalchemy model objects from them and saving them in the database. There are few global dictionaries which help maintain the order in which the files are to be imported and saved and also the file vs model mapping. The first JSON file to be imported is the event JSON file. Since all the other tables to be imported are related to the event table so first we read the event JSON file. After that the order in which the files are read is as follows:

  1. SocialLink
  2. CustomForms
  3. Microlocation
  4. Sponsor
  5. Speaker
  6. Track
  7. SessionType
  8. Session

This order helps maintain the foreign constraints. For importing data from these files we use the function create_service_from_json(). It sorts the elements in the data list  based on the key “id”. It then loops over all the elements or dictionaries contained in the data list. In each iteration delete the unnecessary key-value pairs from the dictionary. Then set the event_id for that element to the id of the newly created event from import instead of the old id present in the data.  After all this is done, create a model object based on the mapping with the filename with the dict data. Then save that model data into the database.

def create_service_from_json(task_handle, data, srv, event_id, service_ids=None):
    """
    Given :data as json, create the service on server
    :service_ids are the mapping of ids of already created services.
        Used for mapping old ids to new
    """
    if service_ids is None:
        service_ids = {}
    global CUR_ID
    # sort by id
    data.sort(key=lambda k: k['id'])
    ids = {}
    ct = 0
    total = len(data)
    # start creating
    for obj in data:
        # update status
        ct += 1
        update_state(task_handle, 'Importing %s (%d/%d)' % (srv[0], ct, total))
        # trim id field
        old_id, obj = _trim_id(obj)
        CUR_ID = old_id
        # delete not needed fields
        obj = _delete_fields(srv, obj)
        # related
        obj = _fix_related_fields(srv, obj, service_ids)
        obj['event_id'] = event_id
        # create object
        new_obj = srv[1](**obj)
        db.session.add(new_obj)
        db.session.commit()
        ids[old_id] = new_obj.id
        # add uploads to queue
        _upload_media_queue(srv, new_obj)

    return ids


After the data has been saved, the next thing to do is upload all the media files to the server. This we do using the
_upload_media_queue()  function. It takes paths to upload the files to from the storage.py helper file for APIs. Then it uploads the files using the various helper functions to the static data storage services like AWS S3, Google storage, etc.

Other than this, the import helpers also contains the function to create an import job that keeps a record of all the imports along with the task url and the user id of the user who started the importing task. It also stores the status of the task. Then there is the get_file_from_request()  function which saves the file that is uploaded through the POST request and returns the path to that file.

Get Response about Event Imported

The POST request returns a task url of the form /v1/tasks/ebe07632-392b-4ae9-8501-87ac27258ce5. To get the final result, you need to keep polling this URL. To know more about polling read my previous blog about exporting event or visit this link. So when the task is completed you would get a “result” key along with the status. The state can either be SUCCESS or FAILURE. If it is a FAILURE you will get a corresponding error message due to which the celery task failed. If it is a success then you get data related to the corresponding event that was created because of import. The data returned are the event id, event name and the event url which you can use to visit the event from the frontend. This data is also sent to the user as an email and notification.

An example response looks something like this:

{ 
    “result”: {
“event_name” : “FOSSASIA 2016”,
     “id” : “24”,
     “url” : “https://eventyay.com/events/ab3de6
},
    “state” : “SUCCESS”
}

The corresponding event name and the url is also sent to the user who started the import task. From the frontend, one can use the object value of the result to show the name of the event that is imported along with providing the event url. Since the id and identifier are both present in the result returned one can also make use of them to send GET, PATCH and other API requests to the events/ endpoint and get the corresponding relationship urls from it to query the other APIs. Thus, the entire data that is imported gets available to the frontend as well.


Reference Links:


Continue ReadingCreate Event by Importing JSON files in Open Event Server

Showing Url, Location and Carousel Responses in Viber Bot

SUSI Webchat is capable of sending Url, location and carousel responses. In this blog, we will learn about implementing these same responses in SUSI viber bot. We can send text response instead of carousels but it doesn’t attract users and cause difficulties in understanding. In SUSI webchat for query “news” it sends a URL of an article from BBC news which looks like this:

If we send a query “Where is Singapore” it sends location using map response and it looks like this:

For web search SUSI sends carousels which look like this:


To implement these responses in SUSI Viber bot we will send a post request with specific types to the send_message endpoint of Viber chat API https://chatapi.viber.com/pa/send_message. Url, location and carousel responses will be implemented in following way:

  • Url:
    For receiving URL in Viber bot we will post a request with type:’url’ and media:’url to be sent here’. A request will look like code given below.
var options = {
                method: 'POST',
                url: 'https://chatapi.viber.com/pa/send_message',
                headers: headerBody,
                body: {
                    receiver: req.body.sender.id,
                    min_api_version: 1,
                    sender: {
                        name: 'Name of your public Account here',
                        avatar: 'Avatar url for your public account here'
                    },
                    tracking_data: 'tracking data',
                    type: 'url',
                    Media: 'http://www.website.com/go_here'
                },
                json: true
            };
request(options, function(err, res, body) {
                   if (err) throw new Error(err);
                   console.log(body);
               });
  • Location:
    For receiving location with a map on Viber bot we will post a request with type: ‘location’ and location: { lat: latitude, lon: longitude }. In location response, we have to send latitude and longitude values of location to be shown on the map. A request will look like code given below:
var options = {
                method: 'POST',
                url: 'https://chatapi.viber.com/pa/send_message',
                headers: headerBody,
                body: {
                    receiver: req.body.sender.id,
                    min_api_version: 1,
                    sender: {
                        name: 'Name of your public Account here',
                        avatar: 'Avatar url for your public account here'
                    },
                    tracking_data: 'tracking data',
                    type: 'location',
                    location: {
                           lat: latitude,
                           lon: longitude
                       }
                },
                json: true
            };
request(options, function(err, res, body) {
                   if (err) throw new Error(err);
                   console.log(body);
               });

Location response in Viber bot will look like this:

  • Carousel:
    Carousels are horizontal tiles which can be scrolled to view content on them. To receive carousels on Viber bot we will post a request with type: ‘rich_media’ and

    rich_media: {
                       Type: "rich_media",
                       ButtonsGroupColumns: 6,
                       ButtonsGroupRows: 6,
                       BgColor: "#FFFFFF",
                       Buttons: buttons
           }
    

    In rich media “ButtonsGroupColumns” is the number of columns per carousel content block,  “ButtonsGroupRows” is the number of rows per carousel content block and buttons is an array of buttons which contains content to be shown in carousels. A request will look like code given below.

    var options = {
                    method: 'POST',
                    url: 'https://chatapi.viber.com/pa/send_message',
                    headers: headerBody,
                    body: {
                        receiver: req.body.sender.id,
                        min_api_version: 1,
                        sender: {
                            name: 'Name of your public Account here',
                            avatar: 'Avatar url for your public account here'
                        },
                        tracking_data: 'tracking data',
                        type: 'rich_media',
                           rich_media: {
                               Type: "rich_media",
                               ButtonsGroupColumns: 6,
                               ButtonsGroupRows: 6,
                               BgColor: "#FFFFFF",
                               Buttons:{
                                   Columns: 6,
                                   Rows: 3,
                                   Text: 'text to be shown in carousel',
                                   "ActionType": "open-url",
                                   "ActionBody": 'link to be opened on clicking on carousel block',
                                   "TextSize": "medium",
                                   "TextVAlign": "middle",
                                  "TextHAlign": "middle"
                              }            
                           }
                    },
                    json: true
                };
    request(options, function(err, res, body) {
                       if (err) throw new Error(err);
                       console.log(body);
                   });
    

    Carousel response from Viber bot will look like this:

    We have successfully implemented URL, location and carousel response in Viber bot.

    If you want to learn more about Viber chat API refer to https://developers.viber.com/docs/api/rest-bot-api/

    Resources

    Viber Chat API: https://developers.viber.com/docs/api/rest-bot-api/
    Claudia bot builder platform to build Viber bot: https://claudiajs.com/tutorials/viber-chatbot.html
    Viber bot by using PHP: http://thedebuggers.com/build-viber-chat-bot-6-simple-steps/

Continue ReadingShowing Url, Location and Carousel Responses in Viber Bot

Image Loading in Open Event Organizer Android App using Glide

Open Event Organizer is an Android App for the Event Organizers and Entry Managers. Open Event API Server acts as a backend for this App. The core feature of the App is to scan a QR code from the ticket to validate an attendee’s check in. Other features of the App are to display an overview of sales and ticket management. As per the functionality, the performance of the App is very important. The App should be functional even on a weak network. Talking about the performance, the image loading part in the app should be handled efficiently as it is not an essential part of the functionality of the App. Open Event Organizer uses Glide, a fast and efficient image loading library created by Sam Judd. I will be talking about its implementation in the App in this blog.

First part is the configuration of the glide in the App. The library provides a very easy way to do that. Your app needs to implement a class named AppGlideModule using annotations provided by the library and it generates a glide API which can be used in the app for all the image loading stuff. The AppGlideModule implementation in the Orga App looks like:

@GlideModule
public final class GlideAPI extends AppGlideModule {

   @Override
   public void registerComponents(Context context, Glide glide, Registry registry) {
       registry.replace(GlideUrl.class, InputStream.class, new OkHttpUrlLoader.Factory());
   }

   // TODO: Modify the options here according to the need
   @Override
   public void applyOptions(Context context, GlideBuilder builder) {
       int diskCacheSizeBytes = 1024 * 1024 * 10; // 10mb
       builder.setDiskCache(new InternalCacheDiskCacheFactory(context, diskCacheSizeBytes));
   }

   @Override
   public boolean isManifestParsingEnabled() {
       return false;
   }
}


This generates the API named GlideApp by default in the same package which can be used in the whole app. Just make sure to add the annotation @GlideModule to this implementation which is used to find this class in the app. The second part is using the generated API GlideApp in the app to load images using URLs. Orga App uses data binding for layouts. So all the image loading related code is placed at a single place in DataBinding class which is used by the layouts. The class has a method named setGlideImage which takes an image view, an image URL, a placeholder drawable and a transformation. The relevant code is:

private static void setGlideImage(ImageView imageView, String url, Drawable drawable, Transformation<Bitmap> transformation) {
       if (TextUtils.isEmpty(url)) {
           if (drawable != null)
               imageView.setImageDrawable(drawable);
           return;
       }
       GlideRequest<Drawable> request = GlideApp
           .with(imageView.getContext())
           .load(Uri.parse(url));

       if (drawable != null) {
           request
               .placeholder(drawable)
               .error(drawable);
       }
       request
           .centerCrop()
           .transition(withCrossFade())
           .transform(transformation == null ? new CenterCrop() : transformation)
           .into(imageView);
   }


The method is very clear. First, the URL is checked for nullability. If null, the drawable is set to the imageview and method returns. Usage of GlideApp is simpler. Pass the URL to the GlideApp using the method with which returns a GlideRequest which has operators to set other required options like transitions, transformations, placeholder etc. Lastly, pass the imageview using into operator. By default, Glide uses HttpURLConnection provided by android to load the image which can be changed to use Okhttp using the extension provided by the library. This is set in the AppGlideModule implementation in the registerComponents method.

Links:
1. Documentation for Glide, an Image Loading Library
2. Documentation for Okhttp, an HTTP client for Android and Java Applications

Continue ReadingImage Loading in Open Event Organizer Android App using Glide

Fascinating Experiments with PSLab

PSLab can be extensively used in a variety of experiments ranging from the traditional electrical and electronics experiments to a number of innovative experiments. The PSLab desktop app and the Android app have all the essential features that are needed to perform the experiments. In addition to that there is a large collection of built-in experiments in both these experiments.

This blog is an extension to the blog post mentioned here. This blog lists some of the basic electrical and electronics experiments which are based on the same principles which are mentioned in the previous blog. In addition to that, some interesting and innovative experiments where PSLab can be used are also listed here. The experiments mentioned here require some prerequisite knowledge of electronic elements and basic circuit building. (The links mentioned at the end of the blog will be helpful in this case)

Op-Amp as an Inverting and a Non-Inverting Amplifier

There are two methods of doing this experiment. PSLab already has a built-in experiment dedicated to inverting and non-inverting amplification of op-amps. In the Android App, just navigate to Saved Experiments -> Electronics Experiments -> Op-Amp Circuits -> Inverting/ Non-Inverting. In case of the Desktop app, select Electronics Experiments from the main drop-down at the top of the window and select the Inverting/Non-inverting op-amp experiment.

This experiment can also performed using the basic features of PSLab. The only advantage of this methodology is that it allows much more tweaking of values to observe the Op-Amp behaviour in greater detail. However, the built-in experiment is good enough for most of the cases.

  • Construct the above circuits on a breadboard.
  • For the amplifier, connect the terminals of CH1 and GND of PSLab on the input side i.e. next to Vi and the terminals of CH2 and GND on the output side i.e next to Vo.
  • Usually, an Op-Amp like LM741 have a set of pins, one dedicated for the inverting input and the other dedicated for the non-inverting input. It is recommended to consult the datasheet of the Op-Amp IC used in order to get the pin number with which the input has to be connected.
  • The terminals of W1 and GND are also connected on the input side and they are used to generate a sine wave.
  • The resistors displayed in the figure have the values R1 = 10k and R2 = 51k. Resistance values other than these can also be considered. The gain of the op-amp would depend on the ratio of R2/R1, so it is better to consider values of R2 which are significantly larger than R1 in order to see the gain properly.
  • Use the PSLab Desktop App and open the Waveform Generator in Control. Set the wave type of W1 to Sine and set the frequency at 1 kHz and magnitude to 0.1 V. Then go ahead and open the Oscilloscope.
  • CH1 would display the input waveform and CH2 will display the output waveform and the plots can be observed.
  • If the input is connected to the inverting pin of the op-amp, the output obtained will be amplified and will have a phase difference of 90o with the input waveform whereas when the non-inverting pin is selected, the output is just amplified and no such phase difference is observed.
  • Note: Take proper care while connecting the V+ and V- pins of the op-amp, else the op-amp will be damaged.

Diode as an Integrator and Differentiator

An integrator in measurement and control applications is an element whose output signal is the time integral of its input signal. It accumulates the input quantity over a defined time to produce a representative output.

Integration is an important part of many engineering and scientific applications. Mechanical integrators are the oldest application, and are still used in such as metering of water flow or electric power. Electronic analogue integrators are the basis of analog computers and charge amplifiers. Integration is also performed by digital computing algorithms.

In electronics, a differentiator is a circuit that is designed such that the output of the circuit is approximately directly proportional to the rate of change (the time derivative) of the input. An active differentiator includes some form of amplifier. A passive differentiator circuit is made of only resistors and capacitors.

  • Construct the above circuits on a breadboard.
  • For both the circuits, connect the terminals of CH1 and GND of PSLab on the input side i.e. next to input voltage source and the terminals of CH2 and GND on the output side i.e next to Vo.
  • Ensure that the inverting and the non-inverting terminals of the op-amp are connected correctly. Check for the +/- signs in the diagram. ‘+’ corresponds to non-inverting and ‘-’ corresponds to inverting.
  • The terminals of W1 and GND are also connected on the input side and they are used to generate a sine wave.
  • The resistors displayed in the figure have the values R1 = 10k and R2 = 51k. Resistance values other than these can also be considered. The gain of the op-amp would depend on the ratio of R2/R1, so it is better to consider values of R2 which are significantly larger than R1 in order to see the gain properly.
  • Use the PSLab Desktop App and open the Waveform Generator in Control. Set the wave type of W1 to Sine and set the frequency at 1 kHz and magnitude to 5V (10V peak to peak). Then go ahead and open the Oscilloscope.
  • CH1 would display the input waveform and CH2 will display the output waveform and the plots can be observed.
  • If all the connections are made properly and the values of the parameters are set properly, then the waveform obtained should be as shown below.

Performing experiments involving ICs (Digital circuits)

The experiments mentioned so far including the ones mentioned in the previous blog post involved analog circuits and so they required features like the arbitrary waveform generator. However, digital circuits work using discrete values only. PSLab has the features needed to perform digital experiments which mainly involve the use of a square wave generator with a variable duty cycle.

PSLab board has dedicated pins named SQR1, SQR2, SQR3 and SQR4. The options for configuring these pins is present under the Advanced Control section in the Desktop app and in the Android app Applications->Control->Advanced. The options include selecting the pins which we want to use for digital outputs and then configuring the frequency and duty cycle of the square wave generated from that particular pin.

Innovative Experiments using PSLab

PSLab has quite a good number of interesting built-in experiments. These experiments can be found in the dropdown list at the top in the Desktop App and under the Saved Experiments header in the Android App. The built-in experiments come bundled with good quality documentation having circuit diagrams and detailed procedure to perform the experiments.

Some of the interesting experiments include:

  • Lemon Cell Experiment: In this experiment, the internal resistance and the voltage supplied by the lemon cell are measured.


  • Sound Beats: In acoustics, a beat is an interference pattern between two sounds of slightly different frequencies, perceived as a periodic variation in volume whose rate is the difference of the two frequencies.


  • When tuning instruments that can produce sustained tones, beats can readily be recognized. Tuning two tones to a unison will present a peculiar effect: when the two tones are close in pitch but not identical, the difference in frequency generates the beating.
  • This experiment requires producing two waves together of different frequencies and connecting them to the same oscilloscope channel. The pattern observed is shown below.

References:

  1. The previous blog on experiments using PSLab – https://blog.fossasia.org/electronics-experiments-with-pslab/
  2. More about op-amps and their characteristics – http://www.electronics-tutorials.ws/opamp/opamp_1.html
  3. Read more about differential and integrator circuits – https://www.allaboutcircuits.com/textbook/semiconductors/chpt-8/differentiator-integrator-circuits/
  4. Experiments involving digital circuits for reference – http://web.iitd.ac.in/~shouri/eep201/experiments.php
Continue ReadingFascinating Experiments with PSLab

Basics behind school level experiments with PSLab

Electronics is a fascinating subject to most kids. Turning on a LED bulb, making a simple circuit will make them dive into much more interesting areas in the field of electronics. PSLab android application with the help of PSLab device implements a set of experiments whose target audience is school children. To make them more interested in science and electronics, there are several experiments implemented such as measuring body resistance, lemon cell experiment etc.

This blog post brings out the basics in implementing these type of experiments and pre-requisite.

Lemon Cell Experiment

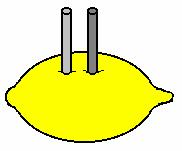
Lemon Cell experiment is a basic experiment which will make school kids interested in science experiments. The setup requires a fresh lemon and a pair of nails which is used to drive into the lemon as illustrated in the figure. The implementation in PSLab android application uses it’s Channel 1. The cell generates a low voltage which can be detected using the CH1 pin of PSLab device and it is sampled at a rate of 10 to read an accurate result.

float voltage = (float) scienceLab.getVoltage("CH1", 10);

2000 instances are recorded using this method and plotted against each instance. The output graph will show a decaying graph of voltage measured between the nails driven into the lemon.

for (int i = 0; i < timeAxis.size(); i++) {
   temp.add(new Entry(timeAxis.get(i), voltageAxis.get(i)));
}

Human Body Resistance Measurement Experiment

This experiment attracts most of the young people to do electronic experiments. This is implemented in the PSLab android application using Channel 3 and the Programmable Voltage Source 3 which can generate voltage up to 3.3V. The experiment requires a human with drippy palms so it makes a good conductance between device connection and the body itself.

The PSLab device has an internal resistance of 1M Ohms connected with the Channel 3 pin. Experiment requires a student to hold two wires with the metal core exposed; in both hands. One wire is connected to PV3 pin when the other wire is connected to CH3 pin. When a low voltage is supplied from the PV3 pin, due to heavy resistance in body and the PSLab device, a small current in the range of nano amperes will flow through body. Using the reading from CH3 pin and the following calculation, body resistance can be measured.

voltage = (float) scienceLab.getVoltage("CH3", 100);
current = voltage / M;
resistance = (M * (PV3Voltage - voltage)) / voltage;

This operation is executed inside a while loop to provide user with a continuous set of readings. Using Java threads there is a workaround to implement the functionalities inside the while loop without overwhelming the system. First step is to create a object without any attribute.

private final Object lock = new Object();

Java threads use synchronized methods where other threads won’t start until the first thread is completed or paused operation. We make use of that technique to provide enough time to read CH3 pin and display output.

while (true) {
   new MeasureResistance().execute();
   synchronized (lock) {
       try {
           lock.wait();
       } catch (InterruptedException e) {
           e.printStackTrace();
       }
   }
}

Once the pin readings and value updates are complete the lock is released to execute the method once again.

updateDataBox();
synchronized (lock) {
   lock.notify();
}

Capacitor Discharge Experiment

This experiment is somewhat similar to the Lemon Cell Experiment as this experiments on electron storage and discharge. The experiment is carried out using two bulky electrolyte capacitors. PSLab device is capable of generating PWM waveforms with any duty cycle. Refer to this article to learn more about how PWM waves are generated using PSLab device to implement more features like sine wave generation.

Using the SQR1 pin of the PSLab device, one capacitor is charged to its fullest capacity using a PWM wave with 100% duty cycle at a 100 Hz.

scienceLab.setSqr1(100, 100, false);

This capacitor is then connected in parallel with the other capacitor which is empty. The voltage transfer is measured using CH1 pin at a sampling rate of 10

float voltage = (float) scienceLab.getVoltage("CH1", 10);

To provide a continuous update in the voltage transfer, a similar implementation is used using an object in the thread to control the implementation inside a while loop.

Resources:

Continue ReadingBasics behind school level experiments with PSLab

Adding Push Wake Button to SUSI on Raspberry PI

SUSI Linux for Raspberry Pi provides the ability to call SUSI with the help of a Hotword ‘Susi’. Calling via Hotword is a natural way of interaction but it is even handier to invoke SUSI listening mode with the help of a Push button. It enables to call SUSI in a noisy environment where detection of Hotword is not that accurate.

To enable Push Wake button is Susi, we need access to Hardware Pins. Devices like Raspberry PI provides GPIO (General Purpose Input Output) Pins for interacting with Hardware Devices.

In this tutorial, we are adding support for Push Wake Button in Raspberry PI, though similar procedure can be extended to add Wake Button to Orange Pi, Beaglebone Black, and other devices. For adding push wake button, we require:

We now need to do wiring to connect button to Raspberry Pi. The button can be connected to Raspberry Pi following the connection diagram. 

After this, we need to install the Raspberry Pi GPIO Python Library. Install it using:

$ pip3 install RPi.GPIO

Now, we may detect the press of the button in our code. We declare an abstract class for implementing Wake Button. In this way, we can later extend our code to include Wake Buttons for more platforms.

import os
from abc import ABC, abstractclassmethod
from queue import Queue
from threading import Thread

from utils.susi_config import config


class WakeButton(ABC, Thread):
   def __init__(self, detection_callback, callback_queue: Queue):
       super().__init__()
       self.detection_callback = detection_callback
       self.callback_queue = callback_queue
       self.is_active = False

   @abstractclassmethod
   def run(self):
       pass

   def on_detected(self):
       if self.is_active:
           self.callback_queue.put(self.detection_callback)
           os.system('play {0} &'.format(config['detection_bell_sound']))
           self.is_active = False

We defined WakeButton class as a Thread. This is done to ensure that listening to Wake Buttons is done in background thread and it does not disturb the main thread. The callback to be executed on main thread after button press is detected is added to callback queue. Main Thread listens on the callback queue and executes any pending functions from other threads.

We also play an Audio File additionally on detection of a button press to confirm the activation of detection to the user.

Now, we define Raspberry Pi Wake Button class. This class extends from abstract WakeButton declared above.

from queue import Queue

import RPi.GPIO as GPIO
import time
from .wake_button import WakeButton


class RaspberryPiWakeButton(WakeButton):
   def __init__(self, detection_callback, callback_queue: Queue):
       super().__init__(detection_callback, callback_queue)
       GPIO.setmode(GPIO.BCM)
       GPIO.setup(18, GPIO.IN, pull_up_down=GPIO.PUD_UP)

   def run(self):
       while True:
           input_state = GPIO.input(18)
           if not input_state:
               self.on_detected()
               self.is_active = False
               time.sleep(0.2)

This class defines the Wake Button for Raspberry Pi. We continuously poll for the input value of GPIO Pin number 18 on which button is connected. If value is negative, it indicated that button was pressed.

Now, we need to add an option if configuration script to give users a choice to enable or disable wake button. We first need to check, if device is Raspberry Pi, since feature is available on Raspberry PI only. To do this, we try to import RPi.GPIO module. If module loading fails, it indicates that device does not support Raspberry Pi GPIO modes. We set the configuration parameters according to it.

def setup_wake_button():
   try:
       import RPi.GPIO
       print("Device supports RPi.GPIO")
       choice = input("Do you wish to enable hardware wake button? (y/n)")
       if choice == 'y':
           config['WakeButton'] = 'enabled'
           config['Device'] = 'RaspberryPi'
       else:
           config['WakeButton'] = 'disabled'
   except ImportError:
       print("This device does not support RPi.GPIO")
       config['WakeButton'] = 'not available'

Now, we simply use the Raspberry Pi wake button detector in our code.

if config['wake_button'] == 'enabled':
   if config['device'] == 'RaspberryPi':
       from hardware_components import RaspberryPiWakeButton

       wake_button = RaspberryPiWakeButton(callback_queue=callback_queue, detection_callback=start_speech_recognition)
       wake_button.start()

Now, when you need to invoke SUSI Listening Mode, instead of saying ‘SUSI’ as Hotword, you may also press the push button. Ask your query after hearing a small bell and get instant reply from SUSI.

Resources:

Continue ReadingAdding Push Wake Button to SUSI on Raspberry PI