Implementation of Image Scraper and Teaser Text in Query Server

Query server helps one to scrap search engines like Google, Yahoo, Bing, DuckDuckGo and get the results in json/ xml format. Also it stores retrieved results in mongoDB for analytical purposes.We have used beautiful soup for scraping results from query server

We have used beautiful soup for scraping results from query server

In this blogpost I will discuss two recent implementations in query server and then end with the introduction of different scrappers for query server.

Implementation of teaser text for Google, Yahoo, and DuckDuckgo:

Teaser text is basically description that is provided by search engines for all search results, this could be implemented by scrapping the description of each result and push it into a list. This is done in query server using beautiful.

Implementation details of this feature is available at pull:

https://github.com/fossasia/query-server/pull/72

And finally we have achieved scaping teaser text for all supported search engines:
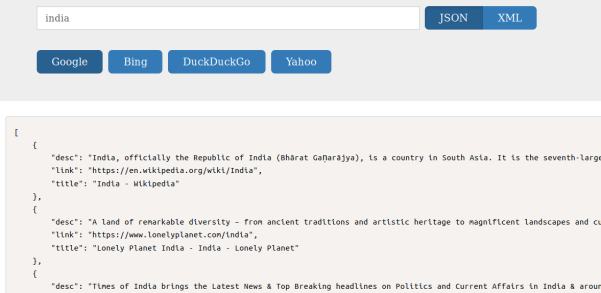
Implementation of Image scraper for google in query server:

Scapping images in google is a bit different from scrapping normal text results. Google has metadata of the original image in rg_meta tag of div containing the thumbnail of the image. We cannot scrap just the thumbnail, because thumbnails are basically of low quality, and also are stored in google server, whereas the links available in the meta data are from the original source. Finally using the metadata of images available we have scraped the images in google.

Implementation details of image scraper to google is available at https://github.com/fossasia/query-server/pull/73

Also we have separated one scraper file for each of the search engine using Object Oriented Paradigm, where as before we used to have only one scraper file for all search engines https://github.com/fossasia/query-server/pull/67

Resources

BeautifulSoup: https://www.crummy.com/software/BeautifulSoup/bs4/doc/

Continue ReadingImplementation of Image Scraper and Teaser Text in Query Server

Implementation of Image Viewer in Susper

We have implemented image viewer in Susper similar to Google.

Before when a user clicks on a thumbnail the images are opened in a separate page, but we want to replace this with an image viewer similar to Google.

Implementation Logic:

1. Thumbnails for images in susper are arranged as shown in the above picture.

2. When a user clicks on an image a hidden empty div(image viewer) of the last image in a row is opened.

3. The clicked image is then rendered in the image viewer (hidden div of the last element in a row).

4. Again clicking on the same image closes the opened image viewer.

5. If a second image is clicked then, if an image is in the same row, it is rendered inside the same image viewer. else if the image is in another row, this closes the previous image viewer and renders the image in a new image viewer (hidden div of the last element of the row)

6. Since image viewer is strictly the hidden empty div of the last element in a row when it is expanded it occupies the position of the next row, moving them further down similar to what we want.

Implementation Code

results.component.html

<div *ngFor="let item of items;let i = index">
 <div class="item">
   <img src="{{item.link}}" height="200px" (click)="expandImage(i)" [ngClass]="'image'+i">
 </div>
 <div class=" item image-viewer" *ngIf="expand && expandedrow === i">
   <span class="helper"></span> <img [src]="items[expandedkey].link" height="200px" style="vertical-align: middle;">
 </div>

</div>

Each thumbnail image will have a <div class=” item image-viewer” which is in hidden state initially.

Whenever a user clicks on a thumbnail that triggers expandImage(i)

results.component.ts

expandImage(key) {
 if (key === this.expandedkey    this.expand === false) {
   this.expand = !this.expand;
 }
 this.expandedkey = key;
 let i = key;
 let previouselementleft = 0;
 while ( $('.image' + i) && $('.image' + i).offset().left > previouselementleft) {
   this.expandedrow = i;
   previouselementleft = $('.image' + i).offset().left;
   i = i + 1;

The expandImage() function takes the unique key and finds which image is the last element is the last image in the whole row, and on finding the last image, expands the image viewer of the last element and renders the selected image in the image viewer.

The source code for the whole implementation of image viewer could be seen at pull: https://github.com/fossasia/susper.com/pull/687/files

Resources:

  1. Selecting elements in Jquery: https://learn.jquery.com/using-jquery-core/selecting-elements/


Continue ReadingImplementation of Image Viewer in Susper

Implementation of Statistic Infobox for Susper

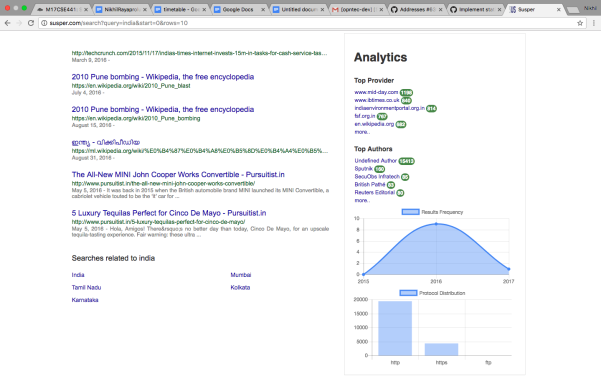
In Susper, we have implemented a statistic infobox to show analytics regarding Top authors, Top Providers and distribution regarding protocols and Results frequency by year.

Yacy also offers additional information for infoboxes such as files types, provider and authors. Using that information which we receive along with results we have implemented the infobox.

Implementation of Infobox:

1. For the distribution graphs, we have used angular library for chart.js https://www.npmjs.com/package/ng2-charts

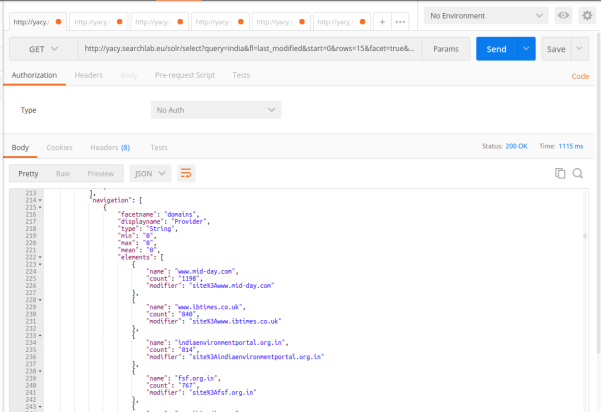
2. We receive required statistics of each facet name from Yacy using the yacy search endpoint

http://yacy.searchlab.eu/solr/select?query=india&fl=last_modified&start=0&rows=15&facet=true&facet.mincount=1&facet.field=host_s&facet.field=url_protocol_s&facet.field=author_sxt&facet.field=collection_sxt&wt=yjson

Screenshot from 2017-08-15 14-10-30.png

Screenshot from 2017-08-15 14-10-16.png

We have created a statbox component to display the data related to statistic infobox at https://github.com/fossasia/susper.com/tree/master/src/app/statsbox

It takes care about rendering the statistic infobox and styling it.

Statsbox.component.ts

this.navigation$.subscribe(navigation => {
   for (let nav of navigation) {
     if (nav.displayname === 'Protocol') {
       let data = [];
       let datalabels = [];
       for (let element of nav.elements){
           datalabels.push(element.name);
           data.push(parseInt(element.count, 10));
         }
       this.barChartData[0].data = data;
       this.barChartLabels = datalabels;

     }
   }
 });
});

navigation observable gives us the latest statistics information received from the yacy and we subscribe to it and update the component variables accordingly for displaying the data.

Later these values are used by statsbox.component.html to display the statsbox.

The whole implementation of this feature can be found at pull: https://github.com/fossasia/susper.com/pull/704/

References:

1.Using Postman for analysing an API Endpoint: https://www.getpostman.com/docs

2.Using ngrx store: https://github.com/ngrx/store

Continue ReadingImplementation of Statistic Infobox for Susper

Continuous Integration and Deployment of Yacy Grid

We have deployed Yacy Grid on Google cloud recently, and we have achieved this using kubernetes and Travis for auto deployment.

How we have deployed it:

Firstly, it is advised to have different containers for each service your application requires, and follow a multi container architecture. Using multi container architecture you can allocate fixed size of power to each application and also replicate individual services, whichever is required. Presently, Yacy has two main applications which are required to be deployed in separate containers – Yacy_grid_mcp and ElasticSearch.

We took the official kubernetes YAML files of ElasticSearch and followed the instructions at https://github.com/kubernetes/examples/blob/master/staging/elasticsearch/README.md for deployment of elastic search on the google cloud.

With this we are able to run pods, volumes required for elastic search and services for connecting Yacy with elastic search.

The pull request regarding deployment of separate elasticsearch component is at https://github.com/yacy/yacy_grid_mcp/pull/27/files

Below figure shows different services and external endpoints present pods use for elastic search.

Now elastic search can be accessed at 35.202.154.219:9300 and http://35.193.124.253:9200/

Continuous deployment of Yacy_grid_mcp:

Please make sure that you have created a cluster on google container engine for deploying our containers on it. Regarding starting a project and cluster please read https://cloud.google.com/container-engine/docs/

1.Initially, Travis.yml initiates and sets up the required environment for Yacy deployment by installing Google cloud cli and kubectl components.

Source code regarding the Travis setup could be found at https://github.com/yacy/yacy_grid_mcp/blob/master/.travis.yml

2.Later Travis runs the depoy_staging.sh file, which builds the docker image of yacy o the present build and pushes it to hub.docker.com

if [ "$TRAVIS_PULL_REQUEST" != "false" -o "$TRAVIS_BRANCH" != "$SOURCE_BRANCH" ]; then
    echo "Skipping deploy; The request or commit is not on master"
    exit 0
fi

set -e

docker build -t nikhilrayaprolu/yacygridmcp:$TRAVIS_COMMIT ./docker
docker login -u="$DOCKER_USERNAME" -p="$DOCKER_PASSWORD"
docker tag nikhilrayaprolu/yacygridmcp:$TRAVIS_COMMIT nikhilrayaprolu/yacygridmcp:latest
docker push nikhilrayaprolu/yacygridmcp

Later with service key, we authenticate with google cloud and set the required environments and variables

echo $GCLOUD_SERVICE   base64 --decode -i > ${HOME}/gcloud-service-key.json
gcloud auth activate-service-account --key-file ${HOME}/gcloud-service-key.json

gcloud --quiet config set project $PROJECT_NAME_STG
gcloud --quiet config set container/cluster $CLUSTER_NAME_STG
gcloud --quiet config set compute/zone ${CLOUDSDK_COMPUTE_ZONE}
gcloud --quiet container clusters get-credentials $CLUSTER_NAME_STG

And Later we push the docker image built to google cloud and deploy it

kubectl config view
kubectl config current-context

kubectl set image deployment/${KUBE_DEPLOYMENT_NAME} ${KUBE_DEPLOYMENT_CONTAINER_NAME}=nikhilrayaprolu/yacygridmcp:$TRAVIS_COMMIT

Presently Yacy runs on 5vCPUs

With the following pods and services:

Also one can use kubectl cli for getting information regarding the cluster and pods as shown below

Pull request regarding deployment of yacy on google cloud is available at: https://github.com/yacy/yacy_grid_mcp/pull/16/files

References:

1.A Medium Blog on CD to Google Container: https://medium.com/google-cloud/continuous-delivery-in-a-microservice-infrastructure-with-google-container-engine-docker-and-fb9772e81da7

2.Another Blog on CD to Google Container: https://engineering.hexacta.com/automatic-deployment-of-multiple-docker-containers-to-google-container-engine-using-travis-e5d9e191d5ad

3.Deploying ElasticSearch to Cloud using Kubernetes: https://github.com/kubernetes/examples/blob/master/staging/elasticsearch/README.md

Continue Reading

Deploying Yacy with Docker on Different Cloud Platforms

To make deploying of yacy easier we are now supporting Docker based installation.

Following the steps below one could successfully run Yacy on docker.

  1. You can pull the image of Yacy from https://hub.docker.com/r/nikhilrayaprolu/yacygridmcp/ or buid it on your own with the docker file present at https://github.com/yacy/yacy_grid_mcp/blob/master/docker/Dockerfile

One could pull the docker image using command:

docker pull nikhilrayaprolu/yacygridmcp


2) Once you have an image of yacygridmcp you can run it by typing

docker run <image_name>


You can access the yacygridmcp endpoint at localhost:8100

Installation of Yacy on cloud servers:

Installing Yacy and all microservices with just one command:

  • One can also download,build and run Yacy and all its microservices (presently supported are yacy_grid_crawler, yacy_grid_loader, yacy_grid_ui, yacy_grid_parser, and yacy_grid_mcp )
  • To build all these microservices in one command, run this bash script productiondeployment.sh
    • `bash productiondeployment.sh build` will install all required dependencies and build microservices by cloning them from github repositories.
    • `bash productiondeployment.sh run` will run all services and starts them.
    • Right now all repositories are cloned into ~/yacy and you can make customisations and your own changes to this code and build your own customised yacy.

The related PRs of this work are https://github.com/yacy/yacy_grid_mcp/pull/21 and https://github.com/yacy/yacy_grid_mcp/pull/20 and https://github.com/yacy/yacy_grid_mcp/pull/13

Resources:

Continue ReadingDeploying Yacy with Docker on Different Cloud Platforms

Implementation of Speech UI in Susper

Recently, we have implemented a speech recognition feature in Susper where user could search by voice but it does not have an attractive UI. Google has a good user experience while recording the voice. We have implemented a similar Speech UI in Susper,

How we have implemented this?

  1. First we made a component speechtotext. It takes care of all the styling and functional changes of the speech UI and rendering the speech and any instructions required for the user. https://github.com/fossasia/susper.com/tree/master/src/app/speechtotext
  2. Initially when user clicks on the microphone in the search bar, it triggers the speechRecognition()

searchbar.component.html

<div class="input-group-btn">
 <button class="btn btn-default" id="speech-button" type="submit">
   <img src="../../assets/images/microphone.png" class="microphone" (click)="speechRecognition()"/>
 </button>

searchbar.component.ts

speechRecognition() {
 this.store.dispatch(new speechactions.SearchAction(true));
}

3) This dispatches an action speechaction.SearchAction(true), the app.component.ts is subscribed to this action and whenever this action is triggered the app component will open the speechtotext component.

Speechtotext.component.ts

Speech to text component on getting initialised calls the speech service’s record function which activates standard browser’s speech API

constructor(private speech: SpeechService) {
 
 this.speechRecognition();
}
speechRecognition() {
 this.speech.record('en_US').subscribe(voice => this.onquery(voice));
}

On recording the user’s voice and converting it to text, the text is sent to the onquery method as input and the recognised text is sent to other components through ngrx store.

onquery(event: any) {
 this.resettimer();
 this.store.dispatch(new queryactions.QueryServerAction({ 'query': event, start: 0, rows: 10, search: true }));
 this.message = event;
}

We have some UI text transitions where the user is shown with messages like ‘Listening…’ ,‘Speak Now’ and ‘Please check your microphone’ which are handle by creating a timer observable in angular.

ngOnInit() {
 this.timer = Observable.timer(1500, 2000);
 this.subscription = this.timer.subscribe(t => {
   this.ticks = t;

   if (t === 1) {
     this.message = "Listening...";
   }
   if (t === 4) {
     this.message = "Please check your microphone and audio levels.";
     this.miccolor = '#C2C2C2';
   }
   if (t === 6) {
     this.subscription.unsubscribe();
     this.store.dispatch(new speechactions.SearchAction(false));
   }
 });
}

The related PR regarding speech to text is at https://github.com/fossasia/susper.com/issues/624 .

With this now we have achieved a good UI for handling requests on Speech.

Resources:

Continue ReadingImplementation of Speech UI in Susper

Reducing Initial Load Time Of Susper

Susper used to take long time to load the initial page. So, there was a discussion on how to decrease the initial loading time of Susper.

Later on going through issues raised in official Angular repository regarding the time takento load angular applications, we found some of the solutions. Those include:

  • Migrating from development to production during build:
    • This shrinks vendor.js and main.js by minimising them and also removing all packages that are not required on production.
    • Enables inline html and extracting CSS.
    • Disables source maps.
  • Enable Ahead of Time (AoT) compilation.
  • Enable service workers.

After these changes we found the following changes in Susper:

File Name Before (content-length) After
vendor.js 709752 216764
main.js 56412 138361

LOADING TIMES GRAPHS:

After:

Vendor file:

Main.js

Before:

Vendor file:

Main.js

Also we could see that all files are now initiated by service worker:

More about Service Workers could be read at Mozilla and Service Workers in Angular.

Implementation:

While deploying our application, we have added –prod and –aot as extra attributes to ng build .This enables angular to use production mode and ahead of time compilation.

For service workers we have to install @angular/service-worker module. One can install it by using:

npm install @angular/service-worker --save
ng set apps.0.serviceWorker=true

The whole implementation of this is available at this pull:

https://github.com/fossasia/susper.com/pull/597/files

Resources:


Continue ReadingReducing Initial Load Time Of Susper

Implementing Intelligence Feature in Susper

Susper gives answers to your questions using SUSI AI. We want to give users best experience while they are searching for solutions to their questions. To achieve this, we have incorporated with features like infobox and intelligence using SUSI.

Google has this feature where users can ask questions like ‘Who is president of USA?’ and get answers directly without encouraging the users to deep-dive into the search results to know the answer.

Similarly Susper gives answer to the user:

It also gives answer to question which is related to real time data like temperature.


How we have implemented this feature?

We used the API Endpoint of SUSI at http://api.asksusi.com/

Using SUSI API is as simple as sending query as a URL parameter in GET request http://api.susi.ai/susi/chat.json?q=YOUR_QUERY

You can also get various action types in the response. Eg: An anwser type response for http://api.susi.ai/susi/chat.json?q=hey%20susi is:

actions: [
  {
    type: "answer",
    expression: "Hi, I'm Susi"
  }
],


Documentation regarding SUSI is available at here.

Implementation in Susper:

We have created an Intelligence component to display answer related to a question. You can check it here: https://github.com/fossasia/susper.com/tree/master/src/app/intelligence

It takes care about rendering the information and styling of the rendered data received from SUSI API.

The intelligence.component.ts makes a call to Intelligence Service with the required query and the intelligence service makes a GETrequest to the SUSI API and retrieves the results.

Intelligence.component.ts

this.intelligence.getintelligentresponse(data.query).subscribe(res => {
  if (res && res.answers && res.answers[0].actions) {
     this.actions = res.answers[0].actions;
       for (let action of this.actions) {
         if (action.type === 'answer' && action.mood !== 'sabta') {
           this.answer = action.expression;
         } else {
             this.answer = '';
         }
      }
   } else {
       this.answer = '';
   }
});


Intelligence.service.ts

export class IntelligenceService {
 server = 'http://api.susi.ai';
 searchURL = 'http://' + this.server + '/susi/chat.json';
 constructor(private http: Http, private jsonp: Jsonp, private store: Store<fromRoot.State>) {
 }
 getintelligentresponse(searchquery) {
   let params = new URLSearchParams();
   params.set('q', searchquery);
   params.set('callback', 'JSONP_CALLBACK');
   return this.jsonp
     .get('http://api.asksusi.com/susi/chat.json', {search: params}).map(res =>
       res.json()

     );
 }

Whenever the getintelligenceresponse of intelligenceService is called, it creates a URLSearchParams() object and set required parameters in it and send them in jsonp.get request. We also set callback to ‘JSONP_CALLBACK’ to inform the API to send us data in JSONP.

Thereby, the intelligence component retrieves the answer and displays it with search resultson Susper.

Source code for this implementation could be found in this pull:

https://github.com/fossasia/susper.com/pull/569

Resources:

Continue ReadingImplementing Intelligence Feature in Susper

Customizing Results Count in Susper Angular Front-end

Problem: Earlier users were not having any option to customise results count in Susper.

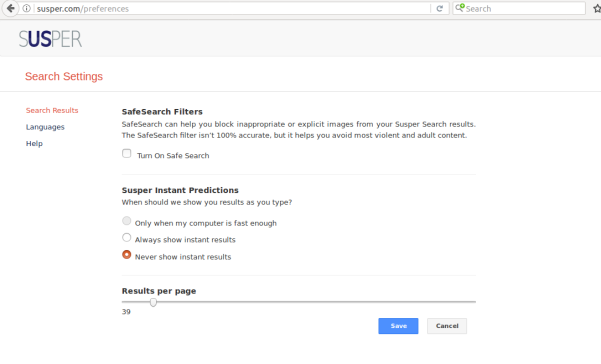
Susper is a Frontend for Peer to Peer Search Engine Yacy built using Angular. So, we implemented ‘results count’ feature and used to have a strict restriction of only 10 results per page. Now, users can customise search results in Susper when instant results are turned off. By default, Susper shows only 10 results per page. If the user requires more results per page he can modify the count of results in Susper. To customise the result count visit http://susper.com/preferences and you will find a range bar to customise the results. Change the value of the range bar to the desired value and save it. (Right now we support only results till maximum size of 100)

How did we implement this feature?

searchsettings.component.html:

<div>
 <h4><strong>Results per page</strong></h4>
 <div class="range-slider">
   <input class="range-slider__range" type="range" [disabled]="instantresults" [(ngModel)]="resultCount" value="100" min="0" max="100">
   <span class="range-slider__value">{{resultCount}}</span>
 </div>

</div>

The user is displayed with a range slider, that could slide between 0 and 100. The value of the range slider is stored in a resultscount variable in search settings component using ngModel.

searchsettings.component.ts: Later when user clicks on save button, it triggers onSave() function.The resultscount is stored into localStorage of the browser and an action is triggered to inform all other components about the change in the value of resultscount.


onSave() {
 if (this.instantresults) {
   localStorage.setItem('instantsearch', JSON.stringify({value: true}));
   localStorage.setItem('resultscount', JSON.stringify({ value: 10 }));
   this.store.dispatch(new queryactions.QueryServerAction({'query': '', start: 0, rows: 10, search: false}));

 } else {
   localStorage.removeItem('instantsearch');
   localStorage.setItem('resultscount', JSON.stringify({ value: this.resultCount }));
   this.store.dispatch(new queryactions.QueryServerAction({'query': '', start: 0, rows: this.resultCount, search: false}));
 }
 this.router.navigate(['/']);
}

app.component.ts

Later new resultscount value is used in other components to request the server for search results with new resultscount.

if (localStorage.getItem('resultscount')) {
 this.store.dispatch(new queryactions.QueryServerAction({'query': '', start: 0, rows: this.resultscount, search: false}));
}

The complete working of Susper’s result count could be seen in this gif


Source code can be found here: https://github.com/fossasia/susper.com/pull/546 .

References

Continue ReadingCustomizing Results Count in Susper Angular Front-end

Implementation of Customizable Instant Search on Susper using Local Storage

Results on Susper could be instantly displayed as user types in a query. This was a strict feature till some time before, where the user doesn’t have customizable option to choose. But now one could turn off and on this feature.

To turn on and off this feature visit ‘Search Settings’ on Susper. This will be the link to it: http://susper.com/preferences and you will find different options to choose from.

How did we implement this feature?

Searchsettings.component.html:

<div>
 <h4><strong>Susper Instant Predictions</strong></h4>
 <p>When should we show you results as you type?</p>
 <input name="options" [(ngModel)]="instantresults" disabled value="#" type="radio" id="op1"><label for="op1">Only when my computer is fast enough</label><br>
 <input name="options" [(ngModel)]="instantresults" [value]="true" type="radio" id="op2"><label for="op2">Always show instant results</label><br>
 <input name="options" [(ngModel)]="instantresults" [value]="false" type="radio" id="op3"><label for="op3">Never show instant results</label><br>
</div>

User is displayed with options to choose from regarding instant search.when the user selects a new option, his selection is stored in the instantresults variable in search settings component using ngModel.

Searchsettings.component.ts:

Later when user clicks on save button the instantresults object is stored into localStorage of the browser

onSave() {
 if (this.instantresults) {
   localStorage.setItem('instantsearch', JSON.stringify({value: true}));
 } else {
   localStorage.setItem('instantsearch', JSON.stringify({ value: false }));
   localStorage.setItem('resultscount', JSON.stringify({ value: this.resultCount }));
 }
 this.router.navigate(['/']);
}


Later this value is retrieved from the localStorage function whenever a user enters a query in search bar component and search is made according to user’s preference.

Searchbar.component.ts

Later this value is retrieved from the localStorage function whenever a user enters a query in search bar component and search is made according to user’s preference.

onquery(event: any) {
 this.store.dispatch(new query.QueryAction(event));
 let instantsearch = JSON.parse(localStorage.getItem('instantsearch'));

 if (instantsearch && instantsearch.value) {
   this.store.dispatch(new queryactions.QueryServerAction({'query': event, start: this.searchdata.start, rows: this.searchdata.rows}));
   this.displayStatus = 'showbox';
   this.hidebox(event);
 } else {
   if (event.which === 13) {
     this.store.dispatch(new queryactions.QueryServerAction({'query': event, start: this.searchdata.start, rows: this.searchdata.rows}));
     this.displayStatus = 'showbox';
     this.hidebox(event);
   }
 }
}


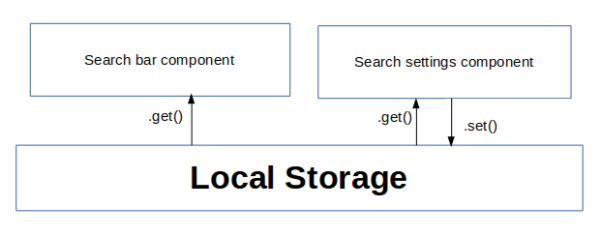
Interaction of different components here:

  1. First we set the instantresults object in Local Storage from search settings component.
  2. Later this value is retrieved and used by search bar component using localstorage.get() method to decide whether to display results instantly or not.

Below, Gif shows how you could use this feature in Susper to customise the instant results in your browser.

References:


Continue ReadingImplementation of Customizable Instant Search on Susper using Local Storage