Open Event Frontend – Implement Access Event API via REST API

FOSSASIA‘s Open Event Frontend uses the Open Event Server as the REST API backend. The user can create an event using the Frontend. He can add sessions, tickets speakers etc. and all this updates the database tables in Open Event Server. The server provides certain endpoints for the user to access and/or update the information. It is important that the user is aware of the expected response from the server for his API request. Let’s see how this is displayed in the frontend.

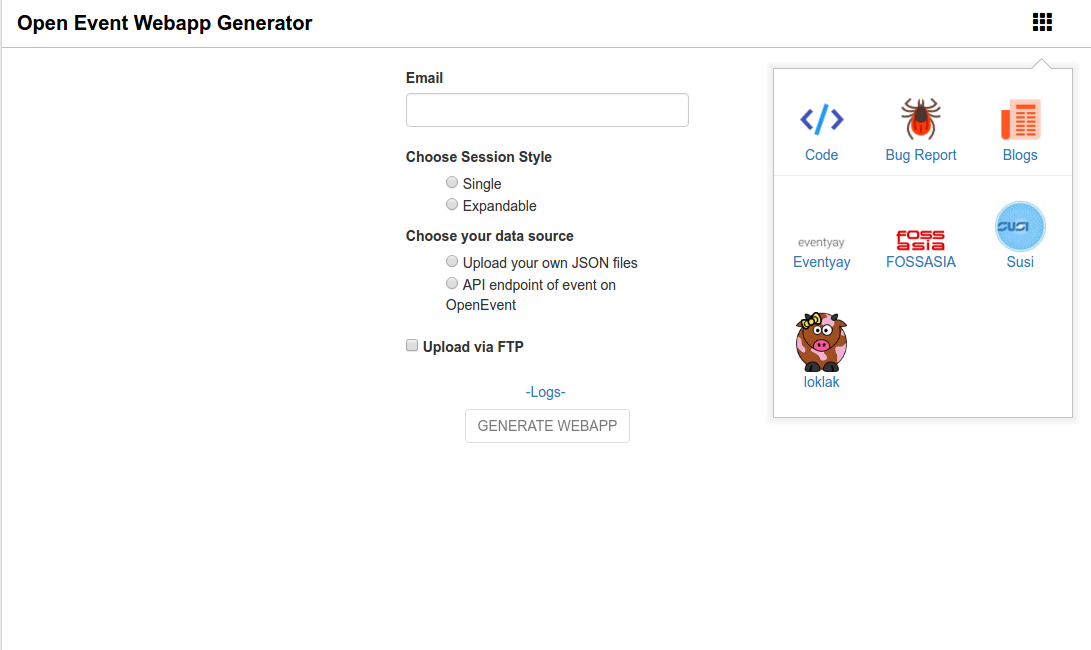
In the event-view page of the frontend, which is accessible to the organizers, there is an Export tab, along with Overview, Tickets, Scheduler, Sessions, Speakers.

This tab has an Access Event Information via REST API section which displays the URL to be used by the user and the expected response. It looks as follows :

The user can choose between various options which he can include or exclude. The GET URL is modified accordingly and the appropriate response is shown to the user.

Example of this –

How is this implemented in Code?

We maintain two variables baseUrl and displayUrl to display the URL. baseUrl is the URL which is common in all requests, ie, till the include tag.

baseUrl: computed('eventId', function() {
 return `${`${ENV.APP.apiHost}/${ENV.APP.apiNamespace}/events/`}${this.get('eventId')}`;
})

displayUrl is the variable which stores the URL being displayed on the webpage. It is initialized to the same as baseUrl.

displayUrl: computed('eventId', function() {
 return `${`${ENV.APP.apiHost}/${ENV.APP.apiNamespace}/events/`}${this.get('eventId')}`;
})

To store the value of the toggle switches we use toggleSwitches as follows:

toggleSwitches: {
 sessions       : false,
 microlocations : false,
 tracks         : false,
 speakers       : false,
 sponsors       : false,
 tickets        : false
}

Whenever any of the switches are toggled, an action checkBox is called. This method updates the value of toggleSwitches, calls the method to update the displayUrl and make the corresponding API request to update the displayed response. The code looks like this :

makeRequest() {
 this.set('isLoading', true);
 this.get('loader')
   .load(this.get('displayUrl'), { isExternal: true })
   .then(json => {
     json = JSON.stringify(json, null, 2);
     this.set('json', htmlSafe(syntaxHighlight(json)));
   })
   .catch(() => {
     this.get('notify').error(this.get('l10n').t('Could not fetch from the server'));
     this.set('json', 'Could not fetch from the server');
   })
   .finally(() => {
     this.set('isLoading', false);
   });
},

buildDisplayUrl() {
 let newUrl = this.get('baseUrl');
 const include = [];

 for (const key in this.get('toggleSwitches')) {
   if (this.get('toggleSwitches').hasOwnProperty(key)) {
     this.get('toggleSwitches')[key] && include.push(key);
   }
 }

 this.set('displayUrl', buildUrl(newUrl, {
   include: include.length > 0 ? include : undefined
 }, true));
},

actions: {
 checkboxChange(data) {
   this.set(`toggleSwitches.${data}`, !this.get(`toggleSwitches.${data}`));
   this.buildDisplayUrl();
   this.makeRequest();
 }
}

The above code uses some utility methods such as buildUrl and this.get(‘loager’).load(). The complete codebase is available here -> Open Event Frontend Repository.

References

Continue ReadingOpen Event Frontend – Implement Access Event API via REST API

Open Event Frontend – Updating Ember Models Table from V1 to V2

FOSSASIA‘s Open Event Frontend uses the Ember Models Table for rendering all its tables. This provides features like easy sorting, pagination etc. Another major feature is that it can be modified to meet our styling needs. As we use Semantic UI for styling, we added the required CSS classes to our table.

In version 1 this was done by overriding the classes, as shown below :

const defaultMessages = {
  searchLabel            : 'Search:',
  searchPlaceholder      : 'Search',


  ..... more to follow 
};

const defaultIcons = {
  sortAsc         : 'caret down icon',
  sortDesc        : 'caret up icon',
  columnVisible   : 'checkmark box icon',
  
  ..... more to follow  
};

const defaultCssClasses = {
  outerTableWrapper              : 'ui ui-table',
  innerTableWrapper              : 'ui segment column sixteen wide inner-table-wrapper',
  table                          : 'ui tablet stackable very basic table',
  globalFilterWrapper            : 'ui row',

 ... more to follow
};

const assign = Object.assign || assign;

export default TableComponent.extend({
  layout,

  _setupMessages: observer('customMessages', function() {
    const customIcons = getWithDefault(this, 'customMessages', {});
    let newMessages = {};
    assign(newMessages, defaultMessages, customIcons);
    set(this, 'messages', O.create(newMessages));
  }),

  _setupIcons() {
    const customIcons = getWithDefault(this, 'customIcons', {});
    let newIcons = {};
    assign(newIcons, defaultIcons, customIcons);
    set(this, 'icons', O.create(newIcons));
  },

  _setupClasses() {
    const customClasses = getWithDefault(this, 'customClasses', {});
    let newClasses = {};
    assign(newClasses, defaultCssClasses, customClasses);
    set(this, 'classes', O.create(newClasses));
  },

  simplePaginationTemplate: 'components/ui-table/simple-pagination',

  ........
});

And was used in the template as follows:

<div class="{{classes.outerTableWrapper}}">
  <div class="{{classes.globalFilterDropdownWrapper}}">

But in version 2, some major changes were introduced as follows:

  1. All partials inside a models-table were replaced with components
  2. models-table can now be used with block content
  3. New themes mechanism introduced for styling

Here, I will talk about how the theming mechanism has been changed. As I mentioned above, in version 1 we used custom classes and icons. In version 2 the idea itself has changed. A new type called Theme was added. It provides four themes out of the box – SemanticUI, Bootstrap4, Bootstrap3, Default.

We can create our custom theme based on any of the predefined themes. To suit our requirements we decided to modify the SemanticUI theme. We created a separate file to keep our custom theme so that code remains clean and short.

import Default from 'ember-models-table/themes/semanticui';

export default Default.extend({
 components: {
   'pagination-simple'    : 'components/ui-table/simple-pagination',
   'numericPagination'    : 'components/ui-table/numeric-pagination',
   .....  
 },

 classes: {
   outerTableWrapper              : 'ui ui-table',
   innerTableWrapper              : 'ui segment column sixteen wide inner-table-wrapper',
   .....
 },

 icons: {
   sortAsc         : 'caret down icon',
   sortDesc        : 'caret up icon',
   ......
 },

 messages: {
   searchLabel            : 'Search:',
   .....
 }
});

So a theme mostly consists of four main parts:

  • Components
  • Classes
  • Icons
  • Messages

The last three are same as customClasses and customIcons and customMessages in version 1. Components is the map for components used internally in the models-table. In case you need to use a custom component, that can be done as follows:

Make a new JavaScript file and provide its path in your theme file.

import DefaultDropdown from '../../columns-dropdown';
import layout from 'your layout file path';
export default DefaultDropdown.extend({
  layout
});

Now just create the theme file object and pass it to themeInstance in the ui-table file (can also be passed in the template and the controller, but this has to be done for each table individually).

import TableComponent from 'ember-models-table/components/models-table';
import layout from 'open-event-frontend/templates/components/ui-table';
import Semantic from 'open-event-frontend/themes/semantic';

export default TableComponent.extend({
 layout,

 themeInstance: Semantic.create()
});

Hence, version 2 introduces many new styling options and requires some refactoring for those who were using version 1. It is totally worth it though considering how easy and well managed it is now.

References

Continue ReadingOpen Event Frontend – Updating Ember Models Table from V1 to V2

Maintaining Extension State in SUSI.AI Chrome Bot Using Chrome Storage API

SUSI Chrome Bot is a browser action chrome extension which is used to communicate with SUSI AI.The browser action extension in chrome is like any other web app that you visit. It will store all your preferences like theme settings and speech synthesis settings and data till you are interacting with it, but once you close it, it forgets all of your data unless you are saving it in some database or you are using cookies for the session. We want to be able to save the chats and other preferences like theme settings the user makes when interacting with SUSI AI through Susi Chrome Bot. In this blog, we’ll explore Chrome’s chrome.storage API for storing data.

What options do we have for storing data offline?

IndexedDB: IndexedDB is a low-level API for client-side storage of data. IndexedDB allows us to store a large amount of data and works like RDBMS but IndexedDB is javascript based Object-oriented database.

localStorage API: localStorage allows us to store data in key/value pairs which is much more effective than storing data in cookies. localStorage data persists even if the user closes and reopens the browser.

Chrome.storage: Chrome provides us with chrome.storage. It provides the same storage capabilities as localStorage API with some advantages.

For susi_chromebot we will use chrome.storage because of the following advantages it has over the localstorage API:

  1. User data can be automatically synced with Chrome sync if the user is logged in.
  2. The extension’s content scripts can directly access user data without the need for a background page.
  3. A user’s extension settings can be persisted even when using incognito mode.
  4. It’s asynchronous so bulk read and write operations are faster than the serial and blocking localStorage API.
  5. User data can be stored as objects whereas the localStorage API stores data in strings.

Integrating chrome.storage to susi_chromebot for storing chat data

To use chrome.storage we first need to declare the necessary permission in the extension’s manifest file. Add “storage” in the permissions key inside the manifest file.

"permissions": [
         "storage"
       ]


We want to store the chat user has made with SUSI. We will use a Javascript object to store the chat data.

var storageObj = {
senderClass: "",
content: ""
};

The storageObj object has two keys namely senderClass and content. The senderClass key represents the sender of the message(user or susi) whereas the content key holds the actual content of the message.

We will use chrome.storage.get and chrome.storage.set methods to store and retrieve data.

var susimessage = newDiv.innerHTML;
storageObj.content = susimessage;
storageObj.senderClass = "susinewmessage";
chrome.storage.sync.get("message",(items) => {
if(items.message){
storageArr = items.message;
}
storageArr.push(storageObj);
chrome.storage.sync.set({"message":storageArr},() => {
console.log("saved");
});
});


In the above code snippet, susimessage contains the actual message content sent by the SUSI server. We then set the correct properties of the storageObj object that we declared earlier. Now we can use chrome.storage.set to save the storageObj object but that would overwrite the current data that we have inside chrome’s StorageArea. To prevent the old message data from getting overwritten, we’ll first get all the message content in our storage using chrome.storage.sync.get. Notice how we are passing the “message” string as the first perimeter to the function. This is done because we only want our message content which was saved in the StorageArea. If we pass null instead, it will return all the content inside storageArea. Once we have our messages (which will be an array of objects that we store as storageObj), we will store that into a new array storageArr. We will then push our new storageObj that contains the message and the sender into the array. Finally, we use chrome.storage.sync.set to save the message content in chrome’s StorageArea which can later be retrieved using the “message” key.

storageArr.push(storageObj);
chrome.storage.sync.set({"message":storageArr},() => {
console.log("saved");
});

We use the same procedure to save messages sent by the user.

Note: chrome.storage is not very large, so we need to be careful about what we store or we may run out of storage space. Also, we should not store confidential data in storage since the storage area is not encrypted.

Resources:

Tags:

  • FOSSASIA, codeheat, Chrome extensions, Javascript, Chrome Storage, Chrome Sync, Susi Chrome Bot, SUSI AI, Bot Development
Continue ReadingMaintaining Extension State in SUSI.AI Chrome Bot Using Chrome Storage API

Adding Map Type Response to SUSI.AI Chromebot

SUSI.AI Chromebot has almost all sorts of reply that SUSI.AI Server can generate. But it still missed the Map Type response that was generated by the SUSI.AI Server.

This blog explains how the map type response was added to the chromebot.

Brief Introduction

The original issue was planned by Manish Devgan and Mohit Sharma as an advanced task for Google Code-In 2017. The link to which can be found here: #157

For a long time the issue remained untouched and after GCI got over I assigned the issue to myself as it was a priority issue since MAP type was a major response from the SUSI.AI Server.

How was Map Type response added?

There were a lot of things to be taken in mind before starting working on this issue.

  • Changing code scheme during GCI and other PRs
  • API Response from the SUSI.AI Server
  • Understanding the new codebase that got altered during GCI-17
  • Doing it quick

I will go through all the steps in detail

Changing Code Scheme

The code was altered numerous times with the addition of a number of pull requests during GCI-17 and there were no docstrings for any functions and methods. So I had to figure them out in order to start working on the map type response.

API Response from the SUSI.AI Server

To understand the JSON that server sent, I went to SUSI.AI API and did a simple search for

“Where is Berlin?” and the response generated is given below.

( Since the JSON is very big I am only posting the relevant data for this issue )


    "actions": [
      {
        "type": "answer",
        "language": "en",
        "expression": "Berlin (, German: [bɛɐ̯ˈliːn] ( listen)) is the capital and the largest city of Germany as well as one of its 16 constituent states."
      },
      {
        "type": "anchor",
        "link": "https://www.openstreetmap.org/#map=13/52.52436820069531/13.41053001275776",
        "text": "Here is a map",
        "language": "en"
      },
      {
        "type": "map",
        "latitude": "52.52436820069531",
        "longitude": "13.41053001275776",
        "zoom": "13",
        "language": "en"
      }
    ]


Here we see and understand that “actions” is an Array of JSONs and the third part has “type” as “map”. This is the relevant information that we require for generating the map-type response.

The important variables in this context are: “latitude” and “longitude”.

Understanding the Codebase

Now I had to figure out the new pattern of adding response types to the SUSI.AI Chromebot.

After having a talk with @ms10398 I figured out the route map.

The above image shows the correct flow of Javascript Code that generated the response. After this, I was good to go and start my work.

Adding the Map-Type Response

To start with I chose “LEAFLET.JS” as the Javascript Library that will be used to create maps.

  • So I added the LEAFLET.JS to the JS folder.
  • Now changes were made to the “index.html” file


<link rel=”stylesheet” href=”https://unpkg.com/leaflet@1.3.1/dist/leaflet.css” />

http://”js/leaflet.js”


Appropriate CSS was added along with a link to leaflet.js was added.

  • Adding CSS to the “mapClass
.mapClass{

    height : 200px;

    width : 200px;

}


  • Generating Maps with dynamic IDs

This part was where I applied brain, as to add the map to any div we required the div to have a proper and unique ID and so a way to generate unique IDs for div without using any external source was to be thought of.

I came with idea of using timestamp, as it will always be unique.

var timeStamp = new Date.now().toString();


Then I created the “composeMapReply()” function.

function composeReplyMap(response, action){

    var newDiv = messages.childNodes[messages.childElementCount];

    var mapDiv = document.createElement(“div”);

    var mapDivId = Date.now().toString();

    mapDiv.setAttribute(“id”, mapDivId);

    mapDiv.setAttribute(“class”, “mapClass”);

    newDiv.appendChild(mapDiv);

    messages.appendChild(newDiv);

    var newMap = L.map(mapDivId).setView([Number(action.latitude), Number(action.longitude)], 13);

 L.tileLayer(“https://api.tiles.mapbox.com/v4/{id}/{z}/{x}/{y}.png?access_token={accessToken}”,{

    /*

        This part contains the data for api call.

    */

}).addTo(newMap);

response.isMap = true;

response.newMap = mapDiv;

return response


}


The complete code can be found: here

At last after adding so many snippets of code we were able to generate the Map-Type response for SUSI.AI Chromebot

GIF

A gif showing the Map-Type response in action.


Resources


Continue ReadingAdding Map Type Response to SUSI.AI Chromebot

Adding Preview Support to BadgeYay!

In an issue it was requested to add a Preview support for BadgeYay, i.e. Badges could be seen before they were generated.

Why Preview Support?

It is a nice question. But Preview support was needed in a badge generator like BadgeYay.

This can be easily answered by an example. Let us suppose that I want to generate hundreds-thousands of badges for a meetup/event that I have organized. But I am confused as to what will look the best on and as badges. So I can just try them all in the Preview section and then choose the one that I like and generate it.

How to add Preview Support?

Adding Preview Support was not an easy task. Although coding it was not the hard part, but thinking of a way that uses less of the server’s support was a thing to take care of.

I had two options to choose from.

Implement Preview Section from backend

This was the idea that first came to my mind when i thought of implementing something like preview section.

It included of generating badges everytime the user wanted a preview and then using the same SVGs generated to show as the preview of badges.

Problems it had

Using Backend to generate badges for every instance would result to a lot of load to the server prior to the actual badge generation. And making it faster and creating less load on server was the main problem to tackle. So I came up with another idea of using frontend to generate Preview(s).

Implementing Preview Section from frontend

This method of generating preview is far more faster and less load heaving to the server.

It uses technologies such as HTML, CSS and Javascript to  generate preview for badges.

The Pull Request for the same is : here

Changes in index.html

  • Adding a button to view preview
<button type=”button” disabled=”disabled” class=”btn btn-block btn-warning” id=”preview-btn”>Preview</button>


  • Adding the text areas for badge

Adding appropriate HTML for text areas.

  • Adding Appropriate CSS
.preview-image{

height: 250px;

width: 180px;

margin-left: 80px;

background-size: cover;

padding: 140px 0 0 5px;

text-align: center;

margin-top: 20px;

}

.preview-image-li{

list-style: none;

color: white;

font-size: 15px;

}

#preview-btn{

font-size: 18px;

}


  • Adding Javascript code for functionality
function readURL(input){

if(input.files && input.files[0]){

var reader = new FileReader();

reader.onload = function(e){

$(‘#preview’).css(‘background-image’,’url(‘ + e.target.result + ‘)’);

$(‘#preview’).css(background-size’,’cover’);

$(‘#preview-btn’).prop(“disabled”,false);

};

reader.readAsDataURL(input.files[0]);

}

}


The above snippet of code adds the image to the background of the preview div and stretches it to occupy full space.

var textValues = $(‘#textArea’).val();

textValues = textValues.split(“/n”)[0].strip(‘,’);

$(‘#preview-li-1’).text(textValue[0]);

$(‘#preview-li-2’).text(textValue[1]);

$(‘#preview-li-3’).text(textValue[2]);

$(‘#preview-li-4’).text(textValue[3]);

The above snippet of code adds the input from the textArea to the appropriate place on the preview badge.

Further Improvements

Adding a real-time preview feature that allows user to see the changes in real-time therefore making the application more flexible and enhancing user experience.

Resources


Continue ReadingAdding Preview Support to BadgeYay!

SUSI.AI Chrome Bot and Web Speech: Integrating Speech Synthesis and Recognition

Susi Chrome Bot is a Chrome extension which is used to communicate with Susi AI. The advantage of having chrome extensions is that they are very accessible for the user to perform certain tasks which sometimes needs the user to move to another tab/site.

In this blog post, we will be going through the process of integrating the web speech API to SUSI Chromebot.

Web Speech API

Web Speech API enables web apps to be able to use voice data. The Web Speech API has two components:

Speech Recognition:  Speech recognition gives web apps the ability to recognize voice data from an audio source. Speech recognition provides the speech-to-text service.

Speech Synthesis: Speech synthesis provides the text-to-speech services for the web apps.

Integrating speech synthesis and speech recognition in SUSI Chromebot

Chrome provides the webkitSpeechRecognition() interface which we will use for our speech recognition tasks.

var recognition = new webkitSpeechRecognition();


Now, we have a speech recognition instance recognition. Let us define necessary checks for error detection and resetting the recognizer.

var recognizing;

function reset() {
recognizing = false;
}

recognition.onerror = function(e){
console.log(e.error);
};

recognition.onend = function(){
reset();
};


We now define the toggleStartStop() function that will check if recognition is already being performed in which case it will stop recognition and reset the recognizer, otherwise, it will start recognition.

function toggleStartStop() {
    if (recognizing) {
      recognition.stop();
      reset();
    } else {
      recognition.start();
      recognizing = true;
    }
}


We can then attach an event listener to a mic button which calls the toggleStartStop() function to start or stop our speech recognition.

mic.addEventListener("click", function () {
    toggleStartStop();
});


Finally, when the speech recognizer has some results it calls the onresult event handler. We’ll use this event handler to catch the results returned.

recognition.onresult = function (event) {
    for (var i = event.resultIndex; i < event.results.length; ++i) {
      if (event.results[i].isFinal) {
        textarea.value = event.results[i][0].transcript;
        submitForm();
      }
    }
};


The above code snipped tests for the results produced by the speech recognizer and if it’s the final result then it sets textarea value with the result of speech recognition and then we submit that to the backend.

One problem that we might face is the extension not being able to access the microphone. This can be resolved by asking for microphone access from an external tab/window/iframe. For SUSI Chromebot this is being done using an external tab. Pressing on the settings icon makes a new tab which then asks for microphone access from the user. This needs to be done only once, so that does not cause a lot of trouble.

setting.addEventListener("click", function () {
chrome.tabs.create({
url: chrome.runtime.getURL("options.html")
});
});navigator.webkitGetUserMedia({
audio: true
}, function(stream) {
stream.stop();
}, function () {
console.log('no access');
});


In contrast to speech recognition, speech synthesis is very easy to implement.

function speakOutput(msg){
    var voiceMsg = new SpeechSynthesisUtterance(msg);
    window.speechSynthesis.speak(voiceMsg);
}


This function takes a message as input, declares a new SpeechSynthesisUtterance instance and then calls the speak method to convert the text message to voice.

There are many properties and attributes that come with this speech recognition and synthesis interface. This blog post only introduces the very basics.

Resources


Continue ReadingSUSI.AI Chrome Bot and Web Speech: Integrating Speech Synthesis and Recognition

Implementing Session and Speaker Creation From Event Panel In Open Event Frontend

Open-Event Front-end uses Ember data for handling Open Event Orga API which abides by JSON API specs. It allows the user to manage the event using the event panel of that event. This panel lets us create or update sessions & speakers. Each speaker must be associated with a session, therefore we save the session before saving the speaker.
In this blog we will see how to Implement the session & speaker creation via event panel. Lets see how we implemented it?

Passing the session & speaker models to the form
On the session & speaker creation page we need to render the forms using the custom form API and create new speaker and session entity. We create a speaker object here and we pass in the relationships for event and the user to it, likewise we create the session object and pass the event relationship to it.

These objects along with form which contains all the fields of the custom form, tracks which is a list of all the tracks & sessionTypes which is a list of all the session types of the event is passed in the model.

return RSVP.hash({
  event : eventDetails,
  form  : eventDetails.query('customForms', {
    'page[size]' : 50,
    sort         : 'id'
  }),
  session: this.get('store').createRecord('session', {
    event: eventDetails
  }),
  speaker: this.get('store').createRecord('speaker', {
    event : eventDetails,
    user  : this.get('authManager.currentUser')
  }),
  tracks       : eventDetails.query('tracks', {}),
  sessionTypes : eventDetails.query('sessionTypes', {})
});

We bind the speaker & session object to the template which has contains the session-speaker component for form validation. The request is only made if the form gets validated.

Saving the data

In Open Event API each speaker must be associated with a session, i.e we must define a session relationship for the speaker. To accomplish this we first save the session into the server and once it has been successfully saved we pass the session as a relation to the speaker object.

this.get('model.session').save()
  .then(session => {
    let speaker = this.get('model.speaker');
    speaker.set('session', session);
    speaker.save()
      .then(() => {
        this.get('notify').success(this.l10n.t('Your session has been saved'));
        this.transitionToRoute('events.view.sessions', this.get('model.event.id'));
      });
  })

We save the objects using the save method. After the speakers and sessions are save successfully we notify the user by showing a success message via the notify service.

Thank you for reading the blog, you can check the source code for the example here.

Resources

Continue ReadingImplementing Session and Speaker Creation From Event Panel In Open Event Frontend

Creating Dynamic Forms Using Custom-Form API in Open Event Front-end

In Open Event Front-end allows the the event creators to customise the sessions & speakers forms which are implemented on the Orga server using custom-form API. While event creation the organiser can select the forms fields which will be placed in the speaker & session forms.

In this blog we will see how we created custom forms for sessions & speakers using the custom-form API. Lets see how we did it.

Retrieving all the form fields

Each event has custom form fields which can be enabled on the sessions-speakers page, where the organiser can include/exclude the fields for speakers & session forms which are used by the organiser and speakers.

return this.modelFor('events.view').query('customForms', {});

We pass return the result of the query to the new session route where we will create a form using the forms included in the event.

Creating form using custom form API

The model returns an array of all the fields related to the event, however we need to group them according to the type of the field i.e session & speaker. We use lodash groupBy.

allFields: computed('fields', function() {
  return groupBy(this.get('fields').toArray(), field => field.get('form'));
})

For session form we run a loop allFields.session which is an array of all the fields related to session form. We check if the field is included and render the field.

{{#each allFields.session as |field|}}
  {{#if field.isIncluded}}
    <div class="field">
      <label class="{{if field.isRequired 'required'}}" for="name">{{field.name}}</label>
      {{#if (or (eq field.type 'text') (eq field.type 'email'))}}
        {{#if field.isLongText}}
          {{widgets/forms/rich-text-editor textareaId=(if field.isRequired (concat 'session_' field.fieldIdentifier '_required'))}}
        {{else}}
          {{input type=field.type id=(if field.isRequired (concat 'session_' field.fieldIdentifier '_required'))}}
        {{/if}}
      {{/if}}
    </div>
  {{/if}}
{{/each}}

We also use a unique id for all the fields for form validation. If the field is required we create a unique id as `session_fieldName_required` for which we add a validation in the session-speaker-form component. We also use different components for different types of fields eg. for a long text field we make use of the rich-text-editor component.

Thank you for reading the blog, you can check the source code for the example here.

Resources

Continue ReadingCreating Dynamic Forms Using Custom-Form API in Open Event Front-end

Updating the UI of the generator form in Open Event Webapp

  • Add a pop-up menu bar similar to the one shown in Google/Susper6be8d972-72bc-4e12-b27a-219e46608cfc.png
  • Add a version deployment link at the bottom of the page like the one shown in staging.loklak.org.

29072668-b1db-4ef5-8865-c71ef2438433.png


  • Implementing the top-bar and the pop-up menu bar

The first task was to introduce a top-bar and a pop-up menu bar in Generator. The top-bar would contain the text Open Event Webapp Generator and an icon button on the right side of it which would show a pop-up menu. The pop-up menu would contain a number of icons which would link to different pages like FOSSASIA blogs and it’s official website, different projects like loklak, SUSI and Eventyay and also to the Webapp Project Readme and issues page.

Creating a top navbar is easy but the pop-up menu is a comparatively tougher. The first step was to gather the gather the small images of the different services. Since this feature had already been implemented in Susper project, we just copied all the icon images from there and copy it into a folder named icons in the open event webapp. Then we create a custom menu div which would hold all the different icons and present it an aesthetic manner. Write the HTML code for the menu and then CSS to decorate and position it! Also, we have to create a click event handler on the pop-up menu button for toggling the menu on and off.

Here is an excerpt of the code. The whole file can be seen here

<div class="custom-navbar">
 <a href='.' class="custom-navtitle">
   <strong>Open Event Webapp Generator</strong> <!-- Navbar Title -->
 </a>
 <div class="custom-menubutton">
   <i class="glyphicon glyphicon-th"></i> <!-- Pop-up Menu button -->
 </div>
 <div class="custom-menu"> <!-- Custom pop-up menu containing different links -->
   <div class="custom-menu-item">
     <a class="custom-icon" href="http://github.com/fossasia/open-event-webapp" target="_blank"><img src="./icons/code.png">
       <p class="custom-title">Code</p></a>
   </div>
   <!-- Code for other links to different projects-->
 </div>
</div>

Here is a screenshot of how the top-bar and the pop-up menu looks!

bb82ba88-4317-46b0-91ec-514499c5cfde.png

  • Adding version deployment info to the bottom

The next task was to add a footer to the page which would contain the version deployment info. The user can click on that link and we can then be taken to the latest version of the code which is currently deployed.

To show the version info, we make use of the Github API. We need to get the hash of the latest commit made on the development branch. We send an API request to the Github requesting for the latest hash and then dynamically add the info and the link received to the footer. The user can then click on that link and will be taken to the latest deployment page of the webapp!

var apiUrl = "https://api.github.com/repos/fossasia/open-event-webapp/git/refs/heads/development";
$.ajax({url: apiUrl, success: function(result){
 var version = result['object']['sha'];
 var versionLink = 'https://github.com/fossasia/open-event-webapp/tree/' + version;
 var deployLink = $('#deploy-link');
 deployLink.attr('href', versionLink);
 deployLink.html(version);
}});

This is how the footer looks after the API Response

44385ad8-e094-490b-8575-a47932aa75c5.png

References:

Continue ReadingUpdating the UI of the generator form in Open Event Webapp

Implementing Order Statistics API on Tickets Route in Open Event Frontend

The order statistics API endpoints are used to display the statistics related to tickets, orders, and sales. It contains the details about the total number of orders, the total number of tickets sold and the amount of the sales. It also gives the detailed information about the pending, expired, placed and completed orders, tickets, and sales.

This article will illustrate how the order statistics can be displayed using the Order Statistics API in Open Event Frontend. The primary end point of Open Event API with which we are concerned with for statistics is

GET /v1/events/{event_identifier}/order-statistics

First, we need to create a model for the order statistics, which will have the fields corresponding to the API, so we proceed with the ember CLI command:

ember g model order-statistics-tickets

Next, we need to define the model according to the requirements. The model needs to extend the base model class. The code for the model looks like this:

import attr from 'ember-data/attr';
import ModelBase from 'open-event-frontend/models/base';

export default ModelBase.extend({
  orders  : attr(),
  tickets : attr(),
  sales   : attr()
});

As we need to display the statistics related to orders, tickets, and sales so we have their respective variables inside the model which will fetch and store the details from the API.

Now, after creating a model, we need to make an API call to get the details. This can be done using the following:

return this.modelFor('events.view').query('orderStatistics', {});

Since the tickets route is nested inside the event.view route so, first we are getting the model for event.view route and then we’re querying order statistics from the model.

The complete code can be seen here.

Now, we need to call the model inside the template file to display the details. To fetch the total orders we can write like this

{{model.orders.total}}


In a similar way, the total sales can be displayed like this.

{{model.sales.total}}


And total tickets can be displayed like this

{{model.tickets.total}}


If we want to fetch other details like the pending sales or completed orders then the only thing we need to replace is the total attribute. In place of total, we can add any other attribute depending on the requirement. The complete code of the template can be seen here.

The UI for the order statistics on the tickets route looks like this.

Fig. 1: The user interface for displaying the statistics

The complete source code can be seen here.

Resources:

Continue ReadingImplementing Order Statistics API on Tickets Route in Open Event Frontend