Modifying Allowed Usage for a User

Badgeyay has been progressing in a very good pace. There are a lot of features being developed and modified in this project. One such feature that has been added is the increasing allowed usage of a user by an admin.

What is Allowed Usage?

Allowed usage is an integer associated with a particular user that determines the number of badges that a person can generate using a single email id. This will allow us to keep track of the number of badges being produced by a particular ID and all.

Modifying the Allowed Usage

This feature is basically an Admin feature, that will allow an admin to increase or decrease the allowed usage of a particular user. This will ensure that if incase a particular user has his/her usage finished, then by contacting the admin, he/she can get the usage refilled.

Adding the functionality

The functionality required us to to add two things

  • A schema for modifying allowed user
  • A route in backend to carry out the functionality

So, Let us start by creating the schema

class UserAllowedUsage(Schema):
class Meta:
type_ =
‘user_allowed_usage’
kwargs = {
‘id’: ‘<id>’}

id = fields.Str(required=True, dump_only=True)
allowed_usage = fields.Str(required=
True, dump_only=True)

Once we have our schema created, then we can create a route to modify the allowed usage for a particular user.

This route will be made accessible to the admin of Badgeyay.

@router.route(‘/add_usage’, methods=[‘POST’])
def admin_add_usage():
try:
data = request.get_json()[
‘data’]
print(data)
except Exception:
return ErrorResponse(JsonNotFound().message, 422, {‘Content-Type’: ‘application/json’}).respond()

uid = data[‘uid’]
allowed_usage = data[
‘allowed_usage’]
user = User.getUser(user_id=uid)
user.allowed_usage = user.allowed_usage + allowed_usage
db.session.commit()

return jsonify(UserAllowedUsage().dump(user).data)

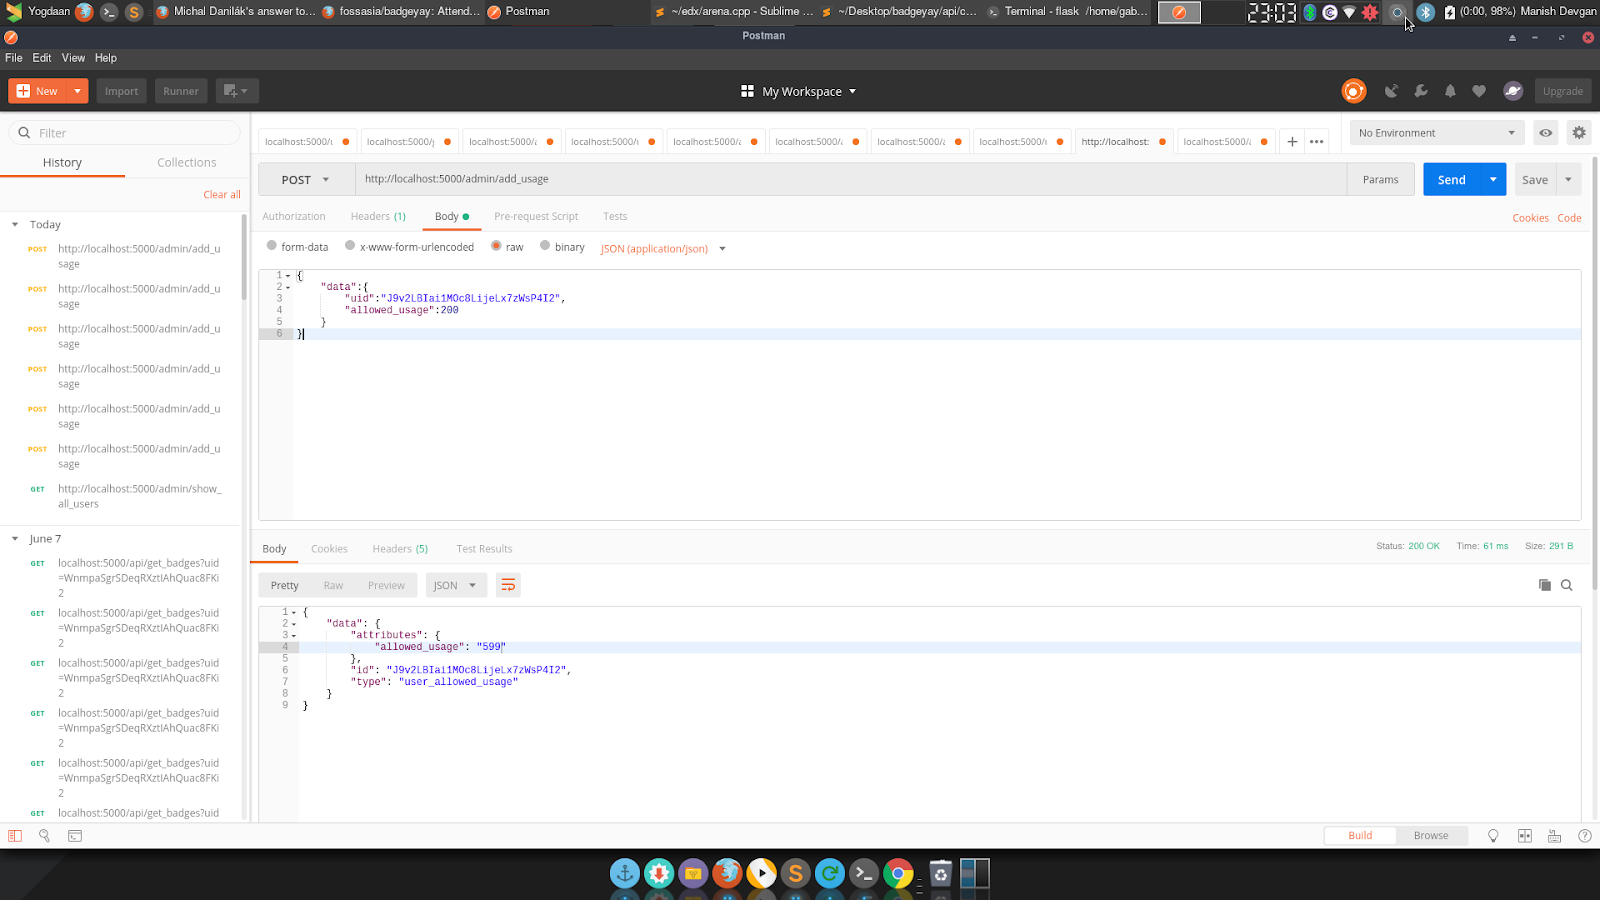
The add_usage route is given above. We can use this route to increase the usage of a particular user.

Given below is an image that shows the API working.

Resources

Continue ReadingModifying Allowed Usage for a User

Adding helper for Default Images

A Badge generator like Badgeyay must be able to generate, store and export the user data as and when needed. This blog post covers the addition of a helper function for the default images in the badge generator. We cover the topics such as the problem caused and the solution to the problem.

The problem was that the names of default images were not being rendered properly.

Adding the functionality to badgeyay

Let us see how we implemented this functionality into the frontend of the project.

Step 1 : Generating helper function

We first need to generate the helper function in order to get it started. Generating a helper function is not a tough task. We need to follow the steps as mentioned below

$ ~ ember generate helper def-images

After this command is executed in the terminal, ember-cli generates two files, the helper file and the helper-test file.

Step 2 : Adding the functionality to helper function

After generating the helper file, we need to add relevant code in order to make sure that the above stated problem is solved. So we work on the helper function to recreate the formatted names from the incoming unformatted names from ember model.

import { helper } from ‘@ember/component/helper’;

export function defImages(params) {
var [imageName] = params;
imageName = imageName.split(
‘_’);
for (var i = imageName.length – 1; i >= 0; i–) {
imageName[i] = imageName[i].charAt(
0).toUpperCase() + imageName[i].slice(1);
}
return imageName.join(‘ ‘);
}

export default helper(defImages);

Step 3 : Adding test to the helper-test.js

Once we have the helper set up correctly, we can now add a test for the same.

import { module, test } from ‘qunit’;
import { setupRenderingTest } from ’ember-qunit’;
import { render } from ‘@ember/test-helpers’;
import hbs from ‘htmlbars-inline-precompile’;

module(‘Integration | Helper | defImages’, function(hooks) {
setupRenderingTest(hooks);

// Replace this with your real tests.
test(
‘it renders’, async function(assert) {
this.set(‘inputValue’, ‘fossasia_badgeyay’);

await render(hbs`{{def-images inputValue}}`);

assert.equal(this.element.textContent.trim(), ‘Fossasia Badgeyay’);
});
});

Finally, we need to add the helper function to the frontend component as well.

<div class=“twelve wide column”>{{def-images image.name}}</div>

Now, the names of the individual default images are being formatted correctly.

Screenshot of changes

Resources

Continue ReadingAdding helper for Default Images

Basic Badge Preview in Badgeyay

A Badge generator like Badgeyay must be able to generate, store and export the user data as and when needed. This blog post covers the addition of a preview section in the badge generator. It is discussed as to how the attributes on preview section are added.

Adding the functionality to badgeyay

Let us see how we implemented this functionality into the frontend of the project.

Step 1 : Adding the helper function

We need to add a helper function for determining the font of the preview items. We define a function “rel”, as in relative, which defines the relative font size according to the chosen one.

export function rel(params) {
var [font_size] = params;
var iFont = parseInt(font_size);
if (iFont <= 10) {
return (iFont * 2.7).toString();
}
return (iFont * 2.15).toString();
}

Step 2 : Adding the styling in the scss file

Now we add the required styling in the SCSS file to ensure that the preview appears at the exactly as we desire it to be.

.bgImg {
border-radius: 5px;
height: 600px;
}

.preview.content {
margin-left: 50px;
padding-top: 200px;
}

Step 3 : Now we need to add attributes to controller

Now we need to define the attributes that will control the text inside the preview and the preview controller.

firstName      : ,
lastName       : ,
organization   : ,
socialHandle   : ,
designation    : ,
prevImageData  : ,

Now we define when will the preview be changed. In our case it will be changed when a user types in something or a new image is selected.

mutateText(txtData) {
this.manualClicked();
let prevData = txtData.split(‘\n’)[0].split(‘,’);
this.set(‘firstName’, prevData[0].toString());
this.set(‘lastName’, prevData[1].toString());
this.set(‘designation’, prevData[2].toString());
this.set(‘organization’, prevData[3].toString());
this.set(‘socialHandle’, prevData[4].toString());
this.set(‘textData’, txtData);
},
.
.
mutateCustomImage() {
this.set(‘prevImageData’, imageData);
}

The state of variables inside the preview section changes whenever the user types in a new name or designation etc. The image gets populated once the image is added either using the custom image input or by selecting the default image.

Screenshot of changes

Resources

Continue ReadingBasic Badge Preview in Badgeyay

Toggling preview section in Badgeyay

A Badge generator like Badgeyay must be able to generate, store and export the user data as and when needed. This blog post covers the addition of a preview section in the badge generator. It is discussed as to how the feature of toggling the preview section was implemented in the project

Adding the functionality to badgeyay

Let us see how we implemented this functionality into the frontend of the project.

Step 1 : Adding the toggle button to the frontend UI

We add the button to toggle the preview on and off the screen using the standard handlebars convention. We add a button with the action ‘togglePreview’ to toggle the preview section in frontend.

<div class=“right floated right aligned six wide column”>
<
div class=“ui”>
<
button {{action ‘togglePreview‘}} class=“ui basic orange button” data-tooltip=“Toggle Preview (WIP)” data-position=“right center”>{{prevButton}}</button>
</
div>
<
/div>

Step 2 : Adding the styling in the scss file

Now we add the required styling in the SCSS file to ensure that the preview button appears at the exact desired position only.

.ui{

.column{
color: black;

.create-badge {
position: relative;
padding-left: 6%;
padding-right: 6%;
top: –50px;
}
}
}

Step 3 : Now we need to define states

Now we need to define the states that will control the text inside the preview button and the preview controller.

previewToggled : false,
prevButton     : ‘<‘,

Now we add the method to control the toggle feature in the component.

togglePreview() {
this.set(‘previewToggled’, !this.previewToggled);
if (this.previewToggled) {
this.set(‘prevButton’, ‘>’);
}
else {
this.set(‘prevButton’, ‘<‘);
}
}

The ‘togglePreview’ function changes the state of the preview, either rendering it on screen or off the screen. This is how we control the preview section being displayed on the screen.

Screenshot of changes

Resources

Continue ReadingToggling preview section in Badgeyay

Enhancing pagination in Badgeyay

A Badge generator like Badgeyay must be able to generate, store and export the user data as and when needed. This blog post covers the enhancement of pagination in the frontend of badgeyay project. There are small “next” and “previous” links to toggle between pages..

Enhancing the current way of links

The problem with the pagination links was that in case of no more badges/users etc, the links would always appear on the bottom right of the table. The previous link must not appear when no previous page is there and vice versa for the next link.

Step 1 : Adding the package to package.json

Image link is the link to the user’s uploaded image on remote firebase server.

{{#if allow}}
<tfoot>
<
tr>
<
th colspan=“5”>
<
div class=“ui right floated pagination menu”>
{{#if allow_prev}}
<
a class=“icon item” {{action ‘prevPage‘}}>
<
i class=“left chevron icon”></i>
</
a>
{{/if}}
{{#if allow_next}}
<
a class=“icon item” {{action ‘nextPage‘}}>
<
i class=“right chevron icon”></i>
</
a>
{{/if}}
</
div>
</
th>
</
tr>
<
/tfoot>
{{/i
f}}

Step 2 : Initializing the variables in setupController

Once we have added the if construct to the badgeyay frontend then we need to add the variable initialization in the setupController method in EmberJS.

setupController(controller, model) {
this._super(…arguments);
set(controller,
‘reports’, model);
if (model.length < 9) {
set(controller,
‘allow_prev’, false);
set(controller,
‘allow_next’, false);
set(controller,
‘allow’, false);
}
}

Step 3 : Implementing state changed in the controllers

Now we need to handle the situation when a user clicks the links and there are more or less links to display. This is done by checking the length of the model in the controller.

if (this.page === 1) {
this.set(‘allow_prev’, false);
}
else {
this.set(‘allow_prev’, true);
}
this..set(‘allow_next’, true);

Same needs to be done for all the controllers that have pagination available.

And finally we need to pass these variables in the component template. One such example is given below.

<div class=“ui grid user-grid”>
<
div class=“row”>
<
div class=“sixteen wide column”>
{{badge-table badges=badges user=user session=session sendbadgeId=(action ‘deleteBadge’ badge) prevPage=(action ‘prevPage’) nextPage=(action ‘nextPage’) allow_prev=allow_prev allow_next=allow_next allow=allow}}
</
div>
</
div>
<
/div>

Finally, we have the pagination links working as desired..

Screenshot of changes

Resources


Continue ReadingEnhancing pagination in Badgeyay

Badge Generation : Adding Progress Bar

A Badge generator like Badgeyay must be able to generate, store and export the user data as and when needed. This blog post covers the addition of ember-progress-bar in the badgeyay project. This progress bar shows real-time progress of the badge generation process.

Adding the functionality to badgeyay

Let us see how we implemented this functionality into the backend of the project.

Step 1 : Adding the package to package.json

Image link is the link to the user’s uploaded image on remote firebase server.

ember install ember-progress-bar

or

npm install ember-progress-bar –save

Step 2 : Adding the progressbar to the frontend

Once we have installed the progress bar, we need to display it onto the frontend of the project.

To do that we use the handlebars templating engine to render the progress bar.

{{#if showProgress}}
<
div class=“ui segment”>
<
div class=“ui centered aligned grid”>{{progressState}}</div>
<
div class=“ui divider”></div>
{{ember-progress-bar progress=progress options=(hash color=’orange’)}}
</
div>
{{/if}}

Step 3 : Now we need to define states

We need to define the states that the progress bar will take up in realtime. And to do so, we make changes to the create-badges controller

showProgress   : false,
progress       : 0,
progressState  : ,

Now we manage the states according to the functionality that has been done.

this.set(‘showProgress’, true);
this.set(‘progress’, 0.1);
this.set(‘progressState’, ‘Setting Paper Size’);

this.set(
‘progress’, 0.4);
this.set(‘progressState’, ‘Gathering background’);

this.set(
‘progress’, 0.7);
this.set(‘progressState’, ‘Preparing your badges’);

this.set(
‘showProgress’, false);
this.set(‘progress’, 0);
this.set(‘progressState’, );

Finally, we have our basic progress bar ready for the users to view.

Screenshot of changes

Resources

Continue ReadingBadge Generation : Adding Progress Bar

Modifying the My-Badges Component

A Badge generator like Badgeyay must be able to generate, store and export the user data as and when needed. This blog post is about modify the my-badges component to show the badges in a more creative manner.. For making the badges look better than they already are, we decided to use another type of semantic-ui card. This card requires an image. So we decided to use the user’s uploaded image as the image for the badge card. For this, we made changes to the backend along with the frontend.

Adding the functionality to badgeyay

Let us see how we implemented this functionality into the backend of the project.

Step 1 : Adding the image_link to backend

Image link is the link to the user’s uploaded image on remote firebase server.

image_link = db.Column(db.String) # adding column to table

image_link = fields.Str(required=True)  # adding to schema

link = fileUploader(imageDirectory, ‘images/’ + image_name) badge_created.image_link = link  # uploading the file and storing the link

Step 2 : Adding a details to frontend model

Now we need add the attributes to the frontend model to accept our image_link data..

import DS from ’ember-data’;

const { Model, attr } = DS;

export default Model.extend({
badge_size    : attr(‘string’),
csv           : attr(‘string’),
download_link : attr(‘string’),
image         : attr(‘string’),
text_color    : attr(‘string’),
image_link    : attr(‘string’)
});

Step 3 : Adding required Handlebar code and SCSS

Now we need to add the handlebar code to render the image from the link provided from the ember data model.

<div class=”image”>
<img src=”{{badge.image_link}}”>
</div>

And apply some CSS to the image and card

.ui.segment {
.cards {
.card {
padding-right: 10px;

img {
height: 300px;
width: 100%;
}
}
}
}

Finally, we need to apply the migrations to the backend server as well. This is carried out by flask-migrate easily.

Screenshot of changes

Resources


Continue ReadingModifying the My-Badges Component

Exporting CSV data through API

A Badge generator like Badgeyay must be able to generate, store and export the user data as and when needed. This blog post is about adding the exporting functionality to badgeyay backend..

Why do we need such an API?

Exporting data is required for a user. A user may want to know the details he/she has uploaded to the system or server. In our case we are dealing with the fact of exporting the CSV data from backend of Badgeyay.

Adding the functionality to backend

Let us see how we implemented this functionality into the backend of the project.

Step 1 : Adding the necessary imports

We first need to import the required dependencies for the route to work

import os
import base64
import uuid
from flask import request, Blueprint, jsonify
from flask import current_app as app
from api.models.file import File
from api.schemas.file import ExportFileSchema
from api.utils.errors import ErrorResponse
from api.schemas.errors import FileNotFound

Step 2 : Adding a route

This step involves adding a separate route that provides us with the exported data from backend.

@router.route(‘/csv/data’, methods=[‘GET’])
def export_data():
input_data = request.args
file = File().query.filter_by(filename=input_data.get(
‘filename’)).first()

if file is None:
return ErrorResponse(FileNotFound(input_data.get(‘filename’)).message, 422, {‘Content-Type’: ‘application/json’}).respond()

export_obj = {
‘filename’: file.filename,
‘filetype’: file.filetype,
‘id’: str(uuid.uuid4()),
‘file_data’: None}

with open(os.path.join(app.config.get(‘BASE_DIR’), ‘static’, ‘uploads’, ‘csv’, export_obj[‘filename’]), “r”) as f:
export_obj[
‘file_data’] = f.read()

export_obj[‘file_data’] = base64.b64encode(export_obj[‘file_data’].encode())

return jsonify(ExportFileSchema().dump(export_obj).data)

Step 2 : Adding a relevant Schema

After creating a route we need to add a relevant schema that will help us to deliver the badges generated by the user to the Ember JS frontend so that it can be consumed as JSON API objects and shown to the user.

class ExportFileSchema(Schema):
class Meta:
type_ =
‘export-data’
kwargs = {
‘id’: ‘<id>’}

id = fields.Str(required=True, dump_only=True)
filename = fields.Str(required=
True, dump_only=True)
filetype = fields.Str(required=
True, dump_only=True)
file_data = fields.Str(required=
True, dump_only=True)

This is the ExportFileSchema that produces the output results of the GET request on the route. This helps us get the data onto the frontend.

Further Improvements

We are working on making badgeyay more comprehensive yet simple. This API endpoint needs to get registered onto the frontend. This can be a further improvement to the project and can be iterated over the next days.

Resources

Continue ReadingExporting CSV data through API

Dated queries in Badgeyay admin

Badgeyay is not just an anonymous badge generator that creates badges according to your needs, but it now has an admin section that allows the admin of the website to control and look over the statistics of the website.

Why do we need such an API?

For an admin, one of the most common functionality is to gather the details of the users or the files being served onto or over the server. Not just that, but the admin must also be aware about the traffic or files on the server in a particular duration of time. So we need an API that can coordinate all the stuff that requires dated queries from the backend database.

Adding the functionality to backend

Let us see how we implemented this functionality into the backend of the project.

Step 1 : Adding a route

This step involves adding a separate route that provides us with the output of the dated badges queries from backend.

@router.route(‘/get_badges_dated’, methods=[‘POST’])
def get_badges_dated():
schema = DatedBadgeSchema()
input_data = request.get_json()
data, err = schema.load(input_data)
if err:
return jsonify(err)
dated_badges = Badges.query.filter(Badges.created_at <= data.get(
‘end_date’)).filter(Badges.created_at >= data.get(‘start_date’))
return jsonify(AllBadges(many=True).dump(dated_badges).data)

This route allows us to get badges produced by any user during a certain duration as a JSON API data object. This object is fed to the frontend to render the badges as cards.

Step 2 : Adding a relevant Schema

After creating a route we need to add a relevant schema that will help us to deliver the badges generated by the user to the Ember JS frontend so that it can be consumed as JSON API objects and shown to the user.

class DatedBadgeSchema(Schema):
class Meta:
type_ =
‘dated-badges’
kwargs = {
‘id’: ‘<id>’}

id = fields.Str(required=True, dump_only=True)
start_date = fields.Date(required=
True)
end_date = fields.Date(required=
True)

class AllBadges(Schema):
class Meta:
type_ =
‘all-badges’
self_view =
‘admin.get_all_badges’
kwargs = {
‘id’: ‘<id>’}

id = fields.Str(required=True, dump_only=True)
image = fields.Str(required=
True)
csv = fields.Str(required=
True)
badge_id = fields.Str(required=
True)
text_color = fields.Str(required=
True)
badge_size = fields.Str(required=
True)
created_at = fields.Date(required=
True)
user_id = fields.Relationship(
self_url=
‘/api/upload/get_file’,
self_url_kwargs={
‘file_id’: ‘<id>’},
related_url=
‘/user/register’,
related_url_kwargs={
‘id’: ‘<id>’},
include_resource_linkage=
True,
type_=
‘User’
)

This is the DatedBadge schema that produces the output results of the POST request on the route. And there is the AllBadges schema that produces the output results of the POST request on the route.

Further Improvements

We are working on adding multiple routes and adding modifications to database models and schemas so that the functionality of Badgeyay can be extended to a large extent. This will help us in making this badge generator even better.

Resources


Continue ReadingDated queries in Badgeyay admin

Get My Badges from Badgeyay API

Badgeyay is no longer a simple badge generator. It has more cool features than before.

Badgeyay now supports a feature that shows your badges. It is called ‘my-badges’ component. To get this component work, we need to design a backend API to deliver the badges produced by a particular user.

Why do we need such an API?

The main aim of Badgeyay has changed from being a standard and simple badge generator to a complete suite that solves your badge generation and management problem. So to tackle the problem of managing the produced badges per user, we need to define a separate route and schema that delivers the generated badges.

Adding the functionality to backend

Let us see how we implemented this functionality into the backend of the project.

Step 1 : Adding a route

This step involves adding a separate route that provides with the generated output of the badges linked with the user account.

@router.route(‘/get_badges’, methods=[‘GET’])
def get_badges():
input_data = request.args
user = User.getUser(user_id=input_data.get(
‘uid’))
badges = Badges().query.filter_by(creator=user)
return jsonify(UserBadges(many=True).dump(badges).data)

This route allows us to get badges produced by the user as a JSON API data object. This object is fed to the frontend to render the badges as cards.

Step 2 : Adding a relevant Schema

After creating a route we need to add a relevant schema that will help us to deliver the badges generated by the user to the Ember JS frontend so that it can be consumed as JSON API objects and shown to the user.

class UserBadges(Schema):
class Meta:
type_ =
‘user-badges’
self_view =
‘generateBadges.get_badges’
kwargs = {
‘id’: ‘<id>’}

id = fields.Str(required=True, dump_only=True)
image = fields.Str(required=
True)
csv = fields.Str(required=
True)
badge_id = fields.Str(required=
True)
text_color = fields.Str(required=
True)
badge_size = fields.Str(required=
True)
user_id = fields.Relationship(
self_url=
‘/api/upload/get_file’,
self_url_kwargs={
‘file_id’: ‘<id>’},
related_url=
‘/user/register’,
related_url_kwargs={
‘id’: ‘<id>’},
include_resource_linkage=
True,
type_=
‘User’
)

This is the ‘UserBadge’ schema that produces the output results of the GET request on the route.

Finally, once this is done we can fire up a GET request on our deployment to receive results. The command that you need to run is given below.

$ ~ curl -X GET http://localhost:5000/api/get_badges?uid={user_id}

Further Improvements

We are working on adding multiple routes and adding modifications to database models and schemas so that the functionality of Badgeyay can be extended to a large extent. This will help us in making this badge generator even better.

Resources


Continue ReadingGet My Badges from Badgeyay API