Implementing Internationalization with Weblate Integration on SUSI Web Chat

SUSI Web Chat supports different browser languages on the Chat UI. The content used to render the date/time formats and the text is translated to the preferred language based on the language selected in the Language Settings.

To test it out on SUSI Web Chat, 

  1. Head over to http://chat.susi.ai
  2. Go to settings from the right dropdown.
  3. Set your preferred language inside Language Settings.
  4. Save and see the SUSI Chat render in the preferred language.

To achieve Internationalization, a number of important steps are to be followed –

  1. The best approach to follow would be to use po/pot files and get the translated string from the files. The format of the files can be used as follows. This is a JSON Structure for Javascript Projects. (File : de.json)
{
   "About":"About",
   "Chat":"Chat",
   "Skills":"Skills",
   "Settings":"Settings",
   "Login":"Login",
   "Logout":"Logout",
   "Themes": "Themes",
}


2. After creating the valid po/pot files in the right formats, we create a component which shall translate our text in the selected language and will import that particular string from that po file. To make it easier in Javascript we are using the JSON files that we created here.

3. Our Translate.react.js component is a special component which shall return us only a <span> text which shall get the User’s preferred language from the store and import that particular po/pot file and match the key as text which is being passed to it and give us the translated text. The following code snippet explains the above sentences more precisely.

changeLanguage = (text) => {
        this.setState({
            text:text
        })
  }
  // Here 'de' is the JSON file which we imported into this component
  componentDidMount() {
    let defaultPrefLanguage = this.state.defaultPrefLanguage;
    var arrDe = Object.keys(de);
    let text = this.state.text;
    if(defaultPrefLanguage!=='en-US'){
      for (let key=0;key<arrDe.length;key++) {
          if (arrDe[key]===text) {
              this.changeLanguage(de[arrDe[key]]);
          }
        }
    }
  } 
   render() {
        return <span>{this.state.text}</span>
     }

4. The next step is to bind all the text throughout our components into this <Translate text=” ”/> component which shall send us back the translated content. So any string in any component can be replaced with the following.

<Translate text="About" />

Here the text “About” is being sent over to the Translate.react.js component and it is getting us the German translation of the string About from the file de.json.

5. We then render the Translated content in our Chat UI. (File: Translate.react.js)


About Weblate

Weblate is a Web based translation tool with git integration supporting wide range of file formats and making it easy for translators to contribute. The translations should be kept within the same repository as source code and translation process should closely follow development. To know more about Weblate go to this link.

Integrating SUSI Web Chat with Weblate

  1. First, we deploy Weblate on our localhost using the installation guide given in these docs. I used the pip installation guide for Weblate as mentioned in this link. After doing that we copy weblate/settings_example.py to weblate/settings.py. Then we configure settings.py and use the following command to migrate the settings.
./manage.py migrate
  1. Next step is to create an admin using the following command.
./manage.py createadmin
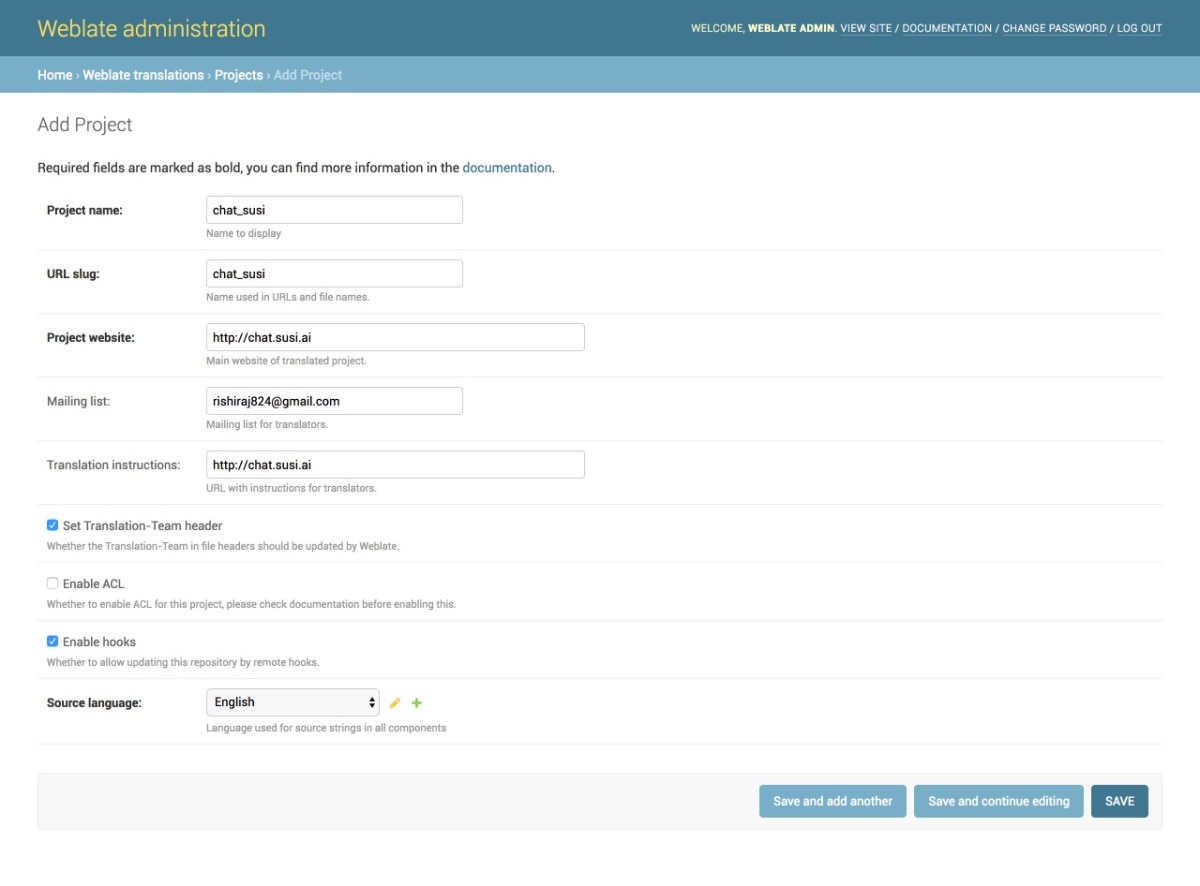
  1. We then add a project from our Admin dashboard by filling details in the following manner as shown in the image
  2. Once the project is added, we add the component to link our Translation files as shown in the image.
  3. Once the files are linked we will see our Overview Project Page and the Information. It can be seen in the image below. The screenshot shows a 100% translation that means all of our strings are translated correctly for German.
  4. To change any translation we make changes and push it to the repository where our SSH key generated from Weblate is added. A full guide to do that is mentioned in this link.
  5. We can push any changes to the repository by making changes in our local. This will generate a commit from the Weblate Admin in our repository as seen in the following screenshot.

Resources

  1. React Internationalization Library  – react-intl
  2. Official Docs about Weblate – Weblate docs.
  3. Format for po/pot files, JSON files etc. – https://docs.weblate.org/en/latest/formats.html#json-and-nested-structure-json-files
  4. Weblate – https://weblate.org
Continue ReadingImplementing Internationalization with Weblate Integration on SUSI Web Chat

Twitter Followers Insight App for loklak Apps Site

Twitter Followers Insight, is an app for checking the followers and following lists of an account and as we click on a name, the chain continues. The app also helps to visualize the data, which is returned from the loklak user information API, where it shows the distribution of followers and following across the world in the form of pie chart.

Related issue: https://github.com/fossasia/apps.loklak.org/pull/291

Developing the App

In the initial stage of the app, the main challenge faced was to implement the clickable feature i.e., make the name of the users in the list which gets displayed should be clickable which navigates to the next list to display as the query changes. Well this was tricky but easy to solve as I had to take the Angular JS with input parameter.

Script for storing and displaying the data:

The script below shows how to details are being fetched from the JSON object which is returned by the loklak Userdata API. The data or details is then being stored into an list/array which is a scope variable. The array is then iterated in a particular fashion how I want to get it displayed.

Storing the data:

for (var i = 0; i < followers.length; i++) {
    user = followers[i].screen_name;
    name = followers[i].name;
    followers_count = followers[i].followers_count;
    pic = followers[i].profile_image_url;
    followers_loc.push(followers[i].location_country);
    followerslist.push([user, pic, name, followers_count]);
}


The below script shows how the array i.e., showed in the above code, being used and iterated over. Here in this script I used a “ng-repeat” angular function where the list/array is iterated till the limit. The script also display in which order the data is getting displayed on the screen. The clickable feature is set in the “ng-click” angular function, where we are calling the Search function with query as the input parameter.

Displaying the data with clickable feature:

<ul class="gallery-container" >
    <li class="gallery-item" style="list-style-type: none;" ng-repeat="value in followersStatus | limitTo: limitFollowers">
        <a href ng-click="Search(value[0])">
            
class="item-image"> src="{{ value[1] }}" style="height: 94px;width: 94px" />
class="item-desc">
class="item-name"> {{ value[2] }}
class="item-handle"> @{{ value[0] }}
class="item-followers"> class="item-label">Followers: class="item-content">{{ value[3] }}
</div> </a> </li> </ul>


Visualizing Followers and Following data using Pie Chart

In this app, the data of user’s followers and following is visualized on the basis of the location they live in. This data is visualized in the form of pie chart using Highcharts.

Script for displaying pie chart:

             $('.pie-chart').highcharts({
                chart: {
                    plotBackgroundColor: null,
                    plotBorderWidth: null,
                    plotShadow: false,
                    type: 'pie'
                },
                title: {
                    text: "Followers"
                },
                tooltip: {
                    pointFormat: '{series.name}: <b>{point.percentage:.1f}%</b>'
                },
                plotOptions: {
                    pie: {
                        allowPointSelect: true,
                        cursor: 'pointer',
                        dataLabels: {
                            enabled: true,
                            format : '',
                            style: {
                                color: (Highcharts.theme && Highcharts.theme.contrastTextColor) || 'black'
                            }
                        }
                    }
                },
                series: [{
                    name: "Followers",
                    colorByPoint: true,
                    data: $scope.locations
                }]
            });


Resources

  • Learn more about AngularJS here.
  • Learn more about Highcharts here.
  • Learn more about Loklak API here.
Continue ReadingTwitter Followers Insight App for loklak Apps Site

Deploy to Azure Button for loklak

In this blog post, am going to tell you about yet a new deployment method for loklak which is easy and quick with just one click. Deploying to Azure Websites from a Git repository just got a little easier with the Deploy to Azure Button. Simply place the button in README.md with a link to the loklak, and users who click on it will be directed to a streamlined deployment process. If we want to do something more advanced and customize this behavior, then add an ARM template called “azuredeploy.json” at the root of the repository which will cause users to be presented with different inputs and configure your services as specified.

I’m going to walk you through a workflow that I used to test them before checking them in to my repo, as well as describe some of the special behaviors that the “Deploy to Azure” site does

Adding a button

To add a deployment button, insert the following markdown to your README.md file:

[![Deploy to Azure](https://azuredeploy.net/deploybutton.svg)](https://deploy.azure.com/?repository=https://github.com/loklak/loklak_server)

How it works

When a user clicks on the button, a “referrer” header is sent to azuredeploy.net which contains the location of the Git repository of loklak_server to deploy from.

An Example Template

This is a blank template which shows, how the azure divides its inputs.

{
  "$schema": "https://schema.management.azure.com/schemas/2015-01-01/deploymentTemplate.json#",
  "contentVersion": "1.0.0.0",
  "parameters": {
  },
  "variables": {
  },
  "resources": [
  ],
  "outputs": {
  }
}

By following the above template, in the case of loklak server, the parameters used are name, image i.e., docker image, port , number of CPUs to be utilized and space i.e., memory required.

In the resources section we use container, the type of the container will be

"type": "Microsoft.ContainerInstance/containerGroups",


And as output, we expect a public IP address to access the azure cloud instance created by us.

Everything under the root “parameters” property will be inputs into our template. Then these parameter values feed into the resources defined later in the template with the “[parameters(‘paramName’)]” syntax.

Try the “Deploy to Azure” Button here:


Resources

Continue ReadingDeploy to Azure Button for loklak

Adding Number of Sessions Label in Open Event Android App

The Open Event Android project has a fragment for showing tracks of the event. The Tracks Fragment shows the list of all the Tracks with title and TextDrawable. But currently it is not showing how many sessions particular track has. Adding TextView with rounded corner and colored background showing number of sessions for track gives great UI. In this post I explain how to add TextView with rounded corner and how to use Plurals in Android.

1. Create Drawable for background

Firstly create track_rounded_corner.xml Shape Drawable which will be used as a background of the TextView. The <shape> element must be the root element of Shape drawable. The android:shape attribute defines the type of the shape. It can be rectangle, ring, oval, line. In our case we will use rectangle.

<?xml version="1.0" encoding="utf-8"?>
<shape xmlns:android="http://schemas.android.com/apk/res/android"
    android:shape="rectangle">

    <corners android:radius="360dp" />

    <padding
        android:bottom="2dp"
        android:left="8dp"
        android:right="8dp"
        android:top="2dp" />
</shape>


Here the <corners> element creates rounded corners for the shape with the specified value of radius attribute. This tag is only applied when the shape is a rectangle. The <padding> element adds padding to the containing view. You can modify the value of the padding as per your need. You can feel shape with appropriate color using <solid> as we are setting color dynamically we will not set color here.

2. Add TextView and set Drawable

Now add TextView in the track list item which will contain number of sessions text. Set  track_rounded_corner.xml drawable we created before as background of this TextView using background attribute.

<TextView
        android:id="@+id/no_of_sessions"
        android:layout_width="wrap_content"
        android:layout_height="wrap_content"
        android:background="@drawable/track_rounded_corner"
        android:textColor="@color/white"
        android:textSize="@dimen/text_size_small"/>


Set color and text size according to your need. Here don’t add padding in the TextView because we have already added padding in the Drawable. Adding padding in the TextView will override the value specified in the drawable.

3.  Create TextView object in ViewHolder

Now create TextView object noOfSessions and bind it with R.id.no_of_sessions using ButterKnife.bind() method.

public class TrackViewHolder extends RecyclerView.ViewHolder {
    ...

    @BindView(R.id.no_of_sessions)
    TextView noOfSessions;

    private Track track;

    public TrackViewHolder(View itemView, Context context) {
        super(itemView);
        ButterKnife.bind(this, itemView);

    public void bindTrack(Track track) {
        this.track = track;
        ...
    }   
}


Here TrackViewHolder is a RecycleriewHolder for the TracksListAdapter. The bindTrack() method of this view holder is used to bind Track with ViewHolder.

4.  Add Quantity Strings (Plurals) for Sessions

Now we want to set the value of TextView. Here if the number of sessions of the track is zero or more than one then we need to set text  “0 sessions” or “2 sessions”. If the track has only one session than we need to set text “1 session” to make text meaningful. In android we have Quantity Strings which can be used to make this task easy.

<resources>
    <!--Quantity Strings(Plurals) for sessions-->
    <plurals name="sessions">
        <item quantity="zero">No sessions</item>
        <item quantity="one">1 session</item>
        <item quantity="other">%d sessions</item>
    </plurals>
</resources>


Using this plurals resource we can get appropriate string for specified quantity like “zero”, “one” and  “other” will return “No sessions”, “1 session”, and “2 sessions”. accordingly. 2 can be any value other than 0 and 1.

Now let’s set background color and test for the text view.

int trackColor = Color.parseColor(track.getColor());
int sessions = track.getSessions().size();

noOfSessions.getBackground().setColorFilter(trackColor, PorterDuff.Mode.SRC_ATOP);
noOfSessions.setText(context.getResources().getQuantityString(R.plurals.sessions,
                sessions, sessions));


Here we are setting background color of textview using getbackground().setColorFilter() method. To set appropriate text we are using getQuantityString() method which takes plural resource and quantity(in our case no of sessions) as parameters.

Now we are all set. Run the app it will look like this.

Conclusion

Adding TextView with rounded corner and colored background in the App gives great UI and UX. To know more about Rounded corner TextView and Quantity Strings follow the links given below.

Continue ReadingAdding Number of Sessions Label in Open Event Android App

Using ThreeTenABP for Time Zone Handling in Open Event Android

The Open Event Android project helps event organizers to organize the event and generate Apps (apk format) for their events/conferences by providing API endpoint or zip generated using Open Event server. For any Event App it is very important that it handles time zone properly. In Open Event Android App there is an option to change time zone setting. The user can view date and time of the event and sessions in Event Timezone and Local time zone in the App. ThreeTenABP provides a backport of the Java SE 8 date-time classes to Java SE 6 and 7. In this blog post I explain how to use ThreeTenABP for time zone handling in Android.

Add dependency

To use ThreeTenABP in your application you have to add the dependency in your app module’s build.gradle file.

dependencies {
      compile    'com.jakewharton.threetenabp:threetenabp:1.0.5'
      testCompile   'org.threeten:threetenbp:1.3.6'
}

Initialize ThreeTenABP

Now in the onCreate() method of the Application class initialize ThreeTenABP.

AndroidThreeTen.init(this);

Create getZoneId() method

Firstly create getZoneId() method which will return ZoneId according to user preference. This method will be used for formatting and parsing dates Here showLocal is user preference. If showLocal is true then this function will return Default local ZoneId otherwise ZoneId of the Event.

private static ZoneId geZoneId() {
        if (showLocal || Utils.isEmpty(getEventTimeZone()))
            return ZoneId.systemDefault();
        else
            return ZoneId.of(getEventTimeZone());
}

Here  getEventTimeZone() method returns time zone string of the Event.

ThreeTenABP has mainly two classes representing date and time both.

  • ZonedDateTime : ‘2011-12-03T10:15:30+01:00[Europe/Paris]’
  • LocalDateTime : ‘2011-12-03T10:15:30’

ZonedDateTime contains timezone information at the end. LocalDateTime doesn’t contain timezone.

Create method for parsing and formating

Now create getDate() method which will take isoDateString and will return ZonedDateTime object.

public static ZonedDateTime getDate(@NonNull String isoDateString) {
        return ZonedDateTime.parse(isoDateString).withZoneSameInstant(getZoneId());;
}


Create formatDate() method which takes two arguments first is format string and second is isoDateString. This method will return a formatted string.

public static String formatDate(@NonNull String format, @NonNull String isoDateString) {
        return DateTimeFormatter.ofPattern(format).format(getDate(isoDateString));
}

Use methods

Now we are ready to format and parse isoDateString. Let’s take an example. Let “2017-11-09T23:08:56+08:00” is isoDateString. We can parse this isoDateString using getDate() method which will return ZonedDateTime object.

Parsing:

String isoDateString = "2017-11-09T23:08:56+08:00";

DateConverter.setEventTimeZone("Asia/Singapore");
DateConverter.setShowLocalTime(false);
ZonedDateTime dateInEventTimeZone = DateConverter.getDate(isoDateString);

dateInEventTimeZone.toString();  //2017-11-09T23:08:56+08:00[Asia/Singapore]


TimeZone.setDefault(TimeZone.getDefault());
DateConverter.setShowLocalTime(true);
ZonedDateTime dateInLocalTimeZone = DateConverter.getDate(dateInLocalTimeZone);

dateInLocalTimeZone.toString();  //2017-11-09T20:38:56+05:30[Asia/Kolkata]


Formatting:

String date = "2017-03-17T14:00:00+08:00";
String formattedString = formatDate("dd MM YYYY hh:mm:ss a", date));

formattedString // "17 03 2017 02:00:00 PM"

Conclusion

As you can see, ThreeTenABP makes Time Zone handling so easy. It has also support for default formatters and methods. To learn more about ThreeTenABP follow the links given below.

Continue ReadingUsing ThreeTenABP for Time Zone Handling in Open Event Android

Implementation of Set Different Language for Query in SUSI Android

SUSI.AI has many skills. Some of which are displaying web search of a certain query, provide a list of relevant information of a topic, displaying a map of the certain position and simple text message of any query. Previously SUSI.AI reply all query in English language but now one important feature is added in SUSI.AI and that feature is, reply query of the user in the language that user wants. But to get the reply in different language user has to send language code of that language along with query to SUSI Server. In this blog post, I will show you how it is implemented in SUSI Android app.

Different language supported in SUSI Android

Currently, different languages added in option in SUSI Android and their language code are:

Language Language Code
English en
German de
Spanish es
French fr
Italian it
Default Default language of the device.

Layout design

I added an option for choosing the different language in settings. When the user clicks on Language option a dialog box pops up. I used listpreference to show the list of different languages.

<ListPreference

  android:title=“@string/Language”

  android:key=“Lang_Select”

  android:entries=“@array/languagentries”

  android:entryValues=“@array/languagentry”>

</ListPreference>

“title” is used to show the title of setting, “entries” is used to show the list of entry to the user and “entryValue” is the value corresponding to each entry. I used listpreference because it has own UI so we don‘t have to develop our own UI for it and also it stores the string into the SharedPreferences so we don’t need to manage the values in SharedPreference. SharedPreference needed to set value in Language in settings so that once user close app and again open it setting will show same value otherwise it will show default value. We used an array of string to show the list of languages.

<string-array name=“languagentries”>

  <item>Default</item>

  <item>English</item>

  <item>German</item>

  <item>Spanish</item>

  <item>French</item>

  <item>Italian</item>

</string-array>

SetLanguage implementation

To set language user must choose Language option in setting.

On clicking Language option a dialog box pop up with the list of different languages. When the user chooses a language then we save corresponding language code in preference with key “prefLanguage” so that we can use it later to send it to the server along with the query. It also uses to send language to the server to store user language on the server, so that user can use the same language in the different client.

querylanguage.setOnPreferenceChangeListener { _, newValue ->

  PrefManager.putString(Constant.LANGUAGE, newValue.toString())

  if(!settingsPresenter.getAnonymity()) {

      settingsPresenter.sendSetting(Constant.LANGUAGE, newValue.toString(), 1)

  }

}

newValue.toString() is the value i.e language code of corresponding language.

Now when we query anything from SUSI.AI we send language code along with query to the server. Default language is default language of the device. Before sending language to the server we check language is default language or any specific language.

val language = if (PrefManager.getString(Constant.LANGUAGE, Constant.DEFAULT).equals(Constant.DEFAULT))

Locale.getDefault().language

else PrefManager.getString(Constant.LANGUAGE, Constant.DEFAULT)

And after that, we send the corresponding language along with query to the server.

clientBuilder.susiApi.getSusiResponse(timezoneOffset, longitude, latitude, source, language, query)

Reference

Continue ReadingImplementation of Set Different Language for Query in SUSI Android

Using Vector Images in SUSI Android

Android designed to run across many devices with different screen sizes and display resolutions. One of the things that confuse many new Android developers is how to support multiple screen sizes. For making  SUSI Android app more user-friendly and interactive we used a lot of images in the form of drawable resources. Most of these drawables are in the form of PNG (Portable Network Graphic) and to support multiple screen size we have to include separate images of varied dimensions because we can’t scale PNG images without losing quality.

Other disadvantages of using PNG images are

  • PNG images take large disk space.
  • PNG images have fixed colour and dimensions which cannot be changed.

To overcome these shortcomings of PNG image we decided to use vector images in SUSI Android.

Advantages of using vector image are

  • It is smaller in size as compared to PNG i.e it takes less disk space than PNG.
  • It can be scaled without losing quality. So we need to include only a single image for all screen size.

Disadvantages of using vector image are

  • Reconstruction of vector data may take considerably longer than that contained in a bitmap file of equivalent complexity because each image element must be drawn individually and in sequence.
  • Vector image can’t be used to display complex photographs.
  • If the object consists of a large number of small elements then file size grow very fast.

Vector produce smaller size file than bitmap only for simple stuff. When it comes to creating a photographic quality vector where colour information is paramount and may vary on a pixel-by-pixel basis, the file can be much larger than its bitmap version, that’s why vector image is only suitable for small images like logo designs, icons etc.

In this blog post, I will show you how we used vector images in SUSI Android.

How to create vector image using Asset Studio tool

Asset Studio is inbuilt Android Studio tool which we use to create a vector image from default material icon or local SVG images. To use vector asset in Android Studio

  • Go to File> New > Vector Asset
  • Vector Asset Studio Tool Window is prompted

  • Create vector image from default material icon or local SVG image.

Asset Studio will add icon in drawable. It can be used anywhere in the project.

Vector images in SUSI Android

In SUSI Android all drawable images like search, mic, arrow, check etc are vector images,  even the logo of the app is a vector image.

This vector image is the result of code you can find here.

Now I will describe some special attributes used here

  • fillColor: It defines the colour of the image. So the colour of your image depends on the colour you provide in fillColor. We used white color(#ffffff) as fillColor that’s why the image is white in colour.
  • strokeColour: It defines the colour of boundary of the image.
  • pathData: Shape of your image depends on pathData. Different commands used in pathData are
  1. M: It is used to define the starting point. For example, M10,10 means starting     Coordinate of the image will be (10,10). M used for absolute position and m   for relative position.
  2. L: L means to draw a line from the current position to given position. For example, M10,10 L20,20 means a straight line will be drawn from coordinate (10,10) to coordinate (20,20. L Use for absolute position and l for relative position.
  3. C: C means to draw an arc. For example, Cx1,x2 x3,x4 x5,x6 means draw a curve  (cubic Bezier curve) from coordinate  (x1,x2) using (x3,x4) as control point at the beginning and (x5,x6) as control point at the end.
  4. Z: Z means to close the path using the straight line between the current position and starting position.

    Example

Let’s consider a curve

M9,16.17L4.83,12l-1.42,1.41L9,19 21,7l-1.41,-1.41z

It starts from point (9,16.17). From (9,16.17) to (4.83,12) a straight line will be drawn. Now again a straight will be drawn from point (4.83,12) to the relative point (-1.42,1.41). After that from point (-1.42, 1.41) it will draw a polyline like an upward arrow(^) with the end point at (21,7). Again it will draw a straight line between point (21,7) and relative point (-1.41, -1.41). At the last z will close curve using the straight line between current point and starting point).

Resources

Tags


Continue ReadingUsing Vector Images in SUSI Android

How to Receive Carousels from SUSI Skype Bot

A good UI primarily focuses on attracting large numbers of users and any good UI designer aims to achieve user satisfaction with a user-friendly design. In this blog, we will learn how to show carousels SUSI Skype bot to make UI better and easy to use. We can show web search result from SUSI in form of text responses in Skype bot but it doesn’t follow design rule as it is not a good approach to show more text in constricted space. Users seem such a layout as less attractive. In SUSI webchat, RSS type response is returned as carousels and is viewable as:

We can implement RSS type response with code given below

for (var i = 0; i < metadata.count; i++) {
        msg = "";
        msg = text to be sent here;
        session.say(msg, msg);
}

If we implement RSS response using this code then we get a very constricted response because of more text. You can see it in the screenshot below:


To make RSS type response better we will implement carousels. Carousels are actually horizontal tiles to show rich content. We will use this code:

          
for (var i = 0; i < 4; i++) {               
    msg = "text here";               
    title  = "title here";               
    cards[i] = new builder.HeroCard(session)                   
         .title(title)
         .text(msg)           
}           
var reply = new builder.Message(session)
.attachmentLayout(builder.AttachmentLayout.carousel)                                        .attachments(cards);           
session.send(reply);

In above code, we are using a hero card which is a rich card containing title and message which are then attached as an attachment to the message. After implementing carousels for RSS response it looks like this

Resources

Bot Builder SDK documentation: https://docs.botframework.com/en-us/node/builder/chat-reference/modules/_botbuilder_d_.html
Rich Card examples: https://github.com/Microsoft/BotBuilder-Samples/blob/master/Node/cards-RichCards/app.js

Continue ReadingHow to Receive Carousels from SUSI Skype Bot

How to Debug SUSI Bots Deployment on Google Container Engine Using Kubernetes

You can learn how to deploy SUSI bots on to Google container engine using Kubernetes from this tutorial. In this blog, we will learn how to debug SUSI bots deployment to keep them running continuously. Whenever we create a deployment on Google container using Kubernetes a pod is created in which our deployment keeps running. Whenever we deploy bots to any platform to check if it is working right or not we refer to logs of that bot. To get logs first we will get pod for our deployment with this

kubectl get pods --namespace={your-namespace-of-deployment-here}

This will show us the pod for our deployment like this

Copy the name of this pod and enter this command to get logs

kubectl get logs {your-pod-here} --namespace={your-namespace-of-deployment-here}

This will show us the logs of our deployment. In Google cloud console you will not get running logs. You will get logs of the everything that has happened before you requested for logs. Now if there is some error in logs and you need to restart the deployment but in Kubernetes you can not restart your pod directly but to restart pod we will need to enter the following command

kubectl replace --force -f {path-to-your-deployment-config-file}

If everything goes well you will get to see the following with your deployment name in it


After deployment, if you want to see the services and deployment in detail follow the approach given below

To get services write this command

kubectl get service --namespace={your-namespace-of-deployment-here}

When you will get service it will look like

If you don’t get your external IP then check your service config file and after fixing it make a new deployment after deleting previous one.

To check deployment in detail write following command

kubectl describe deployments --namespace={your-namespace-of-deployment-here}

This will show us details about deployment like this

You can now easily solve issues with deployments now.

Resources

Debugging Kubernetes service locally using telepresence: https://www.telepresence.io/tutorials/kubernetes.html
Debug Services: https://kubernetes.io/docs/tasks/debug-application-cluster/debug-service/
Troubleshooting Kuberetes: https://access.redhat.com/documentation/en-us/red_hat_enterprise_linux_atomic_host/7/html/getting_started_with_kubernetes/troubleshooting_kubernetes


Continue ReadingHow to Debug SUSI Bots Deployment on Google Container Engine Using Kubernetes

Shift from Java to Kotlin in SUSI Android

Previously SUSI Android was written in JAVA. But recently Google announced that it will officially support Kotlin on Android as a first class language so we decided to shift from Java to Kotlin. Kotlin runs on Java Virtual Machine and hence we can use Kotlin for Android app development. Kotlin is new programming language developed by JetBrains, which also developed IntelliJ-the IDE that Android Studio is based on. So Android Studio has excellent support for Kotlin.

Advantages of Kotlin over Java

  • Kotlin is a null safe language. It changes all the instances used in the code to non nullable type thus it ensures that the developers don’t get any nullPointerException.
  • Good Android Studio support. Kotlin tool is included with Android Studio 3.0 by default. But for Android Studio 2.x we need to install the required plugin for Kotlin.
  • Kotlin also provides support for Lambda function and other high order functions.
  • One of Kotlin’s greatest strengths as a potential alternative to Java is interoperability between Java and Kotlin. You can even have Java and Kotlin code existing side by side in the same project.
  • Kotlin provides the way to declare Extension function similar to that of C# and Gosu. We can use this function in the same way as we use the member functions of our class.

After seeing the above points it is now clear that Kotlin is much more effective than Java. In this blog post, I will show you how ForgotPasswordActivity is shifted from JAVA to Kotlin in SUSI Android.

How to install Kotlin plugin in Android Studio 2.x

We are using Android Studio 2.3.0 in our android project. To use Kotlin in Android Studio 2.x we need to install Kotlin plugin.

Steps to include Kotlin plugin in Android Studio 2.x are:

  • Go to File
  • After that select Settings
  • Then select Plugin Option from the left sidebar.
  • After that click on Browse repositories.
  • Search for Kotlin and install it.

Once it is installed successfully, restart Android Studio. Now configure Kotlin in Android Studio.

Shift  SUSI Android from JAVA to Kotlin

Kotlin is compatible with JAVA. Thus it allows us to change the code bit by bit instead of all at once. In SUSI Android app we implemented MVP architecture with Kotlin. We converted the code by one activity each time from JAVA to Kotlin. I converted the ForgotPassword of SUSI Android from JAVA to Kotlin with MVP architecture. I will discuss only shifting of SUSI Android from JAVA to Kotlin and not about MVP architecture implementation.

First thing is how to extend parent class. In JAVA we need to use extend keyword

public class ForgotPasswordActivity extends AppCompatActivity

but in Kotlin parent class is extended like

class ForgotPasswordActivity : AppCompatActivity ()

Second is no need to bind view in Kotlin. In JAVA we bind view using Butter Knife.

@BindView(R.id.forgot_email)

protected TextInputLayout email;

and

email.setError(getString(R.string.email_invalid_title));

but in Kotlin we can directly use view using id.

forgot_email.error = getString(R.string.email_invalid_title)

Another important thing is that instead of using setError and getError we can use only error for both purposes.

forgot_email.error

It can be used to get error in TextInputLayout ‘forgot_email’ and

forgot_email.error = getString(R.string.email_invalid_title)

can be use to set error in TextInputLayout ‘forgot_email’.

Third one is in Kotlin we don’t need to define variable type always

val notSuccessAlertboxHelper = AlertboxHelper(this@ForgotPasswordActivity, title, message, null, null, button, null, color)

but in JAVA we need to define it always.

AlertboxHelper notSuccessAlertboxHelper = new AlertboxHelper(ForgotPasswordActivity.this, title, message, null, null, positiveButtonText, null, colour);

And one of the most important feature of Kotlin null safety. So you don’t need to worry about NullPointerException. In java we need to check for null otherwise our app crash

if (url.getEditText() == null)

      throw new IllegalArgumentException(“No Edittext hosted!”);

But in Kotlin there is no need to check for null. You need to use ’?’ and Kotlin will handle it itself.  

input_url.editText?.text.toString()

You can find the previous ForgotPasswordActivity here. You can compare it with new ForgotPaswordActivity.

Reference

Continue ReadingShift from Java to Kotlin in SUSI Android