Using NodeBuilder to instantiate node based Elasticsearch client and Visualising data

As elastic.io mentions, Elasticsearch is a distributed, RESTful search and analytics engine capable of solving a growing number of use cases. But in many setups, it is not possible to manually install an Elasticsearch node on a machine. To handle these type of scenarios, Elasticsearch provides the NodeBuilder module, which can be used to spawn Elasticsearch node programmatically. Let’s see how.

Getting Dependencies

In order to get the ES Java API, we need to add the following line to dependencies.

compile group: 'org.elasticsearch', name: 'securesm', version: '1.0'

The required packages will be fetched the next time we gradle build.

Configuring Settings

In the Elasticsearch Java API, Settings are used to configure the node(s). To create a node, we first need to define its properties.

Settings.Builder settings = new Settings.Builder();

settings.put("cluster.name", "cluster_name");  // The name of the cluster

// Configuring HTTP details
settings.put("http.enabled", "true");
settings.put("http.cors.enabled", "true");
settings.put("http.cors.allow-origin", "https?:\/\/localhost(:[0-9]+)?/");  // Allow requests from localhost
settings.put("http.port", "9200");

// Configuring TCP and host
settings.put("transport.tcp.port", "9300");
settings.put("network.host", "localhost");

// Configuring node details
settings.put("node.data", "true");
settings.put("node.master", "true");

// Configuring index
settings.put("index.number_of_shards", "8");
settings.put("index.number_of_replicas", "2");
settings.put("index.refresh_interval", "10s");
settings.put("index.max_result_window", "10000");

// Defining paths
settings.put("path.conf", "/path/to/conf/");
settings.put("path.data", "/path/to/data/");
settings.put("path.home", "/path/to/data/");

settings.build();  // Buid with the assigned configurations

There are many more settings that can be tuned in order to get desired node configuration.

Building the Node and Getting Clients

The Java API makes it very simple to launch an Elasticsearch node. This example will make use of settings that we just built.

Node elasticsearchNode = NodeBuilder.nodeBuilder().local(false).settings(settings).node();

A piece of cake. Isn’t it? Let’s get a client now, on which we can execute our queries.

Client elasticsearhClient = elasticsearchNode.client();

Shutting Down the Node

elasticsearchNode.close();

A nice implementation of using the module can be seen at ElasticsearchClient.java in the loklak project. It uses the settings from a configuration file and builds the node using it.


Visualisation using elasticsearch-head

So by now, we have an Elasticsearch client which is capable of doing all sorts of operations on the node. But how do we visualise the data that is being stored? Writing code and running it every time to check results is a lengthy thing to do and significantly slows down development/debugging cycle.

To overcome this, we have a web frontend called elasticsearch-head which lets us execute Elasticsearch queries and monitor the cluster.

To run elasticsearch-head, we first need to have grunt-cli installed –

$ sudo npm install -g grunt-cli

Next, we will clone the repository using git and install dependencies –

$ git clone git://github.com/mobz/elasticsearch-head.git
$ cd elasticsearch-head
$ npm install

Next, we simply need to run the server and go to indicated address on a web browser –

$ grunt server

At the top, enter the location at which elasticsearch-head can interact with the cluster and Connect.

Upon connecting, the dashboard appears telling about the status of cluster –

The dashboard shown above is from the loklak project (will talk more about it).

There are 5 major sections in the UI –
1. Overview: The above screenshot, gives details about the indices and shards of the cluster.
2. Index: Gives an overview of all the indices. Also allows to add new from the UI.
3. Browser: Gives a browser window for all the documents in the cluster. It looks something like this –

The left pane allows us to set the filter (index, type and field). The table listed is sortable. But we don’t always get what we are looking for manually. So, we have the following two sections.
4. Structured Query: Gives a dead simple UI that can be used to make a well structured request to Elasticsearch. This is what we need to search for to get Tweets from @gsoc that are indexed –

5. Any Request: Gives an advance console that allows executing any query allowable by Elasticsearch API.

A little about the loklak project and Elasticsearch

loklak is a server application which is able to collect messages from various sources, including twitter. The server contains a search index and a peer-to-peer index sharing interface. All messages are stored in an elasticsearch index.

Source: github/loklak/loklak_server

The project uses Elasticsearch to index all the data that it collects. It uses NodeBuilder to create Elasticsearch node and process the index. It is flexible enough to join an existing cluster instead of creating a new one, just by changing the configuration file.

Conclusion

This blog post tries to explain how NodeBuilder can be used to create Elasticsearch nodes and how they can be configured using Elasticsearch Settings.

It also demonstrates the installation and basic usage of elasticsearch-head, which is a great library to visualise and check queries against an Elasticsearch cluster.

The official Elasticsearch documentation is a good source of reference for its Java API and all other aspects.

Continue ReadingUsing NodeBuilder to instantiate node based Elasticsearch client and Visualising data

Adding swap space to your DigitalOcean droplet, if you run out of RAM

The Open Event Android App generator runs on a DigitalOcean. The deployment runs on a USD 10 box, that has 1 GB of RAM, but for testing I often use a USD 5 box, that has only 512mb of RAM.

When trying to build an android app using gradle and Java 8, there could be an issue where you run out of RAM (especially if it’s 512 only).

What we can do to remedy this problem is creating a swapfile. On an SSD based system, Swap spaces work almost as fast as RAM, because SSDs have very high R/W speeds.

Check hard disk space availability using

df -h

There should be an output like this

Filesystem      Size  Used Avail Use% Mounted on
udev            238M     0  238M   0% /dev
tmpfs            49M  624K   49M   2% /run
/dev/vda1        20G  1.1G   18G   6% /
tmpfs           245M     0  245M   0% /dev/shm
tmpfs           5.0M     0  5.0M   0% /run/lock
tmpfs           245M     0  245M   0% /sys/fs/cgroup
tmpfs            49M     0   49M   0% /run/user/1001

The steps to create a swap file and allocating it as swap are

sudo fallocate -l 1G /swapfile
sudo chmod 600 /swapfile
sudo mkswap /swapfile
sudo swapon /swapfile

We can verify using

sudo swapon --show
NAME      TYPE  SIZE USED PRIO
/swapfile file 1024M   0B   -1

And now if we see RAM usage using free -h , we’ll see

              total        used        free      shared  buff/cache   available
Mem:           488M         37M         96M        652K        354M        425M
Swap:          1.0G          0B        1.0G

Do not use this as a permanent measure for any SSD based filesystem. It can corrupt your SSD if used as swap for long. We use this only for short periods of time to help us build android apks on low ram systems.

Continue ReadingAdding swap space to your DigitalOcean droplet, if you run out of RAM

Working with ButterKnife in Android

logo

The following tutorial will help you understand Butter Knife implementation in Android

Why to use Butter Knife for Android?

Butter Knife in short is used in case for method binding of Android Views. Butter Knife is mainly used to make coding clean and simple especially in cases where where you deal with complex layout. Usually if you aren’t using Butter Knife you’ll have to eventually use findViewById() method for each view that you create in your layout, in cases where your application deals with many TextView’s, EditText’s, Button’s , ImageView’s the lines of code you write extends. In such cases Butter Knife comes in handy, using which you can reduce many lines of code and simply avoid methods such as findViewById().

Does Butter Knife make your App to slow down ?

No. Butter Knife doesn’t slow down your App, it gives the same result as when you declare your views using findViewById. The reason behind it is ButterKnife automatically generates findViewById calls at compile time itself thus, making use of “Annotation Processing”.

Butter Knife in Action :

Usage in xml :

<LinearLayout
android:layout_width="match_parent"
android:layout_height="wrap_content"
android:orientation="horizontal"
android:layout_marginTop="15dp"
android:id="@+id/butterknifeLayout"
android:layout_marginLeft="@dimen/pager_margin"
android:layout_marginRight="16dp"
android:weightSum="2">

<EditText
android:id="@+id/butterknifeEdittext"
android:layout_width="0dp"
android:layout_height="wrap_content"
android:textSize="13sp"
android:hint="First Name"
android:singleLine="true"
android:layout_weight="1"/>
 
</LinearLayout>;
 

Usage in Java class.
 
@InjectView(R.id.butterknifeLayout)
LinearLayout linearLayout;
@InjectView(R.id.butterknifeText)
EditText edittext;
 
//Just use the below code for setting a OnclickListener. That’s it. you don’t need to use findViewById multiple times
 
@OnClick(R.id.butterknifeLayout)
void OnLayoutClicked(View view) {
 
//Do Your Stuff here
}

Learn more about butterknife at : http://jakewharton.github.io/butterknife/

Continue ReadingWorking with ButterKnife in Android

sTeam GSoC 2016 Windup

(ˢᵒᶜⁱᵉᵗʸserver) aims to be a platform for developing collaborative applications.
sTeam server project repository: sTeam.
sTeam-REST API repository: sTeam-REST

An overview of the work done by ajinkya007 during Google Summer of code 2016 with FOSSASIA on its project sTeam.

The community bonding period saw the creation of a docker image and a debian package for the sTeam server. The integration of the sTeam shell into vi, improvements in the export and import to git scripts, user and group manipulation commands, sending mails through the commandline, viewing logs and the edit script modifications were done subsequently. The later part of GSOC saw that the sTeam-rest repository was restructured, unit and api-end point tests were performed. The new web interface developed was tested.
The code written during this period by me and siddhant was merged and the conflicts were resolved. The merged code was tested thoroughly as no automated test integration tool supports pike programming language. Documentation was generated using Doxygen and deployed in the gh-pages of the sTeam server repository.

A trello board was maintained throughout the course of GSOC 2016.

Trello Board: sTeam

Accomplishments

Issues Reported and Resolved

A list of tasks covered and all the Pull requests related to each:

Tasks Issue PR
Make changes in the Makefile for installation of sTeam. Issue-25 Issue-27 PR-66 PR-67
Edit script modifications Issue-20 Issue-29 Issue-43 PR-44 PR-48
Indentation of output in steal-shell. Issue-24 PR-42
Integrate steam-shell into vim or emacs. Issue-37 Issue-43 Issue-49 PR-41 PR-48 PR-51
Improve the import and export from git scripts. Issue-9 Issue-14 Issue-16 Issue-18 Issue-19 Issue-46 PR-45 PR-54 PR-55 PR-76
Create, Delete and List the user through commandline Issue-58 Issue-69 Issue-72 PR-59 PR-70 PR-78
Sending Mails through commandline Issue-74 PR-85
Generate error logs and display them in CLI Issue-83 PR-86
Create a file of any mime type from command line. Issue-79 PR-82
Add more commands for group operations. Issue-80 PR-84
Add more utility to the steam-shell Issue-56 Issue-71 Issue-73 PR-57 PR-75 PR-81
Restructure the sTeam-rest repository List of Issue’s List of PR’s
Write test cases to test sTeam-rest api List of Issue’s List of PR’s
Create a debian package and a docker image for easy deployment Create docker image Docker Image
Document the work done Issue 149 sTeam Server Structure, sTeam Server Documentation
Test the web-interface

Commits Merged

During the course of GSOC 2016, work was done on the sTeam and sTeam-rest repositories.

1. The work done on the sTeam repository.

We have combined all the work into two branches for the ease of creating a debian package. The commits made by me in each branch can be seen here.

2. The work done on the sTeam-rest repository

The push request’s sent for the issue’s are yet to be merged in the main repository. The list of PR’s for the sTeam-rest repository.

sTeam-rest PR’s

The weekly blogs

The blogs summarizing the work done during the week were published on my personal website. These can be found on Weekly Blogs
All the blogs can also be found on the Fossasia blog.
The list in reverse chronological order is as follows.

Scrums

Scrum reports were posted on the #steam-devel on irc.freenode.net and sTeam google group. The sTeam trello board also has everyday scrum reports.

Further Improvements

  1. sTeam command line lacks the functionality to read and set the object access permissions. sTeam function analogous to getfacl() to change the sTeam server object permisssions.
  2. sTeam debian package for easy installation of the sTeam server. The debian package is yet to be fully packaged.

Special Thanks

  • I would like to thank my mentors Mario Behling, Hong Phuc Dang, Martin Bahr, Trilok Tourani and my peers for being there to help me and guide me.
  • I would like to thank FOSSASIA, sTeam and Pike Community for giving me this opportunity and guiding me in this endeavour.
  • I would also like to thank Google Summer of Code for this experience.

Feel free to explore the repository. Suggestions for improvements are welcomed.

Checkout the FOSSASIA Idea’s page for more information on projects supported by FOSSASIA.

Continue ReadingsTeam GSoC 2016 Windup

KISS Datatable

Recenlty I’ve faced a problem with sorting columns in Datatable.

What is Datatable?

Datatable is a plug-in for Jquery library. It provides a lot of features like pagination, quick search or multi-column ordering. Besides, you can develop easily Bootstrap or Foundation ui css styles. There are also more other option but It doesn’t make sense to list it here, because you can visit their site and you can read clearly documentation. On Datatable website you can see a lot of examples. First of them shows how to improve your ordinary table to awesome and rich of features table. One function changes everything, It’s fantastic!  

$('#myTable').DataTable();

Returning to my problem which I’ve faced, as I told it was problem related to sorting column in table.

I know sorting is a trivial thing. I hope that everyone knows it 🙂 Sorting by a date is also implemented in a datatable library. So everything is clear when we don’t change date format to human readable format. I mean something like this ‘3 hours ago’, ‘1 year ago’.

When Open Event team tested how datatable manages ordering columns in that format it didn’t work. It’s quite hard to sort by that format, So I’ve invented an idea. Surely you are wondering what i’ve invented. I’ve postponed my minds about sort by this values. It can direct to overwork. When I thought about it, weird ideas came to my mind, a lots of conditions, If statements… Therefore I’ve resigned from this. I’ve used KISS principle. KISS means ‘keep it simple stupid’. I like it!

Therefore that sorting is implemented on frontend side. I’ve decided not to display human readable date format at the beginning. I find  all dates which have format “YYYY-MM-DD HH:mm” then I replace that format to human readable format. So it’s very quick and comfortable, and doesn’t require a lot conditions to write. Of course I’ve tried to implement it in Datatable library. I suppose that it would  require more effort than it’s now.

Below You can see great function which changes a date in frontend side but does not change data in a datatable. So sorting process takes place in a datatable using format  “YYYY-MM-DD HH:mm” but user see human readable format. Isn’t it awesome?!

function change_column_time_to_humanize_format(datatable_name, column_id) {
  $(datatable_name).each(function( key, value ) {
    $(value).children().each(function( key1, value2 ) {
       if(key1 === column_id ){
          var current_value = $(value2).text().slice(0, 16);
          var changed_value = moment(current_value, "YYYY-MM-DD hh:mm").fromNow()
          var isValid = moment(current_value, "YYYY-MM-DD HH:mm", true).isValid()
          if (changed_value !== current_value && isValid === true){
              $(value2).text(changed_value)
          }
      }
  });
});


Continue ReadingKISS Datatable

sTeam Docker Image

(ˢᵒᶜⁱᵉᵗʸserver) aims to be a platform for developing collaborative applications.
sTeam server project repository: sTeam.
sTeam-REST API repository: sTeam-REST

DOCKER IT!

What is Docker?

Docker is open source software to pack, ship and run any application as a lightweight container. Containers are completely hardware and platform independent so you don’t have to worry about whether what you are creating will run everywhere.

In order to facilitate development in all the environments and give the user the ease from the cumbersome installation steps a docker image was made for the sTeam project.
This docker image contains all the necessary dependencies to start the sTeam server.
It also includes the sTeam UI and the Rest API along with it’s dependencies. These have already been installed and developer can start collaborating to it.

docker-image

The docker image can be found at :


https://hub.docker.com/r/ajinkya007/societyserver/

It has all the necessary information for it’s usage and installation.

The dockerfile for the sTeam repository:


FROM ubuntu:latest
RUN apt-get update
RUN apt-get install -y wget git firefox nodejs nodejs-legacy npm
RUN apt-get install -y build-essential mysql-server libmysqld-dev bzip2 libjpeg$
RUN apt-get install -y pike7.8 pike7.8-bzip2 pike7.8-svg
RUN apt-get install -y libxml2-dev libxslt1-dev automake flex
RUN npm install -g npm bower gulp coffee-script jasmine-node frisby
RUN cd home
RUN wget -c https://raw.githubusercontent.com/societyserver/sTeam/steam-package$
RUN git clone www.github.com/societyserver/steam.git
RUN cd sTeam
RUN git checkout societyserver-source
RUN ./build
RUN sudo ./install
RUN cd ..
RUN git clone https://github.com/societyserver/sTeam-web-interface-gsoc-2015.git
RUN cd sTeam-web-interface-gsoc-2015
RUN npm install
RUN cd ..
RUN git clone https://github.com/societyserver/steam-rest.git
RUN cd steam-rest
RUN npm install

Feel free to explore the repository. Suggestions for improvements are welcomed.

Checkout the FOSSASIA Idea’s page for more information on projects supported by FOSSASIA.

Continue ReadingsTeam Docker Image

Python code examples

I’ve met many weird examples of  behaviour in python language while working on Open Event project. Today I’d like to share some examples with you. I think this knowledge is necessary, if you’d like to increase a  bit your knowledge in python area.

Simple adding one element to python list:

def foo(value, x=[]):
  x.append(value)
  return x

>>> print(foo(1))
>>> print(foo(2))
>>> print(foo(3, []))
>>> print(foo(4))

OUTPUT

[1] 
[1, 2] 
[3]
[1, 2, 4]

First output is obvious, but second not exactly. Let me explain it, It happens because x(empty list) argument is only evaluated once, So on every call foo(), we modify that list, appending a value to it. Finally we have [1,2, 4] output. I recommend to avoid mutable params as default.

Another example:

Do you know which type it is?

>>> print(type([ el for el in range(10)]))
>>> print(type({ el for el in range(10)}))
>>> print(type(( el for el in range(10))))

Again first and second type are obvious <class ‘list’>, <class ‘set’>. You may  think that last one should return type tuple but it returns a generator <class ‘generator’>.

Example:

Do you think that below code returns an exception?

list= [1,2,3,4,5]
>>> print(list [8:])

If you think that above expression returns index error you’re wrong. It returns empty list [].

Example funny boolean operators

>>> 'c' == ('c' or 'b')
True
>>> 'd' == ('a' or 'd')
False
>>> 'c' == ('c' and 'b')
False 
>>> 'd' == ('a' and 'd')
True

You can think that that OR and AND operators are broken.

You have to know how python interpreter behaves while looking for OR and AND operators.

So OR Expression takes the first statement and checks if it is true. If the first statement is true, then Python returns object’s value without checking second value. If first statement is false interpreter checks second value and returns that value.

AND operator checks if first statement is false, the whole statement has to be false. So it returns first value, but if first statement is true it checks second statement and returns second value.

Below i will show you how it works

>>> 'c' == ('c' or 'b')
>>> 'c' == 'c'
True
>>> 'd' == ('a' or 'd')
>>> 'd' == 'a'
False
>>> 'c' == ('c' and 'b')
>>> 'c' == 'b'
False 
>>> 'd' == ('a' and 'd')
>>> 'd' == 'd'
True

I hope that i have explained you how the python interpreter checks OR and AND operators. So know above examples should be more understandable.

Continue ReadingPython code examples

sTeam Server Object permissions and Doxygen Documentation

(ˢᵒᶜⁱᵉᵗʸserver) aims to be a platform for developing collaborative applications.
sTeam server project repository: sTeam.
sTeam-REST API repository: sTeam-REST

sTeam Server object permissions

sTeam command line lacks the functionality to read and set the object access permissions. The permission bits are: read,write, execute, move, insert,
annotate, sanction. The permission function was designed analogous to the getfacl() command in linux. It should display permissions as: rwxmias corresponding to the  permission granted on the object.

The the key functions are get_sanction, which returns a list of objects and permissions and sanction_object, which adds a new object and its set of permissions. The permissions is stored as an integer and the function should break the individual bits like getfact().

The permission bits for the sTeam objects are declared in the
access.h

// access.h: The permission bits

#define FAIL           -1 
#define ACCESS_DENIED   0
#define ACCESS_GRANTED  1
#define ACCESS_BLOCKED  2

#define SANCTION_READ          1
#define SANCTION_EXECUTE       2
#define SANCTION_MOVE          4
#define SANCTION_WRITE         8
#define SANCTION_INSERT       16
#define SANCTION_ANNOTATE     32

The get_sanction method defined in the access.pike returns a mapping which has the ACL(Access Control List) of all the objects in the sTeam server.


// Returns the sanction mapping of this object, if the caller is privileged
// the pointer will be returned, otherwise a copy.
final mapping
get_sanction()
{
    if ( _SECURITY->trust(CALLER) )
	return mSanction;
    return copy_value(mSanction);
}

The functions gets the permission values which are set for every object in the server.

The sanction_object method defined in the object.pike sets the permissions for the new objects.


// Set new permission for an object in the acl. Old permission are overwritten.
int sanction_object(object grp, int permission)
{
    ASSERTINFO(_SECURITY->valid_proxy(grp), "Sanction on non-proxy!");
    if ( query_sanction(grp) == permission )
      return permission; // if permissions are already fine

    try_event(EVENT_SANCTION, CALLER, grp, permission);
    set_sanction(grp, permission);

    run_event(EVENT_SANCTION, CALLER, grp, permission);
    return permission;
} 

This method makes use of the set_sanction which sets the permission onthe object. The task ahead is to make use of the above functions and write a sTeam-shell command which would provide the user to easily access and change the permissions for the objects.

Merging into the Source

The work done during GSOC 2016 by Siddhant and Ajinkya on the sTeam server was merged into the gsoc201-societyserver-devel and gsoc2016-source branches in the societyserver repository.
The merged code can be found at:

https://github.com/societyserver/sTeam/tree/gsoc2016-source
https://github.com/societyserver/sTeam/tree/gsoc2016-societyserver-devel

The merged code needs to be tested before the debian package for the sTeam server is prepared. The testing has resulted into resolving of minor bugs.

Doxygen Documentation

The documentation for the sTeam is done using doxygen. The doxygen.pike is written and used to make the documentation for the sTeam server. The Doxyfile which includes the configuration for generating the sTeam documentation is modified and input files are added. The generated documentation is deployed on the gh-pages in the societyserver/sTeam repository.
The documentation can be found at:


http://societyserver.github.io/sTeam/files.html

The header files and the constants defined are also included in the sTeam documentation.

sTeam Documentation:

SocietyserverDoc

sTeam defined constants:

SocietyServerConstants

sTeam Macro Definitions:

SocietyServerMacroDefnitions

Feel free to explore the repository. Suggestions for improvements are welcomed.

Checkout the FOSSASIA Idea’s page for more information on projects supported by FOSSASIA.

Continue ReadingsTeam Server Object permissions and Doxygen Documentation

Accepting Stripe payments on behalf of a third-party

{ Repost from my personal blog @ https://blog.codezero.xyz/accepting-stripe-payments-on-behalf-of-a-third-party }

In Open Event, we allow the organizer of each event to link their Stripe account, so that all ticket payments go directly into their account. To make it simpler for the organizer to setup the link, we have a Connect with stripe button on the event creation form.

Clicking on the button, the organizer is greeted with a signup flow similar to Login with Facebook or any other social login. Through this process, we’re able to securely and easily obtain the credentials required to accept payments on behalf of the organizer.

For this very purpose, stripe provides us with an OAuth interface called as Stripe Connect. Stripe Connect allows us to connect and interact with other stripe accounts through an API.

We’ll be using Python’s requests library for making all the HTTP Requests to the API.
You will be needing a stripe account for this.

Registering your platform
The OAuth Flow

The OAuth flow is similar to most platforms.

  • The user is redirected to an authorization page where they login to their stripe account and authorize your app to access their account
  • The user is then redirected back to a callback URL with an Authorization code
  • The server makes a request to the Token API with the Authorization code to retrieve the access_token, refresh_token and other credentials.

Implementing the flow

Redirect the user to the Authorization URL.
https://connect.stripe.com/oauth/authorize?response_type=code&client_id=ca_8x1ebxrl8eOwOSqRTVLUJkWtcfP92YJE&scope=read_write&redirect_uri=http://localhost/stripe/callback  

The authorization url accepts the following parameters.

  1. client_id – The client ID acquired when registering your platform.required.
  2. response_type – Response type. The value is always code. required.
  3. redirect_uri – The URL to redirect the customer to after authorization.
  4. scope – Can be read_write or read_only. The default is read_only. For analytics purposes, read_only is appropriate; To perform charges on behalf of the connected user, We will need to request read_write scope instead.

The user will be taken to stripe authorization page, where the user can login to an existing account or create a new account without breaking the flow. Once the user has authorized the application, he/she is taken back to the Callback URL with the result.

Requesting the access token with the authorization code

The user is redirected back to the callback URL.

If the authorization failed, the callback URL has a query string parameter error with the error name and a parameter error_description with the description of the error.

If the authorization was a success, the callback URL has the authorization code in the code query string parameter.

import requests

data = {  
    'client_secret': 'CLIENT_SECRET',
    'code': 'AUTHORIZATION_CODE',
    'grant_type': 'authorization_code'
}

response = requests.post('https://connect.stripe.com/oauth/token', data=data)

The client_secret is also obtained when registering your platform. The codeparameter is the authorization code.

On making this request, a json response will be returned.

If the request was a success, the following response will be obtained.

{
  "token_type": "bearer",
  "stripe_publishable_key": PUBLISHABLE_KEY,
  "scope": "read_write",
  "livemode": false,
  "stripe_user_id": USER_ID,
  "refresh_token": REFRESH_TOKEN,
  "access_token": ACCESS_TOKEN
}

If the request failed for some reason, an error will be returned.

{
  "error": "invalid_grant",
  "error_description": "Authorization code does not exist: AUTHORIZATION_CODE"
}

The access_token token obtained can be used as the secret key to accept payments like discussed in Integrating Stripe in the Flask web framework.

Continue ReadingAccepting Stripe payments on behalf of a third-party

CommonsNet’s main features are ready

Main CommonsNet features are generating a file and  generating a code script. Today I would like to provide you with a simple and short guideline how I have managed to implement them.

Generate a file

Generating a file is the most important feature of our website, and it is not only a condition of its existance but also a basis to find stakeholders – in general people who want to use CommonsNet webiste.  It is the most complicated CommonsNet feature as well even if it is not so difficult as you may think.

To implement this feature a pure JavaScript is used and for now we have chosen the simplest solution to build it, mainly because we need to have a working webiste now to start a real promotion and find many customers.

Important steps here are:

  1. Manually prepare a .fodt file
  2. Get .fodt file and modify it
  3. Generate a pdf file from a ready .fodt file
  4. Write function to download a pdf file.


Preparing .fodt file

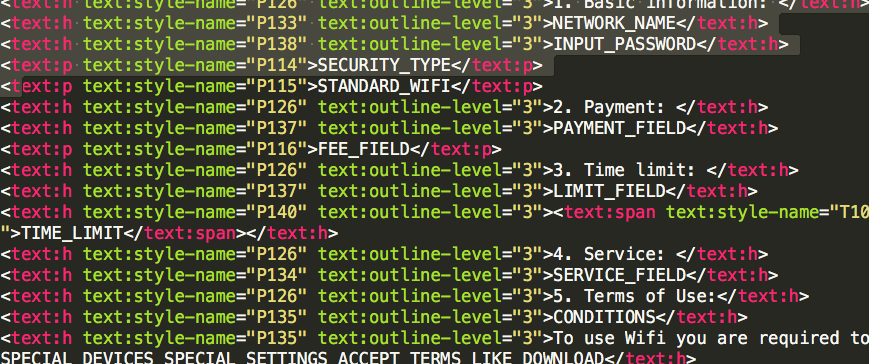
My mentor Andre Rebentisch has recommended me to use .fodt file because it’s very user-friendly and let you to prepare a file’s structure very easy. Actually that’s it! I have prepared manually in Libre Office a default doc file, and then save it in .fodt extension. .Fodt is a great option because it behaves as .xml file and let you modify this file using any programming language.

So, as I have already mentioned above I have created a simple doc file and prepare the structure. It is very clear and looks like a default Libre Office file. Only thing is that it has .fodt extension which means that you can open it in a code editior like for e.g. Sublime and start modifying easily.

If you open your .fodt file in a Sublime, it looks like this. Isn’t it simply? And above all it helps you to easily manipulate your data using for e.g a JavaScript.

Screen Shot 2016-08-13 at 17.19.06

Screen Shot 2016-08-13 at 17.18.00Get .fodt file to manipulate it

In my AngularJS Wizard Controller I write a function to get data from my .fodt file

$http({
 method: 'GET',
 url: 'http://commonsnet.herokuapp.com/generatefile.fodt',
 }).success(function(data){}) .error(function(){
 alert("error");
 });

It’s very easy code sample and you can find it in many Internet resources. I hope it is understandable to you as well. I have written a function which get a .fodt file and return data. Inside .success I have written my whole code to manipulate a .fodt file.  To use it I have decided to use a simple JavaScript replace method and if-else conditions, and in dependence on user’s inputs in a wizard form create different file’s structures. Let me show you a small section :

result = result.replace("NETWORK_NAME", "The owner provides" + " " + vm.ssid + "network connection")

if ((vm.password !== "") && (typeof vm.password !== "undefined")) {
 result = result.replace("INPUT_PASSWORD", "The owner informs that password is" + " " + vm.password);

}

Generate a pdf file from a ready .fodt file

It is still in progress! I will update it as soon as I manage to successfully implement it!

Write function to save it

To save my ready file I have used save function() and put in my AngularJS Wizard Controller.

$scope.save = function() {}

Generate a code script

We have decided to implement a generating code feature, because we want our users to be able to simply fill a wizard form with all Wifi details, then copy  a generated code  and be able to simply  paste it to their website.

We believe it is a very convenient solution to them because all they need to do it is to go through a form and it is ready. Besides, we have already decided to get rid of a database and use only a JSON file to not complicate our website’s working. So, that’s also the reason why we want to make it as simple as possible.

That’s why I have decided to create a link snd store there all wizard form’s values Undoubtedly it causes to build a very long link, but in the same time I believe that it is a good solution if we don’t use a database. I have also already found some ways to shorten and encrypt the generated link.

In my WizardController AngularJS I have write a function with a condtion

$scope.gotoStep = function(newStep) {
 currentStep = newStep;
 if ( currentStep === 3) {
 var link = "commonsnet.herokuapp.com/#/file?ssid=" + vm.ssid + "&password=" + vm.password + "&security=" + vm.securitytypes + "&standard=" + vm.wifistandards + "&payment=" + vm.paymentfieldyes + "&fee=" + vm.paymentfield + "&timelimit=" + vm.timelimityes + "&limit=" + vm.timelimitfield + "&service=" + vm.serviceyes + "&specialdevices=" + vm.specialdevices + "&devices=" + vm.specialdevicesfield + "&specialsettings=" + vm.specialsettings + "&settings=" + vm.specialsettingsfield + "&acceptterms=" + vm.acceptterms + "&liking=" + vm.socialprofile + "&downloading=" + vm.downloading + "&restrictions=" + vm.country + "&country=" + vm.countries + "&law=" + vm.legalrestrictions
 vm.code = '<a href="' + link + '">CommonsNet</a>'
 }
 }

If my currentStep === 3 (actually it’s a  confirmation.html templateUrl) I create a link (a code) which is available to users to copy and paste to their website.

Then I have also created a new FileController (FileCtrl) which is called when users enter a commonsnet.herokuapp.com/#/file (if they paste in an url a copied generated link)

app.controller('FileCtrl',['$scope', '$routeParams', function ($scope, $routeParams) { $scope.ssid = $routeParams.ssid; $scope.password = $routeParams.password; }])

Finally I have created a .html structure to post data from a wizard from which are all stored in our link. It’s a normal html structure but in order to adjust the html’s content to user’s wizard inputs I have used an Angular ng-if . A little example looks like this:

ng-if="ssid && ssid != 'undefined'

And that’s it. It still needs some improvements and fixing bugs but main features work according to my plan!!!

It’ time to intensively extend the idea of CommonsNet and find stakeholders! Are you interested too? I am sure you are, because CommonsNet is a great tool which helps us to build a transparent Wifi networks!

Feel free to write your comments and suggestion!

Continue ReadingCommonsNet’s main features are ready