sTeam API Endpoint Testing

(ˢᵒᶜⁱᵉᵗʸserver) aims to be a platform for developing collaborative applications.
sTeam server project repository: sTeam.
sTeam-REST API repository: sTeam-REST

sTeam API Endpoint Testing using Frisby

sTeam API endpoint testing is done using Frisby.  Frisby is a REST API testing framework built on node.js and Jasmine that makes testing API endpoints very easy, speedy and joyous.

Issue. Github Issue Github PR
sTeam-REST Frisby Test for login Issue-38 PR-40
sTeam-REST Frisby Tests Issue-41 PR-42

Write Tests

Frisby tests start with frisby.create with a description of the test followed by one of get, post, put, delete, or head, and ending with toss to generate the resulting jasmine spec test. Frisby has many built-in test helpers like expectStatus to easily test HTTP status codes, expectJSON to test expected JSON keys/values, and expectJSONTypes to test JSON value types, among many others.

// Registration Tests
frisby.create('Testing Registration API calls')
.post('http://steam.realss.com/scripts/rest.pike?request=register', {
email: "ajinkya007.in@gmail.com",
fullname: "Ajinkya Wavare",
group: "realss",
password: "ajinkya",
userid: "aj007"
}, {json: true})
.expectStatus(200)
.expectJSON({
"request-method": "POST",
"request": "register",
"me": restTest.testMe,
"__version": testRegistrationVersion,
"__date": testRegistrationDate
})
.toss();
The testMe, testRegistrationVersion and testRegistrationDate are the functions written in the rest_spec.js.

The frisby API endpoint tests have been written for testing the user login, accessing the user home directory, user workarea, user container, user document, user created image,  groups and subgroups.

The REST API url’s used for testing are described below. A payload consists of the user id and password.

Check if the user can login.

http://steam.realss.com/scripts/rest.pike?request=aj007

Test whether a user workarea exists or not. Here aj workarea has been created by the user.

http://steam.realss.com/scripts/rest.pike?request=aj007/aj

Test whether a user created container exists or not.

http://steam.realss.com/scripts/rest.pike?request=aj007/container

Test whether a user created document exists or not.

http://steam.realss.com/scripts/rest.pike?request=aj007/abc.pike

Test whether a user created image(object of any mime-type) inside a container exists or not.

http://steam.realss.com/scripts/rest.pike?request=aj007/container/Image.jpeg

Test whether a user created document exists or not. The group name and the subgroups can be queried.
eg. GroupName: groups, Subgroup: test.
The subgroup should be appended using “.” to the groupname.

http://steam.realss.com/scripts/rest.pike?request=groups.test

Here “groups” is a Groupname and “gsoc” is a subgroup of it.

http://ngtg.techgrind.asia/scripts/rest.pike?request=groups.gsoc

FrisbyTests

FrisbyTestCount

Unit Testing the sTeam REST API

The unit testing of the sTeam REST API is done using the karma and the jasmine test runner. The karma and the jasmine test runner are set up in the project repository.

The karma test runner : The main goal for Karma is to bring a productive testing environment to developers. The environment being one where they don’t have to set up loads of configurations, but rather a place where developers can just write the code and get instant feedback from their tests. Because getting quick feedback is what makes you productive and creative.

The jasmine test runner: Jasmine is a behavior-driven development framework for testing JavaScript code. It does not depend on any other JavaScript frameworks. It does not require a DOM. And it has a clean, obvious syntax so that you can easily write tests.

The karma and jasmine test runner were configured for the project and basic tests were ran. The angular js and angular mocks version in the local development repository was different. This had resulted into a new error been incorporated into the project repo.

Angular Unit-Testing: TypeError ‘angular.element.cleanData is not a function’

When angular and angular-mocks are not of the same version, these error occurs while running the tests. If the versions of the two javascript libraries don’t match your tests will be testing to you.

The jasmine test runner can be accessed from the browser. The karma tests can be performed from the command line. These shall be enhanced further during the course of work.

Feel free to explore the repository. Suggestions for improvements are welcomed.

Checkout the FOSSASIA Idea’s page for more information on projects supported by FOSSASIA.

Continue ReadingsTeam API Endpoint Testing

Testing Hero

Our sTeam code base had no tests written and therefore we were facing a lot of issues and were not able to merge our code easily. My next task dealt with this problem. I had to write test cases for the function calls to COAL commands. On some basic research I found out that the only testing framework available for pike is used for testing the pike interpreter itself. This includes a set of scripts. mktestsuite is one of the scripts and is responsible for generating the tests. The problem with this is that the tests should have a particular syntax and since it is used to test interpreter is assumes each line of pike code is a test. This prevented us from writing multiple line tests and also from setting up the client.

Issue:

https://github.com/societyserver/sTeam/issues/104 (Establish testing framework),

https://github.com/societyserver/sTeam/issues/107 (Add tests for create)

My first approach to the problem was to try using the scripts available to write the tests, however this didn’t turn out very well and tests written were very confusing and out of context. The lines written for setting up the client was also being counted as tests and there was no continuation that is variables defined in one line was not accessible in the next. I realized that this is not going to work out and decided to write my own testing framework. I started by writing a simple testing structure.

The framework has a central script called test.pike. This script is used to run all the test cases. This script uses the the scripts called move.pike and create.pike which are the scripts containing the actual test cases. These scripts contain various functions each of which is a test case and return 1 on passing the case and 0 on failing. test.pike, the central node, is responsible for looping through this functions and calling each of these and recording the result. The framework then outputs the total number of cases passed or failed. Again implementing this became simple as we can import pike scripts as objects and also extract the functions from them.

test
Running tests for move
test1
Running test for create (Earlier version of framework)

test.pike involved initialization for various variables. It establishes a connection to the server and initializes _Server and me, which are then passed to all the test cases. move.pike has various test cases involving moving things around. Moving user into a room, into a container or to an non existential location and moving a room inside a container. I also got my first failing test case which is moving user into a non existential location. This shouldn’t have been allowed but is not throwing any error and incorrectly writes the trail.

create.pike involved cases creating various kinds of objects and also attempting to create objects for classes that do not exist. As I went along writing these cases I also kept improving the central test.pike. I added the code for creation of a special room for testing while initializing and also clearing this room before destroying the object and exiting.

Solution:

 https://github.com/societyserver/sTeam/pull/105 (Establish testing framework),

https://github.com/societyserver/sTeam/pull/108 (Add tests for create)

Continue ReadingTesting Hero

Getting fired up with Firebase Database

As you might’ve noticed, in my Open Event Android Project, we are asking the user to enter his/her details and then using these details at the backend for generating the app according to his/her needs.

One thing to wonder is how did we transmit the details from webpage to the server.

Well, this is where Firebase comes to the rescue one more time!

If you’ve read my previous post on Firebase Storage, you might have started to appreciate what an awesometastic service Firebase is.

So without any further adieu, lets get started with this.

Step 1 :

Add your project to Firebase from the console.

 newProj
Click on the Blue button

Step 2 :

Add Firebase to your webapp

Open the project, you’ve just created and click on the bright red button that says, “ Add Firebase to your web app”

 addFirebase

Copy the contents from here and paste it after your HTML code.

Step 3 :

Next up, navigate to the Database section in your console and move to the Rules tab.

 screenshot-area-2016-07-18-204133.png

For now, let us edit the rules to allow anyone to read and write to the database.

 screenshot-area-2016-07-18-204437

Almost all set up now.

Step 4 :

Modify the HTML to allow entering data by the user

This looks something like this :

<form name="htmlform" id="form" enctype="multipart/form-data">
<p align="center"><b><big>FOSSASIA's App Generator</big></b></p>
<table align="center"
width = "900px"
height="200px">
<tr>
<td valign="top">
<label for="Email">Email</label>
</td>
<td valign="top">
<input id="email" type="email" name="Email" size="30">
</td>
<td>
<td valign="top">
<label for="name">App's Name</label>
</td>&nbsp;
<td valign="top">
<input id="appName" type="text" name="App_Name" maxlength="50" size="30">
</td>&nbsp;
</tr>
<tr>
<td valign="top">
<label for="link">Api Link</label>
</td>
<td valign="top">
<input id="apiLink" type="url" name="Api_Link" maxlength="90" size="30">
</td>
</tr>
<tr>
<td valign="top">
<label for="sessions">Zip containing .json files</label>
</td>
<td valign="top">
<input accept=".zip" type="file" id="uploadZip" name="sessions">
</td>
</tr>
<tr>
<td colspan="5" style="text-align:center">
<button type="submit">Generate and Download app</button>
</td>
</tr>
</table>
</form>
view raw index.html hosted with ❤ by GitHub

Now let us setup our javascript to extract this data and store this in Firebase Database.

<script src="https://www.gstatic.com/firebasejs/live/3.0/firebase.js"></script>
<script src="https://code.jquery.com/jquery-1.10.2.js"></script>
<script src="https://code.jquery.com/ui/1.11.2/jquery-ui.js"></script>
<script>
var $ = jQuery;
var timestamp = Number(new Date()); //this will server as a unique ID for each user
var form = document.querySelector("form");
var config = {
apiKey: "API_KEY",
authDomain: "app-id.firebaseapp.com",
databaseURL: "https://app-id.firebaseio.com",
storageBucket: "app-id.appspot.com",
};
firebase.initializeApp(config);
var database = firebase.database();
form.addEventListener("submit", function(event) {
event.preventDefault();
var ary = $(form).serializeArray();
var obj = {};
for (var a = 0; a < ary.length; a++) obj[ary[a].name] = ary[a].value;
console.log("JSON",obj);
var file_data = $('#uploadZip').prop('files')[0];
var storageRef = firebase.storage().ref(timestamp.toString());
storageRef.put(file_data);
var form_data = new FormData();
form_data.append('file', file_data);
firebase.database().ref('users/' + timestamp).set(obj);
database.ref('users/' + timestamp).once('value').then(function(snapshot) {
console.log("Received value",snapshot.val());
)};
});
</script>
view raw script.js hosted with ❤ by GitHub

We are almost finished with uploading the data to the database.

Enter data inside the fields and press submit.

If everything went well, you will be able to see the newly entered data inside your database.

screenshot-area-2016-07-18-205651.png

Now on to retrieving this data on the server.

Our backend runs on a python script, so we have a library known as python-firebase which helps us easily fetch the data stored in the Firebase database.

The code for it goes like this

firebase = firebase.FirebaseApplication('https://app-id.firebaseio.com', None)
result = firebase.get('/users', str(arg))
jsonData = json.dumps(result)
email = json.dumps(result['Email'])
email = email.replace('"', '')
app_name = json.dumps(result['App_Name'])
app_name = app_name.replace('"', '')
print app_name
print email
view raw firebase.py hosted with ❤ by GitHub

The data will be returned in JSON format, so you can manipulate and store it as you wish.

Well, that’s it!

You now know how to store and retrieve data to and from Firebase.
It makes the work a lot simpler as there is no Database schema or tables that need to be defined, firebase handles this on its own.

I hope that you found this tutorial helpful, and if you have any doubts regarding this feel free to comment down below, I would love to help you out.

Cheers.

Continue ReadingGetting fired up with Firebase Database

What is sTeam

Whenever I tell someone that I am working for Fossasia under Google Summer of Code, I am asked to explain what my project is all about. Here I give a detailed introduction to sTeam and explain what it actually is.

kopfleiste_big

Well some of you must of heard of MUDs (Multi User Dungeon) sTeam is based on this concept. For those who don’t know what MUDs are I will provide a brief introduction. MUDs are text based games. These games create a kind of real-time virtual world. These games are based on role playing and the user acts like one of the organisms of the virtual world. He can do whatever the organisms could have done in a real world. For example if I represent a man in a virtual world, I can do whatever a man can do, things like walk, talk, eat and stuff. This way the user interacts with his virtual environment.

This whole concept is taken to create a virtual office space. Just like MUDs sTeam creates virtual office space. Now how can we imagine an office? Well it will have rooms each room will have containers with different kinds of files, there will be people moving around working or having meetings. Well all this is possible in sTeam virtually. The user is also carrying a rucksack and can copy objects into this as he moves around. This is what sTeam is.

Steam provides two interfaces web and command line. The web interface can be accessed at http://societyserver.org/ and the code is put up at https://github.com/societyserver/sTeam.

logo-200

More of similar projects are available under Fossasia. Check this site for more details http://labs.fossasia.org/ideas.html.

Continue ReadingWhat is sTeam

DesignaKnit

I started a conversation on strickforum.de and was inspired to take a closer look at DesignaKnit 8.

A free Demo version of DesignaKnit is available which cannot save changes to patterns or shapes and cannot connect to a knitting machine. Otherwise all functionality is available.

DesignaKnit contains:

  • an editor for color patterns
  • an editor for shapes or sewing patterns
  • a shape library
  • a tool for converting images to patterns
  • interactive knitting

Patterns can be applied to shapes.

I did not look very closely at the editors because I do not know much about pattern generation, especially shape or sewing patterns. And the editor for the color patterns did not work for me.

Interactive Knitting:
I took a look at some of the features available in the interactive knitting. There are some interesting features we would also like to implement.

I was not able to take in all the functions available. I could not connect it to a machine and I am still a beginner with knitting machines, which is why I am probably missing some features which make life easier.

The interactive knitting support has several views:

  • overview of knit piece which also shows the position of the carriage
  • view for next row to be knit, some rows around for context
  • view for yarn colors in use and visualization that shows which yarn is currently in the carriage and being knit
  • view for instructions to the human, which also contains
    • row counter as it should be on the machine
    • counter for row in the piece being knit
    • counter for row in pattern
    • information on start and stop needle on machine

DesignaKnit

DesignaKnit can be configured to play sounds when an action, like decreasing the number of meshes, needs to be taken. Voice cuing is also possible. Furthermore, the view for the instructions for the human can flash yellow and displays what step needs to be completed by the human next. In the image above the number of meshes should be decreased by 6 on the right side.

Ideas for our interactive knitting support:
The idea of extra audio and visual cuing is very interesting and we are considering also having this option in our interface. We are not yet sure how we will organize all the information, but the information we will show to the user will be similar to what is shown in DesignaKnit.

The interface for DesignaKnit serves its purpose well. However, we think we can create something that is a little more appealing to the eye.
To keep our Design of the user interface clean and simple we are designing for mobile devices first.


Continue ReadingDesignaKnit

Generating Documentation and Modifying the sTeam-REST API

(ˢᵒᶜⁱᵉᵗʸserver) aims to be a platform for developing collaborative applications.
sTeam server project repository: sTeam.
sTeam-REST API repository: sTeam-REST

Documentation

Documentation is an important part of software engineering. Types of documentation include:

  1. Requirements – Statements that identify attributes, capabilities, characteristics, or qualities of a system. This is the foundation for what will be or has been implemented.
  2. Architecture/Design – Overview of software. Includes relations to an environment and construction principles to be used in design of software components.
  3. Technical – Documentation of code, algorithms, interfaces, and APIs.
  4. End user – Manuals for the end-user, system administrators and support staff.
  5. Marketing – How to market the product and analysis of the market demand.

Doxygen

Doxygen is the de facto standard tool for generating documentation from annotated C++ sources, but it also supports other popular programming languages such as C, Objective-C, C#, PHP, Java, Python, IDL (Corba, Microsoft, and UNO/OpenOffice flavors), Fortran, VHDL, Tcl, and to some extent D.
The Doxygen treats files of other languages as C/C++ and creates documentation for it accordingly.
sTeam documentation was tried to be created with the doxygen. But empty documentation was created due to the lack of the doxygen annotations used in the project.
 Doxygen doc generation.
DoxyGenTerminal
Doxygen Docs
DoxyDoc
The next way to create documentation was to make use of the autodoc utility provided by the Pike. The utility to generate docs was provided in the later versions of the Pike(>=8.0.155).
The autodoc files are generated and  later these are converted into  html pages. The commands used for generating the autodoc include:-
pike -x extract_autodoc /source
pike -x autodoc_to_html /src /opfile
The autodoc_to_html utility converts a single autodoc file to an html page. As a result a shell script was written to convert all the generated autodoc files to the html file.
docGenerator.sh
#!/bin/bash  

shopt -s globstar  
for filename in ./**/*.pike.xml; do  
    outputFile=doc/${filename#./}  
    outputFile=${outputFile%.xml}."html"  
    if [ -d $(dirname "./"$outputFile) ]; then  
      touch "./"$outputFile  
    else  
      mkdir -p $(dirname "./"$outputFile) && touch "./"$outputFile  
    fi  
    pike -x autodoc_to_html $filename "./"$outputFile  
done  

Autodoc Documentation
AutoDocThe documentation generated by this was less informative and lacked the referrals to other classes and headers. The societyserver project was developed long back but the autodoc utility was introduced in the later versions of pike. As a result the source files lacked the autodoc tags which are required to generate a well informative documentation with bindings to other files.

Restructuring the sTeam-REST API

The sTeam-REST API project made use of the angular-seed to initiate the development during the early phases. However these files still existed in the project. This had lead to a pandemonium and created difficulty in understanding the project. The files had to be removed and the app was in dire need of a restructuring. The following issues have been reported and resolved.

Issue. Github Issue Github PR
sTeam-REST Issues Issues PR

The new UI can be seen below.

Home

Home

Register

Register

About

About

Testing the REST API

The functionality to run the tests using the npm test command was added to the project. Now the user can run the tests using these commands instead of the traditional approach of running the tests using jasmine-node and specifying the test directory. The domain name of the urls to which the request was sent was changed. The e2e tests and frisby tests were conducted successfully.

e2e Tests.

e2eTests

Frisby Tests

NPM tests

The next step would be to do add more tests for the REST API.

Feel free to explore the repository. Suggestions for improvements are welcomed.

Checkout the FOSSASIA Idea’s page for more information on projects supported by FOSSASIA.

Continue ReadingGenerating Documentation and Modifying the sTeam-REST API

How can you get an access to Instagram API?

unnamed.png

First of all you need to know that Instagram API uses OAuth 2.0 protocol. OAuth 2.0 provides a specific authorization flow for web apps, desktop apps and mobile apps. Instagram requires authentication before getting information from their API, but don’t be afraid it’s very simple.

Pre Requirements:

  • Created account in Instagram
  • Registered Client(You can create your own client here)

Instagram Developer Documentation.png

Requirements:

CLIENT_ID -79e1a142dbeabd57a3308c52ad43e31d
CLIENT_SECRET -34a6834081c44c20bd11e0a112a6adg1
REDIRECT_URI - http://127.0.0.1:8001/iCallback

You can get above information from https://www.instagram.com/developer/clients/manage/

CODE - You need to open page https://api.instagram.com/oauth/authorize/?client_id=CLIENT-ID&redirect_uri=REDIRECT-URI&response_type=code
https://api.instagram.com/oauth/authorize/?client_id=79e1a142dbeabd57a3308c52ad43e31d&redirect_uri=http://127.0.0.1:8001/iCallback&response_type=code

You will be redirected to

http://your-redirect-uri?code=CODE

In my case it looks like this:

http://127.0.0.1:8001/iCallback?code=2e122f3d76e8125b8b4982f16ed623c2

Now we have all information to get access token!

 curl -F 'client_id=CLIENT_ID'  
      -F 'client_secret=CLIENT_SECRET' 
      -F 'grant_type=authorization_code'  
      -F 'redirect_uri=REDIRECT_URI' 
      -F 'code=CODE'  https://api.instagram.com/oauth/access_token

if everything is ok you should receive

 { "access_token": "fb2e77d.47a0479900504cb3ab4a1f626d174d2d",
   "user": { "id": "1574083",
   "username": "rafal_kowalski",
   "full_name": "Rafal Kowalski",
   "profile_picture": "..." } } 

In Open Event we used it to get all media from instagram – to use it  as for example a background in an event details’ page

curl 'https://api.instagram.com/v1/users/self/media/recent/?access_token=ACCESS_TOKEN'


Continue ReadingHow can you get an access to Instagram API?

What is CommonsNet?

It is already a few posts of Commons Net but I suppose you may wonder what CommonsNet is and what can it do for you. I think that it’ s the highest time to talk about CommonsNet. Let me explain it step by step.

CommonsNet is an open source project of FOSSASIA . FOSSASIA has participated for several years as a mentor organization in Google Summer of Code, and  CommonsNet is being developed as this year project.

This is how FOSSASIA sees CommonsNet:

CommonsNet

Develop Website for Standardized Open Networks Agreement similar to Creative Commons

Creative Commons is a wonderful example how standardized processes can enable millions of people to share freely. What about sharing your Internet connection? Across the world there are different legal settings and requirements for sharing of Internet connections and specifically Open Wifi connections. The Picopeering Agreement already offered a basis for completely free and open sharing: http://www.picopeer.net/

However, in many settings people cannot enable unrestricted level of sharing, e.g. if you share Internet in your office, you might need to reserve a certain bandwidth for you and restrict the bandwidth of users.

We need a website, that reflects these details and makes it transparent to the user. Just like at Creative Commons the site should generate a) a human readable file and b) a machine readable file of the level of sharing that is offered by someone. Examples are, that networks are completely free (all ports are open, all services are enabled, bandwidth is unrestricted) compared to networks with restrictions e.g. no torrent sharing, limited bandwidth and an accepted user agreement that is required.

This is how it actually looks, and is being developed on CommonsNet website

We decided to create a simple and user-friendly wizard form to let our users provide their wifi details in a convient way. We divided these different kind of wifi information into four different section like wireless settings – the most basic wifi information like ssid, password, authentication, speed and standard. Then we’ve decided that payment and time limit are also really important part of sharing wireless connection, so we enable our users to mention these details as well.

CommonsNet-wizard 1

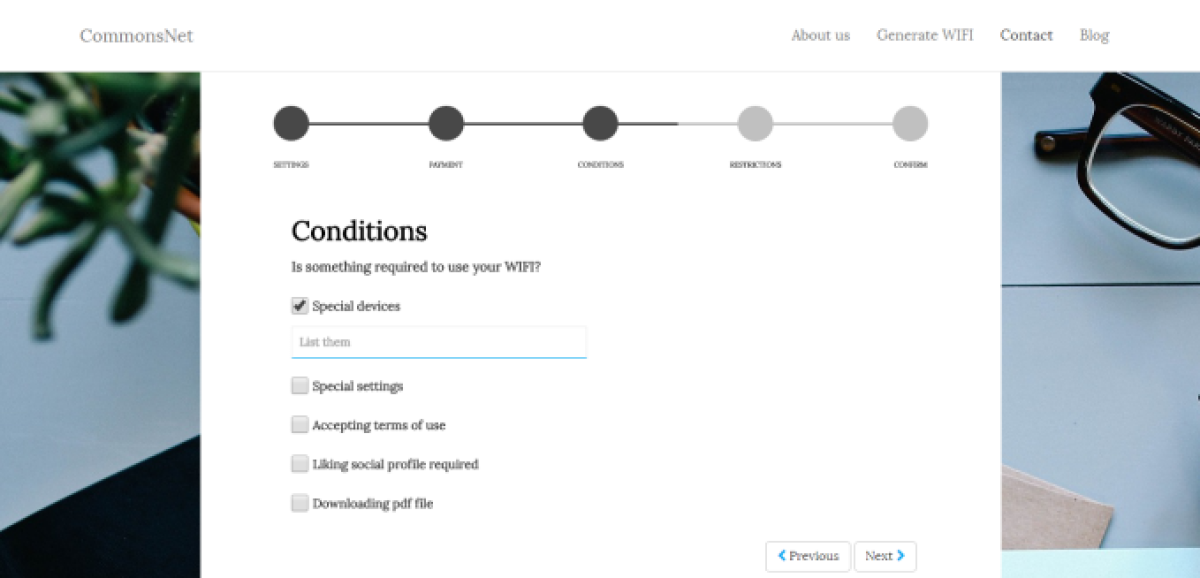
Then, you can provide your wireless connection usage’s conditions.

CommonsNet wizard3

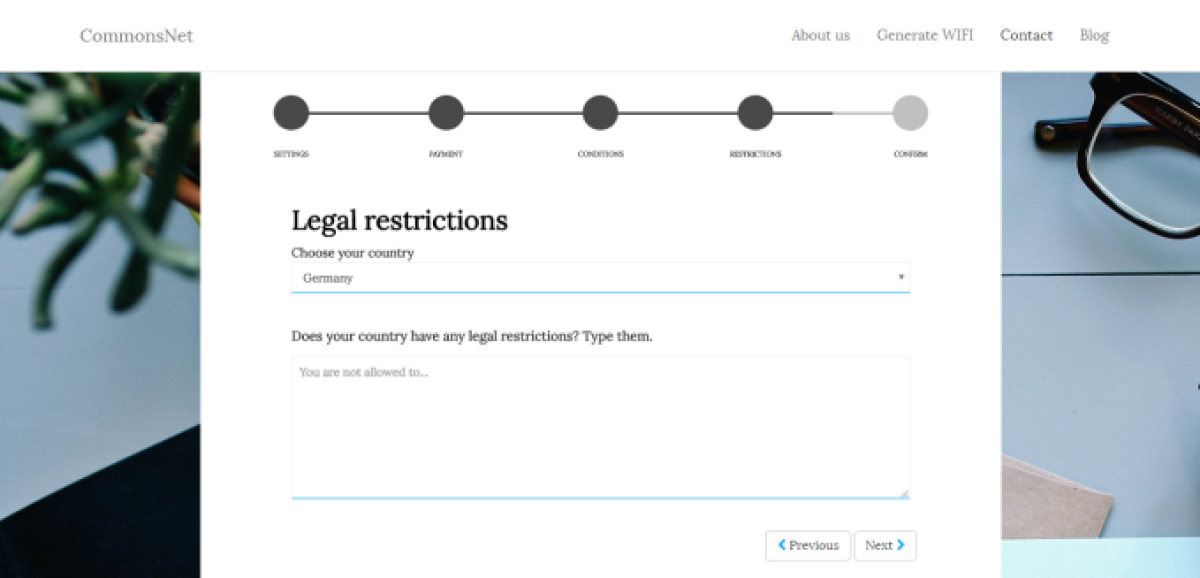
And finally we’ve put a section legal restrictions which is one of the most important part of using wireless connection and Internet resources and what vary over the world due to different legal systems.

For now our users are obliged to type legal restrictions on their own, but we are working hard on making it simpler for everyone by creating legal restrictions’ data base, which will let you simply choose your own country and the legal details will be provided and put into wizard form automatically thanks to collected resources.

CommonsNet wizard 4

And as you successfully finish filling form, you will be able to generate your pdf file or code to your website in order to share a transparent wireless connection with your users. It is so simple, but makes our world more transparent and trustworthy.

Feel free to visit us and test it https://commonsnet.herokuapp.com/

Don’t forget to join us on our social media profile where you can be up to date with our amazing work, and updates.

Continue ReadingWhat is CommonsNet?

Implementing multiselect dropdown


select2 is one of the nicest jQuery libraries available for web site development. It gives the web developer a lot of power in creating select boxes.

In this post I would like to discuss how to implement a multiselect dropdown in PHP using select2

When we need to select multiple options from a list of many options. Multi checkbox will also work, but the UI of it will not be as neat as multiselect dropdown.

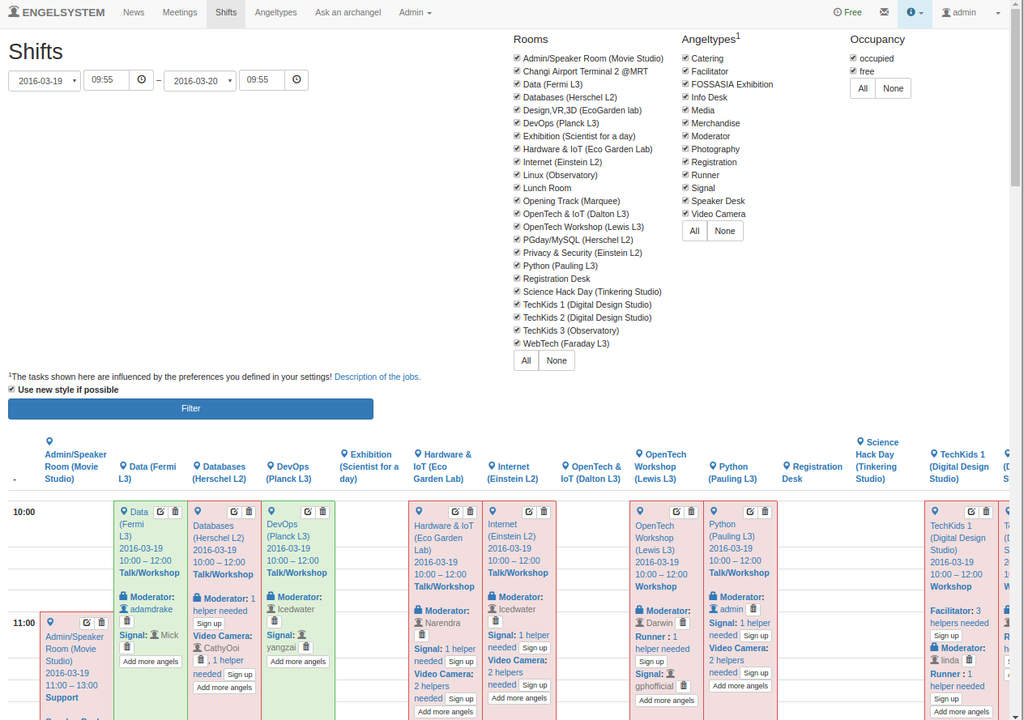
Initial UI of shifts page
227d62ea-2bf5-11e6-8159-7bfe52680de0

In the above image. We can see all the rooms. It becomes tough for the user to select and go through each one of them and the UI also looks clumsy. After implementing multi select dropdown UI looks like the below image.

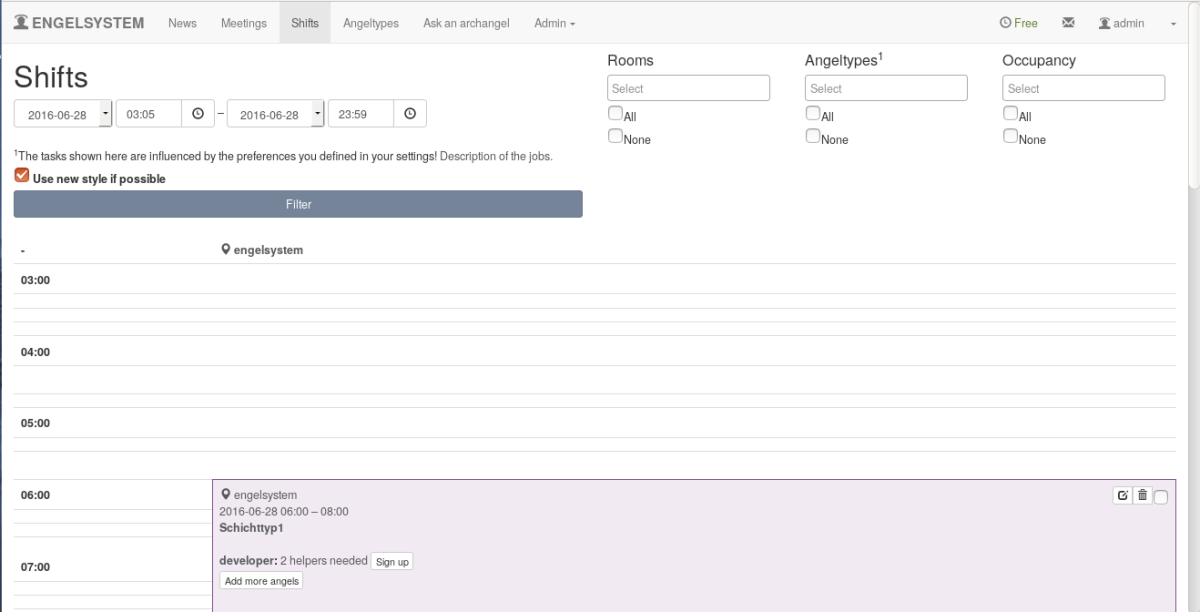
After implementing multiselect dropdown UI looks likes this.

5ea7d648-3d15-11e6-9901-3341dbc49a91

Once we select rooms/Angel type/Occupancy. The list of options will be visible as a drop-down.

Implementation

Library used for implementing multiselect dropdown is select2 we can download the select2 Library from here Download

CODE

Cdn links for js and css files should be added

<link href="https://cdnjs.cloudflare.com/ajax/libs/select2/4.0.3/css/select2.min.css" rel="stylesheet"/>
<script src="https://cdnjs.cloudflare.com/ajax/libs/select2/4.0.3/js/select2.min.js"></script>

We need to call this function whenever we need to implement a multi select drop containing the $items in its list.

// $items = items for multiselect dropdown

function multiple_select($items, $selected, $name, $title = null){ 
  $html_items = array();
  if (isset($title))
      $html .= '<h4>' . $title . '</h4>' . "\n";
  // assigning the items to multiple
  $html .= '<select multiple id="selection_' . $name . '"  class="selection ' . $name . '" style="width:200px">';

  foreach ($items as $i)
    $html_items[] = '<option  value="' . $i['id'] . '"' . '>' . $i['name'] . '</option>';
  $html .= implode("\n", $html_items);
  $html .= '</select>';
  $html .= '<input type="checkbox" id="checkboxall_' . $name . '"  >All' . '<br>';
  $html .= '<input type="checkbox" id="checkboxnone_' . $name . '"  >None';
  // javascript for multiselect
  $html .= '$("#' . "selection_" . $name . '").select2({
  placeholder: "Select",
    });
  });
  ';
    return $html;
}

Englesystem

Development: https://github.com/fossasia/engelsystem

Issues/Bugs: Issues


Continue ReadingImplementing multiselect dropdown

Re-login in debug.pike

I will first talk about what is debug.pike and then explain my task and then the solution.

Debug.pike gives the user a pike prompt with all the constants from the sTeam client. It is like a self programmable pike client for the sTeam server. All the client side variable are available using which the user can write pike code to interact with the sTeam server. Steam-shell was built on top of this and has functions that perform common actions using these variables.

My task was to build a function to allow re-login as different users. I had worked with the code for connection to the sever and the login part while working on my second task. My second task was to implement TLS and thus I was familiar with the functions available and how COAL was working.

Implementing TLS: https://github.com/societyserver/sTeam/issues/47

First I tried the code for my function on the prompt of debug.pike itself. My plan of action was to logout the current user and restart the connection. However the logout function gave me a lot of troubles. On logging out I was losing the connection to the server and was not able to establish it back even with the connect_server() function, which establishes a connection between the server and the client. Breaking up the problem I devised a solution for the problem without logging out, that is, calling the login again without logging out.

After calling the function login() when I was unable to get any results I realized that I will have to reset all the variable values that get set during the first login. I moved all the variable initializations to init and called this function after login and the problem was solved. The temporary solution was working fine. I also realized that the logout function was giving me troubles because I was not re-initializing all the variables. So now I was also able to logout and my solution was complete.

My next task was to improve the code. The initialization and the login part of the code was repeated throughout several files with minor changes. I had to bring out the common part put it in a separate file and then inherit. The files I changed were:

  • steam-shell.pike
  • debug.pike
  • edit.pike

I shifted all the uncommon parts to the main of the respective files and then included the common file called client.pike

Issue: https://github.com/societyserver/sTeam/issues/91

Solution: https://github.com/societyserver/sTeam/pull/92

Now again after this I went back to my previous task and standardized the init function as I had changed it a lot and this would have given a merge conflict later.

Issue: https://github.com/societyserver/sTeam/issues/87

Solution: https://github.com/societyserver/sTeam/pull/89

Continue ReadingRe-login in debug.pike