Enhancement of steam-shell plugin and Import from git

(ˢᵒᶜⁱᵉᵗʸserver) aims to be a platform for developing collaborative applications.
sTeam server project repository: sTeam.

Indentation of output made independent of the screen-width.

There were errors encountered in the pull request. These needed to be modified. The notable one’s were the Indentation of the output displayed by the look command in the steam-shell. The earlier display was taken into consideration that the default size of the linux terminal is 80 char long. However this can differ from individual to individual terminal settings. Therefore the module reference of pike was studied and a method to display the contents in the output of ls command format was written down. Thus,  now the output is independent of the screen width of an individual.

Issue. Github Issue Github PR
Indentation of output in steal-shell. Issue-24 PR-42

Indentation

Also there were minor errors in the edit.pike script. These were resolved too. The edit.pike was not able to exit the program. Therefore an exit(0) call was made. This resulted in the edit.pike being able to exit successfully but a new error was introduced in the steam-shell.pike. When the edit.pike command was called inside it, the steam-shell.pike would exit on successfully completing the edit command. The steam-shell should not exit in this case. There were changes made in the VisTeam.pike, edit.pike and applauncher.pike in order to get the utility working correctly.

Issue. Github Issue Github PR
Edit.pike hangs on closing Issue-29 PR-44
Edit command closes the steam-shell abruptly Issue-43 PR-44

The steam-shell vim plugin was modified and the support for multi line commands was added. Now the user can type the commands in multipe lines, format them and then execute them. The output will be displayed in a new tab.

Issue. Github Issue Github PR
Integrate sTeam-shell into Vi. Issue-37 PR-41

An example of it can be seen below:-

ListGates
Output:

OutputMult

The import-from-git.pike script is used to import contents from a normal git repository into the steam directory. The import from git script was studied and understood initially. The issue’s listed were replicated in the system and a possible solution for them was found out.

The script has support for importing multiple documents at the same time. Also the objects imported supported only text mime type. The script was modified to support other mime types by initially detecting them through an external process. However later in the server/factories/Document_factory.pike file the auto detecting of mime type was found out and used in the code. Now the mime types are detected and updated successfully for documents of other mime types like MP3, jpg, png etc

Issue. Github Issue Github PR
Auto-detect Mime type. Issue-18 PR-45

ImportMimeType

The contents of objects of types other than text mime type were not been read by the existing process. As a result this resulted into creation of empty objects with the set mime type. The process to read the contents was modified and the contents of objects of other types were set accordingly. The content is read in the form of a string. Since every object can be read as a string.

However in the import-from-git an issue was encountered. Indexing over Null value with set_contents for every object created by the script. On running the script again the earlier object is successfully imported but the same error is encountered over the next object to be imported. This issue would be looked down and tried to be solved. Also support for importing single objects will be provided.

Error1


Checkout the FOSSASIA Idea’s page for more information on projects supported by FOSSASIA.

Continue ReadingEnhancement of steam-shell plugin and Import from git

79 issues done in one week!

Have you ever wondered how to achieve such a result?

Screen Shot 2016-05-31 at 12.09.51I couldn’t believe that we’ve solved such many issues in Milestone 2. The 79 is 34% of all issues, isn’t it amazing? I think that defining what kind of project do we want to develop and what features should it have allows us to move quickly and cooperate with the whole team very effectively.

What you need to achieve similar score?

First of all, you need to prepare good document which help a whole team to get familiar with the project and its features. The most important part is to describe very precisely step by step a project flow, and features required to implement. It can help us to avoid obstacles, tie-ups and questions related to flow, because every developer is able to go through the document and find a desired answer.

Secondly, you need to define a target what are we going to achieve and when. Based on this info developers can define plan of work easily. We have divided 3 month period into 15 milestones. In each end of milestone we talk what we have achieved, what has been done, what hasn’t been done and what are we going to do in next week.

Daily, also works well in our team, because we are able to monitor what is currently happening in project. And you can quickly help if someone has a problem.

Flow of solving issues is very simple(Justin configured a CI). We have two branches – master and testing. Writing tests is essential to do before writing code. If tests are ready and passed successfully we can create a pull request. Then other developers review our code and finally if everything is ok we can merge changes with testing branch.

Continue Reading79 issues done in one week!

One step at a time – The beginnings of CommonsNet

The beginnings

If you have been accepted to a serious project like Google Summer of Code is, you can feel lost and scared. I think it’s nothing special and probably everyone experiences it. You can feel that pressure because you want to fulfill all expectations, follow your obligations and to do your best, but working in such project is something different from working on your own, private and small one.  Your organisation and mentors require something from you, and they can even provide you with a detailed guideline how to behave but doubts may occur anyway.

My advice is not to give up and go through that tought period in order to experience the joy of results and sense of satisfaction, and to learn something to be better in the future. I am going to tell about my beginnings and to provide you with some tips  from my own experience

CommonsNet

CommonsNet (feel free to see it) is a new project of FOSSASIA. It focuses on providing users with transparent information about WiFi they may use in public places like hotels, restaurants, stations. The thing is that for now, if you go to a new place, and want to connect to Internet, you look for a free WIFI sign and as soon as you find it you try to connect. But think about it, how much do you know about this connection? Is is safe for your private data? How fast is it? Does the Internet connection have any legal restrictions?  I suppose that you answer ‘no’ to all these questions. But what if you know? Or if you can compare details of different WIFI available in a specific public place and connect to more suitable for your needs. I am sure you will appreciate it. I hope to run this project successfully and I am going to tell you more about it in next posts.

How to start?

Due to the fact that CommonsNet is a new project as I have mentioned before, and for now apart from mentor @agonarch and FOSSASIA leaders @mariobehling @hpdang, I am an only contributor, I am in a good position to tell you what are my steps. Remember not to think about all at once. It will make you crazy.

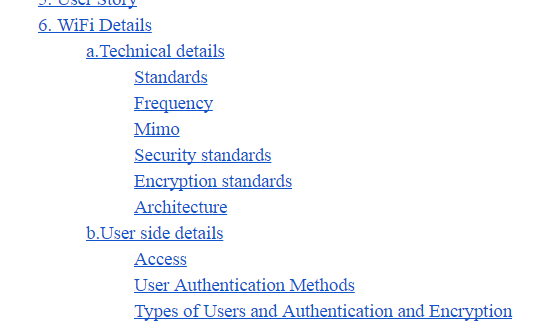
So first of all – prepare your work. Try to get to know about your project as much as possible. Follow group chat, GitHub repositories, do research in Internet about the subject of area of your project or don’t be afraid to ask your team member. That’s what I have done at first. I have prepared a Google Doc about all WiFi details. I  have tried to get to know as much as possible and to gather this information in a clear, easy-to-understand way.

project details

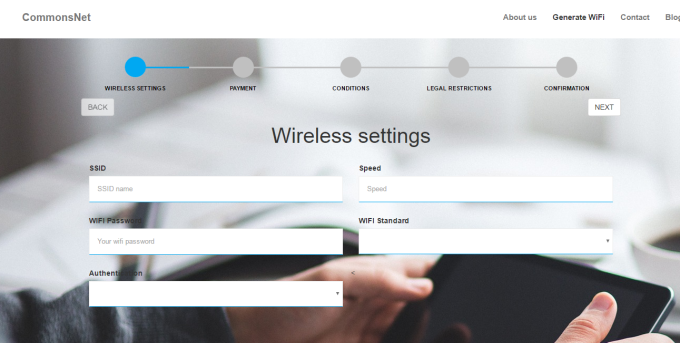
I need it because I will be preparing a wizard form for users to let them provide all important details about their WiFi. I need to think seriously which data are important and have to be used to do it. It is not finished yet and will be changing (yes, I am going to share it with you and update you about changes!) but for now I want you to follow my view about it, how am I going to use the gathered information. wizard-ui

Next step is to prepare user stories. I think it’s a crucial point before you start to implement your project. I think there is no point of developing something until you think who will your user be. You need to imagine him/her and try to predict what he or she may expect from your app. Remeber – even if app is well coded it’s useless until somebody wants to use it. You can find many tutorials how to write a good user story in Internet. Just type ‘user stories’ in Google search. Some of them are here;

http://www.romanpichler.com/blog/10-tips-writing-good-user-stories/

https://www.mountaingoatsoftware.com/agile/user-stories

You can also see my user stories created for CommonsNet .

Furthermore, I have prepared a mockups to visualize my ideas. I think it’s also an important part of running your project. It will help you to express and concretize your ideas and let the whole team discuss about it. And there is no doubt that it’s easier to change a simple draft of mockups than coded views. You can see my mockups here: CommonsNet MockupsScreen Shot 2016-06-23 at 12.38.20

As soon as you finish all these activities is a high time to start creating issues on GitHub. Yes, of course, you probably have already started, so have I, but I am talking about further issues which help you to take control over your progress and work, discuss on specific subject and share it with other.

Lost on GitHub?

Is is possible at all? I suppose we all know and use GitHub. It’s a perfect place of working to all programmers. Its possibilities seems to be unlimited. But maybe some of you experience the difficulties which I have experienced at first, because just like me you have used GitHub so far only for your private aims and simply just pushed code and have not worried about creating issues, following discussions and  organizing your work step by step . Let me to explain you why and how to follow GitHub flow.

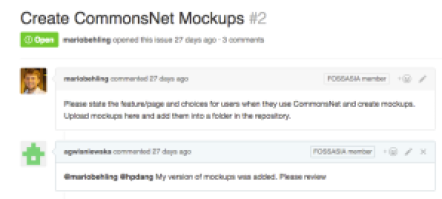
GitHub issues let you and your team take control over your work. It’s really important to create bigger, let’s say main issues, and then subissues, which help you to divide your work into small parts. Remember – only one step at a time! Using my mockups first I have created some issues which present main tasks like ‘deploying app to Heroku’ or different pages in my app like ‘Home’, ‘About us’. And then I have created many smaller issues – subissues to present what tasks I have to do in each section like ‘Home’ -> ‘Impementing top menu’, ‘Implementing footer’, ‘Implementing big button’. It helps me to control where I am, what have been done, and what do I need to do next. And I think the smaller the tasks are, the more fruitful the discussion and work can be, because you can simply refine each detail. Please feel free to see CommonsNet issues. It’s not finished yet, and while working I am going to add further issues but it presents the main idea I am talking about.

Screen Shot 2016-06-23 at 12.57.48.png

I hope these tips help you to run your work and to go through harder time – easier. And remember even the longest journey starts from the first step!

Please follow CommonsNet webiste https://commonsnet.herokuapp.com/ to be updated about progress, latest news and tips how to resolve programming problems you may experience.

Feel free to follow us on social media Facebook https://web.facebook.com/CommonsNetApp/  Twitter https://twitter.com/Commons_Net

Continue ReadingOne step at a time – The beginnings of CommonsNet

Integrate sTeam-shell into Vi and Indentation of output

(ˢᵒᶜⁱᵉᵗʸserver) aims to be a platform for developing collaborative applications.
sTeam server project repository: sTeam.

Indentation of sTeam-shell output

The Indentation of the output in the look command in steam-shell is formatted to be displayed in the way the output is displayed when the ls command is executed in a terminal window.

The module reference provided by the pike language is used for formatting.
The pike reference module can be found at Pike Ref module

The screen-width of the the user is calculated using the command tput rows.
This value is then passed as an argument to the write function to display it in the form of output of an ls command.
The example of this can be seen in the modref by Pike.

Issue. Github Issue Github PR
Indentation of output in steal-shell. Issue-24 PR-42

Example:

write("%-$*s\n", screen_width,"Given a\nlist of\nslosh-n\nseparated\n'words',\nthis option\n"+ "creates a\ntable out\nof them\nthe number of\ncolumns\n"+"be forced\nby specifying a\npresision.\nThe most obvious\n"+"use is for\nformatted\nls output.");

Output:

 Given a          list of          slosh-n
 separated        'words',         this option
 creates a        table out        of them
 the number of    columns          be forced
 by specifying a  precision.       The most obvious
 use is for       formatted        ls output.

The following changes have been made in order to incorporate the changes:

IndentationCodeChange

Integration of sTeam-shell into Vi

For integration of sTeam-shell.pike into the Vi, the steam-shell is made compatible to be run when a command is passed as an argument to it. The changes have been made in steam-shell.pike and the applauncher.pike. Also a new file called as VisTeam.pike is created. When this is executed it validates the user and opens two vi buffers. One for typing the command and the other to display the log/ output of the executed command.

A steam-shell.vim vi plugin is created so as to be able to run the Steam function in vi. Whenever this function is executed the selected text in the vi visual mode will be executed.

The results are displayed in the log buffer in a new tab. Since the already existing vim scripts Goldenratio.vim and watchforchanges.vim divide the command buffer and the log buffer in the ration 2:1, the output is not visible in the logs. Thus a newtab consisting of the logs is opened.

Issue. Github Issue Github PR
Integrate sTeam-shell into Vi. Issue-37 PR-41

InsertIntoVIExecute the command:

ExecuteCommandsTeam

Display the output:

DisplayTheOutput

Checkout the FOSSASIA Idea’s page for more information on projects supported by FOSSASIA.

Continue ReadingIntegrate sTeam-shell into Vi and Indentation of output

Updates on FOSSASIA Activities – GSoC, Science Hack and Meshcon

FOSSASIA Participation in Google Summer of Code

An exciting summer is behind us, where we had lots of students coding on summer of code projects. Check out some of the outcome on our project repositories. For example the Open Event project, our twitter harvester and search engine loklak.net [repo] or the activities at our FashionTec knitapps project with lots of interesting blog articles.

FOSSASIA Science Hack

What else happened? FOSSASIA’s Hong Phuc is working on organizing Science Hack events across Asia in cooperation with Science Hack Day. She is now an official Ambassador. Congratulations! You can meet her in the US at the San Francisco Science Hack Day on October 24-25, 2015 at GitHub HQ.

FOSSASIA Participants Present at Meshcon @Maker Faire Berlin + Free Tickets

FOSSASIA participants are present at Meshcon@Maker Faire Berlin on Saturday, October 3rd. Meshcon brings together Mozilla’s Firefox Open Web makers, IoT experts, industry representatives, fashion designers, local producers, knitters, textile manipulators, software developers and DIY hardware makers. We will have a stand in the club area. So if you are there, please come over and talk to us.

And, if you are in Berlin and still need a ticket, we might be able to help you out. FOSSASIA is an official partner and we got free tickets. Please go to http://meshcon.net, choose your ticket and enter the code FLDUXH on the next page.

The event starts at 10am (until 6pm) on Sat. 3rd Oct. 2015 at Postbahnhof Club at Berlin Ostbahnhof. On top of topics around Fashion and technology, we are coding, doing usability tests and hack for refugees. The schedule of talks is available here: http://meshcon.net/schedule.pdf

130 projects will showcase their work at the Maker Faire. Workshops include FOSSASIA’s machine knitting project, 3D printing, and Arduino tinkering:

* http://www.meetup.com/FashionTec-Meetup-Berlin/

* http://www.meetup.com/OpenXLab/

* http://www.meetup.com/opentechschool-berlin/events/225532149/

Additional Info: http://meshcon.net | http://makerfaire.berlin

Location: Postbahnhof, Strasse der Pariser Kommune 8, 10243 Berlin

Continue ReadingUpdates on FOSSASIA Activities – GSoC, Science Hack and Meshcon

searchQuick Apprise: EIGHT #GoogleSummerOfCode #FOSSASIA

banner-gsoc2015.png.pagespeed.ce.1-XG35qq3R8SQJ5DGgL9

The intended searchQuick” (sQuick) is an application to enable a user to search a set of books or texts, like an encyclopedia, or some other topical book collection offline built in the open source platform Pharo 4.0.

header


Bringing up to the rear of the summers, the project was brought to a penultimate stage by achieving the following tasks:

    • Handling empty string searches by raising error pop ups.
      searchButtonClicked
      searchBar accept .
      (myString isEmptyOrNil  ) 
      ifTrue: [self errorPopUp ] 
      ifFalse: [ 
           myString := searchBar getText asString .
                self printSearchResults
                     ] .
    • Adding Help, About and Feedback sections to give an authentic application look and required details to an interested developer.
    • Inserting ScrollPane for BrowseFile list menu
      browseScroll := ScrollPane new.
      browseScroll scroller addMorph: browse.
    • Truncating BrowseFile list menu file titles to have their extent within the #MenuMorph: boundary
      title := anObject truncateWithElipsisTo: 25. 
    • Removal of OK/CANCEL buttons from the Search results accordion widget
      dialog buttons: {}.
    • Implementation of a Search Bar for searching via Search results accordion widget.
    • Categorizing methods as: accessing, initializationsubmorphsadd/remove etc.
    • Removal of unwanted/redundant/commented code lines i.e. scrubbing dead-code.

UPCOMING: Wrap Up.


Continue ReadingsearchQuick Apprise: EIGHT #GoogleSummerOfCode #FOSSASIA

[Tutorial] Continuous Integration Automated Build for your Pharo Application

reposted from jigyasagrover.wordpress.com/ci-automated-build-for-your-pharo-application

Hello Fellas !

This post aims to put forward the basics of Build Automation and also brief the steps required to put up a Pharo application on Continuous Integration, Inria which is a platform for Scheduled Automated Build.
For simplicity, Build automation is the act of scripting or automating a wide variety of tasks that software developers do in their day-to-day activities including things like:
  • compiling computer source code into binary code
  • packaging binary code
  • running automated tests
  • deploying to production systems
  • creating documentation and/or release notes

Various types of automation are as:

  • On-Demand automation such as a user running a script at the command line
  • Scheduled automation such as a continuous integration server running a nightly build
  • Triggered automation such as a continuous integration server running a build on every commit to a version control system.
In recent years, build management tools have provided relief when it comes to automating the build process.
The dominant benefits of continuous integration include:
  • Improvement of product quality
  • Acceleration of compile and link processing
  • Elimination of redundant tasks
  • Minimization of ‘bad builds’
  • Have history of builds and releases in order to investigate issues
  • Save time and money – because of above listed reasons.

A build system should fulfill certain requirements.

Basic requirements:

  1. Frequent or overnight builds to catch problems early.
  2. Support for Source Code Dependency Management
  3. Incremental build processing
  4. Reporting that traces source to binary matching
  5. Build acceleration
  6. Extraction and reporting on build compile and link usage

Optional requirements:

  1. Generate release notes and other documentation such as help pages
  2. Build status reporting
  3. Test pass or fail reporting
  4. Summary of the features added/modified/deleted with each new build

Considering the above mentioned advantages of automated build, the below enlisted steps will help to put up your own Pharo application hosted on github on the CI server for continuous integration/scheduled build.
 1. Log on to Continuous Integration, Inria website (https://ci.inria.fr/).

Screenshot from 2015-08-08 15:53:49
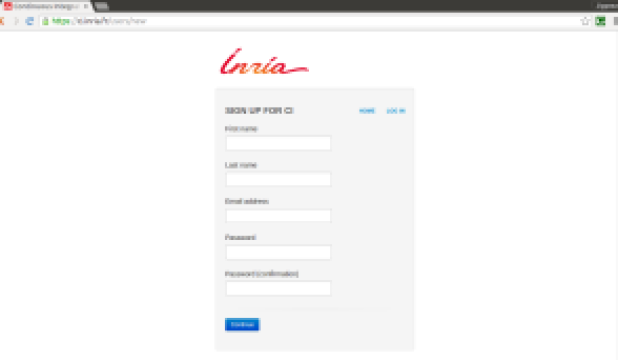
2. Click on ‘Sign Up‘ at the top-right corner, enter the required details and register for CI.

Screenshot from 2015-08-08 15:54:02
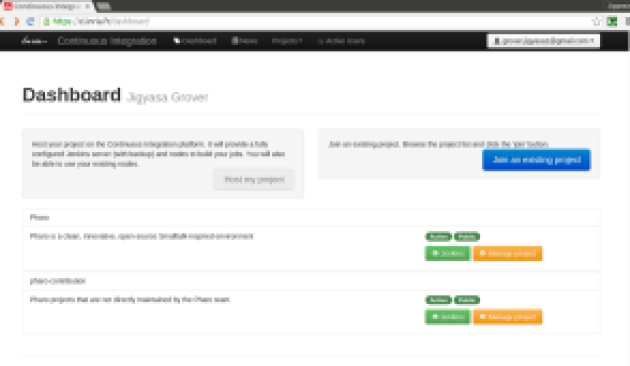
3. From the ‘Dashboard‘ option located at the top most of the screen click on ‘Join an existing project‘ blue button as shown .

Screenshot from 2015-08-08 15:59:22
4. Search ‘pharo-contribution‘ in the enlisted public projects and click on ‘Join

5. On clicking the ‘Join‘ button, a message stating: “Request to join the project ‘pharo-contribution’ sent.” appears.

6. It might take a day or two for the request approval mail to deliver at your registered Email ID.

The E-Mail content is as follows:
        Your request to join pharo-contribution has been accepted
        Hi _ _ _,
        Your request to join the project pharo-contribution has been accepted !
        Regards,
        Support team.

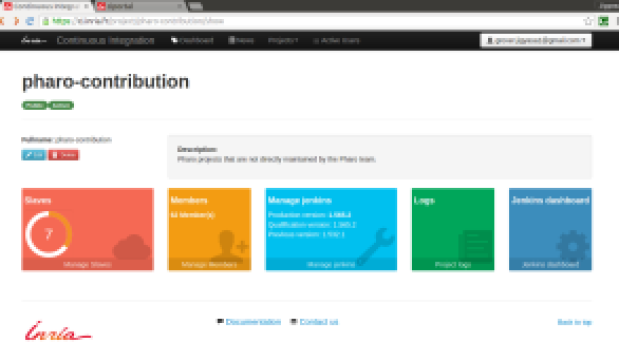
7. Click on ‘My Account‘ option and under ‘My Projects‘ check the status of pharo-contribution project. It should state ‘member‘.

Screenshot from 2015-08-08 16:17:55
8. Now, visit the LINK: https://ci.inria.fr/pharo-contribution/job/JobTemplate/  to create a ‘New Job

Screenshot from 2015-08-08 16:21:06
9. Read all the steps mentioned carefully. After going through all the points, click on the ‘New Job‘ mentioned in point 2 on the Project Job Template web page.

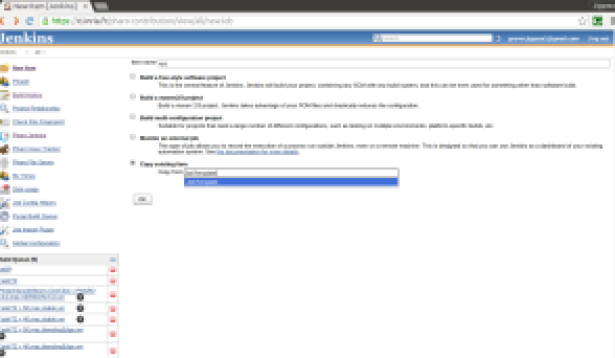
10. Enter the ‘Project Name‘ in the ‘Item Name: ‘ box and choose ‘Copy from existing item‘ option and fill ‘JobTemplate

Screenshot from 2015-08-08 16:30:01
11. After clicking OK, You will be directed to your project configuration.

12. Fill in the description of the project in the desired box.

Screenshot from 2015-08-08 16:32:31
13. Fill int the configuration details of your project like:

* Maximum number of builds
*  Link to GitHub Project
*  Source Code Manager
* Build Triggers
*  Schedule of build (@hourly, @daily, @weekly, @fortnightly, @monthly, @yearly etc.)
*  Configuration Matrix (User Defined Axis: Name && Version Values- stable, development etc.)
* Build environment options
* Post-build actions
*  Report regressed tests

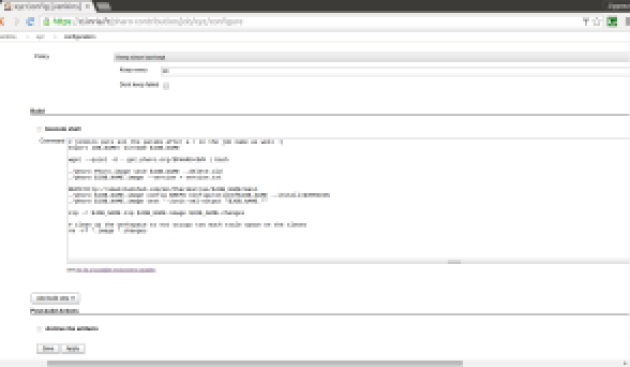
14. The main task is to carefully write the commands in the ‘Execute Shell
The default commands are as:

Screenshot from 2015-08-08 16:39:06
15. After saving and applying the changes, the application is all set for automated build.

16. Each build’s ‘Console Output‘ can be used to analyse the steps and highlight the weak areas of the project.
For instance: The below output is of a project whose stable version build was successful.

Screenshot from 2015-08-08 16:49:05

TIP: Keep a regular tab on the build results and analyze each line of the Console Output with utmost care.

Hope this post was able to help you start with the automation build process of Pharo Application.

Do like if it was worth a read !
Post queries/suggestions as comments 🙂 Looking forward to them.


UPCOMING: Next, I plan to share experience of putting up my Pharo application searchQuick on CI Inria for automated build. I intend to detail about the various configuration settings applied along with the Execute Shell commands utilized for a GitHub project 🙂


Introduction Accredits: Wikipedia 
Resources:  Build Automation and Continuous Integration .


Continue Reading[Tutorial] Continuous Integration Automated Build for your Pharo Application

searchQuick Apprise: SEVEN #GoogleSummerOfCode #FOSSASIA

banner-gsoc2015.png.pagespeed.ce.1-XG35qq3R8SQJ5DGgL9

The intended searchQuick” (sQuick) is an application to enable a user to search a set of books or texts, like an encyclopedia, or some other topical book collection offline built in the open source platform Pharo 4.0.

header


After the chief tasks of search functionality and automated build were done with, the next undertaking included working on finer details and embellishments.

  • Embedding Jenkins automated build status icon in GitHub markdown file
  • Relative widget re-sizing by using ‘World extent x‘ and ‘World extent y‘ co-ordinates instead of hard coded co-ordinates
  • Modifying the Accordion Widget by addition of ‘Search Bar‘ at the top
  • Checking for duplicates in the ‘Browse Files‘ menu, thus reducing the CPU consumption
  • Equalizing the sizes of all the windows to bring uniformity
  • Addition of ‘Scroll Pane‘ in accordion search result display list
  • Multi-line search result display by extending the Expander Title Morph and use of new line character in labels (otherwise not supported by default)
  • Truncating file content to first n characters for neater look in Expander Title

Latest Screenshot of Accordion Widget:
Screenshot from 2015-08-18 18:38:06
UPCOMING:

  • Removal of OK & CANCEL buttons (present by default in Pluggable Dialog Window) from Accordion Widget
  • Implementing of Search via the result window as well
  • Relative re-sizing of background images (Image Morphs)

Continue ReadingsearchQuick Apprise: SEVEN #GoogleSummerOfCode #FOSSASIA

searchQuick Apprise: SIX #GoogleSummerOfCode #FOSSASIA

banner-gsoc2015.png.pagespeed.ce.1-XG35qq3R8SQJ5DGgL9

The intended searchQuick” (sQuick) is an application to enable a user to search a set of books or texts, like an encyclopedia, or some other topical book collection offline built in the open source platform Pharo 4.0.

header


The main task achieved was putting up the application up on Continuous Integration, Inria for automated build. It was indeed a beneficial idea as it helped me keep a check on the builds and work on issues.
Being a newbie, this work was cumbersome initially but with the help of my mentors and the #pharo community, I was able to accomplish it. To assist fellow Pharo-ers, I have compiled all the information regarding CI Automated Build for yout Pharo Application and published the same on my blog-spot. Kindly go through it for a complete understanding 🙂

Other tasks completed as of now include:

  • Putting up the project for automated build on https://ci.inria.fr/
  • Successful ‘stable’ and ‘development’ version builds
  • Accessing resource folder via MCGitHubRepository, Removal of manual download option
  • By default full screen system window open
  • Removing redundant code by creating open argument methods
  • Abolishment of hard-coded font family and font point size
  • Categorization of methods & classes
  • GUI Embellishment with background colors, borders etc.

Upcoming: 

  • Dynamic widget re-sizing
  • Multi-line search result title
  • Putting up Help and About sections
  • Removal of old configurations

Continue ReadingsearchQuick Apprise: SIX #GoogleSummerOfCode #FOSSASIA

searchQuick Apprise: FIVE #GoogleSummerOfCode #FOSSASIA

banner-gsoc2015.png.pagespeed.ce.1-XG35qq3R8SQJ5DGgL9

The intended searchQuick” (sQuick) is an application to enable a user to search a set of books or texts, like an encyclopedia, or some other topical book collection offline built in the open source platform Pharo 4.0.

header


As the rudimentary structure of the application is sewn up, embellishment of GUI and rigorous testing are the major part of course of action.
On eMBee’s ( +Martin Bähr ) suggestion to build up an accordion widget to display the search results, various trials were conducted to design a similar one in Pharo.

The task of developing the accordion widget in Pharo was achieved using Expander Morphs. Looping through the search results array, a #newExpander: was added in each #newRow: of the modal built.

A challenging chore was to add a scroll-able content on the click of the desired search result expander. Sundry experiments with #newLabel: and #newText: in #newScrollPaneFor: {i.e. adding text model and labels in scroll pane} had no effect. Eventually, #newTextEditorFor: did the trick and the desired look was created.
Next on the cards is putting up sQuick for automated build on the CI Server, as suggested by +Sean DeNigris for its various advantages which include:
  • Improvement of product quality
  • Acceleration of compile and link processing
  • Elimination of redundant tasks
  • Minimization of ‘bad builds’
  • Have history of builds and releases in order to investigate issues
  • Save time and money – because of above listed reasons.
For simplicity, Build automation is the act of scripting or automating a wide variety of tasks that software developers do in their day-to-day activities including things like:
  • compiling computer source code into binary code
  • packaging binary code
  • running automated tests
  • deploying to production systems
  • creating documentation and/or release notes
UPCOMING:
To achieve Build Automation for sQuick, I have already registered on CI and configured sQuick.
Next endeavor is to look into the red signal in the build evaluation.
 

Stay tuned for more….Post any queries, will be happy to help 🙂
Continue ReadingsearchQuick Apprise: FIVE #GoogleSummerOfCode #FOSSASIA