Showing Pull Request Build logs in Yaydoc

In Yaydoc, I added the feature to show build status of the Pull Request. But there was no way for the user to see the reason for build failure, hence I decided to show the build log in the Pull Request similar to that of TRAVIS CI. For this, I had to save the build log into the database, then use GitHub status API to show the build log url in the Pull Request which redirects to Yaydoc website where we render the build log.

StatusLog.storeLog(name, repositoryName, metadata,  `temp/admin@fossasia.org/generate_${uniqueId}.txt`, function(error, data) {
                            if (error) {
                              status = "failure";
                            } else {
                              targetBranch = `https://${process.env.HOSTNAME}/prstatus/${data._id}`
                            }
                            github.createStatus(commitId, req.body.repository.full_name, status, description, targetBranch, repositoryData.accessToken, function(error, data) {
                              if (error) {
                                console.log(error);
                              } else {
                                console.log(data);
                              }
                            });
                          });

In the above snippet, I’m storing the build log which is generated from the build script to the mongodb and I’m appending the mongodb unqiueID to the `prstatus` url so that we can use that id to retrieve build log from the database.

exports.createStatus = function(commitId, name, state, description, targetURL, accessToken, callback) {
  request.post({
    url: `https://api.github.com/repos/${name}/statuses/${commitId}`,
    headers: {
      'User-Agent': 'Yaydoc',
      'Authorization': 'token ' + crypter.decrypt(accessToken)
    },
    "content-type": "application/json",
    body: JSON.stringify({
      state: state,
      target_url: targetURL,
      description: description,
      context: "Yaydoc CI"
    })
  }, function(error, response, body) {
    if (error!== null) {
      return callback({description: 'Unable to create status'}, null);
    }
    callback(null, JSON.parse(body));
  });
};

After saving the build log, I’m sending the request to GitHub for showing the status of the build along with build log url where user can click the detail link and can see the build log.

Resources:

Continue ReadingShowing Pull Request Build logs in Yaydoc

Implementing Skill Detail Section in SUSI Android App

SUSI Skills are rules that are defined in SUSI Skill Data repo which are basically the responses SUSI gives to the user queries. When a user queries something from the SUSI Android app, a query to SUSI Server is made which further fetches response from SUSI Skill Data and gives the response to the app. Similarly, when we need to list all skills, an API call is made to server to list all skills. The server then checks the SUSI Skill Data repo for the skills and then return all the required information to the app. Then the app displays all the information about the skill to user. User then can view details of each skill and then interact on the chat interface to use that skill. This process is similar to what SUSI Skill CMS does. The CMS is a skill wiki like interface to view all skills and then edit them. Though the app can not be currently used to edit the skills but it can be used to view them and try them on the chat interface.

API Information

For listing SUSI Skill groups, we have to call on /cms/getGroups.json

This will give you all groups in SUSI model in which skills are present. Current response:

{
  "session": {"identity": {
    "type": "host",
    "name": "14.139.194.24",
    "anonymous": true
  }},
  "accepted": true,
  "groups": [
    "Small Talk",
    "Entertainment",
    "Problem Solving",
    "Knowledge",
    "Assistants",
    "Shopping"
  ],
  "message": "Success: Fetched group list"
}

So, the groups object gives all the groups in which SUSI Skills are located.

Next comes, fetching of skills. For that the endpoint is /cms/getGroups.json?group=GROUP_NAME

Since we want all skills to be fetched, we call this api for every group. So, for example we will be calling http://api.susi.ai/cms/getSkillList.json?group=Entertainment for getting all skills in group “Entertainment”. Similarly for other groups as well.

Sample response of skill:

{
  "accepted": true,
  "model": "general",
  "group": "Shopping",
  "language": "en",
  "skills": {"amazon_shopping": {
    "image": "images/amazon_shopping.png",
    "author_url": "https://github.com/meriki",
    "examples": ["Buy a dress"],
    "developer_privacy_policy": null,
    "author": "Y S Ramya",
    "skill_name": "Shop At Amazon",
    "dynamic_content": true,
    "terms_of_use": null,
    "descriptions": "Searches items on Amazon.com for shopping",
    "skill_rating": null
  }},
  "message": "Success: Fetched skill list",
  "session": {"identity": {
    "type": "host",
    "name": "14.139.194.24",
    "anonymous": true
  }}
}

It gives all details about skills:

  1. image
  2. author_url
  3. examples
  4. developer_privacy_policy
  5. author
  6. skill_name
  7. dynamic_content
  8. terms_of_use
  9. descriptions
  10. skill_rating

Implementation in SUSI Android App

Skill Detail Section UI of Google Assistant

Skill Detail Section UI of SUSI SKill CMS

Skill Detail Section UI of SUSI Android App

The UI of skill detail section in SUSI Android App is the mixture of UI of Skill detail section in Google Assistant ap and SUSI Skill CMS. It displays details of skills in a beautiful manner with horizontal recyclerview used to display the examples.

So, we have to display following details about the skill in Skill Detail Section:

  1. Skill Name
  2. Author Name
  3. Skill Image
  4. Try it Button
  5. Description
  6. Examples
  7. Rating
  8. Content type (Dynamic/Static)
  9. Terms of Use
  10. Developer’s Privacy policy

Let’s see the implementation.

1. Whenever a skill Card View is clicked, showSkillDetailFragment() is called and it opens a new instance of a fragment named SkillDetailsFragment which shows details of the skill. We have to provide necessary information while starting the fragment. This information is passed as a Serializable.

fun showSkillDetailFragment(skillData: SkillData, skillGroup: String) {
   val skillDetailsFragment = SkillDetailsFragment.newInstance(skillData,skillGroup)
   (context as SkillsActivity).fragmentManager.beginTransaction()
           .replace(R.id.fragment_container, skillDetailsFragment)
           .commit()
}

2.  The data which was passed as a Serializeable object is now casted back to the required form and a method to set up the UI is called.

companion object {
   val SKILL_KEY = "skill_key"
   val SKILL_GROUP = "skill_group"
   fun newInstance(skillData: SkillData, skillGroup: String): SkillDetailsFragment {
       val fragment = SkillDetailsFragment()
       val bundle = Bundle()
       bundle.putSerializable(SKILL_KEY, skillData as Serializable)
       bundle.putString(SKILL_GROUP, skillGroup)
       fragment.arguments = bundle

       return fragment
   }
}

override fun onCreateView(inflater: LayoutInflater, container: ViewGroup?, savedInstanceState: Bundle?): View {
   skillData = arguments.getSerializable(
           SKILL_KEY) as SkillData
   skillGroup = arguments.getString(SKILL_GROUP)
   return inflater.inflate(R.layout.fragment_skill_details, container, false)
}

override fun onViewCreated(view: View?, savedInstanceState: Bundle?) {
   setupUI()
   super.onViewCreated(view, savedInstanceState)
}

3. The setupUI() method then calls separate method for setting every part of the UI like image, name etc.

fun setupUI() {
   setImage()
   setName()
   setAuthor()
   setTryButton()
   setDescription()
   setExamples()
   setRating()
   setDynamicContent()
   setPolicy()
   setTerms()
}

4. One example of setting a part of the UI is setting Author name. It checks if AuthorName is null or not. After that it anchors author’s github account link with his/her name.

fun setAuthor() {
   skill_detail_author.text = "Author : ${activity.getString(R.string.no_skill_author)}"
   if(skillData.author != null && !skillData.author.isEmpty()){
       if(skillData.authorUrl == null || skillData.authorUrl.isEmpty())
           skill_detail_author.text = "Author : ${skillData.skillName}"
       else {
           skill_detail_author.linksClickable = true
           skill_detail_author.movementMethod = LinkMovementMethod.getInstance()
           if (android.os.Build.VERSION.SDK_INT >= Build.VERSION_CODES.N) {
               skill_detail_author.text = Html.fromHtml("Author : <a href=\"${skillData.authorUrl}\">${skillData.author}</a>", Html.FROM_HTML_MODE_COMPACT)
           } else {
               skill_detail_author.text = Html.fromHtml("Author : <a href=\"${skillData.authorUrl}\">${skillData.author}</a>")
           }
       }
   }
}

Summary

So, this blog talked about how the Skill detail section in SUSI Android App is implemented. This included how a network call is made, logic for making different network calls, making a horizontal recyclerview for displaying examples. So, If you are looking forward to contribute to SUSI Android App, this can help you a little. But if not so, this may also help you in understanding and how you can implement horizontal recyclerview similar to Google Play Store.

References

  1. To know about servlets https://en.wikipedia.org/wiki/Java_servlet
  2. To see how to implement one https://www.javatpoint.com/servlet-tutorial
  3. To see how to make network calls in android using Retrofit https://guides.codepath.com/android/Consuming-APIs-with-Retrofit
  4. To see how to implement custom RecyclerView Adapter https://www.survivingwithandroid.com/2016/09/android-recyclerview-tutorial.html
Continue ReadingImplementing Skill Detail Section in SUSI Android App

Implementing Event Copy API in Open Event Frontend

In Open Event Frontend, we give the organizer a facility to create a copy of the event by copying it and making the modifications he wants to a particular event. Thus, it is easy for the organizer to create multiple events with same sponsors, sessions, etc. For this, we implemented the event copy API in frontend.
We achieved the copy of events as follows:
Since the event copy API is application/json type, we used the simple GET and POST requests to copy the event rather than using the ember data. For this, we use the loader service which is injected throughout the app. To copy the event we have given a “Copy” button which looks as follows:

 <button class="ui button {{if isCopying 'loading'}}" {{action 'copyEvent'}} disabled={{isCopying}}>
    <i class="copy icon"></i>
        {{t 'Copy'}}
 </button>

Thus, we trigger an action ‘copyEvent’ on clicking the Copy button. The action is defined in controller as follows:

 copyEvent() {
      this.set('isCopying', true);
      this.get('loader')
        .post(`events/${this.get('model.id')}/copy`, {})
        .then(copiedEvent => {
          this.transitionToRoute('events.view.edit', copiedEvent.identifier);
          this.get('notify').success(this.l10n.t('Event copied successfully'));
        })
        .catch(() => {
          this.get('notify').error(this.l10n.t('Copying of event failed'));
        })
        .finally(() => {
          this.set('isCopying', false);
        });
    }

The endpoint to copy the event as defined in our API is:

POST : /v1/events/{identifier}/copy
Content-Type: application/vnd.api+json
Authorization: JWT <Auth Key>
Request body: {}

Thus, we make a post request to the given URL by passing the event id of the event to be copied and the request body to be an empty object. Thus, on successful response from the server, we get the new event id for which the event info is same. We then redirect the user to the edit details route where he can change the info he wants.
Thus, we copy the event in Open Event Frontend.

Resources: Docs on loader service in Ember JS

Continue ReadingImplementing Event Copy API in Open Event Frontend

Link Preview Service from SUSI Server

 SUSI Webchat, SUSI Android app, SUSI iOS app are various SUSI clients which depend on response from SUSI Server. The most common response of SUSI Server is in form of links. Clients usually need to show the preview of the links to the user. This preview may include featured image, description and the title of the link.  Clients show this information by using various 3rd party APIs and libraries. We planned to create an API endpoint for this on SUSI Server to give the preview of the link. This service is called LinkPreviewService.
String url = post.get("url", "");
        if(url==null || url.isEmpty()){
            jsonObject.put("message","URL Not given");
            jsonObject.put("accepted",false);
            return new ServiceResponse(jsonObject);
        }

This API Endpoint accept only 1 get parameter which is the URL whose preview is to be shown.

Here we also check if no parameter or wrong URL parameter was sent. If that was the the case then we return an error message to the user.

 SourceContent sourceContent =     TextCrawler.scrape(url,3);
        if (sourceContent.getImages() != null) jsonObject.put("image", sourceContent.getImages().get(0));
        if (sourceContent.getDescription() != null) jsonObject.put("descriptionShort", sourceContent.getDescription());
        if(sourceContent.getTitle()!=null)jsonObject.put("title", sourceContent.getTitle());
        jsonObject.put("accepted",true);
        return new ServiceResponse(jsonObject);
    }

The TextCrawler function accept two parameters. One is the url of the website which is to be scraped for the preview data and the other is depth. To get the images, description and title there are methods built in. Here we just call those methods and set them in our JSON Object.

 private String htmlDecode(String content) {
        return Jsoup.parse(content).text();
    }

Text Crawler is based on Jsoup. Jsoup is a java library that is used to scrape HTML pages.

To get anything from Jsoup we need to decode the content of HTML to Text.

public List<String> getImages(Document document, int imageQuantity) {
        Elements media = document.select("[src]");
        while(var5.hasNext()) {
            Element srcElement = (Element)var5.next();
            if(srcElement.tagName().equals("img")) {
                ((List)matches).add(srcElement.attr("abs:src"));
            }
        }

 The getImages method takes the HTML document from the JSoup and find the image tags in that. We have given the imageQuantity parameter in the function, so accordingly it returns the src attribute of the first n images it find.

This API Endpoint can be seen working on

http://127.0.0.1:4000/susi/linkPreview.json?url=<ANY URL>

A real working example of this endpoint would be http://api.susi.ai/susi/linkPreview.json?url=https://techcrunch.com/2017/07/23/dear-tech-dudes-stop-being-such-idiots-about-women/

Resources:

Web Crawlers: https://www.promptcloud.com/data-scraping-vs-data-crawling/

JSoup: https://jsoup.org/

JSoup Api Docs: https://jsoup.org/apidocs/

Parsing HTML with JSoup: http://www.baeldung.com/java-with-jsoup

Continue ReadingLink Preview Service from SUSI Server

Implementation of Image Scraper and Teaser Text in Query Server

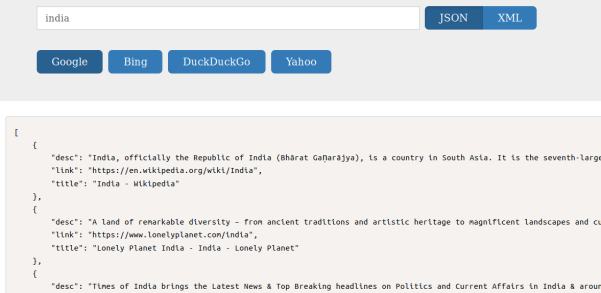
Query server helps one to scrap search engines like Google, Yahoo, Bing, DuckDuckGo and get the results in json/ xml format. Also it stores retrieved results in mongoDB for analytical purposes.We have used beautiful soup for scraping results from query server

We have used beautiful soup for scraping results from query server

In this blogpost I will discuss two recent implementations in query server and then end with the introduction of different scrappers for query server.

Implementation of teaser text for Google, Yahoo, and DuckDuckgo:

Teaser text is basically description that is provided by search engines for all search results, this could be implemented by scrapping the description of each result and push it into a list. This is done in query server using beautiful.

Implementation details of this feature is available at pull:

https://github.com/fossasia/query-server/pull/72

And finally we have achieved scaping teaser text for all supported search engines:

Implementation of Image scraper for google in query server:

Scapping images in google is a bit different from scrapping normal text results. Google has metadata of the original image in rg_meta tag of div containing the thumbnail of the image. We cannot scrap just the thumbnail, because thumbnails are basically of low quality, and also are stored in google server, whereas the links available in the meta data are from the original source. Finally using the metadata of images available we have scraped the images in google.

Implementation details of image scraper to google is available at https://github.com/fossasia/query-server/pull/73

Also we have separated one scraper file for each of the search engine using Object Oriented Paradigm, where as before we used to have only one scraper file for all search engines https://github.com/fossasia/query-server/pull/67

Resources

BeautifulSoup: https://www.crummy.com/software/BeautifulSoup/bs4/doc/

Continue ReadingImplementation of Image Scraper and Teaser Text in Query Server

Performing Custom Experiments with PSLab

PSLab has the capability to perform a variety of experiments. The PSLab Android App and the PSLab Desktop App have built-in support for about 70 experiments. The experiments range from variety of trivial ones which are for school level to complicated ones which are meant for college students. However, it is nearly impossible to support a vast variety of experiments that can be performed using simple electronic circuits.

So, the blog intends to show how PSLab can be efficiently used for performing experiments which are otherwise not a part of the built-in experiments of PSLab. PSLab might have some limitations on its hardware, however in almost all types of experiments, it proves to be good enough.

  • Identifying the requirements for experiments

    • The user needs to identify the tools which are necessary for analysing the circuit in a given experiment. Oscilloscope would be essential for most experiments. The voltage & current sources might be useful if the circuit requires DC sources and similarly, the waveform generator would be essential if AC sources are needed. If the circuit involves the use and analysis of data of sensor, the sensor analysis tools might prove to be essential.
    • The circuit diagram of any given experiment gives a good idea of the requirements. In case, if the requirements are not satisfied due to the limitations of PSLab, then the user can try out alternate external features.
  • Using the features of PSLab

  • Using the oscilloscope
    • Oscilloscope can be used to visualise the voltage. The PSLab board has 3 channels marked CH1, CH2 and CH3. When connected to any point in the circuit, the voltages are displayed in the oscilloscope with respect to the corresponding channels.
    • The MIC channel can be if the input is taken from a microphone. It is necessary to connect the GND of the channels to the common ground of the circuit otherwise some unnecessary voltage might be added to the channels.

  • Using the voltage/current source
    • The voltage and current sources on board can be used for requirements within the range of +5V. The sources are named PV1, PV2, PV3 and PCS with V1, V2 and V3 standing for voltage sources and CS for current source. Each of the sources have their own dedicated ranges.
    • While using the sources, keep in mind that the power drawn from the PSLab board should be quite less than the power drawn by the board from the USB bus.
      • USB 3.0 – 4.5W roughly
      • USB 2.0 – 2.5W roughly
      • Micro USB (in phones) – 2W roughly
    • PSLab board draws a current of 140 mA when no other components are connected. So, it is advisable to limit the current drawn to less than 200 mA to ensure the safety of the device.
    • It is better to do a rough calculation of the power requirements in mind before utilising the sources otherwise attempting to draw excess power will damage the device.

  • Using the Waveform Generator
    • The waveform generator in PSLab is limited to 5 – 5000 Hz. This range is usually sufficient for most experiments. If the requirements are beyond this range, it is better to use an external function generator.
    • Both sine and square waves can be produced using the device. In addition, there is a feature to set the duty cycle in case of square waves.
  • Sensor Quick View and Sensor Data Logger
    • PSLab comes with the built in support for several plug and play sensors. The support for more sensors will be added in the future. If an experiment requires real time visualisation of sensor data, the Sensor Quick View option can be used whereas for recording the data for sensors for a period of time, the Sensor Data Logger can be used.
  • Analysing the Experiment

    • The oscilloscope is the most common tool for circuit analysis. The oscilloscope can sample data at very high frequencies (~250 kHz). The waveform at any point can be observed by connecting the channels of the oscilloscope in the manner mentioned above.
    • The oscilloscope has some features which will be essential like Trigger to stabilise the waveforms, XY Plot to plot characteristics graph of some devices, Fourier Transform of the Waveforms etc. The tools mentioned here are simple but highly useful.
    • For analysing the sensor data, the Sensor Quick View can be paused at any instant to get the data at any instant. Also, the logged data in Sensor Data Logger can be exported as a TXT/CSV file to keep a record of the data.
  • Additional Insight

    • The PSLab desktop app comes with the built-in support for the ipython console.
    • The desired quantities like voltages, currents, resistance, capacitance etc. can also be measured by using simple python commands through the ipython console.
    • A simple python script can be written to satisfy all the data requirements for the experiment. An example for the same is shown below.

This is script to produce two sine waves of 1 kHz and capturing & plotting the data.

from pylab import *
from PSL import sciencelab
I=sciencelab.connect()
I.set_gain('CH1', 2) # set input CH1 to +/-4V range
I.set_gain('CH2', 3) # set input CH2 to +/-4V range
I.set_sine1(1000) # generate 1kHz sine wave on output W1
I.set_sine2(1000) # generate 1kHz sine wave on output W2
#Connect W1 to CH1, and W2 to CH2. W1 can be attenuated using the manual amplitude knob on the PSlab
x,y1,y2 = I.capture2(1600,1.75,'CH1') 
plot(x,y1) #Plot of analog input CH1
plot(x,y2) #plot of analog input CH2
show()


References

Continue ReadingPerforming Custom Experiments with PSLab

Using Android Palette with Glide in Open Event Organizer Android App

Open Event Organizer is an Android Application for the Event Organizers and Entry Managers. The core feature of the App is to scan a QR code from the ticket to validate an attendee’s check in. Other features of the App are to display an overview of sales, ticket management and basic editing in the Event Details. Open Event API Server acts as a backend for this App. The App uses Navigation Drawer for navigation in the App. The side drawer contains menus, event name, event start date and event image in the header. Event name and date is shown just below the event image in a palette. For a better visibility Android Palette is used which extracts prominent colors from images. The App uses Glide to handle image loading hence GlidePalette library is used for palette generation which integrates Android Palette with Glide. I will be talking about the implementation of GlidePalette in the App in this blog.

The App uses Data Binding so the image URLs are directly passed to the XML views in the layouts and the image loading logic is implemented in the BindingAdapter class. The image loading code looks like:

GlideApp
   .with(imageView.getContext())
   .load(Uri.parse(url))
   ...
   .into(imageView);


So as to implement palette generation for event detail label, it has to be implemented with the event image loading. GlideApp takes request listener which implements methods on success and failure where palette can be generated using the bitmap loaded. With GlidePalette most of this part is covered in the library itself. It provides GlidePalette class which is a sub class of GlideApp request listener which is passed to the GlideApp using the method listener. In the App, BindingAdapter has a method named bindImageWithPalette which takes a view container, image url, a placeholder drawable and the ids of imageview and palette. The relevant code is:

@BindingAdapter(value = {"paletteImageUrl", "placeholder", "imageId", "paletteId"}, requireAll = false)
public static void bindImageWithPalette(View container, String url, Drawable drawable, int imageId, int paletteId) {
   ImageView imageView = (ImageView) container.findViewById(imageId);
   ViewGroup palette = (ViewGroup) container.findViewById(paletteId);

   if (TextUtils.isEmpty(url)) {
       if (drawable != null)
           imageView.setImageDrawable(drawable);
       palette.setBackgroundColor(container.getResources().getColor(R.color.grey_600));
       for (int i = 0; i < palette.getChildCount(); i++) {
           View child = palette.getChildAt(i);
           if (child instanceof TextView)
               ((TextView) child).setTextColor(Color.WHITE);
       }
       return;
   }
   GlidePalette<Drawable> glidePalette = GlidePalette.with(url)
       .use(GlidePalette.Profile.MUTED)
       .intoBackground(palette)
       .crossfade(true);

   for (int i = 0; i < palette.getChildCount(); i++) {
       View child = palette.getChildAt(i);
       if (child instanceof TextView)
           glidePalette
               .intoTextColor((TextView) child, GlidePalette.Swatch.TITLE_TEXT_COLOR);
   }
   setGlideImage(imageView, url, drawable, null, glidePalette);
}


The code is pretty obvious. The method checks passed URL for nullability. If null, it sets the placeholder drawable to the image view and default colors to the text views and the palette. The GlidePalette object is generated using the initializer method with which takes the image URL. The request is passed to the method setGlideImage which loads the image and passes the GlidePalette to the GlideApp as a listener. Accordingly, the palette is generated and the colors are set to the label and text views accordingly. The container view in the XML layout looks like:

<LinearLayout
   android:layout_width="match_parent"
   android:layout_height="wrap_content"
   android:orientation="vertical"
   app:paletteImageUrl="@{ event.largeImageUrl }"
   app:placeholder="@{ @drawable/header }"
   app:imageId="@{ R.id.image }"
   app:paletteId="@{ R.id.eventDetailPalette }">


Links:
1. Documentation for Glide Image Loading Library
2. GlidePalette Github Repository
3. Android Palette Official Documentation

Continue ReadingUsing Android Palette with Glide in Open Event Organizer Android App

Making App Name Configurable for Open Event Organizer App

Open Event Organizer is a client side android application of Open Event API server created for event organizers and entry managers. The application provides a way to configure the app name via environment variable app_name. This allows the user to change the app name just by setting the environment variable app_name to the new name. I will be talking about its implementation in the application in this blog.

Generally, in an android application, the app name is stored as a static string resource and set in the manifest file by referencing to it. In the Organizer application, the app name variable is defined in the app’s gradle file. It is assigned to the value of environment variable app_name and the default value is assigned if the variable is null. The relevant code in the manifest file is:

def app_name = System.getenv('app_name') ?: "eventyay organizer"

app/build.gradle

The default value of app_name is kept, eventyay organizer. This is the app name when the user doesn’t set environment variable app_name. To reference the variable from the gradle file into the manifest, manifestPlaceholders are defined in the gradle’s defaultConfig. It is a map of key value pairs. The relevant code is:

defaultConfig {
   ...
   ...
   manifestPlaceholders = [appName: app_name]
}

app/build.gradle

This makes appName available for use in the app manifest. In the manifest file, app name is assigned to the appName set in the gradle.

<application
   ...
   ...
   android:label="${appName}"

app/src/main/AndroidManifest.xml

By this, the application name is made configurable from the environment variable.

Links:
1. ManifestPlaceholders documentation
2. Stackoverflow answer about getting environment variable in gradle

Continue ReadingMaking App Name Configurable for Open Event Organizer App

Adding Number of Sessions Label in Open Event Android App

The Open Event Android project has a fragment for showing tracks of the event. The Tracks Fragment shows the list of all the Tracks with title and TextDrawable. But currently it is not showing how many sessions particular track has. Adding TextView with rounded corner and colored background showing number of sessions for track gives great UI. In this post I explain how to add TextView with rounded corner and how to use Plurals in Android.

1. Create Drawable for background

Firstly create track_rounded_corner.xml Shape Drawable which will be used as a background of the TextView. The <shape> element must be the root element of Shape drawable. The android:shape attribute defines the type of the shape. It can be rectangle, ring, oval, line. In our case we will use rectangle.

<?xml version="1.0" encoding="utf-8"?>
<shape xmlns:android="http://schemas.android.com/apk/res/android"
    android:shape="rectangle">

    <corners android:radius="360dp" />

    <padding
        android:bottom="2dp"
        android:left="8dp"
        android:right="8dp"
        android:top="2dp" />
</shape>


Here the <corners> element creates rounded corners for the shape with the specified value of radius attribute. This tag is only applied when the shape is a rectangle. The <padding> element adds padding to the containing view. You can modify the value of the padding as per your need. You can feel shape with appropriate color using <solid> as we are setting color dynamically we will not set color here.

2. Add TextView and set Drawable

Now add TextView in the track list item which will contain number of sessions text. Set  track_rounded_corner.xml drawable we created before as background of this TextView using background attribute.

<TextView
        android:id="@+id/no_of_sessions"
        android:layout_width="wrap_content"
        android:layout_height="wrap_content"
        android:background="@drawable/track_rounded_corner"
        android:textColor="@color/white"
        android:textSize="@dimen/text_size_small"/>


Set color and text size according to your need. Here don’t add padding in the TextView because we have already added padding in the Drawable. Adding padding in the TextView will override the value specified in the drawable.

3.  Create TextView object in ViewHolder

Now create TextView object noOfSessions and bind it with R.id.no_of_sessions using ButterKnife.bind() method.

public class TrackViewHolder extends RecyclerView.ViewHolder {
    ...

    @BindView(R.id.no_of_sessions)
    TextView noOfSessions;

    private Track track;

    public TrackViewHolder(View itemView, Context context) {
        super(itemView);
        ButterKnife.bind(this, itemView);

    public void bindTrack(Track track) {
        this.track = track;
        ...
    }   
}


Here TrackViewHolder is a RecycleriewHolder for the TracksListAdapter. The bindTrack() method of this view holder is used to bind Track with ViewHolder.

4.  Add Quantity Strings (Plurals) for Sessions

Now we want to set the value of TextView. Here if the number of sessions of the track is zero or more than one then we need to set text  “0 sessions” or “2 sessions”. If the track has only one session than we need to set text “1 session” to make text meaningful. In android we have Quantity Strings which can be used to make this task easy.

<resources>
    <!--Quantity Strings(Plurals) for sessions-->
    <plurals name="sessions">
        <item quantity="zero">No sessions</item>
        <item quantity="one">1 session</item>
        <item quantity="other">%d sessions</item>
    </plurals>
</resources>


Using this plurals resource we can get appropriate string for specified quantity like “zero”, “one” and  “other” will return “No sessions”, “1 session”, and “2 sessions”. accordingly. 2 can be any value other than 0 and 1.

Now let’s set background color and test for the text view.

int trackColor = Color.parseColor(track.getColor());
int sessions = track.getSessions().size();

noOfSessions.getBackground().setColorFilter(trackColor, PorterDuff.Mode.SRC_ATOP);
noOfSessions.setText(context.getResources().getQuantityString(R.plurals.sessions,
                sessions, sessions));


Here we are setting background color of textview using getbackground().setColorFilter() method. To set appropriate text we are using getQuantityString() method which takes plural resource and quantity(in our case no of sessions) as parameters.

Now we are all set. Run the app it will look like this.

Conclusion

Adding TextView with rounded corner and colored background in the App gives great UI and UX. To know more about Rounded corner TextView and Quantity Strings follow the links given below.

Continue ReadingAdding Number of Sessions Label in Open Event Android App

Using ThreeTenABP for Time Zone Handling in Open Event Android

The Open Event Android project helps event organizers to organize the event and generate Apps (apk format) for their events/conferences by providing API endpoint or zip generated using Open Event server. For any Event App it is very important that it handles time zone properly. In Open Event Android App there is an option to change time zone setting. The user can view date and time of the event and sessions in Event Timezone and Local time zone in the App. ThreeTenABP provides a backport of the Java SE 8 date-time classes to Java SE 6 and 7. In this blog post I explain how to use ThreeTenABP for time zone handling in Android.

Add dependency

To use ThreeTenABP in your application you have to add the dependency in your app module’s build.gradle file.

dependencies {
      compile    'com.jakewharton.threetenabp:threetenabp:1.0.5'
      testCompile   'org.threeten:threetenbp:1.3.6'
}

Initialize ThreeTenABP

Now in the onCreate() method of the Application class initialize ThreeTenABP.

AndroidThreeTen.init(this);

Create getZoneId() method

Firstly create getZoneId() method which will return ZoneId according to user preference. This method will be used for formatting and parsing dates Here showLocal is user preference. If showLocal is true then this function will return Default local ZoneId otherwise ZoneId of the Event.

private static ZoneId geZoneId() {
        if (showLocal || Utils.isEmpty(getEventTimeZone()))
            return ZoneId.systemDefault();
        else
            return ZoneId.of(getEventTimeZone());
}

Here  getEventTimeZone() method returns time zone string of the Event.

ThreeTenABP has mainly two classes representing date and time both.

  • ZonedDateTime : ‘2011-12-03T10:15:30+01:00[Europe/Paris]’
  • LocalDateTime : ‘2011-12-03T10:15:30’

ZonedDateTime contains timezone information at the end. LocalDateTime doesn’t contain timezone.

Create method for parsing and formating

Now create getDate() method which will take isoDateString and will return ZonedDateTime object.

public static ZonedDateTime getDate(@NonNull String isoDateString) {
        return ZonedDateTime.parse(isoDateString).withZoneSameInstant(getZoneId());;
}


Create formatDate() method which takes two arguments first is format string and second is isoDateString. This method will return a formatted string.

public static String formatDate(@NonNull String format, @NonNull String isoDateString) {
        return DateTimeFormatter.ofPattern(format).format(getDate(isoDateString));
}

Use methods

Now we are ready to format and parse isoDateString. Let’s take an example. Let “2017-11-09T23:08:56+08:00” is isoDateString. We can parse this isoDateString using getDate() method which will return ZonedDateTime object.

Parsing:

String isoDateString = "2017-11-09T23:08:56+08:00";

DateConverter.setEventTimeZone("Asia/Singapore");
DateConverter.setShowLocalTime(false);
ZonedDateTime dateInEventTimeZone = DateConverter.getDate(isoDateString);

dateInEventTimeZone.toString();  //2017-11-09T23:08:56+08:00[Asia/Singapore]


TimeZone.setDefault(TimeZone.getDefault());
DateConverter.setShowLocalTime(true);
ZonedDateTime dateInLocalTimeZone = DateConverter.getDate(dateInLocalTimeZone);

dateInLocalTimeZone.toString();  //2017-11-09T20:38:56+05:30[Asia/Kolkata]


Formatting:

String date = "2017-03-17T14:00:00+08:00";
String formattedString = formatDate("dd MM YYYY hh:mm:ss a", date));

formattedString // "17 03 2017 02:00:00 PM"

Conclusion

As you can see, ThreeTenABP makes Time Zone handling so easy. It has also support for default formatters and methods. To learn more about ThreeTenABP follow the links given below.

Continue ReadingUsing ThreeTenABP for Time Zone Handling in Open Event Android