Adding ‘Voice Search’ Feature in Loklak Search

It is beneficial to have a voice search feature embedded in a search engine like loklak.org based on PWA (Progressive Web Application) architecture. This will allow users to make query using voice on phone or computer. For integrating voice search, JavaScript Web Speech API (also known as webkitSpeechRecognition) is used which allows us to add speech recognition feature in any website or a web application.

Integration Process

For using webkitSpeechRecognition, a separate typescript service is being created along with its relevant unit test

  1. speech.service.ts
  2. speech.service.spec.ts

The main idea to implement the voice search was

  1. To create an injectable speech service.
  2. Write methods for starting and stopping voice record in it.
  3. Import and inject the created speech service into root app module.
  4. Use the created speech service into required HomeComponent and FeedHeaderComponent.

Structure of Speech Service

The speech service mainly consists of two methods

  • record() method which accepts lang as string input which specifies the language code for speech recording and returns a string Observable.

   record(lang: string): Observable<string> {
           return Observable.create(observe => {
                 const webkitSpeechRecognition }: IWindow = 
                        <IWindow>window;
                 this.recognition = new webkitSpeechRecognition();
                 this.recognition.continuous = true;
                 this.recognition.interimResults = true;
                 this.recognition.onresult = take => 
                 this.zone.run(()                            
                 observe.next(take
                 .results.item
                 (take.results.
                 length - 1).
                 item(0).
                 transcript);
                 this.recognition
                 .onerror = 
                 err => observe
                 .error(err);
                 this.recognition.onend 
                 = () => observe
                 .complete();
                 this.recognition.lang = 
                 lang;
                 this.recognition.start( 
             );
        });
     }


Using observe.complete() allows speech recognition action to stop when the user stops speaking.

  • stoprecord() method which is used to stop the current instance of recording.

 stoprecord() {
       if (this.recognition) {
           this.recognition.stop();
       }
   }


stop() method is used to stop the current instance of speech recognition.

Using Speech Service in required Component

In Loklak Search, the speech service have been included in two main components i.e. HomeComponent and FeedHeaderComponent. The basic idea of using the created speech service in these components is same.

In the TypeScript (not spec.ts) file of the two components, firstly import the SpeechService and create its object in constructor.

constructor( private speech: SpeechService ) { }


Secondly, define a speechRecognition() method and use the created instance or object of SpeechService in it to record speech and set the query as the recorded speech input. Here, default language has been set up as ‘en_US’ i.e. English.

 stoprecord() {
       if (this.recognition) {
           this.recognition.stop();
       }
   }


After user clicks on speech icon, this method will be called and the recorded speech will be set as the query and there will be router navigation to the /search page where the result will be displayed.

Resources

Continue ReadingAdding ‘Voice Search’ Feature in Loklak Search

Making Shapes with PSLab Oscilloscope

Looking back to history, the first ever video game was ‘Pong’ which was played on an analog oscilloscope with a very small screen. Oscilloscopes are not made to play video games, but by just tinkering around its basic functionality which is display waveforms, we can do plenty of cool things. PSLab device also has an oscilloscope; in fact it’s a four channel oscilloscope.

This blog post will show you how the oscilloscope in PSLab is not just a cheap oscilloscope but it has lots of functionalities an industry grade oscilloscope has (except for the bandwidth limitation to a maximum of 2 MHz)

To produce shapes like above figures, we are using another instrument available in PSLab. That is ‘Waveform Generator’. PSLab Waveform Generator can generate three different waveforms namely Sine waves, Triangular waves and Square waves ranging from 5 Hz to 5 kHz.

To get started, first connect two jumper wires between SI1-CH1 and SI2-CH2 pins. We needn’t worry about ground pins as they are already internally connected. Now it’s time to open up the PSLab oscilloscope. Here we are going to utilize two channels for this activity and they will be CH1 and CH2. Check the tick boxes in front of ‘Chan 1’ and ‘Chan 2’ and set ‘Range’ to “+/-4V” to have the maximum visibility filling the whole screen with the waveform.

The shapes are drawn using a special mode called ‘X-Y Mode’ in PSLab oscilloscope. In this mode, two channels will be plotted against their amplitudes at every point in time.

As it is already mentioned that PSLab can generate many waveform types and also they can have different phase angles relative to each other. They can have different independent frequencies. With all these combinations, we can tweak the settings in Waveform Generator to produce different cool shapes in PSLab oscilloscope.

These shapes can vary from basic geometric shapes such as circle, square, rectangle to complicated shapes such as rhombus, ellipse and polynomial curves.

Circle

A circular shape can be made by generating two sine waves having the same frequency but with a phase difference of 90 degrees or 270 degrees between the two wave forms.


Square

Square shape can be made by generating two triangular waveforms again having the same frequency but with a phase difference of either 90 degrees or 270 degrees between the two.


Rectangle

Similar to creating a Square, by having the same frequency for both triangular waveforms but a different phase angle greater than or less than 90 degree will do the trick.


Rhombus

Keeping the waveform settings same for the rectangle, by changing the amplitude of the SI1 waveform using the knob we can generate a rhombic shape on the XY graph plot.


Ellipse

Generating ellipse is also similar to creating a rhombus. But here we are using sine waves instead of triangular waves. By changing the amplitude of SI1 using the knob we can change the curvature.


Helix

Helix or spiral shape can be generated using two sine waves having same phase but two different frequencies. Frequencies better be integer multiples of the smaller frequency to  have a steady shape.


Parabola

Parabolic shapes can be generated by mixing up triangular waves with sine waves with different phase angles.


More random shapes


References:

https://www.aps.org/publications/apsnews/200810/physicshistory.cfm

Continue ReadingMaking Shapes with PSLab Oscilloscope

Database Listener for User Centric Events

Badgeyay is an open-source utility developed by FOSSASIA to generate badges for conferences and events. The project is separated into two components to ease maintainability. First is the frontend part which is in ember and second part is backend which is in Flask. The choice of database to support backend is PostgreSQL.

Now comes the problem, whenever a user is registered in the database, he should receive  a verification mail, that he is successfully registered on the platform. For this case we have to listen to the database events on User model. This issue has greater extendibility than only sending greeting or verification mail to the user. We can extend this to trigger services that are dependent on user registration, like subscribing the user to some set of services based on the plan he opted while registration and many more.

These type of issues cannot be handled by normal relationship with tables and other entities, there has to be logic in place to support such functionalities. So the challenges for tackling the problem are as follows:

  • Listen to the insert_action in User model
  • Extracting the details necessary for the logic
  • Execute particular logic

Procedure

  1. Attaching insert_action listener to the User model. This function will get triggered whenever an entity is saved in the User model.

<!– HTML generated using hilite.me –>

@db.event.listens_for(User, "after_insert")
def logic(mapper, connection, target): {
......
}
  1. When the function gets triggered, extract the details of the saved user that is necessary for the logic. As currently we are sending greeting mail to the user,we only need the email of the user. Target is the actual saved user passed as argument to the listening function from the library.

<!– HTML generated using hilite.me –>

msg = {}
msg['subject'] = "Welcome to Badgeyay"
msg['receipent'] = target.email
msg['body'] = "It's good to have you onboard with Badgeyay. Welcome to " \
"FOSSASIA Family."
sendMail(msg)
  1. Now the details are passed to sendMail() function for sending mail which uses flask-mail library to send mail to the recipient.
    def sendMail(message):
    if message and message.receipent:
    try:
    msg = Message(
    subject=message.subject,
    sender=app.config['MAIL_USERNAME'], Response(200).generateMessage(
    recipients=[message.receipent],
    body=message.body)
    Mail(app).send(msg)
    except Exception as e:
    return jsonify(
    Response(500).exceptWithMessage(
    str(e),
    'Unable to send the mail'))
    return jsonify(
    Response(200).generateMessage(
    'Mail Sent'))
    else:
    return jsonify(
    Response(403).generateMessage(
    'No data received')) 'No data received'))
    
  2. This will send mail to the user who has been registered to the application.

Similarly we can use separate logics according to the need of the application.


The Pull Request for the above functionality is at this Link

Topics Involved

Working on the issue involve following topics:

  • Configuring mail service to allow insecure apps access.
  • Sending mail from the flask-mail to end user
  • Attaching listener to listen for database change
  • Extraction of data from saved object in database sqlalchemy.

Resources

  • Sending Mails Programmatically –  Link
  • Flask Mail Documentation – Link
  • Listening to database events – Link
  • Enabling access to GMAIL to send mails to recipient – Link
Continue ReadingDatabase Listener for User Centric Events

Adding multiple email support for users on Open Event Server

The Open Event Server enables organizers to manage events from concerts to conferences and meet-ups. It offers features for events with several tracks and venues. Event managers can create invitation forms for speakers and build schedules in a drag and drop interface. The event information is stored in a database. The system provides API endpoints to fetch the data, and to modify and update it.

The Open Event Server is based on JSON 1.0 Specification and hence build on top of Flask Rest Json API (for building Rest APIs) and Marshmallow (for Schema).

In this blog, we will talk about how to add support of multiple emails for a user in Open Event Server. The focus is on model and schema creation for this support.

Model Creation

For the UserEmail, we’ll make our model as follows

from app.models import db

class UserEmail(db.Model):
“””user email model class”””
__tablename__ = ‘user_emails’
id = db.Column(db.Integer, primary_key=True)
email = db.Column(db.String(120), unique=True, nullable=False)
verified = db.Column(db.Boolean, default=False)
user_id = db.Column(db.Integer, db.ForeignKey(‘users.id’, ondelete=’CASCADE’))
user = db.relationship(“User”, backref=”emails”, foreign_keys=[user_id])

def __init__(self, email=None, user_id=None):
self.email = email
self.user_id = user_id

def __str__(self):
return ‘User:’ + unicode(self.user_id).encode(‘utf-8’) + ‘ email: ‘ + unicode(self.email).encode(‘utf-8’)

def __unicode__(self):
return unicode(self.id)

Now, let’s try to understand the attributes of this model.

  1. id is most important Column required in every model to set it as primary key and to uniquely identify an UserEmail object.
  2. email is that attribute which is required hence should be unique and non-nullable.
  3. Verified attribute is used to check whether a email is verified or not (thus should be boolean)
  4. User_id is the attribute which specifies id of the user whose email is contained in the UserEmail object.
  5. Finally, a relationship with the user of id user_id and these emails (associated with the User.id == user_id) will be stored in the attribute emails in User Model.

Schema Creation

For the model UserEmail, we’ll make our schema UserEmailSchema as follows

from marshmallow_jsonapi import fields
from marshmallow_jsonapi.flask import Schema, Relationshipfrom app.api.helpers.utilities import dasherizeclass UserEmailSchema(Schema):
“””   API Schema for user email Model   “””class Meta:
“””  Meta class for user email API schema  “””
type_ = ‘user-emails’
self_view = ‘v1.user_emails_detail’
self_view_kwargs = {‘id’: ‘<id>’}
inflect = dasherize

id = fields.Str(dump_only=True)
email = fields.Email(allow_none=False)
user_id = fields.Integer(allow_none=False)
user = Relationship(attribute=’user’,
self_view=’v1.user_email’,
self_view_kwargs={‘id’: ‘<id>’},
related_view=’v1.user_detail’,
related_view_kwargs={‘user_id’: ‘<id>’},
schema=’UserSchema’,
type_=’user’
)

  • Marshmallow-jsonapi provides a simple way to produce JSON API-compliant data in any Python web framework.

Now, let’s try to understand the schema UserEmailSchema

  1. id : Same as in model id is used as uniquely identify an UserEmail object.
  2. email : Same as in model email is required thus allow_none is set to False.
  3. User_id : user_id is the id of user whose email is contained in a UserEmailSchema object.
  4. User : It tells whole attributes of the user to which this email belongs to.

So, we saw how to add multiple email support for users on Open Event Server. We just required to create a model and its schema to add this feature. Similarly, to add support for any database model in the project, we need to create Model and Schema with all the attributes as specified in the model too. This Schema creation is done with guidelines of JSONAPI 1.0 Specification using Marshmallow.

Resources

Continue ReadingAdding multiple email support for users on Open Event Server

Variable Font Size Badgeyay

Badgeyay is a simple badge generator that aims for promoting an open-source tool for generation of badges in PDF format. The project has options to choose from predefined set of images or upload a background image. User can choose from set of fonts and color of the same. But now Badgeyay also has option to choose custom font-size in generation of badges.

To implement font size feature,  first, the component that is determining the font of the label has to be identified. The label that determines the text on the badge is the <text> label and within it, the label that determines the properties of the text is <tspan>. So mainly we need to alter the properties in the tspan.

The property that determines the font size for the badge is font-size and its default value is set to 31.25 px. If the property in the labels changed, then we can see the corresponding changes in the PDF generated from the svg.

Now the challenges were:

  • To Determine the font value from the frontend.
  • Using the same for the font-config.
  • Changing the built svg accordingly.

Procedure

  1. Firstly frontend component has to be changed to incorporate a slider to give input for the variable font size. So a range input is inserted with range from 15 px to 45 px and default as 30 px. The size_print label gets changed dynamically to show the value selected from the range slider.
<li>
<input type="radio" name="fontsize" id="font-size-picker"> Choose font size
</li>
<section id="font-size-input" style="display:none;">
<label for="inputFile" id="size_print"></label>
<div>
<input type="range" id="font-size" max=45 min=15 step=5 value=30  class="form-control" name="font_size">
</div>
</section>
  1. After adding the component, form script is changed to add toggle behaviour to the button. For adding the toggling behaviour in the component, checkbox is used and the value of the label is updated dynamically as the slider value is changed.
$("#size_print").text($("#font-size").val() + " px");

      $("#font-size-picker").click(function () {

          if ($(this).is(":checked")) {

              $("#font-size-input").css("display", "block");

          } else {

              $("#font-size-input").css("display", "none");

          }

      });

      $("#font-size").on('input', function () {

          $("#size_print").text($(this).val() + " px");

      });
  1. After completing the work on the frontend, it is necessary to modify the backend too. The method for choosing custom font has to be refactored. It now checks whether the custom font is set or font size variable is set, and creates a config file for fonts which after use gets deleted.
font_config = {}
   # custom font is specified
   if custom_font != '':
       font_config['font'] = custom_font
   if font_size != '':
       font_config['font_size'] = font_size
   if custom_font != '' or font_size != '':
       json_str = json.dumps(font_config)
       print(json_str)
       f = open(os.path.join(app.config['UPLOAD_FOLDER'], 'fonts.json'), "w+")
       f.write(json_str)
       f.close()
  1. The generator class is modified as well to accommodate the changes, by adding a new class attribute called font_size. We find the keys in the dict object loaded from the file and assign the same to class attribute.
if 'font_size' in self.DATA.keys():
               self.font_size = self.DATA['font_size']
  1. Make the necessary change in the svg, so that font size change can be represented in the generated PDF. Replace the old font size with the new font size specified.
if self.font_size:
           content = content.replace("font-size:31.25px",
                                     "font-size:" + str(self.font_size) + "px")
  1. After all the changes, badge generated will have a different font size.

The Pull request for the above change is at this Link

Topics Involved

Working on this Issue (Link) involve following topics:

  • SVG Label manipulation
  • Sending data from Ember frontend to Backend.
  • Javascript for the toggle radio button.

References

  • Extracting map information from the SVG (Link)
  • Python Documentation for class (Link)
  • About Github Pages- (Link)
  • Ajax Serialize method to serialize the form contents – (Link)
Continue ReadingVariable Font Size Badgeyay

Refactoring and Remodeling Badgeyay API

When we build a full scale production application, we make sure that everything is modeled correctly and accordingly to the need of the code. The code must be properly maintained as well as designed in such a way that it is less prone to errors and bugs.

Badgeyay is also targeting to be a full production application, and in order to achieve it we first need to re-factor the code and model it using a strong yet maintainable structure.

What is the current state of Badgeyay?

Currently Badgeyay is divided into two sub folders.

\badgeyay
    \frontend
    \backend
    .
    .

It is backed by two folders, viz backend and frontend. The ‘backend’ folder handles the API that the service is currently running. The ‘frontend’ folder houses the Ember based frontend logic of the application.

Improvements to Badgeyay Backend

We have worked on improving Backend for Badgeyay. Instead of traditional methods, i.e. current method, of API development; We employ a far better approach of using Flask Blueprint as a method of refactoring the API.

The new backend API resides inside the following structure.

\badgeyay
    \backend
        \blueprint
            \api

The API folder currently holds the new API being formatted from scratch using

  • Flask Blueprint
  • Flask Utilities like jsonify, response etc

The new structure of Badgeyay Backend will follow the following structure

api
    \config
    \controllers
    \helpers
    \models
    \utils
    db.py
    run.py

The folders and their use cases are given below

  • \config
    • Contain all the configuration files
    • Configurations about URLs, PostgreSQL etc
  • \controllers
    • This will contain the controllers for our API
    • Controllers will be the house to our routes for APIs
  • \helpers
    • Helpers folder will contain the files directly related to API
  • \models
    • Models folder contains the Schemas for PostgreSQL
    • Classes like User etc will be stored in here
  • \utils
    • Utils will contain the helper functions or classes
    • This classes or functions are not directly connected to the APIs
  • db.py
    • Main python file for Flask SQLAlchemy
  • run.py
    • This is the main entry point.
    • Running this file will run the entire Flask Blueprint API

How does it help?

  • It helps in making the backend more solid.
  • It helps in easy understanding of application with maintained workflow.
  • Since we will be adding a variety of features during Google Summer of Code 2018 therefore we need to have a well structured API with well defined paths for every file being used inside it.
  • It will help in easy maintaining for any maintainer on this project.
  • Development of the API will be faster in this way, since everything is divided into sub parts therefore many people can work on many different possibilities on the same time.

Further Improvements

Since this structure has been setup correctly in Badgeyay now, so we can work on adding separate routes and different functionalities can be added simultaneously.

It ensures faster development of the project.

Resources

Continue ReadingRefactoring and Remodeling Badgeyay API

Creating Bill of Materials for PSLab using KiCAD

PSLab device consists of a hundreds of electronic components. Resistors, diodes, transistors, integrated circuits are to name a few. These components are of two types; Through hole and surface mounted.

Surface mount components (SMD) are smaller in size. Due to this reason, it is hard to hand solder these components onto a printed circuit board. We use wave soldering or reflow soldering to connect them with a circuit.

Through Hole components (TH) are fairly larger than their SMD counter part. They are made bigger to make it easy for hand soldering. These components can also be soldered using wave soldering.

Once a PCB has completed its design, the next step is to manufacture it with the help of a PCB manufacturer. They will require the circuit design in “gerber” format along with its Bill of Materials (BoM) for assembly. The common requirement of BoM is the file in a csv format. Some manufacturers will require the file in xml format. There are many plugins available in KiCAD which does the job.

KiCAD when first installed, doesn’t come configured with a BoM generation tool. But there are many scripts developed with python available online free of charge. KiBoM is one of the famous plugins available for the task.

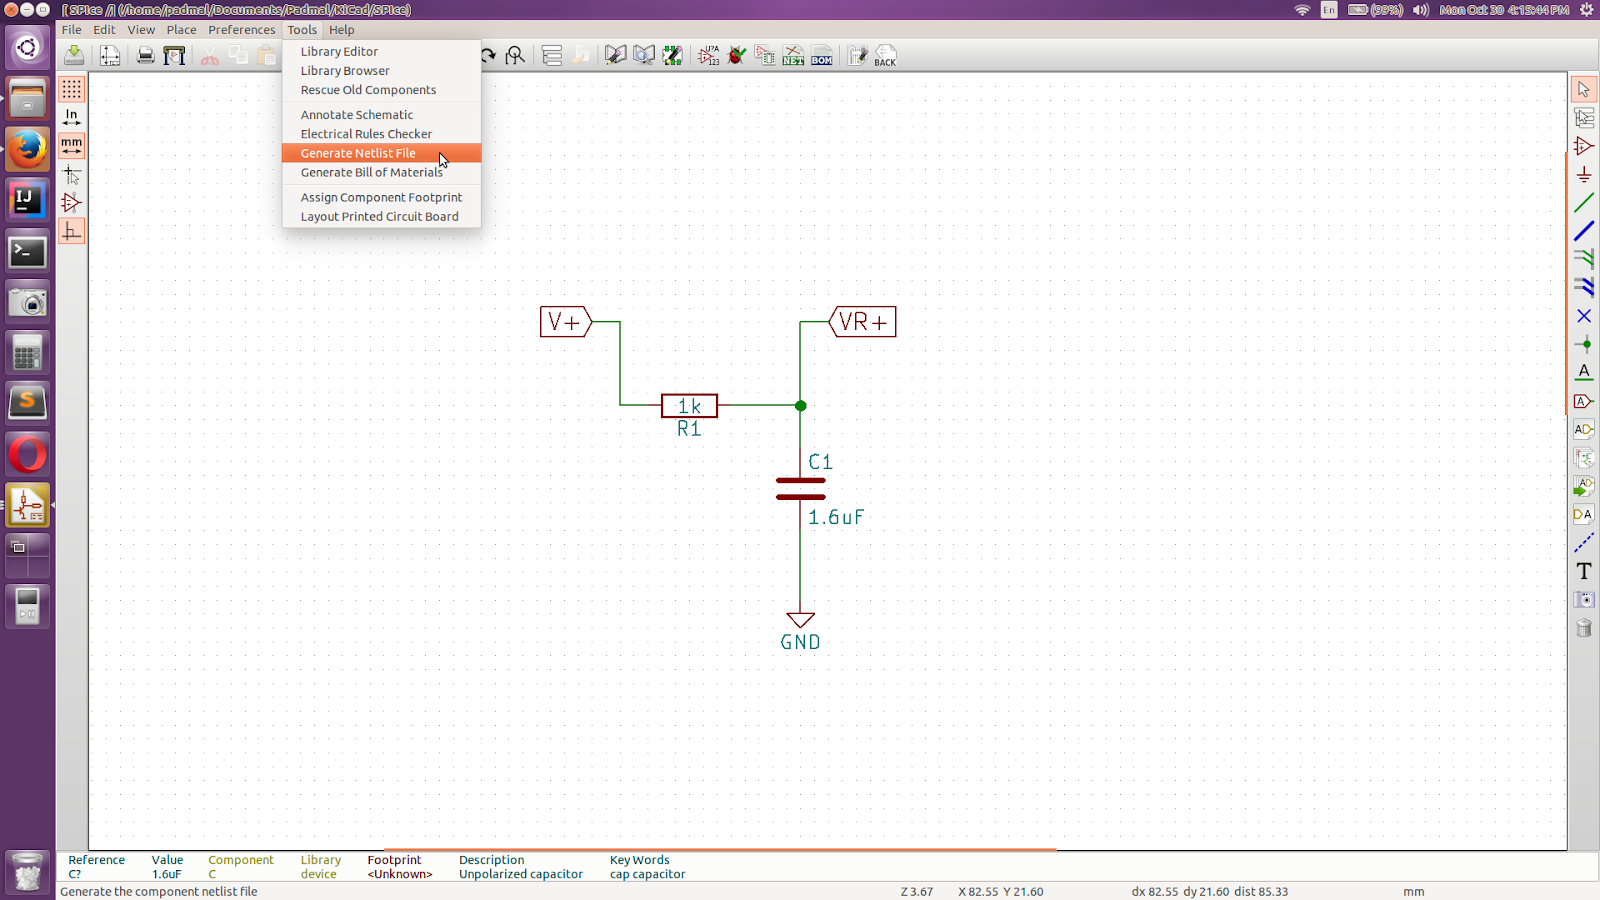
Go to “Eeschema” editor in KiCAD where the schematic is present and then click on the “BoM” icon in the menu bar. This will open a dialog box to select which plugin to use to generate the bill of materials.

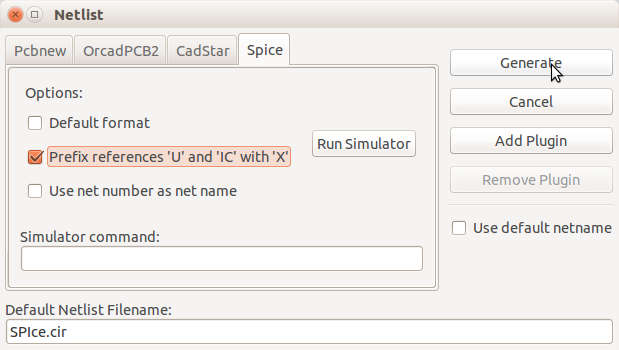
Initially there won’t be any plugins available in the “Plugins” section. As we are adding plugins to it, they will be listed down so that we can select which plugin we need. To add a plugin, click on the “Add Plugin” button to open the dialog box to browse to the specific plugin we have already downloaded. There are a set of available plugins in the KiCAD installation directory.

The path is most probably will be (unless you have made any changes to the installation);

usr/lib/kicad/plugins

Once a plugin is selected, click on “Generate” button to generate the bom file. “Plugin Info” will display where the file was made and it’s name.

Make sure we have made the BoM file compatible to the file required by the manufacturer. That is; removed all the extra content and added necessary details such as manufacturer’s part numbers and references replacing the auto generated part numbers.

Resources:

Continue ReadingCreating Bill of Materials for PSLab using KiCAD

The Road to Success in Google Summer of Code 2017

It’s the best time when GCI students can get the overview experience of GSoC and all the aspiring participant can get themselves into different projects of FOSSASIA.

I’m a Junior year undergraduate student pursuing B.Tech in Electrical Engineering from Indian Institute of Technology Patna. This summer, I spent coding in Google Summer of Code with FOSSASIA organization. It feels great to be an open-source enthusiast, and Google as a sponsor make it as icing on the cake. People can learn new things here and meet new people.

I came to know about GSoC through my senior colleagues who got selected in GSoC in the year 2016. It was around September 2016 and I was in 2nd year of my college. At that time, last year, result of GSoC was declared.

What is GSoC?

Consider GSoC as a big bowl which has lots of small balls and those small balls are open-source organizations. Google basically acts as a sponsor for the open-source organizations. A timeline is proposed according to the applied organization and then student select their favorite organization and start to contribute to it. Believe me, it’s not only computer science branch specific, anyone can take part in it and there is no minimum CPI requirement. I consider myself to be one of the examples who have an electrical branch with not so good academic performance yet successfully being part of GSoC 2017.

How to select an organization?

This is the most important step and it takes time. I wandered around 100 organizations to find where my interest actually lies. But now, I’ll describe how to sort this and find your organization a little quicker. Take a pen and paper (kindly don’t use notepad of pc) and write down your field of interest in computer science. Number every point in decreasing order of your interest. Then for each respective field write down its basic pre-requisites. Visit GSoC website, go to organization tab and there is a slide for searching working field of the organization. Select only one organization, dig out its website, see the previous project and its application. If nothing fits you, repeat the same with another organization. And if that organization interests you, then look for a project of that organization. First of all, look at that application of the project, and give that application a try and must give a feedback to the organization. Then try to find that what languages, modules, etc that project used to work and how the project works. Don’t worry if nothing goes into your mind. Find out the developers mailing list, their chat channel, their code base area. And ask developers out there for help.

First Love It:

Open-Source, it’s a different world which exists on Earth. All organizations are open-source and all their codes are open and free to view. Find things that interests you the most and start to love the work. If you don’t understand a code, learn things by doing and asking. Most of the times we don’t get favorable responses, in such times we need to carry on and have patience for the best to happen.

My Favourite part:

GSoC has been my dream since the day I came to know about it. It’s only through this that one gets a chance to explore open-source softwares, and organizations get a chance to hire on board developers. This is the great initiative taken by Google which brings hope for the developers to increase the use of open-source. This is one of the ways through which one can look into the codes of the developers and help them out and even also get helped.

GSoC is the platform through which one can implement lots of new things, meet new people, develop new softwares and see the world around in a different way. That’s what happened with me, it’s just at the end of the first phase, my love towards open-source increased exponentially. Now I see every problem in my life as a way to solve it through the open-source. Rather it’s part of arranging an event or designing an invitation, I am encouraged to use open-source tools to help me out. It becomes very easy to distribute data and convey information through open-source, so the people can reach to you much easier.

You always see a thing according to your perspective and it’s always the best but the open-source gives it a view through the perspective of the world and gets the best from them through a compilation of all the sources. One can give ideas, their views, find something that other can’t even see and increase its karma through contribution. And all these things have been made possible through GOOGLE only. I became such that I can donate the rest of my life working for open-source. GSoC is responsible for including the open-source contribution in my daily life. It made me feel really bad if my Github profile page has 0 contributions at the end of the day. Open Source opens door to another world.

Challenging part:

To conclude, I would say that GSoC made me love the challenge. I became such that the things that come easily to me don’t taste good to me at all. Specifically, GSoC’s most challenging part is to get into it that is to get selected. I still can’t believe that I was selected. Now onwards it’s just fun and learning. Each and every day, I encountered several issues, bugs, etc but just before going to bed at night, there were things which collectively made me feel that whether the bug has been solved or not, but I was able to break the upper most covering of that conch shell. And such things increases the motivation and light up the enthusiasm to tackle the problem. Open-Source not only taught me to control different snapshots of software but also of time. I learn to manage different works of day efficiently and it includes the contribution in open-source as part of my daily life.

Advice to students:

The only problem new developers have is to get started. I’ll advise them to close their eyes and dive into it without thinking whether they would be able to complete this task or not. Believe me, you will gradually find that whether the task is completed or not but you are much above the condition than you were at the time of beginning the task.

Just learn by doing the things.

Make mistakes and enlist them as “things that will not work” so one may read it and avoid it.

GSoC Project link: https://summerofcode.withgoogle.com/projects/#5560333780385792
Final Code Submission: https://gist.github.com/meets2tarun/270f151d539298831ce542be5f733c82

Continue ReadingThe Road to Success in Google Summer of Code 2017

Speeding up the Travis Build to Decrease the Building Time

Meilix is the repository which uses build script to generate community version of lubuntu as LXQT Desktop. It usually takes around 25-26 to build and deploy the ISO as a Github Release on master branch.
Observing the build log we can see that there are most of the packages like debootstrap, squashfs-tool, etc which are being fetch and setup at the time of building which results in increasing build time.

The issue is to decrease the build time supplying the packages from Travis so that when we run build.sh we won’t be required to download them again and thus few minutes will get reduced.
We included list of packages to be pre-downloaded in .travis.yml

include:
  - os: linux
    addons:
      apt:
        sources:
          - ubuntu-toolchain-r-test
        packages:
          - debootstrap
          - genisoimage
          - p7zip-full
          - squashfs-tools
          - ubuntu-dev-tools
          - dpkg-dev
          - debhelper
          - fakeroot
          - devscripts

These are some important packages included in the build.sh  as devtools=”debootstrap genisoimage p7zip-full squashfs-tools ubuntu-dev-tools” which are always fetched, so we included it into .travis.yml and downloaded it before entering into the chroot environment. By specifying those packages in the .travis.yml, Travis provides those packages beforehand into the docker container so it will run our script. Since the scripts also include package then when the script runs apt-get it won’t download those packages again. They are specified outside the chroot environment because they are expected to be at the system the build.sh script is run to get the iso. By this way, we get a sharp decrease in build time as the internet in the Travis CI container is not so fast so the package download time can be avoided. Now the build is taking around 15-16 minutes to build and deploy.

One thing to note that we didn’t remove those packages off build.sh so that build.sh works outside Travis CI as well.

References:
Pull #176 by @abishekvashok
Speeding up Travis Build by Travis CI
Faster Build by atchai.com

Continue ReadingSpeeding up the Travis Build to Decrease the Building Time

KiCAD Simulation to Validate Circuitry in PSLab Device

A circuit is a combination of passive or active electronic components which are interconnected with wires and provided to power to perform a specific task. Bringing a conceptual circuit design into an actual model includes several steps. It all starts with a problem definition such as a “Power module to regulate input voltage to output 5V”. The next step is to design the schematic with the help of a designing tool. Once the schematic is complete, the PCB layout can be made which will be later printed out as the final circuit.

The importance of testing the schematic circuit for performance and functionalities is very important as once the circuit is printed out, there is no way to modify the wiring or components. That is when the SPICE simulation comes into picture.

PSLab device is consisted of hundreds of circuit components and they are interconnected using a 4 layer printed circuit board. A fault in one sub circuitry may fail the complete device. Hence each of them must be tested and simulated using proper tools to ensure functionality against a test input data set.

KiCAD requires an external SPICE engine to be installed. Ngspice is a famous SPICE tool used in the industry.

The test procedures carried out to ensure the circuitry functions in PSLab device is described in this blog. Once the circuit is complete, generate the spice netlist. This will open up a dialog box and in the “Spice” tab, select “Prefix references ‘U’ and ‘IC’ with ‘X’”.

U and IC prefixes are used with chips which cannot be simulated with SPICE. Click “Generate” to build the netlist. Note that this is not the netlist we use to build up the PCB but a netlist which can be used in SPICE simulation.

Now browse to the project folder and rename the file extension of cir to cki to make them compatible with command line SPICE commands.

cp <filename>.cir <filename>.cki

Then open the file using a text editor and modify the GND connection to have a global ground connection by replacing “GND” with “0” which is required in SPICE simulation. Once the SPICE code is complete run the following commands to get the SPICE script compiled;

export SPICE_ASCIIRAWFILE=1
ngspice -b -r <filename>.raw <filename>.cki
ngnutmeg SPIce.raw

This will open up a data analysis and manipulation program provided with ngspice to plot graphs and analyse SPICE simulations. Using this we can verify if the circuit can produce expected outputs with respect to the inputs we are providing and make adjustments if necessary.

Resource:

Continue ReadingKiCAD Simulation to Validate Circuitry in PSLab Device