Filtering List with Search Manager in Connfa Android App

It is a good practice to provide the facility to filter lists in Android apps to improve the user experience. It often becomes very unpleasing to scroll through the entire list when you want to reach a certain data point. Recently I modified Connfa app to read the list of speakers from the Open Event Format. In this blog I describe how to add filtering facility in lists with Search Manager.

First, we declare the search menu so that the widget appears in it.

<?xml version="1.0" encoding="utf-8"?>
<menu xmlns:android="http://schemas.android.com/apk/res/android">
    <item android:id="@+id/search"
        android:title="Search"
        android:icon="@drawable/search"
        android:showAsAction="collapseActionView ifRoom"
        android:actionViewClass="android.widget.SearchView" />
</menu>

In above menu item the collapseActionView attribute allows your SearchView to expand to take up the whole action bar and collapse back down into a normal action bar item when not in use. Now we create the SearchableConfiguration which defines how SearchView behaves.

<?xml version="1.0" encoding="utf-8"?>
<searchable
    xmlns:android="http://schemas.android.com/apk/res/android"
    android:label="@string/app_name"
    android:hint="Search friend">
</searchable>

Also add this to the activity that will be used with <meta-data> tag in the manifest file. Then associate searchable configuration with the SearchView in the activity class

@Override
public boolean onCreateOptionsMenu(Menu menu) {
    MenuInflater inflater = getMenuInflater();
    inflater.inflate(R.menu.search_menu, menu);

    SearchManager searchManager = (SearchManager)
                            getSystemService(Context.SEARCH_SERVICE);
    searchMenuItem = menu.findItem(R.id.search);
    searchView = (SearchView) searchMenuItem.getActionView();

    searchView.setSearchableInfo(searchManager.
                            getSearchableInfo(getComponentName()));
    searchView.setSubmitButtonEnabled(true);
    searchView.setOnQueryTextListener(this);

    return true;
}

Implement SearchView.OnQueryTextListener in activity, need to override two new methods now

@Override
public boolean onQueryTextSubmit(String searchText) {
  
  return true;
}

@Override
public boolean onQueryTextChange(String searchedText) {

   if (mSpeakersAdapter != null) {
       lastSearchRequest = searchedText;
       mSpeakersAdapter.getFilter().filter(searchedText);
   }
   return true;
}

Find the complete implementation here. In the end it will look like this,


References

Android Search View documentation – https://developer.android.com/reference/android/widget/SearchView.html

Continue ReadingFiltering List with Search Manager in Connfa Android App

Creating Sajuno Filter in Editor of Phimpme Android

What is Sajuno filter?

Sajuno filter is an image filter which we used in the editor of Phimpme Android application for brightening the skin region of a portrait photo.

How to perform?

Generally in a portrait photo, the dark regions formed due to shadows or low lightning conditions or even due to tanning of skin contains more darker reds than the greens and blues. So, for fixing this darkness of picture, we need to find out the area where reds are more dominant than the greens and blues. After finding the region of interest, we need to brighten that area corresponding to the difference of the reds and other colors.

How we implemented in Phimpme Android?

In Phimpme Android application, first we created a mask satisfying the above conditions. It can be created by subtracting blues and greens from red. The intensity can be varied by adjusting the intensity of reds. The condition mentioned here in programmatical way is shown below.


bright = saturate_cast<uchar>((intensity * r - g * 0.4 - b * 0.4));

In the above statement, r,g,b are the reds, greens and blues of the pixels respectively. The coefficients can be tweaked a little. But these are the values which we used in Phimpme Android application. After the above operation, a mask is generated as below.


This mask has the values that correspond to the difference of reds and greens and difference of reds and blues. So, we used this mask directly to increase the brightness of the dark toned skin of the original image. We simply need to add the mask and the original image. This results the required output image shown below.


As you can see the resultant image has less darker shades on the face than the original image. The way of implementation which we used in Phimpme Android editor is shown below.


double intensity = 0.5 + 0.35 * val;     // 0 < val < 1
dst = Mat::zeros(src.size(), src.type());
uchar r, g, b;
int bright;

for (y = 0; y < src.rows; y++) {
   for (x = 0; x < src.cols; x++) {
       r = src.at<Vec3b>(y, x)[0];
       g = src.at<Vec3b>(y, x)[1];
       b = src.at<Vec3b>(y, x)[2];

       bright = saturate_cast<uchar>((intensity * r - g * 0.4 - b * 0.4));
       dst.at<Vec3b>(y, x)[0] =
               saturate_cast<uchar>(r + bright);
       dst.at<Vec3b>(y, x)[1] =
               saturate_cast<uchar>(g + bright);
       dst.at<Vec3b>(y, x)[2] =
               saturate_cast<uchar>(b + bright);
   }
}

Resources:

Continue ReadingCreating Sajuno Filter in Editor of Phimpme Android

Real Time Upload Progress in Phimpme Android

The Phimpme Android application along with a wonderful gallery, edit image and camera section comes in with an option to share the images to different connected accounts. For sharing the images to different accounts, we have made use of different SDK’s provided to help users to share the images to multiple accounts at once without having to install other applications on their devices. When the user connects the account and shares the image to any account, we display a snackbar at the bottom that the upload has started and then we display the progress of the uploads in the notification panel as depicted in the screenshot below.

In this tutorial, I will be explaining how we achieved this feature of displaying the upload progress in the Phimpme Android application using a Notification handler class.

Step 1

The first thing we need to do is to create an AsyncTask that will be handling the upload progress and the notification handling in the background without affecting the main UI of the application. This can be done using the upload progress class which is a subclass of the AsyncTask class as depicted below.

private class UploadProgress extends AsyncTask<Void, Integer, Void> {
}

The AsyncTask overrides three methods which are onPreExecute, doInBackground and onPostExecute methods. In the onPreExecute method we will make the uploading notification visible to the user via the Notification handler class.

Step 2

After this, we need to create a notification handler class which will be handling the uploads progress. We will be needing four methods inside of the Notification handler class to :

  1. Make the app notification in the notification panel.
  2. To update the progress of the upload.
  3. To display the upload failed progress.
  4. To display the upload passed progress.

The notification display can be made using the following lines of code below:

mNotifyManager = (NotificationManager) ActivitySwitchHelper.getContext().getSystemService(Context.NOTIFICATION_SERVICE);
mBuilder = new NotificationCompat.Builder(ActivitySwitchHelper.getContext());
mBuilder.setContentTitle(ActivitySwitchHelper.getContext().getString(R.string.upload_progress))
      .setContentText(ActivitySwitchHelper.getContext().getString(R.string.progress))
      .setSmallIcon(R.drawable.ic_cloud_upload_black_24dp)
      .setOngoing(true);
mBuilder.setProgress(0, 0, true);
// Issues the notification
mNotifyManager.notify(id, mBuilder.build());

The above code makes use of the Android’s NotificationManager class to get the notification service and sets the title and the upload image which is to be displayed to the user at the time of image uploads.

Now we need to update the notification after every each second to display the real time upload progress to the user. This can be done by using the upload progress method which takes in total file size and the amount of data uploaded as a parameter.

public static void updateProgress(int uploaded, int total, int percent){
  mBuilder.setProgress(total, uploaded, false);
  mBuilder.setContentTitle(ActivitySwitchHelper.getContext().getString(R.string.upload_progress)+" ("+Integer.toString(percent)+"%)");
  // Issues the notification
  mNotifyManager.notify(id, mBuilder.build());

The above updating process can be done in the doInBackground task of the AsyncTask described in step 1.

Step 3

After the upload has completed, the onPostExecute method will be executed and in that we need to make display the status whether the upload passed or failed and we need to set the onProgress value of the notification to be false so that user can remove the notification. This can be done using the following line of code below:

mBuilder.setContentText(ActivitySwitchHelper.getContext().getString(R.string.upload_done))
      // Removes the progress bar
      .setProgress(0,0,false)
      .setContentTitle(ActivitySwitchHelper.getContext().getString(R.string.upload_complete))
      .setOngoing(false);
mNotifyManager.notify(0, mBuilder.build());
mNotifyManager.cancel(id);

This is how we have created and made use of the Notification handler class in the Phimpme Application to display the upload progress in the application. To get the full source code for implementing the uploads to multiple accounts and to display the notification, please refer to the Phimpme Android GitHub repository.

Resources

  1. Google Developer’s Guide – Notification Handling – https://developer.android.com/guide/topics/ui/notifiers/notifications.html
  2. Google Developer’s Guide – AsyncTask in Android – https://developer.android.com/reference/android/os/AsyncTask.html
  3. StackOverflow – Notification Handling – https://stackoverflow.com/questions/31063920/how-to-program-android-notification
  4. GitHub – Phimpme Android Repository – https://github.com/fossasia/phimpme-android/
Continue ReadingReal Time Upload Progress in Phimpme Android

Adding Sticky Headers for Grouping Sponsors List in Open Event Android App

The Open Event Android project has a fragment for showing sponsors of the event. Each Sponsor model has a name, url, type and level. The SponsorsFragment shows list according to type and level. Each sponsor list item has sponsor type TextView. There can be more than one sponsors with the same type. So instead of showing type in the Sponsor item we can add Sticky header showing type at the top which will group the sponsors with the same type and also gives the great UI. In this post I explain how to add the Sticky headers in the RecyclerView using StickyHeadersRecyclerView library.

1. Add dependency

In order to use Sticky Headers in your app add following dependencies in your app module’s build.gradle file.

dependencies {
	compile 'com.timehop.stickyheadersrecyclerview:library:0.4.3'
}

2. Create layout for header

Create recycler_view_header.xml file for the header. It will contain LinearLayout and simple TextView which will show Sponsor type.

<?xml version="1.0" encoding="utf-8"?>
<LinearLayout xmlns:android="http://schemas.android.com/apk/res/android"
    android:layout_width="match_parent"
    android:layout_height="wrap_content"
    android:orientation="vertical">

    <TextView
        android:id="@+id/recyclerview_view_header"
        android:layout_width="match_parent"
        android:layout_height="wrap_content"
        android:padding="@dimen/padding_medium" />

</LinearLayout>

Here you can modify layout according to your need.

3.  Implement StickyRecyclerHeadersAdapter

Now implement StickyRecyclerHeadersAdapter in the List Adapter. Override getHeaderId(), onCreateHeaderViewHolder(), onBindHeaderViewHolder
() methods of the StickyRecyclerHeadersAdapter.

public class SponsorsListAdapter extends BaseRVAdapter<Sponsor, SponsorViewHolder> implements StickyRecyclerHeadersAdapter {
    ...

    @Override
    public long getHeaderId(int position) {...}

    @Override
    public RecyclerView.ViewHolder onCreateHeaderViewHolder(ViewGroup parent) {...}

    @Override
    public void onBindHeaderViewHolder(RecyclerView.ViewHolder holder, int position) {...}
}


The getHeaderId() method is used to give an id to the header. It is the main part of the implementation here all the sponsors with the same type should return the same id. In our case we are returning sponsor level because all the sponsor types have corresponding levels.

String level = getItem(position).getLevel();
return Long.valueOf(level);


The onCreateHeaderViewHolder() returns Recycler ViewHolder for the header. Here we will use in the inflate() method of  LayoutInflater to get View object of recycler_view_header.xml file. Then return new RecyclerView.ViewHolder object using View object.

View view = LayoutInflater.from(parent.getContext())
                .inflate(R.layout.recycler_view_header, parent, false);
return new RecyclerView.ViewHolder(view) {};


The onBindHeaderViewHolder() binds the sponsor to HeaderViewHolder. In this method we sets the sponsor type string to the TextView we have created in the recycler_view_header.xml file.

TextView textView = (TextView) holder.itemView.findViewById(R.id.recyclerview_view_header);
textView.setGravity(Gravity.CENTER_HORIZONTAL);

String sponsorType = getItem(position).getType();
if (!Utils.isEmpty(sponsorType))  
   textView.setText(sponsorType.toUpperCase());

Here you can also modify TextView according to your need. We are centering text using setGravity() method.

4.  Setup RecyclerView

Now create RecyclerView and set adapter using setAdapter() method. Also as we want the linear list of sponsors so set the LinearLayoutManager using setLayoutManager() method.

SponsorsListAdapter sponsorsListAdapter = new SponsorsListAdapter(getContext(), sponsors);
sponsorsRecyclerView.setAdapter(sponsorsListAdapter);
sponsorsRecyclerView.setLayoutManager(new LinearLayoutManager(getActivity()));


Create StickyRecyclerHeadersDecoration object and add it in the RecyclerView using addItemDecoration() method.

final StickyRecyclerHeadersDecoration headersDecoration = new StickyRecyclerHeadersDecoration(sponsorsListAdapter);

sponsorsRecyclerView.addItemDecoration(headersDecoration);
sponsorsListAdapter.registerAdapterDataObserver(new RecyclerView.AdapterDataObserver(){
    @Override
    public void onChanged {
            headersDecoration.invalidateHeaders();
    }
});

Now add AdapterDataObserver using registerAdapterDataObserver() method. The onChanged() method in this observer is called whenever dataset changes. So in this method invalidate headers using invalidateHeaders() method of HeaderDecoration.

Now we are all set. Run the app it will look like this.

Conclusion

Sticky headers in the App gives great UI and UX. You can also add a click listener to the headers. To know more about Sticky Headers follow the links given below.

Continue ReadingAdding Sticky Headers for Grouping Sponsors List in Open Event Android App

Preparing for Automatic Publishing of Android Apps in Play Store

I spent this week searching through libraries and services which provide a way to publish built apks directly through API so that the repositories for Android apps can trigger publishing automatically after each push on master branch. The projects to be auto-deployed are:

I had eyes on fastlane for a couple of months and it came out to be the best solution for the task. The tool not only allows publishing of APK files, but also Play Store listings, screenshots, and changelogs. And that is only a subset of its capabilities bundled in a subservice supply.

There is a process before getting started to use this service, which I will go through step by step in this blog. The process is also outlined in the README of the supply project.

Enabling API Access

The first step in the process is to enable API access in your Play Store Developer account if you haven’t done so. For that, you have to open the Play Dev Console and go to Settings > Developer Account > API access.

If this is the first time you are opening it, you’ll be presented with a confirmation dialog detailing about the ramifications of the action and if you agree to do so. Read carefully about the terms and click accept if you agree with them. Once you do, you’ll be presented with a setting panel like this:

Creating Service Account

As you can see there is no registered service account here and we need to create one. So, click on CREATE SERVICE ACCOUNT button and this dialog will pop up giving you the instructions on how to do so:

So, open the highlighted link in the new tab and Google API Console will open up, which will look something like this:

Click on Create Service Account and fill in these details:

Account Name: Any name you want

Role: Project > Service Account Actor

And then, select Furnish a new private key and select JSON. Click CREATE.

A new JSON key will be created and downloaded on your device. Keep this secret as anyone with access to it can at least change play store listings of your apps if not upload new apps in place of existing ones (as they are protected by signing keys).

Granting Access

Now return to the Play Console tab (we were there in Figure 2 at the start of Creating Service Account), and click done as you have created the Service Account now. And you should see the created service account listed like this:

Now click on grant access, choose Release Manager from Role dropdown, and select these PERMISSIONS:

Of course you don’t want the fastlane API to access financial data or manage orders. Other than that it is up to you on what to allow or disallow. Same choice with expiry date as we have left it to never expire. Click on ADD USER and you’ll see the Release Manager created in the user list like below:

Now you are ready to use the fastlane service, or any other release management service for that matter.

Using fastlane

Install fastlane by

sudo gem install fastlane

Go to your project folder and run

fastlane supply init

First it will ask the location of the private key JSON file you downloaded, and then the package name of the application you are trying to initialize fastlane for.

Then it will create metadata folder with listing information excluding the images. So you’ll have to download and place the images manually for the first time

After modifying the listing, images or APK, run the command:

fastlane supply run

That’s it. Your app along with the store listing has been updated!

This is a very brief introduction to the capabilities of the supply service. All interactive options can be supplied via command line arguments, certain parts of the metadata can be omitted and alpha beta management along with release rollout can be done in steps! Make sure to check out the links below:

Continue ReadingPreparing for Automatic Publishing of Android Apps in Play Store

Using Firebase Test Lab for Testing test cases of Phimpme Android

As now we started writing some test cases for Phimpme Android. While running my instrumentation test case, I saw a tab of Cloud Testing in Android Studio. This is for Firebase Test Lab. Firebase Test Lab provides cloud-based infrastructure for testing Android apps. Everyone doesn’t have every devices of all the android versions. But testing on all of them is equally important.

How I used test lab in Phimpme

  • Run your first test on Firebase

Select Test Lab in your project on the left nav on the Firebase console, and then click Run a Robo test. The Robo test automatically explores your app on wide array of devices to find defects and report any crashes that occur. It doesn’t require you to write test cases. All you need is the app’s APK. Nothing else is needed to use Robo test.

Upload your Application’s APK (app-debug-unaligned.apk) in the next screen and click Continue

Configure the device selection, a wide range of devices and all API levels are present there. You can save the template for future use.

Click on start test to start testing. It will start the tests and show the real time progress as well.

  • Using Firebase Test Lab from Android Studio

It required Android Studio 2.0+. You needs to edit the configuration of Android Instrumentation test.

Select the Firebase Test Lab Device Matrix under the Target. You can configure Matrix, matrix is actually on what virtual and physical devices do you want to run your test. See the below screenshot for details.

Note: You need to enable the firebase in your project

So using test lab on firebase we can easily test the test cases on multiple devices and make our app more scalable.

Resources:

Continue ReadingUsing Firebase Test Lab for Testing test cases of Phimpme Android

Image Loading in Open Event Organizer Android App using Glide

Open Event Organizer is an Android App for the Event Organizers and Entry Managers. Open Event API Server acts as a backend for this App. The core feature of the App is to scan a QR code from the ticket to validate an attendee’s check in. Other features of the App are to display an overview of sales and ticket management. As per the functionality, the performance of the App is very important. The App should be functional even on a weak network. Talking about the performance, the image loading part in the app should be handled efficiently as it is not an essential part of the functionality of the App. Open Event Organizer uses Glide, a fast and efficient image loading library created by Sam Judd. I will be talking about its implementation in the App in this blog.

First part is the configuration of the glide in the App. The library provides a very easy way to do that. Your app needs to implement a class named AppGlideModule using annotations provided by the library and it generates a glide API which can be used in the app for all the image loading stuff. The AppGlideModule implementation in the Orga App looks like:

@GlideModule
public final class GlideAPI extends AppGlideModule {

   @Override
   public void registerComponents(Context context, Glide glide, Registry registry) {
       registry.replace(GlideUrl.class, InputStream.class, new OkHttpUrlLoader.Factory());
   }

   // TODO: Modify the options here according to the need
   @Override
   public void applyOptions(Context context, GlideBuilder builder) {
       int diskCacheSizeBytes = 1024 * 1024 * 10; // 10mb
       builder.setDiskCache(new InternalCacheDiskCacheFactory(context, diskCacheSizeBytes));
   }

   @Override
   public boolean isManifestParsingEnabled() {
       return false;
   }
}


This generates the API named GlideApp by default in the same package which can be used in the whole app. Just make sure to add the annotation @GlideModule to this implementation which is used to find this class in the app. The second part is using the generated API GlideApp in the app to load images using URLs. Orga App uses data binding for layouts. So all the image loading related code is placed at a single place in DataBinding class which is used by the layouts. The class has a method named setGlideImage which takes an image view, an image URL, a placeholder drawable and a transformation. The relevant code is:

private static void setGlideImage(ImageView imageView, String url, Drawable drawable, Transformation<Bitmap> transformation) {
       if (TextUtils.isEmpty(url)) {
           if (drawable != null)
               imageView.setImageDrawable(drawable);
           return;
       }
       GlideRequest<Drawable> request = GlideApp
           .with(imageView.getContext())
           .load(Uri.parse(url));

       if (drawable != null) {
           request
               .placeholder(drawable)
               .error(drawable);
       }
       request
           .centerCrop()
           .transition(withCrossFade())
           .transform(transformation == null ? new CenterCrop() : transformation)
           .into(imageView);
   }


The method is very clear. First, the URL is checked for nullability. If null, the drawable is set to the imageview and method returns. Usage of GlideApp is simpler. Pass the URL to the GlideApp using the method with which returns a GlideRequest which has operators to set other required options like transitions, transformations, placeholder etc. Lastly, pass the imageview using into operator. By default, Glide uses HttpURLConnection provided by android to load the image which can be changed to use Okhttp using the extension provided by the library. This is set in the AppGlideModule implementation in the registerComponents method.

Links:
1. Documentation for Glide, an Image Loading Library
2. Documentation for Okhttp, an HTTP client for Android and Java Applications

Continue ReadingImage Loading in Open Event Organizer Android App using Glide

Basics behind school level experiments with PSLab

Electronics is a fascinating subject to most kids. Turning on a LED bulb, making a simple circuit will make them dive into much more interesting areas in the field of electronics. PSLab android application with the help of PSLab device implements a set of experiments whose target audience is school children. To make them more interested in science and electronics, there are several experiments implemented such as measuring body resistance, lemon cell experiment etc.

This blog post brings out the basics in implementing these type of experiments and pre-requisite.

Lemon Cell Experiment

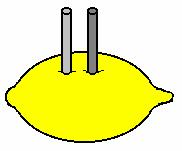
Lemon Cell experiment is a basic experiment which will make school kids interested in science experiments. The setup requires a fresh lemon and a pair of nails which is used to drive into the lemon as illustrated in the figure. The implementation in PSLab android application uses it’s Channel 1. The cell generates a low voltage which can be detected using the CH1 pin of PSLab device and it is sampled at a rate of 10 to read an accurate result.

float voltage = (float) scienceLab.getVoltage("CH1", 10);

2000 instances are recorded using this method and plotted against each instance. The output graph will show a decaying graph of voltage measured between the nails driven into the lemon.

for (int i = 0; i < timeAxis.size(); i++) {
   temp.add(new Entry(timeAxis.get(i), voltageAxis.get(i)));
}

Human Body Resistance Measurement Experiment

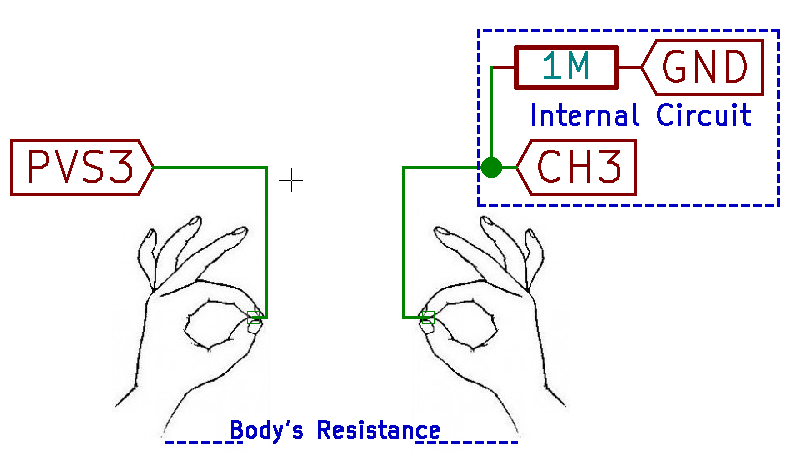
This experiment attracts most of the young people to do electronic experiments. This is implemented in the PSLab android application using Channel 3 and the Programmable Voltage Source 3 which can generate voltage up to 3.3V. The experiment requires a human with drippy palms so it makes a good conductance between device connection and the body itself.

The PSLab device has an internal resistance of 1M Ohms connected with the Channel 3 pin. Experiment requires a student to hold two wires with the metal core exposed; in both hands. One wire is connected to PV3 pin when the other wire is connected to CH3 pin. When a low voltage is supplied from the PV3 pin, due to heavy resistance in body and the PSLab device, a small current in the range of nano amperes will flow through body. Using the reading from CH3 pin and the following calculation, body resistance can be measured.

voltage = (float) scienceLab.getVoltage("CH3", 100);
current = voltage / M;
resistance = (M * (PV3Voltage - voltage)) / voltage;

This operation is executed inside a while loop to provide user with a continuous set of readings. Using Java threads there is a workaround to implement the functionalities inside the while loop without overwhelming the system. First step is to create a object without any attribute.

private final Object lock = new Object();

Java threads use synchronized methods where other threads won’t start until the first thread is completed or paused operation. We make use of that technique to provide enough time to read CH3 pin and display output.

while (true) {
   new MeasureResistance().execute();
   synchronized (lock) {
       try {
           lock.wait();
       } catch (InterruptedException e) {
           e.printStackTrace();
       }
   }
}

Once the pin readings and value updates are complete the lock is released to execute the method once again.

updateDataBox();
synchronized (lock) {
   lock.notify();
}

Capacitor Discharge Experiment

This experiment is somewhat similar to the Lemon Cell Experiment as this experiments on electron storage and discharge. The experiment is carried out using two bulky electrolyte capacitors. PSLab device is capable of generating PWM waveforms with any duty cycle. Refer to this article to learn more about how PWM waves are generated using PSLab device to implement more features like sine wave generation.

Using the SQR1 pin of the PSLab device, one capacitor is charged to its fullest capacity using a PWM wave with 100% duty cycle at a 100 Hz.

scienceLab.setSqr1(100, 100, false);

This capacitor is then connected in parallel with the other capacitor which is empty. The voltage transfer is measured using CH1 pin at a sampling rate of 10

float voltage = (float) scienceLab.getVoltage("CH1", 10);

To provide a continuous update in the voltage transfer, a similar implementation is used using an object in the thread to control the implementation inside a while loop.

Resources:

Continue ReadingBasics behind school level experiments with PSLab

Adding Static Code Analyzers in Open Event Orga Android App

This week, in Open Event Orga App project (Github Repo), we wanted to add some static code analysers that run on each build to ensure that the app code is free of potential bugs and follows a certain style. Codacy handles a few of these things, but it is quirky and sometimes produces false positives. Furthermore, it is not a required check for builds so errors can creep in gradually. We chose checkstyle, PMD and Findbugs for static analysis as they are most popular for Java. The area they work on kind of overlaps but gives security regarding code quality. Findbugs actually analyses the bytecode instead of source code to find possible JVM bugs.

Adding dependencies

The first step was to add the required dependencies. We chose the library android-check as it contained all 3 libraries and was focused on Android and easily configurable. First, we add classpath in project level build.gradle

dependencies {
   classpath 'com.noveogroup.android:check:1.2.4'
}


Then, we apply the plugin in app level build.gradle

apply plugin: 'com.noveogroup.android.check'


This much is enough to get you started, but by default, the build will not fail if any violations are found. To change this behaviour, we add this block in app level build.gradle

check {
   abortOnError true
}


There are many configuration options available for the library. Do check out the project github repo using the link provided above

Configuration

The default configuration is of easy level, and will be enough for most projects, but it is of course configurable. So we took the default hard configs for 3 analysers and disabled properties which we did not need. The place you need to store the config files is the config folder in either root project directory or the app directory. The name of the config file should be checkstyle.xml, pmd.xml and findbugs.xml

These are the default settings and you can obviously configure them by following the instructions on the project repo

Checkstyle

For checkstyle, you can find the easy and hard configuration here

The basic principle is that if you need to add a check, you include a module like this:

<module name="NewlineAtEndOfFile" />


If you want to modify the default value of some property, you do it like this:

<module name="RegexpSingleline">
   <property name="format" value="\s+$" />
   <property name="minimum" value="0" />
   <property name="maximum" value="0" />
   <property name="message" value="Line has trailing spaces." />
   <property name="severity" value="info" />
</module>


And if you want to remove a check, you can ignore it like this:

<module name="EqualsHashCode">
   <property name="severity" value="ignore" />
</module>


It’s pretty straightforward and easy to configure.

Findbugs

For findbugs, you can find the easy and hard configuration here

Findbugs configuration exists in the form of filters where we list resources it should skip analyzing, like:

<Match>
   <Class name="~.*\.BuildConfig" />
</Match>


If we want to ignore a particular pattern, we can do so like this:

<!-- No need to force hashCode for simple models -->
<Match>
   <Bug pattern="HE_EQUALS_USE_HASHCODE " />
</Match>


Sometimes, you’d want to only ignore a pattern only for certain files or fields. Findbugs supports regex to match such items:

<!-- Don't complain about rules in tests. -->
<Match>
   <Field name="~.*mockitoRule"/>
   <Bug pattern="URF_UNREAD_PUBLIC_OR_PROTECTED_FIELD" />
</Match>


You can also annotate your code to suppress warning in the particular class, mehod or field rather than disabling it for the whole project. For that, you need to add findbugs annotations dependency in the project

compile 'com.google.code.findbugs:findbugs-annotations:3.0.1'


And then use it like this:

@SuppressFBWarnings(
   value = "ICAST_IDIV_CAST_TO_DOUBLE",
   justification = "We want granularity to be integer")
public void showChart(LineChart lineChart) {
   ...
}


It also allows setting the justification of suppressing the rule for clarity

PMD

For findbugs, you can find the easy and hard configuration here

Like checkstyle, you have to first add a rule set to tell PMD which checks to perform:

<rule ref="rulesets/java/android.xml" />


If you want to modify the default value of the rule, you can do it like this:

<rule ref="rulesets/java/codesize.xml/TooManyMethods">
   <properties>
       <property name="maxmethods" value="15" />
   </properties>
</rule>


Or if you want to entirely exclude a rule, you can do it like this:

<rule ref="rulesets/java/basic.xml">
   <exclude name="OverrideBothEqualsAndHashcode" />
</rule>


PMD also supports suppressing warnings in the code itself using annotations. You don’t require any external libraries for it as it supports the in built java.lang.SuppessWarnings annotations. You can use it like this:

@SuppressWarnings("PMD.AvoidInstantiatingObjectsInLoops") // Entries cannot be created outside loop
private LineDataSet setData(Map<String, Long> map, String label) throws ParseException {
   ...
}


As you can see, we need to prepend “PMD.” to the rule name so that there are no clashes while annotation processing. Remember to comment the reason for suppressing the warning so that your co-developers know and can remove it in future if criteria does not meet anymore.

There is a lot more to learn about these static analyzers, which you can read upon in their official documentation:

Continue ReadingAdding Static Code Analyzers in Open Event Orga Android App

Posting Tweet from Loklak Wok Android

Loklak Wok Android is a peer harvester that posts collected tweets to the Loklak Server. Not only it is a peer harvester, but also provides users to post their tweets from the app. Images and location of the user can also be attached in the tweet. This blog explains

Adding Dependencies to the project

In app/build.gradle:

apply plugin: 'com.android.application'
apply plugin: 'me.tatarka.retrolambda'

android {
   ...
   packagingOptions {
       exclude 'META-INF/rxjava.properties'
   }
}

dependencies {
   ...
   compile 'com.google.code.gson:gson:2.8.1'

   compile 'com.squareup.retrofit2:retrofit:2.3.0'
   compile 'com.squareup.retrofit2:converter-gson:2.3.0'
   compile 'com.squareup.retrofit2:adapter-rxjava2:2.3.0'

   compile 'io.reactivex.rxjava2:rxjava:2.0.5'
   compile 'io.reactivex.rxjava2:rxandroid:2.0.1'
}


In build.gradle project level:

dependencies {
   classpath 'com.android.tools.build:gradle:2.3.3'
   classpath 'me.tatarka:gradle-retrolambda:3.2.0'
}


Implementation

User first authorize the application, so that they are able to post tweet from the app. For posting tweet statuses/update API endpoint of twitter is used and for attaching images with tweet media/upload API endpoint is used.

As, photos and location can be attached in a tweet, for Android Marshmallow and above we need to ask runtime permissions for camera, gallery and location. The related permissions are mentioned in Manifest file first

<uses-permission android:name="android.permission.CAMERA" />
<uses-permission android:name="android.permission.WRITE_EXTERNAL_STORAGE" />
<uses-permission android:name="android.permission.READ_EXTERNAL_STORAGE" />
<uses-permission android:name="android.permission.ACCESS_FINE_LOCATION" />
// for location
<uses-feature android:name="android.hardware.location.gps"/>
<uses-feature android:name="android.hardware.location.network"/>


If, the device is using an OS below Android Marshmallow, there will be no runtime permissions, the user will be asked permissions at the time of installing the app.

Now, runtime permissions are asked, if the user had already granted the permission the related activity (camera, gallery or location) is started.

For camera permissions, onClickCameraButton is called

@OnClick(R.id.camera)
public void onClickCameraButton() {
   int permission = ContextCompat.checkSelfPermission(
           getActivity(), Manifest.permission.CAMERA);
   if (isAndroidMarshmallowAndAbove && permission != PackageManager.PERMISSION_GRANTED) {
       String[] permissions = {
               Manifest.permission.CAMERA,
               Manifest.permission.WRITE_EXTERNAL_STORAGE,
               Manifest.permission.READ_EXTERNAL_STORAGE
       };
       requestPermissions(permissions, CAMERA_PERMISSION);
   } else {
       startCameraActivity();
   }
}


To start the camera activity if the permission is already granted, startCameraActivity method is called

private void startCameraActivity() {
   Intent intent = new Intent(MediaStore.ACTION_IMAGE_CAPTURE);
   File dir = getActivity().getExternalFilesDir(Environment.DIRECTORY_PICTURES);
   mCapturedPhotoFile = new File(dir, createFileName());
   Uri capturedPhotoUri = getImageFileUri(mCapturedPhotoFile);
   intent.putExtra(MediaStore.EXTRA_OUTPUT, capturedPhotoUri);
   startActivityForResult(intent, REQUEST_CAPTURE_PHOTO);
}


If the user decides to save the photo clicked from camera activity, the photo should be saved by creating a file and its uri is required to display the saved photo. The filename is created using createFileName method

private String createFileName() {
   String timeStamp = new SimpleDateFormat("ddMMyyyy_HHmmss").format(new Date());
   return "JPEG_" + timeStamp + ".jpg";
}


and uri is obtained using getImageFileUri

private Uri getImageFileUri(File file) {
   if (Build.VERSION.SDK_INT < Build.VERSION_CODES.N) {
       return Uri.fromFile(file);
   } else {
       return FileProvider.getUriForFile(getActivity(), "org.loklak.android.provider", file);
   }
}


Similarly, for the gallery, onClickGalleryButton method is implemented to ask runtime permissions and launch gallery activity if the permission is already granted.

@OnClick(R.id.gallery)
public void onClickGalleryButton() {
   int permission = ContextCompat.checkSelfPermission(
           getActivity(), Manifest.permission.WRITE_EXTERNAL_STORAGE);
   if (isAndroidMarshmallowAndAbove && permission != PackageManager.PERMISSION_GRANTED) {
       String[] permissions = {
               Manifest.permission.WRITE_EXTERNAL_STORAGE,
               Manifest.permission.READ_EXTERNAL_STORAGE
       };
       requestPermissions(permissions, GALLERY_PERMISSION);
   } else {
       startGalleryActivity();
   }
}


For starting the gallery activity, startGalleryActivity is used

private void startGalleryActivity() {
   Intent intent = new Intent();
   intent.setType("image/*");
   intent.setAction(Intent.ACTION_GET_CONTENT);
   intent.putExtra(Intent.EXTRA_ALLOW_MULTIPLE, true);
   startActivityForResult(
           Intent.createChooser(intent, "Select images"), REQUEST_GALLERY_MEDIA_SELECTION);
}


And finally for location onClickAddLocationButton is implemented

@OnClick(R.id.location)
public void onClickAddLocationButton() {
   int permission = ContextCompat.checkSelfPermission(
           getActivity(), Manifest.permission.ACCESS_FINE_LOCATION);
   if (isAndroidMarshmallowAndAbove && permission != PackageManager.PERMISSION_GRANTED) {
       String[] permissions = {Manifest.permission.ACCESS_FINE_LOCATION};
       requestPermissions(permissions, LOCATION_PERMISSION);
   } else {
       getLatitudeLongitude();
   }
}


If, the permission is already granted getLatitudeLongitude is called. Using LocationManager last known location is tried to obtain, if there is no last known location, current location is requested using a LocationListener.

private void getLatitudeLongitude() {
   mLocationManager =
           (LocationManager) getActivity().getSystemService(Context.LOCATION_SERVICE);

   // last known location from network provider
   Location location = mLocationManager.getLastKnownLocation(LocationManager.NETWORK_PROVIDER);
   if (location == null) { // last known location from gps
       location = mLocationManager.getLastKnownLocation(LocationManager.GPS_PROVIDER);
   }

   if (location != null) { // last known loaction available
       mLatitude = location.getLatitude();
       mLongitude = location.getLongitude();
       setLocation();
   } else { // last known location not available
       mLocationListener = new TweetLocationListener();
       // current location requested
       mLocationManager.requestLocationUpdates("gps", 1000, 1000, mLocationListener);
   }
}


TweetLocationListener implements a LocationListener that provides the current location. If GPS is disabled, settings is launched so that user can enable GPS. This is implemented in onProviderDisabled callback of the listener.

private class TweetLocationListener implements LocationListener {

   @Override
   public void onLocationChanged(Location location) {
       mLatitude = location.getLatitude();
       mLongitude = location.getLongitude();
       setLocation();
   }

   @Override
   public void onStatusChanged(String s, int i, Bundle bundle) {

   }

   @Override
   public void onProviderEnabled(String s) {

   }

   @Override
   public void onProviderDisabled(String s) {
       Intent intent = new Intent(Settings.ACTION_LOCATION_SOURCE_SETTINGS);
       startActivity(intent);
   }
}


If the user is asked for permissions, onRequestPermissionResult callback is invoked, if the permission is granted then the respective activities are opened or latitude and longitude are obtained.

@Override
public void onRequestPermissionsResult(
       int requestCode, @NonNull String[] permissions, @NonNull int[] grantResults) {
   boolean isResultGranted = grantResults[0] == PackageManager.PERMISSION_GRANTED;
   switch (requestCode) {
       case CAMERA_PERMISSION:
           if (grantResults.length > 0 && isResultGranted) {
               startCameraActivity();
           }
           break;
       case GALLERY_PERMISSION:
           if (grantResults.length > 0 && isResultGranted) {
               startGalleryActivity();
           }
           break;
       case LOCATION_PERMISSION:
           if (grantResults.length > 0 && isResultGranted) {
               getLatitudeLongitude();
           }
   }
}


Since, the camera and gallery activities are started to obtain a result i.e. photo(s). So, onActivityResult callback is called

@Override
public void onActivityResult(int requestCode, int resultCode, Intent data) {
   switch (requestCode) {
       case REQUEST_CAPTURE_PHOTO:
           if (resultCode == Activity.RESULT_OK) {
               onSuccessfulCameraActivityResult();
           }
           break;
       case REQUEST_GALLERY_MEDIA_SELECTION:
           if (resultCode == Activity.RESULT_OK) {
               onSuccessfulGalleryActivityResult(data);
           }
           break;
       default:
           super.onActivityResult(requestCode, resultCode, data);
   }
}


If the result of Camera activity is success i.e. the image is saved by the user. The saved image is displayed in a RecyclerView in TweetPostingFragment. This is implemented in onSuccessfulCameraActivityResult mehtod

private void onSuccessfulCameraActivityResult() {
   tweetMultimediaContainer.setVisibility(View.VISIBLE);
   Bitmap bitmap = BitmapFactory.decodeFile(mCapturedPhotoFile.getAbsolutePath());
   mTweetMediaAdapter.clearAdapter();
   mTweetMediaAdapter.addBitmap(bitmap);
}


For a gallery activity, if a single image is selected then the uri of image can be obtained using getData method of an Intent. If multiple images are selected, the uri of images are stored in ClipData. After uris of images are obtained, it is checked if more than 4 images are selected as Twitter allows at most 4 images in a tweet. If more than 4 images are selected than the uris of extra images are removed. Using the uris of the images, the file is obtained and then from file Bitmap is obtained which is displayed in RecyclerView. This is implemented in onSuccessfulGalleryActivityResult

private void onSuccessfulGalleryActivityResult(Intent intent) {
   tweetMultimediaContainer.setVisibility(View.VISIBLE);
   Context context = getActivity();

   // get uris of selected images
   ClipData clipData = intent.getClipData();
   List<Uri> uris = new ArrayList<>();
   if (clipData != null) {
       for (int i = 0; i < clipData.getItemCount(); i++) {
           ClipData.Item item = clipData.getItemAt(i);
           uris.add(item.getUri());
       }
   } else {
       uris.add(intent.getData());
   }

   // remove of more than 4 images
   int numberOfSelectedImages = uris.size();
   if (numberOfSelectedImages > 4) {
       while (numberOfSelectedImages-- > 4) {
           uris.remove(numberOfSelectedImages);
       }
       Utility.displayToast(mToast, context, moreImagesMessage);
   }

   // get bitmap from uris of images
   List<Bitmap> bitmaps = new ArrayList<>();
   for (Uri uri : uris) {
       String filePath = FileUtils.getPath(context, uri);
       Bitmap bitmap = BitmapFactory.decodeFile(filePath);
       bitmaps.add(bitmap);
   }

   // display images in RecyclerView
   mTweetMediaAdapter.setBitmapList(bitmaps);
}


Now, to post images with tweet, first the ID of the image needs to be obtained using media/upload API endpoint, a multipart post request and then the obtained ID(s) is passed as the value of “media_ids” in statuses/update API endpoint. Since, there can be more than one image, a single observable is created for each image. The bitmap is converted to raw bytes for the multipart post request. As the process includes a network request and converting bitmap to bytes – a heavy resource consuming task which shouldn’t be on the main thread -, so an observable is created for the same as a result of which the tasks are performed concurrently i.e. in a separate thread.

private Observable<String> getImageId(Bitmap bitmap) {
   return Observable
           .defer(() -> {
               // convert bitmap to bytes
               ByteArrayOutputStream byteArrayOutputStream = new ByteArrayOutputStream();
               bitmap.compress(Bitmap.CompressFormat.JPEG, 100, byteArrayOutputStream);
               byte[] bytes = byteArrayOutputStream.toByteArray();
               RequestBody mediaBinary = RequestBody.create(MultipartBody.FORM, bytes);
               return Observable.just(mediaBinary);
           })
           .flatMap(mediaBinary -> mTwitterMediaApi.getMediaId(mediaBinary, null))
           .flatMap(mediaUpload -> Observable.just(mediaUpload.getMediaIdString()))
           .subscribeOn(Schedulers.newThread());
}


The tweet is posted when the “Tweet” button is clicked by invoking onClickTweetPostButton mehtod

@OnClick(R.id.tweet_post_button)
public void onClickTweetPostButton() {
   String status = tweetPostEditText.getText().toString();

   List<Bitmap> bitmaps = mTweetMediaAdapter.getBitmapList();
   List<Observable<String>> mediaIdObservables = new ArrayList<>();
   for (Bitmap bitmap : bitmaps) { // observables for images is created
       mediaIdObservables.add(getImageId(bitmap));
   }

   if (mediaIdObservables.size() > 0) {
       // Post tweet with image
       postImageAndTextTweet(mediaIdObservables, status);
   } else if (status.length() > 0) {
       // Post text only tweet
       postTextOnlyTweet(status);
   } else {
       Utility.displayToast(mToast, getActivity(), tweetEmptyMessage);
   }
}


Tweet containing images are posted by calling postImageAndTextTweet, once the tweet data is obtained, the data is cross posted to loklak server. The image IDs are obtained concurrently by using the zip operator.

private void postImageAndTextTweet(List<Observable<String>> imageIdObservables, String status) {
   mProgressDialog.show();
   ConnectableObservable<StatusUpdate> observable = Observable.zip(
           imageIdObservables,
           mediaIdArray -> {
               String mediaIds = "";
               for (Object mediaId : mediaIdArray) {
                   mediaIds = mediaIds + String.valueOf(mediaId) + ",";
               }
               return mediaIds.substring(0, mediaIds.length() - 1);
           })
           .flatMap(imageIds -> mTwitterApi.postTweet(status, imageIds, mLatitude, mLongitude))
           .subscribeOn(Schedulers.io())
           .publish();

   Disposable postingDisposable = observable
           .subscribeOn(Schedulers.io())
           .observeOn(AndroidSchedulers.mainThread())
           .subscribe(this::onSuccessfulTweetPosting, this::onErrorTweetPosting);
   mCompositeDisposable.add(postingDisposable);

   // cross posting to loklak server   
   Disposable crossPostingDisposable = observable
           .flatMap(this::pushTweetToLoklak)
           .subscribeOn(Schedulers.io())
           .observeOn(AndroidSchedulers.mainThread())
           .subscribe(
                   push -> {},
                   t -> Log.e(LOG_TAG, "Cross posting failed: " + t.toString())
           );
   mCompositeDisposable.add(crossPostingDisposable);

   Disposable publishDisposable = observable.connect();
   mCompositeDisposable.add(publishDisposable);
}


In case of only text tweets, the text is obtained from editText and mediaIds are passed as null. And once the tweet data is obtained it is cross posted to loklak_server. This is executed by calling postTextOnlyTweet

private void postTextOnlyTweet(String status) {
   mProgressDialog.show();
   ConnectableObservable<StatusUpdate> observable =
           mTwitterApi.postTweet(status, null, mLatitude, mLongitude)
           .subscribeOn(Schedulers.io())
           .publish();

   Disposable postingDisposable = observable
           .subscribeOn(Schedulers.io())
           .observeOn(AndroidSchedulers.mainThread())
           .subscribe(this::onSuccessfulTweetPosting, this::onErrorTweetPosting);
   mCompositeDisposable.add(postingDisposable);


   // cross posting to loklak server
   Disposable crossPostingDisposable = observable
           .flatMap(this::pushTweetToLoklak)
           .subscribeOn(Schedulers.io())
           .observeOn(AndroidSchedulers.mainThread())
           .subscribe(
                   push -> Log.e(LOG_TAG, push.getStatus()),
                   t -> Log.e(LOG_TAG, "Cross posting failed: " + t.toString())
           );
   mCompositeDisposable.add(crossPostingDisposable);

   Disposable publishDisposable = observable.connect();
   mCompositeDisposable.add(publishDisposable);
}


Resources

Continue ReadingPosting Tweet from Loklak Wok Android