Configuring Codacy: Use Your Own Conventions

Screenshot from 2016-07-23 01:08:20

All the developers agree on at least one thing – writing clean code is necessary. Because as someone anonymous said, always write a code as if the developer who comes after you is a homicidal maniac who knows your address. So, yeah, writing clean code is very important. Codacy helps in code reviewing and code quality monitoring. You can set codacy in any of your github project. It automatically identifies new static analysis issues, code coverage, code duplication and code complexity evolution in every commit and pull request.

Continue ReadingConfiguring Codacy: Use Your Own Conventions

Angular API testing with frisby and jasmine-node

week9gsoc1

sTeam-web-UI is an application written in angular. So the application relies on sTeam's existing REST api which is written in pike. Since there are a lot of API calls and actions involved ensuring that the application is making proper API calls and getting proper responses is crucial. In order to go ahead with the API testing there are two important things to be know about first.

  • frisby
  • jasmine

What is frisby ?

“Frisby is a REST API testing framework built on node.js and Jasmine that makes testing API endpoints easy, fast, and fun. Read below for a quick overview, or check out the API documentation.”

What is Jasmine ?

“Jasmine is a Behavior Driven Development testing framework for JavaScript. It does not rely on browsers, DOM, or any JavaScript framework. Thus it’s suited for websites, Node.js projects, or anywhere that JavaScript can run.”

The api methods present in frisby can be categorized into :

  • Expectations
  • Helpers
  • Headers
  • Inspectors

So let me show couple of tests that are written with the help of frisby for the sTeam's web interface.

Checking the Home directory of the user :


frisby.create('Request `/home` returns proper JSON')
  .get(config.baseurl + 'rest.pike?request=/home')
  .expectStatus(200)
  .expectJSON({
    'request': '/home',
    'request-method': 'GET',
    'me': objUnit.testMeObj,
    'inventory': function (val) {
      val.forEach(function (e) {
        objUnit.testInventoryObj(e)
      })
    }
  })
.toss()

Checking the container of the user :


frisby.create('Request `/home/:user` returns proper JSON')
  .get(config.baseurl + 'rest.pike?request=/home/akhilhector/container')
  .expectStatus(200)
  .expectJSON({
    'request': '/akhilhector',
    'request-method': 'GET',
    'me': objUnit.testMeObj,
    'inventory': function (val) {
      val.forEach(function (e) {
        objUnit.testInventoryObj(e)
      })
    }
  })
.toss()

Accessing the file in the user’s workarea :


frisby.create('Request `/home/:user/:container/:filename` returns proper JSON')
  .get(config.baseurl + 'rest.pike?request=//home/akhilhector/playground-hector/icon1.png')
  .expectStatus(200)
  .expectJSON({
    'request': '/akhilhector/playground-hector/icon1.png',
    'request-method': 'GET',
    'me': objUnit.testMeObj,
    'inventory': function (val) {
      val.forEach(function (e) {
        objUnit.testInventoryObj(e)
      })
    }
  })
.toss()

Observing the above three modules, each of them are different from one another. We have to understand that depending on the API the request payload must be sent. So for suppose the API needs authentication headers to be sent then we need to use the proper helper methods of frisby in order to send the same.
The .get() can be substituted with put, post, delete. Basically all the frisby tests start with frisby.create with a description of the test followed by one of get, post, put, delete, or head, and ending with toss to generate the resulting response.
Apart from the request payload there is an interesting thing with the helper method expectJSON, it is used for testing the given path or full JSON response of the specified length. In order to use expectJSON we must pass the path as the primary argument and the JSON as the second argument.
The expectStatus helper method is pretty straightforward. It helps us in determining the HTTP Status code equivalent of the request so made.

NOTE While writing the tests it is better to put all the config in one place and use that config variable for all the operations.

Thats it folks,
Happy Hacking !!

Continue ReadingAngular API testing with frisby and jasmine-node

The new AYABInterface module

One create knit work with knitting machines and the AYAB shield. Therefore, the computer communicates with the machine. This communication shall be done, in the future, with this new library, the AYABInterface.

Here are some design decisions:

Complete vs. Incomplete

The idea is to have the AYAB seperated from the knittingpattern format. The knittingpattern format is an incomplete format that can be extended for any use case.  In contrast, the AYAB machine has a complete instruction set. The knittingpattern format is a means to transform these formats into different complete instruction sets. They should be convertible but not mixed.

Desciptive vs. Imperative

The idea is to be able to pass the format to the AYABInterface as a description. As much knowledge about the behavior is capsuled in the AYABInterface module. With this striving, we are less prone to intermix concerns across the applications.

Responsibilty Driven Design

I see these separated responsibilities:

  • A communication part focusing on the protocol to talk and the messages sent across the wire. It is an interpreter of the protocol, transforming it from bytes to objects.
  • A configuration that is passed to the interface
  • Different Machines types supported.
  • Actions the user shall perform.

Different Representations

I see these representations:

  • Commands are transferred across the wire. (PySerial)
  • For each movement of a carriage, the needles are used and put into a new position, B or D. (communication)
  • We would like to knit a list of rows with different colors. (interface)
    • Holes can be described by a list of orders in which meshes are moved to other locations, i.e. on needle 1 we can find mesh 1, on needle 2 we find mesh 2 first and then mesh 3, so mesh 2 and mesh 3 are knit together in the following step
  • The knitting pattern format.

Actions and Information for the User

The user should be informed about actions to take. These actions should not be in the form of text but rather in the form of an object that represents the action, i.e. [“move”, “this carriage”, “from right to left”]. This way, they can be adequately represented in the UI and translated somewhere central in the UI.

Summary

The new design separates concerns and allows testing. The bridge between the machine and the knittnigpattern format are primitive, descriptive objects such as lists and integers.

Continue ReadingThe new AYABInterface module

ETag based caching for GET APIs

Many client applications require caching of data to work with low bandwidth connections. Many of them do it to provide faster loading time to the client user. The Webapp and Android app had similar requirements. Previously they provided caching using a versions API that would keep track of any modifications made to Events or Services. The response of the API would be something like this:

[{
  "event_id": 6,
  "event_ver": 1,
  "id": 27,
  "microlocations_ver": 0,
  "session_ver": 4,
  "speakers_ver": 3,
  "sponsors_ver": 2,
  "tracks_ver": 3
}]

The number corresponding to "*_ver" tells the number of modifications done for that resource list. For instance, "tracks_ver": 3 means there were three revisions for tracks inside the event (/events/:event_id/tracks). So when the client user starts his app, the app would make a request to the versions API, check if it corresponds to the local cache and update accordingly. It had some shortcomings, like checking modifications for a individual resources. And if a particular service (microlocation, track, etc.) resource list inside an event needs to be checked for updates, a call to the versions API would be needed.

ETag based caching for GET APIs

The concept of ETag (Entity Tag) based caching is simple. When a client requests (GET) a resource or a resource list, a hash of the resource/resource list is calculated at the server. This hash, called the ETag is sent with the response to the client, preferably as a header. The client then caches the response data and the ETag alongside the resource. Next time when the client makes a request at the same endpoint to fetch the resource, he sets an If-None-Match header in the request. This header contains the value of ETag the client saved before. The server grabs the resource requested by the client, calculates its hash and checks if it is equal to the value set for If-None-Match. If the value of the hash is same, then it means the resource has not changed, so a response with resource data is not needed. If it is different, then the server returns the response with resource data and a new ETag associated with that resource.

Little modifications were needed to deal with ETags for GET requests. Flask-Restplus includes a Resource class that defines a resource. It is a pluggable view. Pluggable views need to define a dispatch_request method that returns the response.

import json
from hashlib import md5

from flask.ext.restplus import Resource as RestplusResource

# Custom Resource Class
class Resource(RestplusResource):
    def dispatch_request(self, *args, **kwargs):
        resp = super(Resource, self).dispatch_request(*args, **kwargs)

        # ETag checking.
        # Check only for GET requests, for now.
        if request.method == 'GET':
            old_etag = request.headers.get('If-None-Match', '')
            # Generate hash
            data = json.dumps(resp)
            new_etag = md5(data).hexdigest()

            if new_etag == old_etag:
                # Resource has not changed
                return '', 304
            else:
                # Resource has changed, send new ETag value
                return resp, 200, {'ETag': new_etag}

        return resp

To add support for ETags, I sub-classed the Resource class to extend the dispatch_request method. First, I grabbed the response for the arguments provided to RestplusResource‘s dispatch_request method. old_etag contains the value of ETag set in the If-None-Match header. Then hash for the resp response is calculated. If both ETags are equal then an empty response is returned with 304 HTTP status (Not Modified). If they are not equal, then a normal response is sent with the new value of ETag.

[smg:~] $ curl -i http://127.0.0.1:8001/api/v2/events/1/tracks/1 
HTTP/1.0 200 OK
Content-Type: application/json
Content-Length: 1061
ETag: ada4d057f76c54ce027aaf95a3dd436b
Server: Werkzeug/0.11.9 Python/2.7.6
Date: Thu, 21 Jul 2016 09:01:01 GMT

{"description": "string", "sessions": [{"id": 1, "title": "Fantastische Hardware Bauen & L\u00f6ten Lernen mit Mitch (TV-B-Gone) // Learn to Solder with Cool Kits!"}, {"id": 2, "title": "Postapokalyptischer Schmuck / Postapocalyptic Jewellery"}, {"id": 3, "title": "Query Service Wikidata "}, {"id": 4, "title": "Unabh\u00e4ngige eigene Internet-Suche in wenigen Schritten auf dem PC installieren"}, {"id": 5, "title": "Nitrokey Sicherheits-USB-Stick"}, {"id": 6, "title": "Heart Of Code - a hackspace for women* in Berlin"}, {"id": 7, "title": "Free Software Foundation Europe e.V."}, {"id": 8, "title": "TinyBoy Project - a 3D printer for education"}, {"id": 9, "title": "LED Matrix Display"}, {"id": 11, "title": "Schnittmuster am PC erstellen mit Valentina / Valentina Digital Pattern Design"}, {"id": 12, "title": "PC mit Gedanken steuern - Brain-Computer Interfaces"}, {"id": 14, "title": "Functional package management with GNU Guix"}], "color": "GREEN", "track_image_url": "http://website.com/item.ext", "location": "string", "id": 1, "name": "string"}

[smg:~] $ curl -i --header 'If-None-Match: ada4d057f76c54ce027aaf95a3dd436b' http://127.0.0.1:8001/api/v2/events/1/tracks/1 
HTTP/1.0 304 NOT MODIFIED
Connection: close
Server: Werkzeug/0.11.9 Python/2.7.6
Date: Thu, 21 Jul 2016 09:01:27 GMT

ETag based caching has a drawback. Since the hash is calculated for every GET request it increases the load on servers. So if four clients request the same resource, the server calcuates hashes four times. This can be solved by calculating and saving the ETag during creation and modification of resources, and then getting and sending this ETag directly.

Continue ReadingETag based caching for GET APIs

sTeam API Endpoint Testing

(ˢᵒᶜⁱᵉᵗʸserver) aims to be a platform for developing collaborative applications.
sTeam server project repository: sTeam.
sTeam-REST API repository: sTeam-REST

sTeam API Endpoint Testing using Frisby

sTeam API endpoint testing is done using Frisby.  Frisby is a REST API testing framework built on node.js and Jasmine that makes testing API endpoints very easy, speedy and joyous.

Issue. Github Issue Github PR
sTeam-REST Frisby Test for login Issue-38 PR-40
sTeam-REST Frisby Tests Issue-41 PR-42

Write Tests

Frisby tests start with frisby.create with a description of the test followed by one of get, post, put, delete, or head, and ending with toss to generate the resulting jasmine spec test. Frisby has many built-in test helpers like expectStatus to easily test HTTP status codes, expectJSON to test expected JSON keys/values, and expectJSONTypes to test JSON value types, among many others.

// Registration Tests
frisby.create('Testing Registration API calls')
.post('http://steam.realss.com/scripts/rest.pike?request=register', {
email: "ajinkya007.in@gmail.com",
fullname: "Ajinkya Wavare",
group: "realss",
password: "ajinkya",
userid: "aj007"
}, {json: true})
.expectStatus(200)
.expectJSON({
"request-method": "POST",
"request": "register",
"me": restTest.testMe,
"__version": testRegistrationVersion,
"__date": testRegistrationDate
})
.toss();
The testMe, testRegistrationVersion and testRegistrationDate are the functions written in the rest_spec.js.

The frisby API endpoint tests have been written for testing the user login, accessing the user home directory, user workarea, user container, user document, user created image,  groups and subgroups.

The REST API url’s used for testing are described below. A payload consists of the user id and password.

Check if the user can login.

http://steam.realss.com/scripts/rest.pike?request=aj007

Test whether a user workarea exists or not. Here aj workarea has been created by the user.

http://steam.realss.com/scripts/rest.pike?request=aj007/aj

Test whether a user created container exists or not.

http://steam.realss.com/scripts/rest.pike?request=aj007/container

Test whether a user created document exists or not.

http://steam.realss.com/scripts/rest.pike?request=aj007/abc.pike

Test whether a user created image(object of any mime-type) inside a container exists or not.

http://steam.realss.com/scripts/rest.pike?request=aj007/container/Image.jpeg

Test whether a user created document exists or not. The group name and the subgroups can be queried.
eg. GroupName: groups, Subgroup: test.
The subgroup should be appended using “.” to the groupname.

http://steam.realss.com/scripts/rest.pike?request=groups.test

Here “groups” is a Groupname and “gsoc” is a subgroup of it.

http://ngtg.techgrind.asia/scripts/rest.pike?request=groups.gsoc

FrisbyTests

FrisbyTestCount

Unit Testing the sTeam REST API

The unit testing of the sTeam REST API is done using the karma and the jasmine test runner. The karma and the jasmine test runner are set up in the project repository.

The karma test runner : The main goal for Karma is to bring a productive testing environment to developers. The environment being one where they don’t have to set up loads of configurations, but rather a place where developers can just write the code and get instant feedback from their tests. Because getting quick feedback is what makes you productive and creative.

The jasmine test runner: Jasmine is a behavior-driven development framework for testing JavaScript code. It does not depend on any other JavaScript frameworks. It does not require a DOM. And it has a clean, obvious syntax so that you can easily write tests.

The karma and jasmine test runner were configured for the project and basic tests were ran. The angular js and angular mocks version in the local development repository was different. This had resulted into a new error been incorporated into the project repo.

Angular Unit-Testing: TypeError ‘angular.element.cleanData is not a function’

When angular and angular-mocks are not of the same version, these error occurs while running the tests. If the versions of the two javascript libraries don’t match your tests will be testing to you.

The jasmine test runner can be accessed from the browser. The karma tests can be performed from the command line. These shall be enhanced further during the course of work.

Feel free to explore the repository. Suggestions for improvements are welcomed.

Checkout the FOSSASIA Idea’s page for more information on projects supported by FOSSASIA.

Continue ReadingsTeam API Endpoint Testing

Testing Hero

Our sTeam code base had no tests written and therefore we were facing a lot of issues and were not able to merge our code easily. My next task dealt with this problem. I had to write test cases for the function calls to COAL commands. On some basic research I found out that the only testing framework available for pike is used for testing the pike interpreter itself. This includes a set of scripts. mktestsuite is one of the scripts and is responsible for generating the tests. The problem with this is that the tests should have a particular syntax and since it is used to test interpreter is assumes each line of pike code is a test. This prevented us from writing multiple line tests and also from setting up the client.

Issue:

https://github.com/societyserver/sTeam/issues/104 (Establish testing framework),

https://github.com/societyserver/sTeam/issues/107 (Add tests for create)

My first approach to the problem was to try using the scripts available to write the tests, however this didn’t turn out very well and tests written were very confusing and out of context. The lines written for setting up the client was also being counted as tests and there was no continuation that is variables defined in one line was not accessible in the next. I realized that this is not going to work out and decided to write my own testing framework. I started by writing a simple testing structure.

The framework has a central script called test.pike. This script is used to run all the test cases. This script uses the the scripts called move.pike and create.pike which are the scripts containing the actual test cases. These scripts contain various functions each of which is a test case and return 1 on passing the case and 0 on failing. test.pike, the central node, is responsible for looping through this functions and calling each of these and recording the result. The framework then outputs the total number of cases passed or failed. Again implementing this became simple as we can import pike scripts as objects and also extract the functions from them.

test
Running tests for move
test1
Running test for create (Earlier version of framework)

test.pike involved initialization for various variables. It establishes a connection to the server and initializes _Server and me, which are then passed to all the test cases. move.pike has various test cases involving moving things around. Moving user into a room, into a container or to an non existential location and moving a room inside a container. I also got my first failing test case which is moving user into a non existential location. This shouldn’t have been allowed but is not throwing any error and incorrectly writes the trail.

create.pike involved cases creating various kinds of objects and also attempting to create objects for classes that do not exist. As I went along writing these cases I also kept improving the central test.pike. I added the code for creation of a special room for testing while initializing and also clearing this room before destroying the object and exiting.

Solution:

 https://github.com/societyserver/sTeam/pull/105 (Establish testing framework),

https://github.com/societyserver/sTeam/pull/108 (Add tests for create)

Continue ReadingTesting Hero

WordPress Upgrade Process

Have you ever wondered how WordPress handles the automated core, plugin, and theme upgrades? Well, it’s time for some quick education!

WordPress is an Open Source project, which means there are hundreds of people all over the world working on it. (More than most commercial platforms.)

There are mainly 2 kinds of Automatic upgrades for WordPress:

  • The main Core’ upgrades
  • The ‘Child’ upgrades, that works for themes and plugins that are being used in your WordPress.

We all see the plugin and theme installer while installing any theme or specific plugin required by the user, where it downloads the plugin to /wp-content/upgrade/ , extracts the plugin, deletes the old one (if an old one exists), and copies the new one. It is used every time we install a theme or a plugin to the WordPress.

Since this is used more often than the core updater (most of the time as many different plugins are used), it’s the sort of upgrade we’re all used to and familiar with. And we think ‘WordPress deletes before upgrading, sure.’ This makes sense. After all, you want to make sure to clean out the old files, especially the ones that aren’t used anymore.

But that not how the WordPress Core updates work.

Core updates are available when there is a new version of WordPress is available with new features or some solved bugs.

Core updates are subdivided into three types:

  1. Core development updates, known as the “bleeding edge”
  2. Minor core updates, such as maintenance and security releases
  3. Major core release updates

By default, every site has automatic updates enabled for minor core releases and translation files. Sites already running a development version also have automatic updates to further development versions enabled by default.

The WordPress updates can be configured by 2 ways:

  • defining constants in wp-config.php,
  • or adding filters using a Plugin

Let’s discuss for both the methods.

Configuration via wp-config.php

We can configure the wp-config.php to, disable automatic updates, and the core updates can be disabled or configured based on update type.

To completely disable all types of automatic updates, core or otherwise, add the following to your wp-config.php file:

define( 'AUTOMATIC_UPDATER_DISABLED', true );

To enable automatic updates for major releases or development purposes, the place to start is with the WP_AUTO_UPDATE_CORE constant. Defining this constant one of three ways allows you to blanket-enable, or blanket-disable several types of core updates at once.

define( 'WP_AUTO_UPDATE_CORE', true );

WP_AUTO_UPDATE_CORE can be defined with one of three values, each producing a different behavior:

  • Value of true – Development, minor, and major updates are all enabled
  • Value of false – Development, minor, and major updates are all disabled
  • Value of 'minor' – Minor updates are enabled, development, and major updates are disabled


Configuration via Filters using Plugins

Using filters allows for fine-tuned control of automatic updates.

The best place to put these filters is a must-use plugin.

Do not add add_filter() calls directly in wp-config.php. WordPress isn’t fully loaded and can cause conflicts with other applications such as WP-CLI.

We can also enable/disable all automatic updates by changing the values in the following filter:

add_filter( 'update_val', '__return_true' );

We can set the parameters update_val as mentioned below:

  • To disable the automatic updates we can set update_val to automatic_updater_disabled
  • To enable the automatci updates we can set update_val to different values as mentioned below:
    • auto_update_core to enable all the updates
    • allow_dev_auto_core_updates to enable the devlopement updates
    • allow_minor_auto_core_updates to enable minor updates
    • allow_major_auto_core_updates to enable the major updates

WordPress has a magnificent auto-update system that notifies you when new versions of the WordPress core, installed plugins or themes are available. The notifications are displayed in the Admin Bar and also on the plugins page where you can get more details about the new version.

To install the new version, you simply hit the “Update automatically” button. WordPress will automatically download the new package, extract it and replace the old files. No FTP, removing old files, and uploading is required.

img01

There is also a dedicated page for updates which can be reached from the dashboard menu. It’s helpful when you want to do bulk updates of multiple plugins instead of updating each one separately. It also has a “Check Again” button which checks for new updates. By default, WordPress does this check every 12 hours.

img02

In the later weeks, we will be applying this WordPress like update system to Engelsystem. Developers who are interested to contribute can work with us.

Development: https://github.com/fossasia/engelsystem             Issues/Bugs:https://github.com/fossasia/engelsystem/issues


Continue ReadingWordPress Upgrade Process

User Notifications

The requirement for a notification area came up when I was implementing Event-Role invites feature. For not-existing users that were not registered in our system, an email with a modified sign-up link was sent. So just after the user signs up, he will be accepted as that particular role. Now for users that were already registered to our platform a dedicated area was needed to let the user know that he has been invited to be a role at an event. Similar areas were needed for Session invites, Call for papers, etc. To take care of these we thought of implementing a separate notifications area for the user, where such messages could be sent to registered users. Issue

Base Model

I kept base db model for a user notification very basic. It had a user field that would be a Foreign key to a User class object. title and message would contain the actual data that the user would read. message can contain HTML tags, so if someone wants to display the notification with some markup he could store that in the message. The user might also want to know when a notification was received. The received_at field stores a datetime object for the same purpose.

There is also has_read field that was later added. It stores a boolean value that tells if the user has marked the notification as Read.

class Notification(db.Model):
    """
    Model for storing user notifications.
    """

    id = db.Column(db.Integer, primary_key=True)

    user_id = db.Column(db.Integer, db.ForeignKey('user.id'))
    user = db.relationship('User', backref='notifications')

    title = db.Column(db.String)
    message = db.Column(db.Text)
    action = db.Column(db.String)
    received_at = db.Column(db.DateTime)
    has_read = db.Column(db.Boolean)

    def __init__(self,
                 user,
                 title,
                 message,
                 action,
                 received_at,
                 has_read=False):
        self.user = user
        self.title = title
        self.message = message
        self.action = action
        self.received_at = received_at
        self.has_read = has_read

action field helps the Admin identify the notification. Like if it is a message for Session Schedule change or an Event-Role invite. When a notification is logged, the administrator could tell what exactly the message is for.

Unread Notification Count

The user must be informed if he has received a notification. This info must be available at every page so he doesn’t have to switch over to the notification area to check for new ones. A notification icon at the navbar perhaps.

Screenshot from 2016-07-19 02:00:47

The data about this notification count had to be available at the navbar template at every page. I decided to define it as a method in the User class. This way it could be displayed using the User object. So if the user was authenticated, the icon with the notification count could be displayed.

class User(db.Model):
    """User model class
    """
    # other stuff
    
    def get_unread_notif_count(self):
        return len(Notification.query.filter_by(user=self,
                                                has_read=False).all())
{% if current_user.is_authenticated %}
    <!-- other stuff -->

    <li>
             <a class="info-number" href="{{ url_for('profile.notifications_view') }}">
                  <i class="fa fa-envelope-o"></i>
                  <span class="badge bg-green">{{ current_user.get_unread_notif_count() | default('', true) }}</span>
             </a>
    </li>

    <!-- other stuff -->

{% endif %}

If the count is zero, count number is not displayed.

Possible Enhancement

The notification count comes with the HTML generated by the template at the server. So to check for new notifications the user must either refresh the page or travel to another page. To show newly received notifications without refreshing the page the WebSocket API can be used. I’ve it in my bucket list and I’ll implement it soon.

Continue ReadingUser Notifications

Getting fired up with Firebase Database

As you might’ve noticed, in my Open Event Android Project, we are asking the user to enter his/her details and then using these details at the backend for generating the app according to his/her needs.

One thing to wonder is how did we transmit the details from webpage to the server.

Well, this is where Firebase comes to the rescue one more time!

If you’ve read my previous post on Firebase Storage, you might have started to appreciate what an awesometastic service Firebase is.

So without any further adieu, lets get started with this.

Step 1 :

Add your project to Firebase from the console.

 newProj
Click on the Blue button

Step 2 :

Add Firebase to your webapp

Open the project, you’ve just created and click on the bright red button that says, “ Add Firebase to your web app”

 addFirebase

Copy the contents from here and paste it after your HTML code.

Step 3 :

Next up, navigate to the Database section in your console and move to the Rules tab.

 screenshot-area-2016-07-18-204133.png

For now, let us edit the rules to allow anyone to read and write to the database.

 screenshot-area-2016-07-18-204437

Almost all set up now.

Step 4 :

Modify the HTML to allow entering data by the user

This looks something like this :

<form name="htmlform" id="form" enctype="multipart/form-data">
<p align="center"><b><big>FOSSASIA's App Generator</big></b></p>
<table align="center"
width = "900px"
height="200px">
<tr>
<td valign="top">
<label for="Email">Email</label>
</td>
<td valign="top">
<input id="email" type="email" name="Email" size="30">
</td>
<td>
<td valign="top">
<label for="name">App's Name</label>
</td>&nbsp;
<td valign="top">
<input id="appName" type="text" name="App_Name" maxlength="50" size="30">
</td>&nbsp;
</tr>
<tr>
<td valign="top">
<label for="link">Api Link</label>
</td>
<td valign="top">
<input id="apiLink" type="url" name="Api_Link" maxlength="90" size="30">
</td>
</tr>
<tr>
<td valign="top">
<label for="sessions">Zip containing .json files</label>
</td>
<td valign="top">
<input accept=".zip" type="file" id="uploadZip" name="sessions">
</td>
</tr>
<tr>
<td colspan="5" style="text-align:center">
<button type="submit">Generate and Download app</button>
</td>
</tr>
</table>
</form>
view raw index.html hosted with ❤ by GitHub

Now let us setup our javascript to extract this data and store this in Firebase Database.

<script src="https://www.gstatic.com/firebasejs/live/3.0/firebase.js"></script>
<script src="https://code.jquery.com/jquery-1.10.2.js"></script>
<script src="https://code.jquery.com/ui/1.11.2/jquery-ui.js"></script>
<script>
var $ = jQuery;
var timestamp = Number(new Date()); //this will server as a unique ID for each user
var form = document.querySelector("form");
var config = {
apiKey: "API_KEY",
authDomain: "app-id.firebaseapp.com",
databaseURL: "https://app-id.firebaseio.com",
storageBucket: "app-id.appspot.com",
};
firebase.initializeApp(config);
var database = firebase.database();
form.addEventListener("submit", function(event) {
event.preventDefault();
var ary = $(form).serializeArray();
var obj = {};
for (var a = 0; a < ary.length; a++) obj[ary[a].name] = ary[a].value;
console.log("JSON",obj);
var file_data = $('#uploadZip').prop('files')[0];
var storageRef = firebase.storage().ref(timestamp.toString());
storageRef.put(file_data);
var form_data = new FormData();
form_data.append('file', file_data);
firebase.database().ref('users/' + timestamp).set(obj);
database.ref('users/' + timestamp).once('value').then(function(snapshot) {
console.log("Received value",snapshot.val());
)};
});
</script>
view raw script.js hosted with ❤ by GitHub

We are almost finished with uploading the data to the database.

Enter data inside the fields and press submit.

If everything went well, you will be able to see the newly entered data inside your database.

screenshot-area-2016-07-18-205651.png

Now on to retrieving this data on the server.

Our backend runs on a python script, so we have a library known as python-firebase which helps us easily fetch the data stored in the Firebase database.

The code for it goes like this

firebase = firebase.FirebaseApplication('https://app-id.firebaseio.com', None)
result = firebase.get('/users', str(arg))
jsonData = json.dumps(result)
email = json.dumps(result['Email'])
email = email.replace('"', '')
app_name = json.dumps(result['App_Name'])
app_name = app_name.replace('"', '')
print app_name
print email
view raw firebase.py hosted with ❤ by GitHub

The data will be returned in JSON format, so you can manipulate and store it as you wish.

Well, that’s it!

You now know how to store and retrieve data to and from Firebase.
It makes the work a lot simpler as there is no Database schema or tables that need to be defined, firebase handles this on its own.

I hope that you found this tutorial helpful, and if you have any doubts regarding this feel free to comment down below, I would love to help you out.

Cheers.

Continue ReadingGetting fired up with Firebase Database

Dockerizing PHP and Mysql application

Docker Introduction

Docker is based on the concept of building images which contain the necessary software and configuration for applications. We can also build distributable images that contain pre-configured software like an Apache server, Caching server, MySQL server, etc. We can share our final image on the Docker HUB to make it accessible to everyone.

First we need to install docker on our local machine. Steps to install docker for ubuntu

Prerequisites

  • Docker requires a 64-bit installation regardless of your Ubuntu version.
  • Your kernel must be 3.10 at minimum. The latest 3.10 minor version or a newer maintained version are also acceptable.

To check your current kernel version, open a terminal and use uname -r to display your kernel version:

$ uname -r
3.11.0-15-generic

Update your apt sources

Docker’s APT repository contains Docker 1.7.1 and higher. To set APT to use packages from the new repository:

  1. Log into your machine as a user with sudo or root privileges.
  2. Open a terminal window.
  3. Update package information, ensure that APT works with the https method, and that CA certificates are installed.
     $ sudo apt-get update
     $ sudo apt-get install apt-transport-https ca-certificates
    
  4. Add the new GPG key.
    $ sudo apt-key adv --keyserver hkp://p80.pool.sks-keyservers.net:80 --recv-keys 58118E89F3A912897C070ADBF76221572C52609D
    
  5. Open the /etc/apt/sources.list.d/docker.list file in your favorite editor.If the file doesn’t exist, create it.
  6. Remove any existing entries.
  7. Add an entry for your Ubuntu operating system
  8. On Ubuntu Trusty 14.04 (LTS)
    deb https://apt.dockerproject.org/repo ubuntu-trusty main
    
  • Save and close the /etc/apt/sources.list.d/docker.list file.
  • Update the APT package index.
    $ sudo apt-get update

For Ubuntu Trusty, Wily, and Xenial, it’s recommended to install the linux-image-extra kernel package. The linux-image-extra package allows you use the aufs storage driver.

Install both the required and optional packages.

$ sudo apt-get install linux-image-generic-lts-trusty

INSTALL

Log into your Ubuntu installation as a user with sudo privileges.

  1. Update your APT package index.
    $ sudo apt-get update
    
  2. Install Docker.
    $ sudo apt-get install docker-engine
    
  3. Start the docker daemon.
    $ sudo service docker start
    
  4. Verify docker is installed correctly.
    $ sudo docker run hello-world
    

    This command downloads a test image and runs it in a container. When the container runs, it prints an informational message. If it runs successfully then docker is installed.

Docker Images

Docker images are the basis of containers. An image can be considered a class definition. We define its properties and behavior. To browse the available images, we can visit the Docker HUB and run docker pull <image> to download them to the host machine.

Listing images on the host

$ docker images

REPOSITORY          TAG                 IMAGE ID            CREATED             SIZE
ubuntu              14.04               1d073211c498        3 days ago          187.9 MB
busybox             latest              2c5ac3f849df        5 days ago          1.113 MB
training/webapp     latest              54bb4e8718e8        5 months ago        348.7 MB

Working with Dockerfile

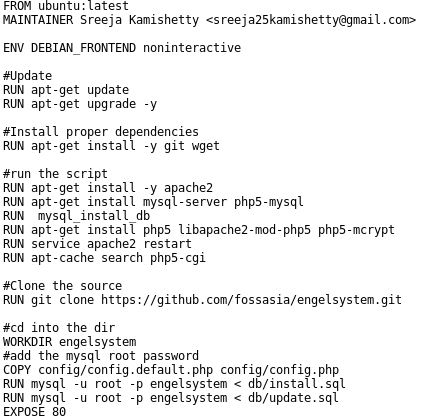
Create a Dockerfile in your PHP project. This is the docker file for engelsystem.

Our Dockerfile is now complete and ready to be built:

Screenshot from 2016-07-18 09:08:52

Building the Image

The docker build . command will build the Dockerfile inside the current directory:

Our image is now labeled and tagged. The final step is to push it to the Docker HUB. This step is optional, but it’s still useful if we’re planning on sharing the image and and helping others with their development environment.

Continue ReadingDockerizing PHP and Mysql application