Creating an API in PHP

One of the key components of my GSoC Project was to have a POST API for the Android App generator.

This was required so that the app generator could be plugged into the server and can be called directly instead of someone manually visiting the webpage and entering his/her details.

It takes in a JSON input and compiles and emails the app to the organizer based on his email address in the input JSON.

The input to the API will look something like this :

{
“email”: “harshithdwivedi@gmail.com”,
“app_name”: “MyApp”,
“endpoint”: “https://open-event-dev.herokuapp.com/api/v2
}

Once the data is sent, on the server I have a php file which intercepts the requests and performs an action based on the request.

<?php
function sendResponse($data) {
    header('Content-type: application/json');
    echo json_encode($data);
    die();
}
/* If the request isn't a POST request then send an error message*/
if ($_SERVER['REQUEST_METHOD'] != 'POST') {
    sendResponse([
        "status"=>"error",
        "code"=>405,
        "message"=>"Method Not Allowed",
    ]);
}
/* Store the input received in a variable named body */
$body = json_decode(file_get_contents('php://input'), true);
/* If the user is nissing any important input parameters, don't process the request */
if (!array_key_exists('email', $body) || !array_key_exists('app_name', $body) || !array_key_exists('endpoint', $body)) {
    sendResponse([
        "status"=>"error",
        "code"=>422,
        "message"=>"Unprocessable entity",
    ]);
}
$uid = mt_rand(1000,9999). "_" .time();  //A random User ID
/* Extracting variables from the body */
$email = escapeshellcmd($body['email']);
$appName = escapeshellcmd($body["app_name"]); 
$endpoint = escapeshellcmd($body["endpoint"]);

/* Run a script based on the input parameters */
exec("sudo python /var/www/html/api/appgenserver.py $email $appName $endpoint");

The code above is pretty much self explanatory.

So basically, first we check for a valid request (GET/POST) and throw an error if it is invalid.

Next up, for a valid request we store the body into a variable and then execute a followup script as per our needs using data from this response.

This PHP file should be located in the public-html (/var/www/data) of the server so as to be accessible from outside of the server.

You can test out this API by calling it directly by prepending the server’s ip address to the name of php file containing this code.

Something like :

domain-name.com/api/api.php

You can also use Postman for Chrome or RESTClient for Firefox for making API calls easily.

Well, that’s it then!

You can easily modify the PHP code provided and modify it to suite your needs for making you own API.

Let me know your thoughts and your queries in the “response” 😉 below.

Until next time.

Continue ReadingCreating an API in PHP

Developing a pdf viewer in AngularJs

week11gsoc1

Handling different mime types and giving support to them is quite important when a collaboration platform is being developed. Previously sTeam web UI had essential components like :

  • image viewer
  • audio player
  • video player

So in the process of developing new components and adding support for different mime types a PDF viewer grew out as a possibility. So the concept of a PDF viewer is quite simple, it just helps you to display, control all the files that come with the mime-type application/pdf.

The process as a whole is quite simple in developing the pdf viewer. Let us have a look at the process;

  • We have to utilize the PDFViewerService in order to build the PDF viewer
  • The configuration variables are pretty much few in number, although it is very necessary to look after what URI is being passed to the pdfURL variable as it is solely responsible for loading the content from the file.
  • Using the pdf viewer instance is pretty much simple as we have to declare the instance viewer first and then use the same $scope.instance for performing operations like :
    1. Going to the next page
    2. Going to the prev page
    3. Going to a particular page
    4. Displaying the total number of pages loaded
    5. Displaying the progress of the loaded files
  • Lastly there is one important thing to be noted, ngPDFViewer is comparitively a light weight library that could be used for development of a PDF viewer although when the application is bloated with large sized PDF’s it takes couple of seconds to load the PDF. A smart move here would be using the $scope.currentPages and $scope.totalPages in order to make a small calculation and display it at the users end as to how much percentage of the file is loaded.

angular.module('steam', [ 'ngPDFViewer' ])
.controller('workspaceDetailedCtrl', [ '$scope', 'PDFViewerService', function($scope, pdf) {
  $scope.pdfURL = "test.pdf"
  $scope.instance = pdf.Instance("viewer")

  $scope.nextPage = function() {
    $scope.instance.nextPage()
  }
  $scope.prevPage = function() {
    $scope.instance.prevPage()
  }
  $scope.gotoPage = function(page) {
    $scope.instance.gotoPage(page)
  }
  $scope.pageLoaded = function(curPage, totalPages) {
    $scope.currentPage = curPage
    $scope.totalPages = totalPages
  }
  $scope.loadProgress = function(loaded, total, state) {
    console.log('loaded =', loaded, 'total =', total, 'state =', state)
  }
}]);

Here is the final outcome of it:

week11gsoc2

week11gsoc3

Source : click here

Thats it folks,
Happy Hacking !!

Continue ReadingDeveloping a pdf viewer in AngularJs

Mark Notifications Read on Click

Screenshot from 2016-08-01 07:31:22

Notification has become a really important way of informing users about the various activities related to them in web apps. There are different types of notification such as web app notification, email notification, desktop notification, push notification, etc. We are going to primarily talk about web app notification and mainly about how to mark them as read.

Create Notification

Creating a notification is plain and simple. You have a json or an object which stores the notification message corresponding to a particular activity. Whenever that activity occurs in the backend, you call the send notification module, which adds the information to the database and shows it in the notification page. As simple as that.

Screenshot from 2016-08-01 07:48:08

Marking Notification as Read

The main functioning of this is plain and simple as well. You have a URL, which on getting a request from the user, marks the notification as read in the database. That’s it.

Screenshot from 2016-08-01 07:48:17

We know how to do this using a button or a link. But the question here is how to mark a notification as read on clicking any part of the notification?? The obvious answer is, well, put the entire notification inside an anchor tag and you are done, right? Well, it would work in many cases. But what if the design structure is such that this doesn’t work somehow. Somehow enclosing the notification inside a particular anchor tag doesn’t solve the purpose. What do we do then?

Identify Whether Inside a DIV

The main problem here actually is how to identify whether the click is inside the enclosing div or somewhere else. Once we solve this problem, we can send an ajax request to the mark read URL and our job is done.

Screenshot from 2016-08-01 07:52:58

So, to identify that a click is indeed inside a div, we use the event.target property of the event clicked. The target event property returns the element that triggered the event. So we check whether event.target has the “notification” class in our case. If it does not have the “notification” class we check in all it’s parent nodes. We get the parent nodes using the “parent()” function and check whether any of that has notification. If either of the 2 occurs, we consider that the click is inside the div. And thus mark the notification as read.

Screenshot from 2016-08-01 07:51:09

So, once this is done, we mark the notification as read in the backend and our job is done…

Continue ReadingMark Notifications Read on Click

UI Testing in Android


Testing in android is something that most people simply don’t do. When I first started with developing android apps, I followed the same dev cycle :

  • Develop a feature
  • deploy to a device
  • manual testing for bugs and errors
  • fix these issues due to wrong implementation
  • then again deploy and manually test and so on……

Trust me it’s a tedious process and no one actually can test for the corner cases that may arise. You may be able to cover like 85% of the cases for each feature but when there are a ton of features you’ll collectively cover much less than 85% as well. So, We should definitely write tests for android. I’ll start with Espresso testing first.

Quote from the Android developer website:


“Testing user interactions within a single app helps to ensure that users do not encounter unexpected results or have a poor experience when interacting with your app. You should get into the habit of creating user interface (UI) tests if you need to verify that the UI of your app is functioning correctly.

The Espresso testing framework, provided by the Android Testing Support Library, provides APIs for writing UI tests to simulate user interactions within a single target app. Espresso tests can run on devices running Android 2.2 (API level 8) and higher. A key benefit of using Espresso is that it provides automatic synchronization of test actions with the UI of the app you are testing. Espresso detects when the main thread is idle, so it is able to run your test commands at the appropriate time, improving the reliability of your tests. This capability also relieves you from having to adding any timing workarounds, such as a sleep period, in your test code.

The Espresso testing framework is an instrumentation-based API and works with theAndroidJUnitRunner test runner.”


Getting started

We first need to setup espresso in android studio. That can be done by adding this to the app level build.gradle

dependencies {
    ...
    androidTestCompile 'com.android.support.test.espresso:espresso-core:2.2.1'
}

After adding this dependency and setting up testing on android, now we can move on to write some tests. We start by adding a new class in androidTest where we will actually write the tests. There are 3 parts to writing an espresso test :

  1. ViewMatchers: Find a view to act/assert upon something
  2. ViewActions: something to perform an action(click, type etc.)
  3. ViewAssertion: something to verify what you expect

Components

  1. For writing tests in espresso we just have to use these three parts to see if the ui is working as it should.

    Let’s say we want to type some text in an edittext and see if the text we have typed is as we expect it to be.

    To start, we’ll see how we use viewMatchers. We need to find a view in ViewMatchers. For that, we will do something like this

    withId(R.id.edittext_id)

    Now we perform a click on this eddittext

    perform(typeText("Hello"))

    Now we join the two by wrapping in onView()

    onView(withId(R.id.edittext_id)).perform(typetext("Hello"))

    This will just type “Hello” in the edittext with the id eddittext_id, now we need to check if this is what was actually expected, for that we will have to further a viewAssertion on this like this :

    onView(withText("Hello")).check(matches(isDisplayed()));

    This is a cheatsheet that shows various methods that can be used in espresso.

    So this is how we can perform basic ui tests using espresso. Mainly people face the issue of deciding on the views that we have to perform this action on. Just think of the 3 components that we have previously talked about (View matching, View action and View assertions), if you think a view can have all three of these, then you can write a test for it. Go ahead and try it for yourself. Cheers!


Continue ReadingUI Testing in Android

Ticketing System in Open-Event

So we implemented the ticketing system in the open-event. Basically we provide the user with two options – either add his/her own ticket url or use our own ticketing system. If the ticketing module is turned off then there is no option and the user has to add a Ticket URL.

1

2

Thus only Add Ticket URL is shown if the ticketing switch is turned off. However if the ticket switch is turned ON then we display our own ticketing system i.e. provide with an option to choose to the user.

3

Now the ticket feature can be either Free, Paid or by donation. If the ticket feature is free then just the normal ticketing details are entered by the user. However if Paid option is selected then a payment system is displayed to the user  where he/she has to choose the country and the currency in which the user will make the payment.

4

The user can pay through PayPal and we can also decide whether we want to add Tax to the event or not.

Continue ReadingTicketing System in Open-Event

Setting up Nginx, Gunicorn and Flask-SocketIO

One of my previous posts was on User Notifications (another blog). There I discussed a possible enhancement to notifications by using WebSocket API. This week I worked on the same using Flask-SocketIO library. Its development required setting up the backend, this post is about the same.

Flask-SocketIO and Gunicorn

From the Flask-SocketIO page itself:

Flask-SocketIO gives Flask applications access to low latency bi-directional communications between the clients and the server.

On the client-side the developer is free to use any library that works on the Socket.io protocol. Flask-SocketIO needs an asynchronous service to work with and gives a choice from the three: Eventlet (eventlet.net), Gevent (gevent.org) and Flask development server. I used it with Eventlet.

pip install flask-socketio
pip install eventlet

We were already using Gunicorn as our webserver, so integrating Eventlet only required specifying the worker class for Gunicorn.

gunicorn app:app --worker-class eventlet -w 1 --bind 0.0.0.0:5000 --reload

This command would start the gunicorn webserver, load the Flask app and bind it to port 5000. The worker class has to be specified as eventlet, using only one worker (-w 1). --reload option helps during development, it restarts the server if the python code changes.

The problem with Gunicorn occurs when working with static files. Gunicorn is not made to serve static assests like CSS stylesheets, JS scripts, etc. It should only be used to serve requests that require the Python application. We were serving static assets with Gunicorn and you could see the static files not changing at the browser during development (even if the server is restarted). The correct way to handle this was to use Nginx as a proxy server that serves static files, and passes other requests to the Flask application (running at Gunicorn).

Nginx

We use Vagrant for development. To test our application, a port in the host machine has to be forwarded to another port in the guest machine. We forward 8001 Host port to 5000 in Guest.

config.vm.network "forwarded_port", guest: 5000, host: 8001

To serve requests with Nginx we need it listening to port 5000 in our Virtualbox. It should serve the static files itself and should pass other requests to the Gunicorn server running the python application. The Gunicorn server should be running on another port, 5001 let’s assume. The following Nginx configuration does this:

server {
    listen       5000;

    location /static {
        alias /vagrant/app/static;
        autoindex on;
    }

    location / {
        proxy_pass http://127.0.0.1:5001;

        proxy_redirect http://127.0.0.1:5001/ http://127.0.0.1:8001/;
    }
}

You can see the static files (which are served at /static in out application) are being served directly. /vagrant/app/static is the directory where our static assets reside inside vagrant. autoindex on lets you browse static file directories in the browser.

For other locations (URIs) the request is passed onto port 5001 where our Gunicorn server is running. Many responses from the Gunicorn server might contain URLs in the headers, like the Location header. This URL is going to have the domain and port of the Gunicorn server, since Flask is running on this server. This response is then grabbed by Nginx to send it to the user. Nginx will convert such URLs to the domain and port that it itself is running on. So if a response from Gunicorn has a header: Location: http://127.0.0.1:5001/blah it would be converted to Location: http://127.0.0.1:5000/blah. Since we were running our application inside a virtualbox, on the outside (host) we needed our application to be available at port 8001. So the response header Location: http://127.0.0.1:5000/blah needed to be Location: http://127.0.0.1:8001/blah. proxy_redirect does this job.

To add support for WebSockets at Nginx some other config parameters need to be defined. You can get them at https://flask-socketio.readthedocs.io/en/latest/.

Continue ReadingSetting up Nginx, Gunicorn and Flask-SocketIO

Handling images inside ZIP or with URL’s

The Open-event webapp generator now provides the user a facility to upload the speakers and sponsors images inside the ZIP as images/speakers and images/sponsors.  After that the user will just have to specify the path of the images inside JSON such as /images/speakers/photoname.jpg  instead of URL’s.

How It Works ?

Whenever a user uploads a ZIP containing different files, it is extracted in dist/ folder according to the filename inside ZIP.

//fold.js... function to extract files according to folder name

var admZip = require('adm-zip');
const distPath = __dirname + '/../../../dist';
const uploadsPath = __dirname + '/../../../uploads';
const mockPath = __dirname + '/../../../mockjson'

copyUploads: function(appFolder, uploadedFile) {
 const appPath = distPath + '/' + appFolder;
 fs.mkdirpSync(appPath + '/json');
 var zip = new admZip(uploadedFile);
 var zipEntries = zip.getEntries(); 

 zipEntries.forEach(function(zipEntry) {
 
 switch(zipEntry.entryName){
 case 'images/speakers/':
 zip.extractEntryTo("images/speakers/", appPath ); 
 break;
 case 'images/sponsors/':
 zip.extractEntryTo("images/sponsors/", appPath ); 
 break;
 case 'audio/':
 zip.extractEntryTo("audio/", appPath);
 break;
 case 'sessions':
 zip.extractEntryTo("sessions", appPath +'/json/');
 break;
 case 'speakers':
 zip.extractEntryTo("speakers", appPath +'/json/');
 break;
 case 'microlocations' :
 zip.extractEntryTo("microlocations", appPath+'/json/');
 break;
 case 'event' :
 zip.extractEntryTo("event", appPath +'/json/');
 break;
 case 'sponsors' :
 zip.extractEntryTo("sponsors", appPath +'/json/');
 break;
 case 'tracks':
 zip.extractEntryTo("tracks", appPath +'/json/');
 break;
 default:
 }

This will send all the speaker images to images/speakers in dist and all sponsors images to images/sponsors in dist ( dist is the folder served to the user).


const appFolder = reqOpts.email + '/' + slugify(reqOpts.name);
 speakers.forEach((speaker) => {
  if ((speaker.photo !== null) && (speaker.photo.substring(0, 4) ===     'http')) {
 speaker.photo = urlencode(distHelper.downloadSpeakerPhoto(appFolder,    speaker.photo));
 }
 else {
 var reg = speaker.photo.split('');
 if(reg[0] =='/'){
 speaker.photo =    urlencode(speaker.photo.substring(1,speaker.photo.length));
 }
 
 }

 });
//dist.js

downloadSpeakerPhoto: function(appFolder, photoUrl) {
 const appPath = distPath + '/' +appFolder;
 const photoFileName = photoUrl.split('/').pop();
 const photoFilePath = 'images/speakers/' + photoFileName;

 console.log('Downloading photo : ' + photoFileName);
 downloadFile(photoUrl, appPath + '/' + photoFilePath);
 return photoFilePath;
 },

The code above shows how the image URL’s are split on the basis of ‘/’ to get the last element of the URL that is photoFileName. After that the image can be written inside the folder.

images/speakers/' + photoFileName

This code also handles the case when the images are downloaded by taking URL paths from JSON. If the photo in JSON has a string matched with ‘HTTP’ .Then it is downloaded in images/speakers/ . Finally, the image is downloaded with the same path as specified in JSON which can then be easily related in HTML image tag.

//dist.js Function to download files

const downloadFile = function(url, filePath) {
 const fileStream = fs.createWriteStream(filePath);

 fileStream.on('error', function(err) {
 console.log(err);
 });
 try {
 request(url).pipe(fileStream);
 } catch (err) {
 console.log(err);
 }
};

That’s how the images inside the ZIP and the image URL’s inside JSON files are handled in Open-event webapp generator.

Continue ReadingHandling images inside ZIP or with URL’s

Using Heroku pipelines to set up a dev and master configuration

The open-event-webapp project, which is a generator for event websites, is hosted on heroku. While it was easy and smooth sailing to host it on heroku for a single branch setup, we moved to a 2-branch policy later on. We make all changes to the development branch, and every week once or twice, when the codebase is stable, we merge it to master branch.

So we had to create a setup where  –

master branch –> hosted on –> heroku master

development branch –> hosted on –> heroku dev

Fortunately, for such a setup, Heroku provides a functionality called pipelines and a well documented article on how to implement git-flow


First and foremost, we created two separate heroku apps, called opev-webgen and opev-webgen-dev

To break it down, let’s take a look at our configuration. First step is to set up separate apps in the travis deploy config, so that when development branch is build, it pushed to open-webgen-dev and when master is built, it pushes to opev-webgen app. The required lines as you can see are –

https://github.com/fossasia/open-event-webapp/blob/master/.travis.yml#L25

https://github.com/fossasia/open-event-webapp/blob/development/.travis.yml#L25

Now, we made a new pipeline on heroku dashboard, and set opev-webgen-dev and opev-webgen in the staging and production stages respectively.

Screenshot from 2016-07-31 04-33-30 Screenshot from 2016-07-31 04-34-41

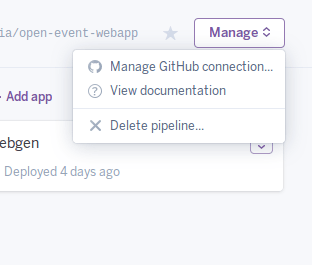
Then, using the “Manage Github Connection” option, connect this app to your github repo.

Screenshot from 2016-07-31 04-36-17

Once you’ve done that, in the review stage of your heroku pipeline, you can see all the existing PRs of your repo. Now you can set up temporary test apps for each PR as well using the Create Review App option.

Screenshot from 2016-07-31 04-37-38

So now we can test each PR out on a separate heroku app, and then merge them. And we can always test the latest state of development and master branches.

Continue ReadingUsing Heroku pipelines to set up a dev and master configuration

sTeam REST API Unit Testing

(ˢᵒᶜⁱᵉᵗʸserver) aims to be a platform for developing collaborative applications.
sTeam server project repository: sTeam.
sTeam-REST API repository: sTeam-REST

Unit Testing the sTeam REST API

The unit testing of the sTeam REST API is done using the karma and the jasmine test runner. The karma and the jasmine test runner are set up in the project repository.

The karma test runner : The main goal for Karma is to bring a productive testing environment to developers. The environment being one where they don’t have to set up loads of configurations, but rather a place where developers can just write the code and get instant feedback from their tests. Because getting quick feedback is what makes you productive and creative.

The jasmine test runner: Jasmine is a behavior-driven development framework for testing JavaScript code. It does not depend on any other JavaScript frameworks. It does not require a DOM. And it has a clean, obvious syntax so that you can easily write tests.

The karma and jasmine test runner were configured for the project and basic tests were ran. The angular js and angular mocks version in the local development repository was different. This had resulted into a new error been incorporated into the project repo. The ‘angular.element.cleanData is not a function’ error is thrown in the local development repository. This error happens when the local version of the angular.js and angular-mocks.js doesn’t match. The testing framework would test you if the versions f the two libraries is not the same.

The jasmine test runner can be accessed from the browser. The karma tests can be performed from the command line.

To access the jasmine test runner from the web browser, go to the url

http://localhost:7000/test/unit/runner.html

To run the karma test suite, run the following command

$ karma start

The unit tests of the sTeam REST service were done using jasmine. The unit tests were written in coffee script. The preprocessor to compile the files from coffee script to javascript is defined in the karma configuration file.

Jasmine Test RunnerJasmineRunner
Jasmine Test Failure

JasmineRunnerFailure

First a dummy pass case and a fail case is tested to check there are no errors in the test suite during the test execution.

The localstoragemodule.js which is used in the steam service is injected in the test module. Then the steam service version is tested.

describe 'Check version of sTeam-service', -> 
 		it 'should return current version', inject (version) -> 
 			expect(version).toEqual('0.1') 

steam service should be injected in a global variable as the same service functions shall be tested while performing the remaining tests.
Then the steam service is injected and checked whether it exists or not.

beforeEach inject (_steam_) -> 
 		steam= _steam_ 
 	describe 'Check sTeam service injection', ->  
 		it 'steam service should exist', -> 
 			expect(steam).toBeDefined() 

The sTeam service has both private and public functions. The private functions cannot be accessed from outside. The private functions defined in the sTeam service arehandle_request and headers.

describe 'Check sTeam service functions are defined.', ->  
 		describe ' Check the sTeam REST API private functions.', -> 
 			it 'steam service handle request function should exist', -> 
 				expect(steam.handle_request).toBeDefined() 
 			it 'steam service headers function should exist', -> 
 				expect(steam.headers).toBeDefined() 

The public functions of the sTeam service are then tested.

describe 'Check sTeam service functions are defined.', ->  
 		describe ' Check the sTeam REST API public functions.', -> 
 			it 'steam service login function should exist', -> 
 				expect(steam.login).toBeDefined() 
 			it 'steam service loginp function should exist', -> 
 				expect(steam.loginp).toBeDefined() 
 			it 'steam service logout function should exist', -> 
 				expect(steam.logout).toBeDefined() 
 			it 'steam service user function should exist', -> 
 				expect(steam.user).toBeDefined() 
 			it 'steam service get function should exist', -> 
 				expect(steam.get).toBeDefined() 
 			it 'steam service put function should exist', -> 
 				expect(steam.put).toBeDefined() 
 			it 'steam service post function should exist', -> 
 				expect(steam.post).toBeDefined() 
 			it 'steam service delete function should exist', -> 
 				expect(steam.delete).toBeDefined() 

The test suite written by Siddhant for the sTeam server was tested. The merging of the code from different branches which includes the work done during the course of GSoC 2016 will be merged subsequently.

Karma test runner

KarmaTestCase

Feel free to explore the repository. Suggestions for improvements are welcomed.

Checkout the FOSSASIA Idea’s page for more information on projects supported by FOSSASIA.


Continue ReadingsTeam REST API Unit Testing

Working with Styles and Themes in Android

All those who have worked with styles and themes know that they’re hard to get right. We tend to get frustrated when we work with them. The hierarchy easily devolves into spaghetti code. How often did you want to change a style but feared you might break the continuity of the design of the app somewhere or the other.

I ran into a similar situation recently. I had to change the whole app’s style’s and theme by just changing the colors etc. in one location. This was for the Open Event android project where we wanted that while generating an apk by the apk generator we could change the color scheme of the app and could make it customisable for the needs of the organisations.

So, I’ll be talking about styling different views in this post. This shall be a long post!

When should we use styles

First of all, most of us get confused on when should we use styles instead of an inline attribute. Now I am going to show the rules that I follow:

When you have multiple views that should look identical ( Perhaps that do similar things)

Few Examples :

  • Payment screens. You want to get the user through a bunch of ordering and payment screens. You need similar kind of buttons there to make it look like a continuous process. Hence we make the Buttons follow one particular style
<style name="Payment_Buttons">
    <item name="android:minWidth">@dimen/button_min_width</item>
    <item name="android:minHeight">@dimen/button_min_height</item>
    <item name="android:background">@color/my_choice_color</item>
</style>

Try to use themes to tweak default styles

Themes provide a way of defining the default style of many widgets. For example :

If you want to define the default button for all of your payment screens in the example above, you can do something like :

<style name="ButtonTheme">
    <item name="android:buttonStyle">@style/MyButton</item>
</style>

But note that if you’re tweaking the default style, the only tricky part is to figure out the parent of your style but that’s really dificult due to a lot of variation within the different versions of android. If you’re using something that’s part of the AppCompat, then it’s okay. you don’t need to worry about the variations but when you want to style something not in AppCompat, then the main problem arises. So For example I want a button to be Holo until kitkat and then Material starting Lollipop, I’ll do something like this :

In values/styles.xml –

<style name="ButtonParent" Parent = "android:Widget.Holo.Button" />
<style name="ButtonParent.Holo">
    <item name="android:background">@drawable/my_bg</item>
</style>

Then in values-v21/styles.xml:

<style name="ButtonParent" parent ="android:Widget.Material.Button/>

This makes the button consistent with guidelines and the app looks perfect.

Now, Themes vs Styles

This is a topic which most of the developers don’t know about. They get confused on what is the difference between them. I was also not totally clear about this until recently. A theme is infact a style, the only difference is the usage.

  • We set a theme in the Manifest of the app or an activity
  • We set a style in a layout file or a widget
  • There are more styles than themes (Checkout styles.xml and themes.xml)
  • Definition of a theme is in the essence jsut a collection of references to stlyes that the theme will use.
  • To elaborate, let’s see the example of Theme.Holo :

It has a combination of

  1. Widget.Holo.Button
  2. Widget.Holo.Button.Small
  3. TextAppearence.Holo.Small
  4. TextAppearence.Holo.Small.Inverse

So, There can be different styles like this which can be referenced in a theme. Themes can be divided into 2 parts : General themes and sub themes

You can have a general them like Theme.ABC and if you want a variation of this general theme, for example no actionbar, you can add another theme like Theme.ABC.NoActionBar . This theme will not have the ActionBar

Inheritance

One of the interesting things that most people don’t know about is inhertance of styles/themes. What do I mean by this is that you can use existing styles and create some variations to suit different needs. There are 2 ways to use this inheritance. I’m going to try to explain and elorate on them :

  1. With a parent attribute

This is the most common way to use it and the way that most of the developers learn it while working on styles for the first time.

So how actually do we use it?

<style name = "Child" parent = "@style/Parent">
</style>

Here the child inherits all the properties of the style with the name “Parent” and define new properties in this style name “Child” where they can define new properties they want on top of the parent style.

2. With implicit style names

The other way to inherit styles/themes using the implicit way. Instead of setting a parent attribute, just prefix your new style/theme with the name of its parent and a dot. Something like this :

<style name = "Parent.Child">
</style>

This works the same as the previous method. Using this reduces some time to write additional parameter and is used by almost all experienced developers.

Plus you get some checks as well while writing code in Android studio. But be careful while using this as you need to take care of somethings :

For example,

  • The Parent style/theme needs to exist, Otherwise an error
  • You cannot inherit default themes and styles. For example you can’t create
<style name = "Theme.Holo.myTheme">

but you do this

<style name = "myTheme" parent = "Theme.Holo">

I know this can be overwhelming for a person who’s just starting with styles and themes. Trust me I was also not able to understand the concepts on the first go. I had to spend some time to grasp all that can be done using styles and themes. So I think this should be it for this blog. It’s already gotten pretty big.

Be sure to check out the Open event android project here and the usage of styles and themes there. Ciao till next time!

Continue ReadingWorking with Styles and Themes in Android