Implementing Database Migrations

Database Migrations Using Phinx

Database migrations can transform your database in many ways such as creating new tables, inserting rows, adding indexes and modifying columns. It avoids the use of writing MYSQL by hand and instead offers a powerful API for creating migrations using PHP code.

Advantages of using Phinx

  • Phinx keeps track of which migrations have been run so you can worry less about the state of your database and instead focus on building better software
  • Each migration is represented by a PHP class in a unique file. We can write our migrations using the Phinx PHP API, or raw SQL.
  • Phinx has an easy installation process and easy to use command line instructions and easy to Integrate with various other PHP tools (Phing, PHPUnit) and web frameworks.

Installating Phinx

Phinx should be installed using Composer. Composer is a tool for dependency management in PHP. We need to require the dependency in composer.json.

php composer.phar require robmorgan/phinx

Then run Composer:

php composer.phar install --no-dev

Now Create a folder in your database directory called migrations with adequate permissions. It is where we write our migrations. In engelsystem it is created in db directory

Phinx can now be executed from within your project:

php vendor/bin/phinx init

Writing Migrations For SQL files

Creating a New Migration

Let’s start by creating a new Phinx migration. Run Phinx using the create command. This will create a new migration in the format YYYYMMDDHHMMSS_my_new_migration.php where the first 14 characters are replaced with the current timestamp down to the second. This will create a skeleton file with a single method.

$ php vendor/bin/phinx create MyNewMigration

The File looks something like this
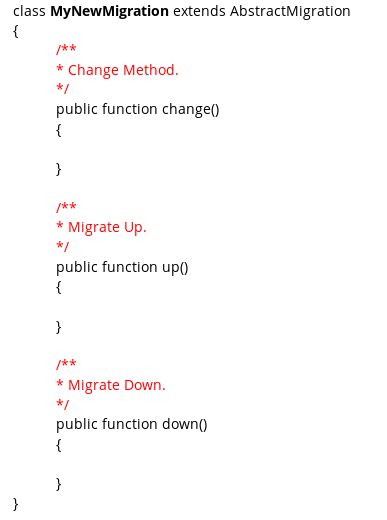
Screenshot from 2016-07-18 08:22:42

Explaining the File

The AbstractMigration Class

Abstraction class provides the necessary support to create your database migrations. All Phinx migrations extend from the AbstractMigration class. Phinx provides different methods in the abstraction class like change, up and down method.

The Change Method

This is the default migration method. I will explain how to write the change method for an example MYSQL query. For example following MYSQL query can also be executed using Phinx change method.

MYSQL Query

ALTER TABLE `AngelTypes` ADD `requires_driver_license` BOOLEAN NOT NULL;

Equivalent change method

public function change()
 {
   $table = $this->table('AngelTypes');
   $table->addColumn('requires_driver_license', 'boolean', array('null' => 'false'))
               ->update();
 }

The Up Method

We should use the up method to transform the database with your intended changes. For example following MYSQL query to create a new settings table can be executed using equivalent up method.

MYSQL Query

DROP TABLE IF EXISTS `Settings`;
 CREATE TABLE IF NOT EXISTS `Settings` (
    `event_name` varchar(255) DEFAULT NULL,
   `buildup_start_date` int(11) DEFAULT NULL,
   `event_start_date` int(11) DEFAULT NULL,
   `event_end_date` int(11) DEFAULT NULL,
   `teardown_end_date` int(11) DEFAULT NULL,
   `event_welcome_msg` varchar(255) DEFAULT NULL
    ) ENGINE=InnoDB DEFAULT CHARSET=utf8 ;

Equivalent up method

public function up()
 {
 $table = $this->table('Settings');
 $table->addColumn('event_name', 'string', array('limit' => 255))
 ->addColumn('buildup_start_date', 'integer', array('limit' => 11))
 ->addColumn('event_start_date', 'integer', array('limit' => 11))
 ->addColumn('event_end_date', 'integer', array('limit' => 11))
 ->addColumn('teardown_end_date', 'integer', array( 'limit' => 11))
 ->addColumn('event_welcome_msg', 'string', array('limit' => 255))
 ->save();
 }We have now created a table. Now we will learn to insert data into the tables using migrations.MYSQL QueryINSERT INTO `Privileges` (`id`, `name`, `desc`) VALUES (39, 'admin_settings', 'Admin Settings');
 INSERT INTO `GroupPrivileges` (`id`, `group_id`, `privilege_id`) VALUES (218, -4, 39);public function up()
{
    // inserting into Privileges
   $Rows = [
     [
     'id'   => 39,
     'name' => 'admin_settings',
     'desc' => 'Admin Settings'
     ]
   ];
  $this->insert('Privileges', $Rows);
  // inserting into GroupPrivileges.
   $rows = [
    [
    'id'    => 218,
    'group_id'  => -4,
    'privilege_id' => 39                                                 
  ]
   ];
  $this->insert('GroupPrivileges', $rows);
}

The Down Method

The down method is automatically run by Phinx when you are migrating down. We should use the down method to reverse/undo the transformations described in the up method.

MYSQL Query

DELETE * FROM  `Users`;

Equivalent Down method

public function down()
    {
        $this->execute('DELETE FROM Users');
    }

Since we have learned how to write migrations. Now we will execute the created migrations.

Configuring phinx.yml

When you initialize your project using the init command, Phinx creates a default file called phinx.yml.We can edit the database name, environment. We need to add the password for mysql user. The file looks something like this.Screenshot from 2016-07-18 07:56:13

Executing the migrations

To Migrate the database we use Migrate command. It runs over all the available migrations. Command to migrate for development environment is:

$ phinx migrate -e development

To migrate to a specific version we use the --target parameter or -t for short.

$ phinx migrate -e development -t 20110103081132

To know whether all your migrations have run successfully we use the status command

$ phinx status -e development

After migrating the database for engelsystem. The status command gives the following output.

88114b3e-4753-11e6-9afa-207e55650c1e

Continue ReadingImplementing Database Migrations

Transcript from the Python Toolbox 101

At the Python User Group Berlin, I lead a talk/discussion about free-of-charge tools for open-source development based on what we use GSoC. The whole content was in an Etherpad and people could add their ideas.

Because there are a lot of tools, I thought, I would share it with you. Maybe it is of use. Here is the talk:


Python Users Berlin 2016/07/14 Talk & Discussion


START: 19:15
Agenda 1min END: 19:15
======
– Example library
– What is code
– Version Control
  – Python Package Index
– …, see headings
– discussion: write down, what does not fit into my structure
Example Library (2min)  19:17
======================
What is Code (2min) 19:19
===================
.. note:: This frames our discussion
– Source files .py, .pyw
– tests
– documentation
– quality
– readability
– bugs and problems
– <3
Configurationsfiles plain Text for editing
Version Control (2min) 19:21
======================
.. note:: Sharing and Collaboration
– no Version Control:
  – Dropbox
  – Google drive
  – Telekom cloud
  – ftp, windows share
– Version Control Tools:
  – git
    – gitweb own server
    – 
  – mecurial
  – svn
  – perforce (proprietary)


Python Package Index (3min) 19:24
—————————
.. note:: Shipping to the users
hosts python packages you develop.
Example: “knittingpattern” package
pip
Installation from Pypi:
    $ python3 -m pip install knittingpattern # Linux
    > py -3.4 -m pip install knittingpattern # Windows
Documentation upload included!
Documentation (3min) 19:27
====================
.. note:: Inform users
I came across a talk:
Documentation can be:
– tutorials
– how to
– introduction to the community/development process
– code documentation!!!
– chat
– 
Building the documentation (3min)  19:30
———————————
Formats:
– HTML
– PDF
– reRST
– EPUB
– doc strings in source code
– test?
Tools:
– Sphinx
– doxygen
– doc strings
  – standard how to put in docstrings in Python
    – 
Example: Sphinx  3min 19:33
~~~~~~~~~~~~~~~
– Used for Python
– Used for knittingpattern
Python file:
Documentation file with sphinx.ext.autodoc:
Built documentation:
    See the return type str, Intersphinx can reference across documentations.
    Intersphinx uses objects inventory, hosted with the documentation:
Testing the documentation:
    – TODO: link
      – evertying is included in the docs
      – everything that is public is documented
      
      syntax
      – numpy 
      – google 
      – sphinx
Hosting the Documentation (3min) 19:36
——————————–
Tools:
– pythonhosted
  only latest version
– readthedocs.io
  several branches, versions, languages
– wiki pages
– 
Code Testing 2min 19:38
============
.. note:: Tests show the presence of mistakes, not their absence.
What can be tested:
– features
– style: pep8, pylint, 
– documentation
– complexity
– 
Testing Features with unit tests 4min 19:42
——————————–
code:
    def fib(i): …
Tools with different styles
– unittest
  
    import unittest
    from fibonacci import fib
    class FibonacciTest(unittest.TestCase):
        def testCalculation(self):
            self.assertEqual(fib(0), 0)
            self.assertEqual(fib(1), 1)
            self.assertEqual(fib(5), 5)
            self.assertEqual(fib(10), 55)
            self.assertEqual(fib(20), 6765)
    if __name__ == “__main__”: 
        unittest.main()
 
– doctest
    import doctest
    def fib(n):
        “”” 
        Calculates the n-th Fibonacci number iteratively  
        >>> fib(0)
        0
        >>> fib(1)
        1
        >>> fib(10) 
        55
        >>> fib(15)
        610
        >>> 
        “””
        a, b = 0, 1
        for i in range(n):
            a, b = b, a + b
        return a
    if __name__ == “__main__”: 
        doctest.testmod()
– pytest (works with unittest)
    import pytest
    from fibonacci import fib
    
    @pytest.mark.parametrize(“parameter,value”,[(0, 0), (1, 1), (10, 55), (15, 610)])
    def test_fibonacci(parameter, value):
        assert fib(parameter) == value
– nose tests?
– …
– pyhumber
– assert in code,  PyHamcrest
– Behaviour driven development
  – human test
Automated Test Run & Continuous Integration 2min 19:44
===========================================
.. note:: 
Several branches:
– production branch always works
– feature branches
– automated test before feature is put into production
Tools running tests 6min 19:50
——————-
– Travis CI for Mac, Ubuntu
– Appveyor for Windows
Host yourself:
– buildbot
– Hudson
– Jenkins
– Teamcity
– circle CI
  + selenium for website test
– 
– …?????!!!!!!
Tools for code quality 4min 19:54
———————-
– landscape
  complexity, style, documentation
  – libraries are available separately
    – flake8
    – destinate
    – pep257
– codeclimate
  code duplication, code coverage
  – libraries are available separately
– PyCharm
  – integrated what landscape has 
  – + complexity
Bugs, Issues, Pull Requests, Milestones 4min 19:58
=======================================
.. note:: this is also a way to get people into the project
1. find bug
2. open issue if big bug, discuss
3. create pull request
4. merge
5. deploy
– github
  issue tracker
– waffle.io – scrumboard
  merge several github issues tracker
– Redmine
JIRA
– trac 
– github issues + zenhub integrated in github
– gitlab
– gerrit framework that does alternative checking https://www.gerritcodereview.com/
  1. propose change
  2. test
  3. someone reviews the code
      – X people needed
  QT company uses it
Localization 2min 20:00
============
crowdin.com
    Crowdsourced translation tool:
    
Discussion
– spellchecker is integrated in PyCharm
  – character set
  – new vocabulary
  – not for continuous integration (CI)
– Emacs
  – 
– pylint plugin 
   – not all languages?
– readthedocs
  – add github project, 
  – hosts docs
– sphinx-plugin?
– PyCon testing talk:
    – Hypothesis package
      – tries to break your code
      – throws in a lot of edge cases (huge number, nothing, …)
      -> find obscure edge cases
      
Did someone create a Pylint plugin
– question:
    – cyclomatic code complexity
    – which metrics tools do you know?
    –
Virtual Environment:
    nobody should install everything in the system
    -> switch between different python versions
    – python3-venv
      – slightly different than virtual-env(more mature)
Beginners:
    Windows:
        install Anaconda
Continue ReadingTranscript from the Python Toolbox 101

Uploading json assets and icons to your app via the app generator

If you have tried out our app generator webpage, you should’ve noticed an option that allows you to upload a zip file which will contain the json for the event.

Why do we need this?

Well, this is needed because not every event organizer can maintain a server and API endpoints which contain the details for their event, so they can simply generate a json for the event by exporting it through the options provided to them on Google Spreadsheets and then they can upload them on the server, so that these files can be packaged in the android and web apps.

Implementation :

The implementation is pretty straightforward and consists of 3 parts :

  1. Making changes to the html file to allow user to upload the zip
<tr>
  <td valign="top">
    <label for="sessions">Zip containing .json files</label>
  </td>
  <td valign="top">
    <input accept=".zip" type="file" id="uploadZip" name="sessions">
  </td>
</tr>

2. Retrieve this file in the javascript and then make an AJAX call to the server

var file_data = $('#uploadZip').prop('files')[0];
 var form_data = new FormData();                 
 form_data.append('file', file_data);
 $.ajax({
            
                  url: '/upload.php', // point to server-side PHP script
                  cache: false,
                  contentType: false,
                  processData: false,
                  data: form_data,                         
                  type: 'post',
                  success: function(php_script_response){
                    // do something
                  }
                });

So here, the form_data contains the details about the file to be uploaded.

In the AJAX call, upload.php takes reads form_data variable and then initiates the upload to the server.

3. Setup a PHP script on the server to respond to the above AJAX call

<?php
    if ( 0 < $_FILES['file']['error'] ) {
        echo 'Error: ' . $_FILES['file']['error'] . '<br>';
    }
    else {
        move_uploaded_file($_FILES['file']['tmp_name'], "/var/www/html/uploads/upload.zip"); 
    }
?>

Here in the PHP script, the file is read and uploaded to a temporary directory in the server.

We then manually copy it to a location and name of our choice.

In case there are multiple users accessing the website and uploading their assets at the same time, we need to pass a timestamp variable to the AJAX call to and later on use it while renaming the uploaded file.

This is to ensure that the file uploaded by one user is not overwritten by another user.

How do we use this data during app compilation

The uploaded zip is then uncompressed and its contents are moved to the assets folder of the android app’s directory.

zip_ref = zipfile.ZipFile(path_to_zip_file, 'r')
zip_ref.extractall(directory)
zip_ref.close()
#TODO: Change path here
for f in os.listdir(directory+ "/zip"):
	if f.endswith('.json'):
		copyfile(f, directoy + "open-event-android/android/app/src/main/assets/"+f)
	elif f.endswith('.png'):
		copyfile(f, directory + "open-event-android/android/app/src/main/res/drawable"+f)
replace(directory+"/open-event-android/android/app/src/main/res/values/strings.xml", 'mipmap/ic_launcher', 'drawable/' + f)

Here replace is a function that searches in the source file for the phrase supplied as it’s argument and changes it with the new phrase.

Now when the app is compiled and ran on a user’s device, it will first search for a json file in the assets directory and if it exists, use that for fetching the data instead of making a network call. For this I have used Gson to first parse the offline files otherwise retrofit makes request to the api and fetches the data from there.

But if there is no json in the assets folder, a normal network call using retrofit will be made and the data will be fetched from the API defined by the user.

Continue ReadingUploading json assets and icons to your app via the app generator

Google Maps Api

OpenEvent uses it everywhere. Let me explain it.

The first problem that we faced was user current location.

We wanted to get location based on geolocation method then display this results on the map.

To get geolocation we use HTML5. Take a look on geolocate() function


function geolocate() {

        if (navigator.geolocation) {

            navigator.geolocation.getCurrentPosition(function (position) {

            }

        }

    }


From variable position you can get longitude and latitude params. These values allow us to move marker on the map on right position and get the name of user current location. Based on these data we are able to find the closest events and display it in a distance order.

To get information about city or country location you have to execute a simple GET request to google MAPS. In that case you need:


curl http://maps.googleapis.com/maps/api/geocode/json?latlng=17.0112,15.06


above result returns json file where you can find name of location: Nguigmi, Niger


Then, we faced a new challenge- we had to choose which map would be better for OpenEvent – Open Street Map or Google Maps. Finally we have chosen google maps because it wa more comfortable for our team.


OpenEvent simple searching engine is based on latitude and longitude params. So we transform all requests which contain city or country names to longitude and latitude params using Google Api. It allows us to avoid having problems with different locations’ names which occur in different nationalities.


Continue ReadingGoogle Maps Api

Adding Client Side validation to Login and Registration Forms

Its very important to have a client side validation apart from a server side validation. The server side validation only helps the developers but not the clients. Thus it was necessary to add a client side validation to the Login page and its other components so that the users  would be comfortable in this.

I had never before done this and was looking at how to achieve this using jQuery or JavaScript when I cam to know that we were already using an amazing validation tool : Bootstrap Validator

It just involves wrapping the form in the html with the validator plugin and all the checks are automatically carried out by it.


1.png

As you can see in the above image, we have just added a data-toggle=”validator” line to the form which automatically wraps the form with the plugin. The above form is the Create New Password form which checks whether the new password and the password entered again are matching or not. If not then the line ,

data-match="#new_password"

checks it with the password in the new_password field and gives an error on the page to the client defined by the following,

data-error="Passwords do not match

Thus adding such checks to the form becomes very simple rather than using jQuery for it. Similarly it was important to add validation to the Register page.

 <input type="email" name="email" class="form-control" id="email" 
 placeholder="Email" data-remote="{{ url_for('admin.check_duplicate_email') }}"
 data-remote-error="Email Address already exists" required="">

This is the validation for the email field. Apart from checking whether the text entered by the user is an email id or not it was also important to check whether the email entered by the user exists in the database or not.

data-remote="{{ url_for('admin.check_duplicate_email')

This line calls a view function to check whether the email entered by the user is duplicate or unique. Here is the function

2.png

This function takes the email value from the request.args and then performs a simple check in the db to check for duplicate email. If the user doesnt exist then the validator receives a simple string “200 OK”. If the error is 404 then it gives the error defined by,

data-remote-error="Email Address already exists"

However this error only for the data-remote part. If the error is something else then it is handled by ,

class="help-block with-errors"

Thus without the hassle of using Ajax and JQuery we can easily add validation to the forms using Bootstrap Validator.

Continue ReadingAdding Client Side validation to Login and Registration Forms

How to parse json assets with gson

So most of us have json assets in our app which we parse on runtime to get the data and use it accordingly but what I have seen is that most of the people create a JSONObject or JSONArray after reading the json into an inputstream but then handling it becomes difficult since we have to manually extract every entity in each array which makes it bound to a lot of errors. A better approach to using it is making use of gson : an open source library by Google to serialise and deserialise Java object to (and from) Json. It’s pretty easy to use and makes the development process easy. For those of you not still convinced on using gson, I’d like to demonstrate the code we had to write to without using gson and the one using gson as well.

So to start with lets see the json file we’ll be using. It’s the events.json file from the open event project.

{
  "events": [
    {
      "color": "#fdfdfd",
      "email": "dev@fossasia.org",
      "end_time": "2015-07-14T00:00:00",
      "id": 4,
      "latitude": 37.783839,
      "location_name": "Moscone centre",
      "logo": "http://mysecureshell.readthedocs.org/en/latest/_images/logo_redhat.png",
      "longitude": -122.400546,
      "name": "FOSSASIA",
      "slogan": "Fossasia",
      "start_time": "2015-05-28T13:00:00",
      "url": "www.google.com"
    }
  ]
}

As you can see it has an object that has an array of event objects. So what we’ll first do is that we’ll get the whole json as a string by openeing an inputstream and then directing it to a buffer. Then we convert the buffer array to a string object.

String json = null;
try {
    InputStream inputStream = getAssets().open("events.json");
    int size = inputStream.available();
    byte[] buffer = new byte[size];
    inputStream.read(buffer);
    inputStream.close();
    json = new String(buffer, "UTF-8");

} catch (IOException e) {
    e.printStackTrace();
}

Now we have the json as a string which we can now parse it using a combination of JSONObject and JSONArray. First we’ll access data in the outer json object i.e. “events”. That’ll be done by

JSONObject jsonObject = new JSONObject(json);
JSONArray events = jsonObject.getJSONArray("events");

Now that we have the array, we can traverse it to get the objects inside events array

for (int j=0; j < events.length(); j++){
    JSONObject cit = events.getJSONObject(j);
    String color = jsonObject.getString("color");
    String email = jsonObject.getString("email"); 
    String endTime = jsonObject.getString("end_time");
    String id = jsonObject.getString("id");
    String latitude = jsonObject.getString("latitude");
    String locationName = jsonObject.getString("location_name");
    String logo = jsonObject.getString("logo");
    String longitude = jsonObject.getString("longitude");
    String name = jsonObject.getString("name");
    String slogan = jsonObject.getString("slogan");
    String startTime = jsonObject.getString("start_time");
    String url = jsonObject.getString("url");
}

This is how we go about it. Now for the exiting part.

We already have an Event data class which has the constructor, getters and setters etc.

public class Event {

    int id;

    String name;

    String email;

    String color;

    String logo;

    @SerializedName("start_time")
    String start;

    @SerializedName("end_time")
    String end;

    float latitude;

    float longitude;

    @SerializedName("location_name")
    String locationName;

    String url;

    String slogan;

    public Event(int id, String name, String email, String color, String logo, String start,
                 String end, float latitude, float longitude, String locationName, String url, String slogan) {
        this.id = id;
        this.name = name;
        this.email = email;
        this.color = color;
        this.logo = logo;
        this.start = start;
        this.end = end;
        this.latitude = latitude;
        this.longitude = longitude;
        this.locationName = locationName;
        this.url = url;
        this.slogan = slogan;
    }

    public String getEmail() {
        return email;
    }

    public void setEmail(String email) {
        this.email = email;
    }

    public String getColor() {
        return color;
    }

    public void setColor(String color) {
        this.color = color;
    }

    public String getUrl() {
        return url;
    }

    public void setUrl(String url) {
        this.url = url;
    }

    public String getSlogan() {
        return slogan;
    }

    public void setSlogan(String slogan) {
        this.slogan = slogan;
    }

    public int getId() {

        return id;

    }

    public void setId(int id) {
        this.id = id;
    }

    public String getName() {
        return name;
    }

    public void setName(String name) {
        this.name = name;
    }

    public String getLogo() {
        return logo;
    }

    public void setLogo(String logo) {
        this.logo = logo;
    }

    public String getStart() {
        return start;
    }

    public void setStart(String start) {
        this.start = start;
    }

    public String getEnd() {
        return end;
    }

    public void setEnd(String end) {
        this.end = end;
    }

    public float getLatitude() {
        return latitude;
    }

    public void setLatitude(float latitude) {
        this.latitude = latitude;
    }

    public float getLongitude() {
        return longitude;
    }

    public void setLongitude(float longitude) {
        this.longitude = longitude;
    }

    public String getLocationName() {
        return locationName;
    }

    public void setLocationName(String locationName) {
        this.locationName = locationName;
    }

}

Now here we name the parameters to the same as that in the json we have or we can just add @SerializedName(entity_name). Then we go to the code for actually retrieving the data from the json file using this data class. How we can do that is by first making a class that’ll get the array of events for us.

public class EventResponseList {
    @SerializedName("events")
    public List<Event> event;
}

Now all we do is

EventResponseList eventResponseList = gson.fromJson(json, EventResponseList.class);

We have a list of events that were in the json array.

Voila! That’s it. It’s so easy to get a list of all the events from the JSONArray and since the library is available for gradle, it’s even better. You can just add

compile 'com.google.code.gson:gson:2.7'

to your build.gradle dependencies and you’re good to go. Cheers!

Continue ReadingHow to parse json assets with gson

Optimizing page load time

The average size of a web page has been growing at an accelerating rate over the last few years. Last week, when the open-event webapp was tested, it was very slow to load because of loading 67.2 MB data ( which contained audio and image files ) on the web page.I have taken following steps which are good to read to make any web application load faster.

1. Stop preloading of audio files

The HTML5 audio player loads all audio files by default on the page. To stop this we have to change the code as

<audio controls preload="none">
 <source src="{{audio}}" type="audio/mpeg">
 </audio>

Setting preload option to none help us to load audio only when it is clicked. Hence it decreases the HTTP calls and decreases the page loading time.

Previously

Network tab with Audio files takes 68.0MB  load and 13.6 minute loading time.

fail

Now

29

Network tab with option <audio controls preloaded=”none”> takes 1.1 MB load and  1 minute loading time. This was a huge improvement but more optimizations can be done.

2. Using Compression Middleware

Express compression middleware works like a charm by compressing the response coming to the web page. It is too simple to add.

$ npm install compression
var compression = require('compression')
var express = require('express')

var app = express()

// compress all requests
app.use(compression())

// add all routes

This has compressed the responses and decreased the page load time.

3.  Reduce the number of HTTP requests

Another great way of speeding up your web pages is to simply reduce the number of files that need to be loaded.

Combine files

Combining multiple stylesheets into one file is a really useful way of eliminating extra HTTP requests. This strategy can also be adopted for your JavaScript files. A single larger CSS or JavaScript file will often load quicker because more time can be spent downloading the data rather than establishing multiple connections to a server.

After such optimizations, the webapp loads now in 8-15 seconds with DOM loaded in 2 seconds.

fulloptimize

The result of these optimizations are awesome. We can test the page speed by using various tools like pagespeed, speedtracer etc.

Continue ReadingOptimizing page load time

Read and Understand Codacy Reports

To begin understanding reports, let’s start with what Codacy is.

So. What is Codacy?

Codacy is an automated code review tool that helps developers to save time in code reviews and to tackle technical debt. It centralises customizable code patterns and enforces them within engineering teams. Codacy tracks new issues by severity level for every commit and pull request.

It can be integrated with the GitHub repository to review every commit and pull request in terms of quality and errors. It checks code style, security, duplication, complexity and coverage on every change while tracking code quality throughout your sprints.

You can integrate Codacy in your private/public repository by going here. Sign up with your Github account and follow the steps mentioned. More information regarding GitHub integration can be found here.

Features of Codacy:

  • SAVE TIME IN CODE REVIEWS
  • INTEGRATED IN YOUR WORKFLOW
  • TRACK YOUR PROJECT QUALITY EVOLUTION

Now we get to understanding Codacy reports.

Below shows and image of how a Codacy dashboard looks like, to evaluate a project. To evaluate a project we should know what are the Software Metrics”.

download

A software metric is a standard of measure of a degree to which a software system or process possesses some property. Even if a metric is not a measurement (metrics are functions, while measurements are the numbers obtained by the application of metrics), often the two terms are used as synonymous. Since quantitative measurements are essential in all sciences, there is a continuous effort by computer science practitioners and theoreticians to bring similar approaches to software development. The goal is obtaining objective, reproducible and quantifiable measurements, which may have numerous valuable applications in the schedule and budget planning, cost estimation, quality assurance testing, software debugging, software performance optimization, and optimal personnel task assignments. You can learn about software metrics by visiting here.

A Codacy Dashboard provides answer to the following 3 main things:

  • What is the state of your projects code quality?
  • How is it evolving throughout time?
  • What are the hotspots in your code?

Component of the Dashboard:

  • Introduction: The Dashboard is the central screen of any project on Codacy.
  • Project Certification: After running a complete on the project or the GitHub repository, Codacy provides an overall grade to the project from A-F. The grade depends on the following parameters.
    • Error Prone
    • Code Complexity
    • Code Style
    • Unused Code
    • Security
    • Compatibility
    • Documentation
    • Performancedashboard-certification
  • Issues Breakdown: Issues breakdown represents the different issues from different areas in a pictorial representation. It provides a quick overview of the total number of issues in the repository and the breakdown per category.
    Issues Brakedown
    Users can click on the specific category for more details.
  • Code Coverage: If you setup the code coverage on your repository, you will be able to see the overall covered percentage on the dashboard. It will also show the files with the worst code coverage allowing you to directly jump to the file to see the details.
    Coverage
  • Goals: Users can define individual goals to remove errors and get better grades for their projects.
  • Historic data: Codacy dashboard also provides an analysis of the Historic data, so as to keep a track of the progress on improving the code, milestones covered in reaching the goal.
    dashboard-historic-issues

Codacy provides a nice dashboard showing the metrics. Codacy saves hours in code review and code quality monitoring, from small teams to big companies. And as the Codacy team itself says “LOVED BY DEVELOPERS”, being a developer I wouldn’t deny this statement. It helped a lot in improving the code quality of my project Engelsystem.

Development: https://github.com/fossasia/engelsystem Issues/Bugs:https://github.com/fossasia/engelsystem/issues

Continue ReadingRead and Understand Codacy Reports

Update Fields with Array Input

Screenshot from 2016-07-15 17:57:58.png

There are certain fields in form where instead of a single value, we need an array of values to be stored. This are fields under the same category but having multiple elements, e.g., Tracks, Session Types, Microlocations, Sponsors, Social Links and similar such fields. Now as we know the way of doing this using simple html is provide the <input> tag with property “name” as “<field_name>[]”. So suppose we want to save the names of the mutliple tracks, we will have something like this
Screenshot from 2016-07-15 18:02:09.png

But the problem begins when you want to update name of a particular element (in this case Track). How to do it? Should we delete and create entries again? That doesn’t sound too good, does it? So what should we do? Let’s see….

Continue ReadingUpdate Fields with Array Input

Developing Image Viewer in Angular JS

week8gsoc0

In the previous article i have addressed about developing audio and video players for sTeam. To know more about developing audio and video players, click here. This article is an extension to the previous one, as to how one could develop image viewer in angular.
Since sTeam is a collaboration platform there was the necessity of having an image viewer. So in angular bootstrapLightbox is very useful in building image viewers, galleries, sliders etc.

Implementation Strategy :
There are basically two things involved in developing this;

The Controller

angular.module('steam', [ 'bootstrapLightbox', 'ui.bootstrap' ])
  .controller('steamImageViewer', ['$scope', 'Lightbox', function($scope, Lightbox) {
    $scope.images = [
    {
      'url': 'https://societyserver.org/home/akhilhector/playground%20-%20hector/icon1.png',
      'title': 'icon1.png'
    },
    {
      'url': 'https://societyserver.org/home/akhilhector/playground%20-%20hector/icon3.jpg',
      'title': 'icon3.jpg'
    },
    {
      'url': 'https://societyserver.org/home/akhilhector/playground%20-%20hector/icon4.png',
      'title': 'icon4.png'
    },
    {
      'url': 'https://societyserver.org/home/akhilhector/playground%20-%20hector/icon4.jpg',
      'title': 'icon4.jpg'
    }
    ];
    $scope.imageViewer = function (index) {
      Lightbox.openModal($scope.images, index);
    };
  }]);

Observe the controller over here, we pass an array of images or a single image to an array object and then we use the same for our DOM. Options like URL, Title, and Thumbnail can be passed in the same object. In the same controller we need to write another function that uses the LightBox service in order to open a modal and serve the image which was passed as an URL. So the modal displays whatever source is being passed as an argument. Also if we are using a REST api for retrieving the images then we can have a we can have similar array object that stores all the information recieved from the api response. In order to better this, there can be a mime-handler written so that if an unknown/unsupported mime type is being requested for, then an error can be popped.

The HTML

<div class="row" ng-controller="steamImageViewer">
    <div class="col-md-12" ng-repeat="image in images">
        <div class="roomItem">
            <div class="roomItemIcon roomItemBlue"><i class="fa fa-image"></i>
            </div>
            <div class="itemText"> {{image.title}} <a href="#" ng-click="imageViewer($index)">view</a>
            </div>
        </div>
    </div>
</div>

The above DOM seems pretty straight forward, we use the help of the function which we previously wrote in the controller in order to get the data. So as soon as we click the Lightbox modal fires and displays the image. It is to be observed that this implementation goes with consideration that there are an array of images that are ought to be retrieved, but the same logic wouldn’t be fruitful for displaying a single image. In order to acheive that we can pass the image object to the $scope and use the same for displaying the image. And minor changes in the HTML will help displaying a single image instead of an array of images.

So here is how it looks :

week8gsoc3

week8gsoc2

week8gsoc1

Thats it folks,
Happy Hacking !!

Continue ReadingDeveloping Image Viewer in Angular JS