Set up Firebase to upload user files

If you’ve read my previous post on uploading files to server, you might have noticed that it was not an easy task to achieve.

There is way too much boilerplate code for uploading a single file, and it will be much more complex in case we plan to upload multiple files, which I need to do for my project.

So what’s the solution to this?

ENTER FIREBASE!

Yeah, you read it right, Firebase once again to the rescue!

I came to know that firebase allows user to store and access the files easily to the built in storage.

Enough chatter for now, lets get to code!

Step 1 :

Add your project to Firebase from the console.

newProj.PNG

Click on the Blue button

Step 2 :

Add Firebase to your webapp

Open the project, you’ve just created and click on the bright red button that says, “ Add Firebase to your web app”

addFirebase.PNGCopy the contents from here and paste it after your HTML code.

Step 3 :

Open the “Storage” tab from the navigation drawer and navigate to the rules tab over there.
We need to set up specific rules as to who all can upload and read files to the storage bucket.

storageRules.PNG
For testing purposes, I’ve allowed everyone to read and write to my storage, but that shouldn’t be the case for your production app

Step 4 :

Add code for uploading your files.

First create a document selection widget and an upload button in your website’s index.html.

<tr>
<td valign=”top”>
<label for=”icon”>Zip File</label>
</td>
<td valign=”top”>
<input accept=”.zip” type=”file” id=”uploadZip” name=”icon”>
</td>
</tr>

Next, create a button to initiate the upload

<tr>
<td colspan=”5″ style=”text-align:center”>
<button type=”submit”>Upload Zip</button>
</td>
</tr>

Next up, inside the JavaScript, add a submitlistener for the submit button and call preventDefault inside it to prevent the form from doing the default action.

var form = document.querySelector(“form”);
form.addEventListener(“submit”, function(event) {
event.preventDefault();

Next up, get a reference to the upload location from your firebase storage bucket.

var timestamp = Number(new Date());
var storageRef = firebase.storage().ref(timestamp.toString());

Next, get the upload button from its ID and add its contents to a variable named file_data.

var $ = jQuery;
var file_data = $(‘#uploadZip’).prop(‘files’)[0];

Now upload that file to firebase.

storageRef.put(file_data);

If everything went as expected, you’ll be able to see the uploaded files onto your firebase console.

 storage

So, you can really appreciate the awesomeness of Firebase by now.
It has replaced the work done by over 50+ lines of code (spread around AJAX calls, PHP Scripts and JavaScript methods) by a single method call.

I would urge you to go through the documentation for more clarity on this.
https://firebase.google.com/docs/storage/

Well, that was it for now.
Next time, I’ll tell you how to retrieve the files back from the storage and add user’s details to Firebase Database.(Yeah, no need for Tables and SQL anymore!)

Cheers. 😀

Continue ReadingSet up Firebase to upload user files

DesignaKnit

I started a conversation on strickforum.de and was inspired to take a closer look at DesignaKnit 8.

A free Demo version of DesignaKnit is available which cannot save changes to patterns or shapes and cannot connect to a knitting machine. Otherwise all functionality is available.

DesignaKnit contains:

  • an editor for color patterns
  • an editor for shapes or sewing patterns
  • a shape library
  • a tool for converting images to patterns
  • interactive knitting

Patterns can be applied to shapes.

I did not look very closely at the editors because I do not know much about pattern generation, especially shape or sewing patterns. And the editor for the color patterns did not work for me.

Interactive Knitting:
I took a look at some of the features available in the interactive knitting. There are some interesting features we would also like to implement.

I was not able to take in all the functions available. I could not connect it to a machine and I am still a beginner with knitting machines, which is why I am probably missing some features which make life easier.

The interactive knitting support has several views:

  • overview of knit piece which also shows the position of the carriage
  • view for next row to be knit, some rows around for context
  • view for yarn colors in use and visualization that shows which yarn is currently in the carriage and being knit
  • view for instructions to the human, which also contains
    • row counter as it should be on the machine
    • counter for row in the piece being knit
    • counter for row in pattern
    • information on start and stop needle on machine

DesignaKnit

DesignaKnit can be configured to play sounds when an action, like decreasing the number of meshes, needs to be taken. Voice cuing is also possible. Furthermore, the view for the instructions for the human can flash yellow and displays what step needs to be completed by the human next. In the image above the number of meshes should be decreased by 6 on the right side.

Ideas for our interactive knitting support:
The idea of extra audio and visual cuing is very interesting and we are considering also having this option in our interface. We are not yet sure how we will organize all the information, but the information we will show to the user will be similar to what is shown in DesignaKnit.

The interface for DesignaKnit serves its purpose well. However, we think we can create something that is a little more appealing to the eye.
To keep our Design of the user interface clean and simple we are designing for mobile devices first.


Continue ReadingDesignaKnit

Generating Documentation and Modifying the sTeam-REST API

(ˢᵒᶜⁱᵉᵗʸserver) aims to be a platform for developing collaborative applications.
sTeam server project repository: sTeam.
sTeam-REST API repository: sTeam-REST

Documentation

Documentation is an important part of software engineering. Types of documentation include:

  1. Requirements – Statements that identify attributes, capabilities, characteristics, or qualities of a system. This is the foundation for what will be or has been implemented.
  2. Architecture/Design – Overview of software. Includes relations to an environment and construction principles to be used in design of software components.
  3. Technical – Documentation of code, algorithms, interfaces, and APIs.
  4. End user – Manuals for the end-user, system administrators and support staff.
  5. Marketing – How to market the product and analysis of the market demand.

Doxygen

Doxygen is the de facto standard tool for generating documentation from annotated C++ sources, but it also supports other popular programming languages such as C, Objective-C, C#, PHP, Java, Python, IDL (Corba, Microsoft, and UNO/OpenOffice flavors), Fortran, VHDL, Tcl, and to some extent D.
The Doxygen treats files of other languages as C/C++ and creates documentation for it accordingly.
sTeam documentation was tried to be created with the doxygen. But empty documentation was created due to the lack of the doxygen annotations used in the project.
 Doxygen doc generation.
DoxyGenTerminal
Doxygen Docs
DoxyDoc
The next way to create documentation was to make use of the autodoc utility provided by the Pike. The utility to generate docs was provided in the later versions of the Pike(>=8.0.155).
The autodoc files are generated and  later these are converted into  html pages. The commands used for generating the autodoc include:-
pike -x extract_autodoc /source
pike -x autodoc_to_html /src /opfile
The autodoc_to_html utility converts a single autodoc file to an html page. As a result a shell script was written to convert all the generated autodoc files to the html file.
docGenerator.sh
#!/bin/bash  

shopt -s globstar  
for filename in ./**/*.pike.xml; do  
    outputFile=doc/${filename#./}  
    outputFile=${outputFile%.xml}."html"  
    if [ -d $(dirname "./"$outputFile) ]; then  
      touch "./"$outputFile  
    else  
      mkdir -p $(dirname "./"$outputFile) && touch "./"$outputFile  
    fi  
    pike -x autodoc_to_html $filename "./"$outputFile  
done  

Autodoc Documentation
AutoDocThe documentation generated by this was less informative and lacked the referrals to other classes and headers. The societyserver project was developed long back but the autodoc utility was introduced in the later versions of pike. As a result the source files lacked the autodoc tags which are required to generate a well informative documentation with bindings to other files.

Restructuring the sTeam-REST API

The sTeam-REST API project made use of the angular-seed to initiate the development during the early phases. However these files still existed in the project. This had lead to a pandemonium and created difficulty in understanding the project. The files had to be removed and the app was in dire need of a restructuring. The following issues have been reported and resolved.

Issue. Github Issue Github PR
sTeam-REST Issues Issues PR

The new UI can be seen below.

Home

Home

Register

Register

About

About

Testing the REST API

The functionality to run the tests using the npm test command was added to the project. Now the user can run the tests using these commands instead of the traditional approach of running the tests using jasmine-node and specifying the test directory. The domain name of the urls to which the request was sent was changed. The e2e tests and frisby tests were conducted successfully.

e2e Tests.

e2eTests

Frisby Tests

NPM tests

The next step would be to do add more tests for the REST API.

Feel free to explore the repository. Suggestions for improvements are welcomed.

Checkout the FOSSASIA Idea’s page for more information on projects supported by FOSSASIA.

Continue ReadingGenerating Documentation and Modifying the sTeam-REST API

Unit testing nodejs with Mocha and Chai

There are a lot of unit testing frameworks available for Javascript, Jasmine and Karma being some of the older and more popular ones.

Jasmine and Karma, though are, originally designed for browser-side JS, and hence, frameworks like NodeUnit and Mocha have become more popular with server-size JS.
We needed code coverage reports to work after the unit tests, and the Jasmine-Node reports were not sufficient, so we just moved to using Mocha.

When using Mocha, we can use some assert library (which is not necessary, but makes life a hell lot easier). We are using chai at the open-event-webapp..

First of all install mocha globally –

npm install -g mocha

And write your tests in the test/ folder that mocha by default considers as the folder containing your test specs. For example we have our tests here – https://github.com/fossasia/open-event-webapp/tree/master/test

Writing a simple mocha test is as easy as this –

var assert = require('chai').assert;
describe('Array', function() {
  describe('#indexOf()', function() {
    it('should return -1 when the value is not present', function() {
      assert.equal(-1, [1,2,3].indexOf(5));
      assert.equal(-1, [1,2,3].indexOf(0));
    });
  });
});

The first parameter inside describe() is just to show the tests in a aesthetic way in the console.

You can see our tests described in this file  – https://github.com/fossasia/open-event-webapp/blob/master/test/serverTest.js

And attached below is an screenshot of the terminal after I have run the command mocha in the root of my project

Screenshot from 2016-07-10 04-42-26

Continue ReadingUnit testing nodejs with Mocha and Chai

Writing tests for Open-Event

As our application and code base increased it became necessary to write tests for each functionality. Earlier we had tests only for basic functionalities like creating an event, editing an event, but then it is very important and also beneficial if we have tests for each and every small functionality. Hence we started writing proper tests. We divivded the tests into three folder

  • API
  • Functionality
  • Views

All the API related tests were in the above one whereas the basic functionalities were in the second one. The last folder was further divided into three parts

  • Admin Tests
  • Super-Admin Tests
  • Guest Pages

We had to test each and every functionality. For example let us look at the test file for the events. It looks like this:

class TestEvents(OpenEventViewTestCase):
    def test_events_list(self):
        with app.test_request_context():
            url = url_for('events.index_view')
            rv = self.app.get(url, follow_redirects=True)

            self.assertTrue("Manage Events" in rv.data, msg=rv.data)

    def test_events_create(self):
        with app.test_request_context():
            url = url_for('events.create_view')
            rv = self.app.get(url, follow_redirects=True)
            self.assertTrue("Create Event" in rv.data, msg=rv.data)

    def test_events_create_post(self):
        with app.test_request_context():
            custom_forms = ObjectMother.get_custom_form()
            url = url_for('events.create_view')
            data = POST_EVENT_DATA.copy()
            del data['copyright']
            data['start_date'] = '07/04/2016'
            data['start_time'] = '19:00'
            data['end_date'] = '07/04/2016'
            data['end_time'] = '22:00'
            data['custom_form[name]'] = ['session_form', 'speaker_form']
            data['custom_form[value]'] = [custom_forms.session_form, custom_forms.speaker_form]
            rv = self.app.post(url, follow_redirects=True, buffered=True, content_type='multipart/form-data',
                               data=data)
            self.assertTrue(POST_EVENT_DATA['name'] in rv.data, msg=rv.data)

    def test_events_create_post_publish(self):
        with app.test_request_context():
            url = url_for('events.create_view')
            data = POST_EVENT_DATA.copy()
            del data['copyright']
            data['start_date'] = '07/04/2016'
            data['start_time'] = '19:00'
            data['end_date'] = '07/04/2016'
            data['end_time'] = '22:00'
            data['state'] = 'Published'
            rv = self.app.post(url, follow_redirects=True, buffered=True, content_type='multipart/form-data',
                               data=data)
            self.assertTrue('unpublish' in rv.data, msg=rv.data)

    def test_events_create_post_publish_without_location_attempt(self):
        with app.test_request_context():
            custom_forms = ObjectMother.get_custom_form()
            url = url_for('events.create_view')
            data = POST_EVENT_DATA.copy()
            del data['copyright']
            data['start_date'] = '07/04/2016'
            data['start_time'] = '19:00'
            data['end_date'] = '07/04/2016'
            data['end_time'] = '22:00'
            data['location_name'] = ''
            data['state'] = u'Published'
            data['custom_form[name]'] = ['session_form', 'speaker_form']
            data['custom_form[value]'] = [custom_forms.session_form, custom_forms.speaker_form]
            rv = self.app.post(url, follow_redirects=True, buffered=True, content_type='multipart/form-data',
                               data=data)
            self.assertTrue('To publish your event please review the highlighted fields below' in rv.data, msg=rv.data)

    def test_events_edit(self):
        with app.test_request_context():
            event = ObjectMother.get_event()
            save_to_db(event, "Event saved")
            custom_forms = ObjectMother.get_custom_form(event.id)
            save_to_db(custom_forms, "Custom forms saved")
            url = url_for('events.edit_view', event_id=event.id)
            data = POST_EVENT_DATA.copy()
            del data['copyright']
            data['name'] = 'EditTestName'
            data['start_date'] = '07/04/2016'
            data['start_time'] = '19:00'
            data['end_date'] = '07/04/2016'
            data['end_time'] = '22:00'
            data['custom_form[name]'] = ['session_form', 'speaker_form']
            data['custom_form[value]'] = [custom_forms.session_form, custom_forms.speaker_form]
            rv = self.app.post(url, follow_redirects=True, buffered=True, content_type='multipart/form-data',
                               data=data)
            self.assertTrue('EditTestName' in rv.data, msg=rv.data)

    def test_event_view(self):
        with app.test_request_context():
            event = ObjectMother.get_event()
            save_to_db(event, "Event saved")
            url = url_for('events.details_view', event_id=event.id)
            rv = self.app.get(url, follow_redirects=True)
            self.assertTrue("event1" in rv.data, msg=rv.data)
            microlocation = ObjectMother.get_microlocation(event_id=event.id)
            track = ObjectMother.get_track(event_id=event.id)
            cfs = ObjectMother.get_cfs(event_id=event.id)
            save_to_db(track, "Track saved")
            save_to_db(microlocation, "Microlocation saved")
            save_to_db(cfs, "Call for speakers saved")
            rv = self.app.get(url, follow_redirects=True)
            self.assertTrue("event1" in rv.data, msg=rv.data)

    def test_event_publish(self):
        with app.test_request_context():
            event = ObjectMother.get_event()
            save_to_db(event, "Event saved")
            url = url_for('events.publish_event', event_id=event.id)
            rv = self.app.get(url, follow_redirects=True)
            event = DataGetter.get_event(event.id)
            self.assertEqual("Published", event.state, msg=event.state)

    def test_event_unpublish(self):
        with app.test_request_context():
            event = ObjectMother.get_event()
            event.state = "Published"
            save_to_db(event, "Event saved")
            url = url_for('events.unpublish_event', event_id=event.id)
            rv = self.app.get(url, follow_redirects=True)
            event = DataGetter.get_event(event.id)
            self.assertEqual("Draft", event.state, msg=event.state)

    def test_event_delete(self):
        with app.test_request_context():
            event = ObjectMother.get_event()
            save_to_db(event, "Event saved")
            url = url_for('events.trash_view', event_id=event.id)
            rv = self.app.get(url, follow_redirects=True)
            self.assertTrue("Your event has been deleted" in rv.data, msg=rv.data)

    def test_event_copy(self):
        with app.test_request_context():
            event = ObjectMother.get_event()
            save_to_db(event, "Event saved")
            url = url_for('events.copy_event', event_id=event.id)
            rv = self.app.get(url, follow_redirects=True)
            self.assertTrue("Copy of event1" in rv.data, msg=rv.data)

if __name__ == '__main__':
    unittest.main()

So this is the test file for the event part. As you can see we have tests for each and every small functionality

  1. test_events_list : Tests the list of events
  2. test_events_create: Tests whether the event creation page is displayed
  3. test_events_create_post: Tests whether the event is created on doing a POST
  4. test_events_create_post_publish : Tests whether the event is published on doing a POST through Publish button
  5. test_events_copy: Tests whether the event is copied properly or not

Thus each functionality related to an event is tested properly. Similarly not just for events but also for the other services like sessions:

import unittest

from tests.api.utils_post_data import POST_SESSION_DATA, POST_SPEAKER_DATA
from tests.object_mother import ObjectMother
from open_event import current_app as app
from open_event.helpers.data import save_to_db
from flask import url_for

from tests.views.view_test_case import OpenEventViewTestCase


class TestSessionApi(OpenEventViewTestCase):

    def test_sessions_list(self):
        with app.test_request_context():
            event = ObjectMother.get_event()
            save_to_db(event, "Event saved")
            session = ObjectMother.get_session(event.id)
            save_to_db(session, "Session Saved")
            url = url_for('event_sessions.index_view', event_id=event.id, session_id=session.id)
            rv = self.app.get(url, follow_redirects=True)
            self.assertTrue("Sessions" in rv.data, msg=rv.data)
            self.assertTrue("test" in rv.data, msg=rv.data)

    def test_session_create(self):
        with app.test_request_context():
            event = ObjectMother.get_event()
            save_to_db(event, "Event saved")
            custom_form = ObjectMother.get_custom_form(event.id)
            save_to_db(custom_form, "Custom form saved")
            url = url_for('event_sessions.create_view', event_id=event.id)
            rv = self.app.get(url, follow_redirects=True)
            self.assertTrue("Create Session" in rv.data, msg=rv.data)

    def test_session_create_post(self):
        with app.test_request_context():
            event = ObjectMother.get_event()
            save_to_db(event, "Event saved")
            custom_form = ObjectMother.get_custom_form(event.id)
            save_to_db(custom_form, "Custom form saved")
            data = POST_SESSION_DATA
            data.update(POST_SPEAKER_DATA)
            url = url_for('event_sessions.create_view', event_id=event.id)
            rv = self.app.post(url, follow_redirects=True, buffered=True, content_type='multipart/form-data', data=data)
            self.assertTrue(data['title'] in rv.data, msg=rv.data)

    def test_session_edit(self):
        with app.test_request_context():
            event = ObjectMother.get_event()
            save_to_db(event, "Event saved")
            custom_form = ObjectMother.get_custom_form(event.id)
            save_to_db(custom_form, "Custom form saved")
            session = ObjectMother.get_session(event.id)
            save_to_db(session, "Session saved")
            url = url_for('event_sessions.edit_view', event_id=event.id, session_id=session.id)
            rv = self.app.get(url, follow_redirects=True)
            self.assertTrue("Edit Session" in rv.data, msg=rv.data)

    def test_session_edit_post(self):
        with app.test_request_context():
            event = ObjectMother.get_event()
            save_to_db(event, "Event saved")
            custom_form = ObjectMother.get_custom_form(event.id)
            save_to_db(custom_form, "Custom form saved")
            session = ObjectMother.get_session(event.id)
            save_to_db(session, "Session saved")
            data = POST_SESSION_DATA
            data['title'] = 'TestSession2'
            url = url_for('event_sessions.edit_view', event_id=event.id, session_id=session.id)
            rv = self.app.post(url, follow_redirects=True, buffered=True, content_type='multipart/form-data', data=data)
            self.assertTrue("TestSession2" in rv.data, msg=rv.data)

    def test_session_accept(self):
        with app.test_request_context():
            session = ObjectMother.get_session()
            save_to_db(session, "Session Saved")
            url = url_for('event_sessions.accept_session', event_id=1, session_id=session.id)
            rv = self.app.get(url, follow_redirects=True)
            self.assertTrue("The session has been accepted" in rv.data, msg=rv.data)

    def test_session_reject(self):
        with app.test_request_context():
            session = ObjectMother.get_session()
            save_to_db(session, "Session Saved")
            url = url_for('event_sessions.reject_session', event_id=1, session_id=session.id)
            rv = self.app.get(url, follow_redirects=True)
            self.assertTrue("The session has been rejected" in rv.data, msg=rv.data)

    def test_session_delete(self):
        with app.test_request_context():
            session = ObjectMother.get_session()
            save_to_db(session, "Session Saved")
            url = url_for('event_sessions.delete_session', event_id=1, session_id=session.id)
            rv = self.app.get(url, follow_redirects=True)
            self.assertTrue("deleted" in rv.data, msg=rv.data)

    def test_session_view(self):
        with app.test_request_context():
            event = ObjectMother.get_event()
            save_to_db(event)
            session = ObjectMother.get_session()
            session.event_id = event.id
            save_to_db(session, "Session Saved")
            url = url_for('event_sessions.session_display_view', event_id=event.id, session_id=session.id)
            rv = self.app.get(url, follow_redirects=True)
            self.assertTrue("Short abstract" in rv.data, msg=rv.data)

    def test_wrong_form_config(self):
        with app.test_request_context():
            event = ObjectMother.get_event()
            save_to_db(event, "Event saved")
            url = url_for('event_sessions.create_view', event_id=event.id)
            rv = self.app.get(url, follow_redirects=True)
            self.assertFalse("incorrectly configured" in rv.data, msg=rv.data)

if __name__ == '__main__':
    unittest.main()

We see that there are tests for each functionality of the sessions. However these tests were simple to write. However there was problem in one aspect of writing tests. In the Event creation wizard there are steps where the sponsors, tracks, rooms are dynamically added to the event. How then should we test them. I wrote the test for the creation of sponsors in step -2

def test_events_create_post(self):
    with app.test_request_context():
        custom_forms = ObjectMother.get_custom_form()
        url = url_for('events.create_view')
        data = POST_EVENT_DATA.copy()
        del data['copyright']
        data['sponsors[name]'] = ['Sponsor 1', 'Sponsor 2']
        data['sponsors[type]'] = ['Gold', 'Silver']
        data['sponsors[url]'] = ["", ""]
        data['sponsors[description]'] = ["", ""]
        data['sponsors[level]'] = ["", ""]
        data['start_date'] = '07/04/2016'
        data['start_time'] = '19:00'
        data['end_date'] = '07/04/2016'
        data['end_time'] = '22:00'
        data['custom_form[name]'] = ['session_form', 'speaker_form']
        data['custom_form[value]'] = [custom_forms.session_form, custom_forms.speaker_form]
        data = ImmutableMultiDict(data)
        rv = self.app.post(url, follow_redirects=True, buffered=True, content_type='multipart/form-data',
                           data=data)
        self.assertTrue(POST_EVENT_DATA['name'] in rv.data, msg=rv.data)

        rv2 = self.app.get(url_for('events.details_view', event_id=1))
        self.assertTrue(data['sponsors[name]'] in rv2.data, msg=rv2.data)

Here on importing the data dict I dynamically add two sponsors to the dict. After that I convert the dict to an Immutablemulti-dict so that the multiple sponsors can be displayed. Then I pass this dict to the event creation view via a POST request and check whether the two sponsors are present in the details page or not.

Thus our test system is developed and improving. Still as we develop more functionalities we will write more tests 🙂


Continue ReadingWriting tests for Open-Event

How can you get an access to Instagram API?

unnamed.png

First of all you need to know that Instagram API uses OAuth 2.0 protocol. OAuth 2.0 provides a specific authorization flow for web apps, desktop apps and mobile apps. Instagram requires authentication before getting information from their API, but don’t be afraid it’s very simple.

Pre Requirements:

  • Created account in Instagram
  • Registered Client(You can create your own client here)

Instagram Developer Documentation.png

Requirements:

CLIENT_ID -79e1a142dbeabd57a3308c52ad43e31d
CLIENT_SECRET -34a6834081c44c20bd11e0a112a6adg1
REDIRECT_URI - http://127.0.0.1:8001/iCallback

You can get above information from https://www.instagram.com/developer/clients/manage/

CODE - You need to open page https://api.instagram.com/oauth/authorize/?client_id=CLIENT-ID&redirect_uri=REDIRECT-URI&response_type=code
https://api.instagram.com/oauth/authorize/?client_id=79e1a142dbeabd57a3308c52ad43e31d&redirect_uri=http://127.0.0.1:8001/iCallback&response_type=code

You will be redirected to

http://your-redirect-uri?code=CODE

In my case it looks like this:

http://127.0.0.1:8001/iCallback?code=2e122f3d76e8125b8b4982f16ed623c2

Now we have all information to get access token!

 curl -F 'client_id=CLIENT_ID'  
      -F 'client_secret=CLIENT_SECRET' 
      -F 'grant_type=authorization_code'  
      -F 'redirect_uri=REDIRECT_URI' 
      -F 'code=CODE'  https://api.instagram.com/oauth/access_token

if everything is ok you should receive

 { "access_token": "fb2e77d.47a0479900504cb3ab4a1f626d174d2d",
   "user": { "id": "1574083",
   "username": "rafal_kowalski",
   "full_name": "Rafal Kowalski",
   "profile_picture": "..." } } 

In Open Event we used it to get all media from instagram – to use it  as for example a background in an event details’ page

curl 'https://api.instagram.com/v1/users/self/media/recent/?access_token=ACCESS_TOKEN'


Continue ReadingHow can you get an access to Instagram API?

What is CommonsNet?

It is already a few posts of Commons Net but I suppose you may wonder what CommonsNet is and what can it do for you. I think that it’ s the highest time to talk about CommonsNet. Let me explain it step by step.

CommonsNet is an open source project of FOSSASIA . FOSSASIA has participated for several years as a mentor organization in Google Summer of Code, and  CommonsNet is being developed as this year project.

This is how FOSSASIA sees CommonsNet:

CommonsNet

Develop Website for Standardized Open Networks Agreement similar to Creative Commons

Creative Commons is a wonderful example how standardized processes can enable millions of people to share freely. What about sharing your Internet connection? Across the world there are different legal settings and requirements for sharing of Internet connections and specifically Open Wifi connections. The Picopeering Agreement already offered a basis for completely free and open sharing: http://www.picopeer.net/

However, in many settings people cannot enable unrestricted level of sharing, e.g. if you share Internet in your office, you might need to reserve a certain bandwidth for you and restrict the bandwidth of users.

We need a website, that reflects these details and makes it transparent to the user. Just like at Creative Commons the site should generate a) a human readable file and b) a machine readable file of the level of sharing that is offered by someone. Examples are, that networks are completely free (all ports are open, all services are enabled, bandwidth is unrestricted) compared to networks with restrictions e.g. no torrent sharing, limited bandwidth and an accepted user agreement that is required.

This is how it actually looks, and is being developed on CommonsNet website

We decided to create a simple and user-friendly wizard form to let our users provide their wifi details in a convient way. We divided these different kind of wifi information into four different section like wireless settings – the most basic wifi information like ssid, password, authentication, speed and standard. Then we’ve decided that payment and time limit are also really important part of sharing wireless connection, so we enable our users to mention these details as well.

CommonsNet-wizard 1

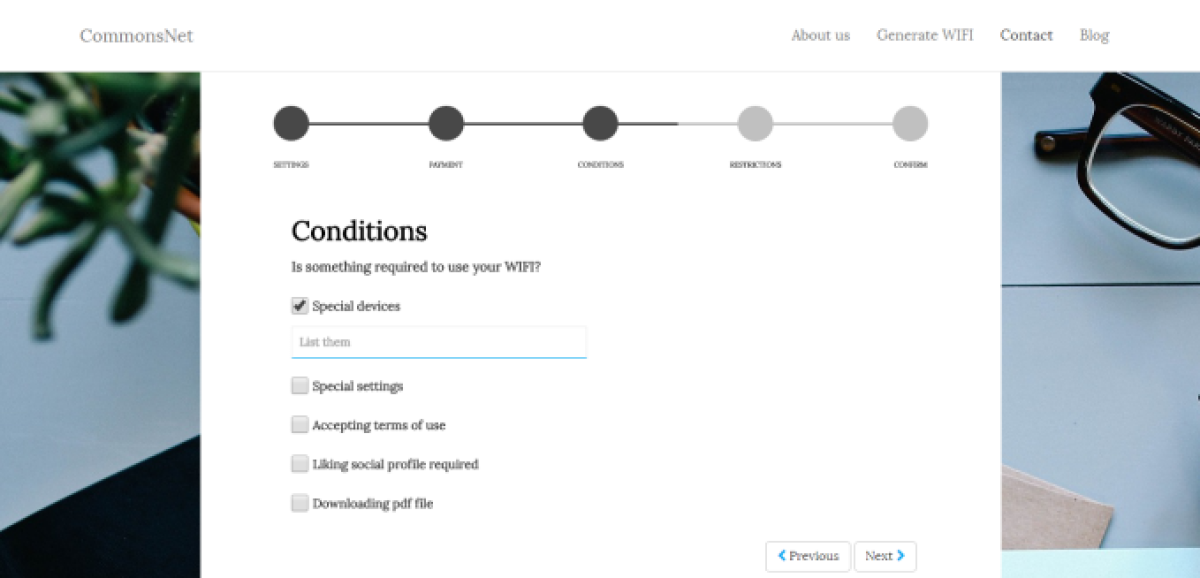
Then, you can provide your wireless connection usage’s conditions.

CommonsNet wizard3

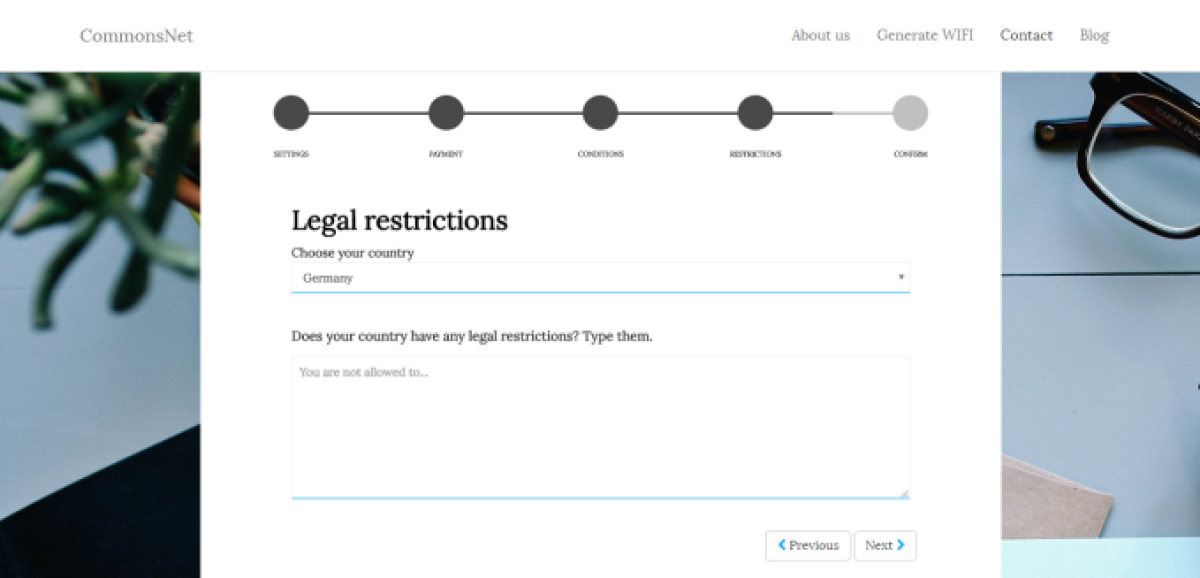
And finally we’ve put a section legal restrictions which is one of the most important part of using wireless connection and Internet resources and what vary over the world due to different legal systems.

For now our users are obliged to type legal restrictions on their own, but we are working hard on making it simpler for everyone by creating legal restrictions’ data base, which will let you simply choose your own country and the legal details will be provided and put into wizard form automatically thanks to collected resources.

CommonsNet wizard 4

And as you successfully finish filling form, you will be able to generate your pdf file or code to your website in order to share a transparent wireless connection with your users. It is so simple, but makes our world more transparent and trustworthy.

Feel free to visit us and test it https://commonsnet.herokuapp.com/

Don’t forget to join us on our social media profile where you can be up to date with our amazing work, and updates.

Continue ReadingWhat is CommonsNet?

Optimization with SASS

The problem with using CSS is that it can become repetitive when used in large projects. Like using same values of margins, paddings, radius. SASS provides a way to store these values in ONE variable and to use that variable instead.

SASS provides various concepts that optimize CSS. Like discussed above using variables for all the color names and fonts will remove the repetition. A piece of code from Open-Event-Webapp is shown below for declaring variable names.

//config.scss

@charset "UTF-8";
 
// Colors
$black: #000;
$white: #fff;
$red: #e2061c;
$gray-light: #c9c8c8;
$gray: #838282;
$gray-dark: #777;
$gray-extra-dark: #757575;
$gray-extra-light:#e7e7e7 !default;
$gray-perfect :#ddd;
$blue: #253652;
$orange: #e12b00;
$vivid-blue: #2196F3;
$pure-orange: #ff8700;
$light-purple: #ebccd1;
$red-dark: #e52d27;
$light-black: #333333;
$light-skyblue : #b7cdff !default;
$gray-trackshade: #999;
$blue-shade: #2482d3;
$dark-black: rgba(22, 22, 22, 0.99) !default;
$black-main:#232323 !default;
$timeroom-color:rgba(0,0,0,.10) !default;
$session-color: $gray-trackshade !default;
$header-color: #f8f8f8 !default;
$main-background: #fff !default;

// Corp-Colors
$corp-color: $white !default;
$corp-color-dark: darken($corp-color, 15%) !default;
$corp-color-second: $red !default;
$corp-color-second-dark: darken($corp-color-second, 15%) !default;

Nesting

SASS supports nesting concept. The nested SCSS changes to CSS when compiled. A good approach follows nesting elements to three-degree maximum.

// Nesting in application.scss session-list (Open-Event-Webapp)

.session{

  &-list {

    li{
     cursor: pointer;
      }
   .label {
     background: #ff8700;
     border-color: $light-purple;
     color: #FFFFFF;
     font-weight: 500;
     font-size: 80%;
     margin-left: -8px;
    }
   .session-title {
      margin-top: 0.1em;
       .session-link {
         font-size: 12px;
        }
    }
 }
 &-location{
 text-align: left;
 }

}

The output generated after compilation will be

//Code from schedule.css in Open-event-webapp

.session-list li {
 cursor: pointer; 
}

.session-list .label {
 background: #ff8700;
 border-color: #ebccd1;
 color: #FFFFFF;
 font-weight: 500;
 font-size: 80%;
 margin-left: -8px; 
}

.session-list .session-title {
 margin-top: 0.1em; 
}

 .session-list .session-title .session-link {
 font-size: 12px;
 }

.session-location {
 text-align: left; 
}

Mixins

Mixins are another way to optimize the SASS code. Mixins are just like functions that let us pass the values as parameters to make the code more flexible.

// Simple mixin for button
@mixin btn($color, $width, $height) {
 display: block;
 font: 16px “Open sans”, arial;
 color: $color;
 width: $width;
 height: $height;
}

Using these type of simple approaches make CSS more effective and efficient. It will enhance the workflow and help us to write cleaner code.

Continue ReadingOptimization with SASS

Import Excel File Data in MYSQL Database using PHP

In this post I will explain how to Import Excel Sheet Data in MySQL Database using PHP. If you follow the below steps we will successfully achieve the target.

For this tutorial we are going to work with a sample CSV file, which has the following fields. I will show an example of User Table of Engelsystem which contains the following fields Nick Name, First Name, Last Name, Email, Current City, Password, Mobile Number, Age.

Steps to Import Excel File Data in MYSQL Database using PHP

Step 1

First you have to create mysql database.

mysql> CREATE DATABASE engelsystem;

Step 2

Create table in your choosen database.

mysql> use DATABASE engelsystem;

The Table schema looks something like this.

 -- Table structure for table `User`
mysql> CREATE TABLE IF NOT EXISTS `User` (
  `UID` int(11) NOT NULL AUTO_INCREMENT,
  `Nick` varchar(23) NOT NULL DEFAULT '',
  `First Name` varchar(23) NOT NULL DEFAULT '',
  `Last Name` varchar(23) NOT NULL DEFAULT '',
  `email` varchar(123) DEFAULT NULL,
  `Age` int(4) DEFAULT NULL,      
  `current_city` varchar(255) DEFAULT NULL,
  `Password` varchar(128) DEFAULT  NULL,               
  `Mobile` varchar(40) DEFAULT NULL,
  PRIMARY KEY (`UID`),
  UNIQUE KEY `Nick` (`Nick`),
) ENGINE=InnoDB  DEFAULT CHARSET=utf8 AUTO_INCREMENT=5 ;

Step 3

create your php excelsheet data uploading file. This is a sample code which I used for my project.

Ex: import_data.php

<?php

function admin_import() {

  if (isset($_REQUEST['upload'])) {
    $ok = true;
    $file = $_FILES['csv_file']['tmp_name'];
    $handle = fopen($file, "r");
    if ($file == NULL) {
      error(_('Please select a file to import'));
      redirect(page_link_to('admin_export'));
    }
    else {
      while(($filesop = fgetcsv($handle, 1000, ",")) !== false)
        {
          $nick_name = $filesop[0];
          $first_name = $filesop[1];
          $last_name = $filesop[2];
          $email = $filesop[3];
          $age = $filesop[4];
          $current_city = $filesop[5];
          $password = $filesop[6];
          $mobile = $filesop[7];
// example error handling. We can add more as required for the database.

        if ( strlen($email) && preg_match("/^[a-z0-9._+-]{1,64}@(?:[a-z0-9-]{1,63}\.){1,125}[a-z]{2,63}$/", $mail) > 0) {
          if (! check_email($email)) {
            $ok = false;
            $msg .= error(_("E-mail address is not correct."), true);
          }
        }
// error handling for password        
        if (strlen($password) >= MIN_PASSWORD_LENGTH) {
            $ok = true;
          } else {
            $ok = false;
            $msg .= error(sprintf(_("Your password is too short (please use at least %s characters)."), MIN_PASSWORD_LENGTH), true);
        }
 // If the tests pass we can insert it into the database.       
        if ($ok) {
          $sql = sql_query("
            INSERT INTO `User` SET
            `Nick Name`='" . sql_escape($nick_name) . "',
            `First Name`='" . sql_escape($first_name) . "',
            `Last Name`='" . sql_escape($last_name) . "',
            `email`='" . sql_escape($email) . "',
            `Age`='" . sql_escape($age) . "',
            `current_city`='" . sql_escape($current_city) . "',
            `Password`='" . sql_escape($password) . "',
             `mobile`='" . sql_escape($mobile) . "',");
        }
      }

      if ($sql) {
        success(_("You database has imported successfully!"));
        redirect(page_link_to('admin_export'));
      } else {
        error(_('Sorry! There is some problem in the import file.'));
        redirect(page_link_to('admin_export'));
        }
    }
  }
//form_submit($name, $label) Renders the submit button of a form
//form_file($name, $label) Renders a form file box

 return page_with_title("Import Data", array(
   msg(),
  div('row', array(
          div('col-md-12', array(
              form(array(
                form_file('csv_file', _("Import user data from a csv file")),
                form_submit('upload', _("Import"))
              ))
          ))
      ))
  ));
}
?>

Step 4

The view of import_data.php looks something like this. Now that import_data.php is up and running. Access it through server browser and select the excel file to be imported.Screenshot from 2016-07-08 23:43:43.png

Step 5

Prepare the excelsheet data and save it as .csv format.

Screenshot from 2016-07-08 23:50:30.png

Step 6

Now just browse the csv file and upload it.

Screenshot from 2016-07-08 23:53:23.png

Step 7

If we see the success message after importing. Then the data is successfully imported. We can also check whether the data is inserted in phpMYAdmin

Screenshot from 2016-07-08 23:56:40.png

Englesystem

Development: https://github.com/fossasia/engelsystem

Issues/Bugs: Issues

Continue ReadingImport Excel File Data in MYSQL Database using PHP

Responsive UI: Testing & Reporting

Few days back I wrote a blog about how to make a website responsive. But how do you exactly check for responsiveness of a website? Well, you can do it using your browser itself. Both Mozilla Firefox and Google Chrome provides responsive mode for testing responsiveness of websites for standard resolutions and also to drag and check for any resolution. Open Event Organizer’s Server has quite some responsive issues, so I would tell about reporting the issues as well.

Continue ReadingResponsive UI: Testing & Reporting