Developing Audio & Video Player in Angular JS | sTeam-web-UI | sTeam

week7gsoc1

sTeam web interface, part of sTeam is a collaboration platform so there was the need to support media. In any collaboration platform support for basic/diverse MIME types is necessary. In angular ngVideo and ngAudio are two good packages that are helpful in building audio and video players for any angular application. So let us see how to go ahead with things while implementing media players.
Controllers and the template :

Using ngAudio

angular.module('steam', [ 'ngAudio' ])
.value("songRemember",{})
.controller('sTeamaudioResource', function($scope, ngAudio) {
$scope.audios = [
ngAudio.load('audio/test.mp3'),
]
})
.controller('sTeamaudioPlayer', ['$scope', 'ngAudio', 'songRemember', function($scope, ngAudio,
songRemember) {
var url = 'test.mp3';
if (songRemember[url]) {
$scope.audio = songRemember[url];
} else {
$scope.audio = ngAudio.load(url);
$scope.audio.volume = 0.8;
songRemember[url] = $scope.audio;
}
}]);

  • First create a controller for storing the resources.Store the items in an array or an object. Note the point storing the images in an Array or an Object depends on your use case, but make sure that you are calling the resources correctly.
  • Now create another controller which handles the control of the audio player.This controller should be responsible for handling the URI’s of the media.
  • In the second controller which we create we must add some config to give support to controls in the front end, things like progress of the media, volume, name of the media etc. These are essentially important for the front end. So each resource loaded to the audio player must have all the above listed controls and information.

Below is the screenshot of the audio player

week7gsoc2

Using ngVideo

angular.module('steam', [ 'ngVideo' ])
.controller('sTeamvideoPlayer', ['$scope', '$timeout', 'video', function($scope, $timeout, video) {
$scope.interface = {};
$scope.playlistopen = false;
$scope.videos = {
test1: "test1.mp4",
test2: "test2.mp4"
};
$scope.$on('$videoReady', function videoReady() {
$scope.interface.options.setAutoplay(true);
});
$scope.playVideo = function playVideo(sourceUrl) {
video.addSource('mp4', sourceUrl, true);
}
$scope.getVideoName = function getVideoName(videoModel) {
switch (videoModel.src) {
case ($scope.videos.test1): return "test1";
case ($scope.videos.test2): return "test2";
default: return "Unknown Video";
}
}
video.addSource('mp4', $scope.videos.test1);
video.addSource('mp4', $scope.videos.test2);
}]);

  • Developing the video player is quite the same as developing the audio player but this involves some extra configurations that are ought to be considered. Things like autoplay, giving the scope for playing the video on full screen etc. If keenly looked these are just additional configuration which you are trying to add in order to make your video player more efficient.
  • Firstly we must have the $on($videoReady) event written in order to autoplay the list of videos in the default playlist
  • Moving on, there are couple of controls which are to be given to the video player. Using the method getVideoName we can bind the video source to the title/name of the video.
  • The video service provider must be used for adding the video Sources, and it must be noted that the mp4 can be altered in order to play mp3 files or video files of different format. Before using other video format, make a note of checking the list of video files supported by ngVideo.

Below is the screenshot of the video player

week7gsoc3

Thats it folks,
Happy Hacking !!

Continue ReadingDeveloping Audio & Video Player in Angular JS | sTeam-web-UI | sTeam

How to create a Windows Installer from tagged commits

I working on an open-source Python project, an editor for knit work called the “KnitEditor”. Development takes place at Github. Here, I would like to give some insight in how we automated deployment of the application to a Windows installer.

The process works like this:

  1. Create a tag with git and push it to Github.
  2. AppVeyor build the application.
  3. AppVeyor pushes the application to the Github release.

(1) Create a tag and push it

Tags should reflect the version of the software. Version “0.0.1” is in tag “v0.0.1”. We automated the tagging with the “setup.py” in the repository. Now, you can run

py -3.4 setup.py tag_and_deploy

Which checks that there is no such tag already. Several commits have the same version, so, we like to make sure that we do not have two versions with the same name. Also, this can only be executed on the master branch. This way, the software has gone through all the automated quality assurance. Here is the code from the setup.py:

from distutils.core import Command
# ...
class TagAndDeployCommand(Command):

    description = "Create a git tag for this version and push it to origin."\
                  "To trigger a travis-ci build and and deploy."
    user_options = []
    name = "tag_and_deploy"
    remote = "origin"
    branch = "master"

    def initialize_options(self):
        pass

    def finalize_options(self):
        pass

    def run(self):
        if subprocess.call(["git", "--version"]) != 0:
            print("ERROR:\n\tPlease install git.")
            exit(1)
        status_lines = subprocess.check_output(
            ["git", "status"]).splitlines()
        current_branch = status_lines[0].strip().split()[-1].decode()
        print("On branch {}.".format(current_branch))
        if current_branch != self.branch:
            print("ERROR:\n\tNew tags can only be made from branch"
                  " \"{}\".".format(self.branch))
            print("\tYou can use \"git checkout {}\" to switch"
                  " the branch.".format(self.branch))
            exit(1)
        tags_output = subprocess.check_output(["git", "tag"])
        tags = [tag.strip().decode() for tag in tags_output.splitlines()]
        tag = "v" + __version__
        if tag in tags:
            print("Warning: \n\tTag {} already exists.".format(tag))
            print("\tEdit the version information in {}".format(
                    os.path.join(HERE, PACKAGE_NAME, "__init__.py")
                ))
        else:
            print("Creating tag \"{}\".".format(tag))
            subprocess.check_call(["git", "tag", tag])
        print("Pushing tag \"{}\" to remote \"{}\"."
              "".format(tag, self.remote))
        subprocess.check_call(["git", "push", self.remote, tag])
# ...
SETUPTOOLS_METADATA = dict(
# ...
    cmdclass={
# ...
        TagAndDeployCommand.name: TagAndDeployCommad
    },
)
# ...
if __name__ == "__main__":
    import setuptools
    METADATA.update(SETUPTOOLS_METADATA)
    setuptools.setup(**METADATA) # METADATA can be found in several other 

Above, you can see a “distutils” command that executed git through the command line interface.

(2) AppVeyor builds the application

As mentioned above, you can configure AppVeyor to build your application. Here are some parts of the “appveyor.yml” file, that I comment on inline:

# see https://packaging.python.org/appveyor/#adding-appveyor-support-to-your-project
environment:
  PYPI_USERNAME: niccokunzmann3
  PYPI_PASSWORD:
    secure: Gxrd9WI60wyczr9mHtiQHvJ45Oq0UyQZNrvUtKs2D5w=

  # For Python versions available on Appveyor, see
  # http://www.appveyor.com/docs/installed-software#python
  # The list here is complete (excluding Python 2.6, which
  # isn't covered by this document) at the time of writing.

  # we only need Python 3.4 for kivy
  PYTHON: "C:\\Python34"


install:
  - "%PYTHON%\\python.exe -m pip install docutils pygments pypiwin32 kivy.deps.sdl2 kivy.deps.glew"
  - "%PYTHON%\\python.exe -m pip install -r requirements.txt"
  - "%PYTHON%\\python.exe -m pip install -r test-requirements.txt"
  - "%PYTHON%\\python.exe setup.py install"
  
build_script:
- cmd: cmd /c windows-build\build.bat

test_script:
  # Put your test command here.
  # If you don't need to build C extensions on 64-bit Python 3.3 or 3.4,
  # you can remove "build.cmd" from the front of the command, as it's
  # only needed to support those cases.
  # Note that you must use the environment variable %PYTHON% to refer to
  # the interpreter you're using - Appveyor does not do anything special
  # to put the Python version you want to use on PATH.
  - windows-build\dist\KnitEditor\KnitEditor.exe /test
  - "%PYTHON%\\python.exe -m pytest --pep8 kniteditor"

artifacts:
  # bdist_wheel puts your built wheel in the dist directory
- path: dist/*
  name: distribution
- path: windows-build/dist/Installer/KnitEditorInstaller.exe
  name: installer
- path: windows-build/dist/KnitEditor
  name: standalone

deploy:
- provider: GitHub
  # http://www.appveyor.com/docs/deployment/github
  tag: $(APPVEYOR_REPO_TAG_NAME)
  description: "Release $(APPVEYOR_REPO_TAG_NAME)"
  auth_token:
    secure: j1EbCI55pgsetM/QyptIM/QDZC3SR1i4Xno6jjJt9MNQRHsBrFiod0dsuS9lpcC7
  artifact: installer
  force_update: true
  draft: false
  prerelease: false
  on:
    branch: master                 # release from master branch only
    appveyor_repo_tag: true        # deploy on tag push only

Note that the line

  - windows-build\dist\KnitEditor\KnitEditor.exe /test

executes the tests in the built application.

These commands are executed to build the application and are executed by this step:

build_script:
- cmd: cmd /c windows-build\build.bat
"%PYTHON%\python.exe" -m pip install pyinstaller

The line above installs pyinstaller

"%PYTHON%\python.exe" -m PyInstaller KnitEditor.spec

The line above uses pyinstaller to create an executable from the specification.

"Inno Setup 5\ISCC.exe" KnitEditor.iss

The line above uses Inno Setup to create the Installer for the built application.

(3) Deploy to Github

As you can see in the “appveyor.yml” file, the resulting executable is listed as an artifact. Artifacts can be downloaded directly from appveyor or used to deploy. In this case, we use the github deploy, which can be customized via the UI of appveyor.

- path: windows-build/dist/Installer/KnitEditorInstaller.exe
  name: installer
deploy:
- provider: GitHub
  # http://www.appveyor.com/docs/deployment/github
  tag: $(APPVEYOR_REPO_TAG_NAME)
  description: "Release $(APPVEYOR_REPO_TAG_NAME)"
  auth_token:
    secure: j1EbCI55pgsetM/QyptIM/QDZC3SR1i4Xno6jjJt9MNQRHsBrFiod0dsuS9lpcC7
  artifact: installer
  force_update: true
  draft: false
  prerelease: false
  on:
    branch: master                 # release from master branch only
    appveyor_repo_tag: true        # deploy on tag push only

Summary

Now, every time we push a tag to Github, AppVeyor build a new installer for our application.

Continue ReadingHow to create a Windows Installer from tagged commits

Implementing multiselect dropdown


select2 is one of the nicest jQuery libraries available for web site development. It gives the web developer a lot of power in creating select boxes.

In this post I would like to discuss how to implement a multiselect dropdown in PHP using select2

When we need to select multiple options from a list of many options. Multi checkbox will also work, but the UI of it will not be as neat as multiselect dropdown.

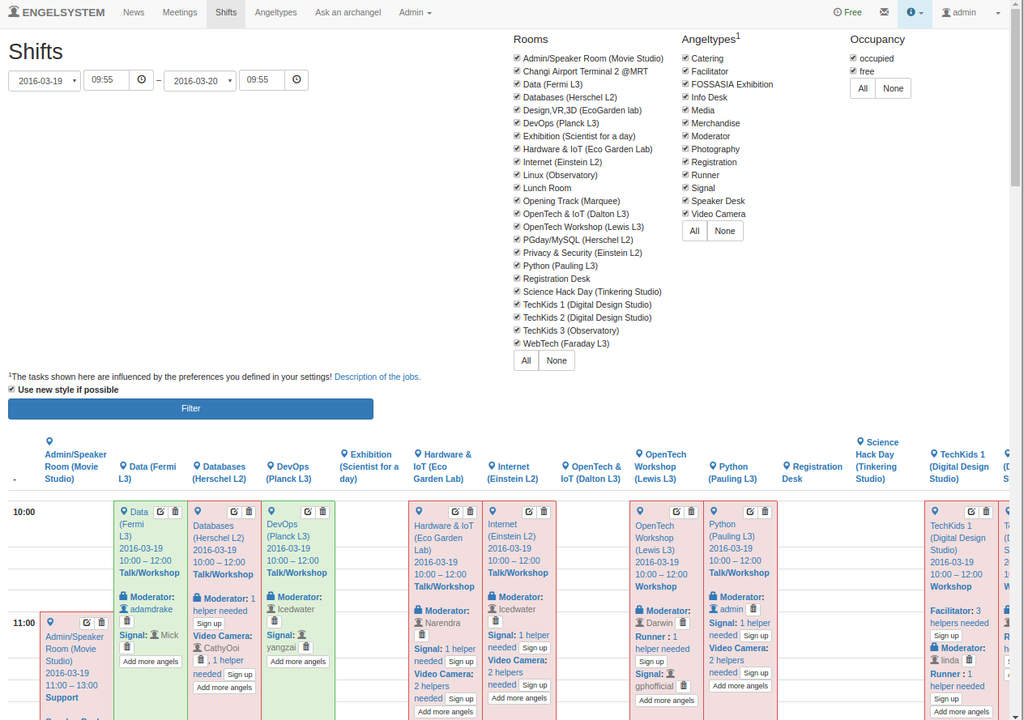
Initial UI of shifts page
227d62ea-2bf5-11e6-8159-7bfe52680de0

In the above image. We can see all the rooms. It becomes tough for the user to select and go through each one of them and the UI also looks clumsy. After implementing multi select dropdown UI looks like the below image.

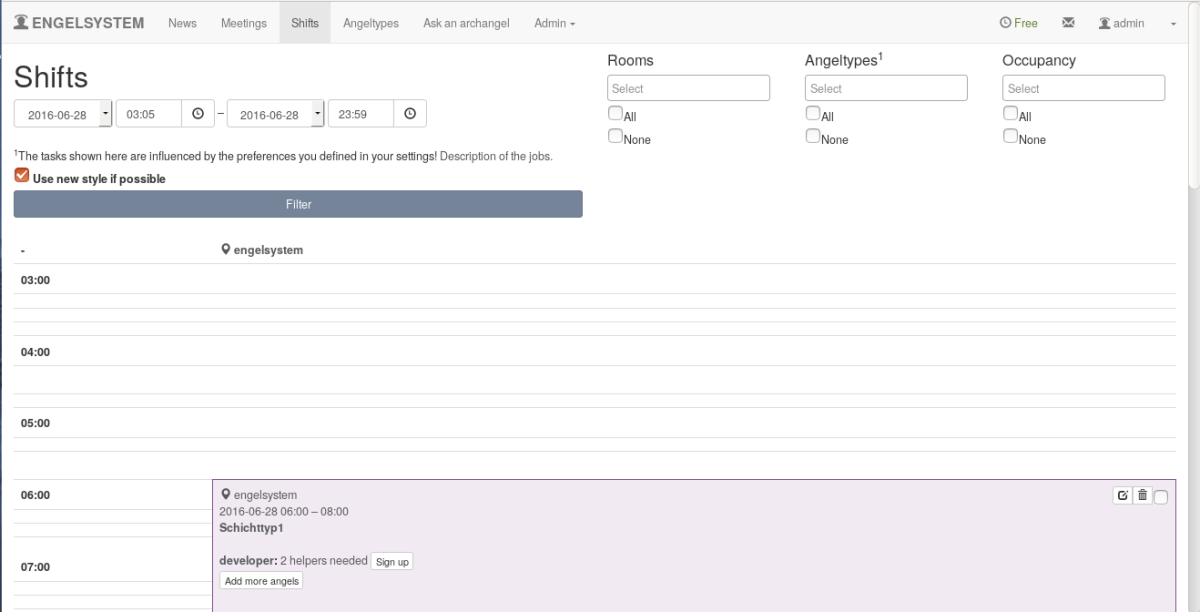
After implementing multiselect dropdown UI looks likes this.

5ea7d648-3d15-11e6-9901-3341dbc49a91

Once we select rooms/Angel type/Occupancy. The list of options will be visible as a drop-down.

Implementation

Library used for implementing multiselect dropdown is select2 we can download the select2 Library from here Download

CODE

Cdn links for js and css files should be added

<link href="https://cdnjs.cloudflare.com/ajax/libs/select2/4.0.3/css/select2.min.css" rel="stylesheet"/>
<script src="https://cdnjs.cloudflare.com/ajax/libs/select2/4.0.3/js/select2.min.js"></script>

We need to call this function whenever we need to implement a multi select drop containing the $items in its list.

// $items = items for multiselect dropdown

function multiple_select($items, $selected, $name, $title = null){ 
  $html_items = array();
  if (isset($title))
      $html .= '<h4>' . $title . '</h4>' . "\n";
  // assigning the items to multiple
  $html .= '<select multiple id="selection_' . $name . '"  class="selection ' . $name . '" style="width:200px">';

  foreach ($items as $i)
    $html_items[] = '<option  value="' . $i['id'] . '"' . '>' . $i['name'] . '</option>';
  $html .= implode("\n", $html_items);
  $html .= '</select>';
  $html .= '<input type="checkbox" id="checkboxall_' . $name . '"  >All' . '<br>';
  $html .= '<input type="checkbox" id="checkboxnone_' . $name . '"  >None';
  // javascript for multiselect
  $html .= '$("#' . "selection_" . $name . '").select2({
  placeholder: "Select",
    });
  });
  ';
    return $html;
}

Englesystem

Development: https://github.com/fossasia/engelsystem

Issues/Bugs: Issues


Continue ReadingImplementing multiselect dropdown

Re-login in debug.pike

I will first talk about what is debug.pike and then explain my task and then the solution.

Debug.pike gives the user a pike prompt with all the constants from the sTeam client. It is like a self programmable pike client for the sTeam server. All the client side variable are available using which the user can write pike code to interact with the sTeam server. Steam-shell was built on top of this and has functions that perform common actions using these variables.

My task was to build a function to allow re-login as different users. I had worked with the code for connection to the sever and the login part while working on my second task. My second task was to implement TLS and thus I was familiar with the functions available and how COAL was working.

Implementing TLS: https://github.com/societyserver/sTeam/issues/47

First I tried the code for my function on the prompt of debug.pike itself. My plan of action was to logout the current user and restart the connection. However the logout function gave me a lot of troubles. On logging out I was losing the connection to the server and was not able to establish it back even with the connect_server() function, which establishes a connection between the server and the client. Breaking up the problem I devised a solution for the problem without logging out, that is, calling the login again without logging out.

After calling the function login() when I was unable to get any results I realized that I will have to reset all the variable values that get set during the first login. I moved all the variable initializations to init and called this function after login and the problem was solved. The temporary solution was working fine. I also realized that the logout function was giving me troubles because I was not re-initializing all the variables. So now I was also able to logout and my solution was complete.

My next task was to improve the code. The initialization and the login part of the code was repeated throughout several files with minor changes. I had to bring out the common part put it in a separate file and then inherit. The files I changed were:

  • steam-shell.pike
  • debug.pike
  • edit.pike

I shifted all the uncommon parts to the main of the respective files and then included the common file called client.pike

Issue: https://github.com/societyserver/sTeam/issues/91

Solution: https://github.com/societyserver/sTeam/pull/92

Now again after this I went back to my previous task and standardized the init function as I had changed it a lot and this would have given a merge conflict later.

Issue: https://github.com/societyserver/sTeam/issues/87

Solution: https://github.com/societyserver/sTeam/pull/89

Continue ReadingRe-login in debug.pike

Pike

(ˢᵒᶜⁱᵉᵗʸserver) aims to be a platform for developing collaborative applications.
sTeam server project repository: sTeam.
sTeam-REST API repository: sTeam-REST

The project is written in Pike programming language. Many of us would not be aware of it. Let’s take a dive into Pike and learn more about it.

What is pike?

Pike is a general purpose programming language, which means that you can put it to use for almost any task. Its application domain spans anything from the world of the Net to the world of multimedia applications, or environments where your shell could use some spicy text processing or system administration tools. Your imagination sets the limit, but Pike will probably extend it far beyond what you previously considered within reach. Pike is a dynamic programming language with a syntax similar to Java and C. It is simple to learn, does not require long compilation passes and has powerful built-in data types allowing simple and really fast data manipulation. Pike is released under the GNU GPL, GNU LGPL and MPL; this means that you can fetch it and use it for almost any purpose you please.

Who made pike?

We will not bother you here with the entire history of Pike, but in a quick summary we should credit Fredrik Hübinette, who started writing Pike (at that time called µLPC), Roxen Internet Software, who funded the Pike development during its first years, the Pike development team that continues its development at present and the Software and Systems division of the Department of Computer and Information Science (IDA for short) at Linköping University, who currently provides funding for some Pike research and development, as well as this site. Also, without the participation of the friendly community of Pike users and advocates all over the world, Pike would hardly be the same either; we are grateful for your commitment.

Who uses pike?

Besides those already mentioned (Roxen IS and SaS, IDA, LiU), there are many other people scattered throughout the world who have put Pike to good use. Read some of their testimonials and find out more about how they value Pike.

…and for what?

Roxen Internet Software wrote the free web servers Spinner, Roxen Challenger and Roxen WebServer in Pike, as well as the highly appraised commercial content management system Roxen Platform / Roxen CMS. SaS uses Pike for their research, currently concentrated on the field of compositioning technology and language connectors. Other noteworthy applications include the works of Per Hedbor, who among other things has written AIDO, a nifty network aware peer-to-peer client/server media player and a distributed jukebox system, both in Pike.

Why use pike?

Pike is Powerful – Being a high-level language, Pike gives you concise, modular code, automatic memory management, flexible and efficient data types, transparent bignum support, a powerful type system, exception handling and quick iterative development cycles, alleviating the need for compiling and linking code before you can run it; on-the-fly modifications are milliseconds away from being put to practice.
Pike is Fast – Most of the time critical parts of Pike are heavily optimized; Pike is really, really fast and uses efficient, carefully handcrafted algorithms and data types. Visit The Computer Language Shootout Benchmarks for more facts and figures on Pike’s performance.
Pike is Extendable – with modules written in C for speed or Pike for brevity. Pike supports multiple inheritance and most other constructs you would demand from a modern programming language.
Pike is Scalable – as useful for small scripts as for bigger and more complex applications. Where some other scripting languages aim for providing unreadable language constructs for minimal code size, Pike aims for a small orthogonal set of readable language elements that encourage good habits and improve maintainability.
Pike is Portable – Platform independence has always been our aim with Pike, and it compiles on most flavors of Unix, as well as on Windows (both ia32 and ia64 versions) and Mac OS X. To see the present status of how well the stable and development branches of Pike work on some of the many hardware architectures and operating systems Pike supports, visit the pikefarm pages.
Pike is Free – Pike is released under multiple licenses; the GNU licenses GPL and LGPL, as well as the Mozilla license, MPL.
Paradigms – Pike supports most programming paradigms, including (but not limited to) object orientation, functional programming, aspect orientation and imperative programming.
Pike is Constantly Improving – While already being a great language, Pike is actively developed and backed by both an active Pike community and the computer science scientific research community. This means that Pike will stay the razorsharp tool that Pike people over the world expect it to be, while assimilating recent findings from the scientific forefront of research, spanning fields such as compositioning, regexp technology and the world of ontologies, also known as the Semantic Web.
Pike is available via git – To help you get your hands on the very latest development versions of Pike, we provide Pike to anyone and everyone who knows his/her way around git. Stay as updated as you like on recent activity in the repository with our on-site repository browser.
You Too are Invited – We welcome contributions to pike, and it is our intention to provide write access to our repositories for those of you who want to join us in improving Pike, be it by contributing code, documentation, work with the web site or making tools and applications of general interest.

Example:


int main() {
  write("Hello world!\n");
  return 0;
}

Pike Resources

Documentation and other resources about the project can be found on the official website of Pike.

Installing Pike

Pike can be installed in the debian based distro’s by running the command

sudo apt-get install pike

Feel free to explore more about this programming language.

(source: http://pike.lysator.liu.se/)

Suggestions for improvements are welcomed.

Checkout the FOSSASIA Idea’s page for more information on projects supported by FOSSASIA.

Continue ReadingPike

Uploading a file to a server via PHP

Uploading a file to a server via PHP

If you have been following my posts about my GSoC project, you would be knowing that we are making an app generator which will allow users to easily generate an android app for any event that they plan to host.

So, the next thing that we wanted in our app was to allow the users to upload a zip containing the json files (in case they don’t have an API, from where app can fetch data from) and then upload it to the server where we can use these files during the app compilation.

Steps below will tell you , how we achieved it :

Changes to HTML

First thing that we needed to do was add a file upload element to out HTML page that would allow only .zip files to be uploaded.
It was pretty simple one liner code which goes as follows

<tr>
<td valign=”top”>
<label for=”sessions”>Zip containing .json files</label>
</td>
<td valign=”top”>
<input accept=”.zip” type=”file” id=”uploadZip” name=”sessions”>
</td>
</tr>

PHP script to upload file on to the server

Next, we needed a server sided script (I used PHP) which would upload the zip provided by the user on to the server and store it to a unique location for each user.
The code for that was,

<?php
if ( 0 < $_FILES[‘file’][‘error’] ) {
echo ‘Error: ‘ . $_FILES[‘file’][‘error’] . ‘<br>’;
}
else {
move_uploaded_file($_FILES[‘file’][‘tmp_name’],“/var/www/html/uploads/upload.zip”);
}
?>

So what is happening here is basically the input arg. is first checked whether it is null or not null.
If it is null, and error is thrown back to the user, else the file is renamed and uploaded to the uploads folder in the server’s public directory.

Changes to the JavaScript

This was the part that needed most of the changes to be done, we first had to store the file that is to be uploaded in the form data, and then make and AJAX call to the php file located on the server.

var file_data = $(‘#uploadZip’).prop(‘files’)[0];
var form_data = new FormData();
form_data.append(‘file’, file_data);
$.ajax(
{ url: ‘/upload.php’, // point to server-side PHP script
cache: false,
contentType: false,
processData: false,
data: form_data,
type: ‘post’,
success: function(php_script_response){
ajaxCall1(); } //Chain up another AJAX call for further operations
});

So, that’s almost it!
Some server sided changes were also required like allowing the web user to execute the upload.php script and making the uploads directory writable by the web user.

Well, does it work?

Um, yeah it does.
There are a few issues with concurrent users which we are still debugging, but apart from that it works like a charm!

Here you can see a folder created by each user based on his/her timestamp
And here you can see the file that was uploaded y him/her
screenshot-area-2016-07-04-124957
Lastly our webapp (Looks stunning right?)

So, that was all for this week, hope to see you again next time.
Cheers and all the best 🙂

Continue ReadingUploading a file to a server via PHP

Continuous Integration and Automated Testing for Engelsystem

Every software development group tests its products, yet delivered software always has defects. Test engineers strive to catch them before the product is released but they always creep in and they often reappear, even with the best manual testing processes. Using automated testing is the best way to increase the effectiveness, efficiency and coverage of your software testing.

Manual software testing is performed by a human sitting in front of a computer carefully going through application screens, trying various usage and input combinations, comparing the results to the expected behavior and recording their observations. Manual tests are repeated often during development cycles for source code changes and other situations like multiple operating environments and hardware configurations.

Continuous integration (CI) has emerged as one of the most efficient ways to develop code. But testing has not always been a major part of the CI conversation.

In some respects, that’s not surprising. Traditionally, CI has been all about speeding up the coding, building, and release process. Instead of having each programmer write code separately, integrate it manually, and then wait until the next daily or weekly build to see if the changes broke anything, CI lets developers code and compile on a virtually continuous basis. It also means developers and admins can work together seamlessly since the programming and build processes are always in sync.

Continuous Integration (CI) is a development practice that requires developers to integrate code into a shared repository several times a day. Each check-in is then verified by an automated build, allowing teams to detect problems early.

By integrating regularly, you can detect errors quickly, and locate them more easily.

Solve problems quickly

Because you’re integrating so frequently, there is significantly less back-tracking to discover where things went wrong, so you can spend more time building features.

Continuous Integration is cheap. Not continuously integrating is costly. If you don’t follow a continuous approach, you’ll have longer periods between integrations. This makes it exponentially more difficult to find and fix problems. Such integration problems can easily knock a project off-schedule, or cause it to fail altogether.

Continuous Integration brings multiple benefits to your organization:

  • Say goodbye to long and tense integrations
  • Increase visibility which enables greater communication
  • Catch issues fast and nip them in the bud
  • Spend less time debugging and more time adding features
  • Proceed with the confidence you’re building on a solid foundation
  • Stop waiting to find out if your code’s going to work
  • Reduce integration problems allowing you to deliver software more rapidly

“Continuous Integration doesn’t get rid of bugs, but it does make them dramatically easier to find and remove.”

– Martin Fowler, Chief Scientist, ThoughtWorks

Continuous Integration is backed by several important principles and practices.

Practices in Continuous Integration:

  • Maintain a single source repository
  • Automate the build
  • Make your build self-testing
  • Every commit should build on an integration machine
  • Keep the build fast
  • Test in a clone of the production environment
  • Make it easy for anyone to get the latest executable
  • Everyone can see what’s happening
  • Automate deployment

How to do Continuous Integration:

  • Developers check out code into their private workspaces.
  • When done, commit the changes to the repository.
  • The CI server monitors the repository and checks out changes when they occur.
  • The CI server builds the system and runs unit and integration tests.
  • The CI server releases deployable artifacts for testing.
  • The CI server assigns a build label to the version of the code it just built.
  • The CI server informs the team of the successful build.
  • If the build or tests fail, the CI server alerts the team.
  • The team fixes the issue at the earliest opportunity.
  • Continue to continually integrate and test throughout the project.

The CI implemented in Engelsystem are as follows:

  • Travis-CITravis CI is a hosted, distributed continuous integration service used to build and test software projects hosted on GitHub. It is integrated using the .travis.yml file in the root folder.
    language: php
    php:
    - '5.4'
    - '5.5'
    - '5.6'
    - '7.0'
    script: cd test && phpunit
  • Nitpick-CI:Automatic comments on PSR-2 violations in one click, so your team can focus on better code review. It requires one click for integratting with the repository.
  • Circle-CI: CircleCI was founded in 2011 with the mission of giving every developer state-of-the-art automated testing and continuous integration tools. It is integrated using a circle.yml file in the root folder of the repository.
    machine:
    php:
    version: 5.4.5
    deployment:
    master:
    branch: master
    owner: fossasia
    commands:
    - ./deploy_master.sh
    dependencies:
    pre:
    - curl -s http://getcomposer.org/installer | php
    - php composer.phar install -n
    - sed -i 's/^;//' ~/.phpenv/versions/$(phpenv global)/etc/conf.d/xdebug.ini
    
    test:
    post:
    - php test/
    - bash <(curl -s https://codecov.io/bash)
  • Codacy: Check code style, security, duplication, complexity and coverage on every change while tracking code quality throughout your sprints.

Development: https://github.com/fossasia/engelsystem Issues/Bugs:https://github.com/fossasia/engelsystem/issues

Continue ReadingContinuous Integration and Automated Testing for Engelsystem

Implementing Admin Trash in Open Event

So last week I had the task of implementing a trash system for the Admin. It was observed that sometimes a user may delete an item and then realize that the item needs to be restores. Thus a trash system works well in this case. Presently the items that are being moved to the trash are:

  • Deleted Users
  • Deleted Events
  • Deleted Sessions

So it works like this. I added a column in_trash to the tables User, Event and Sessions to mark whether the item is in the trash or not

in_trash = db.Column(db.Boolean, default=False)

So depending on whether the value is True or False the item will be in the trash of the admin. Thus for a normal user on deleting an event, user or session a message would flash that the item is deleted and the item would not be shown in the table list of the user. However it would not be deleted from the database.

trash4.png

trash5.png

Thus for the user the item is deleted. The item’s in_trash property is set to True and it gets moved to the trash. The items are displayed in the “Deleted Items” section of the Admin panel

trash1trash2trash3

The items deleted are displayed in the trash and as soon as they deleted in the trash they are deleted from the database permanently. A message will flash for the Admin when it is deleted

trash11

trash10.png

Thus the trash is implemented. 🙂

Two more things are left:

  • To restore items from trash
  • To automatically delete the items in trash after an inactivity of 30 days

This will soon be implemented 🙂

Continue ReadingImplementing Admin Trash in Open Event

Implementing revisioning feature in Open Event

{ Repost from my personal blog @ https://blog.codezero.xyz/implementing-revisioning-feature-in-open-event }

As I said in my previous blog post about Adding revisioning to SQLAlchemy Models,

In an application like Open Event, where a single piece of information can be edited by multiple users, it’s always good to know who changed what. One should also be able to revert to a previous version if needed.

Let’s have a quick run through on how we can enable SQLAlchemy-Continuum on our project.

  1. Install the library SQLAlchemy-Continuum with pip
  2. Add __versioned__ = {} to all the models that need to be versioned.
  3. Call make_versioned() before the models are defined
  4. Call configure_mappers from SQLAlchemy after declaring all the models.

Example:

import sqlalchemy as sa  
from sqlalchemy_continuum import make_versioned

# Must be called before defining all the models
make_versioned()

class Event(Base):

    __tablename__ = 'events'
    __versioned__ = {}  # Must be added to all models that are to be versioned

    id = sa.Column(sa.Integer, primary_key=True, autoincrement=True)
    name = sa.Column(sa.String)
    start_time = sa.Column(db.DateTime, nullable=False)
    end_time = sa.Column(db.DateTime, nullable=False)
    description = db.Column(db.Text)
    schedule_published_on = db.Column(db.DateTime)

# Must be called after defining all the models
sa.orm.configure_mappers()

We have SQLAlchemy-Continuum enabled now. You can do all the read/write operations as usual. (No change there).

Now, for the part where we give the users an option to view/restore revisions. The inspiration for this, comes from wordpress’s wonderful revisioning functionality.

The layout is well designed. The differences are shown in an easy-to-read form. The slider on top makes it intuitive to move b/w revisions. We have a Restore this Revision button on the top-right to switch to that revision.

A similar layout is what we would like to achieve in Open Event.

  1. A slider to switch b/w sessions
  2. A pop-over infobox on the slider to show who made that change
  3. A button to switch to that selected revision.
  4. The colored-differences shown in side-by-side manner.

To make all this a bit easier, SQLAlchemy-Continuum provides us with some nifty methods.

count_versions is a method that allows us to know the number of revisions a record has.

event = session.query(Event).get(1)  
count = count_versions(event)  # number of versions of that event

Next one is pretty cool. All the version objects have a property called as changeset which holds a dict of changed fields in that version.

event = Event(name=u'FOSSASIA 2016', description=u'FOSS Conference in Asia')  
session.add(article)  
session.commit(article)

version = event.versions[0]  # first version  
version.changeset  
# {
#   'id': [None, 1],
#   'name': [None, u'FOSSASIA 2016'],
#   'description': [None, u'FOSS Conference in Asia']
# }

event.name = u'FOSSASIA 2017'  
session.commit()

version = article.versions[1]  # second version  
version.changeset  
# {
#   'name': [u'FOSSASIA 2016', u'FOSSASIA 2017'],
# }

As you can see, dict holds the fields that changed and the content the changed (before and after). And this is what we’ll be using for generating those pretty diffs that the guys and girls over at wordpress.com have done. And for this we’ll be using two things.

  1. A library named diff-match-patch. It is a library from Google which offers robust algorithms to perform the operations required for synchronizing plain text.
  2. A small recipe from from code.activestate.com Line-based diffs with the necessary HTML markup for styling insertions and deletions.
import itertools  
import re

import diff_match_patch

def side_by_side_diff(old_text, new_text):  
    """
    Calculates a side-by-side line-based difference view.

    Wraps insertions in <ins></ins> and deletions in <del></del>.
    """
    def yield_open_entry(open_entry):
        """ Yield all open changes. """
        ls, rs = open_entry
        # Get unchanged parts onto the right line
        if ls[0] == rs[0]:
            yield (False, ls[0], rs[0])
            for l, r in itertools.izip_longest(ls[1:], rs[1:]):
                yield (True, l, r)
        elif ls[-1] == rs[-1]:
            for l, r in itertools.izip_longest(ls[:-1], rs[:-1]):
                yield (l != r, l, r)
            yield (False, ls[-1], rs[-1])
        else:
            for l, r in itertools.izip_longest(ls, rs):
                yield (True, l, r)

    line_split = re.compile(r'(?:r?n)')
    dmp = diff_match_patch.diff_match_patch()

    diff = dmp.diff_main(old_text, new_text)
    dmp.diff_cleanupSemantic(diff)

    open_entry = ([None], [None])
    for change_type, entry in diff:
        assert change_type in [-1, 0, 1]

        entry = (entry.replace('&', '&amp;')
                      .replace('<', '&lt;')
                      .replace('>', '&gt;'))

        lines = line_split.split(entry)

        # Merge with previous entry if still open
        ls, rs = open_entry

        line = lines[0]
        if line:
            if change_type == 0:
                ls[-1] = ls[-1] or ''
                rs[-1] = rs[-1] or ''
                ls[-1] = ls[-1] + line
                rs[-1] = rs[-1] + line
            elif change_type == 1:
                rs[-1] = rs[-1] or ''
                rs[-1] += '<ins>%s</ins>' % line if line else ''
            elif change_type == -1:
                ls[-1] = ls[-1] or ''
                ls[-1] += '<del>%s</del>' % line if line else ''

        lines = lines[1:]

        if lines:
            if change_type == 0:
                # Push out open entry
                for entry in yield_open_entry(open_entry):
                    yield entry

                # Directly push out lines until last
                for line in lines[:-1]:
                    yield (False, line, line)

                # Keep last line open
                open_entry = ([lines[-1]], [lines[-1]])
            elif change_type == 1:
                ls, rs = open_entry

                for line in lines:
                    rs.append('<ins>%s</ins>' % line if line else '')

                open_entry = (ls, rs)
            elif change_type == -1:
                ls, rs = open_entry

                for line in lines:
                    ls.append('<del>%s</del>' % line if line else '')

                open_entry = (ls, rs)

    # Push out open entry
    for entry in yield_open_entry(open_entry):
        yield entry

So, what we have to do is,

  1. Get the changeset from a version
  2. Run each field’s array containing the old and new text through the side_by_side_diff method.
  3. Display the output on screen.
  4. Use the markups <ins/> and <del/> to style changes.

So, we do the same for each version by looping through the versions array accessible from an event record.

For the slider, noUiSlider javascript library was used. Implementation is simple.

<div id="slider"></div>

<script type="text/javascript">  
    $(function () {
        var slider = document.getElementById('slider');
        noUiSlider.create(slider, {
            start: [0],
            step: 1,
            range: {
                'min': 0,
                'max': 5
            }
        });
    });
</script>

This would create a slider that can go from 0 to 5 and will start at position 0.

By listening to the update event of the slider, we’re able to change which revision is displayed.

slider.noUiSlider.on('update', function (values, handle) {  
    var value = Math.round(values[handle]);
    // the current position of the slider
    // do what you have to do to change the displayed revision
});

And to get the user who caused a revision, you have to access the user_idparameter of the transaction record of a particular version.

event = session.query(Event).get(1)  
version_one = event.versions[0]  
transaction = transaction_class(version_one)  
user_id = transaction.user_id

So, with the user ID, you can query the user database to get the user who made that revision.

The user_id is automatically populated if you’re using Flask, Flask-login and SQLAlchemy-Continuum’s Flask Plugin. Enabling the plugin is easy.

from sqlalchemy_continuum.plugins import FlaskPlugin  
from sqlalchemy_continuum import make_versioned

make_versioned(plugins=[FlaskPlugin()])

This is not a very detailed blog post. If you would like to see the actual implementation, you can checkout the Open Event repository over at GitHub. Specifically, the file browse_revisions.html.

The result is,

Still needs some refinements in the UI. But, it gets the job done :wink:

Continue ReadingImplementing revisioning feature in Open Event

Introduction to JWT

In this post, I will try to explain what is JWT, what are its advantages and why you should be using it.

JWT stands for JSON Web Tokens. Let me explain what each word means.

  1. Tokens – Token is in tech terms a piece of data (claim) which gives access to certain piece of information and allows certain actions.
  2. Web – Web here means that it was designed to be used on the web i.e. web projects.
  3. JSON – JSON means that the token can contain json data. In JWT, the json is first serialized and then Base64 encoded.

A JWT looks like a random sequence of strings separated by 2 dots. The yyyyy part which you see below has the Base64 encoded form of json data mentioned earlier.

xxxxx.yyyyy.zzzzz

The 3 parts in order are –

  • Header – Header is the base64 encoded json which contains hashing algorithm on which the token is secured.
  • Payload – Payload is the base64 encoded json data which needs to be shared through the token. The json can include some default keys like iss (issuer), exp (expiration time), sub (subject) etc. Particularly exp here is the interesting one as it allows specifying expiry time of the token.

At this point you might be thinking that how is JWT secure if all we are doing is base64 encoding payload. After all, there are easy ways to decode base64. This is where the 3rd part (zzzzz) is used.

  • Signature – Signature is a hashed string made up by the first two parts of the token (header and payload) and a secret. The secret should be kept confidential to the owner who is authenticating using JWT. This is how the signature is created. (assuming HMACSHA256 as the algorithm)
HMACSHA256(
  xxxxx + "." + yyyyy,
  secret)

How to use JWT for authentication

Once you realize it, the idea of JWT is quite simple. To use JWT for authentication, what you do is you make the client POST their username and password to a certain url. If the combination is correct, you return a JWT including username in the “Payload”. So the payload looks like –

{
  "username": "john.doe"
}

Once the client has this JWT, they can send the same in Header when accessing protected routes. The server can read the JWT from the header and verify its correctness by matching the signature (zzzzz part) with the encoded hash created using header+payload and secret (generated signature). If the strings match, it means that the JWT is valid and therefore the request can be given access to the routes. BTW, you won’t have to go through such a deal for using JWT for authentication, there are already a handful of libraries that can do these for you.

Why use JWT over auth tokens ?

As you might have noticed in the previous section, JWT has a payload field that can contain any type of information. If you include username in it, you will be able to identify the user just by validating the JWT and there will be no need to read from the database unlike typical tokens which require a database read cycle to get the claimed user. Now if you go ahead and include permission informations in JWT too (like'isAdmin': True), then more database reads can be prevented. And this optimization comes at no cost at all. So this is why you should be using JWT.

We at Open Event use JWT for our primary means of authentication. Apart from that, we support basic authentication too. Read this post for some points about that.

That’s it for now. Thanks for reading.


{{ Repost from my personal blog http://aviaryan.in/blog/gsoc/jwt-intro.html }}

Continue ReadingIntroduction to JWT