Setting Environment Variables up in Travis and Heroku for Meilix and Meilix-Generator

Meilix Generator is a webapp whose task is to take input as a configuration and start the Meilix build. But an anonymous person cannot start the Meilix build of any user and deploy the release in the repository. There are ways which are used as authentication passes through environment variable to start the build. In this article, I show the way I used to trigger Meilix by setting up environment variables in Meilix Generator.

Environment variables are of great use when one has to supply personal token in an open-source project for accessing the repository. So down there, we will have ways to configure the variables in Heroku and Travis. There are so many wikis out there but this one is the blend of both Heroku and Travis.

Heroku

There are several ways to setup variables in Heroku. The way I’m going to describe below is used to access Travis build using Heroku.
Using the Heroku variable generated using Travis will help to trigger the build on Travis.

How:

Idea:
We will use Travis CLI to generate a token (unique and keep it secret). Then provide the token as a variable name to the Heroku.
Backdoor:
This Travis token will give access to the Heroku to trigger the build on that particular Travis account. We use variable to provide the token since in the script we will use this variable as an environment variable to fetch the token in the place of token like as $token.
Implementation:
Open your terminal and type the following:

sudo apt install ruby ruby-dev
sudo gem install travis                       	# install Travis CLI
travis login --org   					# login into Travis
travis token --org		# generate your secret personal access token

You will get a token, copy and paste it into your Heroku app’s settings config vars token. You have to use the `KEY` as the variable which is used in the script for triggering the build. Save it and you are done the setting of the token in the Heroku.

Travis

Now it’s time for Travis token.
It is used to deploy the build to that repository only.
We can use the token in two ways either paste it in the setting of that repository on Travis or pasting the encrypted form of that in the .travis.yml file in that repository. Both will work. But one thing to remember that you must have the write access to that repository.

How

,Idea:
It is used in .travis.yml file as an environment variable to successfully build and deploy the application as a Github release.
Backdoor:
The token gives the permission to Travis to deploy the build application in the GitHub release of the repo(if one using to deploy it there only).
Implementation:
Head up to Github and generate a personal access token with scope repo. Copy the generated token in a safe place.

Way 1:

Paste the token in the setting of the repo in Travis in Environment Variable option. Now it will access the Github repository since it has got the permission from the personal token generated from Github.

Way 2:
Open terminal:

cd repo_name				# cd into the cloned repo
travis encrypt secret_token	#replace secret_token with the token generated

or

travis encrypt secret_token -r user/repo 	#if you are not in the repo

Copy that encrypted token and paste it in proper format in the .travis.yml file. Now you enabled Travis giving permission to release the build.

How can this idea be helpful to a developer

A developer can use this to build the Github Release in its repository. One can secure its token using this technique. One can use it to trigger its personal project in Travis using Heroku.

Useful repositories and link which uses this:

I have used the same idea in my project. Do have a look https://github.com/fossasia/meilix-generator
about environment variable
encryption keys
triggering build

Continue ReadingSetting Environment Variables up in Travis and Heroku for Meilix and Meilix-Generator

High School Physics Practicals using PSLab Device

High school physics syllabus includes rather advanced concepts in the world of Physics; namely practicals related to sound, heat, light and electric. Almost all of these practicals are done in physics labs using conventional bulky equipments. Especially the practicals related to electrical and electronics. They use bulky oscilloscopes with complex controls and multimeter with so many controls. PSLab being a sophisticated device which integrates a whole science lab into a 2” by 2” small circuit, these practicals made easy and interesting.

There are several practicals required to be completed by a student before sitting for GCE (Advanced Level) examination. This blog post points out how to perform those experiments using PSLab device and several other tools required without having to use bulky instruments.

  • Calculating internal resistance and EMF of a dry cell

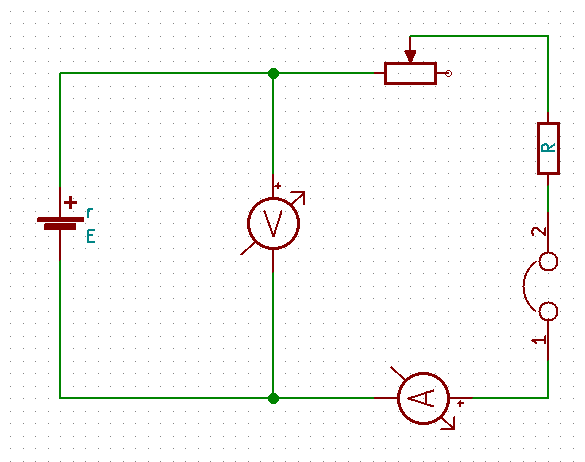
This experiment includes the above mentioned circuitry. Once the basic setup is completed using;

  • Dry cell
  • 10K variable resistor
  • 1K resistor
  • Switch/Jumper

Connect the CH1 pin and GND pin of PSLab across the dry cell and CH2 pin and GND across the Ammeter instead of the Ammeter. Once the pin connection is complete, plug the PSLab device to the computer and using the desktop application voltmeter, measure the voltage from CH1 and current from voltage value read from CH2 and the known resistance value of R. Record these data against step changes in the resistance of the variable resistor starting from a high value to a low value. Once there are sufficient data as much as 10 data set, using a graph paper draw the relation between current and voltage measured according to the equation given below.

E = V + Ir

V = -rI + E

This will produce a graph with a constant negative gradient. Gradient of the graph will produce the internal resistance of the dry cell.

  • I-V graphs for a semiconductor

This experiment will require;

  • Diode
  • 100 Ohms resistor

Conduct the experiment as follows once the circuit is set up. Increase the voltage provided by the PV1 pin of the PSLab by 100 mV per step and measure the voltage across diode using CH3 pin of PSLab device. Using that voltage and the supply voltage, calculate the current flowing through the resistor. Note down the readings as voltage to current pairs and plot them on a graph paper. The graph will produce the following results which is identical to common IV characteristics of a semiconductor.

Start A at zero and increase by 0.1V steps while measuring voltage and current across diode. (Image from Wikipedia)

Apart from this conventional experiment, PSLab provides an inbuilt experiment students and teachers can use. In the Electronics Experiments section, Diode IV characteristics experiment is configured in such a way that this experiment can be conducted very easily. The circuit configuration is the same and R value should be 1K. Once the step size is set to an appropriate resolution, START button will begin the experiment and provide with the final graph.

  • Transfer characteristics of a transistor

Set up the above mentioned circuitry on a breadboard and connect the appropriate pins of PSLab device as mentioned. In this experiment, student need to observe the increase in current/voltage across CH1 when PV2 is varying. We need to measure CH1 parameter value against PV2 voltage value and plot these two against to obtain the transfer characteristics of a BJT.

Apart from this conventional experiment, PSLab provides an inbuilt experiment to perform this lab exercise. Using “BJT Transfer Characteristics” experiment, students and teachers can easily obtain the characteristics curves by setting step sizes and voltage values to the required pins.

  • Ohm’s law

Configure the following circuit and connect PCS, CH1 and GND pins of PSLab into relevant positions. This experiment is to measure voltage across the resistor against the variation in current through the circuit. Increase current provided to the circuit using PCS pin and measure voltage using CH1 pin and plot against the current. The gradient will produce the resistor value.

In the electrical experiments section in PSLab application has a separate experiment to perform the Ohm’s Law experiment. Using this experiment, students can change the current values using the knob and record the voltage values related to that. Finally the plot can be generated which will be of a constant gradient.

  • Kirchhoff’s Laws
  • Voltage law

Kirchhoff’s Voltage law states that the directed sum of the voltage around any closed network is zero.

This law can be proved using the following circuit with the help of PSLab device. Connect the channel pins as per the diagram and measure voltages in the three channels. They will show a relationship as the directed sum of the combination will turn into a zero.

  • Current law

Kirchhoff’s current law states that at any node in a circuit, the sum of currents flowing into that node is equal to the sum of currents flowing out of that node; which is similar to the direct summation of currents in a node is zero.

Using the same circuit as above, measure the current flowing through each node using the voltage readings of the channels and known resistor values. Considering the sign of the current which is easily readable in PSLab desktop application, the summation will produce a zero.

Resources:

Continue ReadingHigh School Physics Practicals using PSLab Device

How to integrate SUSI AI in Google Assistant

Google Assistant is a personal assistant by Google. Google Assistant can interact with other applications. In fact, we can integrate our own applications with Google Assistant using Actions on Google. In order to integrate SUSI action with Google Assistant we will follow these steps:

  1. Install Node.js from the link below on your computer if you haven’t installed it already. https://nodejs.org/en/
  2. Create a folder with any name and open a shell and change your current directory to the new folder you created. 
  3. Type npm init in the shell and enter details like name, version and entry point. 
  4. Create a file with the same name that you wrote in entry point in above-given step. i.e index.js and it should be in the same folder you created. 
  5. Type following commands in command line  npm install –save actions-on-google. After actions-on-google is installed, type npm install –save express.  On success, type npm install –save request, and at last type npm install –save body-parser. When all the modules are installed check your package.json file; therein you’ll see the modules in the dependencies portion.

    Your package.json file should look like this

    {
     "name": "susi_google",
     "version": "1.0.0",
     "description": "susi on google",
     "main": "app.js",
     "scripts": {
       "start": "node app.js"
     },
     "author": "",
     "license": "ISC",
     "dependencies": {
       "actions-on-google": "^1.1.1",
       "body-parser": "^1.17.2",
       "express": "^4.15.3",
       "request": "^2.81.0"
     }
    }
    
  6. Copy following code into file you created i.e index.js
    // Enable debugging
    process.env.DEBUG = 'actions-on-google:*';
    
    var Assistant = require('actions-on-google').ApiAiApp;
    var express = require('express');
    var bodyParser = require('body-parser');
    
    //defining app and port
    var app = express();
    app.set('port', (process.env.PORT || 8080));
    app.use(bodyParser.json());
    
    const SUSI_INTENT = 'name-of-action-you defined-in-your-intent';
    
    app.post('/webhook', function (request, response) {
     //console.log('headers: ' + JSON.stringify(request.headers));
     //console.log('body: ' + JSON.stringify(request.body));
    
     const assistant = new Assistant({request: request, response: response});
    
     function responseHandler (app) {
       // intent contains the name of the intent you defined in the Actions area of API.AI
       let intent = assistant.getIntent();
       switch (intent) {
         case SUSI_INTENT:
           var query = assistant.getRawInput(SUSI_INTENT);
           console.log(query);
    
           var options = {
           method: 'GET',
           url: 'http://api.asksusi.com/susi/chat.json',
           qs: {
               timezoneOffset: '-330',
               q: query
             }
           };
    
           var request = require('request');
           request(options, function(error, response, body) {
           if (error) throw new Error(error);
    
           var ans = (JSON.parse(body)).answers[0].actions[0].expression;
           assistant.ask(ans);
    
           });
           break;
    
       }
     }
     assistant.handleRequest(responseHandler);
    });
    
    // For starting the server
    var server = app.listen(app.get('port'), function () {
     console.log('App listening on port %s', server.address().port);
    });
    
  7. Now we will make a project on developer’s console of Actions on Google and after that, you will set up action on your project using API.AI
  8. Above step will open API.AI console create an agent there for the project you created above. 
  9. Now we have an agent. In order to create SUSI action on Google, we will define an “intent” from options in the left menu on API.AI, but as we have to receive responses from SUSI API so we have to set up webhook first.

     
  10. See “fulfillment” option in the left menu. Open to enable it and to enter the URL. We have to deploy the above-written code onto Heroku, but first, make a Github repository and push the files in the folder we created above.

    In command line change current directory to folder we created above and  write
    git init
    git add .
    git commit -m”initial”
    git remote add origin <URL for remote repository>
    git remote -v
    git push -u origin master 

    You will get URL for the remote repository by making a repository on your Github and copying this link of your repository.


  11. Now we have to deploy this Github repository to Heroku to get URL. 
  12. If you don’t have an account on Heroku sign up here https://www.heroku.com/ else just sign in and create a new app. 
  13. Deploy your repository onto Heroku from deploy option and choosing GitHub as a deployment method.
  14. Select automatic deployment so that when you make any changes in the Github repository, they are automatically deployed to Heroku.
  15. Open your app from an option on the top right and copy the link of your Heroku app and append it with /webhook and enter this URL into fulfillment URL.

    https://{Your_App_Name}.herokuapp.com/webhook
     
  16. After setting up webhook we will make an intent on API.AI, which will get what user is asking from SUSI. To create an intent, select “intent” from the left menu and create an intent with the information given in screenshot below and save your intent.

     
  17. After creating the intent, your agent is ready. You just have to integrate your agent with Actions on Google. Turn on its integration from the “integration” option in the left menu. 
  18. Your SUSI action on Google Assistant is ready now. To test it click on actions on Google in integration menu and choose “test” option.

  19. You can only test it with the same email you have used for creating the project in step 7. To test it on Google Assistant follow this demo video https://youtu.be/wHwsZOCKaYY

If you want to learn more about action on Google with API.AI refer to this link https://developers.google.com/actions/apiai/

Resources
Actions on Google: https://developers.google.com/actions/apiai/

Continue ReadingHow to integrate SUSI AI in Google Assistant

Specifying Configurations for Yaydoc with .yaydoc.yml

Like many continuous integration services, Yaydoc also reads configurations from a YAML file. To get started with Yaydoc the first step is to create a file named .yaydoc.yml and specify the required options. Recently the yaydoc team finalized the layout of the file. You can still expect some changes as the projects continues to grow on but they shall not be major ones. Let me give you an outline of the entire layout before describing each in detail. Overall the file is divided into four sections.

  • metadata
  • build
  • publish
  • extras

For the first three sections, their intention is pretty clear from their names. The last section extras is meant to hold settings related to integration to external services.

Following is a description of config options under the metadata section and it’s example usage.

Key Description Default
author

The author of the repository. It is used to construct the copyright text.

user/organization
projectname

The name of the project. This would be displayed on the generated documentation.

Name of the repository
version

The version of the project. This would be displayed alongside the project name

Current UTC date
debug

If true, the logs generated would be a little more verbose. Can be one of true|false.

true
inline_math

Whether inline math should be enabled. This only affects markdown documents.

false
autoindex

This section contains various settings to control the behavior of the auto generated index. Use this to customize the starting page while having the benefit of not having to specify a manual index.

metadata:
  author: FOSSASIA
  projectname: Yaydoc
  version: development
  debug: true
  inline_math: false

Following is a description of config options under the build section and it’s example usage.

Key Description Default
theme

The theme which should be used to build the documentation. The attribute name can be one of the built-in themes or any custom sphinx theme from PyPI. Note that for PyPI themes, you need to specify the distribution name and not the package name. It also provides an attribute options to control specific theme options

sphinx_fossasia_theme
source

This is the path which would be scanned for markdown and reST files. Also any static content such as images referenced from embedded html in markdown should be placed under a _static directory inside source. Note that the README would always be included in the starting page irrespective of source from the auto-generated index

docs/
logo

The path to an image to be used as logo for the project. The path specified should be relative to the source directory.

markdown_flavour

The markdown flavour which should be used to parse the markdown documents. Possible values for this are markdown, markdown_strict, markdown_phpextra, markdown_github, markdown_mmd and commonmark. Note that currently this option is only used for parsing any included documents using the mdinclude directive and it’s unlikely to change soon.

markdown_github
mock

Any python modules or packages which should be mocked. This only makes sense if the project is in python and uses autodoc has C dependencies.

autoapi

If enabled, Yaydoc will crawl your repository and try to extract API documentation. It Provides attributes for specifying the language and source path. Currently supported languages are java and python.

subproject

This section can be used to include other repositories when building the docs for the current repositories. The source attribute should be set accordingly.

github_button

This section can be used to include various Github buttons such as fork, watch, star, etc.

hidden
github_ribbon

This section can be used to include a Github ribbon linking to your github repo.

hidden
build:
  theme:
    name: sphinx_fossasia_theme
  source: docs
  logo: images/logo.svg
  markdown_flavour: markdown_github
  mock:
    - numpy
    - scipy
  autoapi:
    - language: python
      source: modules
    - language: java
  subproject:
    - url: <URL of Subproject 1>
      source: doc
    - url: <URL of subproject 2>

Following is a description of config options under the publish section and it’s example usage.

Key Description Default
ghpages

It provides a attribute url whose value is written in a CNAME file while publishing to github pages.

heroku

It provides an app_name attribute which is used as the name of the heroku app. Your docs would be deployed at <app_name>.herokuapp.com

publish:
  ghpages:
    url: yaydoc.fossasia.org
  heroku:
    app_name: yaydoc 

Following is a description of config options under the extras section and it’s example usage.

Key Description Default
swagger

This can be used to include swagger API documentation in the build. The attribute url should point to a valid swagger json file. It also accepts an additional parameter ui which for now only supports swagger.

javadoc

It takes an attribute path and can include javadocs from the repository.

extras:
  swagger:
    url: http://api.susi.ai/docs/swagger.json
    ui: swagger
  javadoc:
    path: 'src/' 

Resources

Continue ReadingSpecifying Configurations for Yaydoc with .yaydoc.yml

How to Receive Picture, Video and Link Type Responses from SUSI kik Bot

In this blog, I will explain how to receive picture, video and link messages from SUSI Kik bot. To do so we have to implement these types in our code.

We will start off by making SUSI kik bot first. Follow this tutorial to make SUSI Kik bot. Next, we will implement picture, video, and link type messages from our bot. To implement these message types we need chatID and username of a user who has sent the message to our bot. To get the username of user we will use the following code:

bot.onTextMessage((message) => {
    var chartID = message.chatId;
    var Username;
    bot.getUserProfile(message.from)
        .then((user) => {
            message.reply(`Hey ${user.username}!`);
            Username = user.username;
        });

Now as we have got the chatID and username we will use these and post a request to https://api.kik.com/v1/message to send pictures, video, and link type messages. To post these requests use below code.

1) Picture:

To send picture type message we will define the type to picture,  URL of the picture to be sent to user and username of the user that we got from the code above.

request.post({
   url: "https://api.kik.com/v1/message",
   auth: {
       user: 'your-bot-name',
       pass: 'your-api-key'
   },
   json: {
       "messages": [
       {
           'chatId': chatID,
           'type': 'picture',
           'to': Username,
           'picUrl': answer
       }
       ]
   }
});

2) Video:

To send video type message we will define the type to video, URL of the video to be sent to the user and username of the user that we got from the code above. In this request, we can also set extra attributes like mute and autoplay.

request.post({
   url: "https://api.kik.com/v1/message",
   auth: {
       user: 'your-bot-name',
       pass: 'your-api-key'
   },
   json: {
     "messages": [
       {
           "chatId": "chatID",
           "type": "video",
           "to": "laura",
           "videoUrl": "http://example.kik.com/video.mp4",
           "muted": true,
           "autoplay": true,
           "attribution": "camera"
       }
   ]
   }
});

3) Link:
To send link type message to the user we will define the type of link, URL to be sent to the user and username of the user that we got from the code above.

request.post({
   url: "https://api.kik.com/v1/message",
   auth: {
       user: 'your-bot-name',
       pass: 'your-api-key'
   },
   json: {
     "messages": [
       {
           "chatId": "chatID",
           "type": "link",
           "to": "laura",
           "url": "url-to-send"
       }
   ]
   }
});

If you want to learn more about kik API refer to https://dev.kik.com/#/docs/messaging

Resources
Kik API reference: https://dev.kik.com/#/docs/messaging

Continue ReadingHow to Receive Picture, Video and Link Type Responses from SUSI kik Bot

Data Indexing in Loklak Server

Loklak Server is a data-scraping system that indexes all the scraped data for the purpose to optimize it. The data fetched by different users is stored as cache. This helps in retrieving of data directly from cache for recurring queries. When users search for the same queries, load on Loklak Server is reduced by outputting indexed data, thus optimizing the operations.

Application

It is dependent on ElasticSearch for indexing of cached data (as JSON). The data that is fetched by different users is stored as cache. This helps in fetching data directly from cache for same queries. When users search for the same queries, load on Loklak Server is reduced and it is optimized by outputting indexed data instead of scraping the same date again.

When is data indexing done?

The indexing of data is done when:

1) Data is scraped:

When data is scraped, data is indexed concurrently while cleaning of data in TwitterTweet data object. For this task, addScheduler static method of IncomingMessageBuffer is used, which acts as

abstract between scraping of data and storing and indexing of data.

The following is the implementation from TwitterScraper (from here). Here writeToIndex is the boolean input to whether index the data or not.

if (this.writeToIndex) IncomingMessageBuffer.addScheduler(this, this.user, true);

2) Data is fetched from backend:

When data is fetched from backend, it is indexed in Timeline iterator. It calls the above method to index data concurrently.

The following is the definition of writeToIndex() method from Timeline.java (from here). When writeToIndex() is called, the fetched data is indexed.

public void writeToIndex() {
    IncomingMessageBuffer.addScheduler(this, true);
}

How?

When addScheduler static method of IncomingMessageBuffer is called, a thread is started that indexes all data. When the messagequeue data structure is filled with some messages, indexing continues.

See here . The DAO method writeMessageBulk is called here to write data. The data is then written to the following streams:

1) Dump: The data fetched is dumped into Import directory in a file. It can also be fetched from other peers.

2) Index: The data fetched is checked if it exists in the index and data that isn’t indexed is indexed.

public static Set<String> writeMessageBulk(Collection<MessageWrapper> mws) {
    List<MessageWrapper> noDump = new ArrayList<>();
    List<MessageWrapper> dump = new ArrayList<>();
    for (MessageWrapper mw: mws) {
        if (mw.t == null) continue;
        if (mw.dump) dump.add(mw);
        else noDump.add(mw);
    }

    Set<String> createdIDs = new HashSet<>();
    createdIDs.addAll(writeMessageBulkNoDump(noDump));
    createdIDs.addAll(writeMessageBulkDump(dump));

    // Does also do an writeMessageBulkNoDump internally
    return createdIDs;
}


The above code snippet is from DAO.java, method calls writeMessageBulkNoDump(noDump) indexes the data to ElasticSearch. The definition of this method can be seen here

Whereas for dumping of data writeMessageBulkDump(Dump) is called. It is defined here

Resources:

Continue ReadingData Indexing in Loklak Server

Some Other Services in Loklak Server

Loklak Server isn’t just a scraper system software, it provides numerous other services to perform other interesting functions like Link Unshortening (reverse of link shortening) and video fetching and administrative tasks like status fetching of the Loklak deployment (for analysis in Loklak development use) and many more. Some of these are internally implemented and rest can be used through http endpoints. Also there are some services which aren’t complete and are in development stage.

Let’s go through some of them to know a bit about them and how they can be used.

1) VideoUrlService

This is the service to extract video from the website that has a streaming video and output the video file link. This service is in development stage and is functional. Presently, It can fetch twitter video links and output them with different video qualities.

Endpoint: /api/videoUrlService.json

Implementation Example:

curl api/loklak.org/api/videoUrlService.json?id=https://twitter.com/EXOGlobal/status/886182766970257409&id=https://twitter.com/KMbappe/status/885963850708865025

2) Link Unshortening Service

This is the service used to unshorten the link. There are shortened URLs which are used to track the Internet Users by Websites. To prevent this, link unshortening service unshortens the link and returns the final untrackable link to the user.

Currently this service is in application in TwitterScraper to unshorten the fetched URLs. It has other methods to get Redirect Link and also a link to get final URL from multiple unshortened link.

Implementation Example from TwitterScraper.java [LINK]:

Matcher m = timeline_link_pattern.matcher(text);

if (m.find()) {
    String expanded = RedirectUnshortener.unShorten(m.group(2));
    text = m.replaceFirst(" " + expanded);
    continue;
}


Further it can be used to as a service and can be used directly. New features like fetching featured image from links can be added to this service. Though these stuff are in discussion and enthusiastic contribution is most welcomed.

3) StatusService

This is a service that outputs all data related to to Loklak Server deployment’s configurations. To access this configuration, api endpoint status.json is used.

It outputs the following data:

a) About the number of messages it scrapes in an interval of a second, a minute, an hour, a day, etc.

b) The configuration of the server like RAM, assigned memory, used memory, number of cores of CPU, cpu load, etc.

c) And other configurations related to the application like size of ElasticSearch shards size and their specifications, client request header, number of running threads, etc.

Endpoint: /api/status.json

Implementation Example:

curl api/loklak.org/api/status.json

Resources:


Continue ReadingSome Other Services in Loklak Server

Implementing Copyright API in Open Event Frontend

This article illustrates how the copyright details have been displayed in the Open Event Frontend project using the Open Event Orga API. The API endpoints which will be mainly focussing on for fetching the copyright details are:

GET /v1/event-copyright/{event_copyright_id}

The events have copyrights which give the creator of the event exclusive rights for its use and distribution. In the Open Event application, the copyright details can be seen on the public event page. The public event page contains the events details like description, venue, tickets, speakers, sponsors along with the copyright details and these details are present on the public/index route in the application. Apart from index route, we have multiple subroutes to display the detailed information of speakers, sessions and schedule. The one thing which remains common to all the public event pages is the copyright information. Most of the time the copyright details are event specific so they are nested within the event model so if we want to display them we need to fetch the event model first.

The code to fetch the event model looks like this:

model(params) {
return this.store.findRecord('event', params.event_id, { include: 'social-links, event-copyright' });
}

If we try to comprehend the code then we can see that ‘event-copyright’ details are included inside the model. The reason behind this is the fact that the copyright information is not specific to a particular route and is displayed on the all the public event pages. After fetching the copyright details the next step we need to perform is to display them on the event’s index page.

The code to display the copyright details looks like this:

{{#if model.event.copyright}}
  <div class="copyright">
    {{public/copyright-item copyright=model.event.copyright}}
  </div>
{{/if}}

In the first line, we have an if conditional statement which verifies whether the copyright data exists or not. If the data does not exist then the copyright class will not be visible on the page and if the model is not empty then it will be displayed with the help of model.event.copyright which is responsible for displaying the fetched data on the page.

If we see in the third line, we have called an another template ‘copyright-item’ which is responsible for how the data will look or in simpler words the UI of the copyright data.

The code which determines UI of the copyright details looks like this:

<img src="{{copyright.logoUrl}}" class="copyright-image" alt="{{copyright.licence}}">
<br>
<div class='copyright text'>
  <p>
    {{t 'This event is licenced under'}} <a href="{{copyright.licenceUrl}}"> {{copyright.licence}} </a>.
  </p>
</div>

In the first line of code, we are providing the src to the image which is stored in ‘logoUrl’ variable of the copyright object. If we hover the image we can see the copyright license which is stored in the ‘license’ variable. Then finally we have copyright license’s URL which is stored under ‘licenceUrl’ variable of copyright object. The resulting UI from the above source code looks like this :

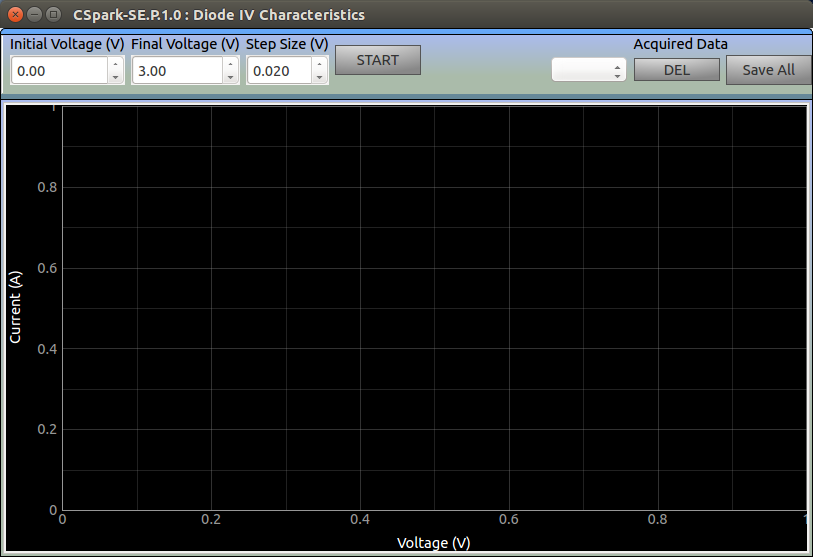
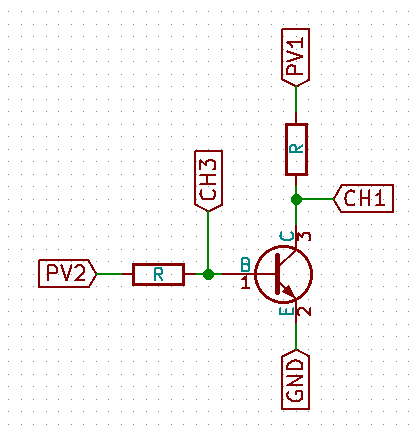
Fig. 1: The user interface of the copyright details

Now we need to test whether the copyright details are completely displayed or not. To test it we created an integration test in which we created a sample ember object to check the correctness of the code. The sample ember object for copyright details looks like this:

To view the complete code regarding the copyright API integration check this.

const copyright = EmberObject.create({
  holder     : 'Creative Commons',
  holderUrl  : 'https://creativecommons.org',
  licence    : 'Public Domain Dedication (CC0)',
  licenceUrl : 'https://creativecommons.org/publicdomain/zero/1.0/',
  year       : 2007,
  logoUrl    : 'http://image.ibb.co/gt7q7v/pdd.png'
});

To conclude, this is how we integrated copyright information inside the Open Event Frontend project using the Open Event Orga API efficiently.

Resources:

Image Source : https://libsource.com/understanding-creative-commons-licensing/

Continue ReadingImplementing Copyright API in Open Event Frontend

Ember Mixins used in Open Event Frontend

This post will illustrate how ember mixins are used in the Open Event Frontend to avoid code duplication and to keep it clean to reduce code complexity.

The Open Event application needs forms at several places like at the time of login, for the creation of the event, taking the details of the user, creating discount codes for tickets etc. Every form performs similar actions which taking input and finally storing it in the database. In this process, a set of things keep executing in the background such as continuous form validation which means checking inputted values to ensure they are correctly matched with their type as provided in the validation rules, popping out an error message in case of wrong inputted values, etc. which is common to all the forms. The only thing which changes is the set of validation rules which are unique for every form. So let’s see how we solved this issue using Ember Mixins.

While writing the code, we often run into the situation where we need to use the similar behaviour in different parts of the project. We always try not to duplicate the code and keep finding the ways to DRY ( Don’t Repeat Yourself ) up the code. In Ember, we can share the code in the different parts of the project using Ember.Mixins.

While creating the forms, we mostly have differing templates but the component logic remains same. So we created a mixin form.js which contains all the properties which are common to all the forms. The code mixin contains can be reused throughout different parts of the application and is not a concern of any one route, controller, component, etc. The mixins don’t get instantiated until we pass them into some object, and they get created in the order of which they’re passed in. The code for form.js mixin looks like this.

export default Mixin.create({
  autoScrollToErrors : true,
  autoScrollSpeed    : 200,

  getForm() {
    return this.get('$form');
  },

  onValid(callback) {
    this.getForm().form('validate form');
    if (this.getForm().form('is valid')) {
      callback();
    }
  },
  
  didRender() {
      const $popUps = this.$('.has.popup');
      if ($popUps) {
        $popUps.popup({
          hoverable: true
        });
      }
      let $form = this.$('.ui.form');
      if ($form) {
        $form = $form.first();
        if (this.get('getValidationRules') && $form) {
          $form.form(merge(defaultFormRules, this.getValidationRules()));
        }
      },
  didInsertElement() {
    $.fn.form.settings.rules.date = (value, format = FORM_DATE_FORMAT) => {
      if (value && value.length > 0 && format) {
        return moment(value, format).isValid();
      }
      return true;
    };
  }

The complete code can be seen here.

Let’s start understanding the above code. In the first line, we created a mixin via Ember.Mixin.create() method. We have then specified the property ‘autoScrollToErrors’ to true so in case if there is some error, the form will automatically scroll to the error. The property ‘autoScrollSpeed’ specifies the speed with which the form will auto scroll to show the error. ‘getForm()’ method helps in getting the object which will be passed to the mixin. In ‘onValid()’ method we’re validating the form and passing the callbacks if it is correctly validated. We then have ‘didRender()’ method which renders the popups, checkboxes and form rules. The popups help in showing the errors on the form. In this method, we’re fetching the validation rules which are written in child/subclasses which are using this mixin to create the form.  The validation rules help in validating the form and tells if the value inputted is correct or not. In most of the forms, we have a field which asks for some specific date. The piece of code under ‘didInsertElement()’ helps in validating the date and returns true if it is correct. We have ‘willDestroyElement()’ method which destroys the popup if the window is changed/refreshed.

Let see the use case of the above form mixin. At the time of login, we see a form which asks for the user’s credentials to validate if the user is already registered or not. To create that login form we use form mixin. The code for login-form.js looks like this.

export default Component.extend(FormMixin, {
getValidationRules() {
  
fields : {
        identification: {
          identifier : 'email',
          rules      : [
            {
              type   : 'empty',
              prompt : this.l10n.t('Please enter your email ID')
            },
            {
              type   : 'email',
              prompt : this.l10n.t('Please enter a valid email ID')
            }
          ]
        },
        password: {
          identifier : 'password',
          rules      : [
            {
              type   : 'empty',
              prompt : this.l10n.t('Please enter your password')
            }
          ]
        }
      }
   }
});

The complete code can be found here.

We can see that in above code we are creating the form by extending our FormMixin which means that the form will have all the properties which are part of mixin along with the properties which remain unique to this class. Since the validation rules remain unique per form so we’re also providing the rules (easy to comprehend) which will help in validating the fields.

This is how our forms look like after and before applying validation rules.

Fig. 1: Login form before applying validation rules

          Fig. 2: Login form after applying validation rules

To sum it up, we can say that mixins are of great use when we want to keep our code DRY or reduce the code duplication. It helps in removing the unnecessary inheritance keeping it short. The code written using mixin is lesser complex and easily understandable.

References:

Continue ReadingEmber Mixins used in Open Event Frontend

Adding Build Type option in the Apk Generator of the Open Event Android App

The apk-generator provided ability to the event organiser to build an apk from a single click by providing the necessary json/binary files. However it gave only one type of apk where on the other hand the Open Event Android was available with apk of different build versions.

Recently the functionality of the apk generator of the Open Event Android App was enhanced where the user is asked to select an option for build type either Google Play or FDroid which generates the apk according to that selected type.

The main difference in the googleplay apk and fdroid apk is the inclusion of googleplay libraries which aren’t included in the app/build.gradle file in case of fdroid build.

To include support for build type the following files for the apk-generator had to be changed:

  1. app/views/__init__.py
  2. app/tasks/__init__.py
  3. app/static/js/main.js
  4. app/generator/generator.py
  5. scripts/build.sh
  6. app/templates/index.html

Changes to the files

  • app/templates/index.html

This file was where the changes to the UI of the apk-generator showing build type option to the user were made. With this the user was presented with an option to choose build type among googleplay and fdroid apart from the rest of the essential information.

  • scripts/build.sh

The android app supported two different flavours one for google play and the other for fdroid. This required the build script to be modified according to the build type selected by the user during the filling of form.

If user selected “Google Play” or “Fdroid”, the script would look something like this:

#!/bin/bash
./gradlew assemblegoogleplayRelease --info
echo "signing"
jarsigner -keystore ${KEYSTORE_PATH} -storepass ${KEYSTORE_PASSWORD} app/build/outputs/apk/app-googleplay-release-unsigned.apk ${KEY_ALIAS}
echo "zipaligning"
${1}/zipalign -v 4 app/build/outputs/apk/app-$2-release-unsigned.apk release.apk
echo "done"

Where $2 is googleplay or fdroid depending on what build type the user has selected while building the apk from the apk generator.

  • app/views/__init__.py and app/tasks/__init__.py

These files were modified by adding another parameter for supporting the two build type options in the desired functions.

  • app/static/js/main.js

This is where the option selected by the user was taken and accordingly the apk corresponding to the build type option selected was made available to the user. The code for it was shown as follows:

$buildTypeRadio.change(
   function () {
       if (this.checked) {
           enableGenerateButton(true);
           buildType = $(this).val();
       }
  }
);

This was how the option to display build type option to the user was incorporated. This gave the user the ability to install different build versions of an apk, thus making it more useful from the user point of view.

Related Links:

Continue ReadingAdding Build Type option in the Apk Generator of the Open Event Android App