Using Wikipedia API for knowledge graph in SUSPER

Knowledge Graph is way to give a brief description about search query by connecting it to a real world entity. This helps users to get information about exactly what they want. Previously Susper had a Knowledge Graph which was implemented using DBpedia API. But since DBpedia do not provide content over HTTPS connections therefore the content was blocked on susper.com and there was a need to implement the Knowledge Graph using a new API that provide contents over HTTPS. In this blog, I will describe how getting a knowledge graph was made possible using Wikipedia API.

What is Wikipedia API ?

The MediaWiki action API is a web service that provides convenient access to wiki features, data, and metadata over HTTP, via a URL usually at api.php. Clients request particular “actions” by specifying an action parameter, mainly action=query to get information.

The endpoint :

https://en.wikipedia.org/w/api.php

The format :

format=json This tells the API that we want data to be returned in JSON format.

The action :

action=query

The MediaWiki web service API implements dozens of actions and extensions implement many more; the dynamically generated API help documents all available actions on a wiki. In this case, we’re using the “query” action to get some information.

The complete API which is used in SUSPER to extract information of a query is :

https://en.wikipedia.org/w/api.php?format=json&action=query&prop=extracts&exintro=&explaintext=&titles=japan

Where titles=Search_Query, here Japan

How it is implemented in SUSPER?

For implementing it a service has been created which fetches information by setting various URL parameters. This result can be fetched by creating an instance of service and passing search query to getsearchresults(searchquery) function.

export class KnowledgeapiService {
 server = 'https://en.wikipedia.org';
 searchURL = this.server + '/w/api.php?';
 homepage = 'http://susper.com';
 logo = '../images/susper.svg';
 constructor(private http: Http,
             private jsonp: Jsonp,
             private store: Store<fromRoot.State>) {
 }
 getsearchresults(searchquery) {
   let params = new URLSearchParams();
   params.set('origin', '*');
   params.set('format', 'json');
   params.set('action', 'query');
   params.set('prop', 'extracts');
   params.set('exintro', '');
   params.set('explaintext', '');
   params.set('titles', searchquery);
   let headers = new Headers({ 'Accept': 'application/json' });
   let options = new RequestOptions({ headers: headers, search: params });
   return this.http
     .get(this.searchURL, options).map(res =>
         res.json().query.pages
     ).catch(this.handleError);
}


Since the result obtained is an observable therefore we have to subscribe for it and then extract information to local variables in infobox.component.ts file.

export class InfoboxComponent implements OnInit {
 public title: string;
 public description: string;
 query$: any;
 resultsearch = '/search';
 constructor(private knowledgeservice: KnowledgeapiService,
             private route: Router,
             private activatedroute: ActivatedRoute,
             private store: Store<fromRoot.State>,
             private ref: ChangeDetectorRef) {
   this.query$ = store.select(fromRoot.getquery);
   this.query$.subscribe( query => {
     if (query) {
       this.knowledgeservice.getsearchresults(query).subscribe(res => {
         const pageId = Object.keys(res)[0];
         if (res[pageId].extract) {
           this.title = res[pageId].title;
           this.description = res[pageId].extract;
         } else {
           this.title = '';
           this.description = '';
         }
       });
     }
   });
 }

The variable title and description are used to display results on results page.

<div *ngIf=“this.description” class=“card”>
  <div>
    <h2><b>{{this.title}}</b></h2>
    <p>{{this.description | slice:0:600}}<a href=‘https://en.wikipedia.org/wiki/{{this.title}}’>..more at Wikipedia</a></p>
  </div>
</div>

Resources

1.MediaWiki API : https://www.mediawiki.org/wiki/API:Main_page

2.Stackoverflow : https://stackoverflow.com/questions/8555320/is-there-a-clean-wikipedia-api-just-for-retrieve-content-summary

3.Angular Docs : https://angular.io/tutorial/toh-pt4

Continue ReadingUsing Wikipedia API for knowledge graph in SUSPER

Integrating YaCy Grid Locally with Susper

The YaCy Grid is the second-generation implementation of YaCy, a peer-to-peer search engine.The search results can be improved to a great extent by using YaCy-Grid as the new backend for SUSPER. YaCy Grid is the best choice for distributed search topology. The legacy YaCy is made for decentralised and also distributed network. While both the networks are distributed,the YaCy-Grid is centralized and legacy YaCy is decentralized. YaCy Grid facilitates a lot with scaling that will be in our hand and can be done in all aspects​(loading, parsing, indexing) with computing power we choose. In YaCy,Solr is embedded. But in YaCy Grid,we will get elasticsearch cluster.​They are both built around the core underlying search library Lucene.But ​elasticsearch will help us to scale almost indefinitely. In this blog, I will show you how to integrate YaCy Grid with Susper locally and how to use it to fetch results.

Implementing YaCy Grid with Susper:

Before using YaCy Grid we need to first setup YaCy Grid and crawl to url using crawl start API, more information about that can be found here Implementing YaCy Grid with Susper and Setting up YaCy Grid locally.

So, once we are done with setup and crawling, we need to begin using its APIs in Susper. Following are some easy steps in which we can show results from YaCy Grid in a separate tab is Susper.

Step 1:

Creating a service to fetch results:

In order to fetch results from local YaCy Grid server we need to create a service to fetch results from local YaCy Grid server. Here is the class in grid-service.ts which fetches results for us.

export class GridSearchService {
 server = 'http://127.0.0.1:8100';
 searchURL = this.server + '/yacy/grid/mcp/index/yacysearch.json?query=';
 constructor(private http: Http,
             private jsonp: Jsonp,
             private store: Store<fromRoot.State>) {
 }
 getSearchResults(searchquery) { 
   return this.http
     .get(this.searchURL+searchquery).map(res =>
         res.json()
     ).catch(this.handleError);
 }


Step 2:

Modifying results.component.ts file

In order to get results from grid-service.ts in results.component.ts we must need to create an instance of the service and use this instance to get the results and store it in variables results.component.ts file and then use these variables to show results in results template. Following is the code that does this for us

ngOnInit() {
   this.grid.getSearchResults(this.searchdata.query).subscribe(res=>{
     this.gridResult=res.channels;
   });
 }


gridClick(){
   this.getPresentPage(1);
   this.resultDisplay = 'grid';
   this.totalgridresults=this.gridResult[0].totalResults;
   this.gridmessage='About ' + this.totalgridresults + ' results';
   this.gridItems=this.gridResult[0].items;
  
   console.log(this.gridItems);
 }


Step 3:

Creating a New tab to show results from YaCy Grid:

Now we need to create a tab in the template where we can use local variables in results.component.ts to show the results following the current design pattern here is the code for that

<li [class.active_view]="Display('grid')" (click)="gridClick()">YaCy_Grid</li>

<!--YaCy Grid-->
 <div class="container-fluid">
     <div class="result message-bar" *ngIf="totalgridresults > 0 && Display('grid')">
       {{gridmessage}}
     </div>
     <div class="autocorrect">
       <app-auto-correct [hidden]="hideAutoCorrect"></app-auto-correct>
     </div>
   </div>
 <div class="grid-result" *ngIf="Display('grid')">
   <div class="feed container">
       <div *ngFor="let item of gridItems" class="result">
         <div class="title">
           <a class="title-pointer" href="{{item.link}}" [style.color]="themeService.titleColor">{{item.title}}</a>
         </div>
         <div class="link">
           <p [style.color]="themeService.linkColor">{{item.link}}</p>
         </div>
         <div class="description">
           <p [style.color]="themeService.descriptionColor">{{item.pubDate|date:'MMMM d, yyyy'}} - {{item.description}}</p>
         </div>
       </div>
   </div>
 </div>
 <!-- END -->


Step 4:

Starting YaCy Grid Locally:

Now all we need is to start YaCy Grid server locally. To start it go in yacy_grid_mcp folder and use

python bin/start_elasticsearch.py


This will start elasticsearch from its respective script.Next use

python bin/start_rabbitmq.py


This will start RabbitMQ server with the required configuration.Next useThis will start elasticsearch from its respective script.Next use

gradle run


To start YaCy Grid locally.

Now we are all done we just need to start Susper using

ng serve


command and type a search query and move to YaCy_Grid tab to see results from YaCy Grid Server.

Here is the image which shows results from YaCy Grid in Susper

Resources

Continue ReadingIntegrating YaCy Grid Locally with Susper

Setting up YaCy Grid locally

SUSPER is a search interface that uses P2P search engine YaCy . Search results are displayed using Solr server which is embedded into YaCy. The retrieval of search results is done using YaCy search API. When a search request is made in one of the search templates, an HTTP request is made to YaCy and the response is done in JSON. In this blog post I will show how to setup YaCy Grid locally.

What is YaCy Grid ?

The YaCy Grid is the second-generation implementation of YaCy, a peer-to-peer search engine. The required storage functions of the YaCy Grid are:

  1.  An asset storage, basically a file sharing environment for YaCy components,an ftp server is used for asset storage.
  2.  A message system providing an Enterprise Integration Framework using a message-oriented middleware,RabbitMQ message queues for the message system.
  3.  A database system providing search-engine related retrieval functions.It uses Elasticsearch for database operations.

How to setup YaCy Grid locally ?

YaCy Grid have 4 components MCP(Master Connect Program), Loader, Crawler and  Parser.

  1. Clone all the components using –recursive flag.

git clone --recursive https://github.com/yacy/yacy_grid_mcp.git
git clone --recursive https://github.com/yacy/yacy_grid_parser.git
git clone --recursive https://github.com/yacy/yacy_grid_crawler.git
git clone --recursive https://github.com/yacy/yacy_grid_loader.git
  1.  Now to starting YaCy Grid requires starting Elasticsearch, RabbitMQ with Username `anonymous` and Password `yacy` and an ftp server(it can be omitted as MCP can take over).
  2.  All the above steps can also be done in a single step by running a python script in `bin` folder `run_all.py`
  3.  Working of `run_all.py` in yacy_grid_mcp:

if not checkportopen(9200):
   print "Elasticsearch is not running"
   mkapps()
   elasticversion = 'elasticsearch-5.6.5'
   if not os.path.isfile(path_apphome + '/data/mcp-8100/apps/' + elasticversion + '.tar.gz'):
       print('Downloading ' + elasticversion)
       urllib.urlretrieve ('https://artifacts.elastic.co/downloads/elasticsearch/' + elasticversion + '.tar.gz', path_apphome + '/data/mcp-8100/apps/' + elasticversion + '.tar.gz')
   if not os.path.isdir(path_apphome + '/data/mcp-8100/apps/elasticsearch'):
       print('Decompressing' + elasticversion)
       os.system('tar xfz ' + path_apphome + '/data/mcp-8100/apps/' + elasticversion + '.tar.gz -C ' + path_apphome + '/data/mcp-8100/apps/')
       os.rename(path_apphome + '/data/mcp-8100/apps/' + elasticversion, path_apphome + '/data/mcp-8100/apps/elasticsearch')
   # run elasticsearch
   print('Running Elasticsearch')
   os.chdir(path_apphome + '/data/mcp-8100/apps/elasticsearch/bin')
   os.system('nohup ./elasticsearch &')


  • Checks whether Elasticsearch is running or not, if not then runs Elasticsearch.
if checkportopen(15672):
   print "RabbitMQ is Running"
   print "If you have configured it according to YaCy setup press N"
   print "If you have not configured it according to YaCy setup or Do not know what to do press Y"
   n=raw_input()
   if(n=='Y' or n=='y'):
       os.system('service rabbitmq-server stop')
       
if not checkportopen(15672):
   print "rabbitmq is not running"
   os.system('python bin/start_rabbitmq.py')
  • Checks whether RabbitMQ is running or not, if yes then asks user to configure it according to YaCy Grid setup by pressing Y or else ignore,if not then starts RabbitMQ according to required configuration.
subprocess.call('bin/update_all.sh')
  • .Updates all the Grid components including MCP.

if not checkportopen(2121):
   print "ftp server is not Running"
  • Checks for an ftp server and prints message accordingly.

def run_mcp():
   subprocess.call(['gnome-terminal', '-e', "gradle run"])

def run_loader():
   os.system('cd ../yacy_grid_loader')
   subprocess.call(['gnome-terminal', '-e', "gradle run"])

def run_crawler():
   os.system('cd ../yacy_grid_crawler')
   subprocess.call(['gnome-terminal', '-e', "gradle run"])

def run_parser():
   os.system('cd ../yacy_grid_parser')
   subprocess.call(['gnome-terminal', '-e', "gradle run"])


  • Runs all components of YaCy Grid in separate terminal.

Once user starts it, then he can start using YaCy Grid through terminal.

If a YaCy Grid service has used the MCP once, it learns from the MCP to connect to the infrastructure itself. For example:

  • a YaCy Grid service starts up and connects to the MCP
  • the Grid service pushes a message to the message queue using the MCP
  • the MCP fulfils the message send operation and response with the actual address of the message broker
  • the YaCy Grid service learns the direct connection information
  • whenever the YaCy Grid service wants to connect to the message broker again, it can do so using a direct broker connection. This process is done transparently, the Grid service does not need to handle such communication details itself. The routing is done automatically. To use the MCP inside other grid components the git submodule functionality is used.

Resources

Continue ReadingSetting up YaCy Grid locally

Fetching Images for RSS Responses in SUSI Web Chat

Initially, SUSI Web Chat rendered RSS action type responses like this:

The response from the server initially only contained

  • Title
  • Description
  • Link

We needed to improvise the web search & RSS results display and also add images for the results.

The web search & RSS results are now rendered as :

How was this implemented?

SUSI AI uses Yacy to fetchRSSs feeds. Firstly the server using the console process to return the RSS feeds from Yacy needs to be configured to return images too.

"yacy":{
  "example":"http://127.0.0.1:4000/susi/console.json?q=%22SELECT%20title,%20link%20FROM%20yacy%20WHERE%20query=%27java%27;%22",
  "url":"http://yacy.searchlab.eu/solr/select?wt=yjson&q=",
  "test":"java",
  "parser":"json",
  "path":"$.channels[0].items",
  "license":""
}

In a console process, we provide the URL needed to fetch data from, the query parameter needed to be passed to the URL and the path to look for the answer in the API response.

  • url = <url>   – the URL to the remote JSON service which will be used to retrieve information. It must contain a $query$ string.
  • test = <parameter> – the parameter that will replace the $query$ string inside the given URL. It is required to test the service.

Here the URL used is :

http://yacy.searchlab.eu/solr/select?wt=yjson&q=QUERY

To include images in RSS action responses, we need to parse the images also from the Yacy response. For this, we need to add `image` in the selection rule while calling the console process

"process":[
  {
    "type":"console",
    "expression":"SELECT title,description,link FROM yacy WHERE query='$1$';"
  }
]

Now the response from the server for RSS action type will also include `image` along with title, description, and link. An example response for the query `Google` :

{
  "title": "Terms of Service | Google Analytics \u2013 Google",
  "description": "Read Google Analytics terms of service.",
  "link": "http://www.google.com/analytics/terms/",
  "image":   "https://www.google.com/images/branding/googlelogo/1x/googlelogo_color_116x41dp.png",
}

However, the results at times, do not contain images because there are none stored in the index. This may happen if the result comes from p2p transmission within Yacy where no images are transmitted. So in cases where images are not returned by the server, we use the link preview service to preview the link and fetch the image.

The endpoint for previewing the link is :

BASE_URL+'/susi/linkPreview.json?url=URL'

On the client side, we first search the response for data objects with images in API actions. And the amongst the remaining data objects in answers[0].data, we preview the link to fetch image keeping a check on the count. This needs to be performed for processing the history cognitions too.To preview the remaining links in a loop, we cannot make ajax calls directly in a loop. To handle this, nested ajax calls are made using the function previewURLForImage() where we loop through the remaining links and on the success we decrement the count and call previewURLForImage() on the next link and on error we try previewURLForImage() on the next link without decrementing the count.

success: function (rssResponse) {
  if(rssResponse.accepted){
    respData.image = rssResponse.image;
    respData.descriptionShort = rssResponse.descriptionShort;
    receivedMessage.rssResults.push(respData);
  }
  if(receivedMessage.rssResults.length === count ||
    j === remainingDataIndices.length - 1){
    let message = ChatMessageUtils.getSUSIMessageData(receivedMessage, currentThreadID);
    ChatAppDispatcher.dispatch({
      type: ActionTypes.CREATE_SUSI_MESSAGE,
      message
    });
  }
  else{
    j+=1;
    previewURLForImage(receivedMessage,currentThreadID,
BASE_URL,data,count,remainingDataIndices,j);
  }
},

And we store the results as rssResults which are used in MessageListItems to fetch the data and render. The nested calling of previewURLForImage() ends when we have the required count of results or we have finished trying all links for previewing images. We then dispatch the message to the message store. We now improvise the UI. I used Material UI Cards to display the results and for the carousel like display, react-slick.

<Card className={cardClass} key={i} onClick={() => {
  window.open(tile.link,'_blank')
}}>
  {tile.image &&
    (
      <CardMedia>
        <img src={tile.image} alt="" className='card-img'/>
      </CardMedia>
    )
  }
  <CardTitle title={tile.title} titleStyle={titleStyle}/>
  <CardText>
    <div className='card-text'>{cardText}</div>
    <div className='card-url'>{urlDomain(tile.link)}</div>
  </CardText>
</Card>

We used the full width of the message section to display the results by not wrapping the result in message-list-item class. The entire card is hyperlinked to the link. Along with title and description, the URL info is also shown at the bottom right. To get the domain name from the link, urlDomain() function is used which makes use of the HTML anchor tag to get the domain info.

function urlDomain(data) {
  var a = document.createElement('a');
  a.href = data;
  return a.hostname;
}

To prevent stretching of images we use `object-fit: contain;` to make the images fit the image container and align it to the middle.

We finally have our RSS results with images and an improvised UI. The complete code can be found at SUSI WebChat Repo. Feel free to contribute

Resources
Continue ReadingFetching Images for RSS Responses in SUSI Web Chat

Implementation of Image Viewer in Susper

We have implemented image viewer in Susper similar to Google.

Before when a user clicks on a thumbnail the images are opened in a separate page, but we want to replace this with an image viewer similar to Google.

Implementation Logic:

1. Thumbnails for images in susper are arranged as shown in the above picture.

2. When a user clicks on an image a hidden empty div(image viewer) of the last image in a row is opened.

3. The clicked image is then rendered in the image viewer (hidden div of the last element in a row).

4. Again clicking on the same image closes the opened image viewer.

5. If a second image is clicked then, if an image is in the same row, it is rendered inside the same image viewer. else if the image is in another row, this closes the previous image viewer and renders the image in a new image viewer (hidden div of the last element of the row)

6. Since image viewer is strictly the hidden empty div of the last element in a row when it is expanded it occupies the position of the next row, moving them further down similar to what we want.

Implementation Code

results.component.html

<div *ngFor="let item of items;let i = index">
 <div class="item">
   <img src="{{item.link}}" height="200px" (click)="expandImage(i)" [ngClass]="'image'+i">
 </div>
 <div class=" item image-viewer" *ngIf="expand && expandedrow === i">
   <span class="helper"></span> <img [src]="items[expandedkey].link" height="200px" style="vertical-align: middle;">
 </div>

</div>

Each thumbnail image will have a <div class=” item image-viewer” which is in hidden state initially.

Whenever a user clicks on a thumbnail that triggers expandImage(i)

results.component.ts

expandImage(key) {
 if (key === this.expandedkey    this.expand === false) {
   this.expand = !this.expand;
 }
 this.expandedkey = key;
 let i = key;
 let previouselementleft = 0;
 while ( $('.image' + i) && $('.image' + i).offset().left > previouselementleft) {
   this.expandedrow = i;
   previouselementleft = $('.image' + i).offset().left;
   i = i + 1;

The expandImage() function takes the unique key and finds which image is the last element is the last image in the whole row, and on finding the last image, expands the image viewer of the last element and renders the selected image in the image viewer.

The source code for the whole implementation of image viewer could be seen at pull: https://github.com/fossasia/susper.com/pull/687/files

Resources:

  1. Selecting elements in Jquery: https://learn.jquery.com/using-jquery-core/selecting-elements/


Continue ReadingImplementation of Image Viewer in Susper

Creating A Dockerfile For Yacy Grid MCP

The YaCy Grid is the second-generation implementation of YaCy, a peer-to-peer search engine. A YaCy Grid installation consists of a set of micro-services which communicate with each other using a common infrastructure for data persistence. The task was to deploy the second-generation of YaCy Grid. To do so, we first had created a Dockerfile. This dockerfile should start the micro services such as rabbitmq, Apache ftp and elasticsearch in one docker instance along with MCP. The microservices perform following tasks:

  • Apache ftp server for asset storage.
  • RabbitMQ message queues for the message system.
  • Elasticsearch for database operations.

To launch these microservices using Dockerfile, we referred to following documentations regarding running these services locally: https://github.com/yacy/yacy_grid_mcp/blob/master/README.md

For creating a Dockerfile we proceeded as follows:

FROM ubuntu:latest
MAINTAINER Harshit Prasad# Update
RUN apt-get update
RUN apt-get upgrade -y# add packages
# install jdk package for java
RUN apt-get install -y git openjdk-8-jdk

#install gradle required for build
RUN apt-get update && apt-get install -y software-properties-common
RUN add-apt-repository ppa:cwchien/gradle
RUN apt-get update
RUN apt-get install -y wget
RUN wget https://services.gradle.org/distributions/gradle-3.4.1-bin.zip
RUN mkdir /opt/gradle
RUN apt-get install -y unzip
RUN unzip -d /opt/gradle gradle-3.4.1-bin.zip
RUN PATH=$PATH:/opt/gradle/gradle-3.4.1/bin
ENV GRADLE_HOME=/opt/gradle/gradle-3.4.1
ENV PATH=$PATH:$GRADLE_HOME/bin
RUN gradle -v

# install apache ftp server 1.1.0
RUN wget http://www-eu.apache.org/dist/mina/ftpserver/1.1.0/dist/apache-ftpserver-1.1.0.tar.gz
RUN tar xfz apache-ftpserver-1.1.0.tar.gz

# install RabbitMQ server
RUN wget https://www.rabbitmq.com/releases/rabbitmq-server/v3.6.6/rabbitmq-server-generic-unix-3.6.6.tar.xz
RUN tar xf rabbitmq-server-generic-unix-3.6.6.tar.xz

# install erlang language for RabbitMQ
RUN apt-get install -y erlang

# install elasticsearch
RUN wget https://artifacts.elastic.co/downloads/elasticsearch/elasticsearch-5.5.0.tar.gz
RUN sha1sum elasticsearch-5.5.0.tar.gz
RUN tar -xzf elasticsearch-5.5.0.tar.gz

# clone yacy_grid_mcp repository
RUN git clone https://github.com/nikhilrayaprolu/yacy_grid_mcp.git
WORKDIR /yacy_grid_mcp

RUN cat docker/configftp.properties > ../apacheftpserver1.1.0/res/conf/users.properties

# compile
RUN gradle build
RUN mkdir data/mcp-8100/conf/ -p
RUN cp docker/config-mcp.properties data/mcp-8100/conf/config.properties
RUN chmod +x ./docker/start.sh

# Expose web interface ports
# 2121: ftp, a FTP server to be used for mass data / file storage
# 5672: rabbitmq, a rabbitmq message queue server to be used for global messages, queues and stacks
# 9300: elastic, an elasticsearch server or main cluster address for global database storage
EXPOSE 2121 5672 9300 9200 15672 8100

# Define default command.
ENTRYPOINT [“/bin/bash”, “./docker/start.sh”]


We have created a start.sh file to start RabbitMQ and Apache FTP services. At the end, for compilation gradle run will be executed.

adduser –disabled-password –gecos ” r
adduser r sudo
echo ‘%sudo ALL=(ALL) NOPASSWD:ALL’ >> /etc/sudoers
chmod a+rwx /elasticsearch-5.5.0 -R
su -m r -c ‘/elasticsearch-5.5.0/bin/elasticsearch -Ecluster.name=yacygrid &’
cd /apacheftpserver1.1.0
./bin/ftpd.sh res/conf/ftpdtypical.xml &
/rabbitmq_server-3.6.6/sbin/rabbitmq-server -detached
sleep 5s;
/rabbitmq_server-3.6.6/sbin/rabbitmq-plugins enable rabbitmq_management
/rabbitmq_server3.6.6/sbin/rabbitmqctl add_user yacygrid password4account
echo [{rabbit, [{loopback_users, []}]}]. >> /rabbitmq_server-3.6.6/etc/rabbitmq/rabbitmq.config
/rabbitmq_server-3.6.6/sbin/rabbitmqctl set_permissions -p / yacygrid “.*” “.*” “.*”
cd /yacy_grid_mcp
sleep 5s;
gradle run


start.sh will first add username and then password. Then it will start RabbitMQ along with Apache FTP.  For username and password, we have created a separate files to configure their properties during Docker run which can be found here:

The logic behind running all the microservices in one docker instance was: creating each container for microservice and then link those containers with the help of docker-compose.yml file.

The Dockerfile which we have created was corresponding to one image. Another image was elasticsearch which was linked to this Dockerfile. The latest version of elasticsearch image was already available on their site: https://www.elastic.co/guide/en/elasticsearch/reference/current/docker.html

We configured the docker-compose.yml file according to the reference link provided above. The docker-compose file can be found here: https://github.com/yacy/yacy_grid_mcp/blob/master/docker/docker-compose.yml

The source code for the implementation of whole structure can be found here: https://github.com/yacy/yacy_grid_mcp/tree/master/docker

Resources


Continue ReadingCreating A Dockerfile For Yacy Grid MCP

Implementation of Statistic Infobox for Susper

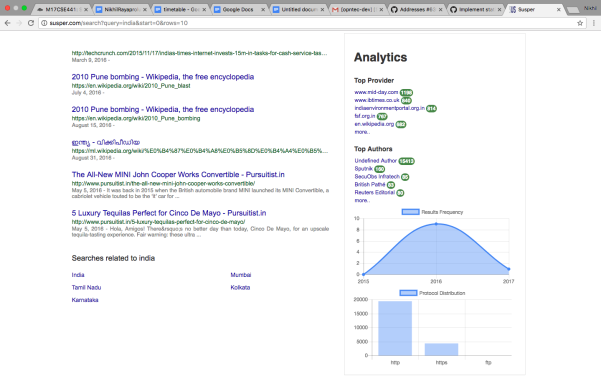
In Susper, we have implemented a statistic infobox to show analytics regarding Top authors, Top Providers and distribution regarding protocols and Results frequency by year.

Yacy also offers additional information for infoboxes such as files types, provider and authors. Using that information which we receive along with results we have implemented the infobox.

Implementation of Infobox:

1. For the distribution graphs, we have used angular library for chart.js https://www.npmjs.com/package/ng2-charts

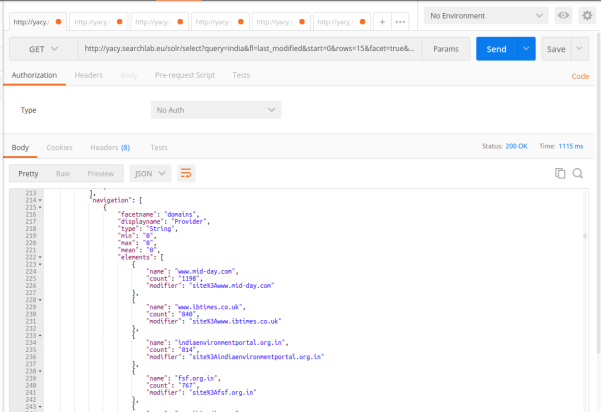
2. We receive required statistics of each facet name from Yacy using the yacy search endpoint

http://yacy.searchlab.eu/solr/select?query=india&fl=last_modified&start=0&rows=15&facet=true&facet.mincount=1&facet.field=host_s&facet.field=url_protocol_s&facet.field=author_sxt&facet.field=collection_sxt&wt=yjson

Screenshot from 2017-08-15 14-10-30.png

Screenshot from 2017-08-15 14-10-16.png

We have created a statbox component to display the data related to statistic infobox at https://github.com/fossasia/susper.com/tree/master/src/app/statsbox

It takes care about rendering the statistic infobox and styling it.

Statsbox.component.ts

this.navigation$.subscribe(navigation => {
   for (let nav of navigation) {
     if (nav.displayname === 'Protocol') {
       let data = [];
       let datalabels = [];
       for (let element of nav.elements){
           datalabels.push(element.name);
           data.push(parseInt(element.count, 10));
         }
       this.barChartData[0].data = data;
       this.barChartLabels = datalabels;

     }
   }
 });
});

navigation observable gives us the latest statistics information received from the yacy and we subscribe to it and update the component variables accordingly for displaying the data.

Later these values are used by statsbox.component.html to display the statsbox.

The whole implementation of this feature can be found at pull: https://github.com/fossasia/susper.com/pull/704/

References:

1.Using Postman for analysing an API Endpoint: https://www.getpostman.com/docs

2.Using ngrx store: https://github.com/ngrx/store

Continue ReadingImplementation of Statistic Infobox for Susper

Continuous Integration and Deployment of Yacy Grid

We have deployed Yacy Grid on Google cloud recently, and we have achieved this using kubernetes and Travis for auto deployment.

How we have deployed it:

Firstly, it is advised to have different containers for each service your application requires, and follow a multi container architecture. Using multi container architecture you can allocate fixed size of power to each application and also replicate individual services, whichever is required. Presently, Yacy has two main applications which are required to be deployed in separate containers – Yacy_grid_mcp and ElasticSearch.

We took the official kubernetes YAML files of ElasticSearch and followed the instructions at https://github.com/kubernetes/examples/blob/master/staging/elasticsearch/README.md for deployment of elastic search on the google cloud.

With this we are able to run pods, volumes required for elastic search and services for connecting Yacy with elastic search.

The pull request regarding deployment of separate elasticsearch component is at https://github.com/yacy/yacy_grid_mcp/pull/27/files

Below figure shows different services and external endpoints present pods use for elastic search.

Now elastic search can be accessed at 35.202.154.219:9300 and http://35.193.124.253:9200/

Continuous deployment of Yacy_grid_mcp:

Please make sure that you have created a cluster on google container engine for deploying our containers on it. Regarding starting a project and cluster please read https://cloud.google.com/container-engine/docs/

1.Initially, Travis.yml initiates and sets up the required environment for Yacy deployment by installing Google cloud cli and kubectl components.

Source code regarding the Travis setup could be found at https://github.com/yacy/yacy_grid_mcp/blob/master/.travis.yml

2.Later Travis runs the depoy_staging.sh file, which builds the docker image of yacy o the present build and pushes it to hub.docker.com

if [ "$TRAVIS_PULL_REQUEST" != "false" -o "$TRAVIS_BRANCH" != "$SOURCE_BRANCH" ]; then
    echo "Skipping deploy; The request or commit is not on master"
    exit 0
fi

set -e

docker build -t nikhilrayaprolu/yacygridmcp:$TRAVIS_COMMIT ./docker
docker login -u="$DOCKER_USERNAME" -p="$DOCKER_PASSWORD"
docker tag nikhilrayaprolu/yacygridmcp:$TRAVIS_COMMIT nikhilrayaprolu/yacygridmcp:latest
docker push nikhilrayaprolu/yacygridmcp

Later with service key, we authenticate with google cloud and set the required environments and variables

echo $GCLOUD_SERVICE   base64 --decode -i > ${HOME}/gcloud-service-key.json
gcloud auth activate-service-account --key-file ${HOME}/gcloud-service-key.json

gcloud --quiet config set project $PROJECT_NAME_STG
gcloud --quiet config set container/cluster $CLUSTER_NAME_STG
gcloud --quiet config set compute/zone ${CLOUDSDK_COMPUTE_ZONE}
gcloud --quiet container clusters get-credentials $CLUSTER_NAME_STG

And Later we push the docker image built to google cloud and deploy it

kubectl config view
kubectl config current-context

kubectl set image deployment/${KUBE_DEPLOYMENT_NAME} ${KUBE_DEPLOYMENT_CONTAINER_NAME}=nikhilrayaprolu/yacygridmcp:$TRAVIS_COMMIT

Presently Yacy runs on 5vCPUs

With the following pods and services:

Also one can use kubectl cli for getting information regarding the cluster and pods as shown below

Pull request regarding deployment of yacy on google cloud is available at: https://github.com/yacy/yacy_grid_mcp/pull/16/files

References:

1.A Medium Blog on CD to Google Container: https://medium.com/google-cloud/continuous-delivery-in-a-microservice-infrastructure-with-google-container-engine-docker-and-fb9772e81da7

2.Another Blog on CD to Google Container: https://engineering.hexacta.com/automatic-deployment-of-multiple-docker-containers-to-google-container-engine-using-travis-e5d9e191d5ad

3.Deploying ElasticSearch to Cloud using Kubernetes: https://github.com/kubernetes/examples/blob/master/staging/elasticsearch/README.md

Continue Reading

Implementing Sort By Date Feature In Susper


Susper has been given ‘Sort By Date’ feature which provides the user with latest results with the latest date. This feature enhances the search experience and helps users to find desired results more accurately. The sorting of results date wise is done by yacy backend which uses Apache Solr technology.

The idea was to create a ‘Sort By Date’ feature similar to the market leader. For example, if a user searches for keyword ‘Jaipur’ then results appear to be like this:

If a user wishes to get latest results, they can use ‘Sort By Date’ feature provided under ‘Tools’.

The above screenshot shows the sorted results.

You may however notice that results are not arranged year wise. Currently, the backend work for this is being going on Yacy and soon will be implemented on the frontend as well once backend provide us this feature.

Under ‘Tools’ we created an option for ‘Sort By Date’ simply using <li> tag.

<ul class=dropdownmenu>
  <li (click)=filterByDate()>Sort By Date</li>
</ul>

When clicked, it calls filterByDate() function to perform the following task:

filterByDate() {
  let urldata = Object.assign({}, this.searchdata);
  urldata.query = urldata.query.replace(/date, “”);
  this.store.dispatch(new queryactions.QueryServerAction(urldata));
}
Earlier we were using ‘last_modified desc’ attribute provided by Solr for sorting out dates in descending order. In June 2017, this feature was deprecated with a new update of Solr. We are using /date attribute in query for sorting out results which is being provided by Solr.


Continue ReadingImplementing Sort By Date Feature In Susper

Deploying Yacy with Docker on Different Cloud Platforms

To make deploying of yacy easier we are now supporting Docker based installation.

Following the steps below one could successfully run Yacy on docker.

  1. You can pull the image of Yacy from https://hub.docker.com/r/nikhilrayaprolu/yacygridmcp/ or buid it on your own with the docker file present at https://github.com/yacy/yacy_grid_mcp/blob/master/docker/Dockerfile

One could pull the docker image using command:

docker pull nikhilrayaprolu/yacygridmcp


2) Once you have an image of yacygridmcp you can run it by typing

docker run <image_name>


You can access the yacygridmcp endpoint at localhost:8100

Installation of Yacy on cloud servers:

Installing Yacy and all microservices with just one command:

  • One can also download,build and run Yacy and all its microservices (presently supported are yacy_grid_crawler, yacy_grid_loader, yacy_grid_ui, yacy_grid_parser, and yacy_grid_mcp )
  • To build all these microservices in one command, run this bash script productiondeployment.sh
    • `bash productiondeployment.sh build` will install all required dependencies and build microservices by cloning them from github repositories.
    • `bash productiondeployment.sh run` will run all services and starts them.
    • Right now all repositories are cloned into ~/yacy and you can make customisations and your own changes to this code and build your own customised yacy.

The related PRs of this work are https://github.com/yacy/yacy_grid_mcp/pull/21 and https://github.com/yacy/yacy_grid_mcp/pull/20 and https://github.com/yacy/yacy_grid_mcp/pull/13

Resources:

Continue ReadingDeploying Yacy with Docker on Different Cloud Platforms