New Tools and Sensors for FOSSASIA PSLab and ExpEYES

ExpEYES: Open Source Science Lab’ is a project FOSSASIA is supporting since 2014. As a part of GSoC-14 and GSoC-15 we started actively developing Pocket Science Lab for open science education. The objective is to make create the most affordable open source pocket lab which can help millions of students and citizen scientists all over the world to  learn science by exploring and experimenting.

We are currently working on  adding new tools/sensors and also  developing a new lab interface with higher capabilities to be added to FOSSASIA Science Lab. My goal for this year’s project is to add new experiments to the ExpEYES library. I also started working on new lab interface.

Here is my kitchen converted to a work space, my GSoC Lab:)

Linear Air track for mechanics experiments, super-critical dryer which uses PSLab for temperature control and monitoring with other instruments.

In the month of May-16, I spent few days at IUAC – Inter University Accelerator Centre, New Delhi, to work with Dr. Ajith Kumar ( Inventor of Expeyes). The time spent at IUAC was most useful as we got help and inputs from many people at IUAC and also the participant teachers of ExpEYES training programme. We designed some new experiments to be done with ExpEYES. Planned improvements in Mechanics experiments especially the experiments on linear air track. We also started working on the new lab interface. Thanks to Jithin B.P. for helping us out with all the development. With the continuous collective efforts now we have a new lab interface. “PSLab: Pocket Science Lab from FOSSASIA”. Here I am trying to give all the details of the equipment and the development done so far and the things planned for next couple of months.


PSLab: Pocket Science Lab from FOSSASIA

Size of PSLab is 62mmx78mmx13mm. The front panel will be slightly different than the one in the picture. It will have little extra portion in the top right corner to accommodative 90 degree connector pins. something like this.pslab
We will finalize the front panel design in a week and get the panels screen printed. The sample kits will be sent to my mentors for testing and suggestions.)

Main Features and GUI’s

PSLab can function like an oscilloscope, data logger, waveform generator, frequency counter, programmable voltage source etc. It can be plugged in to USB port of PC or SBC’s like Raspberry Pi. PSLab has:

  • 2 variable sine waves
  • 4 programmable  square wave generators
  • 3 programmable voltage sources
  • Programmable constant current source
  • 4 channels for fetching data
  • Sensor input
  • Berg Strip sockets  etc…

We are also working on to add wireless sensor interface. This will enable PSLab in accessing various sensors using a wireless module.

PSLab Code repository , Installation and Communicating with PSLab

All the programs are written in Python. PyQt is used for GUI designing and Pyqtgraph is used for plotting library. I have created two repositories  for PSLab

  • https://github.com/fossasia/pslab-apps: GUI programs and templates for various experiments. (Depends on python-pyqtgraph (>=0.9.10), python-qt4 (>=4.10), ipython(>=1.2), ipython-qtconsole(>=1.2)

In addition to the above development work we also conducted a few demonstration sessions in science and engineering colleges at Belgaum, India. The feedback from teachers and students in improving the kit  is really helpful in modifying the GUI’s for better user experience.

Next Steps/To Do

  • Add new experiments to PSLab
  • Complete Voltammetry module for ExpEYES
  • Complete Unified GUI for all  Mechanics Experiments using ExpEYES
  • Documentation for PSLab

We are  getting about 25 PSLab  kits ready in the first batch by the end of this month. Thanks to funding from GSoC-15.) Need to work on the PSL@FOSSASIA website. Next immediate plan is to get about 50-100 kits ready and update the website with all the information and user manuals before FOSSASIA-17. I am also working on a plan to reach-out to  maximum number of science and engineering students who will definitely get benefit from PSLab.)

Continue ReadingNew Tools and Sensors for FOSSASIA PSLab and ExpEYES

Working with Absolute Positioning

During the past week, I have done a lot of work for making the feature that allow the users to view the schedule of events according to track and time. The toughest part was to have a headstart to think of the mockup that fulfills this criterion.

After the mockup, I started coding it and realized that I have to add CSS by using Javascript. The frontend needs to calculate the top of each pop-up that appears when the track is hovered and to append the box just below it.

a

The interesting part was to calculate the top each time the element is hovered and to place the box at the right position by using jQuery.

Position Absolute 

The difficulty becomes maximum when we use “position : absolute “. As, it takes the element out of the layer. The element with absolute positioning is difficult to handle when it comes to responsiveness. Here also the pop-overs showing the speakers are to be made with absolute positioning.

The code snippet shows the calculation for exact position of the pop-up box.

$(document).ready(function(){

 $('.pop-box').hide();
 $('.item').hover(function (event) {

 event.preventDefault();
 event.stopPropagation();
 var track = $(event.target);
 var link = track.children(0);
 var offset =$(link).offset();

 var position= offset.top-link.height()-30;
 if( $(window).width()<600){
 var position= offset.top-link.height()-48; 
 }
 if(offset.top){
 
 $('.pop-box').hide();
 var p=$(this);
 $(p).next().show();
 var posY = event.pageY;
 nextOfpop=$(p).next();
 
 var toptrack = position ;

 $(nextOfpop).css({'top':toptrack
                 });

 $(document).mouseup(function (e)
 {
 var container = $(".pop-box");

  if (!container.is(e.target) 
  && container.has(e.target).length === 0 && (e.target)!=$('html').get(0)) 
   {
   container.hide();
   }
   });
  });
 })

This code sets the value of top of the pop-over in the variable position and copy it to toptrack that is passed to CSS to adjust the top dynamically.

Responsiveness for top

I was struggling a whole day to find out the best possible way for the responsiveness of track page. Obviously, the difficult part was the recalculation of top with the screen-size. Currently I have used $window.width() to check the width of screen and adjust the top on mobile. But, it will include more complexity when it is done for other screen sizes rather than mobile.

 if( $(window).width()<600){
 var position= offset.top-link.height()-48; 
 }

The tracks page is ready now with both light and dark theme.

10.png

That’s how the position absolute is handled with jQuery. To remove the complexity, all the CSS except the calculation of top is written with SASS.

Continue ReadingWorking with Absolute Positioning

Adding Notifications, Volunteer Shifts and DB Export in Engelsystem

Admin can change the display message in registration form

The present system doesn’t allow to change the display message in register form. When the system is used for different events it would be useful if the admin is able to change the display message in registration form . I have added feature were admin can change the display message

settings page

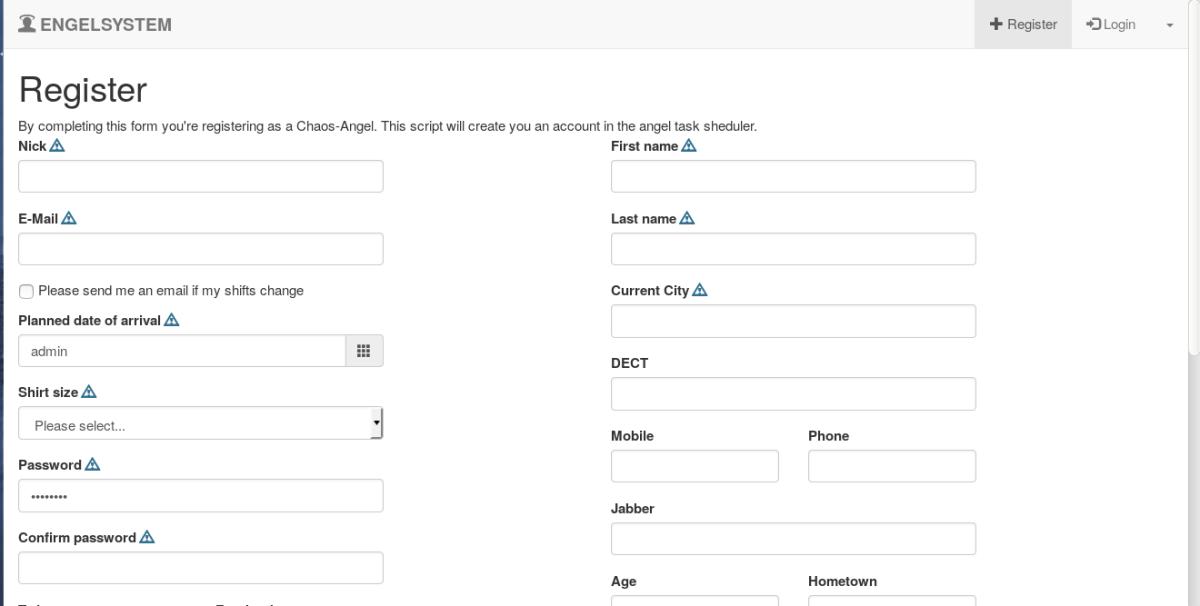
By changing the message in the message box admin can change the display message.Now the message looks like this.

register page

Implementation of changing display message.

Adding display_msg field to User Table so that the display_msg can be accessed through the database any where through the code and can be changed easily

ALTER TABLE `User` 
   ADD `display_msg` varchar(255) DEFAULT "By completing this form you're registering as a Chaos-Angel. This script will create you an account in the angel task scheduler.";

Next step is to update the field whenever it is changed by admin

sql_query("UPDATE `User` SET `display_msg`='" . sql_escape($display_message) . "' WHERE  `UID`='" . sql_escape($user['UID']) . "'");

Copy/ Duplicate function for creating new shifts from existing shifts

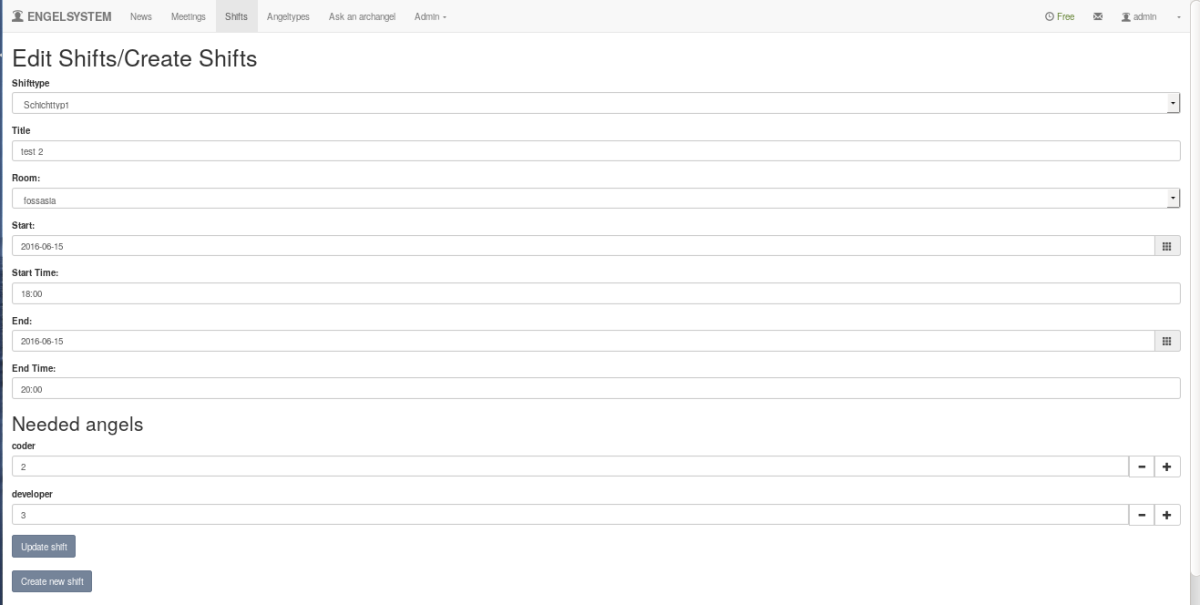
The present system doesn’t allow admin to edit an existing shift and create a new shift from the existing data of already created shifts . I have created a copy shift option where admin can edit the shift and create a new shift

create new shifts

In this page admin can create new shift or update the existing shift . Admin can change the date , time , no of angels etc as admin used to create shifts.

Implementation of copy shifts function

Once the admin selects create new shifts button , we need to use the same data so we need to store the values in variables. once admin selects the option we need to do all the error handling and create new shifts .

    if (isset($_REQUEST['shifttype_id'])) {
      $shifttype = ShiftType($_REQUEST['shifttype_id']);
      if ($shifttype === false)
        engelsystem_error('Unable to load shift type.');
      if ($shifttype == null) {
        $ok = false;
        error(_('Please select a shift type.'));
      } else
        $shifttype_id = $_REQUEST['shifttype_id'];
    } else {
      $ok = false;
      error(_('Please select a shift type.'));
    }
    
    $title = strip_request_item('title');
    // check for errors
    if (isset($_REQUEST['rid']) && preg_match("/^[0-9]+$/", 
    $_REQUEST['rid']) && isset($room_array[$_REQUEST['rid']]))
      $rid = $_REQUEST['rid'];
    else {
      $ok = false;
      $rid = $rooms[0]['RID'];
      error(_('Please select a location.'));
    }
    
    if (isset($_REQUEST['start']) && $tmp = 
    DateTime::createFromFormat("Y-m-d", trim($_REQUEST['start'])))
      $start = $tmp->getTimestamp();
    else {
      $ok = false;
      error(_('Please select a start date.'));
    }
    
    if (isset($_REQUEST['end']) && 
    $tmp = DateTime::createFromFormat("Y-m-d", trim($_REQUEST['end'])))
      $end = $tmp->getTimestamp();
    else {
      $ok = false;
      error(_('Please select an end date.'));
    }

    if (isset($_REQUEST['start_time']) &&
  $tmp = DateTime::createFromFormat("H:i", trim($_REQUEST['start_time'])))
      $start_time = $tmp->getTimestamp();
    else {
      $ok = false;
      error(_('Please select an start time.'));
    }

    if (isset($_REQUEST['end_time']) && 
    $tmp = DateTime::createFromFormat("H:i", trim($_REQUEST['end_time'])))
      $end_time = $tmp->getTimestamp();
    else {
      $ok = false;
      error(_('Please select an end time.'));
    }
    
    if (strtotime($_REQUEST['start']) > strtotime($_REQUEST['end'])) {
      $ok = false;
      error(_('The shifts end has to be after its start.'));
    }
    if (strtotime($_REQUEST['start']) == strtotime($_REQUEST['end'])) {
      if (strtotime($_REQUEST['start_time']) > 
                                     strtotime($_REQUEST['end_time'])) {
        $ok = false;
        error(_('The shifts end time  has to be after its start time.'));
      }
    }
    if (strtotime($_REQUEST['start']) == strtotime($_REQUEST['end'])) {
      if (strtotime($_REQUEST['start_time']) == 
                                 strtotime($_REQUEST['end_time'])) {
        $ok = false;
        error(_('The shifts start and end at same time.'));
      }
    }
    $angelmode = 'manually';
    foreach ($types as $type) {
      if (isset($_REQUEST['type_' . $type['id']]) && 
      preg_match("/^[0-9]+$/", trim($_REQUEST['type_' . $type['id']]))) {
        $needed_angel_types[$type['id']] = 
                       trim($_REQUEST['type_' . $type['id']]);
      } else {
        $ok = false;
        error(sprintf(_('Please check the needed angels for team %s.'), 
                                              $type['name']));
      }
    }
    if (array_sum($needed_angel_types) == 0) {
      $ok = false;
      error(_('There are 0 angels needed. 
                         Please enter the amounts of needed angels.'));
    }
    if (isset($_REQUEST['back']))
      $ok = false;

    if ($ok) {
      $shifts = array();
      $start = DateTime::createFromFormat("Y-m-d H:i",
                    date("Y-m-d", $start) . date("H:i", $start_time));
      $start = $start->getTimestamp();
      $end = DateTime::createFromFormat("Y-m-d H:i", 
                        date("Y-m-d", $end) . date("H:i", $end_time));
      $end = $end->getTimestamp();  
      $shifts[] = array(
          'start' => $start,
          'end' => $end,
          'RID' => $rid,
          'title' => $title,
          'shifttype_id' => $shifttype_id   
        );
      $shifts_table = array();
      foreach ($shifts as $shift) {
      $shifts_table_entry = [
          'timeslot' => '<span class="glyphicon glyphicon-time"></span> ' . 
date("Y-m-d H:i", $shift['start']) . ' - ' . date("H:i", $shift['end']) . 
'<br />' . Room_name_render(Room($shift['RID'])),
          'title' => ShiftType_name_render(ShiftType($shifttype_id)) . 
           ($shift['title'] ? '<br />' . $shift['title'] : ''),
            'needed_angels' => '' 
        ];
        foreach ($types as $type)
          if (isset($needed_angel_types[$type['id']]) 
          && $needed_angel_types[$type['id']] > 0)
            $shifts_table_entry['needed_angels'] .= '<b>' . 
AngelType_name_render($type) . ':</b> ' . $needed_angel_types[$type['id']]. '<br />';
        
        $shifts_table[] = $shifts_table_entry;
      }

Display shifts in map view .

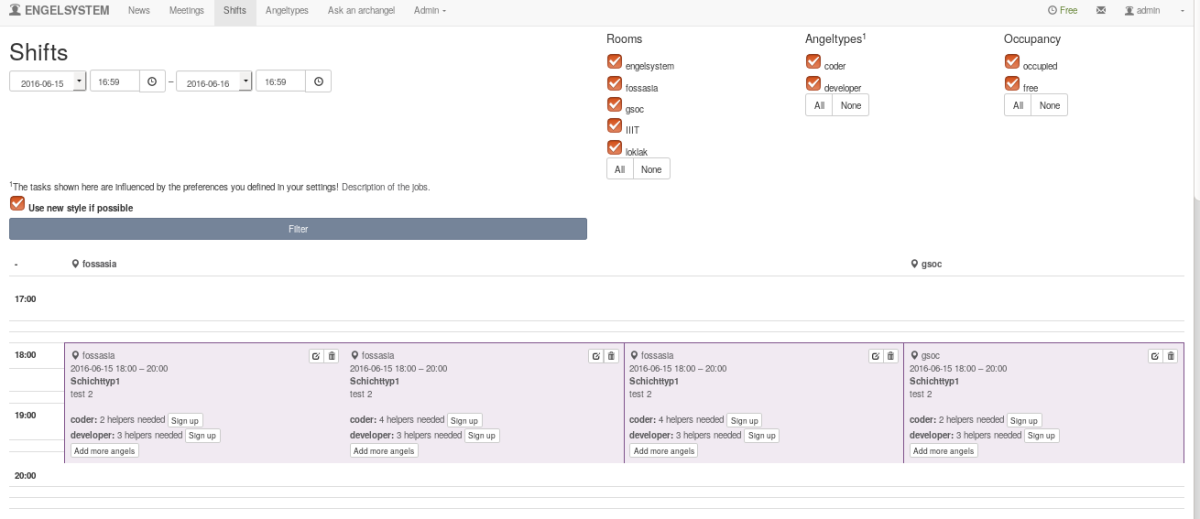
Map view makes the user/admin easy to view the shifts and easy to sign-up for shifts.Initially was not able to view the shifts but now the shifts can be viewed in both map view and normal view

shifts view

Implementation of map view .

Map view is very nice way of representing events with dates on Y – axis and rooms on X-axis. We need to make blocks and map the key

$_SESSION['user_shifts'][$key] = array_map('get_ids_from_array', $$key);

Here we map the ids and keys and then we need to print the keys against the id’s

Exporting database of user

In a system like this . It would be better if we could get all the user data who want to volunteer so that they can be contacted for other events also.

export database

Here is the code which can be useful for exporting database of any mysql database

function export_xls(){
// filename
$xls_filename = 'export_'.date('Y-m-d').'.xls'; // Define Excel (.xls) file name
// selecting the table user
$sql = "SELECT * FROM `User`";
//enter your mysql root password here
$Connect = @mysql_connect("localhost", "root", "") or die("Failed to connect to MySQL.You need to enter the password:<br />" . mysql_error() . "<br />" . mysql_errno());
// Select database
$Db = @mysql_select_db($databasename, $Connect) or die("Failed to select database:<br />" . mysql_error(). "<br />" . mysql_errno());
// Execute query
$result = @mysql_query($sql,$Connect) or die("Failed to execute query:<br />" . mysql_error(). "<br />" . mysql_errno());

// Header info settings
header("Content-Type: application/xls");
header("Content-Disposition: attachment; filename=$xls_filename");
header("Pragma: no-cache");
header("Expires: 0");
 
// Define separator (defines columns in excel &amp; tabs in word)
$separator = "\t";
 
// Start of printing column names as names of MySQL fields
for ($i = 0 ; $i < mysql_num_fields($result) ; $i++) {
  echo mysql_field_name($result, $i) . "\t";
}
print("\n");
 
// Start while loop to get data
while($row = mysql_fetch_row($result))
{
  $schema= "";
  for( $j=0 ; $j < mysql_num_fields($result) ; $j++)
  {
    
    if(!isset($row[$j])) {
      $schema .= "NULL".$separator;
    }
    elseif ($row[$j] != "") {
      $schema .= "$row[$j]".$separator;
    }
    else {
      $schema .= "".$separator;
    }
  }
  $schema = str_replace($seperator."$", "", $schema);
  $schema = preg_replace("/\r\n|\n\r|\n|\r/", " ", $schema);
  $schema.= "\t";
  print(trim($schema));
  print "\n";
}
}

Coding standards

Coding standards are a set of guidelines, best practices, programming styles and conventions that developers adhere to when writing source code for a project. All big software companies have them.

For our system we use drupal coding standards.

Development: https://github.com/fossasia/engelsystem

Issues/Bugs:Issues

Continue ReadingAdding Notifications, Volunteer Shifts and DB Export in Engelsystem

Migrations make us crazy!

Our Open Event team is not small, so problems with migrations occur very often. I’d like to describe how to solve these common problems and avoid Contributors frustration. Because more of us didn’t know how to solve this problems at the beginning so we wasted a lot of time to find a source of problem.

The most common mistake is that we forget run migration on Heroku. Developer is sometimes surprised because something works for him but he forgets to run migration on server. These small mistakes lead to huge problems and at that time our app throws a lots of bugs related to database. We can often see “Internal server error”.Screen Shot 2016-06-17 at 22.55.25.png So if developer changes table he has to run migration!

vagrant@vagrant-ubuntu-trusty-64:/vagrant$ python manage.py db migrate

But above command Quite often doesn’t solve our problem, because We face other problems while updating DB for example

alembic.util.exc.CommandError: Multiple head revisions are present for given argument ‘head’; please specify a specific target revision, ‘<branchname>@head’ to narrow to a specific head, or ‘heads’ for all heads

this problem is caused by two developers which push code to Github with migrations without merging two heads to achieve one head.

So to solve this problem you only have to know ids of two heads

vagrant@vagrant-ubuntu-trusty-64:/vagrant$ python manage.py db heads

e38935822969 (head)
f55fde3d62b1 (head)

Then you have to merge it

vagrant@vagrant-ubuntu-trusty-64:/vagrant$ python manage.py db merge e38935822969 f55fde3d62b1

Generating /vagrant/migrations/versions/ecb671d1eb4b_.py … done

Upgrade DB

vagrant@vagrant-ubuntu-trusty-64:/vagrant$ python manage.py db upgrade

INFO [alembic.runtime.migration] Context impl PostgresqlImpl.
INFO [alembic.runtime.migration] Will assume transactional DDL.
INFO [alembic.runtime.migration] Running upgrade 00ea66754d06 -> d84f976530e1, empty message
INFO [alembic.runtime.migration] Running upgrade d84f976530e1 -> 1b3e4f5f56bd, empty message
INFO [alembic.runtime.migration] Running upgrade 1b3e4f5f56bd -> e38935822969, empty message
INFO [alembic.runtime.migration] Running upgrade e38935822969, f55fde3d62b1 -> ecb671d1eb4b, empty message

And finally run migrations

vagrant@vagrant-ubuntu-trusty-64:/vagrant$ python manage.py db migrate
INFO [alembic.runtime.migration] Context impl PostgresqlImpl.
INFO [alembic.runtime.migration] Will assume transactional DDL.
INFO [alembic.ddl.postgresql] Detected sequence named ‘role_id_seq’ as owned by integer column ‘role(id)’, assuming SERIAL and omitting
INFO [alembic.ddl.postgresql] Detected sequence named ‘microlocation_id_seq’ as owned by integer column ‘microlocation(id)’, assuming SERIAL and omitting….

Continue ReadingMigrations make us crazy!

Increasing utility of sTeam tools

(ˢᵒᶜⁱᵉᵗʸserver) aims to be a platform for developing collaborative applications.
sTeam server project repository: sTeam.

User Utils

User  convenience is an important aspect for any application to succeed. The sTeam root user should be able to create or delete a user. A command to add / delete a user was added successfully.

The root user should be able to add new user’s using the command line.
The parameter’s like username, password, email-id etc. should be asked and then the user should be created.

Issue. Github Issue Github PR
Create a user. Issue-58 PR-59
Delete an object Issue-56 PR-57
Delete a user. Issue-69 PR-70

To create a new user:

create_user username password email

The current users can be found by running the command

 _Server->get_module("users")->get_users();

Similarly a command to delete the user was added to the steam-shell.

The user should be able to delete the objects created/existing inside the user area. A steam-shell command needs to be added to delete the objects from the command line.

The usage of command to delete a user inside steam-shell.pike. Only the root user can delete other user.
Command:

delete_user username

UserActivities
In order to delete an object which can be a container, document or a room in the current steam directory, run the command;

delete test.pike

The object would be deleted.

Tab-Completion Module

The tab completion module of the sTeam shell was analyzed during this period. The tab completion module has an issue whereby it doesn’t lists the options on pressing the tab after  ".

query_attribute("

After pressing the tab after ” the options should be listed. But this is not the case. The bug needs to be resolved.

Tab_completion

Import from git script

The import to git script can now import a single file into the sTeam directory.

The feature for this was added.

Issue. Github Issue Github PR
Add utility to support single import in import-from-git script . Issue-16 PR-76
sudo ./import-from-git.pike gitfolder/xyz.mp3 /home/sTeam/

The xyz.mp3 would be imported to the sTeam directory.

Import-script

The future work would include resolving the tab_completion module issues and enhancing the import script to support the feature where by a user would be able to specify the name of the file in the sTeam directory.

Checkout the FOSSASIA Idea’s page for more information on projects supported by FOSSASIA.

Continue ReadingIncreasing utility of sTeam tools

Implementing TLS in pike

My next task was an enhancement. The command line client for sTeam was not using any kind of encryption and all the data sent over a network was in clear text. Now this was a little different from normal tasks because,

1. TLS had to be implemented in Pike.

2. TLS was to be implemented over COAL.

COAL is a home grown protocol specially for sTeam. My mentor Martin helped me to go about this task. He taught me how to break a task into small ones. I began with writing an SSL client in pike that can interact with an https server. It turned out pike has an SSL module that just made the task very simple. I had to understand how SSL works however pike made the task quite easy. I also received constant help from the pike mailing list where people actively guided me in the right direction.

Once I was done with the SSL client I approached the actual problem. I had to understand the functioning of COAL and narrow down the particular files involved. I had to wrap the COAL protocol in TLS so that it becomes COALS. Pike allows users to import programs at objects. This was used to import client_base.pike. This file involved the code for the connection. I had to throughly go through this and the files that it imported that is kernel/socket. After several experiment with these files I was able to use the SSL module and successfully make the connection use the TLS protocol. I checked this using wireshark, which captured all the packets over the network and all the data could be seen as encrypted.

wireshark clear text
clear text data over network
wireshark ssl
encrypted data after implementing TLS protocol
Continue ReadingImplementing TLS in pike

Open Event Apk generator

So we made this apk generator currently hosted on a server (http://192.241.232.231) which let’s you generate an android app for your event in 10 minutes out of which the server takes about 8 minutes to build 😛 . So, essentially you just have to spare 2 minutes and just enter 3 things(email, Desired app’s name and Api link). Isn’t this cool?

So how exactly do we do this?

At the backend, we are running a python scripts with some shell scripts where the python script is basically creating directories, interacting with our firebase database to get the data entered by a user. So we made these scripts to first of all to clone the open event android repo, then customise and change the code in the repo according to the parameters entered by the organiser earlier(shown in the image).

Screen Shot 2016-06-14 at 12.13.12 AM
Generator Website

After the code has been changed by the scripts to customise the app according to the event the app will be used for, we move on to the script to build the apk, where we build and sign the apk in release mode using signing configs and release keys from the server because we don’t the organiser to generate keys and store it on the server to avoid the hassle and also the privacy concerns involving the keys. So this is when the apk is generated on the server. Now you have questions like the apk is generated but how do I get it? Do I have to wait on the same page for 10 minutes while the apk is being sent? The answer is no and yes. What I mean by this is that you can wait to download the apk if you want but we’ll anyways send it to your email you specified on the apk generator website. This is the sample Email we got when we were testing the system

Screen Shot 2016-06-14 at 12.08.59 AM.png

So it’s an end to end complete solution from which you can easily get an android app for your event in just 2 minutes. Would love to hear feedback and reviews. Please feel free to contact me @ manan13056@iiitd.ac.in or on social media’s(Twitter, Facebook). Adios!

P.S. : Here is the link to the scripts we’re using.

Continue ReadingOpen Event Apk generator

The beauty of Directives, Transclusion in Angular.JS

week3gsoc1

To be honest in Angular directives are nothing but DOM elements simply put on steroids. Now if you add transclusion to it literally the possibilty of exploring the playground is boundless .With that said before diving into what directives are and how cool are they, let us basically understand what makes directives in angular so powerful.

Some of the well known directives which are used regularly are :

  • ng-src
  • ng-show
  • ng-hide
  • ng-model
  • ng-repeat

Custom Directives and the benifit of creating reusable components

We often tend to waste a lot of time and energy in writing code which is already/previously written and components which are already built. But what if you could write them only once and reuse them as many times as possible ?
ANS : “Directives”
You can create truly reusable components with directives, and the approach to build custom components is definitely neater and more intuitive.
Where do Custom Directives get implemented ?

  • elements
  • attributes
  • classes

Scope of Directives

After we initialize a directive we can observe that it gets a parent scope by default. In the best interests of the application you write you won’t really want that to happen. So in order to freely modify the properties of the directive we expose the parent’s controller scope to the directives.In some cases your directive may want to add several properties and functions to the scope that are for internal use only.

Example : If you have a directive that deals with comments(just like my sTeam web interface), you may want to set some internal variable to show or hide some of its specific sections. If we set these models to the parent’s scope we would pollute it.

Without polluting, is there any option ?

Absolutely there are two options,

  • Use a child scope
  • Use an isolated scope

If we use a child scope then the child scope prototypically inherits the parent’s scope. If we use an isolated scope then its all on its own, by not inheriting its parent’s scope

Transclusion

Transclusion is a feature that enables us to wrap a directive around arbitrary content. We can extract and compile it against the correct scope later, and eventually place it at the specified position in the directive template. If you set transclude:true in the directive definition, a new transcluded scope will be created which prototypically inherits from the parent scope. If you want your directive with isolated scope to contain an arbitrary piece of content and execute it against the parent scope, transclusion can be used.

Example :

week3gsoc2

See the above snippet, here ng-transclude says where to put the transcluded content. In this case the DOM content Hello {{name}} is extracted and put inside div ng-tran- sclude /div> . The important point to remember is that the expression {{name}} interpolates against the property defined in the parent scope rather than the isolated scope.

Thats it folks,
Happy Hacking !!

Continue ReadingThe beauty of Directives, Transclusion in Angular.JS

Why should you use Heroku?

Last week I’ve dedicated most time to implement new heroku features to Open Event. Due to the fact that wasn’t easy tasks I can share my experience.

What is heroku?

Heroku is a cloud Platform-as-a-Service (PaaS) supporting several programming languages like Java, Node.js, Scala, Clojure, Python, PHP, and Go

Easy to deploy

what you need to do:

  1. Create account on heroku
  2. Download a heroku toolbelt to your enviroment.
  3. Go to your project directory(/open-event-orga-server)
  4. Sign in to heroku in your command line using your credentials
    $ heroku login
  5. Create app with name $
    heroku apps:create your_app_name

    after execution above command you will recive a link to your application

    http://your_app_name.herokuapp.com/
  6. Push latest changes to heroku
    $ git push heroku master
  7. If everythings is ok you can check results http://your_app_name.herokuapp.com/ (sometimes it does not work like we want 🙁 )

Easy to configure

To list/set/get config variables use:

$ heroku config
$ heroku config:set YOUR_VARIABLE=token123
$ heroku config:get YOUR_VARIABLE

or you can go to you application dashboard and make above operations

How you can get access to this variables using python langauges?

$ python

Python 2.7.10 (default, Oct 23 2015, 19:19:21) 

[GCC 4.2.1 Compatible Apple LLVM 7.0.0 (clang-700.0.59.5)] on darwin

Type "help", "copyright", "credits" or "license" for more information.

>>> import os

>>> your_variable  = os.environ.get('YOUR_VARIABLE', None)

>>> print your_variable
token123

I’ve used this to display current release in my python application(You need to generate a special API token and add it to config variables)

os.popen('curl -n https://api.heroku.com/apps/open-event/releases -H 
"Authorization: Bearer ' + token + '" -H 
"Accept: application/vnd.heroku+json; version=3"').read()

Easy to monitor

If something is wrong with your APP you need to use this command

$ heroku logs

it shows all logs

To see 10 latest releases use:

$ heroku releases

How you can set up Open Event to deploy to heroku?

  1. Clone https://github.com/fossasia/open-event-orga-server
  2. Go to directory of open event orga server(/open-event-orga-server)
  3. Add git remote
     heroku git:remote -a open-event
  4. You can check if open event is added to git remote
    $ git remote -v
    heroku https://git.heroku.com/open-event.git (fetch)
    heroku https://git.heroku.com/open-event.git (push)
    origin https://github.com/fossasia/open-event-orga-server.git (fetch)
    origin https://github.com/fossasia/open-event-orga-server.git (push)
  5. Now you can deploy changes to open-event application(You need a permissions 🙂 )

Why should you use a Heroku?

It’s great to deploy apps because you are able to share content in short time what I’ve done. Besides it’s very well documented so you can find there answers for most of your questions. Finally most of things you can configure using Heroku dashboard so it’s the best advantages of this tool.

Continue ReadingWhy should you use Heroku?

Improvements in sTeam shell and export script

(ˢᵒᶜⁱᵉᵗʸserver) aims to be a platform for developing collaborative applications.
sTeam server project repository: sTeam.

Logs

A breakthrough in sTeam development took place. Siddhant Gupta was able to successfully implement the TLS protocol in pike.

The Logs were displayed erroneously. Also the user was not able to scroll down the log to the latest message.  The golden ratio script used in the program was updated to it’s latest version.

Also the editor is opened using sudo command so as to access the vim scrips in the /usr/local/lib/steam/tools directory.
The files are opened using the vim command:
vim -S script -c edit filename1|sp filename2

Only one buffer is accessible at a time. In order to switch the buffer to log buffer the command is CTRL+Ww. Enter this command directly without entering the vim terminal using :.
The log buffer would be accessible, can be edited and scrolled down to the latest log message.

Issue. Github Issue Github PR
Access the log window till the end. Issue-20 PR-48
Open appropriate log window when a sTeam command is executed. Issue-49 PR-51

ScrollToLatest

The logs were displayed erroneously. Ideally the log should be displayed based on the buffer where the sTeam function is called and accordingly the relevant log buffer should be called and display the output. This error was fixed.

MultTabs

The log is displayed in the file named after the file which is opened and concatenated with the suffix “-disp”. In Vi the  :% buffer stores the value of the current file. Consequently this value was concatenated with “-disp” to display the buffer accordingly. The Vi script can be seen below.
ViFunc

Export to git script.

The  export-to-git script was tested vigorously.  All the known issue’s based on the script were replicated in the system and solution was found for them.

The export to git script is now capable of exporting multiple sources at a time. If the last argument is always the target repository then any number of previous arguments can be sources.

Issue. Github Issue Github PR
Support Multiple Source arguments Issue-14 Issue-19 PR-54
Include Source-name in branch name and add branch description. Issue-9 PR-55

Example command :
./export-to-git.pike /home/sTeam/file1 /home/coder/file2 /home/sTeam/container3 ~/gitfolder

The export-to-git script also exports the source name in the branch.  To help distinguish between the branches, we need more descriptive names:

./export-to-git.pike /sources/ /tmp/export-test/

This should create the branch sources-cur_time. Also when a file is specifically exported:

./ecport-to-git.pike /home/coder/demo1.txt /temp/export-test/

would create a branch with name home/coder/demo1.txt-cur_time. This is done to avoid ambiguity between files with same name existing in different locations.
Also a description is added fo the branch name using the git command
git config branch.<branch name>.description "describe branch"
To view this description go to the folder where the branch is exported and then enter the git command
git config branch.<branch name>.description

Export to Git script executing when Multiple Source arguments passed and the modified branch name.
GitExportAndBranchName

Branch Description

BranchDesc

Checkout the FOSSASIA Idea’s page for more information on projects supported by FOSSASIA.

Continue ReadingImprovements in sTeam shell and export script