Controlling Camera Actions Using Voice Interaction in Phimpme Android

In this blog, I will explain how I implemented Google voice actions to control camera features on the Phimpme Android project. I will cover the following features I have implemented on the Phimpme project:

  • Opening the application using Google Voice command.
  • Switching between the cameras.
  • Clicking a Picture and saving it through voice command.

Opening application when the user gives a command to Google Now.                       When the user gives command “Take a selfie” or “Click a picture” to Google Now it directly opens Phimpme camera activity.

 First                                                                                                                                        We need to add an intent filter to the manifest file so that Google Now can  detect Phimpme camera activity

<activity
   android:name=".opencamera.Camera.CameraActivity"
   android:screenOrientation="portrait"
   android:theme="@style/Theme.AppCompat.NoActionBar">
   <intent-filter>
       <action android:name="android.media.action.IMAGE_CAPTURE"/>

       <category android:name="android.intent.category.DEFAULT"/>
       <category android:name="android.intent.category.VOICE"/>
   </intent-filter>
</activity>

category android:name=”android.intent.category.VOICE” is added to the IMAGE_CAPTURE intent filter for the Google Now to detect the camera activity. For the Google Now assistance to accept the command in the camera activity we need to add the following in the STILL_IMAGE_CAMERA intent filter in the camera activity.

<intent-filter>
   <action android:name="android.media.action.STILL_IMAGE_CAMERA"/>

   <category android:name="android.intent.category.DEFAULT"/>
   <category android:name="android.intent.category.VOICE"/>
</intent-filter>

So, now when the user says “OK Google” and “Take a Picture” the camera activity on Phimpme opens.

Integrating Google Voice assistance in Camera Activity

Second,                                                                                                                               After opening the camera application the Google Assistance should ask a question.

The cameraActivity in Phimpme can be opened in two ways, such as:

  • When opened from a different application.
  • When given the command to Goole Now assistance.

We need to check whether the camera activity is prompted from Google assistance or not to activate voice command. We will check it in onResume function.

@Override
public void onResume() {
if (CameraActivity.this.isVoiceInteraction()) {
     startVoiceTrigger();
  }
} 

If is.VoiceInteraction gives “true” then voice Assistance prompts.             Assistance to ask which camera to use

Third,                                                                                                                                 After the camera activity opens the Google assistance should ask which camera to use either front or back.

To take any voice input from the user, we to store the expected commands in VoiceInteractor.PickoptionRequest. This function listens to the command by the user. We need to add synonyms for the same command.

To choose the rear camera

VoiceInteractor.PickOptionRequest.Option rear = new VoiceInteractor.PickOptionRequest.Option(getResources().getString(R.string.camera_rear), 0);
rear.addSynonym(getResources().getString(R.string.rear));
rear.addSynonym(getResources().getString(R.string.back));
rear.addSynonym(getResources().getString(R.string.normal)); 

I added synonyms like the rear, normal and back.

To choose front camera

VoiceInteractor.PickOptionRequest.Option front = new VoiceInteractor.PickOptionRequest.Option(getResources().getString(R.string.camera_front), 1);
front.addSynonym(getResources().getString(R.string.front));
front.addSynonym(getResources().getString(R.string.selfie_camera));
front.addSynonym(getResources().getString(R.string.forward));

I added synonyms like the front, selfie camera and forward. 

For assistance to ask any question such as “Which camera to use we” I have used getVoiceinteractor and inflating VoiceInteractor.PickOptionRequest.option[] array with options front and rear.

CameraActivity.this.getVoiceInteractor()
     .submitRequest(new VoiceInteractor.PickOptionRequest(
           new VoiceInteractor.Prompt(getResources().getString(“Which camera would you like to use?”),
           new VoiceInteractor.PickOptionRequest.Option[]{front, rear},
           null) {

The google assistance waits for a response from the user for only a few seconds and it goes inactive. If the user gives any unexpected command the assistance will ask the question one more time.

Check if the user gives an expected command or not.

We will override OnOptionResult(boolean finished, Options[] selection, Bundle result) function.if  (finished && selections.length == 1) if the speech length matches with any of the options provided it checks which option was used.

Check the command given by the user to switch between the cameras.

Two array objects are passed 0 and 1.  If the command given was “rear” then selection[0].getindex() = 0 and camera activity switches to the rear camera and if the the command given by the user is rear then selection[0].getIndex = 1 and camera activity switches to front camera.

@Override
public void onPickOptionResult(boolean finished, Option[] selections, Bundle result) {
  if (finished && selections.length == 1) {
     Message message = Message.obtain();
     message.obj = result;
     if (selections[0].getIndex() == 0)
     {  rearCamera();
        asktakePicture();
     }
     if (selections[0].getIndex() == 1)
     {
        asktakePicture();
     }
  }else{

       getActivity().finish();
  }

Click Picture when the user says “Cheese

After switching the camera the assistant prompts the message”Say cheese”. We need to add voiceInteractor.prompt(“Say cheese”).

We need to store the synonyms in VoiceInteractor.PickOption.Options options. I have added synonyms like ready, go, take it, OK, and Cheese to click a picture. If the user gives an unexpected output the assistance checks selection.length ==1 or not and prompts the message “Say cheese” again.

private void asktakePicture() {
  VoiceInteractor.PickOptionRequest.Option option = new VoiceInteractor.PickOptionRequest.Option(getResources().getString(R.string.cheese), 2);
  option.addSynonym(getResources().getString(R.string.ready));
  option.addSynonym(getResources().getString(R.string.go));
  option.addSynonym(getResources().getString(R.string.take));
  option.addSynonym(getResources().getString(R.string.ok));
getVoiceInteractor()
        .submitRequest(new VoiceInteractor.PickOptionRequest(
              new VoiceInteractor.Prompt(getResources().getString(R.string.say_cheese)),
              new VoiceInteractor.PickOptionRequest.Option[]{option},
              null) {
           @Override
           public void onPickOptionResult(boolean finished, Option[] selections, Bundle result) {
              if (finished && selections.length == 1) {
                 Message message = Message.obtain();
                 message.obj = result;
                 takePicture();
              } else {
                 getActivity().finish();
              }
           }
           @Override
           public void onCancel() {
              getActivity().finish();
           }
        });                                                                                                                                     

Conclusion

Now, Users can start camera activity on Phimpme through voice command “Take a Selfie”. They can switch between the cameras through voice command “Selfie camera” or “back camera”, “back” or “front” and finally click a picture by giving voice command “Cheese”, “Click it” and related synonyms.

Github

Resources

Continue ReadingControlling Camera Actions Using Voice Interaction in Phimpme Android

Implementing Stickers on an Image in Phimpme

One feature we implemented in the Phimpme photo editing application is to enable users to add stickers on top of the image. In this blog, I will explain how stickers are implemented in Phimpme.

Features of Stickers

  • Users can resize the stickers.
  • Users can place the stickers wherever in the canvas.

Step.1-Storing the Stickers in assets folder

In Phimpme I stored the stickers in the assets folder. To distribute the stickers in different categories I made different folders according to the categories namely type1, type2, type3, type4 and so on.  

Displaying stickers

We used onBindViewHolder to Display the stickers in different categories like:

  • Facial
  • Express
  • Objects
  • Comments
  • Wishes
  • Emojis
  • Hashtags

String path will get the position of the particular type of stickers collection. This type is then loaded to the ImageLoader with the specific icon associating with the types.   

@Override
public void onBindViewHolder(mRecyclerAdapter.mViewHolder holder, final int position) {

   String path = pathList.get(position);
       ImageLoader.getInstance().displayImage("assets://" + path,holder.icon, imageOption);
       holder.itemView.setTag(path);
       holder.title.setText("");

   int size = (int) getActivity().getResources().getDimension(R.dimen.icon_item_image_size_filter_preview);
   LinearLayout.LayoutParams layoutParams = new LinearLayout.LayoutParams(size,size);
   holder.icon.setLayoutParams(layoutParams);

   holder.itemView.setOnClickListener(new View.OnClickListener() {
       @Override
       public void onClick(View v) {
           String data = (String) v.getTag();
           selectedStickerItem(data);
       }
   });
}

Step.2- Applying a sticker on the image

When a particular sticker is selected selectedStickerItem() function is called.This function calls StickerView class to add the Bitmap on the image. It sends the path of the sticker as a parameter.  

public void selectedStickerItem(String path) {
   mStickerView.addBitImage(getImageFromAssetsFile(path));
}

In StickerView class the image of the sticker is then converted into a Bitmap. It creates an object(item) of StickerItem class. This object calls the init function, which handles the size of the sticker and the placement of the sticker on the image.

public void addBitImage(final Bitmap addBit) {
   StickerItem item = new StickerItem(this.getContext());
   item.init(addBit, this);
   if (currentItem != null) {
       currentItem.isDrawHelpTool = false;
   }
   bank.put(++imageCount, item);
   this.invalidate();
}

Step.3-Resizing the Sticker in the canvas

A bitmap or any image has two axes namely x and y. We can resize the image using matrix calculation.

float c_x = dstRect.centerX();
float c_y = dstRect.centerY();

float x = this.detectRotateRect.centerX();
float y = this.detectRotateRect.centerY();

We then calculate the source length and the current length:

float srcLen = (float) Math.sqrt(xa * xa + ya * ya);
float curLen = (float) Math.sqrt(xb * xb + yb * yb);

Then we calculate the scale. This is required to calculate the zoom ratio.

float scale = curLen / srcLen;

We need to rescale the bitmap. That is if the user rotates the sticker or zoom in or zoom out the sticker. A helpbox surrounds the stickers showing the actual size of the sticker. This helpbox which is rectangular shape helps in resizing the sticker.

RectUtil.scaleRect(this.dstRect, scale);// Zoom destination rectangle

// Recalculate the Toolbox coordinates
helpBox.set(dstRect);
updateHelpBoxRect();// Recalculate
rotateRect.offsetTo(helpBox.right - BUTTON_WIDTH, helpBox.bottom
       - BUTTON_WIDTH);
deleteRect.offsetTo(helpBox.left - BUTTON_WIDTH, helpBox.top
       - BUTTON_WIDTH);

detectRotateRect.offsetTo(helpBox.right - BUTTON_WIDTH, helpBox.bottom
       - BUTTON_WIDTH);
detectDeleteRect.offsetTo(helpBox.left - BUTTON_WIDTH, helpBox.top
       - BUTTON_WIDTH);

Conclusion

In Phimpme a user can now place the sticker on top of the image. Resize the sticker, that is Zoom in the image or zoom out of the image. Move the image around the canvas. This will give users the flexibility to add multiple stickers on the image.

Github

Resources

Continue ReadingImplementing Stickers on an Image in Phimpme

Share Images on Pinterest from Phimpme Android Application

After successfully establishing Pinterest authentication in Phimpme our next goal was to share the image on the Pinterest website directly from Phimpme, without using any native Android application.

Adding Pinterest Sharing option in Sharing Activity in Phimpme

To add various sharing options in Sharing Activity in the Phimpme project, I have applied a ScrollView for the list of the different sharing options which include: Facebook, Twitter, Pinterest, Imgur, Flickr and Instagram. All the App icons with the name are arranged in a TableLayout in the activity_share.xml file. Table rows consist of two columns. In this way, it is easier to add more app icons for future development.

<ScrollView
   android:layout_width="wrap_content"
   android:layout_height="@dimen/scroll_view_height"
   android:layout_above="@+id/share_done"
   android:id="@+id/bottom_view">
   <LinearLayout
       android:layout_width="wrap_content"
       android:layout_height="wrap_content"
       android:orientation="vertical">
       <TableLayout

Adding Pinterest app icon on the icons_drawable array. This array is then used to inflate the icon on the list view.

private int[] icons_drawables = {R.drawable.ic_facebook_black, R.drawable.ic_twitter_black,R.drawable.ic_instagram_black, R.drawable.ic_wordpress_black, R.drawable.ic_pinterest_black);

Adding Pinterest text on the titles_text array. This array is then used to inflate the names of the various sharing activity.

private int[] titles_text = {R.string.facebook, R.string.twitter, R.string.instagram,
       R.string.wordpress, R.string.pinterest);

Prerequisites to share Image on Pinterest

To share an Image on Pinterest a user has to add a caption and Board ID. Our first milestone was to get the input of the Board ID  by the user. I have achieved this by taking the input in a Dialog Box. When the user clicks on the Pinterest option, a dialog box pops and then the user can add their Board ID.

private void openPinterestDialogBox() {
   AlertDialog.Builder captionDialogBuilder = new AlertDialog.Builder(SharingActivity.this, getDialogStyle());
   final EditText captionEditText = getCaptionDialog(this, captionDialogBuilder);

   captionEditText.setHint(R.string.hint_boardID);

   captionDialogBuilder.setNegativeButton(getString(R.string.cancel).toUpperCase(), null);
   captionDialogBuilder.setPositiveButton(getString(R.string.post_action).toUpperCase(), new DialogInterface.OnClickListener() {
       @Override
       public void onClick(DialogInterface dialog, int which) {
           //This should be empty it will be overwrite later
           //to avoid dismiss of the dialog on the wrong password
       }
   });

   final AlertDialog passwordDialog = captionDialogBuilder.create();
   passwordDialog.show();

   passwordDialog.getButton(AlertDialog.BUTTON_POSITIVE).setOnClickListener(new View.OnClickListener() {
       @Override
       public void onClick(View v) {
           String captionText = captionEditText.getText().toString();
           boardID =captionText;
           shareToPinterest(boardID);
           passwordDialog.dismiss();
       }
   });
}

A user can fetch the Board ID by following the steps:

Board ID is necessary because it specifies where the image needs to be posted.

Creating custom post function for Phimpme

The image is posted using a function in PDKClient class. PDKClient is found in the PDK module which we get after importing Pinterest SDK. Every image is posted on Pinterest is called a Pin. So we will call createPin function. I have made my custom createPin function so that it also accepts Bitmaps as a parameter. In the Pinterest SDK it only accepts image URL to share, The image should already be on the internet to be shared. For this reason, we to add a custom create Pin function to accept Bitmaps as an option.

public void createPin(String note, String boardId, Bitmap image, String link, PDKCallback callback) {
   if (Utils.isEmpty(note) || Utils.isEmpty(boardId) || image == null) {
       if (callback != null) callback.onFailure(new PDKException("Board Id, note, Image cannot be empty"));
       return;
   }

   HashMap<String, String> params = new HashMap<String, String>();
   params.put("board", boardId);
   params.put("note", note);
   params.put("image_base64", Utils.base64String(image));
   if (!Utils.isEmpty(link)) params.put("link", link);
   postPath(PINS, params, callback);
}

Compressing Bitmaps

Since Pinterest SDK cannot accept Bitmap I have added a function to compress the Bitmap and encode it to strings.

public static String base64String(Bitmap bitmap) {
   ByteArrayOutputStream baos = new ByteArrayOutputStream();
   bitmap.compress(Bitmap.CompressFormat.JPEG, 100, baos);
   String b64Str = Base64.encodeToString(baos.toByteArray(), Base64.NO_WRAP);
   return b64Str;
}

Calling createPin function from the sharingActivity

From the sharingActivity we will call createPin activity. We will pass caption of the image, Board ID, Image bitmap and link(which is optional) as parameters.

PDKClient
       .getInstance().createPin(caption, boardID, image, null, new PDKCallback() {

If the image is posted successfully then onSuccess function is called which pops a snackbar and shows the success message. Otherwise, onFailure function is called which displays failure message on a snackbar.

@Override
public void onSuccess(PDKResponse response) {
   Log.d(getClass().getName(), response.getData().toString());
   Snackbar.make(parent, R.string.pinterest_post, Snackbar.LENGTH_LONG).show();
   //Toast.makeText(SharingActivity.this,message,Toast.LENGTH_SHORT).show();

}

@Override
public void onFailure(PDKException exception) {
   Log.e(getClass().getName(), exception.getDetailMessage());
   Snackbar.make(parent, R.string.Pinterest_fail, Snackbar.LENGTH_LONG).show();
   //Toast.makeText(SharingActivity.this, boardID + caption, Toast.LENGTH_SHORT).show();

}

Conclusion

In Phimpme user can now send Image on Pinterest directly from the application. This is done without the use of the native Pinterest application.

Github

Resources

Continue ReadingShare Images on Pinterest from Phimpme Android Application

Using OpenCV for Native Image Processing in Phimpme Android

OpenCV is very widely used open-source image processing library. After the integration of OpenCV Android SDK in the Phimpme Android application, the image processing functions can be written in Java part or native part. Taking runtime of the functions into consideration we used native functions for image processing in the Phimpme application.

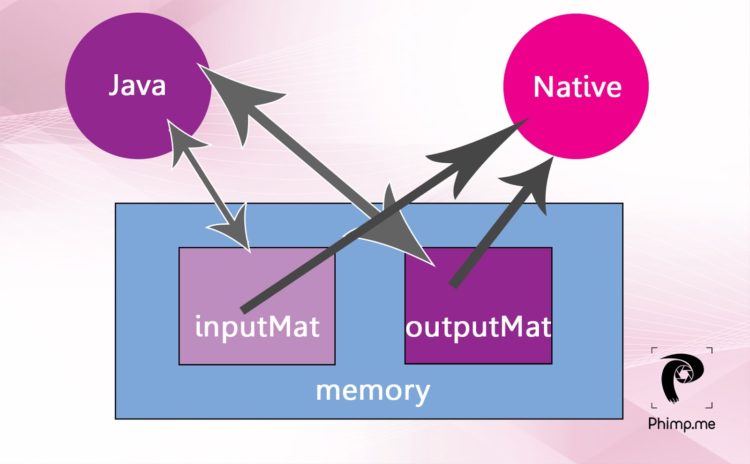
We didn’t have the whole application written in native code, we just called the native functions on the Java OpenCV Mat object. Mat is short for the matrix in OpenCV. The image on which we perform image processing operations in the Phimpme Android application is stored as Mat object in OpenCV.

Creating a Java OpenCV Mat object

Mat object of OpenCV is same whether we use it in Java or C++. We have common OpenCV object in Phimpme for accessing from both Java part and native part of the application. We have a Java bitmap object on which we have to perform image processing operations using OpenCV. For doing that we need to create a Java Mat object and pass its address to native. Mat object of OpenCV can be created using the bitmap2Mat() function present in the OpenCV library. The implementation is shown below.

Mat inputMat = new Mat(bitmap.getWidth(), bitmap.getHeight(), CvType.CV_8UC3);
Utils.bitmapToMat(bitmap, inputMat);

“bitmap” is the Java bitmap object which has the image to be processed. The third argument in the Mat function indicates that the Mat should be of type 8UC3 i.e. three color channels with 8-bit depth. With the second line above, the bitmap gets saved as the OpenCV Mat object.

Passing Mat Object to Native

We have the OpenCV Mat object in the memory. If we pass the whole object again to native, the same object gets copied from one memory location to another. In Phimpme application, instead of doing all that we can just get the memory location of the current OpenCV Mat object and pass it to native. As we have the address of the Mat, we can access it directly from native functions. Implementation of this is shown below.

Native Function Definition:

private static native void nativeApplyFilter(long inpAddr);

Native Function call:

nativeApplyFilter(inputMat.getNativeObjAddr());

Getting Native Mat Object to Java

We can follow the similar steps for getting the Mat from the native part after processing. In the Java part of Phimpme, we created an OpenCV Mat object before we pass the inputMat OpenCV Mat object to native for processing. So we have inputMat and outputMat in the memory before we send them to native. We get the memory locations of both the Mat objects and pass those addresses to native part. After the processing is done, the data gets written to the same memory location and can be accessed in Java. The above functions can be modified and rewritten for this purpose as shown below

Native Function Definition:

private static native void nativeApplyFilter(long inpAddr, long outAddr );

Native Function call:

nativeApplyFilter(inputMat.getNativeObjAddr(),outputMat.getNativeObjAddr());
inputMat.release();

if (outputMat !=null){
   Bitmap outbit = Bitmap.createBitmap(bitmap.getWidth(),bitmap.getHeight(),bitmap.getConfig());
   Utils.matToBitmap(outputMat,outbit);
   outputMat.release();
   return outbit;
}

Native operations on Mat using OpenCV

The JNI function in the native part of Phimpme application receives the memory locations of both the OpenCV Mat objects. As we have the addresses, we can create Mat object pointing that memory location and can be passed to processing functions for performing native operations just like all OpenCV functions. This implementation is shown below.

#include <jni.h>
#include <opencv2/core/core.hpp>
#include <opencv2/imgproc/imgproc.hpp>
#include "enhance.h"
using namespace std;
using namespace cv;

JNIEXPORT void JNICALL
Java_org_fossasia_phimpme_editor_editimage_filter_PhotoProcessing_nativeApplyFilter(JNIEnv *env, jclass type, jlong inpAddr,jlong outAddr) {
       Mat &src = *(Mat*)inpAddr;
       Mat &dst = *(Mat*)outAddr;
       applyFilter(src, dst);
}

applyFilter() function can have any image processing operation. The implementation of edge detection function using OpenCV in the Phimpme Android is shown below. We were able to do this in very few lines which otherwise would have needed an extremely large code.  

Mat grey,detected_edges;
cvtColor( src, grey, CV_BGR2GRAY );
blur( grey, detected_edges, Size(3,3) );
dst.create( grey.size(), grey.type() );
Canny( detected_edges, detected_edges, 70, 200, 3 );
dst = Scalar::all(0);
detected_edges.copyTo( dst, detected_edges);


The general structure of an OpenCV function which is necessary for implementing custom image processing operations can be understood by referring this below-mentioned brightness adjustment function.  

int x,y,bright;
cvtColor(src,src,CV_BGRA2BGR);
dst = Mat::zeros( src.size(), src.type() );
for (y = 0; y < src.rows; y++) {
   for (x = 0; x < src.cols; x++) {
       dst.at<Vec3b>(y, x)[0] =
                  saturate_cast<uchar>((src.at<Vec3b>(y, x)[0]) + bright);
       dst.at<Vec3b>(y, x)[1] =
               saturate_cast<uchar>((src.at<Vec3b>(y, x)[1]) + bright);
       dst.at<Vec3b>(y, x)[2] =
               saturate_cast<uchar>((src.at<Vec3b>(y, x)[2]) + bright);
   }
}


Resources:

Continue ReadingUsing OpenCV for Native Image Processing in Phimpme Android

Adding Sentry Integration in Open Event Orga Android App

Sentry is a service that allows you to track events, issues and crashes in your apps and provide deep insights with context about them. This blog post will discuss how we implemented it in Open Event Orga App (Github Repo).

Configuration

First, we need to include the gradle dependency in build.gradle
compile ‘io.sentry:sentry-android:1.3.0’
Now, our project uses proguard for release builds which obfuscates the code and removes unnecessary class to shrink the app. For the crash events to make sense in Sentry dashboard, we need proguard mappings to be uploaded every time release build is generated. Thankfully, this is automatically handled by sentry through its gradle plugin, so to include it, we add this in our project level build.gradle in dependencies block

classpath 'io.sentry:sentry-android-gradle-plugin:1.3.0'


And then apply the plugin by writing this at top of our app/build.gradle

apply plugin: 'io.sentry.android.gradle'


And then configure the options for automatic proguard configuration and mappings upload

sentry {
   // Disables or enables the automatic configuration of proguard
   // for Sentry.  This injects a default config for proguard so
   // you don't need to do it manually.
   autoProguardConfig true

   // Enables or disables the automatic upload of mapping files
   // during a build.  If you disable this you'll need to manually
   // upload the mapping files with sentry-cli when you do a release.
   autoUpload false
}


We have set the autoUpload to false as we wanted Sentry to be an optional dependency to the project. If we turn it on, the build will crash if sentry can’t find the configuration, which we don’t want to happen.

Now, as we want Sentry to configurable, we need to set Sentry DSN as one of the configuration options. The easiest way to externalize configuration is to use environment variables. There are other methods to do it given in the official documentation for config https://docs.sentry.io/clients/java/config/

Lastly, for proguard configuration, we also need 3 other config options, namely:

defaults.project=your-project
defaults.org=your-organisation
auth.token=your-auth-token


For getting the auth token, you need to go to https://sentry.io/api/

Now, the configuration is complete and we’ll move to the code

Implementation

First, we need to initialise the sentry instance for all further actions to be valid. This is to be done when the app starts, so we add it in onCreate method Application class of our project by calling this method

// Sentry DSN must be defined as environment variable
// https://docs.sentry.io/clients/java/config/#setting-the-dsn-data-source-name
Sentry.init(new AndroidSentryClientFactory(getApplicationContext()));


Now, we’re all set to send crash reports and other events to our Sentry server. This would have required a lot of refactoring if we didn’t use Timber for logging. We are using default debug tree for debug build and a custom Timber tree for release builds.

if (BuildConfig.DEBUG)
   Timber.plant(new Timber.DebugTree());
else
   Timber.plant(new ReleaseLogTree());


The ReleaseLogTree extends Timber.Tree which is an abstract class requiring you to override this function:

@Override
protected void log(int priority, String tag, String message, Throwable throwable) {

 }


This function is called whenever there is a log event through Timber and this is where we send reports through Sentry. First, we return from the function if the event priority is debug or verbose

if(priority == Log.DEBUG || priority == Log.VERBOSE)
   return;


If the event if if info priority, we attach it to sentry bread crumb

if (priority == Log.INFO) {
    Sentry.getContext().recordBreadcrumb(new BreadcrumbBuilder()
          .setMessage(message)
          .build());
}


Breadcrumbs are stored and only send with an event. What event comprises for us is the crash event or something we want to be logged to dashboard whenever the user does it. But since info events are just user interactions throughout the app, we don’t want to crowd the issue dashboard with them. However, we want to understand what user was doing before the crash happened, and that is why we use bread crumbs to store the events and only send them attached to a crash event. Also, only the last 100 bread crumbs are stored, making it easier to parse through them.

Now, if there is an error event, we want to capture and send it to the server

if (priority == Log.ERROR) {
   if (throwable == null)
       Sentry.capture(message);
   else
       Sentry.capture(throwable);
}


Lastly, we want to set Sentry context to be user specific so that we can easily track and filter through issues based on the user. For that, we create a new class ContextManager with two methods:

  • setOrganiser: to be called at login
  • clearOrganiser: to be called at logout

public void setOrganiser(User user) {
   Map<String, Object> userData = new HashMap<>();
   userData.put("details", user.getUserDetail());
   userData.put("last_access_time", user.getLastAccessTime());
   userData.put("sign_up_time", user.getSignupTime());

   Timber.i("User logged in - %s", user);
   Sentry.getContext().setUser(
       new UserBuilder()
       .setEmail(user.getEmail())
       .setId(String.valueOf(user.getId()))
       .setData(userData)
       .build()
   );
}


In this method, we put all the information about the user in the context so that every action from here on is attached to this user.

public void clearOrganiser() {
   Sentry.clearContext();
}


And here, we just clear the sentry context.

This concludes the implementation of our sentry client. Now all Timber log events will through sentry and appropriate events will appear on the sentry dashboard. To read more about sentry features and Timber, visit these links:

Sentry Java Documentation (check Android section)

https://docs.sentry.io/clients/java/

Timber Library

https://github.com/JakeWharton/timber

Continue ReadingAdding Sentry Integration in Open Event Orga Android App

Implementing Attendee Detail BottomSheet UI in Open Event Orga App

In Open Event Orga App (Github Repo), we allow the option to check the attendee details before checking him/her in or out. Originally, a dialog was shown showing the attendee details, which did not contain much information about the attendee, ticket or the order. The disadvantage of such design was also that it was tied to only one view. We couldn’t show the check in dialog elsewhere in the app, like during QR scanning. So we had to switch back to the attendee view for showing the check in dialog. We decided to create a usable detached component in the form of a bottom sheet containing all required information. This blog will outline the procedure we employed to design the bottom sheet UI.

The attendee check in dialog looked like this:

So, first we decide what we need to show on the check in bottom sheet:

  • Attendee Name
  • Attendee Email
  • Attendee Check In Status
  • Order Status ( Completed, Pending, etc )
  • TIcket Type ( Free, Paid, Donation )
  • Ticket Price
  • Order Date
  • Invoice Number
  • Order ‘Paid Via’

As we are using Android Data Binding in our layout, we’ll start by including the variables required in the layout. Besides the obvious attendee variable, we need presenter instance to handle the check in and check out of the attendee and DateUtils class to parse the order date. Additionally, to handle the visibility of views, we need to include the View class too

<data>
   <import type="org.fossasia.openevent.app.utils.DateUtils" />
   <import type="android.view.View" />

   <variable
       name="presenter"
       type="org.fossasia.openevent.app.event.checkin.contract.IAttendeeCheckInPresenter" />

   <variable
       name="checkinAttendee"
       type="org.fossasia.openevent.app.data.models.Attendee" />
</data>


Then, we make the root layout to be CoordinatorLayout and add a NestedScrollView inside it, which contains a vertical linear layout in it. This vertical linear layout will contain our fields.

Note: For brevity, I’ll skip most of the layout attributes from the blog and only show the ones that correspond to the text

Firstly, we show the attendee name:

<TextView
   style="@style/TextAppearance.AppCompat.Headline"
   android:text='@{attendee.firstName + " " + attendee.lastName }'
   tools:text="Name" />


The perks of using data binding can be seen here, as we are using string concatenation in layout itself. Furthermore, data binding also handles null checks for us if we add a question mark at the end of the variable name ( attendee.firstName? ).

But our server ensures that both these fields are not null, so we skip that part.

Next up, we display the attendee email

<TextView
   android:text="@{ checkinAttendee.email }"
   tools:text="xyz@example.com" />


And then the check in status of the attendee

<TextView
   android:text="@{ checkinAttendee.checkedIn ? @string/checked_in : @string/checked_out }"
   android:textColor="@{ checkinAttendee.checkedIn ? @color/light_green_500 : @color/red_500 }"
   tools:text="CHECKED IN" />


Notice that we dynamically change the color and text based on the check in status of the attendee

Now we begin showing the fields with icons to their left. You can use Compound Drawable to achieve this effect, but we use vector drawables which are incompatible with compound drawables on older versions of Android, so we use a horizontal LinearLayout instead.

The first field is the order status denoting if the order is completed or in transient state

<LinearLayout android:orientation="horizontal">

   <ImageView app:srcCompat="@drawable/ic_transfer" />
   <TextView android:text="@{ checkinAttendee.order.status }" />
</LinearLayout>


Now, again for keeping the snippets relevant, I’ll skip the icon portion and only show the text binding from now on.

Next, we include the type of ticket attendee has. There are 3 types of ticket supported in Open Event API – free, paid, donation

<TextView
   android:text="@{ checkinAttendee.ticket.type }"  />


Next, we want to show the price of the ticket, but only when the ticket is of paid type.

I’ll include the previously omitted LinearLayout part in this snippet because it is the view we control to hide or show the field

<LinearLayout
   android:visibility='@{ checkinAttendee.ticket.type.equalsIgnoreCase("paid") ? View.VISIBLE : View.GONE }'>

   <ImageView app:srcCompat="@drawable/ic_coin" />
   <TextView
       android:text='@{ "$" + checkinAttendee.ticket.price }'
       tools:text="3.78" />
</LinearLayout>


As you can see, we are showing this layout only if the ticket type equals paid

The next part is about showing the date on which the order took place

<TextView
   android:text="@{ DateUtils.formatDateWithDefault(DateUtils.FORMAT_DAY_COMPLETE, checkinAttendee.order.completedAt) }" />


Here we are using internal DateUtils method to format the date into complete date time from the ISO 8601 standard date present in the order object

Now, we show the invoice number of the order

<TextView
   android:text="@{ checkinAttendee.order.invoiceNumber }" />


Lastly, we want to show how the ticket was paid for via

<LinearLayout
   android:visibility='@{ checkinAttendee.order.paidVia.equalsIgnoreCase("free") ? View.GONE : View.VISIBLE }'>

   <ImageView app:srcCompat="@drawable/ic_ray" />
   <TextView  android:text="@{ checkinAttendee.order.paidVia }" />
</LinearLayout>


Notice that here too we are controlling the visibility of the layout container and only showing it if the ticket type is paid

This ends our vertical linear layout showing the fields about attendee detail. Now, we add a floating action button to toggle the check in status of attendee

<FrameLayout
   android:layout_gravity="top|end">

   <android.support.design.widget.FloatingActionButton
       android:layout_gravity="center"
       android:onClick="@{() -> presenter.toggleCheckIn() }"
       app:backgroundTint="@{ checkinAttendee.checkedIn ? @color/red_500 : @color/light_green_500 }"
       app:srcCompat="@{ checkinAttendee.checkedIn ? @drawable/ic_checkout : @drawable/ic_checkin }"
       app:tint="@android:color/white" />

   <ProgressBar
       android:layout_gravity="center" />

</FrameLayout>


We have used a FrameLayout to wrap a FAB and progress bar together in top end of the bottom sheet. The progress bar shows the indeterminate progress of the toggling of attendee status. And you can see the click binder on FAB triggering the presenter method toggleCheckIn() and how the background color and icon change according to the check in status of the attendee.

This wraps up our layout design. Now we just have to create a BottomSheetDialogFragment, inflate this layout in it and bind the attendee variable and we are all set. The result with all fields visible looks like this:

To learn more about bottom sheet and android data binding, please refer to these links:

Continue ReadingImplementing Attendee Detail BottomSheet UI in Open Event Orga App

Invalidating user login using JWT in Open Event Orga App

User authentication is an essential part of Open Event Orga App (Github Repo), which allows an organizer to log in and perform actions on the event he/she organizes. Backend for the application, Open Event Orga Server sends an authentication token on successful login, and all subsequent privileged API requests must include this token. The token is a JWT (Javascript Web Token) which includes certain information about the user, such as identifier and information about from when will the token be valid, when will it expire and a signature to verify if it was tampered.

Parsing the Token

Our job was to parse the token to find two fields:

  • Identifier of user
  • Expiry time of the token

We stored the token in our shared preference file and loaded it from there for any subsequent requests. But, the token expires after 24 hours and we needed our login model to clear it once it has expired and shown the login activity instead.

To do this, we needed to parse the JWT and compare the timestamp stored in the exp field with the current timestamp and determine if the token is expired. The first step in the process was to parse the token, which is essentially a Base 64 encoded JSON string with sections separated by periods. The sections are as follows:

  • Header ( Contains information about algorithm used to encode JWT, etc )
  • Payload ( The data in JWT – exp. Iar, nbf, identity, etc )
  • Signature ( Verification signature of JWT )

We were interested in payload and for getting the JSON string from the token, we could have used Android’s Base64 class to decode the token, but we wanted to unit test all the util functions and that is why we opted for a custom Base64 class for only decoding our token.

So, first we split the token by the period and decoded each part and stored it in a SparseArrayCompat

public static SparseArrayCompat<String> decode(String token) {
   SparseArrayCompat<String> decoded = new SparseArrayCompat<>(2);

   String[] split = token.split("\\.");
   decoded.append(0, getJson(split[0]));
   decoded.append(1, getJson(split[1]));

   return decoded;
}


The getJson function is primarily decoding the Base64 string

private static String getJson(String strEncoded) {
   byte[] decodedBytes = Base64Utils.decode(strEncoded);
   return new String(decodedBytes);
}

The decoded information was stored in this way

0={"alg":"HS256","typ":"JWT"},  1={"nbf":1495745400,"iat":1495745400,"exp":1495745800,"identity":344}

Extracting Information

Next, we create a function to get the expiry timestamp from the token. We could use GSON or Jackson for the task, but we did not want to map fields into any object. So we simply used JSONObject class which Android provides. It took 5 ms on average to parse the JSON instead of 150 ms by GSON

public static long getExpiry(String token) throws JSONException {
   SparseArrayCompat<String> decoded = decode(token);

   // We are using JSONObject instead of GSON as it takes about 5 ms instead of 150 ms taken by GSON
   return Long.parseLong(new JSONObject(decoded.get(1)).get("exp").toString());
}


Next, we wanted to get the ID of user from token to determine if a new user is logging in or an old one, so that we can clear the database for new user.

public static int getIdentity(String token) throws JSONException {
   SparseArrayCompat<String> decoded = decode(token);

   return Integer.parseInt(new JSONObject(decoded.get(1)).get("identity").toString());
}

Validating the token

After this, we needed to create a function that tells if a stored token is expired or not. With all the right functions in place, it was just a matter of comparing current time with the stored timestamp

public static boolean isExpired(String token) {
   long expiry;

   try {
       expiry = getExpiry(token);
   } catch (JSONException jse) {
       return true;
   }

   return System.currentTimeMillis()/1000 >= expiry;
}


Since the token provides timestamp from epoch in terms of seconds, we needed to divide the current time in milliseconds by 1000 and the function returned true if current timestamp was greater than the expiry time of token.

After writing a few unit tests for both functions, we just needed to plug them in our login model at the time of authentication.

At the time of starting of the application, we use this function to check if a user is logged in or not:

public boolean isLoggedIn() {
   String token = utilModel.getToken();

   return token != null && !JWTUtils.isExpired(token);
}


So, if there is no token or the token is expired, we do not automatically login the user and show the login screen.

Implementing login

The next task were

  • Sequest the server to login
  • Store the acquired token
  • Delete database if it is a new user

Before implementing the above logic, we needed to implement a function to determine if the person logging in is previous user, or new one. For doing so, we first loaded the saved user from our database, if the query is empty, surely it is a new user logging in. So we return false, and if there is a user in the database, we match its ID with the logged in user’s ID:

public Single<Boolean> isPreviousUser(String token) {
   return databaseRepository.getAllItems(User.class)
       .first(EMPTY)
       .map(user -> !user.equals(EMPTY) && user.getId() == JWTUtils.getIdentity(token));
}


We have added a default user EMPTY in the first operator so that RxJava returns it if there are no users in the database and then we simply map the user to a boolean denoting if they are same or different using the EMPTY user and getIdentity method from JWTUtils

Finally, we use all this information to implement our self contained login request:

eventService
   .login(new Login(username, password))
   .flatMapSingle(loginResponse -> {
       String token = loginResponse.getAccessToken();
       utilModel.saveToken(token);

       return isPreviousUser(token);
   })
   .flatMapCompletable(isPrevious -> {
       if (!isPrevious)
           return utilModel.deleteDatabase();

       return Completable.complete();
   });


Let’s see what is happening here. A request using username and password is made to the server which returns a login response containing a JWT, which we store for future use. Next, we flatMapSingle to the Single returned by the isPreviousUser method. And we finally clear the database if it is not a previous user.

Creating these self contained models help reduce complexity in presenter or view layer and all data is handled in one layer making presenter layer model agnostic.

To learn more about JWT and some of the Rx operators I mentioned here, please visit these links:

Continue ReadingInvalidating user login using JWT in Open Event Orga App

Implementing Text-to-Speech (TTS) in SUSI Android

Mobile assistants are designed to perform tasks that the user “commands” through by chat UI or speech. The Android OS already provides Text to speech (TTS) and Speech to text (STT) features. This feature is available from Android version 1.6 onward. In this blog post I will show how tts is implemented in SUSI Android and how I fix the issue ‘delay in speech response’.

TextToSpeech class controls the tts engine. To use TextToSpeech class import it in the activity where you want to use text to speech feature.

import android.speech.tts.TextToSpeech;

After you import TextToSpeech class now we need to initialize TextToSpeech

TextToSpeech tts = new TextToSpeech(this,this);

Here first parameter is the Context and the other one is the listener. The listener is  use  to  inform our app that the engine is ready to use. In order to be notified we have to  implement  TextToSpeech.OnInitListener.

TextToSpeech.OnInitListener listener = new  TextToSpeech.OnInitListener {
@Override
public void onInit(int status) {
if (status == TextToSpeech.SUCCESS)
tts.setLanguage(Locale.UK/* set the default language*/);
}
}

Hence the engine can be initialized asIf status is success then, it means that TTS is initialized successfully and now we can use it. Otherwise, we can’t use it. setLanguage method is used to set language in which we want reply.

TextToSpeech tts = new TextToSpeech(getApplicationContext,listener)

When you use TTS one thing you have to remember that TTS run  on main thread so sometimes it may cause delays in text to speech conversion or it may block UI for a while. It is better to wrap it like below code.

new Handler().post(new Runnable() {
      @Override
      public void run() {
         tts = new TextToSpeech(getApplicationContext(), listener);
        }
    });

Now our engine is ready to speak, we need simply pass the string we want to read.

tts.speak(text to read,TextToSpeech.QUEUE_FLUSH, null, null);

But before tts.speak, it is important to check for the audio focus change request. It is important because only one audio source can have focus at a time. You can check it using below code.

private AudioManager.OnAudioFocusChangeListener afChangeListener =
           new AudioManager.OnAudioFocusChangeListener() {
                 public void onAudioFocusChange(int focusChange) {
                                                        //check for focus
                                                   }
                                           };

OnAudioFocusChangeListener is called when audio focus of the system is changed and according to value of focusChange either we stop TTS or keep using it.

AudioManager audiofocus = (AudioManager)                                    getSystemService(Context.AUDIO_SERVICE);

audiofocus is instance of AudioManager class. We need it to call requestAudioFocus method of AudioManager class. requestAudioFocus method returns the status of request for audio focus change. This method requires three parameter  instance of AudioManager.OnAudioFocusChangeListener, stream type and duration hint. If request is granted only then we can we can use tts.speak .

int result = audiofocus.requestAudioFocus(afChangeListener,AudioManager.STREAM_MUSIC, AudioManager.AUDIOFOCUS_GAIN);

if (result == AudioManager.AUDIOFOCUS_REQUEST_GRANTED) {

tts.speak(text to read,TextToSpeech.QUEUE_FLUSH, null, null);

}

We were continuously facing issue ‘delay in speech response’ because voiceReply method implementation was wrong. We were initializing TextToSpeech on each call of voiceReply method and since onInit method runs on main thread causing delay in voice response. So I removed it and instead of initializing tts each time I used the tts instance already initialized when activity create.

 String spoken = reply;

textToSpeech.speak(spoken, TextToSpeech.QUEUE_FLUSHnull);

You can also control how the engine read text. Like we can modify pitch and speech rate.

tts.setPitch((float)pitch);

tts.setSpeechRate((float)speed);

Resource

Continue ReadingImplementing Text-to-Speech (TTS) in SUSI Android

Passing Java Bitmap Object to Native for Image Processing and Getting it back in Phimpme Android

To perform any image processing operations on an image, we must have an image object in native part like we have a Bitmap object in Java. We cannot just pass the image bitmap object directly as an argument to native function because ‘Bitmap’ is a java object and C/C++ cannot interpret it directly as an image. So, here I’ll discuss a method to send java Bitmap object to Native part for performing image processing operations on it, which we implemented in the image editor of Phimpme Android Image Application.

C/C++ cannot interpret java bitmap object. So, we have to find the pixels of the java bitmap object and send them to native part to create a native bitmap over there.

In Phimpme, we used a “struct” data structure in C to represent native bitmap. An image has three color channels red, green, blue. We consider alpha channel(transparency) for an argb8888 type image. But in Phimpme, we considered only three channels as it is enough to manipulate these channels to implement the edit functions, which we used in the Editor of Phimpme.

We defined a struct, type-defined as NativeBitmap with attributes corresponding to all the three channels. We defined this in the nativebitmap.h header file in the jni/ folder of Phimpme so that we can include this header file in c files in which we needed to use a NativeBitmap struct.

#ifndef NATIVEBITMAP
#define NATIVEBITMAP
#endif
typedef struct {
  unsigned int width;
  unsigned int height;
  unsigned int redWidth;
  unsigned int redHeight;
  unsigned int greenWidth;
  unsigned int greenHeight;
  unsigned int blueWidth;
  unsigned int blueHeight;
  unsigned char* red;
  unsigned char* green;
  unsigned char* blue;
} NativeBitmap;

void deleteBitmap(NativeBitmap* bitmap);
int initBitmapMemory(NativeBitmap* bitmap, int width, int height);

As I explained in my previous post here on introduction to flow of native functions in Phimpme-Android, we defined the native functions with necessary arguments in Java part of Phimpme. We needed the image bitmap to be sent to the native part of the Phimpme application. So the argument in the function should have been java Bitmap object. But as mentioned earlier, the C code cannot interpret this java bitmap object directly as an image. So we created a function for getting pixels from a bitmap object in the Java class of Phimpme application. This function returns an array of unsigned integers which correspond to the pixels of a particular row of the image bitmap. The array of integers can be interpreted by C, so we can send this array of integers to native part and create a receiving native function to create NativeBitmap.

We performed image processing operations like enhancing and applying filters on this NativeBitmap and after the processing is done, we sent the array of integers corresponding to a row of the image bitmap and constructed the Java Bitmap Object using those received arrays in java.

The integers present in the array correspond to the color value of a particular pixel of the image bitmap. We used this color value to get red, green and blue values in native part of the Phimpme application.

Java Implementation for getting pixels from the bitmap, sending to and receiving from native is shown below.

private static void sendBitmapToNative(NativeBitmap bitmap) {
   int width = bitmap.getWidth();
   int height = bitmap.getHeight();
   nativeInitBitmap(width, height);
   int[] pixels = new int[width];
   for (int y = 0; y < height; y++) {
       bitmap.getPixels(pixels, 0, width, 0, y, width, 1); 
                    //gets pixels of the y’th row
       nativeSetBitmapRow(y, pixels);
   }
}
private static Bitmap getBitmapFromNative(NativeBitmap bitmap) {
   bitmap = Bitmap.createBitmap(srcBitmap.getWidth(), srcBitmap.getHeight(), srcBitmap.getConfig());
   int[] pixels = new int[width];
   for (int y = 0; y < height; y++) {
       nativeGetBitmapRow(y, pixels);
       bitmap.setPixels(pixels, 0, width, 0, y, width, 1);
   }
   return bitmap;
}

The native functions which are defined in Java part have to be linked to native functions. So they have to be created with proper function name in main.c (JNI) file of the Phimpme application. We included nativebitmap.h in main.c so that we can use NativeBitmap struct which is defined in nativebitmap.h.
The main functions which do the actual work related to converting integer array received from java part to NativeBitmap and converting back to an integer array of color values of pixels in rows of image bitmap are present in nativebitamp.c. The main.c file acts as Java Native Interface which helps in linking native functions and java functions in Phimpme Android.

After adding all the JNI functions, the main.c function looks as below.

main.c

static NativeBitmap bitmap;
int Java_org_fossasia_phimpme_PhotoProcessing_nativeInitBitmap(JNIEnv* env, jobject thiz, jint width, jint height) {
  return initBitmapMemory(&bitmap, width, height);  //function present
                                                    // in nativebitmap.c
}

void Java_org_fossasia_phimpme_PhotoProcessing_nativeSetBitmapRow(JNIEnv* env, jobject thiz, jint y, jintArray pixels) {
  int cpixels[bitmap.width];
  (*env)->GetIntArrayRegion(env, pixels, 0, bitmap.width, cpixels);
  setBitmapRowFromIntegers(&bitmap, (int)y, &cpixels);
}

void Java_org_fossasia_phimpme_PhotoProcessing_nativeGetBitmapRow(JNIEnv* env, jobject thiz, jint y, jintArray pixels) {
  int cpixels[bitmap.width];
  getBitmapRowAsIntegers(&bitmap, (int)y, &cpixels);
  (*env)->SetIntArrayRegion(env, pixels, 0, bitmap.width, cpixels);
                    //sending bitmap row as output
}

We now reached the main part of the implementation where we created the functions for storing integer array of color values of pixels in the NativeBitmap struct, which we created in nativebitmap.h of Phimpme Application. The definition of all the functions is present in nativebitmap.h, so we included that header file in the nativebitmap.c for using NativeBitmap struct in the functions. We implemented the functions defined in main.c i.e. initializing bitmap memory, setting bitmap row using integer array, getting bitmap row and a method for deleting native bitmap from memory after completion of processing the image in nativebitmap.c.

The implementation of nativebitmap.c after adding all functions is shown below. A proper explanation is added as comments wherever necessary.

void setBitmapRowFromIntegers(NativeBitmap* bitmap, int y, int* pixels) {
  //y is the number of the row (yth row)
  //pixels is the pointer to integer array which contains color value of a pixel
  unsigned int width = (*bitmap).width;
  register unsigned int i = (width*y) + width - 1;
                                //this represent the absolute                                 //index of the pixel in the image bitmap  
  register unsigned int x;      //this represent the index of the pixel 
                                //in the particular row of image bitmap
  for (x = width; x--; i--) {
          //functions defined above
     (*bitmap).red[i] = red(pixels[x]);
     (*bitmap).green[i] = green(pixels[x]);
     (*bitmap).blue[i] = blue(pixels[x]);
  }
}

void getBitmapRowAsIntegers(NativeBitmap* bitmap, int y, int* pixels) {
  unsigned int width = (*bitmap).width;
  register unsigned int i = (width*y) + width - 1; 
  register unsigned int x;              
  for (x = width; x--; i--) {
          //function defined above
     pixels[x] = rgb((int)(*bitmap).red[i], (int)(*bitmap).green[i], (int)(*bitmap).blue[i]);
  }
}

The native bitmap has to be initialized first before we set pixel values to it and has to be deleted from memory after completion of the processing. The functions for doing these tasks are given below. These functions should be added to nativebitmap.c file.

void deleteBitmap(NativeBitmap* bitmap) {
//free up memory
  freeUnsignedCharArray(&(*bitmap).red);//do same for green and blue
}

int initBitmapMemory(NativeBitmap* bitmap, int width, int height) {
  deleteBitmap(bitmap); 
             //if nativebitmap already has some value it gets removed
  (*bitmap).width = width;
  (*bitmap).height = height;
  int size = width*height;
  (*bitmap).redWidth = width;
  (*bitmap).redHeight = height;
            //assigning memory to the red,green and blue arrays and
            //checking if it succeeded for each step.
  int resultCode = newUnsignedCharArray(size, &(*bitmap).red);
  if (resultCode != MEMORY_OK) return resultCode;
            //repeat the code given above for green and blue colors
}

You can find the values of different color components of the RGB color value and RGB color values from the values of color components using the below functions. Add these functions to the top of the nativebitmap.c file.

int rgb(int red, int green, int blue) {
  return (0xFF << 24) | (red << 16) | (green << 8) | blue;
//Find the color value(int) from the red, green, blue values of a particular //pixel.
}

unsigned char red(int color) {
  return (unsigned char)((color >> 16) & 0xFF);
//Getting the red value form the color value of a particular pixel
}

//for green return this ((color >> 8) & 0xFF)
//for blue return this (color & 0xFF);

Do not forget to define native functions in Java part. As now everything got set up, we can use this in PhotoProcessing.java in the following manner to send Bitmap object to native.

Bitmap input = somebitmap;
if  (bitmap != null) {
    sendBitmapToNative(bitmap);
}

////Do some native processing on native bitmap struct
////Discussed in the next post

Bitmap output = getBitmapFromNative(input);
nativeDeleteBitmap();

Performing image processing operations on the NativeBitmap in the image editor of Phimpme like enhancing the image, applying filters are discussed in next posts.

Resources

Continue ReadingPassing Java Bitmap Object to Native for Image Processing and Getting it back in Phimpme Android