Implementing Skill Listing in SUSI Android App using Nested RecyclerViews

SUSI Skills are rules that are defined in SUSI Skill Data repo which are basically the responses SUSI gives to the user queries. When a user queries something from the SUSI Android app, a query to SUSI Server is made which further fetches response from SUSI Skill Data and gives the response to the app. Similarly, when we need to list all skills, an API call is made to server to list all skills. The server then checks the SUSI Skill Data repo for the skills and then return all the required information to the app. Then the app displays all the information about the skill to user. User then can view details of each skill and then interact on the chat interface to use that skill. This process is similar to what SUSI Skill CMS does. The CMS is a skill wiki like interface to view all skills and then edit them. Though the app can not be currently used to edit the skills but it can be used to view them and try them on the chat interface.

API Information

For listing SUSI Skill groups, we have to call on  /cms/getGroups.json

This will give you all groups in SUSI model in which skills are present. Current response:

{
  "session": {"identity": {
    "type": "host",
    "name": "14.139.194.24",
    "anonymous": true
  }},
  "accepted": true,
  "groups": [
    "Small Talk",
    "Entertainment",
    "Problem Solving",
    "Knowledge",
    "Assistants",
    "Shopping"
  ],
  "message": "Success: Fetched group list"
}

So, the groups object gives all the groups in which SUSI Skills are located.

Next comes, fetching of skills. For that the endpoint is /cms/getGroups.json?group=GROUP_NAME

Since we want all skills to be fetched, we call this api for every group. So, for example we will be calling http://api.susi.ai/cms/getSkillList.json?group=Entertainment for getting all skills in group “Entertainment”. Similarly for other groups as well.

Sample response of skill:

{
  "accepted": true,
  "model": "general",
  "group": "Shopping",
  "language": "en",
  "skills": {"amazon_shopping": {
    "image": "images/amazon_shopping.png",
    "author_url": "https://github.com/meriki",
    "examples": ["Buy a dress"],
    "developer_privacy_policy": null,
    "author": "Y S Ramya",
    "skill_name": "Shop At Amazon",
    "dynamic_content": true,
    "terms_of_use": null,
    "descriptions": "Searches items on Amazon.com for shopping",
    "skill_rating": null
  }},
  "message": "Success: Fetched skill list",
  "session": {"identity": {
    "type": "host",
    "name": "14.139.194.24",
    "anonymous": true
  }}
}

It gives all details about skills:

  1. image
  2. author_url
  3. examples
  4. developer_privacy_policy
  5. author
  6. skill_name
  7. dynamic_content
  8. terms_of_use
  9. descriptions
  10. skill_rating

Implementation in SUSI Android App

Skill Listing UI of Google Assistant

Skill Listing UI of SUSI SKill CMS

Skill Listing UI of SUSI Android App

The UI of skill listing in SUSI Android App is the mixture of UI of Skill listing in Google Assistant ap and SUSI Skill CMS. It displays skills in a beautiful manner with horizontal recyclerview nested in vertical recyclerview.

So, for implementing horizontal recyclerview inside vertical recyclerview, you need two viewholders and two adapters (one each for a recyclerview).

Let’s see the implementation.

1. First task is to fetch the information of groups in which skills are located. This line calls method in SkillListModel which then makes an API call to fetch groups.

skillListingModel.fetchGroups(this)

2. When the API call is succeeded, the below mentioned method is called which then calls a  skillListingModel.fetchSkills(groups[0], this) which fetches the skills located in group[0] group.

override fun onGroupFetchSuccess(response: Response<ListGroupsResponse>) {
   if (response.isSuccessful && response.body() != null) {
       groupsCount = response.body().groups.size
       groups = response.body().groups
       skillListingModel.fetchSkills(groups[0], this)
   } else {
       skillListingView?.visibilityProgressBar(false)
       skillListingView?.displayErrorDialog()
   }
}

3. When API call for fetching skills in group[0] succeeds, the count value is increased and then skills in group[1] are fetched and so on.

override fun onSkillFetchSuccess(response: Response<ListSkillsResponse>, group: String) {
   if (response.isSuccessful && response.body() != null) {
       skills.add(Pair(group, response.body().skillMap))
       count++
       if(count == groupsCount) {
           skillListingView?.visibilityProgressBar(false)
           skillListingView?.updateAdapter(skills)
       } else {
           skillListingModel.fetchSkills(groups[count], this)
       }
   } else {
       skillListingView?.visibilityProgressBar(false)
       skillListingView?.displayErrorDialog()
   }
}

4. When skills in all groups are fetched, the data in adapter is updated using skillGroupAdapter.notifyDataSetChanged()

override fun updateAdapter(skills: ArrayList<Pair<String, Map<String, SkillData>>>) {
   this.skills.clear()
   this.skills.addAll(skills)
   skillGroupAdapter.notifyDataSetChanged()
}

5. The data is set to the layout in two adapters made earlier. The following is the code to set the group name and adapter to horizontal recyclerview. This is the GroupAdapter to set data to row item in vertical recyclerview.

override fun onBindViewHolder(holder: GroupViewHolder?, position: Int) {
   if(skills[position].first != null)
       holder?.groupName?.text = skills[position].first
   holder?.skillList?.setHasFixedSize(true)
   val mLayoutManager = LinearLayoutManager(context, LinearLayoutManager.HORIZONTAL, false)
   holder?.skillList?.layoutManager = mLayoutManager
   holder?.skillList?.adapter = SkillListAdapter(context, skills[position])
}

6. Similarly, the data of each individual element in the horizontal recyclerview is set in the skillAdapter. The data set are title, examples, description and image. We have used Picasso library to load images from the URL.

override fun onBindViewHolder(holder: SkillViewHolder?, position: Int) {
   val skillData = skillDetails.second.values.toTypedArray()[position]

   if(skillData.skillName == null || skillData.skillName.isEmpty()){
       holder?.skillPreviewTitle?.text = context.getString(R.string.no_skill_name)
   } else {
       holder?.skillPreviewTitle?.text = skillData.skillName
   }

   if( skillData.descriptions == null || skillData.descriptions.isEmpty()){
       holder?.skillPreviewDescription?.text = context.getString(R.string.no_skill_description)
   } else {
       holder?.skillPreviewDescription?.text = skillData.descriptions
   }

   if(skillData.examples == null || skillData.examples.isEmpty())
       holder?.skillPreviewExample?.text = StringBuilder("\"").append("\"")
   else
       holder?.skillPreviewExample?.text = StringBuilder("\"").append(skillData.examples[0]).append("\"")

   if(skillData.image == null || skillData.image.isEmpty()){
       holder?.previewImageView?.setImageResource(R.drawable.ic_susi)
   } else {
       Picasso.with(context.applicationContext).load(StringBuilder(imageLink)
               .append(skillDetails.first.replace(" ","%20")).append("/en/").append(skillData.image).toString())
               .fit().centerCrop()
               .into(holder?.previewImageView)
   }
}

Summary

So, this blog talked about how the Skill Listing feature in SUSI Android App is implemented. This included how a network call is made, logic for making different network calls, making a nested horizontal recyclerview inside vertical recyclerview, etc. So, If you are looking forward to contribute to SUSI Android App, this can help you a little. But if not so, this may also help you in understanding and how you can implement nested recyclerviews similar to Google Play Store.

References

  1. To know about servlets https://en.wikipedia.org/wiki/Java_servlet
  2. To see how to implement one https://www.javatpoint.com/servlet-tutorial
  3. To see how to make network calls in android using Retrofit https://guides.codepath.com/android/Consuming-APIs-with-Retrofit
  4. To see how to implement Horizontal recyclerView inside Vertical recyclerView http://android-pratap.blogspot.in/2015/12/horizontal-recyclerview-in-vertical.html
  5. To see how to implement custom RecyclerView Adapter https://www.survivingwithandroid.com/2016/09/android-recyclerview-tutorial.html
Continue ReadingImplementing Skill Listing in SUSI Android App using Nested RecyclerViews

Implementation of Child Routes in SUSI Skill CMS

In a previous blog post I discussed about how we implemented routing in SUSI Web Chat Application. In this post I’m planning to discuss about how we developed child routes in SUSI Skill CMS .

When we start developing our application, it was working correctly but  all skills loaded in the same URL. ( skill.susi.ai/SkillPage ). When user clicks the edit button every skill loaded in the same URL ( skill.susi.ai/EditSkill ). We got a requirement to load each of our skills in separate routes. This is how we implemented the child routes of the application.

We wanted to show each individual skill under this type of URL,

skill.susi.ai/ [SKILL GROUP] / [SKILL NAME] / [LANGUAGE]

When user clicks on the edit button, we needed to show that particular skill under this URL.

skill.susi.ai/ [SKILL GROUP] / [SKILL NAME] / edit / [LANGUAGE]

First we set our routings in index.js file.

<Switch>
    <Route exact path="/:category/:skill/edit/:lang" component={Home} />
    <Route exact path="/:category/:skill/:lang" component={SkillListing}/>
    <Route exact path="/" component={BrowseSkill} />
    <Route exact path="*" component={NotFound} />
</Switch>

We have to add the “exact” attribute, if we don’t add that it will not redirect users to “404” page when user trying to access wrong routes.

Next step is sending data from one component to another component.
In SUSI Skill CMS, user can choose any skill from the home page. Then after it goes to the skill page and shows details about the selected skill. We have to modify the button as,

<Link to={{ pathname: '/'+self.state.groupValue+'/'+el+'/'+self.state.languageValue }} >
<Card>
</Card>
</Link>

Now the user clicks on the card. It changes the URL and loads the corresponding component according to the routes that we defined in “index.js” file previously.
Second thing that we need to do is to catch URL routs and render relevant data according to the URL routes.
Let’s say I clicked on “distance” skill. Then user will go to this URL “http://skills.susi.ai/Knowledge/distance/en ”
Now It loads the “SkillListing” component according to the route we defined in “ index.js ” here ””.
To derive data from URL we simply used these codes in “SkillListing.js”.

let baseUrl = 'http://api.susi.ai/cms/getSkillMetadata.json';           
let modelValue = "general";
           this.name = this.props.location.pathname.split('/')[2];
           this.groupValue = this.props.location.pathname.split('/')[1];
           this.languageValue = this.props.location.pathname.split('/')[3];
           url = baseUrl + '?model=' + modelValue + '&group=' + this.groupValue + '&language=' + this.languageValue + '&skill=' + this.name;

We collected data from the URL and made another URL, we used this URL to get details of the skill from the server. We used this urls as below.

           $.ajax({
               url: url,
               jsonpCallback: 'pc',
               dataType: 'jsonp',
               jsonp: 'callback',
               crossDomain: true,
               success: function (data) {
                   self.updateData(data.skill_metadata)
               }
           });

If the Ajax request is success, those data are passed to “updateData()” and it updates the component and shows to users like this.

We applied same mechanism to the edit button and edit page. This is how we modified skill.susi.ai ‘s Routings. If you like to contribute SUSI Skill CMS please fork our repository on github. here

Resources:

  • Previous Blogpost about routing: https://blog.fossasia.org/implementation-of-react-routers-in-susi-web-chat/
  • React Router v4 tutorial https://medium.com/@pshrmn/a-simple-react-router-v4-tutorial-7f23ff27adf
Continue ReadingImplementation of Child Routes in SUSI Skill CMS

Enabling Google App Signing for Android Project

Signing key management of Android Apps is a hectic procedure and can grow out of hand rather quickly for large organizations with several independent projects. We, at FOSSASIA also had to face similar difficulties in management of individual keys by project maintainers and wanted to gather all these Android Projects under singular key management platform:

To handle the complexities and security aspect of the process, this year Google announced App Signing optional program where Google takes your existing key’s encrypted file and stores it on their servers and asks you to create a new upload key which will be used to sign further updates of the app. It takes the certificates of your new upload key and maps it to the managed private key. Now, whenever there is a new upload of the app, it’s signing certificate is matched with the upload key certificate and after verification, the app is signed by the original private key on the server itself and delivered to the user. The advantage comes where you lose your key, its password or it is compromised. Before App Signing program, if your key got lost, you had to launch your app under a new package name, losing your existing user base. With Google managing your key, if you lose your upload key, then the account owner can request Google to reassign a new upload key as the private key is secure on their servers.

There is no difference in the delivered app from the previous one as it is still finally signed by the original private key as it was before, except that Google also optimizes the app by splitting it into multiple APKs according to hardware, demographic and other factors, resulting in a much smaller app! This blog will take you through the steps in how to enable the program for existing and new apps. A bit of a warning though, for security reasons, opting in the program is permanent and once you do it, it is not possible to back out, so think it through before committing.

For existing apps:

First you need to go to the particular app’s detail section and then into Release Management > App Releases. There you would see the Get Started button for App Signing.

The account owner must first agree to its terms and conditions and once it’s done, a page like this will be presented with information about app signing infrastructure at top.

So, as per the instructions, download the PEPK jar file to encrypt your private key. For this process, you need to have your existing private key and its alias and password. It is fine if you don’t know the key password but store password is needed to generate the encrypted file. Then execute this command in the terminal as written in Step 2 of your Play console:

java -jar pepk.jar –keystore={{keystore_path}} –alias={{alias}} –output={{encrypted_file_output_path}} –encryptionkey=eb10fe8f7c7c9df715022017b00c6471f8ba8170b13049a11e6c09ffe3056a104a3bbe4ac5a955f4ba4fe93fc8cef27558a3eb9d2a529a2092761fb833b656cd48b9de6a

You will have to change the bold text inside curly braces to the correct keystore path, alias and the output file path you want respectively.

Note: The encryption key has been same for me for 3 different Play Store accounts, but might be different for you. So please confirm in Play console first

When you execute the command, it will ask you for the keystore password, and once you enter it, the encrypted file will be generated on the path you specified. You can upload it using the button on console.

After this, you’ll need to generate a new upload key. You can do this using several methods listed here, but for demonstration we’ll be using command line to do so:

keytool -genkey -v -keystore {{keystore_path}} -alias {{alias_name}} -keyalg RSA -keysize 2048 -validity 10000

The command will ask you a couple of questions related to the passwords and signing information and then the key will be generated. This will be your public key and be used for further signing of your apps. So keep it and the password secure and handy (even if it is expendable now).

After this step, you need to create a PEM upload certificate for this key, and in order to do so, execute this command:

keytool -export -rfc -keystore {{keystore_path}} -alias {{alias_name}} -file {{upload_certificate.pem}}

After this is executed, it’ll ask you the keystore password, and once you enter it, the PEM file will be generated and you will have to upload it to the Play console.

If everything goes right, your Play console will look something like this:


Click enrol and you’re done! Now you can go to App Signing section of the Release Management console and see your app signing and new upload key certificates


You can use the SHA1 hash to confirm the keys as to which one corresponds to private and upload if ever in confusion.

For new apps:

For new apps, the process is like a walk in park. You just need to enable the App Signing, and you’ll get an option to continue, opt-out or re-use existing key.


If you re-use existing key, the process is finished then and there and an existing key is deployed as the upload key for this app. But if you choose to Continue, then App Signing will be enabled and Google will use an arbitrary key as private key for the app and the first app you upload will get its key registered as the upload key


This is the screenshot of the App Signing console when there is no first app uploaded and you can see that it still has an app signing certificate of a key which you did not upload or have access to.

If you want to know more about app signing program, check out these links:

Continue ReadingEnabling Google App Signing for Android Project

Introducing Stream Servlet in loklak Server

A major part of my GSoC proposal was adding stream API to loklak server. In a previous blog post, I discussed the addition of Mosquitto as a message broker for MQTT streaming. After testing this service for a few days and some minor improvements, I was in a position to expose the stream to outside users using a simple API.

In this blog post, I will be discussing the addition of /api/stream.json endpoint to loklak server.

HTTP Server-Sent Events

Server-sent events (SSE) is a technology where a browser receives automatic updates from a server via HTTP connection. The Server-Sent Events EventSource API is standardized as part of HTML5 by the W3C.

Wikipedia

This API is supported by all major browsers except Microsoft Edge. For loklak, the plan was to use this event system to send messages, as they arrive, to the connected users. Apart from browser support, EventSource API can also be used with many other technologies too.

Jetty Eventsource Plugin

For Java, we can use Jetty’s EventSource plugin to send events to clients. It is similar to other Jetty servlets when it comes to processing the arguments, handling requests, etc. But it provides a simple interface to send events as they occur to connected users.

Adding Dependency

To use this plugin, we can add the following line to Gradle dependencies –

compile group: 'org.eclipse.jetty', name: 'jetty-eventsource-servlet', version: '1.0.0'

[SOURCE]

The Event Source

An EventSource is the object which is required for EventSourceServlet to send events. All the logics for emitting events needs to be defined in the related class. To link a servlet with an EventSource, we need to override the newEventSource method –

public class StreamServlet extends EventSourceServlet {
    @Override
    protected EventSource newEventSource(HttpServletRequest request) {
        String channel = request.getParameter("channel");
        if (channel == null) {
            return null;
        }
        if (channel.isEmpty()) {
            return null;
        }
        return new MqttEventSource(channel);
    }
}

[SOURCE]

If no channel is provided, the EventSource object will be null and the request will be rejected. Here, the MqttEventSource would be used to handle the stream of Tweets as they arrive from the Mosquitto message broker.

Cross Site Requests

Since the requests to this endpoint can’t be of JSONP type, it is necessary to allow cross site requests on this endpoint. This can be done by overriding the doGet method of the servlet –

@Override
protected void doGet(HttpServletRequest request, HttpServletResponse response) throws ServletException, IOException {
     response.setHeader("Access-Control-Allow-Origin", "*");
    super.doGet(request, response);
}

[SOURCE]

Adding MQTT Subscriber

When a request for events arrives, the constructor to MqttEventSource is called. At this stage, we need to connect to the stream from Mosquitto for the channel. To achieve this, we can set the class as MqttCallback using appropriate client configurations –

public class MqttEventSource implements MqttCallback {
    ...
    MqttEventSource(String channel) {
        this.channel = channel;
    }
    ...
    this.mqttClient = new MqttClient(address, "loklak_server_subscriber");
    this.mqttClient.connect();
    this.mqttClient.setCallback(this);
    this.mqttClient.subscribe(this.channel);
    ...
}

[SOURCE]

By setting the callback to this, we can override the messageArrived method to handle the arrival of a new message on the channel. Just to mention, the client library used here is Eclipse Paho.

Connecting MQTT Stream to SSE Stream

Now that we have subscribed to the channel we wish to send events from, we can use the Emitter to send events from our EventSource by implementing it –

public class MqttEventSource implements EventSource, MqttCallback {
    private Emitter emitter;


    @Override
    public void onOpen(Emitter emitter) throws IOException {
        this.emitter = emitter;
        ...
    }

    @Override
    public void messageArrived(String topic, MqttMessage message) throws Exception {
        this.emitter.data(message.toString());
    }
}

[SOURCE]

Closing Stream on Disconnecting from User

When a client disconnects from the stream, it doesn’t makes sense to stay connected to the server. We can use the onClose method to disconnect the subscriber from the MQTT broker –

@Override
public void onClose() {
    try {
        this.mqttClient.close();
        this.mqttClient.disconnect();
    } catch (MqttException e) {
        // Log some warning 
    }
}

[SOURCE]

Conclusion

In this blog post, I discussed connecting the MQTT stream to SSE stream using Jetty’s EventSource plugin. Once in place, this event system would save us from making too many requests to collect and visualize data. The possibilities of applications of such feature are huge.

This feature can be seen in action at the World Mood Tracker app.

The changes were introduced in pull request loklak/loklak_server#1474 by @singhpratyush (me).

Resources

Continue ReadingIntroducing Stream Servlet in loklak Server

Displaying Proper Notification While Image is Being Uploaded in Phimpme

In this blog, I will explain how to display App Icon and appropriate text messages in the notification bar while the image is being uploaded on the various social media platform in Phimpme Android application.

Displaying Application icon in the Notification Bar

Whenever Phimpme application uses the notification the application icon should be present during the progress bar is showing and after the image has been uploaded to the social network website.

In the notification bar there are two types of the icon that can be set:

  • Small icon
  • Large Icon

In the small icon, we are putting the upload sign to tell the users that the image is being uploaded.

In the large icon, I am putting the logo of the Phimpme application. This way when the user exits the application while there is an upload process going on, he or she will know that the upload process is from the Phimpme application.

To set the app icon in the Notification bar:

.setLargeIcon(BitmapFactory.decodeResource(ActivitySwitchHelper.getContext().getResources(),
       R.mipmap.ic_launcher))

To set the small icon in the Notification bar:

.setSmallIcon(R.drawable.ic_cloud_upload_black_24dp)

Displaying appropriate account name while uploading the Image

While uploading an Image the notification bar should show the appropriate Account Name in which the account is being uploaded. For example, if the image is being uploaded on Google Plus then the Notification should display “Uploading the image on Google Plus”.

For this, we need to modify the NotificationHandler.make() function and make it accept String resource as a parameter. We can then modify setContentTitle() function to display the appropriate message.

public static void make(@StringRes int title){

//Display Notification code over here

}

setContentTitle() function in Phimpme to display the appropriate function:

mBuilder.setContentTitle(ActivitySwitchHelper.getContext().getString(R.string.upload_progress) + " " + ActivitySwitchHelper.getContext().getResources().getString(title))

Notification make() function after the changes:

public static void make(@StringRes int title){
   mNotifyManager = (NotificationManager) ActivitySwitchHelper.getContext().getSystemService(Context.NOTIFICATION_SERVICE);
   mBuilder = new NotificationCompat.Builder(ActivitySwitchHelper.getContext());
   mBuilder.setContentTitle(ActivitySwitchHelper.getContext().getString(R.string.upload_progress) + " " + ActivitySwitchHelper.getContext().getResources().getString(title))
           .setLargeIcon(BitmapFactory.decodeResource(ActivitySwitchHelper.getContext().getResources(),
                   R.mipmap.ic_launcher))
           .setContentText(ActivitySwitchHelper.getContext().getString(R.string.progress))
           .setSmallIcon(R.drawable.ic_cloud_upload_black_24dp)
           .setOngoing(true);
   mBuilder.setProgress(0, 0, true);
   // Issues the notification
   mNotifyManager.notify(id, mBuilder.build());
}

Conclusion

Notification makes any application more interactive and show live updates even when the application is in use. By following this method users can be aware of the upload functionality and in which account the image is beign uploaded.

Github

Resources


Continue ReadingDisplaying Proper Notification While Image is Being Uploaded in Phimpme

Implementing Skill Listing in SUSI iOS

Skills are basically a set of rules which respond to the user’s queries through any client app. All the skills are defined in the SUSI Skill Data repo where the user’s queries are matched with the already present skills and the server responds accordingly. Apps like Alexa, Google Assistant have an interface to view skills with a set of sample queries that can be used therefore, we are adding the same skill display UI in the SUSI iOS app.

Implementation

All the skills are arranged into categories or groups, so we first need to fetch all those groups followed by fetching skills from each group. For listing all the groups, we use the endpoint below:

http://api.susi.ai/cms/getGroups.json

Which returns all the groups in the groups object like below:

{
  "session": {"identity": {
    "type": "host",
    "name": "67.214.191.117",
    "anonymous": true
  }},
  "accepted": true,
  "groups": [
    "Social",
    "News",
    "Food and Drink",
    "Travel and Transportation",
    "Connected Car",
    "Movies and TV",
    "Problem Solving",
    "Knowledge",
    "Business and Finance",
    "Productivity",
    "Games, Trivia and Accessories",
    "Lifestyle",
    "Health and Fitness",
    "Music and Audio",
    "Shopping",
    "Communication",
    "Novelty and Humour",
    "Utilities",
    "Sports", 
    "Weather"
  ],
  "message": "Success: Fetched group list"
}

After the groups have been fetched, we need to get the skills for each group. Here, we use the endpoint below:

http://api.susi.ai/cms/getSkillList.json?group=GROUP_NAME

Since, we have a number of groups, we need to make the above API call as many times as the group count is. A sample call would look like:

http://api.susi.ai/cms/getSkillList.json?group=News

which would fetch all the skills in the News group.

{
  "accepted": true,
  "model": "general",
  "group": "News",
  "language": "en",
  "skills": {"news": {
    "image": "images/news.png",
    "author_url": "https://github.com/AliAyub007",
    "examples": [
      "News",
      "latest news",
      "most viewed articles in science today",
      "most viewed articles in science in the last week",
      "most viewed articles in science in the last month",
      "most shared articles in science today",
      "can you tell me last week's most shared articles in science",
      "do you know most shared articles in arts in the last month",
      "most emailed articles today in arts",
      "most emailed articles in science in the last week",
      "can you tell me most emailed articles in science in the last month",
      "articles in science",
      "show me articles",
      "most emailed articles",
      "most shared articles",
      "tell me news in tech world"
    ],
    "developer_privacy_policy": null,
    "author": "Ali Ayub Khan",
    "skill_name": "NEWS",
    "dynamic_content": true,
    "terms_of_use": null,
    "descriptions": "A skill to give news.",
    "skill_rating": null
  }},
  "message": "Success: Fetched skill list",
  "session": {"identity": {
    "type": "host",
    "name": "23.94.137.239",
    "anonymous": true
  }}
}

Each such json object gives us the following values:

  • Model
  • Group
  • Language
  • Image Path
  • Author’s URL
  • Author’s Name
  • A list of sample queries
  • Skill Name
  • Licence and terms of use
  • Rating
  • Description

Implementation in SUSI iOS

The UI for listing skills is a little complex as it consists of a UITableView where each UITableViewCell consists of a UILabel(group name) and a UICollectionVIew (horizontal scroll).

Let’s see the step by step process to implement the skill listing.

  1. First, we need to fetch all the groups available using the endpoint above.
// get all groups
func getAllGroups() {
  Client.sharedInstance.getAllGroups { (groups, success, message) in
    DispatchQueue.main.async {
      if success {
        self.groups = groups
        self.tableView.reloadData()
      } else {
        print(message ?? "error")
      }
    }
  }
}
  1. After the response from the above call is obtained, the groups object containing all the groups is returned to the controller which the group name to set the UILabel.
var groupName: String? {
  didSet {
    backgroundColor = Color.grey.lighten3
    groupNameLabel.text = groupName
  }
}
  1. After the label is set, each cell makes another API call to populate the collection view, since these calls are concurrent, the collection view populates as soon as the response is fetched.
  2. The response from the above API call is used to create an array of Skill Model objects which is used to parse the response and to effectively use the data to display.
if let skills = response[Client.SkillListing.skills] as? [String : AnyObject],
  let model = response[Client.SkillListing.model] as? String,
  let group = response[Client.SkillListing.group] as? String,
  let language = response[Client.SkillListing.language] as? String,
  skills.count > 0 {
    let skillData = Skill.getAllSkill(skills, model, group, language)
    completion(skillData, true, nil)
    return
}
static func getAllSkill(_ skills: [String : AnyObject], _ model: String, _ group: String, _ language: String) -> [Skill] {
  var skillData = [Skill]()
  for skill in skills {
    let newSkill = Skill(dictionary: skill.value as! [String : AnyObject])
    newSkill.imagePath = getImagePath(model, group, language, newSkill.imagePath)
    skillData.append(newSkill)
  }
  return skillData
}
  1. At last, the skill object for the collection view is used to populate it as below:
var skill: Skill? {
  didSet {
    if let skill = skill {
      if let url = URL(string: skill.imagePath) {
        imageView.kf.setImage(with: url)
      }
      exampleQueryLabel.text = "\(skill.examples.first?.debugDescription ?? "")"
      skillNameLabel.text = skill.skillName
      skillDescription.text = skill.skillDescription
    }
  }
}

Here, we make use of the didSet method to populate the collection view. We have used Kingfisher to display the images.

That’s all for the scope of this tutorial. We learned how to fetch the skill groups followed by fetching the skills and displaying the skill data using the skill model object.

Below is the final UI we see after implementation.

Resources

Continue ReadingImplementing Skill Listing in SUSI iOS

Creating an Elementary Oscilloscope in PSLab’s Remote Framework

The last couple of blog posts explained how we could put together the versatility of ember components, the visual appeal of jqplot, the flexibility of Python Flask, and the simplicity of Python itself in order to make simple scripts for PSLab that would could be run on a server by a remote client anywhere on the web. We have also seen how callbacks could be assigned to widgets created in these scripts in order to make object oriented applications. In this blog post, we shall see how to assign a capture method to a button, and update a plot with the received data. It will also demonstrate how to use ember-lodash to perform array manipulations.

Specifying the return data type in the callback success routine

For a more instructive write-up on assigning callbacks, please refer to these posts .

Whenever the callback assigned to a button is a function that returns an array of elements, and the target for the resultant data is a plot, the stacking order of the returned array must be specified in order to change its shape to suit the plotting library. The default return data from a capture routine (oscilloscope) is made up of separate arrays for X coordinate and Y coordinate values. Since JQplot requires [X,Y] pairs , we must specify a stacking order of ‘xy’ so that the application knows that it must convert them to pairs (using lodash/zip)  before passing the result to the plot widget. Similarly, different stacking orders for capture2, and capture4 must also be defined.

Creating an action that performs necessary array manipulations and plots the received data

It can be seen from the excerpt below, that if the onSuccess target for a callback is specified to be a plot in the actionDefinition object, then the stacking order is checked, and the returned data is modified accordingly

Relevant excerpt from controllers/user-home.js/runButtonAction

if (actionDefinition.success.type === 'update-plot') {
  if (actionDefinition.success.stacking === 'xy') {
    $.jqplot(actionDefinition.success.target, [zip(...resultValue)]).replot();
  } else if (actionDefinition.success.stacking === 'xyy') {
    $.jqplot(actionDefinition.success.target, [zip(...[resultValue[0], resultValue[1]]), zip(...[resultValue[0], resultValue[2]])]).replot();
  } else if (actionDefinition.success.stacking === 'xyyyy') {
    $.jqplot(actionDefinition.success.target, [zip(...[resultValue[0], resultValue[1]]), zip(...[resultValue[0], resultValue[2]]), zip(...[resultValue[0], resultValue[3]]), zip(...[resultValue[0], resultValue[4]])]).replot();
  } else {
    $.jqplot(actionDefinition.success.target, resultValue).replot();
  }
}


With the above framework in place, we can add a plot with the line plt = plot(x, np.sin(x)) , and associate a button with a capture routine that will update its contents with a single line of code: button(‘capture1’,”capture1(‘CH1’,100,10)”,”update-plot”,target=plt)

Final Result

The following script created on the pslab-remote platform makes three buttons and plots, and sets the buttons to invoke capture1, capture2, and capture4 respectively when clicked.

import numpy as np
x=np.linspace(0,2*np.pi,30)
plt = plot(x, np.sin(x))
button('capture 1',"capture1('CH1',100,10)","update-plot",target=plt)

plt2 = plot(x, np.sin(x))
button('capture 2',"capture2(50,10)","update-plot",target=plt2,stacking='xyy')

plt3 = plot(x, np.sin(x))
button('capture 4',"capture4(50,10)","update-plot",target=plt3,stacking='xyyyy')


Resources


Continue ReadingCreating an Elementary Oscilloscope in PSLab’s Remote Framework

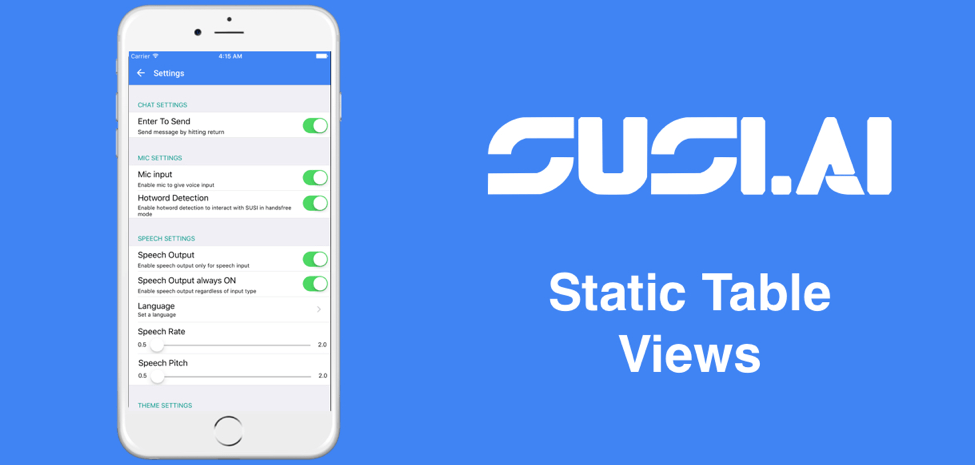
Settings Controller UI using Static Table View

Dynamic Table Views are used at places where there may be any kind of reusability of cells. This means that there would exist cells that would have the same UI elements but would differ in the content being displayed. Initially the Settings Controller was built using UICollectionViewController which is completely dynamic but later I realized that the cells will remain static every time so there is no use of dynamic cells to display the UI hence, I switched to static table view cells. Using Static Table View is very easy. In this blog, I will explain how the implementation of the same was achieved in SUSI iOS app.

Let’s start by dragging and dropping a UITableViewController into the storyboard file.

The initial configuration of the UITableView has content as Dynamic Prototypes but we need Static cells so we choose them and make the sections count to 5 to suit our need. Also, to make the UI better, we choose the style as Grouped.

Now for each section, we have the control of statically adding UI elements so, we add all the settings with their corresponding section headers and obtain the following UI.


After creating this UI, we can refer any UI element independently be it in any of the cells. So here we create references to each of the UISlider and UISwitch so that we can trigger an action whenever the value of anyone of them changes to get their present state.

To create an action, simply create a function and add `@IBAction` in front so that they can be linked with the UI elements in the storyboard and then click and drag the circle next to the function to UI element it needs to be added. After successful linking, hovering over the same circle would reveal all the UI elements which trigger that function. Below is a method with the @IBAction identifier indicating it can be linked with the UI elements in the storyboard. This method is executed whenever any slider or switch value changes, which then updates the UserDefaults value as well sends an API request to update the setting for the user on the server.

@IBAction func settingChanged(sender: AnyObject?) {
        var params = [String: AnyObject]()
        var key: String = ""

        if let senderTag = sender?.tag {
            if senderTag == 0 {
                key = ControllerConstants.UserDefaultsKeys.enterToSend
            } else if senderTag == 1 {
                key = ControllerConstants.UserDefaultsKeys.micInput
            } else if senderTag == 2 {
                key = ControllerConstants.UserDefaultsKeys.hotwordEnabled
            } else if senderTag == 3 {
                key = ControllerConstants.UserDefaultsKeys.speechOutput
            } else if senderTag == 4 {
                key = ControllerConstants.UserDefaultsKeys.speechOutputAlwaysOn
            } else if senderTag == 5 {
                key = ControllerConstants.UserDefaultsKeys.speechRate
            } else if senderTag == 6 {
                key = ControllerConstants.UserDefaultsKeys.speechPitch
            }

            if let slider = sender as? UISlider {
                UserDefaults.standard.set(slider.value, forKey: key)
            } else {
                UserDefaults.standard.set(!UserDefaults.standard.bool(forKey: key), forKey: key)
            }

            params[ControllerConstants.key] = key as AnyObject
            params[ControllerConstants.value] = UserDefaults.standard.bool(forKey: key) as AnyObject

            if let delegate = UIApplication.shared.delegate as? AppDelegate, let user = delegate.currentUser {
                params[Client.UserKeys.AccessToken] = user.accessToken as AnyObject
                params[ControllerConstants.count] = 1 as AnyObject

                Client.sharedInstance.changeUserSettings(params) { (_, message) in
                    DispatchQueue.main.async {
                        self.view.makeToast(message)
                    }
                }
            }
        }
    }

References

Continue ReadingSettings Controller UI using Static Table View

Making SUSI Alexa skill as an express app

Previously SUSI Alexa skill was deployed using AWS Lambda service (Refer to this blog). Each SUSI.AI Bot should be deployed on Google cloud using Kubernetes. To accomplish that, we need to remove the dependency of the SUSI Alexa skill from AWS Lambda service. We need to make it an express app, to be able to deploy it to Google cloud. Let’s start with on how to achieve it:

SUSI Alexa skill:

We require three files to make the skill as an express app. The main entry point for the skill would be server.js file, which will serve the incoming request using two helper files alexa.js and handlers.js.

Server.js:

This file acts as the main entry point for the incoming request. We handle two type of requests using it, that are:

  1. Launch request
  2. Intent request

Launch request is triggered when a person utters “Alexa, open susi chat” , “Alexa, start susi chat”, “Alexa, launch susi chat” etc. This request is responded with an introductory phrase about SUSI.AI. To catch this request:

if (type === "LaunchRequest") {
        var endpoint = "http://api.susi.ai/susi/chat.json?q="+"Welcome"; // ENDPOINT GOES HERE
        
        http.get(endpoint, (response1) => {
            var body = "";
            response1.on("data", (chunk) => { body += chunk; });
            response1.on("end", () => {
                var viewCount;
                viewCount = JSON.parse(body).answers[0].actions[0].expression;
                endpoint = "http://api.susi.ai/susi/chat.json?q="+"Get+started"; // ENDPOINT GOES HERE
                body = "";
                http.get(endpoint, (response2) => {
                    response2.on("data", (chunk) => { body += chunk; });
                    response2.on("end", () => {
                        viewCount += JSON.parse(body);.answers[0].actions[0].expression;
                        response.say(viewCount,false);
                    });
                });
            });
        });
    }

Intent request gets triggered, when any other phrase is uttered by the user except Launch related phrases. We check if the intent triggered has a corresponding handler to handle the request. If the handler is found in handlers.js file, we call it passing the required arguments to the handler function. Let’s see how handlers make this step possible.

Handler.js:

This file decides on what function to run when a particular type of intent is triggered. As we have just one intent for our SUSI Alexa skill i.e. callSusiApi, we have just one function in our handlers.js file. During its execution, the first step we do is extract the query value:

let query = slots.query.value;

Depending upon the query value, we run its corresponding code. For example, in case of a generic query (i.e. any query except stop, cancel and help):

var endpoint = "http://api.susi.ai/susi/chat.json?q="+query; // ENDPOINT GOES HERE

http.get(endpoint, (response1) => {
    var body = "";
    response1.on("data", (chunk) => { body += chunk; });
    response1.on("end", () => {
        var data = JSON.parse(body);
        if(data.answers[0].actions[1]){
            // handle rss and table type results
        }
        else
        {
            viewCount = data.answers[0].actions[0].expression;
        }
        response.say(viewCount,true);
    });
});

At the end of the function we respond to the user with an answer to his/her query using:

response.say(viewCount,true);

Alexa.js:

When we get a request from the user, we pass that request and response object to this file. This file helps us wrap the required request properties into an object and return that back to the server file, which was the entry point for the request. Now, we can easily extract the properties in server file and work with those:

We extract the properties like this:

let session = req.body.session,
        intent,
        slots;
session.attributes = session.attributes || {};

if (req.body.request.intent) {
    intent = req.body.request.intent.name;
    slots = req.body.request.intent.slots;
}

Then we return the object back at the end:

return {
        type: req.body.request.type,
        intent: intent,
        slots: slots,
        session: session,
        response: {
            say: (text, shouldEndSession) => say(text, shouldEndSession),
            ask: (text, shouldEndSession) => say(text, shouldEndSession)
        }
    };

Great, we have made the SUSI Alexa skill as an express app. The next step is to do some changes in the configuration tab of our skill:

  1. Instead of Amazon resource number, we fill our webhook address here: 

  2. A new property shows up that is SSL certificate. As we are using Heroku for webhook services, we select the second option as shown below: 

  3. It’s time to test the skill: 

    This repository by Salesforce helped me a lot in making the SUSI skill as an express app.

    Resources:

    1. Developing Alexa Skills Locally with Node.js by Josh Skeen from Bignerdranch.
    2. Amazon Alexa Skills: Create a Custom Skill by Simon Coope from SJCNET.
Continue ReadingMaking SUSI Alexa skill as an express app

Implementing Roles API on Open Event Frontend to Create Roles Using an External Modal

This blog article will illustrate how the roles are created via the external model  on the admin permissions page in Open Event Frontend, using the roles API. Our discussion primarily will involve the admin/permissions/index route to illustrate the process.The primary end point of Open Event API with which we are concerned with for fetching the permissions  for a user is

POST /v1/roles

First we need to create a model for the user-permissions, which will have the fields corresponding to the api, so we proceed with the ember CLI command:

ember g model role

Next we define the model according to the requirements. The model needs to extend the base model class, and has only two fields one for the title and one for the actual name of the role.

import attr from 'ember-data/attr';
import ModelBase from 'open-event-frontend/models/base';

export default ModelBase.extend({
 name           : attr('string'),
 titleName      : attr('string')
 });

Next we need to modify the existing modal to incorporate the API and creation of roles in it. It is very important to note here that using createRecord as the model will result in a major flaw. If createRecord is used and the user tries to create multiple roles, other than the first POST request all the subsequent requests will be PATCH requests and will keep on modifying the same role. To avoid this, a new record needs to be created every time the user clicks on Add Role.  We slightly modify the modal component call to pass in the name and titleName to it.

{{modals/add-system-role-modal  isOpen=isAddSystemRoleModalOpen
                                isLoading=isLoading
                                name=name
                                titleName=titleName
                                addSystemRole=(action 'addSystemRole')}}

Upon entering the details of the roles and successful validation of the form, if the user clicks the Add Role button of the modal, the action addSystemRole will be triggered. We will write the entire logic for the same in the respective controller of the route.

addSystemRole() {
     this.set('isLoading', true);
     this.get('store').createRecord('role', {
       name      : this.get('name'),
       titleName : this.get('titleName')
     }).save()
       .then(() => {
         this.set('isLoading', false);
         this.notify.success(this.l10n.t('User permissions have 
         been saved successfully.'));
         this.set('isAddSystemRoleModalOpen', false);
         this.setProperties({
           name          : null,
           roleTitleName : null
         });
       })
       .catch(()=> {
         this.set('isLoading', false);
         this.notify.error(this.l10n.t('An unexpected error has occurred.
         User permissions not saved.'));
       });
   },

At first the isLoading property is made true.This adds the semantic UI class loading to the the form,  and so the form goes in the loading state, Next, a record is created of the type role  and it’s properties are made equal to the corresponding values entered by the user.

Then save() is called, which subsequently makes a POST request to the server. If the request is successful the modal is closed by setting the isAddSystemRoleModalOpen property to false. Also, the fields of the modal are cleared for a  better user experience in case multiple roles need to be added one after the other.

In cases when  there is an error during the processing of the request the catch() block executes. And the modal is not closed. Neither are the fields cleared.

Resources

Continue ReadingImplementing Roles API on Open Event Frontend to Create Roles Using an External Modal