Make a helper for AJAX requests using axios

In this blog post, we are going to go through the implementation of the helper function that is created for making AJAX requests using axios. Currently, the AJAX calls are made in a very random manner where the calls are written in the component itself and involves rewriting of headers, etc for the API call. Let us go through the implementation in the blog, which will standardise the way to make API calls in SUSI.AI web clients.

The primary changes are –

  • Making a common helper for AJAX requests with the help of axios.
  • Making a common file containing all the API calls across the project.

Going through the implementation

The API calls within the repository were not being made in an organised way, also a lot of redundant code was present. The aim of creating the helper is that, all the API calls is called via this common function. It takes care of the headers and also sending access_token with the API if the user is already logged in for API calls requiring authentication. The function for a API request now looks this simple –

// API call for signup
export function getSignup(payload) {
 const { email, password } = payload;
 const url = `${API_URL}/${AUTH_API_PREFIX}/signup.json`;
 return ajax.get(url, { signup: email, password });
}
  • In the above snippet, the ajax is the common helper used for making API calls. ajax is an object of functions that returns a promise for  various methods of API requests
  • We have primarily taken into consideration GET & POST requests type.
  • The helper function is as follows –
/* Insert imports here*/
const cookies = new Cookies();
const obj = {};

['get', 'post', 'all'].forEach(function(method) {
 obj[method] = function(url, payload, settings = {}) {
   /* Request will be aborted after 30 seconds */
   settings = {
     timeout: 30000,
     dataType: 'json',
     crossDomain: true,
     ...settings,
   };
   
   // Check if logged in
   if (cookies.get('loggedIn')) {
     payload = {
       access_token: cookies.get('loggedIn'),
       ...payload,
     };
   }

   return new Promise(function(resolve, reject) {
     let methodArgs = [];
     if (method === 'post') {
       if (payload && payload instanceof FormData !== true) {
           // Convert to Form Data
           payload = toFormData(payload);
       }

       settings.headers = {
         'Content-Type': 'application/x-www-form-urlencoded',
         ...settings.headers,
       };
     } else if (method === 'get') {
       if (payload) {
         // Add params to the URL   
         url += `?${Object.keys(payload)
           .map(key => key + '=' + payload[key])
           .join('&')}`;
       }
     }

     const methodsToAxiosMethodsMap = {
       get: 'get',
       post: 'post',
       all: 'all',
     };

     if (method === 'all') {
       methodArgs = [url];
     } else if (method === 'get') {
       methodArgs = [url, settings];
     } else {
       methodArgs = [url, payload, settings];
     }

     axios[methodsToAxiosMethodsMap[method]].apply({}, methodArgs).then(
       function(data = {}, ...restSuccessArgs) {
         const statusCode = _.get(data, 'status');
         /*  Send only api response */
         let responseData = { statusCode, ..._.get(data, 'data') };

         if (method === 'all') {
           responseData = data;
           responseData.statusCode = statusCode;
         }

         if (payload) {
           responseData.requestPayload = payload;
         }
         // Mark the promise resolved and return the payload
         resolve(camelizeKeys(responseData), ...restSuccessArgs);
       },
       function(data = {}, ...restErrorArgs) {
         // If request is canceled by user
         if (axios.isCancel(data)) {
           reject(data);
         }

         const statusCode = _.get(data, 'response.status', -1);
         let responseData = { statusCode, ..._.get(data, 'response.data') };

         if (method === 'all') {
           responseData = data;
           responseData.statusCode = statusCode;
         }

         if (payload) {
           responseData.requestPayload = payload;
         }
         // Mark the promise rejected and return the payload
         reject(camelizeKeys(responseData), ...restErrorArgs);
       },
     );
   });
 };
});

export default obj;
  • The above objects contains 3 functions –
    • ajax.get(url, payload, settings) – GET – The helper adds the query params to the URL by iterating through them and appending it to the URL and joining them with &.
    • ajax.post(url, payload, settings) –  POST – The helper checks, if the POST requests contains a payload which is an instance of form data, it converts to toFormData payload.
    • ajax.all(url, payload, settings) – ALL – It helps to deal with concurrent requests.
  • The url is the complete API endpoint, payload consists of the data/request payload. The settings consists of any headers related info, that needs to be added exclusively to the axios config.
  • There is also no need to pass access token to each API request as a payload. The helper check whether the user is logged-in and adds the access_token to the request payload. The snippet below demonstrates it –
if (cookies.get('loggedIn')) {
     payload = {
       access_token: cookies.get('loggedIn'),
       ...payload,
     };
   }
  • The access token, if present in the cookies is added to the payload, therefore authenticating the API call.
  • The keys of the response are changed to camel case before being sent to the caller function. It is done to maintain variable nomenclature standards across the app and also to follow javascript guidelines.
  • The file containing the API calls is structured as follows –
import ajax from '../helpers/ajax';
import urls from '../utils/urls';

const { API_URL } = urls;
const AUTH_API_PREFIX = 'aaa';
const CHAT_API_PREFIX = 'susi';
const CMS_API_PREFIX = 'cms';

// API without request payload
export function fetchApiKeys() {
 const url = `${API_URL}/${AUTH_API_PREFIX}/getApiKeys.json`;
 return ajax.get(url);
}

// API with request payload
export function getLogin(payload) {
 const { email, password } = payload;
 const url = `${API_URL}/${AUTH_API_PREFIX}/login.json`;
 return ajax.get(url, { login: email, password, type: 'access-token' });
}

The above was the implementation of the helper function that is created for making AJAX requests using axios. I hope the blog provided a detailed insight of it helps in making the process of making API calls more standardised and easier.

References

Continue ReadingMake a helper for AJAX requests using axios

Adding 3D Home Screen Quick Actions to SUSI iOS App

Home screen quick actions are a convenient way to perform useful, app-specific actions right from the Home screen, using 3D Touch. Apply a little pressure to an app icon with your finger—more than you use for tap and hold—to see a list of available quick actions. Tap one to activate it. Quick actions can be static or dynamic.

We have added some 3D home screen quick action to our SUSI iOS app. In this post, we will see how they are implemented and how they work.

The following 3D home screen quick actions are added to SUSI iOS:

  • Open SUSI Skills – user can directly go to SUSI skills without opening a chat screen.
  • Customize Settings – user can customize their setting directly by using this quick action.
  • Setup A Device – when the user quickly wants to configure his/her device for SUSI Smart Speaker, this is quick action is very helpful in that.
  • Change SUSI’s Voice – user can change SUSI message reading language accents directly from this quick action.

Each Home screen quick action includes a title, an icon on the left or right (depending on your app’s position on the home screen), and an optional subtitle. The title and subtitle are always left-aligned in left-to-right languages.

Step 1 – Adding the Shortcut Items

We add static home screen quick actions using the UIApplicationShortcutItems array in the app Info.plist file. Each entry in the array is a dictionary containing items matching properties of the UIApplicationShortcutItem class. As seen in screenshot below, we have 4 shortcut items and each item have three properties UIApplicationShortcutItemIconType/UIApplicationShortcutItemIconFile, UIApplicationShortcutItemTitle, and UIApplicationShortcutItemType.

  • UIApplicationShortcutItemIconType and UIApplicationShortcutItemIconFile is the string for setting icon for quick action. For the system icons, we use UIApplicationShortcutItemIconType property and for the custom icons, we use UIApplicationShortcutItemIconFile.
  • UIApplicationShortcutItemTitle is a required string that is displayed to the user.
  • UIApplicationShortcutItemType is a required app specific string used to identify the quick action.

Step 2 – Handling the Shortcut

AppDelegate is the place where we handle all the home screen quick actions. We define these variables:

var shortcutHandled: Bool!
var shortcutIdentifier: String?

When a user chooses one of the quick actions the launch of the system or resumes the app and calls the performActionForShortcutItem method in app delegate:

func application(_ application: UIApplication,
                     performActionFor shortcutItem: UIApplicationShortcutItem,
                     completionHandler: @escaping (Bool) -> Void) {
        shortcutIdentifier = shortcutItem.type
        shortcutHandled = true
        completionHandler(shortcutHandled)
    }

Whenever the application becomes active, applicationDidBecomeActive function is called:

func applicationDidBecomeActive(_ application: UIApplication) {
        // Handel Home Screen Quick Actions
        handelHomeActions()
    }

Inside the applicationDidBecomeActive function we call the handleHomeAction() method which handles the home screen quick action.

func handelHomeActions() {
       if shortcutHandled == true {
           shortcutHandled = false
           if shortcutIdentifier == ControllerConstants.HomeActions.openSkillAction {
               // Handle action accordingly
               }
           } else if shortcutIdentifier == ControllerConstants.HomeActions.customizeSettingsAction {
               // Handle action accordingly
           } else if shortcutIdentifier == ControllerConstants.HomeActions.setupDeviceAction {
               // Handle action accordingly
               }
           } else if shortcutIdentifier == ControllerConstants.HomeActions.changeVoiceAction {
               // Handle action accordingly
               }
           }
       }
   }

Final Output:

Resources –

  1. Home Screen Quick Actions – Human Interface Guidelines by Apple
  2. Adding 3D Touch Quick Actions by Use Your Leaf
  3. Apple’s documentation on performActionFor:completionHandler
Continue ReadingAdding 3D Home Screen Quick Actions to SUSI iOS App

Adding report skills feature in SUSI iOS

SUSI.AI is having a various type of Skills that improving the user experience. Skills are powering the SUSI.AI personal chat assistant. SUSI skills have a nice feedback system. We have three different feedback way for SUSI skills, 5-star rating system, posting feedback, and reporting skills.

5-Star Rating – rate skills from 1 (lowest) to 5 (highest) star

Posting Feedback – user can post feedback about particular skill

Report Skill – user can report skill if he/she found it inappropriate

In this post, we will see how reporting skills feature work in SUSI iOS and how it is implemented. You can learn about 5-star rating here and posting feedback feature here.

Adding report skill button –

let reportSkillButton: UIButton = {
        let button = UIButton(type: .system)
        button.contentHorizontalAlignment = .left
        button.setTitle("Report Skill", for: .normal)
        button.setTitleColor(UIColor.iOSGray(), for: .normal)
        button.titleLabel?.font = UIFont.systemFont(ofSize: 16)
        button.translatesAutoresizingMaskIntoConstraints = false
        return button
    }()

In above, we have set translatesAutoresizingMaskIntoConstraints property for false. By default, the property is set to true for any view you programmatically create. If you add views in Interface Builder, the system automatically sets this property to false. If this property’s value is true, the system creates a set of constraints that duplicate the behavior specified by the view’s autoresizing mask.

Setting up report skill button –

We are setting constraints programmatically as we created button programmatically and set translatesAutoresizingMaskIntoConstraints to false. Also, setting a target to the button.

if let delegate = UIApplication.shared.delegate as? AppDelegate, let _ = delegate.currentUser {
            view.addSubview(reportSkillButton)
            reportSkillButton.widthAnchor.constraint(equalToConstant: 140).isActive = true
            reportSkillButton.heightAnchor.constraint(equalToConstant: 32).isActive = true
            reportSkillButton.leftAnchor.constraint(equalTo: contentType.leftAnchor).isActive = true
            reportSkillButton.topAnchor.constraint(equalTo: contentType.bottomAnchor, constant: 8).isActive = true

            reportSkillButton.addTarget(self, action: #selector(reportSkillAction), for: .touchUpInside)
        }

In the above method, we can see that we are only showing button if user is logged-in. Only a logged-in user can report the skill. To check if user is logged in or not, we are using the AppDelegate shared instance where we save the logged-in user globally when the user signs in.

When user clicks the Report Skill button, a popup is open up with a text field for feedback message like below:

This is how UI look like!

When user clicks the Report action after typing feedback message, we are using the following endpoint:

https://api.susi.ai/cms/reportSkill.json

With the following parameters –

  • Model
  • Group
  • Skill
  • Language
  • Access Token
  • Feedback

Here is how we are handling the API call within our app –

func reportSkill(feedbackMessage: String) {
        if let delegate = UIApplication.shared.delegate as? AppDelegate, let user = delegate.currentUser {

            let params = [
                Client.SkillListing.model: skill?.model as AnyObject,
                Client.SkillListing.group: skill?.group as AnyObject,
                Client.SkillListing.skill: skill?.skillKeyName as AnyObject,
                Client.SkillListing.language: Locale.current.languageCode as AnyObject,
                Client.SkillListing.accessToken: user.accessToken as AnyObject,
                Client.SkillListing.feedback: feedbackMessage as AnyObject
            ]

            Client.sharedInstance.reportSkill(params) { (success, error) in
                DispatchQueue.main.async {
                    if success {
                        self.view.makeToast("Skill reported successfully")
                    } else if let error = error {
                        self.view.makeToast(error)
                    }
                }
            }
        }
    }

On successfully reported skill, we show a toast with ‘Skill reported successfully’ message and if there is error reporting the skills, we present the toast with error as a message.

Resources –

  1. SUSI Skills: https://skills.susi.ai/
  2. Apple’s documentations on translatesAutoresizingMaskIntoConstraints
  3. Allowing user to submit ratings for skills in SUSI iOS
  4. Displaying Skills Feedback on SUSI iOS
Continue ReadingAdding report skills feature in SUSI iOS

UNESCO Hackathon Vietnam 2018 Wrap Up

204 participants gathered at the UNESCO Hackathon over the weekend of October 13 – 14 in Ho Chi Minh City to develop digital applications that tackle climate change and sustainable development challenges in Vietnam and the Mekong region. The event was a great success thanks to support from the Government of Malaysia, UNESCO YouthMobile Initiative and Officience.

24 project teams were formed during the Hackathon. With the dedication of team members and mentorship from facilitators, all teams managed to complete their hacks. It was challenging for the judges to make their final decision as all proposed solutions appeared to be innovative and applicable. The three winning teams were Klima Kage, Climap & Bird’s Eye View. Additionally, the judges also selected three runner-ups ThreeWolves, DBTFC & GreenELF, whose projects directly address the issues related to climate change in the country.

Winning Projects: Klima Kage, Bird’s Eye View and Climap

Klima Kage is a website application which consists of two parts: main page and community page. The main page contains data from open source database and tutorials extracted from the UNESCO handbook for journalists on climate change and sustainable development in Asia Pacific, which directly assist journalists in selecting data to monitor.

On the community side, there is a forum for discussion and a news section where relevant articles will be published. The team decided to give priority to female journalists (ration 6:4) in reviewing and releasing news articles on this page, as a way to raise public awareness on gender dimension. SUSI.AI was also integrated into the web app to record users’ behaviour and offer suggestions for their next visits.

Klima Kage (Sieben) Team

Bird’s Eye View is a mobile game built in unity with an objective to educate people about the impacts of climate change on all kind of creatures under the sea. In each level of the game, players are brought into a different coastal city in Vietnam, where they learn about the real problems which are happening to the regional aquatic animals.

The game was designed to target on younger age groups, who generally have less awareness on environmental issues, yet are expected to create big differences in the community once they grow up. In the future, the development team hopes to expand the application, to include more terrains and other kinds of animals in order to provide players with a more overall image of the situation in Vietnam and the region.

Bird’s Eye View app presented by ‘Why triple teas?’ Team

Climap is the last project selected as a winner of the hackathon. Proposed and developed by a team of young developers from Ho Chi Minh City, Climap acts as an EXIF based Image Sharing System that enables users to to collect and instantly share data/images of places before, during and after disasters happen (due to the impacts of climate change). 

By using Climap, users can view all relevant data from the uploaded photos including: its location, weather index, and the occurred events/incidents, etc. They can write tags for each picture to label what was happening at that moment so the data can be further analyzed by local authorities or responsible institutions.

Climap by BIT Team

Talks and Workshops

Alongside with the hacking competition, tech talks and workshops were hosted to support the participants and provide them crucial knowledge of the topics.

Panel Discussion: A Green Planet for All

At the beginning of the hackathon, Hong Phuc Dang (FOSSASIA Founder) led a panel discussing featuring Misako Ito (UNESCO Advisor for Information and Communication), Pham Lan Phuong (Author Khai Don) and Tran Le Thu Giang (Youtuber GiangOi) to uncover the concepts of climate change and sustainable development under the own perspectives. The conversation offered the audience specific answers on how they can practice sustainable development in every aspects of their daily lives.

Panel Discussion: A Green Planet for All

Workshops: Working with Git/Github and Doing Electronics Experiments with PSLab

PadMal M, FOSSASIA/PSLab Lead Developer delivered two workshops, when he showed participants how contributors can effectively work together on an open source project using Github and what electronics experiments can be performed using PSLab (Pocket Science Lab – a hardware device by FOSSASIA). Together with FOSSASIA robotics expert, Marco Gutiérrez, the two successfully developed and integrated a robot into the PSLab device, which amazed participants and audience alike.

Learn how to perform scientific experiments using PSLab

Robotics integration on PSLab device by Marco Gutiérrez and Padmal M

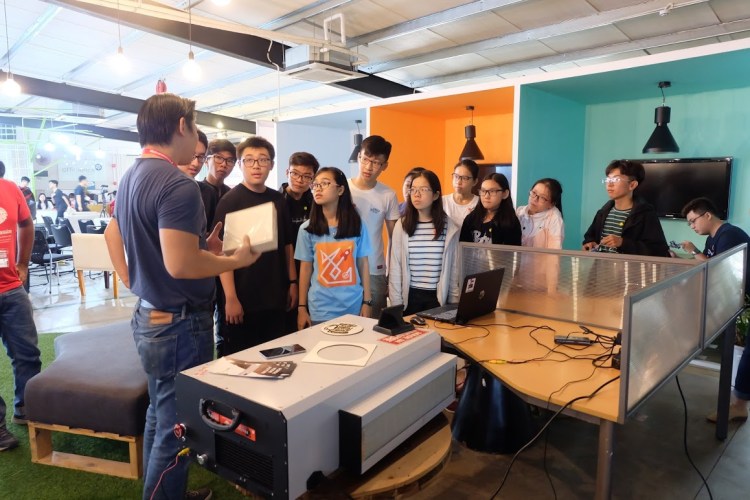
Experience the world’ first portable CO2 Laser Cutter by LionsForge

Kee Wee Teng, Founder at LionsForge is a maker at heart, he always felt that the laser cutter, being such a useful tool, should be more accessible. He believed this type of machine should be safer so that everyone can use it for their own needs. After two years working on several designs and samples, Kee Wee and his team finally introduced to the world the CraftLaser laser cutter, a portable yet powerful machine that can be safely use at home, in the schools or even in public places.

Kee Wee Teng, Founder/CEO at LionsForge explained the CraftLaser’s operation procedures,

then shared how he successfully got the project fully funded from Indiegogo in just a week.

Video Footage of UNESCO Hackathon Vietnam 2018

Links

Hackathon Photos: https://photos.app.goo.gl/tJRN2b3mayNy6FcE6

FOSSASIA on Twitter: https://twitter.com/fossasia

FOSSASIA Videos: https://www.youtube.com/fossasiaorg

FOSSASIA Calendar: https://calendar.fossasia.org

Posts on the Web

UNESCO Bangkok: UNESCO Hackathon sets its sights on climate change solutions in Asia-Pacific

LionsForge Singapore: UNESCO Hackathon in Ho Chi Minh, Vietnam

Vietnamese-German University News: VGU students won first prize at UNESCO Hackathon Vietnam  

Share your write-ups about UNESCO Hackathon by making a tweet using hashtag #UNESCOHackathon #YouthMobile @fossasia @YouthMobile_ 

Continue ReadingUNESCO Hackathon Vietnam 2018 Wrap Up

Jugaad Fest Hyderabad on 30th September 2018 – Hack, Fix, Trick It, or Simply Make Open Tech Work for You

Jugaadfest is a gathering of developers and FOSS contributors who get together to learn, share, and hack on Open Source projects for one day with the goal of making things work. 30+ mentors and successful FOSSASIA Google Summer of Code students from India and Europe will guide you during the day. At Jugaadfest you can:

  • join various hands-on activities, e.g. set up FOSSASIA apps, install conversational voice assistants, do experiments with PSLab
  • learn from developers how to find innovative fixes or simple work-arounds to get FOSSASIA prototypes working
  • learn how to build up an awesome developer profile that improves your job chances by collaborating in the FOSS community
  • improve your coding and tech skills while contributing to open source software and hardware projects
  • enjoy presentations conducted by veteran developers

Jugaadfest is a hands-on event. Please bring your laptop.

We kick-off in the morning with short introductions by developers of FOSS projects. After that participants have the chance to join teams at different tables and start learning and collaborating on Open Tech projects.

At the lunch break participants mingle and discuss what they have learned before they continue browsing  projects. At the end of the event day we ask developers to share their learnings in short lightning talks.

Certificates: Participants of Jugaadfest receive a certificate of participation. (Prerequisite: Full-day participation)

Contributors Discount Tickets

You are a contributor to FOSSASIA project or other Open Source communities? Apply for a discount ticket. There is a limited number of contributor tickets for 90, 80, and 70% discounts available. Please fill in the form here: https://jugaadfest.com/community-ticket

AGENDA

Jugaadfest Hyderabad

  • Location: BVRIT HYDERABAD College of Engineering for Women
  • Date: Sunday, September 30, 2018
  • 8:30 Registration and Breakfast Snacks
  • 9:30 Introduction and Opening Sessions
  • 9:45 How to Participate in FOSSASIA Coding Programs, Google Summer of Code and Codeheat
  • 10:00 Project Presentations: SUSI.AI, Open Event Solutions, Pocket Science Lab, Meilix, Badgeyay
  • 11:00 Developers Join Project Tables
  • 12:30 Lunch Break
  • 13:30 Developers Learn and Participate at Project Tables
  • 16:00 How to Collaborate in International Open Source Projects and Global Enterprises Using Best Practices
  • 16:15 Lightning Talks
  • 16:30 What’s Next?
  • 17:00 End of Event

Social Event (Ticket Required)

  • Date: Sunday, September 30, 2018
  • 19:30 Dinner in Hyderabad City

Jugaadfest Extended (Contributors – Invitation Only)

  • Location: Co-Working Hyderabad
  • Developer Workshops: Monday October 1 – Wednesday, October 3, 2018
  • Brunch: Thursday, October 4, 2018

LINKS

Continue ReadingJugaad Fest Hyderabad on 30th September 2018 – Hack, Fix, Trick It, or Simply Make Open Tech Work for You

UNESCO Hackathon in Ho Chi Minh City, Vietnam

Join UNESCO Hackathon in Ho Chi Minh City on Oct 13 -14, 2018 to learn about climate change and environmental challenges in Vietnam, meet regional sustainable development experts and listen to their successful startup stories by doing sustainable and green businesses.

There is no restriction of age or backgrounds of participants. Students, NGOs reps, journalists, bloggers, developers and all open source contributors are invited to join! The hackathon is open for all and awesome prizes are waiting for you!

Each winner of the three top teams will receive these prizes.

The objective of the hackathon is to propose innovative solutions that help journalists to monitor and report on climate change and sustainable development issues in Asia and the Pacific.

The participants will be introduced to UNESCO’s Guidebook for Journalists Reporting on Climate Change and Sustainable Development in Asia and the Pacific which includes information and knowledge on climate science, related international and regional treaties and policy frameworks including the 2030 Agenda for Sustainable development, and tips for journalists for finding and telling stories.

Time and Location

Time: Saturday October 13 – Sunday October 14, 2018
Location: Officience Vietnam, 16A Le Hong Phong, Ward 12, District 10, Ho Chi Minh City

Why should I participate?

  • Learn how to create a chatbot within an hour with SUSI.AI
  • Carry out experiment with electronic devices PSlab.io
  • Update yourselves with knowledge of technology and sustainable development in Vietnam
  • Meet special guest speakers from the UNESCO, Embassy of Sweden and many more.
  • Improve your language skills, presentation skills and build up your leadership abilities
  • Receive certificates from UNESCO, T-shirts, swags, and special prizes from the sponsors

How do I know if I am qualified to join?

The hackathon is open for everyone, especially for those:

  • Curious and willing to learn new things
  • Interested in technology and sustainable development
  • Like to make new friends and expand their networks
  • Able to communicate in English
  • No prior coding skill is required

How do I sign up?

  1. Get your ticket to the Event on eventyay.com
  2. Sign up on Devpost as you will need to submit your final hack there.
  3. Join the Gitter channel at https://gitter.im/fossasia/hackathon (requires login with Github).
  4. Find team members and form a team with at least 2 members and maximum 4 contributors. You are also welcome to sign up and then wait until the Presentation of Ideas on Saturday before deciding to join a team, however we’d encourage you to form/join a team in advance if you already have an idea that you’d like to work on.
  5. Join the event at the Officience Vietnam on Saturday, Oct 13 at the opening at 8.30am until 9.00pm and on Sunday, Oct 14 from 8.00am until 5.00pm.

Visit the website at unesco.sciencehack.asia and stay connected, join the event on Facebook and follow FOSSASIA on Twitter.

Prizes

All participants will receive a gift bag (Tshirt, sticker, wristband and lanyard) and a certificate from UNESCO for participating in the hacking.

Each winner of the three top teams will be awarded special gift package including:

  • A Pocket Science Lab – hardware device by FOSSASIA
  • Special Developer Helmet by FOSSASIA
  • Winner Medal
  • Team Building Buffet Dinner Voucher
  • Team Hack-Away Mekong Delta Tour (floating Market, hackerspace, hotel)
  • Tiki Techie Gift Voucher
  • 6-month coworking space membership

Links

UNESCO Hackathon: https://unesco.sciencehack.asia

Tickets: https://eventyay.com/e/dbd7567d

Project Signup: https://unesco-hackathon.devpost.com

Communication Channel: https://gitter.im/fossasia/hackathon

Facebook: https://www.facebook.com/events/1713085622073681

FOSSASIA: https://twitter.com/fossasia

Continue ReadingUNESCO Hackathon in Ho Chi Minh City, Vietnam

Adding different metrics sections to the start page

In the initial version of the SUSI.AI Skill CMS we simply displayed all the skills present in the system in the form of cards. Once the skill analytics was incorporated into the CMS we got a bunch of skill statistics and thus we enhanced the start page by incorporating horizontally scrollable skill cards as per skill metrics like top rated skills, most used skills, skills which have received the most feedback etc. I worked on adding the skills with most feedback section and the section for the top games. This post will majorly deal with how the metrics sections are implemented on the start page and how any new metrics can be incorporated into the system and thus displayed on the CMS.

About the API

/cms/getSkillMetricsData.json?language=${language}

Sample API call:

https://api.susi.ai/cms/getSkillMetricsData.json?language=en


This will return a JSON which contains the skill data for all the metrics.

{
 "accepted": true,
 "model": "general",
 "group": "All",
 "language": "en",
 "metrics": {
        "newest": [...],
     "rating": [...],
      ...
 }
 "message": "Success: Fetched skill data based on metrics",
   "session": {"identity": {
           "type": "host",
          "name": "162.158.23.7_68cefd16",
          "anonymous": true
   }}
}


All of the data for several metics comes from the metrics object of the response which in turn contains arrays of skill data for each metric.

CMS Implementation

Once the BrowseSkill component is mounted we make an API call to the server to fetch all the data and save it to the component state, this data is then fed to the ScrollCardList component as props and the scroll component is rendered with appropriate data for different metrics.

loadMetricsSkills = () => {
   let url;
   url =
           urls.API_URL +
           '/cms/getSkillMetricsData.json?language=' +
           this.state.languageValue;
   let self = this;
   $.ajax({
           url: url,
           dataType: 'jsonp',
           jsonp: 'callback',
           crossDomain: true,
           success: function(data) {
                   self.setState({
                           skillsLoaded: true,
                           staffPicksSkills: data.metrics.staffPicks,
                           topRatedSkills: data.metrics.rating,
                           topUsedSkills: data.metrics.usage,
                           latestUpdatedSkills: data.metrics.latest,
                           newestSkills: data.metrics.newest,
                           topFeedbackSkills: data.metrics.feedback,
                           topGames: data.metrics['Games, Trivia and Accessories'],
                   });
           },
           error: function(e) {
                   console.log('Error while fetching skills based on top metrics', e);
                   return self.loadMetricsSkills();
           },
   });
};


We are using a single component for skill metrics and skill listing which show up on applying any filter or visiting any category. Thus we think of a condition when the skill metrics are to be displayed and conditionally render the metrics section depending on the condition.

So the metrics section shows up only when we have not visited any category or language page, there’s no search query in the search bar, there’s no rating refine filter applied and no time filter applied.

let metricsHidden =
         this.props.routeType ||
         this.state.searchQuery.length > 0 ||
         this.state.ratingRefine ||
         this.state.timeFilter;


Depending on the section you want to display, pass appropriate data as props to the SkillCardScrollList component, say we want to display the section with most feedback

{this.state.topFeedbackSkills.length &&
!metricsHidden ? (
   <div style={metricsContainerStyle}>
           <div
                   style={styles.metricsHeader}
                   className="metrics-header"
           >
                   <h4>
                           {'"SUSI, what are the skills with most feedback?"'}
                   </h4>
           </div>
           {/* Scroll Id must be unique for all instances of SkillCardList*/}
           {!this.props.routeType && (
                   <SkillCardScrollList
                           scrollId="topFeedback"
                           skills={this.state.topFeedbackSkills}
                           modelValue={this.state.modelValue}
                           languageValue={this.state.languageValue}
                           skillUrl={this.state.skillUrl}
                   />
           )}
   </div>
) : null}


So if there are skills preset in the topFeedbackSkills array which was saved in the state from the server initially and the condition to hide metrics is false we render the component and pass appropriate props for scrollId, skills data, language and model values and skill url.

In a similar way any metrics section can be implemented in the CMS, if the data is not present in the API, modify the endpoint to enclose the data you need, fetch data data from the server and just render it.

So I hope after reading through this you have a more clearer understanding about how the metrics sections are implemented on the CMS.

Resources

Continue ReadingAdding different metrics sections to the start page

Serializing Java objects for REST API Requests in Open Event Organizer App

Open Event Organizer App is a client side application which uses REST API for network requests. The server supports sending and receiving of data only in JSONAPI spec, so, we needed to serialize java models into JSON objects and deserialize JSON data into java models following JSONAPI spec. To achieve this we followed the following steps.

Specifications

We will be using jasminb/jsonapi-converter which handles request/response parsing of models following JSONAPI Spec and Retrofit plugin of jackson converter to serializing JSON to Java Models and vice versa.

Let’s create a java model. We are using some annotations provided by Lombok library to avoid writing boilerplate code. @JsonNaming annotation is used to apply KebabCaseStrategy while serializing fields

@Data
@Type(“order”)
@AllArgsConstructor
@JsonNaming(PropertyNamingStrategy.KebabCaseStrategy.class)
@Table(database = OrgaDatabase.class, allFields = true)
public class Order {

@PrimaryKey
@Id(LongIdHandler.class)
public Long id;

public float amount;
public String completedAt;
public String identifier;
public String paidVia;
public String paymentMode;
public String status;

@Relationship(“event”)
@ForeignKey(stubbedRelationship = true, onDelete = ForeignKeyAction.CASCADE)
public Event event;

public Order() { }
}

In the NetworkModule class, there is a method providesMappedClasses() containing a list of classes that needs to be serialized/deserialized. We need to add the above model in the list. Then, this list is provided to Singleton instance of JSONAPIConvertorFactory through Dagger. JSONAPIConvertorFactory uses the Retrofit ObjectMapper and maps the classes that are handled by this instance.

@Provides
Class[] providesMappedClasses() {
return new Class[]{Event.class, Attendee.class, Ticket.class, Order.class};
}

Further, various serialization properties can be used while building Singleton ObjectMapper instance. Adding any properties here ensures that these are applied to all the mapped classes by JSONAPIConvertorFactory. For eg, we are using the serialization property to throw an exception and fail whenever empty beans are encountered.

@Provides
@Singleton
ObjectMapper providesObjectMapper() {
return new ObjectMapper()
.disable(DeserializationFeature.FAIL_ON_UNKNOWN_PROPERTIES)
.disable(SerializationFeature.FAIL_ON_EMPTY_BEANS)
// Handle constant breaking changes in API by not including null fields
// TODO: Remove when API stabilizes and/or need to include null values is there
.setSerializationInclusion(JsonInclude.Include.NON_ABSENT);
}

Resources

  1. Github Repository for jsonapi-converter https://github.com/jasminb/jsonapi-converter
  2. Github repository for Jackson Retrofit Plugin https://github.com/square/retrofit/tree/master/retrofit-converters/jackson
  3. Official Website for Project Lombok https://projectlombok.org/

Github Repository for Open-Event-Orga-App https://github.com/fossasia/open-event-orga-app

Continue ReadingSerializing Java objects for REST API Requests in Open Event Organizer App

Adding Preference Settings using Preference Fragment Compat

It is very much likely that one needs to add preferences to their app which span the entire application and therefore can be accessed anywhere in the app without storing anything in database or making global variables. For an instance, in Open Event Organizer App we added the preferences to store the privacy policy, cookie policy etc. The user can access these items in Settings Preference which in device settings. In this blog post we will see how to add preference settings to the app by storing the data in shared preferences.

Specifications

The benefit of storing the data in shared preference and not in local storage is that the access time for the data is drastically reduced and the data persists even when the app is closed. We will use this library which is built on top of official preference-v7 library.

Firstly, we will make a preference resource layout file and add the preference for privacy policy and cookie policy in the preference screen.

<PreferenceScreen xmlns:android=”http://schemas.android.com/apk/res/android”>

<Preference
android:key=”@string/privacy_policy_key”
android:title=”@string/privacy_policy” />

<Preference
android:key=”@string/cookie_policy_key”
android:title=”@string/cookie_policy” />

</PreferenceScreen>

Make a separate preference fragment class named LegalPreferenceFragment which extends PreferenceFragmentCompat. Then we will override onCreatePreferenceFix() method.

Inside this, we will create an instance of Preference Manager and set shared preference name for it and set the preference using the layout file. This enables us to use findPreference() method to retrieve the layout preferences by their key. After, retrieving the preference we will set onClick listener to launch activity with an intent to open browser for the url passed in data bundle.

@Override
public void onCreatePreferencesFix(@Nullable Bundle bundle, String rootKey) {
PreferenceManager manager = getPreferenceManager();
manager.setSharedPreferencesName(Constants.FOSS_PREFS);

setPreferencesFromResource(R.xml.legal_preferences, rootKey);

findPreference(getString(R.string.privacy_policy_key)).setOnPreferenceClickListener(preference -> {
BrowserUtils.launchUrl(getContext(), PRIVACY_POLICY_URL);
return true;
});
findPreference(getString(R.string.cookie_policy_key)).setOnPreferenceClickListener(preference -> {
BrowserUtils.launchUrl(getContext(), COOKIE_POLICY_URL);
return true;
});
}

References

  1. Preference Fragment Compat library by Takisoft https://github.com/Gericop/Android-Support-Preference-V7-Fix
  2. Android Preference Documentation https://developer.android.com/reference/android/preference/PreferenceGroup
Continue ReadingAdding Preference Settings using Preference Fragment Compat

Implementing Timeline for Attendees Activity in Organizer App

Open Event Organizer App offers the functionality to Checkin/checkout attendees but the Organizer was unable to view when a particular attendee was checkin or checkout. We decided to implement a feature to view the timeline of checkin/checkout for each attendee.

Let’s begin by adding the dependency in build.gradle.

implementation “com.github.vipulasri:timelineview:”1.0.6”

In the recyclerview item layout add the TimeLineView layout. Following are some of the useful attributes.

  1. app:markerInCenter – This defines the position of the round marker within the layout. Setting it to true, position it in center.
  2. app:marker – Custom drawables can be set as marker.
<com.github.vipulasri.timelineview.TimelineView
android:id=”@+id/time_marker”
android:layout_width=”wrap_content”
android:layout_height=”match_parent”
app:marker=”@drawable/ic_marker_active”
app:line=”#aaa4a4″
app:lineSize=”2dp”
app:linePadding=”3dp”
app:markerInCenter=”true”
app:markerSize=”20dp” />

The ViewHolder class will extend the RecyclerView,ViewHolder class. In the constructor, we will add a parameter viewType and then set it to TimeLine Marker layout using method initLine.

public CheckInHistoryViewHolder(CheckInHistoryLayoutBinding binding, int viewType) {
super(binding.getRoot());
this.binding = binding;
binding.timeMarker.initLine(viewType);
}

In RecyclerViewAdapter, we will override the getItemViewType() method. Here we will use the getTimeLineViewType method which takes in position and total size of the recycler view list and returns a TimeLineView type object.

@Override
public int getItemViewType(int position) {
return TimelineView.getTimeLineViewType(position, getItemCount());
}

References

  1. TimeLineView library by VipulAsri https://github.com/vipulasri/Timeline-View
  2. Android Documentation for RecyclerViewAdapter https://developer.android.com/reference/android/support/v7/widget/RecyclerView.Adapter
  3. Android Documentation for RecyclerViewView https://developer.android.com/reference/android/support/v7/widget/RecyclerView
Continue ReadingImplementing Timeline for Attendees Activity in Organizer App