Integrating Redux with SUSI.AI Web Clients

In this blog post, we are going to go through the implementation of the Redux integration on the SUSI.AI web clients. The existing SUSI.AI WebChat codebase has Flux integrated into it, but integrating Redux would make it a lot easier to manage the app state in a single store. And would result in a more maintainable and performant application. Let us go through the implementation in the blog - The key steps involved the following - Restructuring the directory structure of the repository to enable better maintenance.Creating a Redux store and configuring the middlewares.Standardizing the format for writing actions and make API calls on dispatching an action.Standardizing the format for writing reducers.Hook the components to the Redux store. Restructuring the directory structure DIrectory structure for https://chat.susi.ai 
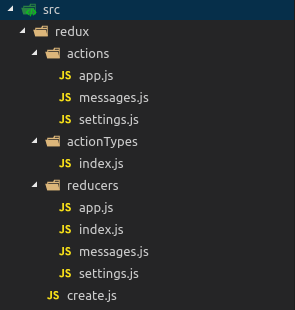
All the redux related files and utils are put into the redux directory, to avoid any sort of confusion, better maintenance and enhanced discoverability. The prime reason for it also because the integration was done side-by-side the existing Flux implementation.The actions and reducers directory each has a index.js, which exports all the actions and reducers respectively, so as to maintain a single import path for the components and this also helped to easily split out different types of actions/reducers. Creating Redux store and configure middlewares import { createStore as _createStore, applyMiddleware } from 'redux'; import { routerMiddleware } from 'react-router-redux'; import reduxPromise from 'redux-promise'; import reducers from './reducers'; export default function createStore(history) { // Sync dispatched route actions to the history const reduxRouterMiddleware = routerMiddleware(history); const middleware = [reduxRouterMiddleware, reduxPromise]; let finalCreateStore; finalCreateStore = applyMiddleware(...middleware)(_createStore); const store = finalCreateStore( reducers, {}, window.__REDUX_DEVTOOLS_EXTENSION__ && window.__REDUX_DEVTOOLS_EXTENSION__(), ); return store; } The function createStore takes in the browserHistory (provided by React Router) and returns a single store object that is passed on to the entry point component of the App. The store is passed to the application via the <Provider> component, provided by the react-redux. It is wrapped to the <App> component as follows - ReactDOM.render( <Provider store={store} key="provider"> <App /> </Provider>, document.getElementById('root'), ); The 2 middlewares used are routerMiddleware provided by the react-router-redux and the reduxPromise provided by redux-promise.The routerMiddleware enhances a history instance to allow it to synchronize any changes it receives into application state.The reduxPromise returns a promise to the caller so that it can wait for the operation to finish before continuing. This is useful to assist the application to tackle async behaviour. Standardizing the actions and making API calls on action dispatch The actions file contains the following - import { createAction } from 'redux-actions'; import actionTypes from '../actionTypes'; import * as apis from '../../apis'; const returnArgumentsFn = function(payload) { return Promise.resolve(payload); }; export default { // API call on action dispatch getApiKeys: createAction(actionTypes.APP_GET_API_KEYS, apis.fetchApiKeys), // Returns a promise for actions not requiring API calls logout: createAction(actionTypes.APP_LOGOUT, returnArgumentsFn), }; As new actions are added, it can be added to the actionTypes file and can be added in the export statement of the above snippet. This enables very standard and easy to manage…

Continue ReadingIntegrating Redux with SUSI.AI Web Clients

Make a helper for AJAX requests using axios

In this blog post, we are going to go through the implementation of the helper function that is created for making AJAX requests using axios. Currently, the AJAX calls are made in a very random manner where the calls are written in the component itself and involves rewriting of headers, etc for the API call. Let us go through the implementation in the blog, which will standardise the way to make API calls in SUSI.AI web clients. The primary changes are - Making a common helper for AJAX requests with the help of axios.Making a common file containing all the API calls across the project. Going through the implementation The API calls within the repository were not being made in an organised way, also a lot of redundant code was present. The aim of creating the helper is that, all the API calls is called via this common function. It takes care of the headers and also sending access_token with the API if the user is already logged in for API calls requiring authentication. The function for a API request now looks this simple - // API call for signup export function getSignup(payload) { const { email, password } = payload; const url = `${API_URL}/${AUTH_API_PREFIX}/signup.json`; return ajax.get(url, { signup: email, password }); } In the above snippet, the ajax is the common helper used for making API calls. ajax is an object of functions that returns a promise for  various methods of API requestsWe have primarily taken into consideration GET & POST requests type.The helper function is as follows - /* Insert imports here*/ const cookies = new Cookies(); const obj = {}; ['get', 'post', 'all'].forEach(function(method) { obj[method] = function(url, payload, settings = {}) { /* Request will be aborted after 30 seconds */ settings = { timeout: 30000, dataType: 'json', crossDomain: true, ...settings, }; // Check if logged in if (cookies.get('loggedIn')) { payload = { access_token: cookies.get('loggedIn'), ...payload, }; } return new Promise(function(resolve, reject) { let methodArgs = []; if (method === 'post') { if (payload && payload instanceof FormData !== true) { // Convert to Form Data payload = toFormData(payload); } settings.headers = { 'Content-Type': 'application/x-www-form-urlencoded', ...settings.headers, }; } else if (method === 'get') { if (payload) { // Add params to the URL url += `?${Object.keys(payload) .map(key => key + '=' + payload[key]) .join('&')}`; } } const methodsToAxiosMethodsMap = { get: 'get', post: 'post', all: 'all', }; if (method === 'all') { methodArgs = [url]; } else if (method === 'get') { methodArgs = [url, settings]; } else { methodArgs = [url, payload, settings]; } axios[methodsToAxiosMethodsMap[method]].apply({}, methodArgs).then( function(data = {}, ...restSuccessArgs) { const statusCode = _.get(data, 'status'); /* Send only api response */ let responseData = { statusCode, ..._.get(data, 'data') }; if (method === 'all') { responseData = data; responseData.statusCode = statusCode; } if (payload) { responseData.requestPayload = payload; } // Mark the promise resolved and return the payload resolve(camelizeKeys(responseData), ...restSuccessArgs); }, function(data = {}, ...restErrorArgs) { // If request is canceled by user if (axios.isCancel(data)) {…

Continue ReadingMake a helper for AJAX requests using axios

Upload Avatar for a User in SUSI.AI Server

In this blog post, we are going to discuss on how the feature to upload the avatar for a user was implemented on the SUSI.AI Server. The API endpoint by which a user can upload his/her avatar image is https://api.susi.ai/aaa/uploadAvatar.json. The endpoint is of POST type. It accepts two request parameters - image - It contains the entire image file sent from the client access_token - It is the access_token for the user The minimalUserRole is set to USER for this API, as only logged-in users can use this API. Going through the API development The image and access_token parameters are first extracted via the req object, that is passed to the main function. The  parameters are then stored in variables. There is a check if the access_token and image exists. It it doesn’t, an error is thrown. This code snippet discusses the above two points - protected void doPost(HttpServletRequest req, HttpServletResponse resp) throws ServletException, IOException { Part imagePart = req.getPart("image"); if (req.getParameter("access_token") != null) { if (imagePart == null) { result.put("accepted", false); result.put("message", "Image file not received"); } else { …. } else{ result.put("message","Access token are not given"); result.put("accepted",false); resp.setContentType("application/json"); resp.setCharacterEncoding("UTF-8"); resp.getWriter().write(result.toString()); } }   Then the input stream is extracted from the imagePart and stored. And post that the identity is checked if it is valid. The input stream is converted into the Image type using the ImageIO.read method. The image is eventually converted into a BufferedImage using a function, described below. public static BufferedImage toBufferedImage(Image img) { if (img instanceof BufferedImage) return (BufferedImage) img; // Create a buffered image with transparency BufferedImage bimage = new BufferedImage(img.getWidth(null), img.getHeight(null), BufferedImage.TYPE_INT_ARGB); // Draw the image on to the buffered image Graphics2D bGr = bimage.createGraphics(); bGr.drawImage(img, 0, 0, null); bGr.dispose(); // Return the buffered image return bimage; }   After that, the file path and name is set. The avatar for each user is stored in the /data/avatar_uploads/<uuid of the user>.jpg. The avatar is written to the path using the ImageIO.write function. Once, the file is stored on the server, the success response is sent and the client side receives it. Resources Source of the API - https://github.com/fossasia/susi_server/blob/development/src/ai/susi/server/api/aaa/UploadAvatarService.java

Continue ReadingUpload Avatar for a User in SUSI.AI Server

Displaying Avatar Image of Users using Gravatar on SUSI.AI

This blog discusses how the avatar of the user has been shown at different places in the UI like the app bar, feedback comments, etc using the Gravatar service on SUSI.AI. A Gravatar is a Globally Recognized Avatar. Your Gravatar is an image that follows you from site to site appearing beside your name when you do things like comment or post on a blog. So, the Gravatar service has been integrated in SUSI.AI, so that it helps identify the user via the avatar too. Going through the implementation The aim is to get an avatar of the user from the email id. For that purpose, Gravatar exposes a publicly available avatar of the user, which can be accessed via the following steps : Creating the Hash of the email Sending the image request For creating the MD5 hash of the email, use the npm library md5. The function takes a string as input and returns the hash of the string. Now, a URL is generated using this hash. The URL format is https://www.gravatar.com/avatar/HASH, where ‘HASH’ is the hash of the email of the user. In case, the hash is invalid, Gravatar returns a default avatar image. Also, append ‘.jpg’ to the URL to maintain image format consistency on the website. When, the generated URL is used in an <img> tag, it behaves like an image and an avatar is returned when the URL is requested by the browser. It has been displayed on various instances in the UI like app bar , feedback comments section, etc. The implementation in the feedback section has been discussed below. The CircleImage component has been used for displaying the avatar, which takes name as a required property and src as the link of the image, if present. Following function returns props to the CircleImage component. import md5 from 'md5'; import { urls } from './'; // urls.GRAVATAR_URL = ‘https://www.gravatar.com/avatar’; let getAvatarProps = emailId => { const emailHash = md5(emailId); const GRAVATAR_IMAGE_URL = `${urls.GRAVATAR_URL}/${emailHash}.jpg`; const avatarProps = { name: emailId.toUpperCase(), src: GRAVATAR_IMAGE_URL, }; return avatarProps; }; export default getAvatarProps;   Then pass the returned props on the CircleImage component and set it as the leftAvatar property of the feedback comments ListItem. Following is the snippet - …. <ListItem key={index} leftAvatar={<CircleImage {...avatarProps} size="40" />} primaryText={ <div> <div>{`${data.email.slice( 0, data.email.indexOf('@') + 1, )}...`}</div> <div className="feedback-timestamp"> {this.formatDate(parseDate(data.timestamp))} </div> </div> } secondaryText={<p>{data.feedback}</p>} /> …. . .   This displays the avatar of the user on the UI. The UI changes have been shown below : References The API reference on Gravatar website https://en.gravatar.com/site/implement/

Continue ReadingDisplaying Avatar Image of Users using Gravatar on SUSI.AI

Overriding the Basic File Attributes while Skill Creation/Editing on Server

In this blog post, we are going to understand the method for overriding basic file attributes while Skill creation/editing on SUSI Server. The need for this arose, when the creationTime for the Skill file that is stored on the server gets changed when the skill was edited. Need for the implementation As briefly explained above, the creationTime for the Skill file that is stored on the server gets changed when the skill is edited. Also, the need to override the lastModifiedTime was done, so that the Skills based on metrics gives correct results. Currently, we have two metrics for the SUSI Skills - Recently updated skills and Newest Skills. The former is determined by the lastModifiedTime and the later is determined by the creationTime. Due, to inconsistencies of these attributes, the skills that were shown were out of order. The lastModifiedTime was overridden to save the epoch date during Skill creation, so that the newly created skills don’t show up on the Recently Updated Skills section, whereas the creationTime was overridden to maintain the correct the time. Going through the implementation Let us first have a look on how the creationTime was overridden in the ModifySkillService.java file. …. BasicFileAttributes attr = null; Path p = Paths.get(skill.getPath()); try { attr = Files.readAttributes(p, BasicFileAttributes.class); } catch (IOException e) { e.printStackTrace(); } FileTime skillCreationTime = null; if( attr != null ) { skillCreationTime = attr.creationTime(); } if (model_name.equals(modified_model_name) && group_name.equals(modified_group_name) && language_name.equals(modified_language_name) && skill_name.equals(modified_skill_name)) { // Writing to File try (FileWriter file = new FileWriter(skill)) { file.write(content); json.put("message", "Skill updated"); json.put("accepted", true); } catch (IOException e) { e.printStackTrace(); json.put("message", "error: " + e.getMessage()); } // Keep the creation time same as previous if(attr!=null) { try { Files.setAttribute(p, "creationTime", skillCreationTime); } catch (IOException e) { System.err.println("Cannot persist the creation time. " + e); } } …. } . . .   Firstly, we get the BasicFileAttributes of the Skill file and store it in the attr variable. Next, we initialise the variable skillCreationTime of type FileTime to null and set the value to the existing creationTime. The new Skill file is saved on the path using the FileWriter instance, which changes the creationTime, lastModifiedTime to the time of editing of the skill. The above behaviour is not desired and hence, we want to override the creationTIme with the FileTime saved in skillCreationTIme. This ensures that the creation time of the skill is persisted, even after editing the skill. Now we are going to see how the lastModifiedTime was overridden in the CreateSkillService.java file. …. Path newPath = Paths.get(path); // Override modified date to an older date so that the recently updated metrics works fine // Set is to the epoch time try { Files.setAttribute(newPath, "lastModifiedTime", FileTime.fromMillis(0)); } catch (IOException e) { System.err.println("Cannot override the modified time. " + e); } . . .   For this, we get the newPath of the Skill file and then the lastModifiedTime for the Skill File is explicitly set to a particular time. We set it to FileTime.fromMillis(0)…

Continue ReadingOverriding the Basic File Attributes while Skill Creation/Editing on Server

Change Role of User in SUSI.AI Admin section

In this blog post, we are going to implement the functionality to change role of an user from the Admin section of Skills CMS Web-app. The SUSI Server has multiple user role levels with different access levels and functions. We will see how to facilitate the change in roles. The UI interacts with the back-end server via the following API – Endpoint URL –  https://api.susi.ai/cms/getSkillFeedback.json The minimal user role for hitting the API is ADMIN It takes 4 parameters – user - The email of the user. role - The new role of the user. It can take only selected values that are accepted by the server and whose roles have been defined by the server. They are - USER, REVIEWER, OPERATOR, ADMIN, SUPERADMIN. access_token -  The access token of the user who is making the request Implementation on the CMS Admin Firstly, a dialog box containing a drop-down was added in the Admin section which contains a list of possible User roles. The dialog box is shown when Edit is clicked, present in each row of the User table. The UI of the dialog box is as follows - The implementation of the UI is done as follows - …. <Dialog title="Change User Role" actions={actions} // Contains 2 buttons for Change and Cancel modal={true} open={this.state.showEditDialog} > <div> Select new User Role for <span style={{ fontWeight: 'bold', marginLeft: '5px' }}> {this.state.userEmail} </span> </div> <div> <DropDownMenu selectedMenuItemStyle={blueThemeColor} onChange={this.handleUserRoleChange} value={this.state.userRole} autoWidth={false} > <MenuItem primaryText="USER" value="user" className="setting-item" /> /* Similarly for REVIEWER, OPERATOR, ADMIN, SUPERADMIN Add Menu Items */ </DropDownMenu> </div> </Dialog> …. . . .   In the above UI immplementation the Material-UI compoenents namely Dialog, DropDownMenu, MenuItems, FlatButton is used. When the Drop down value is changed the handleUserRoleChange function is executed. The function changes the value of the state variables and the definition is as follows - handleUserRoleChange = (event, index, value) => { this.setState({ userRole: value, }); };   Once, the correct user role to be changed has been selected, the on click handlers for the action button comes into picture. The handler for clicking the Cancel button simply closes the dialog box, whereas the handler for the Change button, makes an API call that changes the user role on the Server. The click handlers for both the buttons is as follows - // Handler for ‘Change’ button onChange = () => { let url = `${urls.API_URL}/aaa/changeRoles.json?user=${this.state.userEmail}& role=${this.state.userRole}&access_token=${cookies.get('loggedIn')}`; let self = this; $.ajax({ url: url, dataType: 'jsonp', crossDomain: true, timeout: 3000, async: false, success: function(response) { self.setState({ changeRoleDialog: true }); }, error: function(errorThrown) { console.log(errorThrown); }, }); this.handleClose(); }; // Handler for ‘Cancel’ button handleClose = () => { this.setState({ showEditDialog: false, }); }; In the first function above, the URL endpoint is hit, and on success the Success Dialog is shown and the previous dialog is hidden. In the second function above, only the Dialog box is hidden. The cross domain in the AJAX call is kept as true to enable API usage from multiple domain names and…

Continue ReadingChange Role of User in SUSI.AI Admin section

Adding Filters for Lists of Skills on the SUSI.AI Server

In this blog post, we will learn how to add filters to the API responsible for fetching the list of skills i.e. the endpoint - https://api.susi.ai/cms/getSkillList.json. The purpose of adding filters is to return a list of skills based on some parameters associated with the skill, that would be required to allow the user to get the desired response that s/he may be using to display it on the UI. Overview of the API API to fetch the list of skills - URL -  https://api.susi.ai/cms/getSkillList.json It takes 5 optional parameters - model - It is the name of the model that user is requesting group - It is the name of the group that user is requesting language - It is the name of the language that user is requesting skill - It is the name of the skill that user is requesting applyFilter - It has true/false values, depending whether filtering is required If the request URL contains the parameter applyFilter as true, in that case the other 2 compulsory parameters are - filter_name - ascending/descending, depending upon the type of sorting the user wants filter_type - lexicographical, rating, etc based on what basis the filtering is going to happen So, we will now look into adding a new filter_type to the API. Detailed explanation of the implementation We can add filters based on the key values of the Metadata object of individual skills. The Metadata object for each skill is similar to the following object - { "model": "general", "group": "Knowledge", "language": "en", "developer_privacy_policy": null, "descriptions": "A skill that returns the anagrams for a word", "image": "images/anagrams.jpg", "author": "vivek iyer", "author_url": "https://github.com/Remorax", "author_email": null, "skill_name": "Anagrams", "protected": false, "terms_of_use": null, "dynamic_content": true, "examples": ["Anagram for best"], "skill_rating": { "negative": "0", "positive": "0", "stars": { "one_star": 0, "four_star": 0, "five_star": 0, "total_star": 0, "three_star": 0, "avg_star": 0, "two_star": 0 }, "feedback_count": 0 }, "creationTime": "2017-12-17T14:32:15Z", "lastAccessTime": "2018-06-19T17:50:01Z", "lastModifiedTime": "2017-12-17T14:32:15Z" }   We will now add provision for URL parameter, filter_type=feedback in the API, which will filter the results based on the feedback_count key, which tells the number of feedback/comments a skill has received. In the serviceImpl method of the ListSkillService class, we can see a code snippet that handles the filtering part, It checks the filter_type parameter received in the URL on if-else block. The code snippet looks like this - if (filter_type.equals("date")) { . . } else if (filter_type.equals("lexicographical")) { . . } else if (filter_type.equals("rating")) { . . }   Similarly, we will need to add an else if condition with feedback_type=feedback and write the code block inside it. Here is the code for it, which is explained in detail. . . else if (filter_type.equals("feedback")) { if (filter_name.equals("ascending")) { Collections.sort(jsonValues, new Comparator<JSONObject>() { @Override public int compare(JSONObject a, JSONObject b) { Integer valA; Integer valB; int result=0; try { valA = a.getJSONObject("skill_rating").getInt("feedback_count"); valB = b.getJSONObject("skill_rating").getInt("feedback_count"); result = Integer.compare(valA, valB); } catch (JSONException e) { e.printStackTrace(); } return result; } }); } else { Collections.sort(jsonValues, new Comparator<JSONObject>() {…

Continue ReadingAdding Filters for Lists of Skills on the SUSI.AI Server

Implementing the List View of the Skill Cards

In this blog post, we are going to understand the implementation of the UI for the SUSI.AI skill card that is displayed on various routes of the SUSI Skill CMS Web-App. Now, there are two types of views of the views for the skill cards - List view and Grid view. We will learn to implement the List View in this blog. Final UI of the Skill Card Going through the implementation The UI has multiple components - The image thumbnail. The title and author section, Below that we have examples, ratings and the description section. Fetching the data The Skill Metadata for each skill is passed as props from the parent of the component, where this UI is implemented. This data object contains the various data points that are needed to display the UI. The key values used are - skill_name - Used in the Title of the Skill Card image - Used to display the thumbnail image of the skill model - used to create the link to the Skill Details page group - used to create the link to the Skill Details page language - used to create the link to the Skill Details page skill_tag - used to create the link to the Skill Details page examples - used to display the examples card. author - used to display the Author name skill_rating - Used to display the stars and the total number of ratings of the skill The following image shows the various areas, where the data is being used. Parsing the data and creating JSX Below is the code used to parse the data and achieving the UI, followed by the explanation. ….. loadSkillCards = () => { let cards = []; Object.keys(this.state.skills).forEach(el => { let skill = this.state.skills[el]; let skill_name = 'Name not available', examples = [], image = '', description = 'No description available', author_name = 'Author', average_rating = 0, total_rating = 0; if (skill.skill_name) skill_name = skill.skill_name.charAt(0).toUpperCase() + skill_name.slice(1); …. // Similarly parse, image, descriptions, author …. if (skill.examples) examples = skill.examples.slice(0, 2); // Select max 2 examples if (skill.skill_rating) { average_rating = parseFloat(skill.skill_rating.stars.avg_star); total_rating = parseInt(skill.skill_rating.stars.total_star, 10); } cards.push( <div style={styles.skillCard} key={el}> <div style={styles.imageContainer}> // Display the image, else default avatar compoennt CircleImage </div> <div style={styles.content}> <div style={styles.header}> // Add Link to the skill title <div style={styles.title}><span>{skill_name}</span></div> <div style={styles.authorName}><span>{author_name}</span></div> </div> <div style={styles.details}> <div style={styles.exampleSection}> {examples.map((eg, index) => { return ( <div key={index} style={styles.example}>&quot;{eg}&quot;</div>); })} </div> <div style={styles.textData}> <div style={styles.row}> <div style={styles.rating}> // Show the 5-star rating section </div> </div> <div style={styles.row}> // Insert the skill description </div> //Close the div tags ); }); this.setState({cards}); }; render() { . . return (<div style={styles.gridList}>{skillDisplay}</div>); } . .   An array of skills is passed as props and set in the state of the component in the constructor lifecycle method. The loadSkillCards() function is called in the didComponentMount lifecycle method, which is responsible for creating the JSX for all the Skill Cards. In this function, the map property of array is used, to…

Continue ReadingImplementing the List View of the Skill Cards

Adding Functionality to Switch between List and Grid View of the Skill Cards on SUSI.AI CMS

In this blog post, we are going to understand the implementation of the functionality that enables the user to switch between the List View and the Grid View UI for the skill cards that is displayed on various routes of the SUSI Skill CMS Web-App. Let us go through the implementation in the blog - Working of the feature Going through the implementation The UI for implementing the switching of views was achieved via the use of RadioButtonGroup component of the Material-UI library for React. The type of view currently being shown was stored in the component state of the BrowseSkill component as viewType, whose default value is set to list, indicating that the skills are firstly shown in a List View. . . export default class BrowseSkill extends React.Component { constructor(props) { super(props); this.state = { . ….. viewType: 'list', …. }; } …. }   The RadioButtonGroup component has 2 child components, for each view. The child component that is to be used is RadioButton. The props passed in the RadioButtonGroup are - name : It is the name given to the component. defaultSelected : It is the default view type. style : It contains the style object of the UI. valueSelected : It is set to the state variable assigned for storing view type. onChange : It is the handler which executes, when the radio buttons are clicked. The style for the desktop view and mobile view is different depending on the screen size and is follows - //Mobile view Style { right: 12, position: 'absolute', top: 216, display: 'flex', } //Desktop view style={ display: 'flex', marginTop: 34 }   The standard Material-UI icons were used in the radio buttons for each view. The props passed in the RadioButton are - value : The value stored in the state, that is responsible for the view type. The values for List and Grid view are list and grid respectively. label : The label for the RadioButton. labelStyle : The style object for the label. checkedIcon : The icon used in the checked state. uncheckedIcon : The icon used in the unchecked state. UI of the Radio Buttons The onClick handler of the radio buttons is - handleViewChange = (event, value) => { this.setState({ viewType: value }); };   The code snippet for the UI implementation, written inside the render function is as follows : …. <RadioButtonGroup name="view_type" defaultSelected="list" style={ window.innerWidth < 430 ? { right: 12, position: 'absolute', top: 216, display: 'flex', } : { display: 'flex', marginTop: 34 } } valueSelected={this.state.viewType} onChange={this.handleViewChange} > <RadioButton value="list" label="List view" labelStyle={{ display: 'none' }} style={{ width: 'fit-content' }} checkedIcon={ <ActionViewStream style={{ fill: '#4285f4' }} /> } uncheckedIcon={<ActionViewStream />} /> <RadioButton value="grid" label="Grid view" labelStyle={{ display: 'none' }} style={{ width: 'fit-content' }} checkedIcon={ <ActionViewModule style={{ fill: '#4285f4' }} /> } uncheckedIcon={<ActionViewModule />} /> </RadioButtonGroup> ….   I hope the implementation of the switching between Views would be clear after going through the blog and proved to be helpful for your understanding.…

Continue ReadingAdding Functionality to Switch between List and Grid View of the Skill Cards on SUSI.AI CMS

Make a cumulative API to return skills based on standard metrics in SUSI.AI

In this blog post, we are going to discuss on how to make a cumulative API which returns skills based on different standard metrics. It was implemented to combine various API calls, that were made from various clients, thereby reducing the number of API calls made. It lead to an optimization in the page load time of various clients and also helped to reduce the 503 errors that were received, due to very frequent API hits. The API endpoint for it is https://api.susi.ai/cms/getSkillMetricsData.json. It accepts 5 optional parameters - model - It represents the model for which the skill are fetched. The default value is set to General. group - It represents the group(category) for which the skill are fetched. The default value is set to Knowledge. language - It represents the language for which the skill are fetched. The default value is set to en. duration - It represents the duration based on which skills are fetched by standard metrics like usage. count - It represents the number of skills to be returned on a particular metric. The minimalUserRole is set to ANONYMOUS for this API, as the data is required for home-page and doesn’t need the user to be logged-in. Going through the API development The parameters are first extracted via the call object that is passed to the main function. The  parameters are then stored in variables. If any parameter is absent, then it is set to the default value. There is a check if the count param exists. If exists, then it is checked if it is of valid data-type. If no, an exception is thrown. And if count param doesn’t exist, it is set to default of 10. This code snippet discusses the above two points - @Override public ServiceResponse serviceImpl(Query call, HttpServletResponse response, Authorization rights, final JsonObjectWithDefault permissions) throws APIException { String model_name = call.get("model", "general"); File model = new File(DAO.model_watch_dir, model_name); String group_name = call.get("group", "All"); String language_name = call.get("language", "en"); int duration = call.get("duration", 0); JSONArray jsonArray = new JSONArray(); JSONObject json = new JSONObject(true); JSONObject skillObject = new JSONObject(); String countString = call.get("count", null); Integer count = null; if(countString != null) { if(Integer.parseInt(countString) < 0) { throw new APIException(422, "Invalid count value. It should be positive."); } else { try { count = Integer.parseInt(countString); } catch(NumberFormatException ex) { throw new APIException(422, "Invalid count value."); } } } else { count = 10; } . . .   Then the skills are fetched based on the group name and then stored in a JSONArray named jsonArray. This array basically contains the metadata objects of each skill. Now, we need to sort and filter these skills based on standard metrics like - Rating, Feedback Count, Usage Count, Latest skills. The implementation for getting the skills based on the creation time is as follows. Rest, all the metrics were also implemented in the same fashion. JSONObject skillMetrics = new JSONObject(); List<JSONObject> jsonValues = new ArrayList<JSONObject>(); // temporary list to extract objects from skillObject for…

Continue ReadingMake a cumulative API to return skills based on standard metrics in SUSI.AI