Implementing SUSI Linux App as a Finite State Machine

SUSI Linux app provides access to SUSI on Linux distributions on desktop as well as hardware devices like Raspberry Pi. It is a headless client that can be used to interact to SUSI via voice only. As more and more features like multiple hotword detection support and wake button support was added to SUSI Linux, the code became complex to understand and manage. A system was needed to model the app after. Finite State Machine is a perfect approach for such system.

The Wikipedia definition of State Machine is

It is an abstract machine that can be in exactly one of a finite number of states at any given time. The FSM can change from one state to another in response to some external inputs; the change from one state to another is called a transition.”

This means that if you can model your app into a finite number of states, you may consider using the State Machine implementation.

State Machine implementation has following advantages:

  • Better control over the working of the app.
  • Improved Error handling by making an Error State to handle errors.
  • States work independently which helps to modularize code in a better form.

To begin with, we declare an abstract State class. This class declares all the common properties of a state and transition method.

from abc import ABC, abstractclassmethod
import logging

class State(ABC):
   def __init__(self, components):
       self.components = components
       self.allowedStateTransitions = {}

   @abstractclassmethod
   def on_enter(self, payload=None):
       pass

   @abstractclassmethod
   def on_exit(self):
       pass

   def transition(self, state, payload=None):
       if not self.__can_transition(state):
           logging.warning("Invalid transition to State{0}".format(state))
           return

       self.on_exit()
       state.on_enter(payload)

   def __can_transition(self, state):
       return state in self.allowedStateTransitions.values()

We declared the on_enter() and on_exit() abstract method. These methods are executed on the entering and exiting a state respectively. The task designated for the state can be performed in the on_enter() method and it can free up resources or stop listening to callbacks in the on_exit() method. The transition method is to transition between one state to another. In a state machine, a state can transition to one of the allowed states only. Thus, we check if the transition is allowed or not before continuing it. The on_enter() and transition() methods additionally accepts a payload argument. This can be used to transfer some data to the state from the previous state.

We also added the components property to the State. Components store the shared components that can be used across all the State and are needed to be initialized only once. We create a component class declaring all the components that are needed to be used by states.

class Components:

   def __init__(self):
       recognizer = Recognizer()
       recognizer.dynamic_energy_threshold = False
       recognizer.energy_threshold = 1000
       self.recognizer = recognizer
       self.microphone = Microphone()
       self.susi = susi
       self.config = json_config.connect('config.json')

       if self.config['hotword_engine'] == 'Snowboy':
           from main.hotword_engine import SnowboyDetector
           self.hotword_detector = SnowboyDetector()
       else:
           from main.hotword_engine import PocketSphinxDetector
           self.hotword_detector = PocketSphinxDetector()

       if self.config['wake_button'] == 'enabled':
           if self.config['device'] == 'RaspberryPi':
               from ..hardware_components import RaspberryPiWakeButton
               self.wake_button = RaspberryPiWakeButton()
           else:
               self.wake_button = None
       else:
           self.wake_button = None

Now, we list out all the states that we need to implement in our app. This includes:

  • Idle State: App is listening for Hotword or Wake Button.
  • Recognizing State: App actively records audio from Microphone and performs Speech Recognition.
  • Busy State: SUSI API is called for the response of the query and the reply is spoken.
  • Error State: Upon any error in the above state, control transfers to Error State. This state needs to handle the speak the correct error message and then move the machine to Idle State.

Each state can be implemented by inheriting the base State class and implementing the on_enter() and on_exit() methods to implement the correct behavior.

We also declare a SUSI State Machine class to store the information about current state and declare the valid transitions for all the states.

class SusiStateMachine:
   def __init__(self):
       super().__init__()
       components = Components()
       self.__idle_state = IdleState(components)
       self.__recognizing_state = RecognizingState(components)
       self.__busy_state = BusyState(components)
       self.__error_state = ErrorState(components)
       self.current_state = self.__idle_state

       self.__idle_state.allowedStateTransitions = \
           {'recognizing': self.__recognizing_state, 'error': self.__error_state}
       self.__recognizing_state.allowedStateTransitions = \
           {'busy': self.__busy_state, 'error': self.__error_state}
       self.__busy_state.allowedStateTransitions = \
           {'idle': self.__idle_state, 'error': self.__error_state}
       self.__error_state.allowedStateTransitions = \
           {'idle': self.__idle_state}

       self.current_state.on_enter(payload=None)

We also set Idle State as the current State of the System. In this way, State Machine approach is implemented in SUSI Linux.

Resources:


Continue ReadingImplementing SUSI Linux App as a Finite State Machine

Adding Service Workers In Generated Event Websites In Open Event Webapp

var urlsToCache = [
 './css/bootstrap.min.css',
 './offline.html',
 './images/avatar.png'
];
self.addEventListener('install', function(event) {
 event.waitUntil(
   caches.open(CACHE_NAME).then(function(cache) {
     return cache.addAll(urlsToCache);
   })
 );
});

All the other assets are cached lazily. Only when they are requested, we fetch them from the network and store it in the local store. This way, we avoid caching a large number of assets at the install step. Caching of several files in the install step is not recommended since if any of the listed files fails to download and cache, then the service worker won’t be installed!

self.addEventListener('fetch', function(event) {
event.respondWith(caches.match(event.request).then(function(response) {
     // Cache hit - return response
     if (response) { return response; }
     // Fetch resource from internet and put into cache
     var fetchRequest = event.request.clone();
     return fetch(fetchRequest).then(function(response) {
         var responseToCache = response.clone();
         caches.open(CACHE_NAME).then(function(cache) {
           cache.put(event.request, responseToCache);
         });
         return response;
       }).catch(function(err) {
         // Return fallback page when user is offline and resource is not cached
         if (event.request.headers.get('Accept').indexOf('text/html') !== -1) {
           return caches.match('./offline.html');
         }
       });
   })
 );
});

One thing which we need to keep in mind is that the website content should not become stale. Because it might happen that the website is updated but the actual content shown is older since response to every request is being fetched from the outdated cache. We need to delete the old cache and install a new service worker when the content of the site is updated. To deal with this issue, we calculate the hash of event website folder after the site has been generated. This value of the hash is used as the cache name inside which we keep the cached resources. When the content of the event website changes, the value of the hash changes. Due to this, a new service worker (containing the new value of the hash) is installed. After the currently open pages of the website are closed, the old service worker is killed and the activate event of the new service worker is fired. During this activate event, we clear the old cache containing the outdated content!  

// Hash of the event website Folder
var CACHE_NAME = 'Mtj5WiGtMtzesubewqMtdGS9wYI=';
self.addEventListener('activate', function(event) {
 event.waitUntil(caches.keys().then(function(cacheNames) {
   return Promise.all(cacheNames.map(function(cacheName) {
     if (cacheName !== CACHE_NAME) {
       console.log('Deleting cache ' + cacheName);
       return caches.delete(cacheName);
     }
   })
   );
 }));
});

Here are many screenshots showing service workers in action

  • When the site is updated, the outdated cache contents are cleared

29312352-87f9e8da-81d2-11e7-9f05-02a557a820da.png

  • On visiting a page which has not yet been cached, its contents are placed into cache for utilization on future visits

29312487-2155e70e-81d3-11e7-85c1-004c4a475e82.png

  • On visiting the cached page again, the assets will be served from the cache directly.

29312349-87f6c222-81d2-11e7-8fb4-c54feb175ed9.png

  • The page will comfortably load even on offline connections

29312351-87f8eec6-81d2-11e7-985a-7f1ba2dba482.png

  • On requesting for a page which has not yet been cached, we show a custom fallback page which shows a message

29312350-87f821c6-81d2-11e7-90e7-30f6467b2988.pngReferences:

Continue ReadingAdding Service Workers In Generated Event Websites In Open Event Webapp

Implementing ICS/ICAL to sync calendars with the event schedule in Open Event Webapp

As an end result, we want to provide a button to the user which will export the whole data of the event schedule to an ICS file and present it to the user for download after clicking the button. The whole work regarding the feature can be seen here.

Instead of implementing the whole specification ourselves which would be much tougher and time-consuming, we looked for some good open source libraries to do a bit of heavy lifting for us. After searching exhaustively for the solution, we came across this library which seemed appropriate for the job. The heart of the library is a function which takes in an object which contains information about the session. It expects information about the start and end time, subject, description and location of the session. Here is an excerpt from the function. The whole file can be seen here

var addEvent = function (session) {
 var calendarEvent = [
   'BEGIN:VEVENT',
   'UID:' + session.uid,
   'CLASS:PUBLIC',
   'DESCRIPTION:' + session.description,
   'DTSTART;VALUE=DATETIME:' + session.begin,
   'DTEND;VALUE=DATE:' + session.stop,
   'LOCATION:' + session.location,
   'SUMMARY;LANGUAGE=en-us:' + session.subject,
   'TRANSP:TRANSPARENT',
   'END:VEVENT'
 ];
 calendarEvents.push(calendarEvent);
};

We need to call the above function for every session in the event schedule. In the schedule template file, we have the jsonData object available which contain all the information about the event. It contains a field called timeList which contains the chronological order of the different sessions taking place throughout the events. The structure of that sub-object is something like this.

[{'slug': '2017-03-20', 'times': {'caption' : '09:00-09:30', 'sessions': [{'title': 'Welcome', 'description': 'Opening of the event', 'start': '09:00', 'end': '09:30'}]}]

So, we define a function for iterating through every session in the above object and adding it to the calendar. We can use most of the attributes directly but have to modify the date and time fields of the session to an appropriate format before adding it. The specification expects time in the ISO 8601 Format. You can read more about the specification here. For eg – If the date is 2017-03-20 and the time is 09:30 then it should be written as 20170320T093000. Here is some part of the function here

function exportICS() {
 var scheduleArr = {{{json timeList}}};
 // Helper functions for converting time to ISO 8601 Format
 function removeDashFromDate(date) {
   return date.replace(/-/g, '');
 }
 function removeColonFromTime(time) {
   return time.replace(/:/g, '');
 }
 // Iteration through the object and adding every session to the calendar
 scheduleArr.forEach(function(scheduleDay) {
   var date = removeDashFromDate(scheduleDay.slug);
   scheduleDay.times.forEach(function(time) {
     time.sessions.forEach(function(session) {
       var sessObj = {};
       sessObj.begin = date + 'T' + removeColonFromTime(session.start) + '00';
       sessObj.stop = date + 'T' + removeColonFromTime(session.end) + '00';
       sessObj.subject = session.title;
       sessObj.description = session.description;
       sessObj.location = session.location;
       cal.addEvent(sessObj);
     });
   });
 });
 cal.download('calendar', 'ics', false); // Download the ics file of the calendar
}

After defining the function, we add a button for starting the download of the whole schedule of the event. On clicking, we call the function which initiates the download after all the sessions of the event have been added.

<span class="schedule-download">
 <button type="button" class="btn btn-default export-schedule"><i class="fa fa-calendar" aria-hidden="true"></i></button>
</span>

$('.export-schedule').click(function() {
 exportICS();
});

Here is the export schedule button

65203af9-3962-4ab5-9655-3250bf2253a0.png

This is the download pop-up of the ICS file of the event.

Screenshot from 2017-08-10 21-56-16.png

After importing it in the Google calendar

Screenshot from 2017-08-10 23-01-22.png

References

Continue ReadingImplementing ICS/ICAL to sync calendars with the event schedule in Open Event Webapp

Enhanced Skill Tiles in SUSI Skill CMS

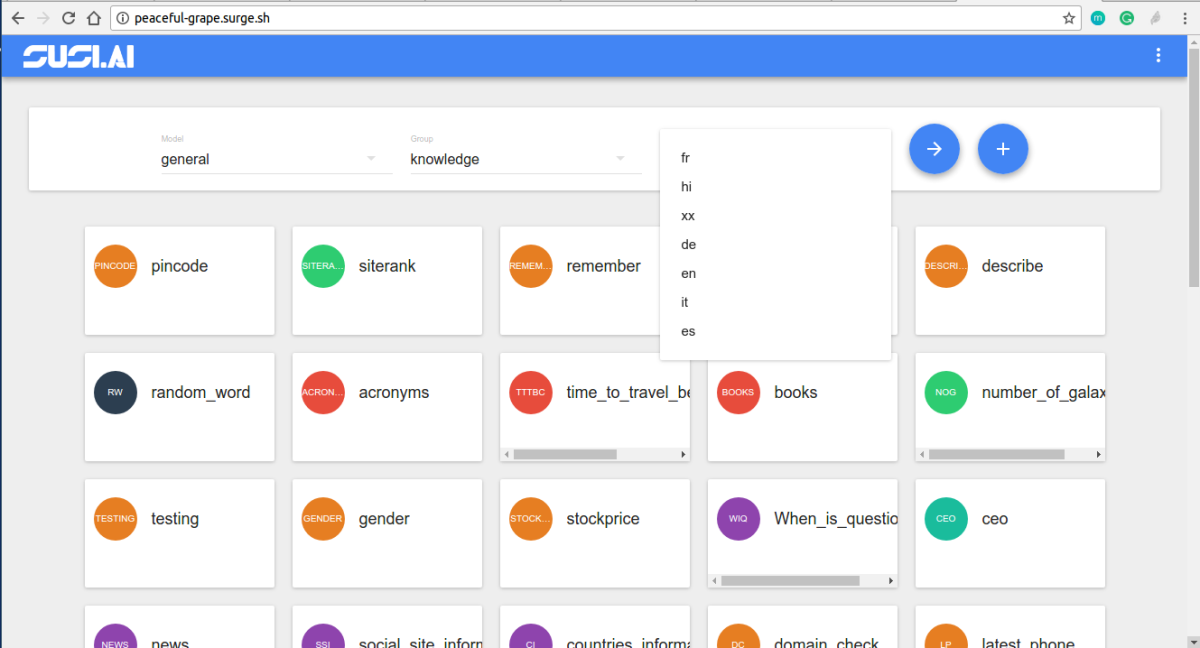
The SUSI Skill Wiki is a management system for all the SUSI Skills and the Skill display screen ought to look attractive. The earlier version of the Skill Display was just a display with the skill name populated as cards as shown in the image.

image

So as we progressed over to add more metadata to the SUSI Skills, we had the challenge to show all details which were as follows –

An example of a skill metadata format-

"cricketTest": {
      "image": "images/images.jpg",
      "author_url": "skill.susi.ai",
      "examples": ["Testing Works"],
      "developer_privacy_policy": "na",
      "author": "cms",
      "skill_name": "cricket",
      "dynamic_content": true,
      "terms_of_use": "na",
      "descriptions": "testing",
      "skill_rating": null
    }

To embed the Skill metadata in the Tiles the following steps are to be followed –

  1. We first use the end point at the SUSI Server, http://api.susi.ai/cms/getSkillList.json with the following attributes –
    1. model – The skill follows a general model or maybe a tutorial model
    2. group -The category or group of the skill.
    3. language – The language of the skill output.

2.  An AJAX request to this end point gives us the following response.

{
accepted: true,
model: "general",
group: "Knowledge",
language: "en",
skills: 
{
capital: 
{
image: "images/capital.png",
author_url: "https://github.com/chashmeetsingh",
examples: 
[
"capital of Bangladesh"
],
developer_privacy_policy: null,
author: "chashmeet singh",
skill_name: "capital",
dynamic_content: true,
terms_of_use: null,
descriptions: "a skill to tell user about capital of any country.",
skill_rating: 
{
negative: "0",
positive: "1"
}
}

We use the descriptions, skill_name, examples, image from the skill metadata to create our Skill Tile.

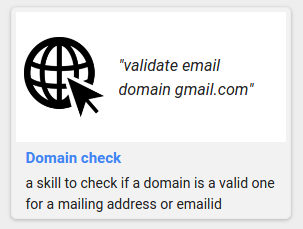
  1. The styles of the cards follow a CSS flexbox structure. A sample mock up of the Skill Card looks as follows.

We first handle all the base cases and show “No name available”, “No description available” for data which does not exist or is found to be “null”. We then create the card mock-up in ReactJS which looks somewhat like this code snippet in the file BrowseSkill.js

                            <Card style={styles.row} key={el}>
                                <div style={styles.right} key={el}>
                                    {image ? <div style={styles.imageContainer}>
                                        <img alt={skill_name} src={image} style={styles.image}/>
                                    </div>:
                                    <CircleImage name={el} size="48"/>}
                                    <div style={styles.titleStyle}>"{examples}"</div>
                                </div>
                                <div style={styles.details}>
                                    <h3 style={styles.name}>{skill_name}</h3>
                                    <p style={styles.description}>{description}</p>
                                </div>
                            </Card>

  1. We then add the following styles to the Card and its contents which complete the look of the View.
imageContainer:{   
        position: 'relative',
        height: '80px',
        width: '80px',
        verticalAlign: 'top'
    },
    name:{
        textAlign: 'left',
        fontSize: '15px',
        color: '#4285f4',
        margin: '4px 0'
    },
    details:{
        paddingLeft:'10px'
    },
    image:{
        maxWidth: '100%',
        border: 0
    },
description:{
        textAlign:'left',
        fontSize: '14px'   
    },
row: {
        width: 280,
        minHeight:'200px',
        margin:"10px",
        overflow:'hidden',
        justifyContent: "center",
        fontSize: '10px',
        textAlign: 'center',
        display: 'inline-block',
        background: '#f2f2f2',
        borderRadius: '5px',
        backgroundColor: '#f4f6f6',
        border: '1px solid #eaeded',
        padding: '4px',
        alignSelf:'flex-start'
    },
titleStyle:{
    textAlign: 'left',
    fontStyle: 'italic',
    fontSize: '16px',
    textOverflow: 'ellipsis',
    overflow: 'hidden',
    width: '138px',
    marginLeft: '15px',
    verticalAlign: 'middle',
    display: 'block'
}

To see the SUSI Skills or to contribute to it, please visit http://skills.susi.ai

Resources

Continue ReadingEnhanced Skill Tiles in SUSI Skill CMS

Adding Fallback Images in SUSI.AI Skill CMS

SUSI.AI Skill CMS shows image of a every skill. Here we are going to talk about a special case, where we handle the case when image is not found. We will be discussing the author’s skill component(all the skills by an author) and how we added fallback image in order to handle all the cases. For displaying image in table displaying all skills of author, we provide the path of image in SUSI Skill Data repository. The path is provided as follows :

let image = 'https://raw.githubusercontent.com/fossasia/susi_skill_data/master/models/general/'+ parse[6]+'/'+parse[7]+'/images/'+parse[8].split('.')[0];

Explanation:
parse is the array which contains the models, language ISO code, and the name of the skill. This is obtained after parsing JSON from this endpoint :

"http://api.susi.ai/cms/getSkillsByAuthor.json?author=" + author;
  • parse[6]: This represents a model of the skill. There are currently six models Assistants, Entertainment, Knowledge, Problem Solving, Shopping and Small Talks.
  • parse[7]: This represents ISO language code of the skill.
  • parse[8]: This represents the name of the skill.

Now the image variable just needs the file extension. We have .jpg and .png extensions in images in our skill data repository. So we made two images :

let image1 = image + '.png';
let image2 = image + '.jpg';

The img tag only takes one attribute in src and we can only add a string in alt tag. Now we needed to check which image exists and add proper src. This can be solved by following methods:

We can use Jquery to solve this:

$.get(image_url)
        .done(function() { 
                // image exists
        }).fail(function() { 
                // Image doesn't exist
    })

This will result in more code and and also this does not handles the case where no image is found and we need to show the Circle Image component which takes first two letters of skill and make a circular component. After researching the internet we found a perfect solution to our problem. There is an npm package named react-image, which is an alternative to default img tag. Features of react-image package helpful to us are:

  • We can provide multiple fallback images in an array as source which will be used in order of index of array. This feature solves our problem of extensions, we add provide image with all extensions.
  • We can show a fallback element in case no images are loaded. This solves our second problem where we needed to show Circle Image component.

Code looks like this:

<Img
  style={imageStyle}
  src={[
       image1,
       image2
      ]}
  unloader={<CircleImage name={name} size="40"/>}
 />

Resources:

Continue ReadingAdding Fallback Images in SUSI.AI Skill CMS

Implementing a Custom Serializer for Yaydoc

At the crux of it, Yaydoc is comprised of a number of specialized bash scripts which perform various tasks such as generating documentation, publishing it to github pages, heroku, etc. These bash scripts also serve as the central communication portal for various technologies used in Yaydoc. The core generator is composed of several Python modules extending the sphinx documentation generator. The web Interface has been built using Node, Express, etc. Yaydoc also contains a Python package dedicated to reading configuration options from a Yaml file.

Till now the options were read and then converted to strings irrespective of the actual data type, based on some simple rules.

  • List was converted to a comma separated string.(Nested lists were not handled)
  • Boolean values were converted to true | false respectively.
  • None was converted to an empty string.

While these simple rules were enough at that time, It was certain that a better solution would be required as the project grew in size. It was also getting tough to maintain because a lot of hard-coding was required when we wanted to convert those strings to python objects. To handle these cases, I decided to create a custom serialization format which would be simple for our use cases and easily parseable from a bash script yet can handle all edge cases. The format is mostly similar to its earlier form apart from lists where it takes heavy inspiration from the python language itself.

With the new implementation, Lists would get converted to comma separated strings enclosed by square brackets. This allowed us to encode the type of the object in the string so that it can later be decoded. This handled the case of an empty list or a list with single element well. The implementation also handled nested lists.

Two methods were created namely serialize and deserialize which detected the type of the corresponding object using several heuristics and applied the proper serialization or deserialization rule.

def serialize(value):
    """
    Serializes a python object to a string.
    None is serialized to an empty string.
    bool values are converted to strings True False.
    list or tuples are recursively handled and are comma separated.
    """
    if value is None:
        return ''
    if isinstance(value, str):
        return value
    if isinstance(value, bool):
        return "true" if value else "false"
    if isinstance(value, (list, tuple)):
        return '[' + ','.join(serialize(_) for _ in value) + ']'
    return str(value)

To deserialize we also had to handle the case of nested lists. The following snippet does that properly.

def deserialize(value, numeric=True):
    """
    Deserializes a string to a python object.
    Strings True False are converted to bools.
    `numeric` controls whether strings should be converted to
    ints or floats if possible. List strings are handled recursively.
    """
    if value.lower() in ("true", "false"):
        return value.lower() == "true"
    if numeric and _is_numeric(value):
        return _to_numeric(value)
    if value.startswith('[') and value.endswith(']'):
        split = []
        element = ''
        level = 0
        for c in value:
            if c == '[':
                level += 1
                if level != 1:
                    element += c
            elif c == ']':
                if level != 1:
                    element += c
                level -= 1
            elif c == ',' and level == 1:
                split.append(element)
                element = ''
            else:
                element += c
        if split or element:
            split.append(element)
        return [deserialize(_, numeric) for _ in split]
    return value

With this new approach, we are able to handle much more cases as compared to the previous implementation and is much more robust. It does however still lacks lacks certain features such as serializing dictionaries. That may be be implemented in the future if need be.

Resources

Continue ReadingImplementing a Custom Serializer for Yaydoc

Using Order Endpoints in Open Event API Server

The main feature i.e., Ordering API is added into API server. These endpoints provide the ability to work with the ordering system. This API is not simple like other as it checks for the discount codes and various other things as well.
The process in layman terms is very simple, first, a user must be registered or added as an attendee into Server without any order_id associated and then the attendee details will be sent to API server as a relationship.

Things needed to take care:

  1. Validating the discount code and ensure it is not exhausted
  2. Calculating the total amount on the server side by applying coupon
  3. Do not calculate amount if the user is the event admin
  4. Do not use coupon if user is event admin
  5. Handling payment modes and generating payment links
  6. Ensure that default status is always pending, unless the user is event admin

Creating Order

    • Prerequisite
      Before initiating the order, attendee records needs to be created associated with the event. These records will not have any order_id associated with them initially. The Order API will add the relationships.
    • Required Body
      Order API requires you to send event relationship and attendee records to create order_tickets
    • Permissions
      Only organizers can provide custom amount and status. Others users will get their status as pending and amount will be recalculated in server. The response will reflect the calculated amount and updated status.
      Also to initiate any order, user must be logged in. Guest can not create any order
    • Payment Modes
      There are three payment modes, free, stripe and paypal. If payment_mode is not provided then API will consider it as “free”.
    • Discount Codes
      Discount code can be sent as a relationship to the API. The Server will validate the code and will act accordingly.

Validating Discount Codes

Discount codes are checked to ensure they are valid, first check ensures that the user is not co-organizer

# Apply discount only if the user is not event admin
if data.get('discount') and not has_access('is_coorganizer', event_id=data['event']):

Second, check ensures that the discount code is active

if not discount_code.is_active:
  raise UnprocessableEntity({'source': 'discount_code_id'}, "Inactive Discount Code")

The third, Check ensures its validity is not expired

if not (valid_from <= now <= valid_till):
  raise UnprocessableEntity({'source': 'discount_code_id'}, "Inactive Discount Code")

Fourth Check ensure that the quantity is not exhausted

if not TicketingManager.match_discount_quantity(discount_code, data['ticket_holders']):
  raise UnprocessableEntity({'source': 'discount_code_id'}, 'Discount Usage Exceeded')

Lastly, the fifth check ensures that event id matches with given discount associated event

if discount_code.event.id != data['event'] and discount_code.user_for == TICKET:
  raise UnprocessableEntity({'source': 'discount_code_id'}, "Invalid Discount Code")

Calculating Order Amount

The next important thing is to recalculate the order amount and it will calculated only if user is not the event admin

if not has_access('is_coorganizer', **view_kwargs):
  TicketingManager.calculate_update_amount(order)

API Response

The API response apart from general fields will provide you the payment-url depending upon the payment mode you selected.

  • Stripe : will give payment-url as stripe
  • Paypal: will provide the payment completing url in payment-url

This all explains the flow and requirements to create an order. Order API consists of many more things related with TIcketing Manager which works to create the payment url and apply discount count as well as calculate the total order amount.

Resources

  1. Stripe Payments API Docs
    https://stripe.com/docs/api
  2. Paypal Payments API docs
    https://developer.paypal.com/docs/api/
  3. Paypal Sandbox docs
    https://developer.paypal.com/docs/classic/lifecycle/ug_sandbox/


Continue ReadingUsing Order Endpoints in Open Event API Server

Sensor Data Logging in the PSLab Android App

The PSLab Android App allows users to log data from sensors connected to the PSLab hardware device. The Connected sensors should support I2C, SPI communication protocols to communicate with the PSLab device successfully. The only prerequisite is the additional support for the particular sensor plugin in Android App. The user can log data from various sensors and measure parameters like temperature, humidity, acceleration, magnetic field, etc. These parameters are useful in predicting and monitoring the environment and in performing many experiments.

The support for the sensor plugins was added during the porting python communication library code to Java. In this post,  we will discuss how we logged real time sensor data from the PSLab Hardware Device. We used Realm database to store the sensor data locally. We have taken the MPU6050 sensor as an example to understand the complete process of logging sensor data.

Creating Realm Object for MPU6050 Sensor Data

The MPU6050 sensor gives the acceleration and gyroscope readings along the three axes X, Y and Z. So the data object storing the readings of the mpu sensor have variables to store the acceleration and gyroscope readings along all three axes.

public class DataMPU6050 extends RealmObject {

   private double ax, ay, az;
   private double gx, gy, gz;
   private double temperature;

   public DataMPU6050() {  }

   public DataMPU6050(double ax, double ay, double az, double gx, double gy, double gz, double temperature) {
       this.ax = ax;
       this.ay = ay;
       this.az = az;
       this.gx = gx;
       this.gy = gy;
       this.gz = gz;
       this.temperature = temperature;
   }

  // getter and setter for all variables
}

Creating Runnable to Start/Stop Data Logging

To sample the sensor data at 500ms interval, we created a runnable object and passed it to another thread which would prevent lagging of the UI thread. We can start/stop logging by changing the value of the boolean loggingThreadRunning on button click. TaskMPU6050 is an AsyncTask which reads each sample of sensor data from the PSLab device, it gets executed inside a while loop which is controlled by boolean loggingThreadRunning. Thread.sleep(500) pauses the thread for 500ms, this is also one of the reason to transfer the logging to another thread instead of logging the sensor data in UI thread. If such 500ms delays are incorporated in UI thread, app experience won’t be smooth for the users.

Runnable loggingRunnable = new Runnable() {
   @Override
   public void run() {
       try {
           MPU6050 sensorMPU6050 = new MPU6050(i2c);
           while (loggingThreadRunning) {
               TaskMPU6050 taskMPU6050 = new TaskMPU6050(sensorMPU6050);
               taskMPU6050.execute();
              // use lock object to synchronize threads
               Thread.sleep(500);
           }
       } catch (IOException   InterruptedException e) {
           e.printStackTrace();
       }
   }
};

Sampling of Sensor Data

We created an AsyncTask to read each sample of the sensor data from the PSLab device in the background thread. The getRaw() method read raw values from the sensor and returned an ArrayList containing the acceleration and gyro values. After the values were read successfully, they were updated in the data card in the foreground which was visible to the user. This data card acts as a real-time screen for the user. All the samples read are appended to ArrayList mpu6050DataList, when the user clicks on button Save Data, the collected samples are saved to the local realm database.

private ArrayList<DataMPU6050> mpu6050DataList = new ArrayList<>();

private class TaskMPU6050 extends AsyncTask<Void, Void, Void> {

   private MPU6050 sensorMPU6050;
   private ArrayList<Double> dataMPU6050 = new ArrayList<>();

   TaskMPU6050(MPU6050 mpu6050) {
       this.sensorMPU6050 = mpu6050;
   }

   @Override
   protected Void doInBackground(Void... params) {
       try {
           dataMPU6050 = sensorMPU6050.getRaw();
       } catch (IOException e) {
           e.printStackTrace();
       }
       return null;
   }

   @Override
   protected void onPostExecute(Void aVoid) {
       super.onPostExecute(aVoid);
       // update data card TextViews with data read.
       DataMPU6050 tempObject = new DataMPU6050(dataMPU6050.get(0), dataMPU6050.get(1), dataMPU6050.get(2),
               dataMPU6050.get(4), dataMPU6050.get(5), dataMPU6050.get(6), dataMPU6050.get(3));
       mpu6050DataList.add(tempObject);
       synchronized (lock) {
           lock.notify();
       }
   }
}
Source: PSLab Android App

There is an option for Start/Stop Logging, clicking on which will change the value of boolean loggingThreadRunning which stops starts/stops the logging thread.

When the Save Data button is clicked, all the samples of sensor data collected from the  PSLab device till that point are saved to the local realm database.

realm.beginTransaction();
for (DataMPU6050 tempObject : mpu6050DataList) {
   realm.copyToRealm(tempObject);
}
realm.commitTransaction();

Data can also be written asynchronously to the local realm database. For other methods to write to a real database refer write section of Realm docs.

Resources

Continue ReadingSensor Data Logging in the PSLab Android App

Enhancing the Functionality of User Submitted Scripts in the PSLab-remote framework

The remote-lab framework of the pocket science lab enables users to access their devices remotely via the internet. Its design involves an API server built with Python-Flask and a webapp that uses EmberJS. This post is the latest in a series of blog posts which have explored and elaborated various aspect of the remote-lab such as designing the API server and testing with Postman, remote execution of function strings, automatic deployment on various domains etc. It also supports creating and submitting python scripts which will be run on the remote server, and the console output relayed to the webapp.

In this post, we shall take a look at how we can extend the functionality by providing support for object oriented code in user submitted scripts.

Let’s take an example of a Python script where the user wishes to create a button which when clicked will read a voltage via the API server, and display the value to the remote user. Clearly, an interpreter that only provides the console output is not enough for this task. We need the interpreter to generate an app structure that also includes callbacks for widgets such as buttons, and JSON objects are an obvious choice for relaying such a structure to the webapp.

In a nutshell, we had earlier created an API method that could execute a python script and return a string output, and now we will modify this method to return a JSON encoded structure which will be parsed by the webapp in order to display an output.

Let’s elaborate this with an example : Example.py

print ('testing')
print ('testing some changes..... ')
print_('highlighted print statement')


JSON returned by the API [localhost:8000/runScriptById] , for the above script:

{"Date": "Tue, 01 Aug 2017 21:39:12 GMT", "Filename": "example.py", "Id": 4,
 "result": [
  {"name": "print", "type": "span", "value": "('testing',)"},
  {"name": "print", "type": "span", "value": "('testing some changes..... ',)"},
  {"class": "row well", "name": "print", "type": "span", "value": "highlighted print statement"}
  ],
"status": true}
Screenshot of the EmberJS webapp showing the output rendered with the above JSON

Adding Support for Widgets

In the previous section, we laid the groundwork for a flexible platform. Instead of returning a string, the webapp accepts a JSON object and parses it. We shall now add support for a clickable button which can be associated with a valid PSLab function.

An elementary JS twiddle has been made by Niranjan Rajendran which will help newbies to understand how to render dynamic templates via JSON objects retrieved from APIs. The twiddle uses two API endpoints; one to retrieve the compiled JSON output, and another to act as a voltmeter method which returns a voltage value.

To understand how this works in pslab-remote, consider a one line script called button.py:

button('get voltage',"get_voltage('CH1')")

The objective is to create a button with the text ‘get voltage’ on it , and which when clicked will run the command ‘get_voltage(‘CH1’)’ on the API server, and display the result.

When this script is run on the API server, it returns a JSON object with the following structure:

{"Date": "Tue, 01 Aug 2017 21:39:12 GMT", "Filename": "example.py", "Id": 4,
 "result": [  {"type":"button","name":"button-id0","label":"get_voltage","fetched_value":"","action":{"type":"POST","endpoint":"get_voltage('CH1')","success":{"datapoint":'result',"type":"display_number", "target":"button-id0-label"}}},
  {"name": "button-id0label", "type": "label", "value": ""},
  ],
"status": true}

The above JSON object is parsed by the webapp’s user-home template, and a corresponding button and label are generated. The following section of code from user-home.hbs renders the JSON object

{{#each codeResults as |element|}}
  {{#if (eq element.type 'label')}}
    <label  id="{{element.name}}" class="{{element.class}}">{{element.value}}</label>
  {{/if}}
  {{#if (eq element.type 'button')}}
    <button id="{{element.name}}" {{action 'runButtonAction' element.action}}>{{element.label}}</button>
  {{/if}}
{{/each}}    

An action was also associated with the the created button, and this is the “get_voltage(‘CH1’)” string which we had specified in our one line script.

For the concluding section, we shall see how this action is invoked when the button is clicked, and how the returned value is used to update the contents of the label that was generated as part of this button.

Action defined in controllers/user-home.js :

runButtonAction(actionDefinition) {
  if(actionDefinition.type === 'POST') {
    Ember.$.post('/evalFunctionString',{'function':actionDefinition.endpoint},this,"json")
      .then(response => {
        const resultValue = Ember.get(response, actionDefinition.success.datapoint);
        if (actionDefinition.success.type === 'display_number') {
           Ember.$('#' + actionDefinition.success.target).text(resultValue.toFixed(3));
        }
      });
  }
}

The action string is passed to the evalFunctionString endpoint of the API, and the contents are mapped to the display label.

Screencast of the above process
Resources:
Continue ReadingEnhancing the Functionality of User Submitted Scripts in the PSLab-remote framework

Adding Sticky Headers for Grouping Sponsors List in Open Event Android App

The Open Event Android project has a fragment for showing sponsors of the event. Each Sponsor model has a name, url, type and level. The SponsorsFragment shows list according to type and level. Each sponsor list item has sponsor type TextView. There can be more than one sponsors with the same type. So instead of showing type in the Sponsor item we can add Sticky header showing type at the top which will group the sponsors with the same type and also gives the great UI. In this post I explain how to add the Sticky headers in the RecyclerView using StickyHeadersRecyclerView library.

1. Add dependency

In order to use Sticky Headers in your app add following dependencies in your app module’s build.gradle file.

dependencies {
	compile 'com.timehop.stickyheadersrecyclerview:library:0.4.3'
}

2. Create layout for header

Create recycler_view_header.xml file for the header. It will contain LinearLayout and simple TextView which will show Sponsor type.

<?xml version="1.0" encoding="utf-8"?>
<LinearLayout xmlns:android="http://schemas.android.com/apk/res/android"
    android:layout_width="match_parent"
    android:layout_height="wrap_content"
    android:orientation="vertical">

    <TextView
        android:id="@+id/recyclerview_view_header"
        android:layout_width="match_parent"
        android:layout_height="wrap_content"
        android:padding="@dimen/padding_medium" />

</LinearLayout>

Here you can modify layout according to your need.

3.  Implement StickyRecyclerHeadersAdapter

Now implement StickyRecyclerHeadersAdapter in the List Adapter. Override getHeaderId(), onCreateHeaderViewHolder(), onBindHeaderViewHolder
() methods of the StickyRecyclerHeadersAdapter.

public class SponsorsListAdapter extends BaseRVAdapter<Sponsor, SponsorViewHolder> implements StickyRecyclerHeadersAdapter {
    ...

    @Override
    public long getHeaderId(int position) {...}

    @Override
    public RecyclerView.ViewHolder onCreateHeaderViewHolder(ViewGroup parent) {...}

    @Override
    public void onBindHeaderViewHolder(RecyclerView.ViewHolder holder, int position) {...}
}


The getHeaderId() method is used to give an id to the header. It is the main part of the implementation here all the sponsors with the same type should return the same id. In our case we are returning sponsor level because all the sponsor types have corresponding levels.

String level = getItem(position).getLevel();
return Long.valueOf(level);


The onCreateHeaderViewHolder() returns Recycler ViewHolder for the header. Here we will use in the inflate() method of  LayoutInflater to get View object of recycler_view_header.xml file. Then return new RecyclerView.ViewHolder object using View object.

View view = LayoutInflater.from(parent.getContext())
                .inflate(R.layout.recycler_view_header, parent, false);
return new RecyclerView.ViewHolder(view) {};


The onBindHeaderViewHolder() binds the sponsor to HeaderViewHolder. In this method we sets the sponsor type string to the TextView we have created in the recycler_view_header.xml file.

TextView textView = (TextView) holder.itemView.findViewById(R.id.recyclerview_view_header);
textView.setGravity(Gravity.CENTER_HORIZONTAL);

String sponsorType = getItem(position).getType();
if (!Utils.isEmpty(sponsorType))  
   textView.setText(sponsorType.toUpperCase());

Here you can also modify TextView according to your need. We are centering text using setGravity() method.

4.  Setup RecyclerView

Now create RecyclerView and set adapter using setAdapter() method. Also as we want the linear list of sponsors so set the LinearLayoutManager using setLayoutManager() method.

SponsorsListAdapter sponsorsListAdapter = new SponsorsListAdapter(getContext(), sponsors);
sponsorsRecyclerView.setAdapter(sponsorsListAdapter);
sponsorsRecyclerView.setLayoutManager(new LinearLayoutManager(getActivity()));


Create StickyRecyclerHeadersDecoration object and add it in the RecyclerView using addItemDecoration() method.

final StickyRecyclerHeadersDecoration headersDecoration = new StickyRecyclerHeadersDecoration(sponsorsListAdapter);

sponsorsRecyclerView.addItemDecoration(headersDecoration);
sponsorsListAdapter.registerAdapterDataObserver(new RecyclerView.AdapterDataObserver(){
    @Override
    public void onChanged {
            headersDecoration.invalidateHeaders();
    }
});

Now add AdapterDataObserver using registerAdapterDataObserver() method. The onChanged() method in this observer is called whenever dataset changes. So in this method invalidate headers using invalidateHeaders() method of HeaderDecoration.

Now we are all set. Run the app it will look like this.

Conclusion

Sticky headers in the App gives great UI and UX. You can also add a click listener to the headers. To know more about Sticky Headers follow the links given below.

Continue ReadingAdding Sticky Headers for Grouping Sponsors List in Open Event Android App