Performing Oscillator Experiments with PSLab

Using PSLab we can read the waveform generated by different Oscillators. First, let’s discuss what’s an Oscillator? An Oscillator is an electronic circuit that converts unidirectional current flow from a DC source into an alternating waveform. Oscillators can produce a sine wave, triangular wave or square wave. Oscillators are used in computers, clocks, watches, radios, and metal detectors. In this post, we are going to discuss 3 different types of Oscillators.

  • Colpitts Oscillator
  • Phase Shift Oscillator
  • Wien Bridge Oscillator

Colpitts Oscillator

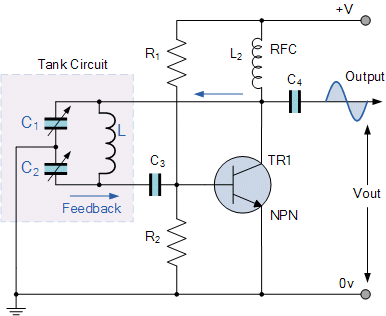
The Colpitts oscillator produces sinusoidal oscillations. The Colpitts oscillator has a tank circuit which consists of two capacitors in series and an inductor connected in parallel to the serial combination. The two capacitors in series produce a 180o phase shift which is inverted by another 180o to produce the required positive feedback. The frequency of the oscillations is determined by the value of the capacitors and inductor in the tank circuit.

Image source

Image source

Phase Shift Oscillator

A phase-shift oscillator produces a sine wave output using regenerative feedback obtained from the combination of resistor and capacitor. This regenerative feedback from the RC network is due to the ability of the capacitor to store an electric charge.

Image source

Wien bridge oscillator

A Wien bridge oscillator generates sine waves. It can generate a large range of frequencies and is based on a bridge circuit. It employs two transistors, each producing a phase shift of 180°, and thus producing a total phase-shift of 360° or 0°. It is simple in design, compact in size, and stable in its frequency output.


Image source

Mapping output waves from the Oscillator Circuits in PSLab Android app

To make PSLab Android app to support experiments related to read the waveforms received from the Oscillator we reused Oscilloscope Activity. In order to analyze the frequencies of the waves captured, we used sine fitting. Sine fitting function simply takes the data points and returns the amplitude, frequency, offset and phase shift of the wave.

The following is a glimpse of output signals from the Oscillators being captured by PSLab Android.

Resources

Read more on Oscillator from the following links

Continue ReadingPerforming Oscillator Experiments with PSLab

Auto Deployment of SUSI Web Chat on gh-pages with Travis-CI

SUSI Web Chat uses Travis CI with a custom build script to deploy itself on gh-pages after every pull request is merged into the project. The build system auto updates the latest changes hosted on chat.susi.ai. In this blog, we will see how to automatically deploy the repository on gh pages.

To proceed with auto deploy on gh-pages branch,

  1. We first need to setup Travis for the project.
  2. Register on https://travis-ci.org/ and turn on the Travis for this repository.

Next, we add .travis.yml in the root directory of the project.

# Set system config
sudo: required
dist: trusty
language: node_js

# Specifying node version
node_js:
  - 6

# Running the test script for the project
script:
  - npm test

# Running the deploy script by specifying the location of the script, here ‘deploy.sh’ 

deploy:
  provider: script
  script: "./deploy.sh"


# We proceed with the cache if there are no changes in the node_modules
cache:
  directories:
    - node_modules

branches:
  only:
    - master

To find the code go to https://github.com/fossasia/chat.susi.ai/blob/master/.travis.yml

The Travis configuration files will ensure that the project is building for every change made, using npm test command, in our case, it will only consider changes made on the master branch.

If one wants to watch other branches one can add the respective branch name in travis configurations. After checking for build passing we need to automatically push the changes made for which we will use a bash script.

#!/bin/bash

SOURCE_BRANCH="master"
TARGET_BRANCH="gh-pages"

# Pull requests and commits to other branches shouldn't try to deploy.
if [ "$TRAVIS_PULL_REQUEST" != "false" -o "$TRAVIS_BRANCH" != "$SOURCE_BRANCH" ]; then
    echo "Skipping deploy; The request or commit is not on master"
    exit 0
fi

# Save some useful information
REPO=`git config remote.origin.url`
SSH_REPO=${REPO/https:\/\/github.com\//git@github.com:}
SHA=`git rev-parse --verify HEAD`

ENCRYPTED_KEY_VAR="encrypted_${ENCRYPTION_LABEL}_key"
ENCRYPTED_IV_VAR="encrypted_${ENCRYPTION_LABEL}_iv"
ENCRYPTED_KEY=${!ENCRYPTED_KEY_VAR}
ENCRYPTED_IV=${!ENCRYPTED_IV_VAR}
openssl aes-256-cbc -K $ENCRYPTED_KEY -iv $ENCRYPTED_IV -in deploy_key.enc -out ../deploy_key -d

chmod 600 ../deploy_key
eval `ssh-agent -s`
ssh-add ../deploy_key

# Cloning the repository to repo/ directory,
# Creating gh-pages branch if it doesn't exists else moving to that branch
git clone $REPO repo
cd repo
git checkout $TARGET_BRANCH || git checkout --orphan $TARGET_BRANCH
cd ..

# Setting up the username and email.
git config user.name "Travis CI"
git config user.email "$COMMIT_AUTHOR_EMAIL"

# Cleaning up the old repo's gh-pages branch except CNAME file and 404.html
find repo/* ! -name "CNAME" ! -name "404.html" -maxdepth 1  -exec rm -rf {} \; 2> /dev/null
cd repo

git add --all
git commit -m "Travis CI Clean Deploy : ${SHA}"

git checkout $SOURCE_BRANCH

# Actual building and setup of current push or PR.
npm install
npm run build
mv build ../build/

git checkout $TARGET_BRANCH
rm -rf node_modules/
mv ../build/* .
cp index.html 404.html

# Staging the new build for commit; and then committing the latest build
git add -A
git commit --amend --no-edit --allow-empty

# Deploying only if the build has changed
if [ -z `git diff --name-only HEAD HEAD~1` ]; then

  echo "No Changes in the Build; exiting"
  exit 0

else
  # There are changes in the Build; push the changes to gh-pages
  echo "There are changes in the Build; pushing the changes to gh-pages"

  # Actual push to gh-pages branch via Travis
  git push --force $SSH_REPO $TARGET_BRANCH
fi

This bash script will enable Travis CI user to push changes to gh pages, for this we need to store the credentials of the repository in encrypted form.

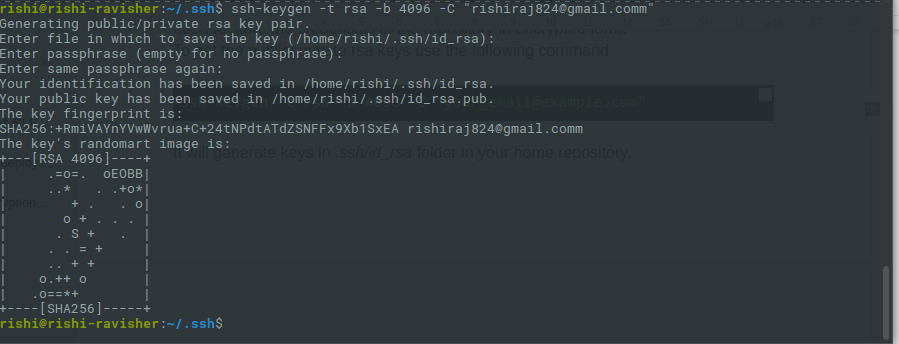
1. To get the public/private rsa keys we use the following command

ssh-keygen -t rsa -b 4096 -C "your_email@example.com"

2.  It will generate keys in .ssh/id_rsa folder in your home repository.

  1. Make sure you do not enter any passphrase while generating credentials otherwise Travis will get stuck at the time of decryption of the keys.
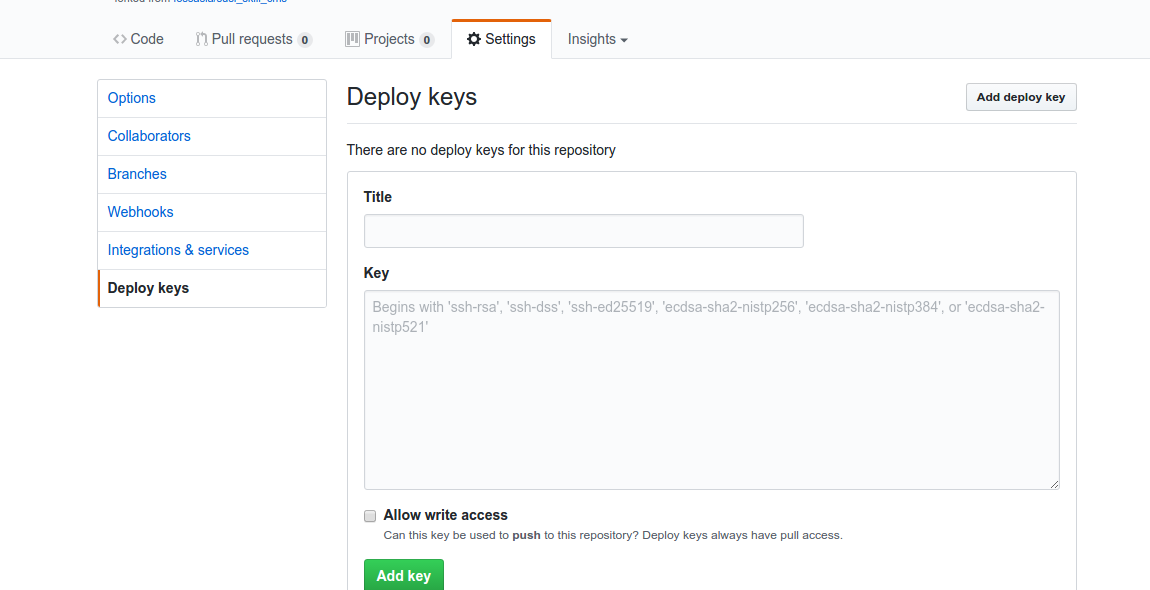
  2. Copy the public key and deploy the key to repository by visiting  

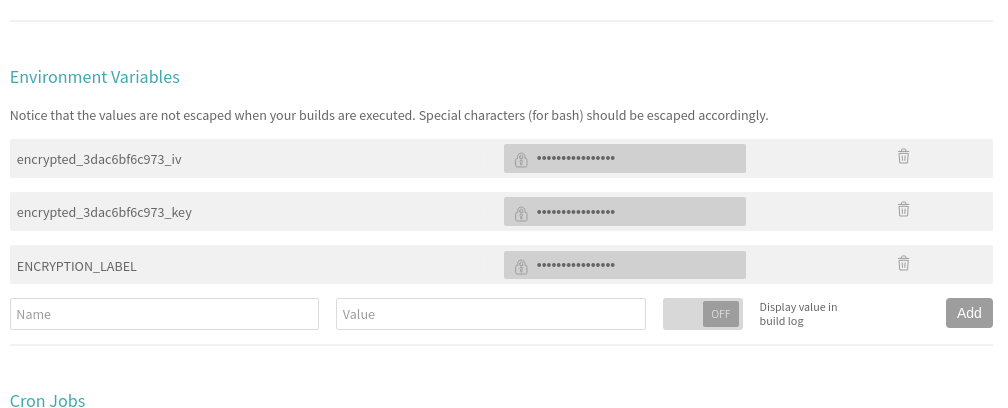
5. We also need to set the environment variable ENCRYPTED_KEY in Travis. Here’s a screenshot where to set it in the Travis repository dashboard.

6. Next, install Travis for encryption of keys.

sudo apt install ruby ruby-dev
sudo gem install travis

7. Make sure you are logged in to Travis, to login use the following command.

travis login

8. Make sure you have copied the ssh to deploy_key and then encrypt your private deploy_key and add it to root of your repository, use command –

travis encrypt-file deploy_key

9. After successful encryption, you will see a message

Please add the following to your build script (before_install stage in your .travis.yml, for instance):

openssl aes-256-cbc -K $encrypted_3dac6bf6c973_key -iv $encrypted_3dac6bf6c973_iv -in deploy_key.enc -out ../deploy_key -d
  1. Add the above-generated deploy_key in Travis and push the changes on your master branch. Do not push the deploy_key only the encryption file i.e., deploy_key.enc
  1. Finally, push the changes and create a Pull request and merge it to test the deployment. Visit Travis logs for more details and debugging.

Resources

Continue ReadingAuto Deployment of SUSI Web Chat on gh-pages with Travis-CI

Implementing Skill Detail Section in SUSI Android App

SUSI Skills are rules that are defined in SUSI Skill Data repo which are basically the responses SUSI gives to the user queries. When a user queries something from the SUSI Android app, a query to SUSI Server is made which further fetches response from SUSI Skill Data and gives the response to the app. Similarly, when we need to list all skills, an API call is made to server to list all skills. The server then checks the SUSI Skill Data repo for the skills and then return all the required information to the app. Then the app displays all the information about the skill to user. User then can view details of each skill and then interact on the chat interface to use that skill. This process is similar to what SUSI Skill CMS does. The CMS is a skill wiki like interface to view all skills and then edit them. Though the app can not be currently used to edit the skills but it can be used to view them and try them on the chat interface.

API Information

For listing SUSI Skill groups, we have to call on /cms/getGroups.json

This will give you all groups in SUSI model in which skills are present. Current response:

{
  "session": {"identity": {
    "type": "host",
    "name": "14.139.194.24",
    "anonymous": true
  }},
  "accepted": true,
  "groups": [
    "Small Talk",
    "Entertainment",
    "Problem Solving",
    "Knowledge",
    "Assistants",
    "Shopping"
  ],
  "message": "Success: Fetched group list"
}

So, the groups object gives all the groups in which SUSI Skills are located.

Next comes, fetching of skills. For that the endpoint is /cms/getGroups.json?group=GROUP_NAME

Since we want all skills to be fetched, we call this api for every group. So, for example we will be calling http://api.susi.ai/cms/getSkillList.json?group=Entertainment for getting all skills in group “Entertainment”. Similarly for other groups as well.

Sample response of skill:

{
  "accepted": true,
  "model": "general",
  "group": "Shopping",
  "language": "en",
  "skills": {"amazon_shopping": {
    "image": "images/amazon_shopping.png",
    "author_url": "https://github.com/meriki",
    "examples": ["Buy a dress"],
    "developer_privacy_policy": null,
    "author": "Y S Ramya",
    "skill_name": "Shop At Amazon",
    "dynamic_content": true,
    "terms_of_use": null,
    "descriptions": "Searches items on Amazon.com for shopping",
    "skill_rating": null
  }},
  "message": "Success: Fetched skill list",
  "session": {"identity": {
    "type": "host",
    "name": "14.139.194.24",
    "anonymous": true
  }}
}

It gives all details about skills:

  1. image
  2. author_url
  3. examples
  4. developer_privacy_policy
  5. author
  6. skill_name
  7. dynamic_content
  8. terms_of_use
  9. descriptions
  10. skill_rating

Implementation in SUSI Android App

Skill Detail Section UI of Google Assistant

Skill Detail Section UI of SUSI SKill CMS

Skill Detail Section UI of SUSI Android App

The UI of skill detail section in SUSI Android App is the mixture of UI of Skill detail section in Google Assistant ap and SUSI Skill CMS. It displays details of skills in a beautiful manner with horizontal recyclerview used to display the examples.

So, we have to display following details about the skill in Skill Detail Section:

  1. Skill Name
  2. Author Name
  3. Skill Image
  4. Try it Button
  5. Description
  6. Examples
  7. Rating
  8. Content type (Dynamic/Static)
  9. Terms of Use
  10. Developer’s Privacy policy

Let’s see the implementation.

1. Whenever a skill Card View is clicked, showSkillDetailFragment() is called and it opens a new instance of a fragment named SkillDetailsFragment which shows details of the skill. We have to provide necessary information while starting the fragment. This information is passed as a Serializable.

fun showSkillDetailFragment(skillData: SkillData, skillGroup: String) {
   val skillDetailsFragment = SkillDetailsFragment.newInstance(skillData,skillGroup)
   (context as SkillsActivity).fragmentManager.beginTransaction()
           .replace(R.id.fragment_container, skillDetailsFragment)
           .commit()
}

2.  The data which was passed as a Serializeable object is now casted back to the required form and a method to set up the UI is called.

companion object {
   val SKILL_KEY = "skill_key"
   val SKILL_GROUP = "skill_group"
   fun newInstance(skillData: SkillData, skillGroup: String): SkillDetailsFragment {
       val fragment = SkillDetailsFragment()
       val bundle = Bundle()
       bundle.putSerializable(SKILL_KEY, skillData as Serializable)
       bundle.putString(SKILL_GROUP, skillGroup)
       fragment.arguments = bundle

       return fragment
   }
}

override fun onCreateView(inflater: LayoutInflater, container: ViewGroup?, savedInstanceState: Bundle?): View {
   skillData = arguments.getSerializable(
           SKILL_KEY) as SkillData
   skillGroup = arguments.getString(SKILL_GROUP)
   return inflater.inflate(R.layout.fragment_skill_details, container, false)
}

override fun onViewCreated(view: View?, savedInstanceState: Bundle?) {
   setupUI()
   super.onViewCreated(view, savedInstanceState)
}

3. The setupUI() method then calls separate method for setting every part of the UI like image, name etc.

fun setupUI() {
   setImage()
   setName()
   setAuthor()
   setTryButton()
   setDescription()
   setExamples()
   setRating()
   setDynamicContent()
   setPolicy()
   setTerms()
}

4. One example of setting a part of the UI is setting Author name. It checks if AuthorName is null or not. After that it anchors author’s github account link with his/her name.

fun setAuthor() {
   skill_detail_author.text = "Author : ${activity.getString(R.string.no_skill_author)}"
   if(skillData.author != null && !skillData.author.isEmpty()){
       if(skillData.authorUrl == null || skillData.authorUrl.isEmpty())
           skill_detail_author.text = "Author : ${skillData.skillName}"
       else {
           skill_detail_author.linksClickable = true
           skill_detail_author.movementMethod = LinkMovementMethod.getInstance()
           if (android.os.Build.VERSION.SDK_INT >= Build.VERSION_CODES.N) {
               skill_detail_author.text = Html.fromHtml("Author : <a href=\"${skillData.authorUrl}\">${skillData.author}</a>", Html.FROM_HTML_MODE_COMPACT)
           } else {
               skill_detail_author.text = Html.fromHtml("Author : <a href=\"${skillData.authorUrl}\">${skillData.author}</a>")
           }
       }
   }
}

Summary

So, this blog talked about how the Skill detail section in SUSI Android App is implemented. This included how a network call is made, logic for making different network calls, making a horizontal recyclerview for displaying examples. So, If you are looking forward to contribute to SUSI Android App, this can help you a little. But if not so, this may also help you in understanding and how you can implement horizontal recyclerview similar to Google Play Store.

References

  1. To know about servlets https://en.wikipedia.org/wiki/Java_servlet
  2. To see how to implement one https://www.javatpoint.com/servlet-tutorial
  3. To see how to make network calls in android using Retrofit https://guides.codepath.com/android/Consuming-APIs-with-Retrofit
  4. To see how to implement custom RecyclerView Adapter https://www.survivingwithandroid.com/2016/09/android-recyclerview-tutorial.html
Continue ReadingImplementing Skill Detail Section in SUSI Android App

Performing Custom Experiments with PSLab

PSLab has the capability to perform a variety of experiments. The PSLab Android App and the PSLab Desktop App have built-in support for about 70 experiments. The experiments range from variety of trivial ones which are for school level to complicated ones which are meant for college students. However, it is nearly impossible to support a vast variety of experiments that can be performed using simple electronic circuits.

So, the blog intends to show how PSLab can be efficiently used for performing experiments which are otherwise not a part of the built-in experiments of PSLab. PSLab might have some limitations on its hardware, however in almost all types of experiments, it proves to be good enough.

  • Identifying the requirements for experiments

    • The user needs to identify the tools which are necessary for analysing the circuit in a given experiment. Oscilloscope would be essential for most experiments. The voltage & current sources might be useful if the circuit requires DC sources and similarly, the waveform generator would be essential if AC sources are needed. If the circuit involves the use and analysis of data of sensor, the sensor analysis tools might prove to be essential.
    • The circuit diagram of any given experiment gives a good idea of the requirements. In case, if the requirements are not satisfied due to the limitations of PSLab, then the user can try out alternate external features.
  • Using the features of PSLab

  • Using the oscilloscope
    • Oscilloscope can be used to visualise the voltage. The PSLab board has 3 channels marked CH1, CH2 and CH3. When connected to any point in the circuit, the voltages are displayed in the oscilloscope with respect to the corresponding channels.
    • The MIC channel can be if the input is taken from a microphone. It is necessary to connect the GND of the channels to the common ground of the circuit otherwise some unnecessary voltage might be added to the channels.

  • Using the voltage/current source
    • The voltage and current sources on board can be used for requirements within the range of +5V. The sources are named PV1, PV2, PV3 and PCS with V1, V2 and V3 standing for voltage sources and CS for current source. Each of the sources have their own dedicated ranges.
    • While using the sources, keep in mind that the power drawn from the PSLab board should be quite less than the power drawn by the board from the USB bus.
      • USB 3.0 – 4.5W roughly
      • USB 2.0 – 2.5W roughly
      • Micro USB (in phones) – 2W roughly
    • PSLab board draws a current of 140 mA when no other components are connected. So, it is advisable to limit the current drawn to less than 200 mA to ensure the safety of the device.
    • It is better to do a rough calculation of the power requirements in mind before utilising the sources otherwise attempting to draw excess power will damage the device.

  • Using the Waveform Generator
    • The waveform generator in PSLab is limited to 5 – 5000 Hz. This range is usually sufficient for most experiments. If the requirements are beyond this range, it is better to use an external function generator.
    • Both sine and square waves can be produced using the device. In addition, there is a feature to set the duty cycle in case of square waves.
  • Sensor Quick View and Sensor Data Logger
    • PSLab comes with the built in support for several plug and play sensors. The support for more sensors will be added in the future. If an experiment requires real time visualisation of sensor data, the Sensor Quick View option can be used whereas for recording the data for sensors for a period of time, the Sensor Data Logger can be used.
  • Analysing the Experiment

    • The oscilloscope is the most common tool for circuit analysis. The oscilloscope can sample data at very high frequencies (~250 kHz). The waveform at any point can be observed by connecting the channels of the oscilloscope in the manner mentioned above.
    • The oscilloscope has some features which will be essential like Trigger to stabilise the waveforms, XY Plot to plot characteristics graph of some devices, Fourier Transform of the Waveforms etc. The tools mentioned here are simple but highly useful.
    • For analysing the sensor data, the Sensor Quick View can be paused at any instant to get the data at any instant. Also, the logged data in Sensor Data Logger can be exported as a TXT/CSV file to keep a record of the data.
  • Additional Insight

    • The PSLab desktop app comes with the built-in support for the ipython console.
    • The desired quantities like voltages, currents, resistance, capacitance etc. can also be measured by using simple python commands through the ipython console.
    • A simple python script can be written to satisfy all the data requirements for the experiment. An example for the same is shown below.

This is script to produce two sine waves of 1 kHz and capturing & plotting the data.

from pylab import *
from PSL import sciencelab
I=sciencelab.connect()
I.set_gain('CH1', 2) # set input CH1 to +/-4V range
I.set_gain('CH2', 3) # set input CH2 to +/-4V range
I.set_sine1(1000) # generate 1kHz sine wave on output W1
I.set_sine2(1000) # generate 1kHz sine wave on output W2
#Connect W1 to CH1, and W2 to CH2. W1 can be attenuated using the manual amplitude knob on the PSlab
x,y1,y2 = I.capture2(1600,1.75,'CH1') 
plot(x,y1) #Plot of analog input CH1
plot(x,y2) #plot of analog input CH2
show()


References

Continue ReadingPerforming Custom Experiments with PSLab

Using Android Palette with Glide in Open Event Organizer Android App

Open Event Organizer is an Android Application for the Event Organizers and Entry Managers. The core feature of the App is to scan a QR code from the ticket to validate an attendee’s check in. Other features of the App are to display an overview of sales, ticket management and basic editing in the Event Details. Open Event API Server acts as a backend for this App. The App uses Navigation Drawer for navigation in the App. The side drawer contains menus, event name, event start date and event image in the header. Event name and date is shown just below the event image in a palette. For a better visibility Android Palette is used which extracts prominent colors from images. The App uses Glide to handle image loading hence GlidePalette library is used for palette generation which integrates Android Palette with Glide. I will be talking about the implementation of GlidePalette in the App in this blog.

The App uses Data Binding so the image URLs are directly passed to the XML views in the layouts and the image loading logic is implemented in the BindingAdapter class. The image loading code looks like:

GlideApp
   .with(imageView.getContext())
   .load(Uri.parse(url))
   ...
   .into(imageView);


So as to implement palette generation for event detail label, it has to be implemented with the event image loading. GlideApp takes request listener which implements methods on success and failure where palette can be generated using the bitmap loaded. With GlidePalette most of this part is covered in the library itself. It provides GlidePalette class which is a sub class of GlideApp request listener which is passed to the GlideApp using the method listener. In the App, BindingAdapter has a method named bindImageWithPalette which takes a view container, image url, a placeholder drawable and the ids of imageview and palette. The relevant code is:

@BindingAdapter(value = {"paletteImageUrl", "placeholder", "imageId", "paletteId"}, requireAll = false)
public static void bindImageWithPalette(View container, String url, Drawable drawable, int imageId, int paletteId) {
   ImageView imageView = (ImageView) container.findViewById(imageId);
   ViewGroup palette = (ViewGroup) container.findViewById(paletteId);

   if (TextUtils.isEmpty(url)) {
       if (drawable != null)
           imageView.setImageDrawable(drawable);
       palette.setBackgroundColor(container.getResources().getColor(R.color.grey_600));
       for (int i = 0; i < palette.getChildCount(); i++) {
           View child = palette.getChildAt(i);
           if (child instanceof TextView)
               ((TextView) child).setTextColor(Color.WHITE);
       }
       return;
   }
   GlidePalette<Drawable> glidePalette = GlidePalette.with(url)
       .use(GlidePalette.Profile.MUTED)
       .intoBackground(palette)
       .crossfade(true);

   for (int i = 0; i < palette.getChildCount(); i++) {
       View child = palette.getChildAt(i);
       if (child instanceof TextView)
           glidePalette
               .intoTextColor((TextView) child, GlidePalette.Swatch.TITLE_TEXT_COLOR);
   }
   setGlideImage(imageView, url, drawable, null, glidePalette);
}


The code is pretty obvious. The method checks passed URL for nullability. If null, it sets the placeholder drawable to the image view and default colors to the text views and the palette. The GlidePalette object is generated using the initializer method with which takes the image URL. The request is passed to the method setGlideImage which loads the image and passes the GlidePalette to the GlideApp as a listener. Accordingly, the palette is generated and the colors are set to the label and text views accordingly. The container view in the XML layout looks like:

<LinearLayout
   android:layout_width="match_parent"
   android:layout_height="wrap_content"
   android:orientation="vertical"
   app:paletteImageUrl="@{ event.largeImageUrl }"
   app:placeholder="@{ @drawable/header }"
   app:imageId="@{ R.id.image }"
   app:paletteId="@{ R.id.eventDetailPalette }">


Links:
1. Documentation for Glide Image Loading Library
2. GlidePalette Github Repository
3. Android Palette Official Documentation

Continue ReadingUsing Android Palette with Glide in Open Event Organizer Android App

Making App Name Configurable for Open Event Organizer App

Open Event Organizer is a client side android application of Open Event API server created for event organizers and entry managers. The application provides a way to configure the app name via environment variable app_name. This allows the user to change the app name just by setting the environment variable app_name to the new name. I will be talking about its implementation in the application in this blog.

Generally, in an android application, the app name is stored as a static string resource and set in the manifest file by referencing to it. In the Organizer application, the app name variable is defined in the app’s gradle file. It is assigned to the value of environment variable app_name and the default value is assigned if the variable is null. The relevant code in the manifest file is:

def app_name = System.getenv('app_name') ?: "eventyay organizer"

app/build.gradle

The default value of app_name is kept, eventyay organizer. This is the app name when the user doesn’t set environment variable app_name. To reference the variable from the gradle file into the manifest, manifestPlaceholders are defined in the gradle’s defaultConfig. It is a map of key value pairs. The relevant code is:

defaultConfig {
   ...
   ...
   manifestPlaceholders = [appName: app_name]
}

app/build.gradle

This makes appName available for use in the app manifest. In the manifest file, app name is assigned to the appName set in the gradle.

<application
   ...
   ...
   android:label="${appName}"

app/src/main/AndroidManifest.xml

By this, the application name is made configurable from the environment variable.

Links:
1. ManifestPlaceholders documentation
2. Stackoverflow answer about getting environment variable in gradle

Continue ReadingMaking App Name Configurable for Open Event Organizer App

Adding Number of Sessions Label in Open Event Android App

The Open Event Android project has a fragment for showing tracks of the event. The Tracks Fragment shows the list of all the Tracks with title and TextDrawable. But currently it is not showing how many sessions particular track has. Adding TextView with rounded corner and colored background showing number of sessions for track gives great UI. In this post I explain how to add TextView with rounded corner and how to use Plurals in Android.

1. Create Drawable for background

Firstly create track_rounded_corner.xml Shape Drawable which will be used as a background of the TextView. The <shape> element must be the root element of Shape drawable. The android:shape attribute defines the type of the shape. It can be rectangle, ring, oval, line. In our case we will use rectangle.

<?xml version="1.0" encoding="utf-8"?>
<shape xmlns:android="http://schemas.android.com/apk/res/android"
    android:shape="rectangle">

    <corners android:radius="360dp" />

    <padding
        android:bottom="2dp"
        android:left="8dp"
        android:right="8dp"
        android:top="2dp" />
</shape>


Here the <corners> element creates rounded corners for the shape with the specified value of radius attribute. This tag is only applied when the shape is a rectangle. The <padding> element adds padding to the containing view. You can modify the value of the padding as per your need. You can feel shape with appropriate color using <solid> as we are setting color dynamically we will not set color here.

2. Add TextView and set Drawable

Now add TextView in the track list item which will contain number of sessions text. Set  track_rounded_corner.xml drawable we created before as background of this TextView using background attribute.

<TextView
        android:id="@+id/no_of_sessions"
        android:layout_width="wrap_content"
        android:layout_height="wrap_content"
        android:background="@drawable/track_rounded_corner"
        android:textColor="@color/white"
        android:textSize="@dimen/text_size_small"/>


Set color and text size according to your need. Here don’t add padding in the TextView because we have already added padding in the Drawable. Adding padding in the TextView will override the value specified in the drawable.

3.  Create TextView object in ViewHolder

Now create TextView object noOfSessions and bind it with R.id.no_of_sessions using ButterKnife.bind() method.

public class TrackViewHolder extends RecyclerView.ViewHolder {
    ...

    @BindView(R.id.no_of_sessions)
    TextView noOfSessions;

    private Track track;

    public TrackViewHolder(View itemView, Context context) {
        super(itemView);
        ButterKnife.bind(this, itemView);

    public void bindTrack(Track track) {
        this.track = track;
        ...
    }   
}


Here TrackViewHolder is a RecycleriewHolder for the TracksListAdapter. The bindTrack() method of this view holder is used to bind Track with ViewHolder.

4.  Add Quantity Strings (Plurals) for Sessions

Now we want to set the value of TextView. Here if the number of sessions of the track is zero or more than one then we need to set text  “0 sessions” or “2 sessions”. If the track has only one session than we need to set text “1 session” to make text meaningful. In android we have Quantity Strings which can be used to make this task easy.

<resources>
    <!--Quantity Strings(Plurals) for sessions-->
    <plurals name="sessions">
        <item quantity="zero">No sessions</item>
        <item quantity="one">1 session</item>
        <item quantity="other">%d sessions</item>
    </plurals>
</resources>


Using this plurals resource we can get appropriate string for specified quantity like “zero”, “one” and  “other” will return “No sessions”, “1 session”, and “2 sessions”. accordingly. 2 can be any value other than 0 and 1.

Now let’s set background color and test for the text view.

int trackColor = Color.parseColor(track.getColor());
int sessions = track.getSessions().size();

noOfSessions.getBackground().setColorFilter(trackColor, PorterDuff.Mode.SRC_ATOP);
noOfSessions.setText(context.getResources().getQuantityString(R.plurals.sessions,
                sessions, sessions));


Here we are setting background color of textview using getbackground().setColorFilter() method. To set appropriate text we are using getQuantityString() method which takes plural resource and quantity(in our case no of sessions) as parameters.

Now we are all set. Run the app it will look like this.

Conclusion

Adding TextView with rounded corner and colored background in the App gives great UI and UX. To know more about Rounded corner TextView and Quantity Strings follow the links given below.

Continue ReadingAdding Number of Sessions Label in Open Event Android App

Using ThreeTenABP for Time Zone Handling in Open Event Android

The Open Event Android project helps event organizers to organize the event and generate Apps (apk format) for their events/conferences by providing API endpoint or zip generated using Open Event server. For any Event App it is very important that it handles time zone properly. In Open Event Android App there is an option to change time zone setting. The user can view date and time of the event and sessions in Event Timezone and Local time zone in the App. ThreeTenABP provides a backport of the Java SE 8 date-time classes to Java SE 6 and 7. In this blog post I explain how to use ThreeTenABP for time zone handling in Android.

Add dependency

To use ThreeTenABP in your application you have to add the dependency in your app module’s build.gradle file.

dependencies {
      compile    'com.jakewharton.threetenabp:threetenabp:1.0.5'
      testCompile   'org.threeten:threetenbp:1.3.6'
}

Initialize ThreeTenABP

Now in the onCreate() method of the Application class initialize ThreeTenABP.

AndroidThreeTen.init(this);

Create getZoneId() method

Firstly create getZoneId() method which will return ZoneId according to user preference. This method will be used for formatting and parsing dates Here showLocal is user preference. If showLocal is true then this function will return Default local ZoneId otherwise ZoneId of the Event.

private static ZoneId geZoneId() {
        if (showLocal || Utils.isEmpty(getEventTimeZone()))
            return ZoneId.systemDefault();
        else
            return ZoneId.of(getEventTimeZone());
}

Here  getEventTimeZone() method returns time zone string of the Event.

ThreeTenABP has mainly two classes representing date and time both.

  • ZonedDateTime : ‘2011-12-03T10:15:30+01:00[Europe/Paris]’
  • LocalDateTime : ‘2011-12-03T10:15:30’

ZonedDateTime contains timezone information at the end. LocalDateTime doesn’t contain timezone.

Create method for parsing and formating

Now create getDate() method which will take isoDateString and will return ZonedDateTime object.

public static ZonedDateTime getDate(@NonNull String isoDateString) {
        return ZonedDateTime.parse(isoDateString).withZoneSameInstant(getZoneId());;
}


Create formatDate() method which takes two arguments first is format string and second is isoDateString. This method will return a formatted string.

public static String formatDate(@NonNull String format, @NonNull String isoDateString) {
        return DateTimeFormatter.ofPattern(format).format(getDate(isoDateString));
}

Use methods

Now we are ready to format and parse isoDateString. Let’s take an example. Let “2017-11-09T23:08:56+08:00” is isoDateString. We can parse this isoDateString using getDate() method which will return ZonedDateTime object.

Parsing:

String isoDateString = "2017-11-09T23:08:56+08:00";

DateConverter.setEventTimeZone("Asia/Singapore");
DateConverter.setShowLocalTime(false);
ZonedDateTime dateInEventTimeZone = DateConverter.getDate(isoDateString);

dateInEventTimeZone.toString();  //2017-11-09T23:08:56+08:00[Asia/Singapore]


TimeZone.setDefault(TimeZone.getDefault());
DateConverter.setShowLocalTime(true);
ZonedDateTime dateInLocalTimeZone = DateConverter.getDate(dateInLocalTimeZone);

dateInLocalTimeZone.toString();  //2017-11-09T20:38:56+05:30[Asia/Kolkata]


Formatting:

String date = "2017-03-17T14:00:00+08:00";
String formattedString = formatDate("dd MM YYYY hh:mm:ss a", date));

formattedString // "17 03 2017 02:00:00 PM"

Conclusion

As you can see, ThreeTenABP makes Time Zone handling so easy. It has also support for default formatters and methods. To learn more about ThreeTenABP follow the links given below.

Continue ReadingUsing ThreeTenABP for Time Zone Handling in Open Event Android

Fetching Images for RSS Responses in SUSI Web Chat

Initially, SUSI Web Chat rendered RSS action type responses like this:

The response from the server initially only contained

  • Title
  • Description
  • Link

We needed to improvise the web search & RSS results display and also add images for the results.

The web search & RSS results are now rendered as :

How was this implemented?

SUSI AI uses Yacy to fetchRSSs feeds. Firstly the server using the console process to return the RSS feeds from Yacy needs to be configured to return images too.

"yacy":{
  "example":"http://127.0.0.1:4000/susi/console.json?q=%22SELECT%20title,%20link%20FROM%20yacy%20WHERE%20query=%27java%27;%22",
  "url":"http://yacy.searchlab.eu/solr/select?wt=yjson&q=",
  "test":"java",
  "parser":"json",
  "path":"$.channels[0].items",
  "license":""
}

In a console process, we provide the URL needed to fetch data from, the query parameter needed to be passed to the URL and the path to look for the answer in the API response.

  • url = <url>   – the URL to the remote JSON service which will be used to retrieve information. It must contain a $query$ string.
  • test = <parameter> – the parameter that will replace the $query$ string inside the given URL. It is required to test the service.

Here the URL used is :

http://yacy.searchlab.eu/solr/select?wt=yjson&q=QUERY

To include images in RSS action responses, we need to parse the images also from the Yacy response. For this, we need to add `image` in the selection rule while calling the console process

"process":[
  {
    "type":"console",
    "expression":"SELECT title,description,link FROM yacy WHERE query='$1$';"
  }
]

Now the response from the server for RSS action type will also include `image` along with title, description, and link. An example response for the query `Google` :

{
  "title": "Terms of Service | Google Analytics \u2013 Google",
  "description": "Read Google Analytics terms of service.",
  "link": "http://www.google.com/analytics/terms/",
  "image":   "https://www.google.com/images/branding/googlelogo/1x/googlelogo_color_116x41dp.png",
}

However, the results at times, do not contain images because there are none stored in the index. This may happen if the result comes from p2p transmission within Yacy where no images are transmitted. So in cases where images are not returned by the server, we use the link preview service to preview the link and fetch the image.

The endpoint for previewing the link is :

BASE_URL+'/susi/linkPreview.json?url=URL'

On the client side, we first search the response for data objects with images in API actions. And the amongst the remaining data objects in answers[0].data, we preview the link to fetch image keeping a check on the count. This needs to be performed for processing the history cognitions too.To preview the remaining links in a loop, we cannot make ajax calls directly in a loop. To handle this, nested ajax calls are made using the function previewURLForImage() where we loop through the remaining links and on the success we decrement the count and call previewURLForImage() on the next link and on error we try previewURLForImage() on the next link without decrementing the count.

success: function (rssResponse) {
  if(rssResponse.accepted){
    respData.image = rssResponse.image;
    respData.descriptionShort = rssResponse.descriptionShort;
    receivedMessage.rssResults.push(respData);
  }
  if(receivedMessage.rssResults.length === count ||
    j === remainingDataIndices.length - 1){
    let message = ChatMessageUtils.getSUSIMessageData(receivedMessage, currentThreadID);
    ChatAppDispatcher.dispatch({
      type: ActionTypes.CREATE_SUSI_MESSAGE,
      message
    });
  }
  else{
    j+=1;
    previewURLForImage(receivedMessage,currentThreadID,
BASE_URL,data,count,remainingDataIndices,j);
  }
},

And we store the results as rssResults which are used in MessageListItems to fetch the data and render. The nested calling of previewURLForImage() ends when we have the required count of results or we have finished trying all links for previewing images. We then dispatch the message to the message store. We now improvise the UI. I used Material UI Cards to display the results and for the carousel like display, react-slick.

<Card className={cardClass} key={i} onClick={() => {
  window.open(tile.link,'_blank')
}}>
  {tile.image &&
    (
      <CardMedia>
        <img src={tile.image} alt="" className='card-img'/>
      </CardMedia>
    )
  }
  <CardTitle title={tile.title} titleStyle={titleStyle}/>
  <CardText>
    <div className='card-text'>{cardText}</div>
    <div className='card-url'>{urlDomain(tile.link)}</div>
  </CardText>
</Card>

We used the full width of the message section to display the results by not wrapping the result in message-list-item class. The entire card is hyperlinked to the link. Along with title and description, the URL info is also shown at the bottom right. To get the domain name from the link, urlDomain() function is used which makes use of the HTML anchor tag to get the domain info.

function urlDomain(data) {
  var a = document.createElement('a');
  a.href = data;
  return a.hostname;
}

To prevent stretching of images we use `object-fit: contain;` to make the images fit the image container and align it to the middle.

We finally have our RSS results with images and an improvised UI. The complete code can be found at SUSI WebChat Repo. Feel free to contribute

Resources
Continue ReadingFetching Images for RSS Responses in SUSI Web Chat

Implementing Text To Speech Settings in SUSI WebChat

SUSI Web Chat has Text to Speech (TTS) Feature where it gives voice replies for user queries. The Text to Speech functionality was added using Speech Synthesis Feature of the Web Speech API. The Text to Speech Settings were added to customise the speech output by controlling features like :

  1. Language
  2. Rate
  3. Pitch

Let us visit SUSI Web Chat and try it out.

First, ensure that the settings have SpeechOutput or SpeechOutputAlways enabled. Then click on the Mic button and ask a query. SUSI responds to your query with a voice reply.

To control the Speech Output, visit Text To Speech Settings in the /settings route.

First, let us look at the language settings. The drop down list for Language is populated when the app is initialised. speechSynthesis.onvoiceschanged function is triggered when the app loads initially. There we call speechSynthesis.getVoices() to get the voice list of all the languages currently supported by that particular browser. We store this in MessageStore using ActionTypes.INIT_TTS_VOICES action type.

window.speechSynthesis.onvoiceschanged = function () {
  if (!MessageStore.getTTSInitStatus()) {
    var speechSynthesisVoices = speechSynthesis.getVoices();
    Actions.getTTSLangText(speechSynthesisVoices);
    Actions.initialiseTTSVoices(speechSynthesisVoices);
  }
};

We also get the translated text for every language present in the voice list for the text – `This is an example of speech synthesis` using google translate API. This is called initially for all the languages and is stored as translatedText attribute in the voice list for each element. This is later used when the user wants to listen to an example of speech output for a selected language, rate and pitch.

https://translate.googleapis.com/translate_a/single?client=gtx&sl=en-US&tl=TARGET_LANGUAGE_CODE&dt=t&q=TEXT_TO_BE_TRANSLATED

When the user visits the Text To Speech Settings, then the voice list stored in the MessageStore is retrieved and the drop down menu for Language is populated. The default language is fetched from UserPreferencesStore and the default language is accordingly highlighted in the dropdown. The list is parsed and populated as a drop down using populateVoiceList() function.

let voiceMenu = voices.map((voice,index) => {
  if(voice.translatedText === null){
    voice.translatedText = this.speechSynthesisExample;
  }
  langCodes.push(voice.lang);
  return(
    <MenuItem value={voice.lang}
              key={index}
              primaryText={voice.name+' ('+voice.lang+')'} />
  );
});

The language selected using this dropdown is only used as the language for the speech output when the server doesn’t specify the language in its response and the browser language is undefined. We then create sliders using Material UI for adjusting speech rate and pitch.

<h4 style={{'marginBottom':'0px'}}><Translate text="Speech Rate"/></h4>
<Slider
  min={0.5}
  max={2}
  value={this.state.rate}
  onChange={this.handleRate} />

The range for the sliders is :

  • Rate : 0.5 – 2
  • Pitch : 0 – 2

The default value for both rate and pitch is 1. We create a controlled slider saving the values in state and using onChange function to record change in values. The Reset buttons can be used to reset the rate and pitch values respectively to their default values. Once the language, rate and pitch values have been selected we can click on `Play a short demonstration of speech synthesis`  to listen to a voice reply with the chosen settings.

{ this.state.playExample &&
  (
    <VoicePlayer
       play={this.state.play}
       text={voiceOutput.voiceText}
       rate={this.state.rate}
       pitch={this.state.pitch}
       lang={this.state.ttsLanguage}
       onStart={this.onStart}
       onEnd={this.onEnd}
    />
  )
}

We use the VoicePlayer by passing the required props to get the speech output. onStart and onEnd functions are triggered at the beginning and ending of the speech synthesis and are used to control the state from the parent component. Chosen language, rate, pitch and translated text are passed as props to VoicePlayer which creates a new SpeechSynthesisUtterance() with the passed props and plays the speech output.

On saving these settings and then using the Mic button to get voice replies we see that the voice output is controlled according to the selected settings.

Finally, we have to store the selected settings on the server and ensure that these are pulled when the app is initialized. The format in which these settings are stored in the server is :

Speech Rate

- Used to control rate of speech output.
- SETTING_NAME :  `speechRate`
- SETTING_VALUE : `0.5 - 2`
- DEFAULT_VALUE : `1`
 
Speech Pitch

- Used to control pitch of speech output.
- SETTING_NAME :  `speechPitch`
- SETTING_VALUE : `0 - 2`
- DEFAULT_VALUE : `1`
 
TTS Language

- Used to set the language for Text-To-Speech used when the response from server doesnt specify language and the browser language is also undefined.
- SETTING_NAME :  `ttsLanguage`
- SETTING_VALUE : `Language Code (string)`
- DEFAULT_VALUE : `en-US`

This is how the Text To Speech Settings were implemented in SUSI Web Chat. The complete code can be found at SUSI Web Chat Repository.

PS: To test whether your browser supports Text To Speech, open your browser console and try the following :

  • var msg = new SpeechSynthesisUtterance(‘Hello World’);
  • window.speechSynthesis.speak(msg)

If you get a speech output then the Web API Speech Synthesis is supported by your browser and Text To Speech features of SUSI Web Chat will work. The Web Speech API has support for all latest Chrome browsers as mentioned in the Web Speech API Mozilla docs.However there are few bugs with some Chromium versions please check out more on how to fix them locally here in this link.

Resources:


Continue ReadingImplementing Text To Speech Settings in SUSI WebChat