Implementation of Text-To-Speech Feature In Susper

Susper has been given a voice search feature through which it provides the user a better experience of search. We introduced to enhance the speech recognition by adding Speech Synthesis or Text-To-Speech feature. The speech synthesis feature should only work when a voice search is attempted.

The idea was to create speech synthesis similar to market leader. Here is the link to YouTube video showing the demo of the feature: Video link

In the video, it will show demo :

  • If a manual search is used then the feature should not work.
  • If voice search is used then the feature should work.

For implementing this feature, we used Speech Synthesis API which is provided with Google Chrome browser 33 and above versions.

window.speechSynthesis.speak(‘Hello world!’); can be used to check whether the browser supports this feature or not.

First, we created an interface:

interface IWindow extends Window {
  SpeechSynthesisUtterance: any;
  speechSynthesis: any;
};


Then under @Injectable we created a class for the SpeechSynthesisService.

export class SpeechSynthesisService {
  utterence: any;  constructor(private zone: NgZone) { }  speak(text: string): void {
  const { SpeechSynthesisUtterance }: IWindow = <IWindow>window;
  const { speechSynthesis }: IWindow = <IWindow>window;  this.utterence = new SpeechSynthesisUtterance();
  this.utterence.text = text; // utters text
  this.utterence.lang = ‘en-US’; // default language
  this.utterence.volume = 1; // it can be set between 0 and 1
  this.utterence.rate = 1; // it can be set between 0 and 1
  this.utterence.pitch = 1; // it can be set between 0 and 1  (window as any).speechSynthesis.speak(this.utterence);
}// to pause the queue of utterence
pause(): void {
  const { speechSynthesis }: IWindow = <IWindow>window;
const { SpeechSynthesisUtterance }: IWindow = <IWindow>window;
  this.utterence = new SpeechSynthesisUtterance();
  (window as any).speechSynthesis.pause();
 }
}


The above code will implement the feature Text-To-Speech.

The source code for the implementation can be found here: https://github.com/fossasia/susper.com/blob/master/src/app/speech-synthesis.service.ts

We call speech synthesis only when voice search mode is activated. Here we used redux to check whether the mode is ‘speech’ or not. When the mode is ‘speech’ then it should utter the description inside the infobox.

We did the following changes in infobox.component.ts:

import { SpeechSynthesisService } from ../speechsynthesis.service;

speechMode: any;

constructor(private synthesis: SpeechSynthesisService) { }

this.query$ = store.select(fromRoot.getwholequery);
this.query$.subscribe(query => {
  this.keyword = query.query;
  this.speechMode = query.mode;
});


And we added a conditional statement to check whether mode is ‘speech’ or not.

// conditional statement
// to check if mode is ‘speech’ or not
if (this.speechMode === speech) {
  this.startSpeaking(this.results[0].description);
}
startSpeaking(description) {
  this.synthesis.speak(description);
  this.synthesis.pause();
}


Continue ReadingImplementation of Text-To-Speech Feature In Susper

Debugging JSON Files of Sample Events for Open Event Android using Stetho

In this blog, I will talk about data validation and debugging in Android using the Stetho-A debug bridge for Android by Facebook. Most Android applications have JSON files to populate the elements like RecyclerViews, ListViews and different types of Layouts. Stetho is a debug tool for Android which uses the well-known Chrome Developer tools as it’s User Interface. With Stetho, we can see all our incoming JSON data in spreadsheets making debugging much easier and fun. What’s more, it’s completely Open source.

Getting started with Stetho

To start with, we need to enable Stetho by adding it as one of the dependencies in the build.gradle file.

compile 'com.facebook.stetho:stetho:1.4.2'

It is already enabled in the Open Event Android app.

Now, you need to add the api endpoint for your sample in the config.json file in the project(if you are using the Android repo for debugging). The config.json file is at app/assets/

In case, you are using an Open Event generated app then there’s no need to do that.

Now connect your phone through the USB cable to your laptop and start your application.

Next, you have to browse to chrome://inspect where you will see your device in the window as shown below.


On clicking “Inspect”, you will be shown the Stetho debug tool interface. Something like this:

When you download the details by clicking “Yes” on the starting of the application, be sure to keep it connected to the Stetho tool in the ‘inspect’ mode.

Once the data has loaded, go to Web SQL-> default.realm. You will see tabs like:-

class_speaker, class_sponsor, class_session, class_track among others.

On clicking them, you will see well-organised tables that show all linked attributes of the class that you selected.

Sessions can be seen along with all the related information in a tabular format.

Stetho displays speakers of the event and their information in an easy-to-read tabular format.

Micro locations of the event along with related information in a tabular format.

This is how you can view all the attributes of your sample in a tabular layout and hence, debug them easily. Although, Stetho is about much more than this, this is all I will talk about in this blog.

You can read more about Stetho and it’s functionalities here.

The official repo for Stetho can be found here for the source code.

Continue ReadingDebugging JSON Files of Sample Events for Open Event Android using Stetho

Getting code coverage in a Nodejs project using Travis and CodeCov

We had set up unit tests on the webapp generator using mocha and chai, as I had blogged before.

But we also need to get coverage reports for each code commit and the overall state of the repo.

Since it is hosted on Github, Travis comes to our rescue. As you can see from our .travis.yml file, we already had Travis running to check for builds, and deploying to heroku.

Now to enable Codecov, simply go to http://codecov.io and enable your repository (You have to login with Github so see your Github repos) .

Once you do it, your dashboard should be visible like this https://codecov.io/github/fossasia/open-event-webapp

We use istanbul to get codecoverage. To try it out just use

istanbul cover _mocha

On the root of your project (where the /test/ folder is ) . That should generate a folder called coverage or lcov. Codecov can read lcov reports. They have provided a bash file which can be run to automatically upload coverage reports. You can run it like this –

bash <(curl -s https://codecov.io/bash)

Now go back to your codecov dashboard, and your coverage report should show up.

Screenshot from 2016-08-29 21-23-00

If all is well, we can integrate this with travis so that it happens on every code push. Add this to your travis.yml file.

script:
  - istanbul cover _mocha
after_success:
- bash <(curl -s https://codecov.io/bash)

This will ensure that on each push, we run coverage first. And if it is successful, we push the result to codecov.

We can see coverage file by file like this

Screenshot from 2016-08-29 21-23-35

And we can see coverage line by line in a file like this

Screenshot from 2016-08-29 21-26-55


Continue ReadingGetting code coverage in a Nodejs project using Travis and CodeCov

Keep your node server running using PM2

The open event webapp generator is a node projects (using an express server), and a copy of it runs all the time on my personal DigitalOcean box (other than our heroku instance).

On a service like Heroku, the platform manages the task of bringing your server process up. But on, say a Linux distro on the DO box, you have to manually do

 npm run server

to be able to run the server.

While that is all good, it is a foreground shell process, which means, you will lose the node server, when you log out (or your internet connection into the ssh breaks).
So we need to be able to keep the process running in the background.

The way we do it in bash on Unix, is that we can do either of the following

 npm run server&

The “&” at the end means it will make a background fork of this task. Or if you’ve already started it without it, you can also do the following.

npm run server # starts in foreground
#Press Ctrl + Z, this pauses task and frees the shell
bg 1 # sends task no 1 to background thread.

Again, both these are hacky methods, will work only on Unix OSs, and are not really recommended for production.
For production, we need a Process Manager, for Node.js the best we can get is pm2 – purpose built process manager for node.

Install pm2 first

sudo npm install -g pm2

Using pm2, we can start any process that can be started with node. We can start the app.js script like this

pm2 start src/app.js

Also, pm2 can run npm tasks too like

pm2 start npm -- start

Pm2 has a pretty status message display window. And we can start, stop, pause, kill and/or restart any process.


Screenshot from 2016-08-28 01-19-29

Continue ReadingKeep your node server running using PM2

Involving to the end-user

The Knit Editor software aims to be installable and usable by end-users. In the whole summer of code, we focused on development and code documentation from the perspective of a developer. In this blog post we will discuss how the Knit Editor is presented to the end user. So, you reading this blog: Please comment with your thoughts on the sketches.

Currently, a site is in the making that shall present the Knit Editor software as is state of the art. The inspiration came from the talk by Tracy Osborn at PyCon 2016: “Web Design for Non Designers”. The site is currently in the making at fossasia.github.io/kniteditor. If you click on the following images, you get redirected to the implementation of the concept.

The Main Page

First thing that comes into view is the download button. This leads to the download site. Then, wen can see three popular use-cases of the knit editor. At the bottom, new developers can see that they can contribute.

End users are knitters of all ages. As tested with my mom, they expect the language to be at the top-right of the page.Main Page

Both, the download and the start developing button are highlighted in a different color to make certain that they are an action the user is expected to perform.

When you access the site you get automatically redirected to your browsers configured language.

The Download Site

When you click the download button on the main page, you reach the download site. Depending on the operating system information the browser sends, your download starts automatically, below, this is  sketched for Windows.

P1040129

Next to the download page, you may want to find other versions of the software or not. This is to be evaluated. Maybe a slightly less visible button is right for that or it can be left out. Usually, no-one uses the old software.

At the bottom, you can see that there is a predecessor of the software which is called “AYAB-Apparat”. Some people may expect to find this software, too.

The Developer Site

If you clicked “Start Developing” on the main page, you will be confronted with the site for development.

There are two ways main flavors of contributing. Either you translate or you write program code. Therefore, we have two buttons that skip to the corresponding sections.

P1040130

At the bottom, you can see that there are tutorials on how to set up the environment for development. Videos for this can be found under this Youtube playlist.

Summary

At the end of GSoC we should document the code. Since we did documentation-driven development, there was already a focus on the developers from the start. End-user involvement fell short during the development phase. “Documentation is the way of informing people.” – this is something I learned from a talk. Thus, I create the new site for the knit editor as a documentation about the project fit for non-developers.

Continue ReadingInvolving to the end-user

Using ftp-deploy in node.js to publish websites over FTP

In the Open Event Webapp Generator, we recently added the functionality for organisers to submit their ftp credentials and when the website is generated, it’ll automatically upload the website to the chosen ftp server (allowing creation of subdirectory internally, if the organiser so wants).

To achieve we used the very useful nodejs module ftp-deploy which is a wrapper on the popular jsftp library

The code dealing with ftp deployment in our webapp generator can be found here  –

https://github.com/fossasia/open-event-webapp/blob/development/src/backend/ftpdeploy.js

As can be seen, deploying using ftp-deploy is pretty straightforward. Primarily we need a config object


  var config = {
    username: ftpDetails.user, //prompted on commandline if not given
    password: ftpDetails.pass, // optional, prompted if none given
    host: ftpDetails.host,
    port: 21,
    localRoot: path.join(__dirname, '/../../dist', appFolder), //local folder containing website
    remoteRoot: ftpDetails.path, //path on ftp server to host website
    exclude: ['.git', '.idea', 'tmp/*'],
    continueOnError: true
};

You can set up some event listeners for events like uploaded uploading and upload-error

Continue ReadingUsing ftp-deploy in node.js to publish websites over FTP

Doing asynchronous tasks serially using ‘async’ in node.js

In the open-event-webapp generator we need to perform a lot of asynchronous tasks in the background like –

  • Downloading images and audio assets
  • Downloading the jsons from the endpoints
  • Generating the html from handelbar templates
  • and so on . .

Sometimes tasks depend on previous tasks, and in such cases we need to perform them serially. Also there are tasks like image downloads, that would be better if done parallelly.

To achieve both these purposes, there is an awesome node.js library called async that helps achieve this.

To perform asynchronous tasks serially (one task, then another task), we can use something like this –


async.series([
    (done) => {
       someAsyncFunction(function () { done () })
    },
    //(done) => {..}, (done) => {..} more tasks here
    (done) => {
       someAsyncFunction(function () { done () })
    });
      
    }
]);

Basically async takes an array of functions. Each function contains a callback that you need to call when the internal task is finished. The 2nd task starts, only after the done() callback of first task is executed.

An example of it’s usage can be seen in the open-event-webapp project here

Continue ReadingDoing asynchronous tasks serially using ‘async’ in node.js

Sending mails using Sendgrid on Nodejs

The open-event webapp generator project needs to send an email to the user notifying him whenever generating the webapp is finished, containing the links to the preview and zip download.

For sending emails, the easiest service we found we could use was SendGrid  which provides upto 15000 free emails a month for students who have a Github Education Pack. (It anyway provides 10000 free emails to all users).

To use sendgrid, it’s best to use the sendgrid npm module that SendGrid officially builds. To get that installed just use the following command –

npm install --save sendgrid

Also, once you have made an account on Sendgrid, create an API key, and save it as an environment variable (so that your API key is not exposed in your code). For example in our project, we save it in the environment variable SENDGRID_API_KEY
To make it permanent you can add it to your ~/.profile file

export SEDGRID_API_KEY=xxxxxxxxxxxxxxxxxxx

The actual sending takes place in the mailer.js script in our project.

Basically we are using the mail helper class provided in the sendgrid module, and the bare minimum code required to send a mail is as follows

  var helper = require('sendgrid').mail
  from_email = new helper.Email('test@example.com')
  to_email = new helper.Email('test@example.com')
  subject = 'Hello World from the SendGrid Node.js Library!'
  content = new helper.Content('text/plain', 'Hello, Email!')
  mail = new helper.Mail(from_email, subject, to_email, content)
 
  var sg = require('sendgrid')(process.env.SENDGRID_API_KEY);
  var request = sg.emptyRequest({
    method: 'POST',
    path: '/v3/mail/send',
    body: mail.toJSON()
  });
 
  sg.API(request, function(error, response) {
    console.log(response.statusCode)
    console.log(response.body)
    console.log(response.headers)
  })

You need to replace the to and from emails to your requirements.

Also as you can see in our project’s code, if you want to send HTML formatted data, you can change the content type from text/plain to text/html and then add any html content (as a string) into the content.

Continue ReadingSending mails using Sendgrid on Nodejs

Using Heroku pipelines to set up a dev and master configuration

The open-event-webapp project, which is a generator for event websites, is hosted on heroku. While it was easy and smooth sailing to host it on heroku for a single branch setup, we moved to a 2-branch policy later on. We make all changes to the development branch, and every week once or twice, when the codebase is stable, we merge it to master branch.

So we had to create a setup where  –

master branch –> hosted on –> heroku master

development branch –> hosted on –> heroku dev

Fortunately, for such a setup, Heroku provides a functionality called pipelines and a well documented article on how to implement git-flow


First and foremost, we created two separate heroku apps, called opev-webgen and opev-webgen-dev

To break it down, let’s take a look at our configuration. First step is to set up separate apps in the travis deploy config, so that when development branch is build, it pushed to open-webgen-dev and when master is built, it pushes to opev-webgen app. The required lines as you can see are –

https://github.com/fossasia/open-event-webapp/blob/master/.travis.yml#L25

https://github.com/fossasia/open-event-webapp/blob/development/.travis.yml#L25

Now, we made a new pipeline on heroku dashboard, and set opev-webgen-dev and opev-webgen in the staging and production stages respectively.

Screenshot from 2016-07-31 04-33-30 Screenshot from 2016-07-31 04-34-41

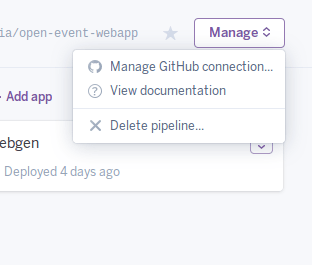
Then, using the “Manage Github Connection” option, connect this app to your github repo.

Screenshot from 2016-07-31 04-36-17

Once you’ve done that, in the review stage of your heroku pipeline, you can see all the existing PRs of your repo. Now you can set up temporary test apps for each PR as well using the Create Review App option.

Screenshot from 2016-07-31 04-37-38

So now we can test each PR out on a separate heroku app, and then merge them. And we can always test the latest state of development and master branches.

Continue ReadingUsing Heroku pipelines to set up a dev and master configuration

Webapp: The generator for making schedule pages

Why a static HTML generator


Before we start working on more advanced features like push notifications and iCal exports etc, we have been working on getting a generator (a simple node.js script) up, that can take data for an event either in form of json files, or from a given API in open-event data format, and generate a schedule page.

It has been used to generate the programm page of OpenTechSummit 2016 (http://2016.opentechsummit.net/programm/)

It is based on the open-event-scraper   project of FOSSASIA, and some more features had been added when developing it for OTS16. Some of the new features include –

  • Ability to define copyright and license in the API/Json, and generator adds it in the footer
  • Ability to define sponsors (support for upto 3 levels are there), and the generator adds sponsor logos with links at the bottom of the page.
  • Ability to embed audio, slides and videos into the session cards.

How the process works

Right now if you take a look at the open-event-scraper project under opentechsummit (which is a fork from the FOSSASIA repo, and being used to develop the new features) , you’ll see the process goes like this –

  1. The scraper.py file scrapes data about sessions and speakers from an internal Google Sheet we have. Then the event.py file gets data about the event itself (copyright, links to social channels).

    This step is not needed if we are using a JSON API endpoint. This is needed only if the data source is a Google Sheet, then local JSON files are created.

  2. Once we have an endpoint or JSON files locally downloaded, there a node.js script – generator.js   which generates a static HTML page.
  3. The generated HTML page is based on a handelbars template – schedule.tpl where all the required markup is there.
  4. And finally there is our own stylesheet which is called schedule.css  and is a very lightweight styling addition, on top of what is majorly a vanilla bootstrap layout.

The road ahead

Going forward we will pull back in this source code to our main repo https://github.com/fossasia/open-event-webapp .

Then we’ll add some parameters that can be fed to generator.js when calling it, like  –

  • Name of event
  • Color scheme
  • URL of endpoints

This will have a minimal form-like frontend

We can host this on heroku then, where filling the form, will run the generator.js and the generated HTML and associated CSS files will be available as a zip.

Continue ReadingWebapp: The generator for making schedule pages