In one of my previous blog posts here, I talked about the Upgrade process of WordPress, how it works. In this blog, I am going to talk about how I implement the Auto-upgrade feature in Engelsystem.
The Upgrade process implemented in Engelsystem includes both core and child upgrades.
Methodology:
A Verison.txt file in included in the repository. It contains the version number of the current release of the Engelsystem.
Implemented a check in index.php to compare the version number in the local repository and the `fossasia/engelsystem` repository. In Engelsystem index.php is run every time when we open the System. Therefore, everytime we open Engelsystem, it automatically checks for updates.
if ($check_autoupdate_enable == true) {
  $online_ver = file_get_contents("https://raw.githubusercontent.com/fossasia/engelsystem/master/Version.txt");
  $current_ver = file_get_contents(" ./Version.txt");
  if (strcmp($current_ver, $online_ver) != 0) {
    return info('<a href="' . page_link_to("user_settings") . '">' . _('There is an Update available on GitHub! Go to settings and update') . '</a>', true);
  }
}
The above code compares the version number in the local server and the fossasia repository. If the version number is different a notification in displayed in the alert box the Engelsystem to the Admin, to update the system.
In the Settings page, Admin can update the System as shown in the screenshot below,
Admin Settings Page
The admin can click on the “Update System Now!”, to update the system to the latest version.
The is also an option provided in the UI to enable/disable the Auto-update feature.
When the version in the Version.txt on local server and fossasia repository are different, the changes the pulled to the local server using the command: git pull origin master , which will pull the changes from the FOSSASIA repository to the local server, and a Message will be displayed that the “System is Updated to Latest Version!” .
After Updating
Also, there is an option in the UI to check to Updates manually.
We are developing new Features for the Engelsystem. Developers who are interested in contributing can work with us.
Tests are an important part of any software development process. We need to write test codes for any feature that we develop to check if that feature is working properly.
In this post, I am gonna talk about writing Unit tests and running those test codes.
If you are a developer, I assume you have heard about unit tests. Most of you probably even wrote one in your life. Unit testing is becoming more and more popular in software development. Let’s first talk about what Unit testing is:
What is unit testing?
Unit testing is the process through which units of source code are tested to verify if they work properly. Performing unit tests is a way to ensure that all functionalities of an application are working as they should. Unit tests inform the developer when a change in one unit interferes with the functionality of another. Modern unit testing frameworks are typically implemented using the same code used by the system under test. This enables a developer who is writing application code in a particular language to write their unit tests in that language as well.
What is a unit testing framework?
Unit testing frameworks are developed for the purpose of simplifying the process of unit-testing. Those frameworks enable the creation of Test Fixtures, which are classes that have specific attributes enabling them to be picked up by a Test Runner.
Although it is possible to perform unit tests without such a framework, the process can be difficult, complicated and very manual.
There are a lot of unit testing frameworks available. Each of the frameworks has its own merits and selecting one depends on what features are needed and the level of expertise of the development team. For my project, Engelsystem I choose PHPUnit as the testing framework.
PHPUnit
With PHPUnit, the most basic thing you’ll write is a test case. A test case is just a term for a class with several different tests all related to the same functionality. There are a few rules you’ll need to worry about when writing your cases so that they’ll work with PHPUnit:
The test class would extend the PHPUnit_Framework_TestCase class.
The test parameters will never receive any parameters.
Below is an example of a test code from my project, Engelsystem
<?php

class ShiftTypes_Model_test extends PHPUnit_Framework_TestCase {

private $shift_id = null;

public function create_ShiftType(){
$this->shift_id = ShiftType_create('test', '1', 'test_description');
}

public function test_ShiftType_create() {
$count = count(ShiftTypes());
$this->assertNotFalse(create_ShiftType($shift_id));

// There should be one more ShiftTypes now
$this->assertEquals(count(ShiftTypes()), $count + 1);
}

public function test_ShiftType(){
$this->create_ShiftType();
$shift_type = ShiftType($this->shift_id);
$this->assertNotFalse($shift_type);
$this->assertTrue(count(ShiftTypes()) > 0);
$this->assertNotNull($shift_type);
$this->assertEquals($shift_type['name'], 'test');
$this->assertEquals(count(ShiftTypes()), 0);
$this->assertNull(ShiftTypes(-1));
}

public function teardown() {
if ($this->shift_id != null)
ShiftType_delete($this->shift_id);
}

}

?>
We can use different Assertions to test the functionality.
We are running these tests on Travis-CI
What is Travis-CI?
Travis CI is a hosted, distributed continuous integration service used to build and test software projects hosted on GitHub.
Open source projects may be tested at no charge via travis-ci.org. Private projects may be tested at the same location on a fee basis. TravisPro provides custom deployments of a proprietary version on the customer’s own hardware.
Although the source is technically free software and available piecemeal on GitHub under permissive licenses, the company notes that it is unlikely that casual users could successfully integrate it on their own platforms.
Allowing web-user on apache server to run scripts as root
If you are new to this, you might be wondering, what the hell is a web user anyways?
So let’s say that you need a server which hosts a simple web page and does a particular task based on data entered into that web-page.
The normal way of doing this is to navigate to /var/www/html and place the web page you want to host here.
You also need to put your php script in this folder so that it is accessible from the website.
This php script will take in the data from your web-page and run the necessary commands that you need to be executed on the server.( I am assuming you are not using “TheReal Dev Language” for now. :p )
I will be using a simple web page and script that I have made for this post.
<html>
<head>
  <title>Apk Generator</title>
  <meta charset="utf-8">
  <meta http-equiv="X-UA-Compatible" content="IE=edge">
  <meta name="viewport" content="width=device-width, initial-scale=1">
  <link href="https://maxcdn.bootstrapcdn.com/bootstrap/3.3.6/css/bootstrap.min.css" rel="stylesheet" integrity="sha384-1q8mTJOASx8j1Au+a5WDVnPi2lkFfwwEAa8hDDdjZlpLegxhjVME1fgjWPGmkzs7" crossorigin="anonymous">
  <link href='https://fonts.googleapis.com/css?family=Roboto:400,100' rel='stylesheet' type='text/css'>
  <link href="css/main.css" rel="stylesheet">
</head>
<body>
<div class="container"><br><br>
<form name="htmlform" id="form" enctype="multipart/form-data" class="col-md-offset-4 col-xs-offset-2 col-xs-8 col-md-4 form-group generator_form" >
  <label for="name">Email</label>
      <input type="email" class="form-control" id="Email" name="Email">
      <br>
      <input type="hidden" id="theme" name="theme" value="light">

      <label for="name">App's Name</label>
      <input type="text" class="form-control" id="App_Name" name="App_Name">
      <br>
      <label> Choose your data source </label>
      <ul style="list-style-type:none">
        <li><input type="radio" name="datasource" value="jsonupload"> Upload your own JSON files </input></li>
        <li><input type="radio" name="datasource" value="eventapi"> API endpoint of event on OpenEvent </input></li>
      </ul>
      <br>
      <section id="eventapi-input" style="display:none;">
        <label for="apiendpoint">Link to Open Event API endpoint</label>
        <input type="url" class="form-control"
        id="Api_Link" name="Api_Link">
      </section>
      <br>
      <section id="jsonupload-input" style="display:none;">
        <input type="file" name="uploadZip" id="uploadZip" class="form-control"/>
        <br>
      </section>
      <br>
      <input type="hidden" name="assetmode" value="download">
      <center>
        <br>
        <div id="status"></div>
        <br>
<tr>
 <td colspan="5" style="text-align:center">
  <button type="submit">Generate and Download app</button>
</td>
</tr>
</table>
</form>
<script src="https://www.gstatic.com/firebasejs/live/3.0/firebase.js"></script>
<script src="https://code.jquery.com/jquery-3.1.0.min.js"></script>
<script src="https://code.jquery.com/ui/1.12.0/jquery-ui.js"></script>
<script>
  $('input:radio[name="datasource"]').change(
  function() {
    if ($(this).is(':checked')) {

      if ($(this).val() === 'mockjson') {
        $('#jsonupload-input').hide(100);
        $('#eventapi-input').hide(100);
      }

      if ($(this).val() === 'jsonupload') {
        $('#jsonupload-input').show(100);
        $('#eventapi-input').hide(100);
      }

      if ($(this).val() === 'eventapi') {
        $('#eventapi-input').show(100);
        $('#jsonupload-input').hide(100);
      }
    }
  });
  var $ = jQuery;
  var timestamp = Number(new Date());
  var form = document.querySelector("form");
      form.addEventListener("submit", function(event) {
        event.preventDefault();
        var ary = $(form).serializeArray();
        var obj = {};
        for (var a = 0; a < ary.length; a++) obj[ary[a].name] = ary[a].value;
          console.log("JSON",obj);
        if(obj.Email == "" || obj.App_Name ==""){
          alert("It seems like you forgot to fill up your email address or the app's name");
          setTimeout("location.reload(true);", 1);
        }
        else{
	alert("Please wait while we generate the app, meanwhile you can stick around to directly download it.The app will also be emailed to you.");
            $.ajax({
              type: "POST",
              url: "/test.php",
              data: { timestamp : timestamp },
              success: function(response){
                console.log("Success",response);
                window.location = response;
              }
            });
        }
      });
    </script>
    </div>
</body>
</html>
This is basically a web page with some inputText widgets which accept response and send it to a php file named test.php on the server via an AJAX post.
This php script will call a bash script which in turns an email to me with the user’s timestamp as the subject.
Well, here is where the problem arises, as I am trying to run the bash file as root.
You might wonder as to why is this such a big issue?
Why can’t we do that?
Well, we can surely do that on the server but the point to be noted here is that we are not running this script directly from the server.
We are running it from a web page which is hosted on a server.
So our user here is a web user aka www-data rather than being a root user.
The web user is not provided root access by default, but there are ways to get this done.
Solution 1 :
Allow the web user to run only specific scripts as root.
Please note that this is not a ideal workaround.
Ideally your web user should not have root access in any case.
Since that’s cleared up, lets proceed.
This can be done by editing your sudoers list and adding www-data to it.
Open up your terminal and enter the following command.
sudo visudo
Next up, navigate to the end of the file and add the following command there
www-data = (root) NOPASSWD: /path/to/script.sh
In case you have to execute one script as root which in turn executes some more scripts as root, you don’t need to set the path to all of them over here.
Doing it only for the parent script will do the job.
Solution 2 :
Using SuExec
DigitalOcean blog has a very good article on how to execute python scripts as root via the web user through cgi.
One of the key components of my GSoC Project was to have a POST API for the Android App generator.
This was required so that the app generator could be plugged into the server and can be called directly instead of someone manually visiting the webpage and entering his/her details.
It takes in a JSON input and compiles and emails the app to the organizer based on his email address in the input JSON.
The input to the API will look something like this :
Once the data is sent, on the server I have a php file which intercepts the requests and performs an action based on the request.
<?php
function sendResponse($data) {
    header('Content-type: application/json');
    echo json_encode($data);
    die();
}
/* If the request isn't a POST request then send an error message*/
if ($_SERVER['REQUEST_METHOD'] != 'POST') {
    sendResponse([
        "status"=>"error",
        "code"=>405,
        "message"=>"Method Not Allowed",
    ]);
}
/* Store the input received in a variable named body */
$body = json_decode(file_get_contents('php://input'), true);
/* If the user is nissing any important input parameters, don't process the request */
if (!array_key_exists('email', $body) || !array_key_exists('app_name', $body) || !array_key_exists('endpoint', $body)) {
    sendResponse([
        "status"=>"error",
        "code"=>422,
        "message"=>"Unprocessable entity",
    ]);
}
$uid = mt_rand(1000,9999). "_" .time();  //A random User ID
/* Extracting variables from the body */
$email = escapeshellcmd($body['email']);
$appName = escapeshellcmd($body["app_name"]);
$endpoint = escapeshellcmd($body["endpoint"]);

/* Run a script based on the input parameters */
exec("sudo python /var/www/html/api/appgenserver.py $email $appName $endpoint");
The code above is pretty much self explanatory.
So basically, first we check for a valid request (GET/POST) and throw an error if it is invalid.
Next up, for a valid request we store the body into a variable and then execute a followup script as per our needs using data from this response.
This PHP file should be located in the public-html (/var/www/data) of the server so as to be accessible from outside of the server.
You can test out this API by calling it directly by prepending the server’s ip address to the name of php file containing this code.
Something like :
domain-name.com/api/api.php
You can also use Postman for Chrome or RESTClient for Firefox for making API calls easily.
Well, that’s it then!
You can easily modify the PHP code provided and modify it to suite your needs for making you own API.
Let me know your thoughts and your queries in the “response” 😉 below.
Engelsystem is an MVC based PHP application, but there was a 4th ties, Pages, introduced with the traditional MVC pattern.It seems to have everything an event manager could want.
The Model-View-Control (MVC) pattern, originally formulated in the late 1970s, is a software architecture pattern built on the basis of keeping the presentation of data separate from the methods that interact with the data. In theory, a well-developed MVC system should allow a front-end developer and a back-end developer to work on the same system without interfering, sharing, or editing files either party is working on.
Like everything else in software engineering, it seems, the concept of Model-View-Controller was originally invented bySmalltalk programmers. More specifically, it was invented by one Smalltalk programmer, Trygve Reenskaug. Trygve maintains a page that explains the history of MVC in his own words.
Block Diagram for MVC
The components of an MVC pattern are explained as follows:
MODEL: The Model is the name given to the permanent storage of the data used in the overall design.
Models represent knowledge. A model could be a single object (rather uninteresting), or it could be some structure of objects.
VIEW: The View is where data, requested from the Model, is viewed and its final output is determined. A view is a (visual) representation of its model. It would ordinarily highlight certain attributes of the model and suppress others. It is thus acting as a presentation filter.
Traditionally in web apps built using MVC, the View is the part of the system where the HTML is generated and displayed. The View also ignites reactions from the user, who then goes on to interact with the Controller.
CONTROLLER: The final component of the triad is the Controller.A controller is the link between a user and the system. It provides the user with input by arranging for relevant views to present themselves in appropriate places on the screen.
Its job is to handle data that the user inputs or submits, and update the Model accordingly. The Controller’s life blood is the user; without user interactions, the Controller has no purpose.
Even though MVC was originally designed for personal computing, it has been adapted and is widely being used by web developers due to its emphasis on separation of concerns, and thus indirectly, reusable code. The pattern encourages the development of modular systems, allowing developers to quickly update, add, or even remove functionality.
Initially, in Engelsystem there were files distributed in 4 tiers, Model, View, Controller, Pages, which are mentioned as follows:
There were 26 Pages files, in which there were both sql queries along with the controller code. All these files were refactured into Controller and Model(which contains sql queries) files seperately to implement proper MVC pattern in Engelsystem.
We are developing new feature for Engelsystem and we will be applying this WordPress like update system toEngelsystem in the upcoming weeks. Developers who are interested in contributing can work with us.
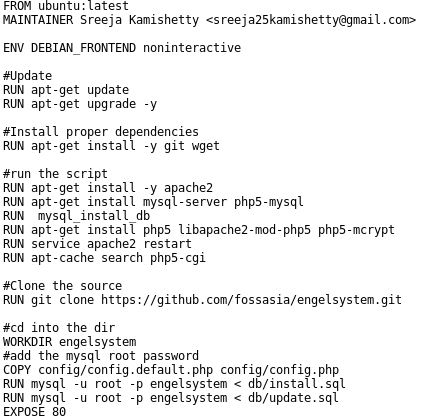
Docker is based on the concept of building images which contain the necessary software and configuration for applications. We can also build distributable images that contain pre-configured software like an Apache server, Caching server, MySQL server, etc. We can share our final image on the Docker HUB to make it accessible to everyone.
First we need to install docker on our local machine. Steps to install docker for ubuntu
Prerequisites
Docker requires a 64-bit installation regardless of your Ubuntu version.
Your kernel must be 3.10 at minimum. The latest 3.10 minor version or a newer maintained version are also acceptable.
To check your current kernel version, open a terminal and use uname -r to display your kernel version:
$ uname -r
3.11.0-15-generic
Update your apt sources
Docker’s APT repository contains Docker 1.7.1 and higher. To set APT to use packages from the new repository:
Log into your machine as a user with sudo or root privileges.
Open a terminal window.
Update package information, ensure that APT works with the https method, and that CA certificates are installed.
Open the /etc/apt/sources.list.d/docker.list file in your favorite editor.If the file doesn’t exist, create it.
Remove any existing entries.
Add an entry for your Ubuntu operating system
On Ubuntu Trusty 14.04 (LTS)
deb https://apt.dockerproject.org/repo ubuntu-trusty main
Save and close the /etc/apt/sources.list.d/docker.list file.
Update the APT package index.
$ sudo apt-get update
For Ubuntu Trusty, Wily, and Xenial, it’s recommended to install the linux-image-extra kernel package. The linux-image-extra package allows you use the aufs storage driver.
Log into your Ubuntu installation as a user with sudo privileges.
Update your APT package index.
$ sudo apt-get update
Install Docker.
$ sudo apt-get install docker-engine
Start the docker daemon.
$ sudo service docker start
Verify docker is installed correctly.
$ sudo docker run hello-world
This command downloads a test image and runs it in a container. When the container runs, it prints an informational message. If it runs successfully then docker is installed.
Docker Images
Docker images are the basis of containers. An image can be considered a class definition. We define its properties and behavior. To browse the available images, we can visit the Docker HUB and run docker pull <image> to download them to the host machine.
Listing images on the host
$ docker images
REPOSITORY TAG IMAGE ID CREATED SIZE
ubuntu 14.041d073211c498 3 days ago 187.9 MB
busybox latest 2c5ac3f849df 5 days ago 1.113 MB
training/webapp latest 54bb4e8718e8 5 months ago 348.7 MB
Working with Dockerfile
Create a Dockerfile in your PHP project. This is the docker file for engelsystem.
Our Dockerfile is now complete and ready to be built:
Building the Image
The docker build . command will build the Dockerfile inside the current directory:
Our image is now labeled and tagged. The final step is to push it to the Docker HUB. This step is optional, but it’s still useful if we’re planning on sharing the image and and helping others with their development environment.
Database migrations can transform your database in many ways such as creating new tables, inserting rows, adding indexes and modifying columns. It avoids the use of writing MYSQL by hand and instead offers a powerful API for creating migrations using PHP code.
Advantages of using Phinx
Phinx keeps track of which migrations have been run so you can worry less about the state of your database and instead focus on building better software
Each migration is represented by a PHP class in a unique file. We can write our migrations using the Phinx PHP API, or raw SQL.
Phinx has an easy installation process and easy to use command line instructions and easy to Integrate with various other PHP tools (Phing, PHPUnit) and web frameworks.
Installating Phinx
Phinx should be installed using Composer. Composer is a tool for dependency management in PHP. We need to require the dependency in composer.json.
php composer.phar require robmorgan/phinx
Then run Composer:
php composer.phar install --no-dev
Now Create a folder in your database directory called migrations with adequate permissions. It is where we write our migrations. In engelsystem it is created in db directory
Phinx can now be executed from within your project:
php vendor/bin/phinx init
Writing Migrations For SQL files
Creating a New Migration
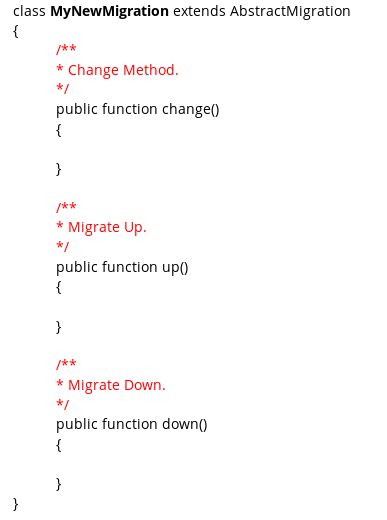
Let’s start by creating a new Phinx migration. Run Phinx using the create command. This will create a new migration in the format YYYYMMDDHHMMSS_my_new_migration.php where the first 14 characters are replaced with the current timestamp down to the second. This will create a skeleton file with a single method.
$ php vendor/bin/phinx create MyNewMigration
The File looks something like this
Explaining the File
The AbstractMigration Class
Abstraction class provides the necessary support to create your database migrations. All Phinx migrations extend from the AbstractMigration class. Phinx provides different methods in the abstraction class like change, up and down method.
The Change Method
This is the default migration method. I will explain how to write the change method for an example MYSQL query. For example following MYSQL query can also be executed using Phinx change method.
MYSQL Query
ALTER TABLE `AngelTypes` ADD `requires_driver_license` BOOLEAN NOT NULL;
Equivalent change method
public function change()
 {
   $table = $this->table('AngelTypes');
   $table->addColumn('requires_driver_license', 'boolean', array('null' => 'false'))
               ->update();
 }
The Up Method
We should use the up method to transform the database with your intended changes. For example following MYSQL query to create a new settings table can be executed using equivalent up method.
public function up()
 {
 $table = $this->table('Settings');
 $table->addColumn('event_name', 'string', array('limit' => 255))
 ->addColumn('buildup_start_date', 'integer', array('limit' => 11))
 ->addColumn('event_start_date', 'integer', array('limit' => 11))
 ->addColumn('event_end_date', 'integer', array('limit' => 11))
 ->addColumn('teardown_end_date', 'integer', array( 'limit' => 11))
 ->addColumn('event_welcome_msg', 'string', array('limit' => 255))
 ->save();
 }We have now created a table. Now we will learn to insert data into the tables using migrations.MYSQL QueryINSERT INTO `Privileges` (`id`, `name`, `desc`) VALUES (39, 'admin_settings', 'Admin Settings');
 INSERT INTO `GroupPrivileges` (`id`, `group_id`, `privilege_id`) VALUES (218, -4, 39);public function up()
{
    // inserting into Privileges
   $Rows = [
     [
     'id'   => 39,
     'name' => 'admin_settings',
     'desc' => 'Admin Settings'
     ]
   ];
  $this->insert('Privileges', $Rows);
  // inserting into GroupPrivileges.
   $rows = [
    [
    'id'    => 218,
    'group_id'  => -4,
    'privilege_id' => 39
  ]
   ];
  $this->insert('GroupPrivileges', $rows);
}
The Down Method
The down method is automatically run by Phinx when you are migrating down. We should use the down method to reverse/undo the transformations described in the up method.
MYSQL Query
DELETE * FROM `Users`;
Equivalent Down method
publicfunctiondown(){$this->execute('DELETE FROM Users');}
Since we have learned how to write migrations. Now we will execute the created migrations.
Configuring phinx.yml
When you initialize your project using the init command, Phinx creates a default file called phinx.yml.We can edit the database name, environment. We need to add the password for mysql user. The file looks something like this.
Executing the migrations
To Migrate the database we use Migrate command. It runs over all the available migrations. Command to migrate for development environment is:
$ phinx migrate -e development
To migrate to a specific version we use the --target parameter or -t for short.
$ phinx migrate -e development -t 20110103081132
To know whether all your migrations have run successfully we use the status command
$ phinx status -e development
After migrating the database for engelsystem. The status command gives the following output.
In this post I will explain how to Import Excel Sheet Data in MySQL Database using PHP. If you follow the below steps we will successfully achieve the target.
For this tutorial we are going to work with a sample CSV file, which has the following fields. I will show an example of User Table of Engelsystem which contains the following fields Nick Name, First Name, Last Name, Email, Current City, Password, Mobile Number, Age.
Steps to Import Excel File Data in MYSQL Database using PHP
create your php excelsheet data uploading file. This is a sample code which I used for my project.
Ex: import_data.php
<?php

function admin_import() {

  if (isset($_REQUEST['upload'])) {
    $ok = true;
    $file = $_FILES['csv_file']['tmp_name'];
    $handle = fopen($file, "r");
    if ($file == NULL) {
      error(_('Please select a file to import'));
      redirect(page_link_to('admin_export'));
    }
    else {
      while(($filesop = fgetcsv($handle, 1000, ",")) !== false)
        {
          $nick_name = $filesop[0];
          $first_name = $filesop[1];
          $last_name = $filesop[2];
          $email = $filesop[3];
          $age = $filesop[4];
          $current_city = $filesop[5];
          $password = $filesop[6];
          $mobile = $filesop[7];
// example error handling. We can add more as required for the database.

        if ( strlen($email) && preg_match("/^[a-z0-9._+-]{1,64}@(?:[a-z0-9-]{1,63}\.){1,125}[a-z]{2,63}$/", $mail) > 0) {
          if (! check_email($email)) {
            $ok = false;
            $msg .= error(_("E-mail address is not correct."), true);
          }
        }
// error handling for password
        if (strlen($password) >= MIN_PASSWORD_LENGTH) {
            $ok = true;
          } else {
            $ok = false;
            $msg .= error(sprintf(_("Your password is too short (please use at least %s characters)."), MIN_PASSWORD_LENGTH), true);
        }
 // If the tests pass we can insert it into the database.
        if ($ok) {
          $sql = sql_query("
            INSERT INTO `User` SET
            `Nick Name`='" . sql_escape($nick_name) . "',
            `First Name`='" . sql_escape($first_name) . "',
            `Last Name`='" . sql_escape($last_name) . "',
            `email`='" . sql_escape($email) . "',
            `Age`='" . sql_escape($age) . "',
            `current_city`='" . sql_escape($current_city) . "',
            `Password`='" . sql_escape($password) . "',
             `mobile`='" . sql_escape($mobile) . "',");
        }
      }

      if ($sql) {
        success(_("You database has imported successfully!"));
        redirect(page_link_to('admin_export'));
      } else {
        error(_('Sorry! There is some problem in the import file.'));
        redirect(page_link_to('admin_export'));
        }
    }
  }
//form_submit($name, $label) Renders the submit button of a form
//form_file($name, $label) Renders a form file box

 return page_with_title("Import Data", array(
   msg(),
  div('row', array(
          div('col-md-12', array(
              form(array(
                form_file('csv_file', _("Import user data from a csv file")),
                form_submit('upload', _("Import"))
              ))
          ))
      ))
  ));
}
?>
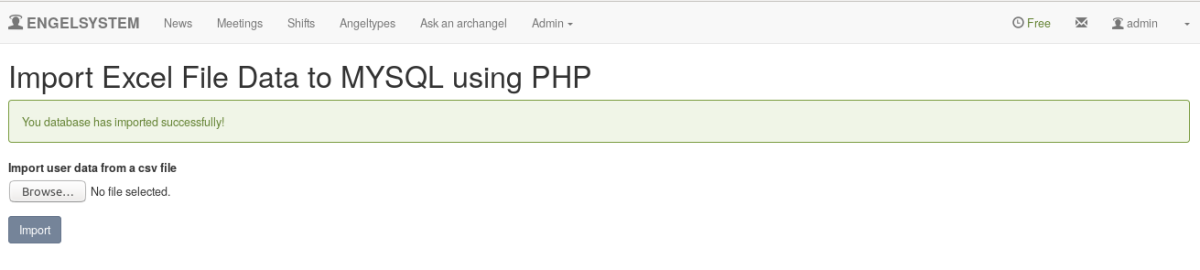
Step 4
The view of import_data.php looks something like this. Now that import_data.php is up and running. Access it through server browser and select the excel file to be imported.
Step 5
Prepare the excelsheet data and save it as .csv format.
Step 6
Now just browse the csv file and upload it.
Step 7
If we see the success message after importing. Then the data is successfully imported. We can also check whether the data is inserted in phpMYAdmin
select2 is one of the nicest jQuery libraries available for web site development. It gives the web developer a lot of power in creating select boxes.
In this post I would like to discuss how to implement a multiselect dropdown in PHP using select2
When we need to select multiple options from a list of many options. Multi checkbox will also work, but the UI of it will not be as neat as multiselect dropdown.
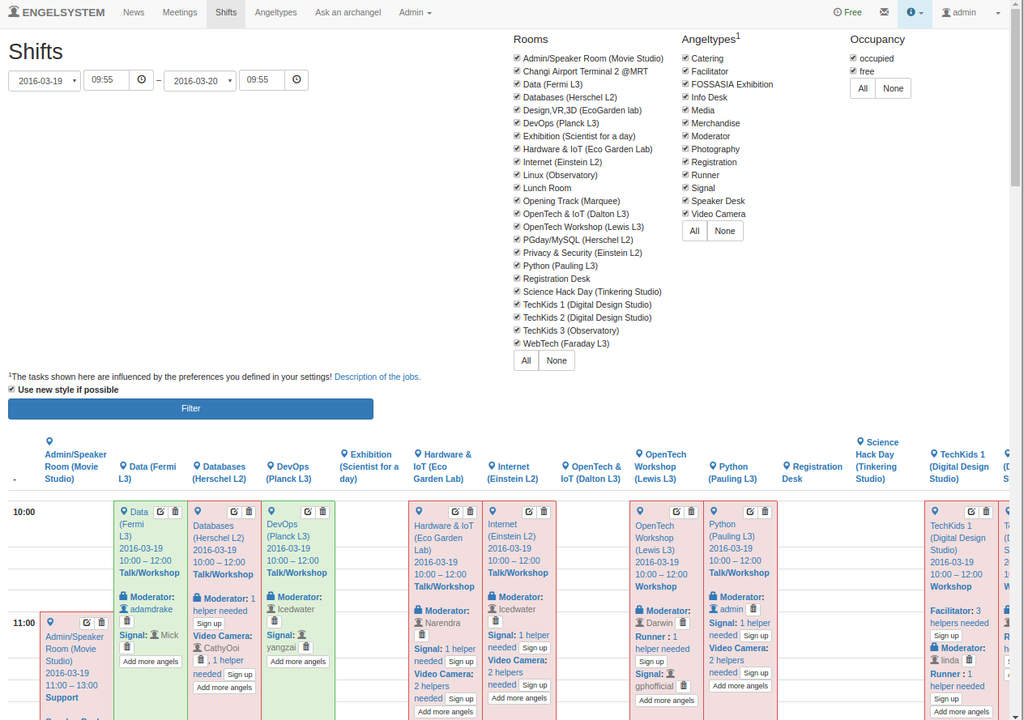
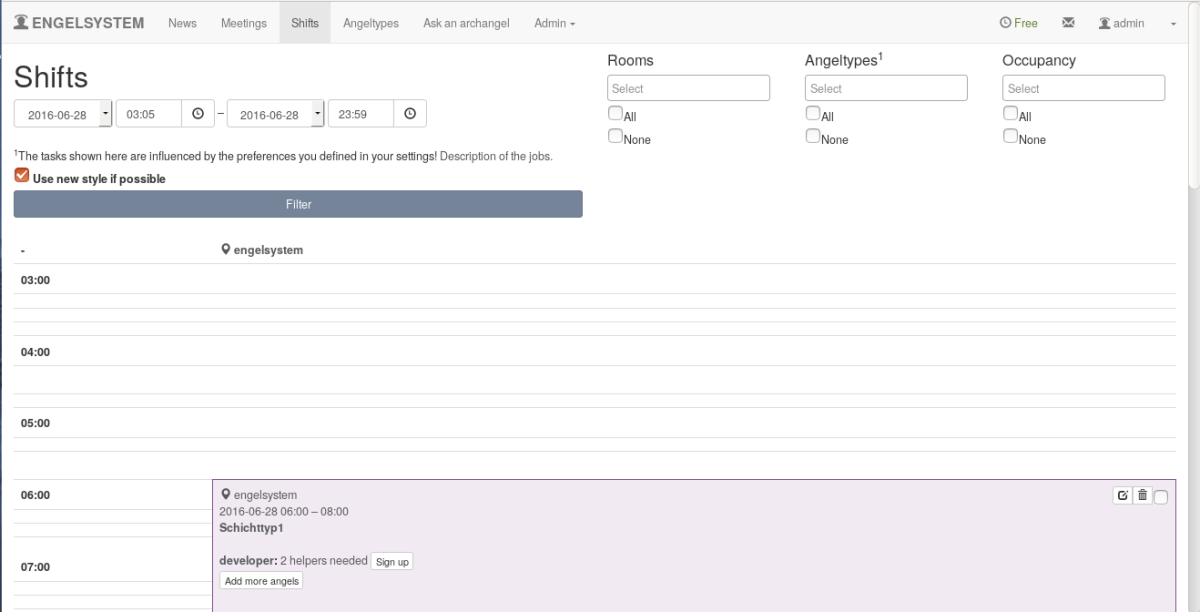
Initial UI of shifts page
In the above image. We can see all the rooms. It becomes tough for the user to select and go through each one of them and the UI also looks clumsy. After implementing multi select dropdown UI looks like the below image.
After implementing multiselect dropdown UI looks likes this.
Once we select rooms/Angel type/Occupancy. The list of options will be visible as a drop-down.
Implementation
Library used for implementing multiselect dropdown is select2 we can download the select2 Library from here Download
If you have been following my posts about my GSoC project, you would be knowing that we are making an app generator which will allow users to easily generate an android app for any event that they plan to host.
So, the next thing that we wanted in our app was to allow the users to upload a zip containing the json files (in case they don’t have an API, from where app can fetch data from) and then upload it to the server where we can use these files during the app compilation.
Steps below will tell you , how we achieved it :
Changes to HTML
First thing that we needed to do was add a file upload element to out HTML page that would allow only .zip files to be uploaded.
It was pretty simple one liner code which goes as follows
Next, we needed a server sided script (I used PHP) which would upload the zip provided by the user on to the server and store it to a unique location for each user.
The code for that was,
So what is happening here is basically the input arg. is first checked whether it is null or not null.
If it is null, and error is thrown back to the user, else the file is renamed and uploaded to the uploads folder in the server’s public directory.
Changes to the JavaScript
This was the part that needed most of the changes to be done, we first had to store the file that is to be uploaded in the form data, and then make and AJAX call to the php file located on the server.
var file_data = $(‘#uploadZip’).prop(‘files’)[0];
var form_data = new FormData();
form_data.append(‘file’, file_data);
$.ajax(
{ url: ‘/upload.php’, // point to server-side PHP script
cache: false,
contentType: false,
processData: false,
data: form_data,
type: ‘post’,
success: function(php_script_response){
ajaxCall1(); } //Chain up another AJAX call for further operations
});
So, that’s almost it!
Some server sided changes were also required like allowing the web user to execute the upload.php script and making the uploads directory writable by the web user.
Well, does it work?
Um, yeah it does.
There are a few issues with concurrent users which we are still debugging, but apart from that it works like a charm!
Here you can see a folder created by each user based on his/her timestamp
And here you can see the file that was uploaded y him/her
Lastly our webapp (Looks stunning right?)
So, that was all for this week, hope to see you again next time.
Cheers and all the best 🙂


You must be logged in to post a comment.