This blog post illustrates on how the order form is included in the attendee information of the Open Event Frontend form and enabling the organizer to choosing what information to collect from the attendee apart from the mandatory data i.e. First Name, Last Name and the Email Id during the creation of event itself.
The addition of this feature required alteration in the existing wizard flow to accommodate this extra step. This new wizard flow contains the step :
Basic Details : Where organizer fills the basic details regarding the event.
Attendee Form : In this step, the organizer can choose what information he/she has to collect from the ticket buyers.
Sponsors : This step enables the organizer to fill in the sponsor details
Session and Speakers : As the name suggests, this final step enables the organizer to fill in session details to be undertaken during the event.
This essentially condensed the flow to this :
The updated wizard checklist
To implement this, the navigation needed to be altered first in the way that Forward and Previous buttons comply to the status bar steps
Once the navigation was done, I decided to add the step in the progress bar by simply including the attendees form in the event mixin.
// app/mixins/event-wizard.js
    {
       title       : this.l10n.t('Attendee Form'),
       description : this.l10n.t('Know your audience'),
       icon        : 'list icon',
       route       : 'events.view.edit.attendee'
     }
Now a basic layout for the wizard is prepared, all what is left is setting up the route for this step and including it in the router file. I took my inspiration for setting up the route from events/view/tickets/order-from.js and implemented it like this:
// app/routes/events/view/edit/attendee.js import Route from '@ember/routing/route'; import CustomFormMixin from 'open-event-frontend/mixins/event-wizard'; import { A } from '@ember/array'; export default Route.extend(CustomFormMixin, {
return data; }, afterModel(data) { /** * Create the additional custom forms if only the compulsory forms exist. */ if (data.customForms.length === 3) { let customForms = A(); for (const customForm of data.customForms ? data.customForms.toArray() : []) { customForms.pushObject(customForm); }
for (const customForm of createdCustomForms ? createdCustomForms : []) { customForms.pushObject(customForm); }
data.customForms = customForms; } } });
With the route setup and included in the router, I just need to take care of the form data and pass it to the server. Thankfully, the project was already using EventWizardMixin so all I had to do was utilize these functions (save and move) which saves the event data in the status user decides to save it in i.e. either published or draft state
// app/controllers/events/view/edit/attendee.js import Controller from '@ember/controller'; import EventWizardMixin from 'open-event-frontend/mixins/event-wizard';
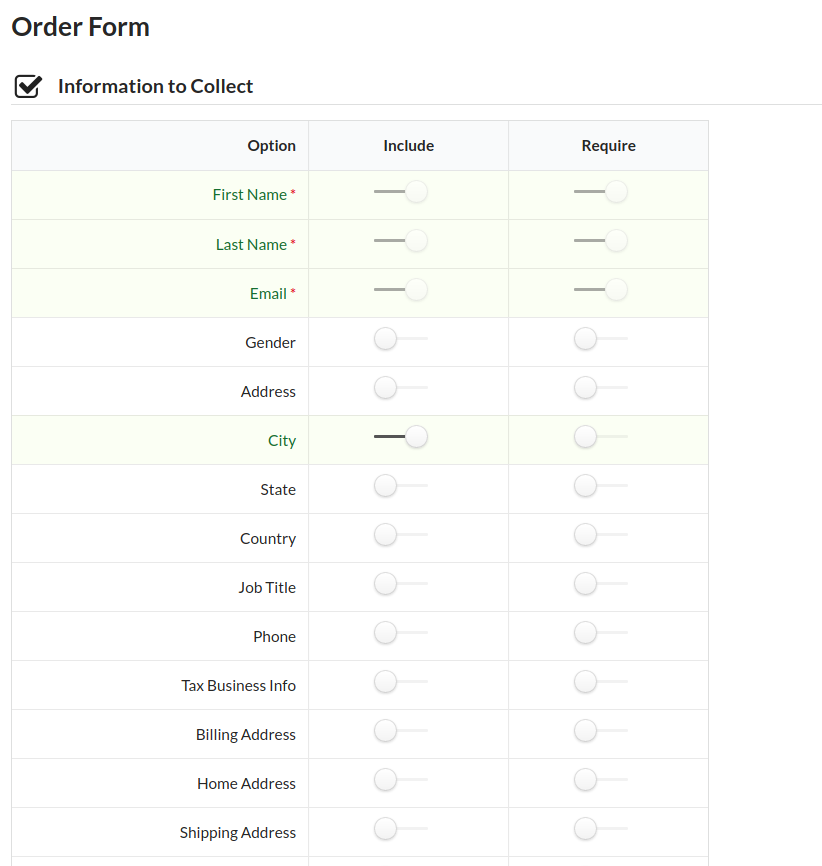
Apart from that, the form design was already there, essentially, I reutilized the form design provided to an event organizer / co-organizer in the ticket section of the event dashboard to make it look like this form :
Basic attendee information collection
In the end, after utilizing the existing template and adding it in the route’s template, the implementation is ready for a test run!
Eventyay Attendee Android app contains a lot of shared components between classes that should be reused. Dependency Injection with Koin really comes in as a great problem solver.
Dependency Injection is a common design pattern used in various projects, especially with Android Development. In short, dependency injection helps to create/provide instances to the dependent class, and share it among other classes.
Why using Koin?
Process of setting up Koin in the application
Results
Conclusion
Resources
Let’s get into the details
WHY USING KOIN?
Before Koin, dependency injection in Android Development was mainly used with other support libraries like Dagger or Guice. Koin is a lightweight alternative that was developed for Kotlin developers. Here are some of the major things that Koin can do for your project:
Modularizing your project by declaring modules
Injecting class instances into Android classes
Injecting class instance by the constructor
Supporting with Android Architecture Component and Kotlin
Create a folder to manage all the dependent classes.
Inside this Modules class, we define modules and create “dependency” class instances/singletons that can be reused or injected. For Eventyay Attendee, we define 5 modules: commonModule, apiModule, viewModelModule, networkModule, databaseModule. This saves a lot of time as we can make changes like adding/removing/editing the dependency in one place.
Let’s take a look at what is inside some of the modules:
DatabaseModule
val databaseModule = module {

   single {
       Room.databaseBuilder(androidApplication(),
           OpenEventDatabase::class.java, "open_event_database")
           .fallbackToDestructiveMigration()
           .build()
   }

   factory {
       val database: OpenEventDatabase = get()
       database.eventDao()
   }

   factory {
       val database: OpenEventDatabase = get()
       database.sessionDao()
   }
CommonModule
val commonModule = module {
   single { Preference() }
   single { Network() }
   single { Resource() }
   factory { MutableConnectionLiveData() }
   factory<LocationService> { LocationServiceImpl(androidContext()) }
}
ApiModule
val apiModule = module {
   single {
       val retrofit: Retrofit = get()
       retrofit.create(EventApi::class.java)
   }
   single {
       val retrofit: Retrofit = get()
       retrofit.create(AuthApi::class.java)
   }
NetworkModule
single {
   val connectTimeout = 15 // 15s
   val readTimeout = 15 // 15s

   val builder = OkHttpClient().newBuilder()
       .connectTimeout(connectTimeout.toLong(), TimeUnit.SECONDS)
       .readTimeout(readTimeout.toLong(), TimeUnit.SECONDS)
       .addInterceptor(HostSelectionInterceptor(get()))
       .addInterceptor(RequestAuthenticator(get()))
       .addNetworkInterceptor(StethoInterceptor())

   if (BuildConfig.DEBUG) {
       val httpLoggingInterceptor = HttpLoggingInterceptor().apply { level = HttpLoggingInterceptor.Level.BODY }
       builder.addInterceptor(httpLoggingInterceptor)
   }
   builder.build()
}

single {
   val baseUrl = BuildConfig.DEFAULT_BASE_URL
   val objectMapper: ObjectMapper = get()
   val onlineApiResourceConverter = ResourceConverter(
       objectMapper, Event::class.java, User::class.java,
       SignUp::class.java, Ticket::class.java, SocialLink::class.java, EventId::class.java,
       EventTopic::class.java, Attendee::class.java, TicketId::class.java, Order::class.java,
       AttendeeId::class.java, Charge::class.java, Paypal::class.java, ConfirmOrder::class.java,
       CustomForm::class.java, EventLocation::class.java, EventType::class.java,
       EventSubTopic::class.java, Feedback::class.java, Speaker::class.java, FavoriteEvent::class.java,
       Session::class.java, SessionType::class.java, MicroLocation::class.java, SpeakersCall::class.java,
       Sponsor::class.java, EventFAQ::class.java, Notification::class.java, Track::class.java,
       DiscountCode::class.java, Settings::class.java, Proposal::class.java)

   Retrofit.Builder()
       .client(get())
       .addCallAdapterFactory(RxJava2CallAdapterFactory.create())
       .addConverterFactory(JSONAPIConverterFactory(onlineApiResourceConverter))
       .addConverterFactory(JacksonConverterFactory.create(objectMapper))
       .baseUrl(baseUrl)
       .build()
}
As described in the code, Koin support single for creating a singleton object, factory for creating a new instance every time an object is injected.
With all the modules created, it is really simple to get Koin running in the project with the function startKoin() and a few lines of code. We use it inside the application class:
Injecting created instances defined in the modules can be used in two way, directly inside a constructor or injecting into Android classes.
Here is an example of dependency injection to the constructor that we used for a ViewModel class and injecting that ViewModel class into the Fragment:
class EventsViewModel(
   private val eventService: EventService,
   private val preference: Preference,
   private val resource: Resource,
   private val mutableConnectionLiveData: MutableConnectionLiveData,
   private val config: PagedList.Config,
   private val authHolder: AuthHolder
) : ViewModel() {
class EventsFragment : Fragment(), BottomIconDoubleClick {
   private val eventsViewModel by viewModel<EventsViewModel>()
   private val startupViewModel by viewModel<StartupViewModel>()
For testing, it is also really easy with support library from Koin.
Koin is really easy to use and integrate into Kotlin Android project. Apart from some of the basic functionalities mention above, Koin also supports other helpful features like Scoping or Logging with well-written documentation and examples. Even though it is only developed a short time ago, Koin has proved to be a great use in the Android community. So the more complicated your project is, the more likely it is that dependency injection with Koin will be a good idea.
This blog post will elaborate on how omise has been integrated into the Open Event Frontend project. Omise is Thailand’s leading online payment gateway offering a wide range of processing solutions for this project and integrating it as a payment option widens the possibilities for user base and ease of payment workflow.
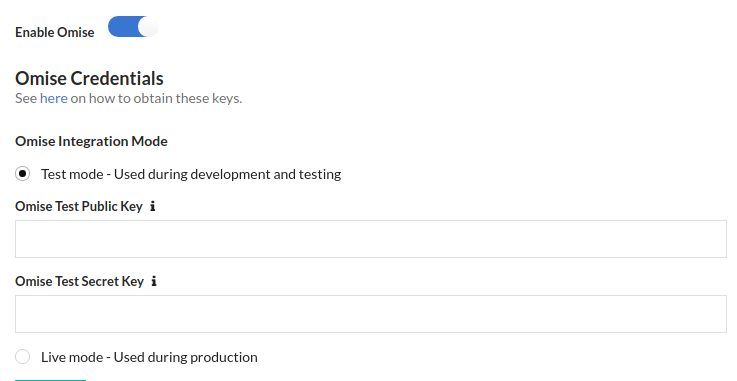
Similar to Paypal, Omise offers two alternatives for using their gateway, Test mode and Live mode, where the former is generally favoured for usage in Development and Testing phase while the latter is used in actual production for capturing live payments. Both these modes require a Public key and Secret key each and are only update-able on the admin route.
This was implemented by introducing appropriate fields in the settings model.
Once your Omise credentials are configured, you can go ahead and include the options in your event creation form. You will see an option to include Omise in your payment options if you have configured your keys correctly and if the gateway supports the currency your event is dealing with, for example, even if your keys are correctly configured, you will not get the option to use omise gateway for money collection if the currency is INR.
For showing omise option in the template, a simple computed property did the trick canAcceptOmise in the form’s component file and the template as follows:
// app/templates/components/forms/wizard/basic-details-step.js
{{#
if canAcceptOmise}} <label>{{t 'Payment with Omise'}}</label> <div class="field payments"> <div class="ui checkbox"> {{input type='checkbox' id='payment_by_omise' checked=data.event.canPayByOmise}} <label for="payment_by_omise"> {{t 'Yes, accept payment through Omise Gateway'}} <div class="ui hidden divider"></div> <span class="text muted"> {{t 'Omise can accept Credit and Debit Cards , Net-Banking and AliPay. Find more details '}} <a href="https://www.omise.co/payment-methods" target="_blank" rel="noopener noreferrer">{{t 'here'}}</a>. </span> </label> </div> </div> {{#if data.event.canPayByOmise}} <label>{{t 'Omise Gateway has been successfully activated'}}</label> {{/if}} {{/if}}
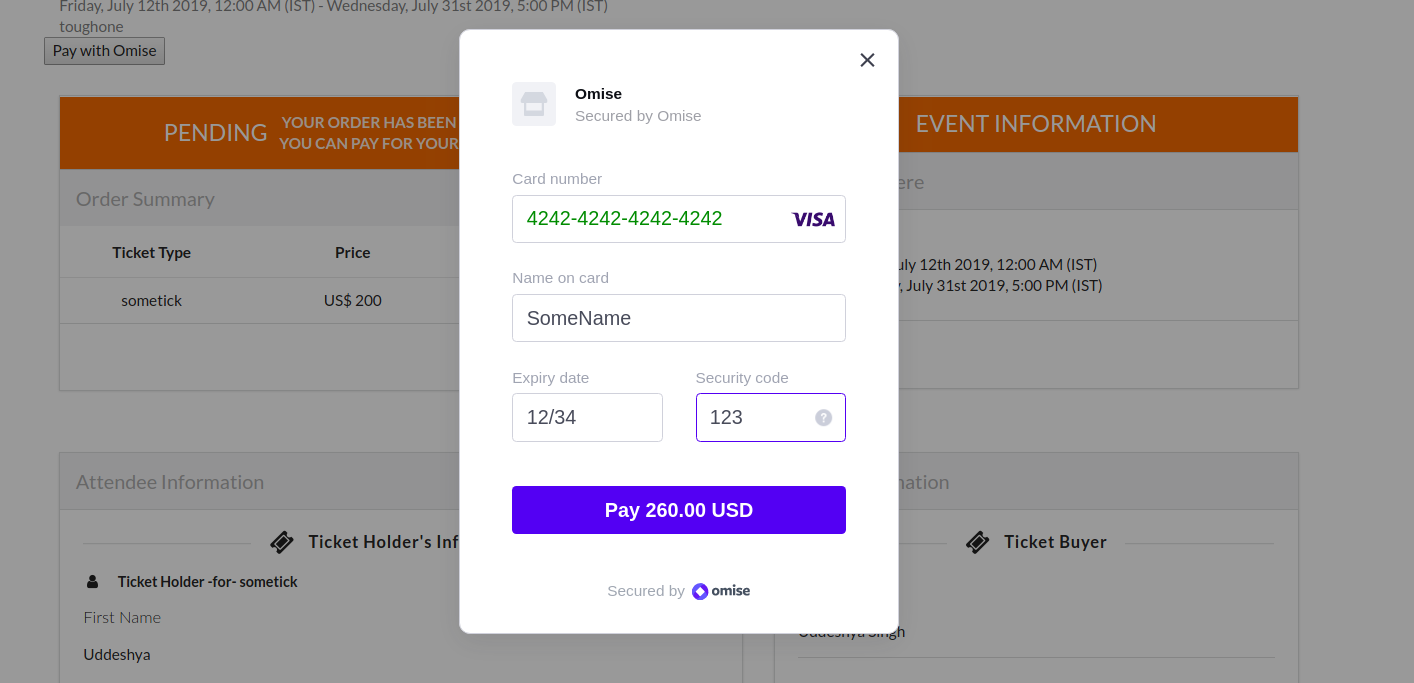
Once the event has the payment option enabled, an attendee has chosen the option to pay up using omise, they will encounter this screen on their pending order page
On entering the credentials correctly, they will be forwarded to order completion page. On clicking the “Pay” button, the omise cdnused hits the server with a POST request to the order endpoint and is implemented as follows :
Thus primarily using Omise.js CDN and introducing the omise workflow, the project now has accessibility to Omise payment gateway service and the organiser can see his successful charge.
A Splash Screen is basically a nice intro-screen that mobile applications have on startup of the app on a device. The splash screen can be customized according to the app’s UX need-animations, sound effects, etc. are some common tweaks to a simple splash screen.
I have been working with FOSSASIA on the Neurolab Android App where we made a splash screen for the same. Our implemented splash screen is below:
Neurolab Splash Screen
While developing this, we followed Google Material Design guidelines and the pattern it suggests is termed as ‘Launch Screen’. Displaying a launch screen can decrease the sense of long load time, and has the potential to add delight to the user experience. Launch screen implementation is considered as one of the best-practised development skills for a proper splash screen for an app.
Implementation
Now, it is not a good idea to use a splash screen that wastes a user’s time. This should be strictly avoided. The right way of implementing a splash screen is a little different. In the new approach specify your splash screen’s background as the activity’s theme background. This way, we can effectively and efficiently use the time gap between the startup of the app and the onCreate() method.
In the Neurolab app, we use the splash screen as a bridge for the time gap between the app startup when we click the app icon and the onCreate method of the Neurolab Activity (Main/Launcher Screen) of the app, wherein the various UI components are laid out on the screen and the functionalities, navigations, listeners are linked to those components.
So, here we won’t be creating a new layout for the Splash screen as a separate activity. Rather we would specify the theme of the landing activity as the splash screen.
We create a drawable named splash_screen.xml in our project and give a parent tag of layer-list. Here is the code for our drawable file:
Next, we are going to create a new theme in the styles resource file. This theme is going to be used as the base theme for the main activity screen of the app. In this style, we specify our created drawable file to the property name windowBackground.
Then, update this style in the project manifest file to set the theme of the main activity
android:theme="@style/AppTheme.Launcher"
Having done the steps so far, we create a simple class extending the AppCompatActivity. Note- This may seem like another Activity screen, but it is not. We don’t specify the setContentView() here. Instead of this class just directs to the main/home activity using an Intent. Finally, be sure to finish() the SplashActivity activity (class) to remove prevailing unused/idle activities from back stack.
In the initial version of the SUSI.AI Skill CMS we simply displayed all the skills present in the system in the form of cards. Once the skill analytics was incorporated into the CMS we got a bunch of skill statistics and thus we enhanced the start page by incorporating horizontally scrollable skill cards as per skill metrics like top rated skills, most used skills, skills which have received the most feedback etc. I worked on adding the skills with most feedback section and the section for the top games. This post will majorly deal with how the metrics sections are implemented on the start page and how any new metrics can be incorporated into the system and thus displayed on the CMS.
This will return a JSON which contains the skill data for all the metrics.
{"accepted":true,"model":"general","group":"All","language":"en","metrics":{"newest":[...],"rating":[...],...}"message":"Success: Fetched skill data based on metrics","session":{"identity":{"type":"host","name":"162.158.23.7_68cefd16","anonymous":true}}}
All of the data for several metics comes from the metrics object of the response which in turn contains arrays of skill data for each metric.
CMS Implementation
Once the BrowseSkill component is mounted we make an API call to the server to fetch all the data and save it to the component state, this data is then fed to the ScrollCardList component as props and the scroll component is rendered with appropriate data for different metrics.
loadMetricsSkills=()=>{leturl;url=urls.API_URL+'/cms/getSkillMetricsData.json?language='+this.state.languageValue;letself=this;$.ajax({url:url,dataType:'jsonp',jsonp:'callback',crossDomain:true,success:function(data){self.setState({skillsLoaded:true,staffPicksSkills:data.metrics.staffPicks,topRatedSkills:data.metrics.rating,topUsedSkills:data.metrics.usage,latestUpdatedSkills:data.metrics.latest,newestSkills:data.metrics.newest,topFeedbackSkills:data.metrics.feedback,topGames:data.metrics['Games, Trivia and Accessories'],});},error:function(e){console.log('Error while fetching skills based on top metrics',e);returnself.loadMetricsSkills();},});};
We are using a single component for skill metrics and skill listing which show up on applying any filter or visiting any category. Thus we think of a condition when the skill metrics are to be displayed and conditionally render the metrics section depending on the condition.
So the metrics section shows up only when we have not visited any category or language page, there’s no search query in the search bar, there’s no rating refine filter applied and no time filter applied.
Depending on the section you want to display, pass appropriate data as props to the SkillCardScrollList component, say we want to display the section with most feedback
{this.state.topFeedbackSkills.length&&!metricsHidden?(<divstyle={metricsContainerStyle}><divstyle={styles.metricsHeader}className="metrics-header"><h4>{'"SUSI, what are the skills with most feedback?"'}</h4></div>{/* Scroll Id must be unique for all instances of SkillCardList*/}{!this.props.routeType&&(<SkillCardScrollListscrollId="topFeedback"skills={this.state.topFeedbackSkills}modelValue={this.state.modelValue}languageValue={this.state.languageValue}skillUrl={this.state.skillUrl}/>)}</div>):null}
So if there are skills preset in the topFeedbackSkills array which was saved in the state from the server initially and the condition to hide metrics is false we render the component and pass appropriate props for scrollId, skills data, language and model values and skill url.
In a similar way any metrics section can be implemented in the CMS, if the data is not present in the API, modify the endpoint to enclose the data you need, fetch data data from the server and just render it.
So I hope after reading through this you have a more clearer understanding about how the metrics sections are implemented on the CMS.
Badgeyay is an open source project developed by FOSSASIA Community to generate badges for conferences and events through a simple user interface.
In this post I am going to explain about the route lifecycle hooks in ember and how we have utilized one lifecycle component to reset the controller state in badge generation form. In Ember every entity has some predefined set of methods, that it goes through the existence of the application. Route is not different from it. Our main goal is to restore the state of the controller every time we entered into a route, so that we receive a clean and new instance and not the previous state. The hook that fits in the situation is setupController(). This method is called after model() hook to set the controller state in the route. We will restore the variables in the controller here in this method to reset it to original state. This will help in removing the messages and progress on the previous state of the page on a new visit.
Procedure
Open the route, where we want to override the hook, and create a method setupController() this will call the base hook and override its behaviour.
As we can see in the method, it first initialises the super constructor and then we are writing the logic for the reset state. This will reset the badgeGenerated and showProgress variable in the controller to mentioned values.
Getting the generated badge link from the last promise resolved to set the value of the variable in the controller action.
This will set the value of the variable to the received object from backend.
Showing the content in frontend based on the values of the variable. When we initially visit the route it is set to as false in the setupController() hook and is changed later on through some promise resolvement in an action.
{{#if badgeGenerated}}
. . .
{{/if}}
This content will be only be shown in the present state and when the user revisits the route the state will be resetted.
The task of badgeyay is to generate badges for events and if the user has provided a large data set, then the system will take time to generate badges and we cannot hold the user on the same page for that time. So instead of showing the user the link of the generated badge on the form, what we can do is that we can send a mail to user with the link of generated badge. However listening for the completion of generated badge from the cloud function is not possible, as cloud functions are based on serverless architecture. This can be done using the listeners for the realtime database events.
Generated badge from the backend will be uploaded to the Firebase Storage, but applying a listener for storage events, will not give us the information of the sender and some other metadata. So after uploading the link on the database, we can use the public link generated and can push a dict to the realtime database with the necessary user information for sending mail.
Procedure
Fetching the necessary information to be pushed on the Firebase realtime database.
defsend_badge_mail(badgeId, userId, badgeLink): ref = firebase_db.reference(‘badgeMails’) print(‘Pushing badge generation mail to : ‘, badgeId) ref.child(userId).child(datetime.datetime.utcnow().isoformat().replace(‘-‘, ‘_’).replace(‘:’, ‘U’).replace(‘.’, ‘D’)).set({ ‘badgeId’: badgeId, ‘badgeLink’: badgeLink }) print(‘Pushed badge generation mail to : ‘, badgeId)
Payload consists of the downloadable link of the badge and the root node is the userID. So whenever any node gets created in this format them the cloud function will be called.
Listening for the database changes at the state of node.
For the realtime database listener, it should listen to node in the form of badgeMails/<user_id>/<date> as whenever a node of such form will be created in the database the function will get triggered and not for any other data insertions in db. This will save the quota for the cloud function execution.
Sending mail to the user from the payload
functionsendBadgeGenMail(uid, email, displayName, badgeId, badgeLink) { const mailOptions = { from: `${APP_NAME}<noreply@firebase.com>`, to: email, }; mailOptions.subject = `Badge Generated ${badgeId}`; mailOptions.html = `<p> Hello ${displayName || ”}! Your badge is generated successfully, please visit the <a href=${badgeLink}>link</a> to download badge</p>`; return mailTransport.sendMail(mailOptions).then(() => { writeMailData(uid, “success”, 3); return console.log(‘Badge mail sent to: ‘, email) }).catch((err) => { console.error(err.message); return -1; }); }
This will send the mail to the user with the generated link.
In previous blog Using RealmRecyclerView Adapter to Show Recorded Sensor Experiments[2], I have created a DataLoggerActivity in PSLab Android app containing RecyclerView showing a list having all the recorded experiments where every list item shows the date, time and the sensor instrument used for recording the data, but there arises below questions:-
What if the user wants to see the actual recorded data in form of a graph?
How the user can see the location recorded along with the data on the map?
How can the user export that data?
There is no way I could show all of that information just on a list item so I created another activity called “SensorGraphViewActivity” the layout of that activity is shown in the figure below:
Figure 1 shows the layout of the Activity as produced in Android editor
The layout contains three views:-
At the top there is graph view which I created using Android MP chart which will show the recorded data plotted on it forming the exact same curve that was created while recording it, this way it is useful to visualize the data and also there is also a play button on the top which simulates the data as it was being plotted on the graph in real time.
In the middle, there is a Card view containing two rows which will simply show the date and time of recording.
At the bottom, there is a Map view which shows the location of the user which would be fetched when the user recorded the data.
This is the gist of the layout file created for the activity.
But now the question arises:-
How to show the data in the activity for the item that the user wanted?
For that, I implemented click listener on every list item by simply adding it inside the onBindViewHolder() method
@Override
public void onBindViewHolder(@NonNull final ViewHolder holder, int position) {
   SensorLogged temp = getItem(position);
   holder.sensor.setText(temp.getSensor());
   Date date = new Date(temp.getDateTimeStart());
   holder.dateTime.setText(String.valueOf(sdf.format(date)));
   holder.cardView.setOnClickListener(new View.OnClickListener() {
       @Override
       public void onClick(View view) {
                    ...
       });
}
and inside the click listener I performed following three steps:-
First I stored the position of the item clicked inside a variable.
int positionVar = holder.getAdapterPosition();
Then I used that position from the variable to fetch related data from the Realm database by simply using getItem() method which returns the SensorLogged[1] RealmObject at that position as I used a special type of RecyclerView Adapter called as RealmRecyclerViewAdapter[2].
int positionVar = holder.getAdapterPosition();
Then I created an Intent to open the SensorGraphViewActivity and passed the related data (i.e., sensortype, foreignkey, latitude, longitude, timezone, date, time) from SensorLogged[1] object to activity in form of extras.
And, in the SensorGraphViewActivity, I used getIntent() method to fetch all those extra data in the form of Bundle. For showing the data in the graph I used the foreign key fetched from the intent and queried all the LuxData[1] RealmObject containing that foreignkey in the form of RealmResult<LuxData>[2] ArrayList and used that list to populate the graph.
Long foreignKey = intent.getLongExtra(DATA_FOREIGN_KEY, -1);
Realm realm = Realm.getDefaultInstance();
entries = new ArrayList<>();
RealmResults<LuxData> results = realm.where(LuxData.class).equalTo(DATA_FOREIGN_KEY, foreignKey).findAll();
for (LuxData item : results) {
   entries.add(new Entry((float) item.getTimeElapsed(), item.getLux()));
}
For the map, I fetched the latitude and longitude again from the intent and used the coordinates to show the location on the open street view map.
Thread thread = new Thread(new Runnable() {
   @Override
   public void run() {
       IMapController mapController = map.getController();
       mapController.setZoom((double) 9);
       GeoPoint startPoint = new GeoPoint(latitude, latitude);
       mapController.setCenter(startPoint);
   }
});
For map purposes, of course, I used a separate thread as it is a heavy and time-consuming process and it could lead the app to lag for a long time which could hamper the User Experience.
Thus after the data being plotted on the map and coordinated being plotted on the map, we can see the layout of the activity as shown in Figure 2.
Figure 2 shows the layout of the activity after being populated with data.
I also created the export button in the toolbar that will use the CSVLogger[3] class implemented inside the PSLab android app to export the data in the form of CSV file and save it in the external storage directory.
In this blog, we will talk about how to add API for adding and displaying events in with a user acts as a Marketer and/or Sales Admin on Open Event Server. The focus is on Model Updation and Schema updation of User.
Model Updation
For the Marketer and Sales Admin events, we’ll update User model as follows
Now, let’s try to understand these relationships.
In this feature, we are providing user to act as a marketer and sales admin for a event.
Both the relationships will return the events in which the user is acting as a Marketer and/or Sales Admin.
There are two custom system roles in model CustomSysRole which are Marketer and Sales Admin. A user can act as these custom system roles with respect to an event.
In this relationship, we will return those events from UserSystemRole model in which a user is acting as Marketer Custom System Role and Sales Admin Custom System Role.
We make use of Event and join UserSystemRole and CustomSysRole where we use that user where UserSystemRole.user_id == User.id , CustomSysRole.id == UserSystemRole.role_id, CustomSysRole.name == “Sales Admin” and then we return events in which Event.id == UserSystemRole.event_id
Similarly, for Marketer events we make use of Event and join UserSystemRole and CustomSysRole where we use that user where UserSystemRole.user_id == User.id , CustomSysRole.id == UserSystemRole.role_id, CustomSysRole.name == “Marketer” and then we return events in which Event.id == UserSystemRole.event_id
Schema Updation
For the Marketer and Sales Admin events, we’ll update UserSchema as follows
Now, let’s try to understand this Schema.
In this feature, we are providing user to act as a marketer and sales admin for a event.
For displaying marketer_events relation self_view is displayed by API v1.user_marketer_events and collection of these events is displayed by API v1.event_list
These APIs will return the Events as schema=”EventSchema”. Here, many=True tells us that this is One to many relationship with Events model.
So, we saw how an user can act as a marketer and/or sales admin for many events.
In this blog, we will talk about how to add different custom system roles concerning a user on Open Event Server. The focus is on its model and Schema updation.
Model Updation
For the User Table, we’ll update our User Model as follows:
Now, let’s try to understand these hybrid properties.
In this feature, we are providing Admin the rights to see whether a user is acting as a Marketer and / or Sales Admin of any of the event or not. Here, _is__system_role method is used to check whether an user plays a system role like Marketer, Sales Admin or not. This is done by querying the record from UserSystemRole model. If the record is present then the returned value is True otherwise false.
Schema Updation
For the User Model, we’ll update our Schema as follows:
Now, let’s try to understand this Schema.
Since all the properties will return either True or false so these all properties are set to Boolean in Schema.Here dump_only means, we will return this property in the Schema.
So, we saw how User Model and Schema is updated to show custom system roles concerning a user on Open Event Server.


You must be logged in to post a comment.