This summer, Open Event project has 3 different payment gateways integrated in its system enabling the user base a wider base of options to buy their tickets and pay the organizers and hence making the platform more user friendly. In the initial period Omise gateway was implemented and properly documented in the first phase while Alipay was subsequently implemented in the middle of the coding period. In the late phase, the focus has been shifted to Indian payment gateways and PayTM came out as prime choice considering it’s popularity and ease of integration with the existing technology stack.
This requires two different modals to be added to frontend project to felicitate the open-event-server hits being made on PayTM’s API services.
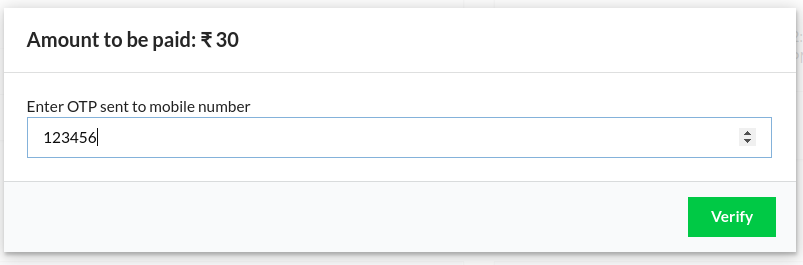
The first modal’s skeleton design is to check paytm wallets as the payment option and acquire the mobile number to be used.
This simple modal design implementation resulted in the skeleton design of the first modal which can be seen as following:
OTP sending modal
The second modal required a simple API hit integration which will be validating the acquired OTP. This was designed rather simply with the following snippet:
// app/templates/components/modals/paytm-otp.hbs
<
div class="header"> {{t 'Amount to be paid:'}} {{currency-symbol currency}} {{amount}} </div>
<div class="content"> {{t 'Enter OTP sent to mobile number'}} <form class="ui form" autocomplete="off"> <div class="field"> {{input type='number' id='otp' value=otp required=true}} </div> </form> </div> <div class="actions"> <button type="button" class="ui black button" {{action 'close'}}> {{t 'Cancel'}} </button> <button class="ui green button"> {{t 'Verify'}} </button> </div>
OTP confirmation modal
These modals were controlled by adding corresponding pop-up logic in the pending.js controller focusing on the clicks on Proceed and verify buttons respectively.
// app/controllers/orders/pending.js openPaytmModal() { // Model controller for PaytmModal this.setProperties({ 'isPaytmModalOpen': true }); },
This concludes the design walk through of custom PayTM checkout modals. These will be integrated with the APIs to complete the backend workflow and hence adding PayTM as another payment option!
The Open Event project has proven to be an excellent event management application with a growing user base. With recent workflow refactors in the order process in open-event-frontend and introduction of event invoices (to be rolled out this month as a work product), the open-event-server’s invoices required a makeover. A ticket buyer is now required to give their billing information if the order is comprised of paid tickets and to accommodate this, and long information addresses, optimisation was required.
Restructuring order invoices
The new order invoices use nested tables concept instead of previously used two-cell tables. The pros of this new design is the accomodation of long-addresses and corresponding changes in billing information display.
This made sure that the new orders have enough space to prevent information overflow and still maintain the original structure to give a sense of uniformity in old and new PDFs.
Generating new event invoices
The new event invoices needed an overall change in structure. They will be rolling out on 1st of every month, according to current implementation. This required an overall implementation of new invoices.
First, the published events are taken in consideration for generation of invoices for a particular user. It has been implemented as a scheduled job accordingly.
events = Event.query.filter_by(deleted_at=None, state='published').all() for event in events: # calculate net & gross revenues user = event.owner admin_info = get_settings() currency = event.payment_currency ticket_fee_object = db.session.query(TicketFees).filter_by(currency=currency).one() ticket_fee_percentage = ticket_fee_object.service_fee ticket_fee_maximum = ticket_fee_object.maximum_fee orders = Order.query.filter_by(event=event).all() gross_revenue = event.calc_monthly_revenue() ticket_fees = event.tickets_sold * (ticket_fee_percentage / 100) if ticket_fees > ticket_fee_maximum: ticket_fees = ticket_fee_maximum net_revenue = gross_revenue - ticket_fees payment_details = { 'tickets_sold': event.tickets_sold, 'gross_revenue': gross_revenue, 'net_revenue': net_revenue, 'amount_payable': ticket_fees } # save invoice as pdf pdf = create_save_pdf(render_template('pdf/event_invoice.html', orders=orders, user=user, admin_info=admin_info, currency=currency, event=event, ticket_fee_object=ticket_fee_object, payment_details=payment_details, net_revenue=net_revenue), UPLOAD_PATHS['pdf']['event_invoice'], dir_path='/static/uploads/pdf/event_invoices/', identifier=event.identifier) # save event_invoice info to DB
This function also required one minor modification. The function for calculating monthly revenue had to be updated as to dodge certain unseen bugs related to non completed order amount calculations hence restructuring the function as follows.
def calc_monthly_revenue(self):
       """Returns revenue of current month. Invoice sent every 1st of the month for the previous month"""
       previous_month = datetime.now().month - 1
       orders = Order.query.filter_by(event_id=self.id, status='completed').all()
monthly_revenue = sum([o.amount for o in orders if o.completed_at and o.completed_at.month == previous_month]) return monthly_revenue
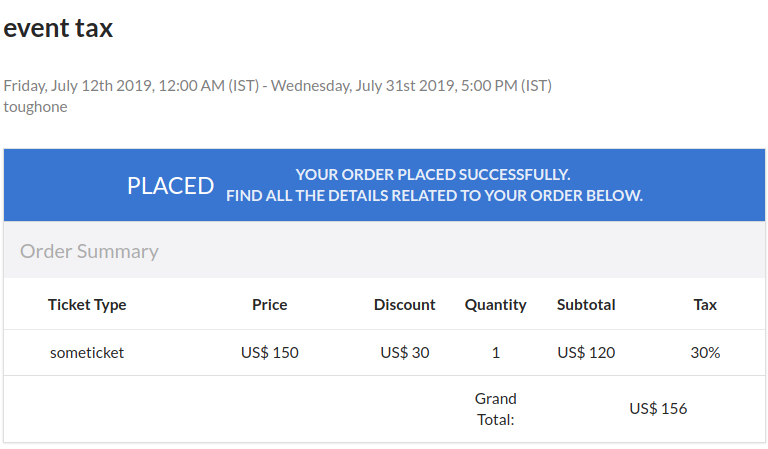
This enabled the system to finally serve event invoice PDFs. One of whose examples are given above, With this, the open-event-server is finally able to serve event invoices accordingly which can be paid via PayPal to the Eventyay account.
This blog post elaborates on the recent addition of user billing form in Eventyay which is an open source event management solution which allows users to buy & sell tickets, organize events & promote their brand, developed by FOSSASIA. As this project moves forward with the implementation of event invoices coming up,. In the past few weeks, I have collaborated with fellow developers in planning the integration of event invoice payments and this is a necessary step for the same due to its involvement in order invoice templates. This implementation focuses on event invoices billing ( the calculated amount an event organiser has to pay to the platform for their event’s revenue ).
This form includes basic details like contact details, tax ID, billing location and additional information (if any). The following is a specimen of this form :
Tax Form Implementation
First step of this form creation is to employ the account/billing/payment-info route for serving the relevant model data to the frontend.
// app/routes/account/billing/payment-info.js import Route from '@ember/routing/route'; import AuthenticatedRouteMixin from 'ember-simple-auth/mixins/authenticated-route-mixin';
Since the field additions have been done in the user schema in the server side, the corresponding changes have to made in the ember user model as well.
// app/models/user.js /** * Billing Contact Information */
This form has a speciality. Instead of using the current user information directly, it uses an intermediate object and employs manipulation in current user record only when the submit button is clicked. This has been implemented in the following way :
This post elaborates on the details of an endpoint which can be used to explicatively used to resend order confirmations. In the current implementation of the open event project, if the order has been confirmed, the ticket holders and buyers get an email each regarding their order confirmation. But in case that email has been accidentally deleted by any of the attendees, the event organizer / owner should have the power to resend the confirmations.
The first step to the implementation was to create the appropriate endpoint for the server to be pinged. I utilized the existing blueprint being used for serving tickets on eventyay frontend project and created a new endpoint on the route : orders/resend-email [POST]
# app/api/auth.py
@ticket_blueprint.route('/orders/resend-email', methods=['POST'])
@limiter.limit(
   '5/minute', key_func=lambda: request.json['data']['user'], error_message='Limit for this action exceeded'
)
@limiter.limit(
   '60/minute', key_func=get_remote_address, error_message='Limit for this action exceeded'
)
def resend_emails():
   """
   Sends confirmation email for pending and completed orders on organizer request
   :param order_identifier:
   :return: JSON response if the email was succesfully sent
   """
   order_identifier = request.json['data']['order']
   order = safe_query(db, Order, 'identifier', order_identifier, 'identifier')
   if (has_access('is_coorganizer', event_id=order.event_id)):
       if order.status == 'completed' or order.status == 'placed':
           # fetch tickets attachment
           order_identifier = order.identifier
           key = UPLOAD_PATHS['pdf']['tickets_all'].format(identifier=order_identifier)
           ticket_path = 'generated/tickets/{}/{}/'.format(key, generate_hash(key)) + order_identifier + '.pdf'
           key = UPLOAD_PATHS['pdf']['order'].format(identifier=order_identifier)
           invoice_path = 'generated/invoices/{}/{}/'.format(key, generate_hash(key)) + order_identifier + '.pdf'

           # send email.
           send_email_to_attendees(order=order, purchaser_id=current_user.id, attachments=[ticket_path, invoice_path])
           return jsonify(status=True, message="Verification emails for order : {} has been sent succesfully".
                          format(order_identifier))
       else:
           return UnprocessableEntityError({'source': 'data/order'},
                                           "Only placed and completed orders have confirmation").respond()
   else:
       return ForbiddenError({'source': ''}, "Co-Organizer Access Required").respond()
I utilized exiting send_email_to_attendees for the email purpose but for security reasons, the endpoint was limited to make sure that an organizer can request only 5 order confrimations to be resent each minute (implemented using flask limiter).
This was all for server implementation, to implement this on the front end, I just created a new action named as resendConfirmation implemented as given.
// app/controllers/events/view/tickets/orders/list.js
async resendConfirmation(order) {
     let payload = {};
     try {
       payload = {
         'data': {
           'order' : order.identifier,
           'user'  : this.authManager.currentUser.email
         }
       };
       await this.loader.post('orders/resend-email', payload);
       this.notify.success(this.l10n.t('Email confirmation has been sent to attendees successfully'));
     } catch (error) {
       if (error.status === 429) {
         this.notify.error(this.l10n.t('Only 5 resend actions are allowed in a minute'));
       }
       if (error.errors[0].detail) {
         this.notify.error(this.l10n.t(error.errors[0].detail));
       }
     }
   }
Using a simple post request, this was implemented on the frontend for sending the confirmation, but the additional work to be done was to handle the new error (429 status). The server throws the error but loader service hasn’t been configured yet to handle this error appropriately.
// app/services/loader.js if (!response.ok) { const defaultMessage = httpStatus[response.status]; if (parsedResponse) { throw parsedResponse; } if (response.status === 429) { throw { status: 429, message: ‘TOO MANY REQUESTS’ }; } throw new Error( getErrorMessage( response.statusText, defaultMessage ? `${response.status} – ${defaultMessage}` : `Could not make ${fetchOptions.type} request to ${fetchOptions.url}` ) ); }
The loader service has been modified in the following manner to accommodate the new error been thrown so that a more user friendly error could be shown on the controller level.
This was the whole mechanism which has been implemented for this particular problem.
This blog post will elaborate on how Tax Information is being displayed on the public page of an event. In current implementation, the user gets to know the total tax inclusive amount only after he/she decides to place an order but no such information was given to them on the public ticket page itself.
Order summary example in eventyay
Example : In initial implementation, the user gets to know that the order is of only $120 and no information is given about the additional 30% being charged and taking the total to $156.
To tackle this issue, I added two hybrid components to the ticket object to handle the two tax cases :
Inclusion in the price : In European and Asian Countries , the tax amount is included in the ticket price itself. For this case, I created the following parameter to store the tax amount included in gross amount.
Added on the ticket price : In basic US tax policy, the tax amount is added on top of the ticket price. For such cases I have added a new attribute to ticket model which calculates the total amount payable for that particular ticket with tax inclusion
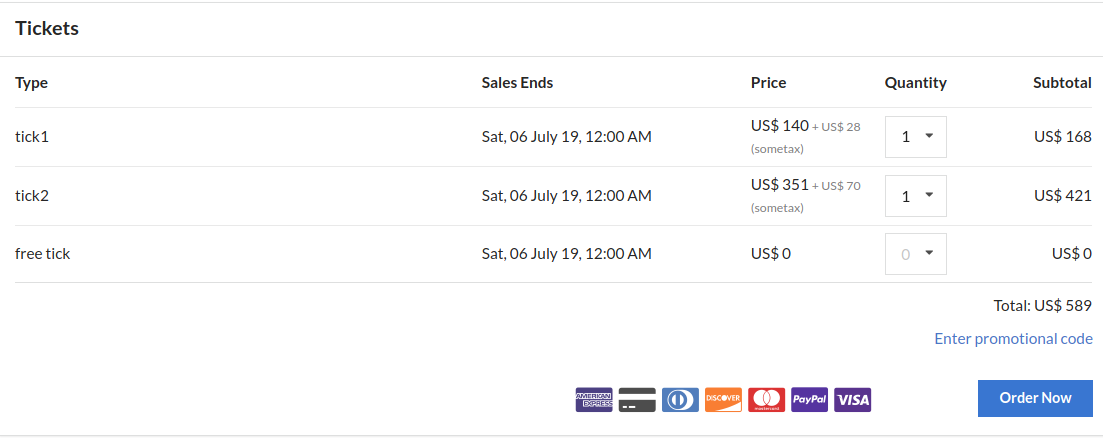
Hence making the new public ticket list display to look like this in case of tax amount inclusion and additional charge as follows
Tax amount is charged over the base price
Discount Code application cases:
In the cases when a user applies the discount code, the ticket price need to be updated, hence, the tax applied has to be updated accordingly. I achieved this by updating the two computed properties of the ticket model on each togglePromotionalCode and applyPromotionalCode action. When a promotional code is applied, the appropriate attribute is updated according to the discount offered.
Similarly, on toggling the discount code off, the ticket’s computed properties are set back to their initial value using the same formula kept during the time of initialization which has been achieved in the following manner.
// app/components/public/ticket-list.js
this.discountedTickets.forEach(ticket => {
 let taxRate = ticket.get('event.tax.rate');
 let ticketPrice = ticket.get('price');
 if (taxRate && !this.showTaxIncludedMessage) {
   let ticketPriceWithTax = ticketPrice * (1 + taxRate / 100);
   ticket.set('ticketPriceWithTax', ticketPriceWithTax);
 } else if (taxRate && this.showTaxIncludedMessage) {
   let includedTaxAmount = (taxRate * ticketPrice) / (100 + taxRate);
   ticket.set('includedTaxAmount', includedTaxAmount);
 }
 ticket.set('discount', 0);
});
This particular change makes sure that the tax amount is calculated properly as per the discounted amount and thus eliminates the possibility of overcharging the attendee.
Tax recalculation for discounted tickets
In conclusion, this feature has been implemented keeping in mind the consumer’s interest in using the Open Event Frontend and the ease of tax application on the public level with minimum required network requests.
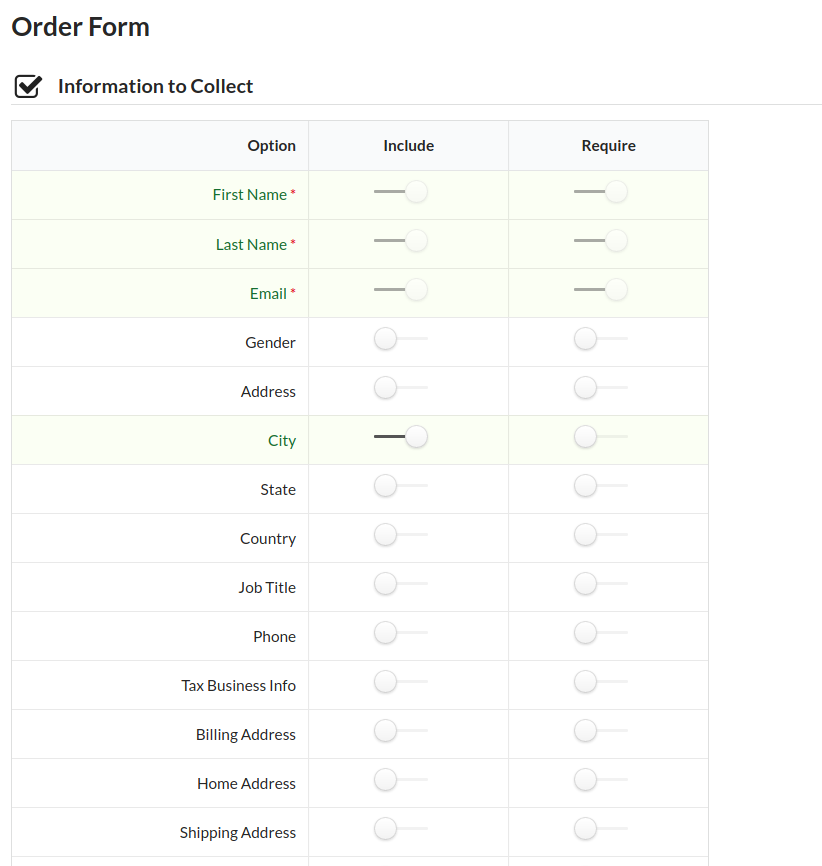
This blog post illustrates on how the order form is included in the attendee information of the Open Event Frontend form and enabling the organizer to choosing what information to collect from the attendee apart from the mandatory data i.e. First Name, Last Name and the Email Id during the creation of event itself.
The addition of this feature required alteration in the existing wizard flow to accommodate this extra step. This new wizard flow contains the step :
Basic Details : Where organizer fills the basic details regarding the event.
Attendee Form : In this step, the organizer can choose what information he/she has to collect from the ticket buyers.
Sponsors : This step enables the organizer to fill in the sponsor details
Session and Speakers : As the name suggests, this final step enables the organizer to fill in session details to be undertaken during the event.
This essentially condensed the flow to this :
The updated wizard checklist
To implement this, the navigation needed to be altered first in the way that Forward and Previous buttons comply to the status bar steps
Once the navigation was done, I decided to add the step in the progress bar by simply including the attendees form in the event mixin.
// app/mixins/event-wizard.js
    {
       title       : this.l10n.t('Attendee Form'),
       description : this.l10n.t('Know your audience'),
       icon        : 'list icon',
       route       : 'events.view.edit.attendee'
     }
Now a basic layout for the wizard is prepared, all what is left is setting up the route for this step and including it in the router file. I took my inspiration for setting up the route from events/view/tickets/order-from.js and implemented it like this:
// app/routes/events/view/edit/attendee.js import Route from '@ember/routing/route'; import CustomFormMixin from 'open-event-frontend/mixins/event-wizard'; import { A } from '@ember/array'; export default Route.extend(CustomFormMixin, {
return data; }, afterModel(data) { /** * Create the additional custom forms if only the compulsory forms exist. */ if (data.customForms.length === 3) { let customForms = A(); for (const customForm of data.customForms ? data.customForms.toArray() : []) { customForms.pushObject(customForm); }
for (const customForm of createdCustomForms ? createdCustomForms : []) { customForms.pushObject(customForm); }
data.customForms = customForms; } } });
With the route setup and included in the router, I just need to take care of the form data and pass it to the server. Thankfully, the project was already using EventWizardMixin so all I had to do was utilize these functions (save and move) which saves the event data in the status user decides to save it in i.e. either published or draft state
// app/controllers/events/view/edit/attendee.js import Controller from '@ember/controller'; import EventWizardMixin from 'open-event-frontend/mixins/event-wizard';
Apart from that, the form design was already there, essentially, I reutilized the form design provided to an event organizer / co-organizer in the ticket section of the event dashboard to make it look like this form :
Basic attendee information collection
In the end, after utilizing the existing template and adding it in the route’s template, the implementation is ready for a test run!
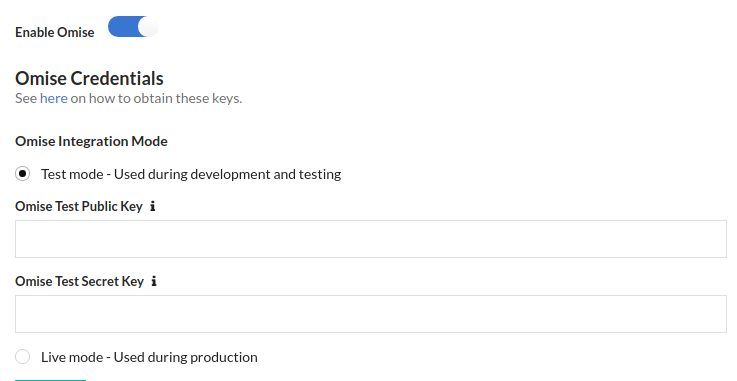
This blog post will elaborate on how omise has been integrated into the Open Event Frontend project. Omise is Thailand’s leading online payment gateway offering a wide range of processing solutions for this project and integrating it as a payment option widens the possibilities for user base and ease of payment workflow.
Similar to Paypal, Omise offers two alternatives for using their gateway, Test mode and Live mode, where the former is generally favoured for usage in Development and Testing phase while the latter is used in actual production for capturing live payments. Both these modes require a Public key and Secret key each and are only update-able on the admin route.
This was implemented by introducing appropriate fields in the settings model.
Once your Omise credentials are configured, you can go ahead and include the options in your event creation form. You will see an option to include Omise in your payment options if you have configured your keys correctly and if the gateway supports the currency your event is dealing with, for example, even if your keys are correctly configured, you will not get the option to use omise gateway for money collection if the currency is INR.
For showing omise option in the template, a simple computed property did the trick canAcceptOmise in the form’s component file and the template as follows:
// app/templates/components/forms/wizard/basic-details-step.js
{{#
if canAcceptOmise}} <label>{{t 'Payment with Omise'}}</label> <div class="field payments"> <div class="ui checkbox"> {{input type='checkbox' id='payment_by_omise' checked=data.event.canPayByOmise}} <label for="payment_by_omise"> {{t 'Yes, accept payment through Omise Gateway'}} <div class="ui hidden divider"></div> <span class="text muted"> {{t 'Omise can accept Credit and Debit Cards , Net-Banking and AliPay. Find more details '}} <a href="https://www.omise.co/payment-methods" target="_blank" rel="noopener noreferrer">{{t 'here'}}</a>. </span> </label> </div> </div> {{#if data.event.canPayByOmise}} <label>{{t 'Omise Gateway has been successfully activated'}}</label> {{/if}} {{/if}}
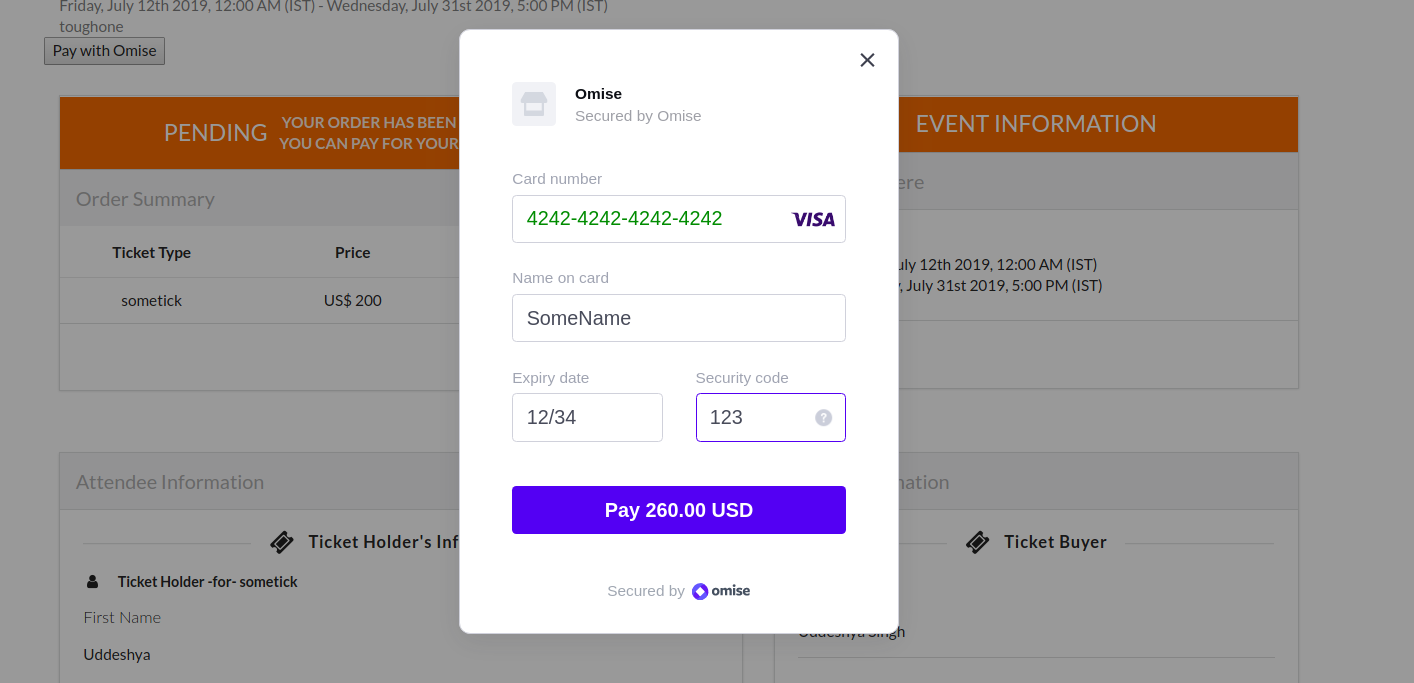
Once the event has the payment option enabled, an attendee has chosen the option to pay up using omise, they will encounter this screen on their pending order page
On entering the credentials correctly, they will be forwarded to order completion page. On clicking the “Pay” button, the omise cdnused hits the server with a POST request to the order endpoint and is implemented as follows :
Thus primarily using Omise.js CDN and introducing the omise workflow, the project now has accessibility to Omise payment gateway service and the organiser can see his successful charge.