Installing Susper Search Engine and Deploying it to Heroku

Susper is a decentralized Search Engine that uses the peer to peer system yacy and Apache Solr to crawl and index search results.

Search results are displayed using the Solr server which is embedded into YaCy. All search results must be provided by a YaCy search server which includes a Solr server with a specialized JSON result writer. When a search request is made in one of the search templates, a HTTP request is made to YaCy. The response is JSON because that can much better be parsed than XML in JavaScript.

In this blog, we will talk about how to install Susper search engine locally and deploying it to Heroku (A cloud application platform).

How to clone the repository

Sign up / Login to GitHub and head over to the Susper repository. Then follow these steps.

  1. Go ahead and fork the repository
https://github.com/fossasia/susper.com

2.   Get the clone of the forked version on your local machine using

git clone https://github.com/<username>/susper.com.git

3. Add upstream to synchronize repository using

git remote add upstream https://github.com/fossasia/susper.com.git

Getting Started

The Susper search application basically consists of the following :

  1. First, we will need to install angular-cli by using the following command:
npm install -g @angular/cli@latest

2. After installing angular-cli we need to install our required node modules, so we will do that by using the following command:

npm install

3. Deploy locally by running this

ng serve

Go to localhost:4200 where the application will be running locally.

How to Deploy Susper Search Engine to Heroku :

  1. We need to install Heroku on our machine. Type the following in your Linux terminal:
wget -O- https://toolbelt.heroku.com/install-ubuntu.sh | sh

This installs the Heroku Toolbelt on your machine to access Heroku from the command line.

  1. Create a Procfile inside root directory and write
web: ng serve
  1. Next, we need to login to our Heroku server (assuming that you have already created an account).

Type the following in the terminal:

heroku login

Enter your credentials and login.

  1. Once logged in we need to create a space on the Heroku server for our application. This is done with the following command
heroku create
  1. Add nodejs buildpack to the app
heroku buildpacks:add –index 1 heroku/nodejs
  1. Then we deploy the code to Heroku.
git push heroku master
git push heroku yourbranch:master # If you are in a different branch other than master

Resources

Continue ReadingInstalling Susper Search Engine and Deploying it to Heroku

Auto Deployment of Pull Requests on Susper using Surge Technology

Susper is being improved every day. Following every best practice in the organization, each pull request includes a working demo link of the fix. Currently, the demo link for Susper can be generated by using GitHub pages by running these simple commands – ng build and npm run deploy. Sometimes this process on slow-internet connectivity takes up to 30 mins to generate a working demo link of the fix.

Surge is the technology which publishes or generates the static web-page demo link, which makes it easier for the developer to deploy their web-app. There are a lot of benefits of using surge over generating demo link using GitHub pages:

  • As soon as the pull request passes Travis CI, the deployment link is generated. It has been set up as such, no extra terminal commands will be required.
  • Faster loading compared to deployment link is generated using GitHub pages.

Surge can be used to deploy only static web pages. Static web pages mean websites that contain fixed contents.

To implement the feature of auto-deployment of pull request using surge, one can follow up these steps:

  • Create a pr_deploy.sh file which will be executed during Travis CI testing.
  • The pr_deploy.sh file can be executed after success i.e. when Travis CI passes by using command bash pr_deploy.sh.

The pr_deploy.sh file for Susper looks like this:

#!/usr/bin/env bash
if [ “$TRAVIS_PULL_REQUEST” == “false” ]; then
echo “Not a PR. Skipping surge deployment.”
exit 0
fi
angular build production

npm i -g surge

export SURGE_LOGIN=test@example.co.in
# Token of a dummy account
export SURGE_TOKEN=d1c28a7a75967cc2b4c852cca0d12206

export DEPLOY_DOMAIN=https://pr-${TRAVIS_PULL_REQUEST}-fossasia-susper.surge.sh
surge project ./dist domain $DEPLOY_DOMAIN;


Once pr_deploy.sh file has been created, execute the file in the travis.yml by using command bash pr_deploy.sh.

In this way, we have integrated the surge technology for auto-deployment of the pull requests in Susper.

References:

Continue ReadingAuto Deployment of Pull Requests on Susper using Surge Technology

Service Workers in Loklak Search

Loklak search is a web application which is built on latest web technologies and is aiming to be a progressive web application. A PWA is a web application which has a rich, reliable, fast, and engaging web experience, and web API which enables us to get these are Service Workers. This blog post describes the basics of service workers and their usage in the Loklak Search application to act as a Network Proxy to and the programmatical cache controller for static resources.

What are Service Workers?

In the very formal definition, Matt Gaunt describes service workers to be a script that the browser runs in the background, and help us enable all the modern web features. Most these features include intercepting network requests and caching and responding from the cache in a more programmatical way, and independent from native browser based caching. To register a service worker in the application is a really simple task, there is just one thing which should be kept in mind, that service workers need the HTTPS connection, to work, and this is the web standard made around the secure protocol. To register a service worker

if ('serviceWorker' in navigator) {
window.addEventListener('load', function() {
navigator.serviceWorker.register('/sw.js').then(function(registration) {
// Registration was successful
console.log('ServiceWorker registration successful with scope: ', registration.scope);
}, function(err) {
// registration failed :(
console.log('ServiceWorker registration failed: ', err);
});
});
}

This piece of javascript, if the browser supports, registers the service worker defined by sw.js. The service worker then goes through its lifecycle, and gets installed and then it takes control of the page it gets registered with.

What does service workers solve in Loklak Search?

In loklak search, service workers currently work as a, network proxy to work as a caching mechanism for static resources. These static resources include the all the bundled js files and images. These bundled chunks are cached in the service workers cache and are responded with from the cache when requested. The chunking of assets have an advantage in this caching strategy, as the cache misses only happen for the chunks which are modified, and the parts of the application which are unmodified are served from the cache making it possible for lesser download of assets to be served.

Service workers and Angular

As the loklak search is an angular application we, have used the @angular/service-worker library to implement the service workers. This is simple to integrate library and works with the, CLI, there are two steps to enable this, first is to download the Service Worker package

npm install --save @angular/service-worker

And the second step is to enable the service worker flag in .angular-cli.json

"apps": [
   {
      // Other Configurations
      serviceWorker: true
   }
]

Now when we generate the production build from the CLI, along with all the application chunks we get, The three files related to the service workers as well

  • sw-register.bundle.js : This is a simple register script which is included in the index page to register the service worker.
  • worker-basic.js : This is the main service worker logic, which handles all the caching strategies.
  • ngsw-manifest.json : This is a simple manifest which contains the all the assets to be cached along with their version hashes for cache busting.

Future enhancements in Loklak Search with Service Workers

The service workers are fresh in loklak search and are currently just used for caching the static resources. We will be using service workers for more sophisticated caching strategies like

  • Dynamically caching the results and resources received from the API
  • Using IndexedDB interface with service workers for storing the API response in a structured manner.
  • Using service workers, and app manifest to provide the app like experience to the user.


Resources and Links

Continue ReadingService Workers in Loklak Search

Implementing Direct URL in loklak Media Wall

Direct URL is a web address which redirects the user to the preset customized media wall so that the media wall can directly be used to be displayed on the screen. Loklak media wall provides direct URL which has information related to customizations set by the user included in the web address. These customizations, as the query parameters are detected when the page is initialized and actions are dispatched to make changes in the state properties, and hence, the UI properties and the expected behaviour of media wall.

In this blog, I would be explaining how I implemented direct URL in loklak media wall and how customizations are detected to build on initialization of component, a customized media wall.

Flow Chart

Working

Media Wall Direct URL effect

This effect detects when the WALL_GENERATE_DIRECT_URL action is dispatched and creates a direct URL string from all the customization state properties and dispatches a side action WallShortenDirectUrlAction() and stores direct URL string as a state property. For this, we need to get individual wall customization state properties and create an object for it and supply it as a parameter to the generateDirectUrl() function. Direct URL string is returned from the function and now, the action is dispatched to store this string as a state property.

@Effect()
generateDirectUrl$: Observable<Action>
= this.actions$
.ofType(mediaWallDirectUrlAction.ActionTypes.WALL_GENERATE_DIRECT_URL)
.withLatestFrom(this.store$)
.map(([action, state]) => {
return {
query: state.mediaWallQuery.query,
.
.
.
wallBackground: state.mediaWallCustom.wallBackground
};
})
.map(queryObject => {
const configSet = {
queryString: queryObject.query.displayString,
.
.
.
wallBackgroundColor: queryObject.wallBackground.backgroundColor
}
const shortenedUrl = generateDirectUrl(configSet);
return new mediaWallDirectUrlAction.WallShortenDirectUrlAction(shortenedUrl);
});

Generate Direct URL function

This function generates Direct URL string from all the current customization options value. Now,  keys of the object are separated out and for each element of the object, it checks if there is some current value for the elements and it then first parses the value of the element into URI format and then, adds it to the direct URL string. In such a way, we are creating a direct URL string with these customizations provided as the query parameters.

export function generateDirectUrl(customization: any): string {
const shortenedUrl = ;const activeFilterArray: string[] = new Array<string>();
let qs = ;
Object.keys(customization).forEach(config => {
if (customization[config] !== undefined && customization[config] !== null) {
if (config !== ‘blockedUser’ && config !== ‘hiddenFeedId’) {
qs += `${config}=${encodeURIComponent(customization[config])}&`;
}
else {
if (customization[config].length > 0) {
qs += `${config}= ${encodeURIComponent(customization[config].join(‘,’))}&`;
}
}
}
});
qs += `ref=share`;
return qs;
}

Creating a customized media wall

Whenever the user searches for the URL link on the web, a customized media wall must be created on initialization. The media wall component detects and subscribes to the URL query parameters using the queryParams API of the ActivatedRoute. Now, the values are parsed to a required format of payload and the respective actions are dispatched according to the value of the parameters. Now, when all the actions are dispatched, state properties changes accordingly. This creates a unidirectional flow of the state properties from the URL parameters to the template. Now, the state properties that are supplied to the template are detected and a customized media wall is created.

private queryFromURL(): void {
this.__subscriptions__.push(
this.route.queryParams
.subscribe((params: Params) => {
const config = {
queryString: params[‘queryString’] || ,
imageFilter: params[‘imageFilter’] || ,
profanityCheck: params[‘profanityCheck’] || ,
removeDuplicate: params[‘removeDuplicate’] || ,
wallHeaderBackgroundColor: params[‘wallHeaderBackgroundColor’] || ,
wallCardBackgroundColor: params[‘wallCardBackgroundColor’] || ,
wallBackgroundColor: params[‘wallBackgroundColor’] ||
}
this.setConfig(config);
})
);
}public setConfig(configSet: any) {
if (configSet[‘displayHeader’]) {
const isTrueSet = (configSet[‘displayHeader’] === ‘true’);
this.store.dispatch(new mediaWallDesignAction.WallDisplayHeaderAction(isTrueSet));
}
.
.
if (configSet[‘queryString’] || configSet[‘imageFilter’] || configSet[‘location’]) {
if (configSet[‘location’] === ‘null’) {
configSet[‘location’] = null;
}
const isTrueSet = (configSet[‘imageFilter’] === ‘true’);
const query = {
displayString: configSet[‘queryString’],
queryString: ,
routerString: configSet[‘queryString’],
filter: {
video: false,
image: isTrueSet
},
location: configSet[‘location’],
timeBound: {
since: null,
until: null
},
from: false
}
this.store.dispatch(new mediaWallAction.WallQueryChangeAction(query));
}
}

Now, the state properties are rendered accordingly and a customized media wall is created. This saves a lot of effort by the user to change the customization options whenever uses the loklak media wall.

Reference

Continue ReadingImplementing Direct URL in loklak Media Wall

Hiding the Scrollbar in HTML in the loklak Media Wall

Loklak media wall needs to provide an appealing view to the user. The issue of visibility of scrollbars appeared on the browsers which uses webkit as a browser engine, for example, Google chrome and some others. This issue caused problems like shifting of elements when scrollbars are visible, bad UI. The task was to hide the scrollbars completely from the application while still making overflow of web page resources available by scrolling.

In this blog, I explain how to hide scrollbars from a webpage and still making scrolling available for the user.

Procedure


  • Removing scrollbars from the body division: By default, the <body> tag has the style property overflow:auto which makes overflow available automatically if web page resources exceed the current page dimensions. Therefore, to hide scrollbar from the body, we need to hide the overflow using overflow:hidden.

body {
overflow: hidden;
}


  • Creating a child wrapper division for the body: Since body now doesn’t provide scrolling available for the web page, we need to create a wrapper division for the web page for which scrolling would be available, however, scrollbars would not be visible. The idea behind this step is that wrapper division would now act as a wrapper for the web page and if there is some overflow of web page resources, scrolling can be performed from the child division (for which scrollbar can be hidden) instead of parent division.


The wrapper division needs to be a block which should occupy total web page available and CSS property overflow should be set to auto.

div.wrapper {
display: block;
width: 100%;
height: 100%;
overflow: auto;
}


  • Hiding scrollbars from the wrapper division: The browsers which uses webkit as the browser engines provides scrollbar to every DOM element as webkit-scrollbar which can be customized according to our need. We can now turn scrollbar background to transparent or either set width to 0. Now, since problem of shifting of DOM elements exists, we can need to set width to 0.

.wrapper::-webkitscrollbar {
width: 0px;
}


  • Blocking Scroll Blocks: For Angular Material Dialog box, same problem exists since Scroll blocks sets the CSS property of HTML to scroll. This causes the whole  html element to have a scroll. For the same, we can set overflow to hidden by using \deep\ tag to change CSS property deeply of different component of Angular project.

/deep/ html.cdkglobalscrollblock {
overflow: hidden;
}

References

Continue ReadingHiding the Scrollbar in HTML in the loklak Media Wall

Implementation of Image Viewer in Susper

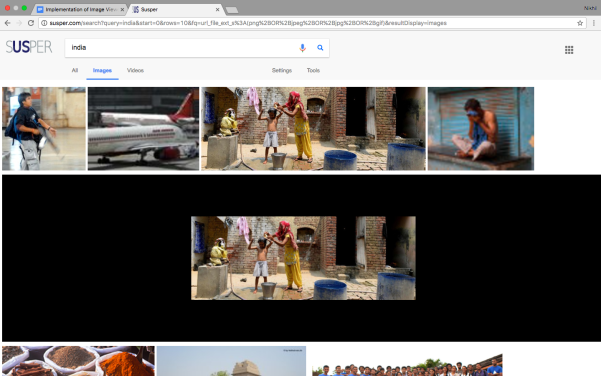
We have implemented image viewer in Susper similar to Google.

Before when a user clicks on a thumbnail the images are opened in a separate page, but we want to replace this with an image viewer similar to Google.

Implementation Logic:

1. Thumbnails for images in susper are arranged as shown in the above picture.

2. When a user clicks on an image a hidden empty div(image viewer) of the last image in a row is opened.

3. The clicked image is then rendered in the image viewer (hidden div of the last element in a row).

4. Again clicking on the same image closes the opened image viewer.

5. If a second image is clicked then, if an image is in the same row, it is rendered inside the same image viewer. else if the image is in another row, this closes the previous image viewer and renders the image in a new image viewer (hidden div of the last element of the row)

6. Since image viewer is strictly the hidden empty div of the last element in a row when it is expanded it occupies the position of the next row, moving them further down similar to what we want.

Implementation Code

results.component.html

<div *ngFor="let item of items;let i = index">
 <div class="item">
   <img src="{{item.link}}" height="200px" (click)="expandImage(i)" [ngClass]="'image'+i">
 </div>
 <div class=" item image-viewer" *ngIf="expand && expandedrow === i">
   <span class="helper"></span> <img [src]="items[expandedkey].link" height="200px" style="vertical-align: middle;">
 </div>

</div>

Each thumbnail image will have a <div class=” item image-viewer” which is in hidden state initially.

Whenever a user clicks on a thumbnail that triggers expandImage(i)

results.component.ts

expandImage(key) {
 if (key === this.expandedkey    this.expand === false) {
   this.expand = !this.expand;
 }
 this.expandedkey = key;
 let i = key;
 let previouselementleft = 0;
 while ( $('.image' + i) && $('.image' + i).offset().left > previouselementleft) {
   this.expandedrow = i;
   previouselementleft = $('.image' + i).offset().left;
   i = i + 1;

The expandImage() function takes the unique key and finds which image is the last element is the last image in the whole row, and on finding the last image, expands the image viewer of the last element and renders the selected image in the image viewer.

The source code for the whole implementation of image viewer could be seen at pull: https://github.com/fossasia/susper.com/pull/687/files

Resources:

  1. Selecting elements in Jquery: https://learn.jquery.com/using-jquery-core/selecting-elements/


Continue ReadingImplementation of Image Viewer in Susper

Live Feeds in loklak Media wall using ‘source=twitter’

Loklak Server provides pagination to provide tweets from Loklak search.json API in divisions so as to improve response time from the server. We will be taking advantage of this pagination using parameter `source=twitter` of the search.json API on loklak media wall. Basically, using parameter ‘source=twitter’ in the API does real time scraping and provides live feeds. To improve response time, it returns feeds as specified in the count (default is 100).

In the blog, I am explaining how implemented real time pagination using ‘source = twitter’ in loklak media wall to get live feeds from twitter.

Working

First API Call on Initialization

The first API call needs to have high count (i.e. maximumRecords = 20) so as to get a higher number of feeds and provide a sufficient amount of feeds to fill up the media wall. ‘source=twitter’ must be specified so that real time feeds are scraped and provided from twitter.

http://api.loklak.org/api/search.json?q=fossasia&callback=__ng_jsonp__.__req0.finished&minified=true&source=twitter&maximumRecords=20&timezoneOffset=-330&startRecord=1


If feeds are received from the server, then the next API request must be sent after 10 seconds so that server gets sufficient time to scrap the data and store it in the database. This can be done by an effect which dispatches WallNextPageAction(‘’) keeping debounceTime equal to 10000 so that next request is sent 10 seconds after WallSearchCompleteSuccessAction().

@Effect()
nextWallSearchAction$
= this.actions$
.ofType(apiAction.ActionTypes.WALL_SEARCH_COMPLETE_SUCCESS)
.debounceTime(10000)
.withLatestFrom(this.store$)
.map(([action, state]) => {
return new wallPaginationAction.WallNextPageAction();
});

Consecutive Calls

To implement pagination, next consecutive API call must be made to add new live feeds to the media wall. For the new feeds, count must be kept low so that no heavy pagination takes place and feeds are added one by one to get more focus on new tweets. For this purpose, count must be kept to one.

this.searchServiceConfig.count = queryObject.count;
this.searchServiceConfig.maximumRecords = queryObject.count;return this.apiSearchService.fetchQuery(queryObject.query.queryString, this.searchServiceConfig)
.takeUntil(nextSearch$)
.map(response => {
return new wallPaginationAction.WallPaginationCompleteSuccessAction(response);
})
.catch(() => of(new wallPaginationAction.WallPaginationCompleteFailAction()));
});


Here, count and maximumRecords is updated from queryObject.count which varies between 1 to 5 (default being 1). This can be updated by user from the customization menu.

Next API request is as follows:

http://api.loklak.org/api/search.json?q=fossasia&callback=__ng_jsonp__.__req2.finished&minified=true&source=twitter&maximumRecords=1&timezoneOffset=-330&startRecord=1


Now, as done above, if some response is received from media wall, next request is sent after 10 seconds after WallPaginationCompleteSuccess() from an effect by keeping debounceTime equal to 10000.

In the similar way, new consecutive calls can be made by keeping ‘source = twitter’ and keeping count low for getting a proper focus on new feed.

Reference

Continue ReadingLive Feeds in loklak Media wall using ‘source=twitter’

Implementation of Statistic Infobox for Susper

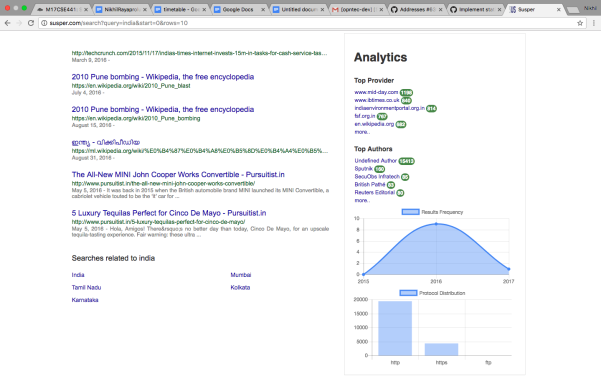
In Susper, we have implemented a statistic infobox to show analytics regarding Top authors, Top Providers and distribution regarding protocols and Results frequency by year.

Yacy also offers additional information for infoboxes such as files types, provider and authors. Using that information which we receive along with results we have implemented the infobox.

Implementation of Infobox:

1. For the distribution graphs, we have used angular library for chart.js https://www.npmjs.com/package/ng2-charts

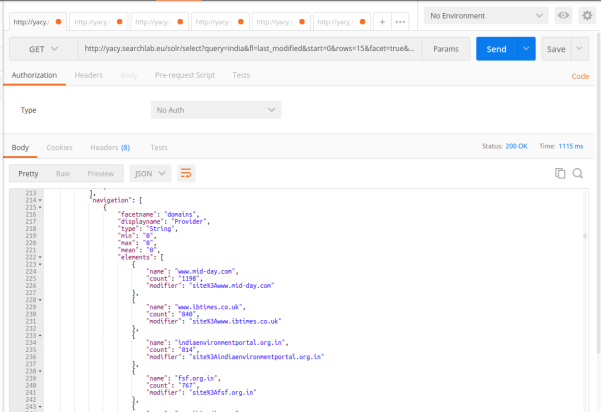
2. We receive required statistics of each facet name from Yacy using the yacy search endpoint

http://yacy.searchlab.eu/solr/select?query=india&fl=last_modified&start=0&rows=15&facet=true&facet.mincount=1&facet.field=host_s&facet.field=url_protocol_s&facet.field=author_sxt&facet.field=collection_sxt&wt=yjson

Screenshot from 2017-08-15 14-10-30.png

Screenshot from 2017-08-15 14-10-16.png

We have created a statbox component to display the data related to statistic infobox at https://github.com/fossasia/susper.com/tree/master/src/app/statsbox

It takes care about rendering the statistic infobox and styling it.

Statsbox.component.ts

this.navigation$.subscribe(navigation => {
   for (let nav of navigation) {
     if (nav.displayname === 'Protocol') {
       let data = [];
       let datalabels = [];
       for (let element of nav.elements){
           datalabels.push(element.name);
           data.push(parseInt(element.count, 10));
         }
       this.barChartData[0].data = data;
       this.barChartLabels = datalabels;

     }
   }
 });
});

navigation observable gives us the latest statistics information received from the yacy and we subscribe to it and update the component variables accordingly for displaying the data.

Later these values are used by statsbox.component.html to display the statsbox.

The whole implementation of this feature can be found at pull: https://github.com/fossasia/susper.com/pull/704/

References:

1.Using Postman for analysing an API Endpoint: https://www.getpostman.com/docs

2.Using ngrx store: https://github.com/ngrx/store

Continue ReadingImplementation of Statistic Infobox for Susper

Implementation of Speech UI in Susper

Recently, we have implemented a speech recognition feature in Susper where user could search by voice but it does not have an attractive UI. Google has a good user experience while recording the voice. We have implemented a similar Speech UI in Susper,

How we have implemented this?

  1. First we made a component speechtotext. It takes care of all the styling and functional changes of the speech UI and rendering the speech and any instructions required for the user. https://github.com/fossasia/susper.com/tree/master/src/app/speechtotext
  2. Initially when user clicks on the microphone in the search bar, it triggers the speechRecognition()

searchbar.component.html

<div class="input-group-btn">
 <button class="btn btn-default" id="speech-button" type="submit">
   <img src="../../assets/images/microphone.png" class="microphone" (click)="speechRecognition()"/>
 </button>

searchbar.component.ts

speechRecognition() {
 this.store.dispatch(new speechactions.SearchAction(true));
}

3) This dispatches an action speechaction.SearchAction(true), the app.component.ts is subscribed to this action and whenever this action is triggered the app component will open the speechtotext component.

Speechtotext.component.ts

Speech to text component on getting initialised calls the speech service’s record function which activates standard browser’s speech API

constructor(private speech: SpeechService) {
 
 this.speechRecognition();
}
speechRecognition() {
 this.speech.record('en_US').subscribe(voice => this.onquery(voice));
}

On recording the user’s voice and converting it to text, the text is sent to the onquery method as input and the recognised text is sent to other components through ngrx store.

onquery(event: any) {
 this.resettimer();
 this.store.dispatch(new queryactions.QueryServerAction({ 'query': event, start: 0, rows: 10, search: true }));
 this.message = event;
}

We have some UI text transitions where the user is shown with messages like ‘Listening…’ ,‘Speak Now’ and ‘Please check your microphone’ which are handle by creating a timer observable in angular.

ngOnInit() {
 this.timer = Observable.timer(1500, 2000);
 this.subscription = this.timer.subscribe(t => {
   this.ticks = t;

   if (t === 1) {
     this.message = "Listening...";
   }
   if (t === 4) {
     this.message = "Please check your microphone and audio levels.";
     this.miccolor = '#C2C2C2';
   }
   if (t === 6) {
     this.subscription.unsubscribe();
     this.store.dispatch(new speechactions.SearchAction(false));
   }
 });
}

The related PR regarding speech to text is at https://github.com/fossasia/susper.com/issues/624 .

With this now we have achieved a good UI for handling requests on Speech.

Resources:

Continue ReadingImplementation of Speech UI in Susper

Reducing Initial Load Time Of Susper

Susper used to take long time to load the initial page. So, there was a discussion on how to decrease the initial loading time of Susper.

Later on going through issues raised in official Angular repository regarding the time takento load angular applications, we found some of the solutions. Those include:

  • Migrating from development to production during build:
    • This shrinks vendor.js and main.js by minimising them and also removing all packages that are not required on production.
    • Enables inline html and extracting CSS.
    • Disables source maps.
  • Enable Ahead of Time (AoT) compilation.
  • Enable service workers.

After these changes we found the following changes in Susper:

File Name Before (content-length) After
vendor.js 709752 216764
main.js 56412 138361

LOADING TIMES GRAPHS:

After:

Vendor file:

Main.js

Before:

Vendor file:

Main.js

Also we could see that all files are now initiated by service worker:

More about Service Workers could be read at Mozilla and Service Workers in Angular.

Implementation:

While deploying our application, we have added –prod and –aot as extra attributes to ng build .This enables angular to use production mode and ahead of time compilation.

For service workers we have to install @angular/service-worker module. One can install it by using:

npm install @angular/service-worker --save
ng set apps.0.serviceWorker=true

The whole implementation of this is available at this pull:

https://github.com/fossasia/susper.com/pull/597/files

Resources:


Continue ReadingReducing Initial Load Time Of Susper