Implementation of Customizable Instant Search on Susper using Local Storage

Results on Susper could be instantly displayed as user types in a query. This was a strict feature till some time before, where the user doesn’t have customizable option to choose. But now one could turn off and on this feature.

To turn on and off this feature visit ‘Search Settings’ on Susper. This will be the link to it: http://susper.com/preferences and you will find different options to choose from.

How did we implement this feature?

Searchsettings.component.html:

<div>
 <h4><strong>Susper Instant Predictions</strong></h4>
 <p>When should we show you results as you type?</p>
 <input name="options" [(ngModel)]="instantresults" disabled value="#" type="radio" id="op1"><label for="op1">Only when my computer is fast enough</label><br>
 <input name="options" [(ngModel)]="instantresults" [value]="true" type="radio" id="op2"><label for="op2">Always show instant results</label><br>
 <input name="options" [(ngModel)]="instantresults" [value]="false" type="radio" id="op3"><label for="op3">Never show instant results</label><br>
</div>

User is displayed with options to choose from regarding instant search.when the user selects a new option, his selection is stored in the instantresults variable in search settings component using ngModel.

Searchsettings.component.ts:

Later when user clicks on save button the instantresults object is stored into localStorage of the browser

onSave() {
 if (this.instantresults) {
   localStorage.setItem('instantsearch', JSON.stringify({value: true}));
 } else {
   localStorage.setItem('instantsearch', JSON.stringify({ value: false }));
   localStorage.setItem('resultscount', JSON.stringify({ value: this.resultCount }));
 }
 this.router.navigate(['/']);
}


Later this value is retrieved from the localStorage function whenever a user enters a query in search bar component and search is made according to user’s preference.

Searchbar.component.ts

Later this value is retrieved from the localStorage function whenever a user enters a query in search bar component and search is made according to user’s preference.

onquery(event: any) {
 this.store.dispatch(new query.QueryAction(event));
 let instantsearch = JSON.parse(localStorage.getItem('instantsearch'));

 if (instantsearch && instantsearch.value) {
   this.store.dispatch(new queryactions.QueryServerAction({'query': event, start: this.searchdata.start, rows: this.searchdata.rows}));
   this.displayStatus = 'showbox';
   this.hidebox(event);
 } else {
   if (event.which === 13) {
     this.store.dispatch(new queryactions.QueryServerAction({'query': event, start: this.searchdata.start, rows: this.searchdata.rows}));
     this.displayStatus = 'showbox';
     this.hidebox(event);
   }
 }
}


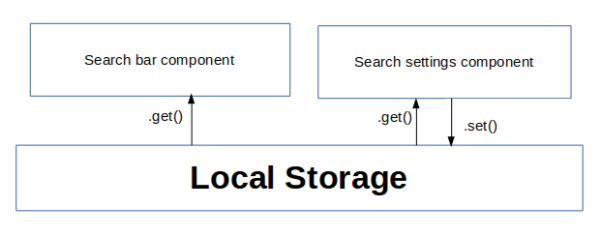
Interaction of different components here:

  1. First we set the instantresults object in Local Storage from search settings component.
  2. Later this value is retrieved and used by search bar component using localstorage.get() method to decide whether to display results instantly or not.

Below, Gif shows how you could use this feature in Susper to customise the instant results in your browser.

References:


Continue ReadingImplementation of Customizable Instant Search on Susper using Local Storage

Adding Unit Test for Reducer in loklak search

Ngrx/store components are an integral part of the loklak search. All the components are dependent on how the data is received from the reducers. Reducer is like a client-side database which stores up all the data received from the API response. It is responsible for changing the state of the application. Reducers also supplies data to the Angular components from the central Store. If correct data is not received by the components, the application would crash. Therefore, we need to test if the reducer is storing the data in a correct way and changes the state of the application as expected.

Reducer also stores the current state properties which are fetched from the APIs. We need to check if reducers store the data in a correct way and if the data is received from the reducer when called from the angular components.

In this blog, I would explain how to build up different components for unit testing reducers.

Reducer to test

This reducer is used for store the data from suggest.json API from the loklak server.The data received from the server is further classified into three properties which can be used by the components to show up auto- suggestions related to current search query.

  • metadata: – This property stores the metadata from API suggestion response.
  • entities: – This property stores the array of suggestions corresponding to the particular query received from the server.
  • valid: – This is a boolean which keeps a check if the suggestions are valid or not.

We also have two actions corresponding to this reducer. These actions, when called, changes the state properties which , further, supplies data to the components in a more classified manner. Moreover, state properties also causes change in the UI of the component according to the action dispatched.

  • SUGGEST_COMPLETE_SUCCESS: – This action is called when the data is received successfully from the server.
  • SUGGEST_COMPLETE_FAIL: – This action is called when the retrieving data from the server fails.

export interface State {
metadata: SuggestMetadata;
entities: SuggestResults[];
valid: boolean;
}export const initialState: State = {
metadata: null,
entities: [],
valid: true
};export function reducer(state: State = initialState, action: suggestAction.Actions): State {
switch (action.type) {
case suggestAction.ActionTypes.SUGGEST_COMPLETE_SUCCESS: {
const suggestResponse = action.payload;return {
metadata: suggestResponse.suggest_metadata,
entities: suggestResponse.queries,
valid: true
};
}case suggestAction.ActionTypes.SUGGEST_COMPLETE_FAIL: {
return Object.assign({}, state, {
valid: false
});
}default: {
return state;
}
}
}

Unit tests for reducers

  • Import all the actions, reducers and mocks

import * as fromSuggestionResponse from ‘./suggest-response’;
import * as suggestAction from ‘../actions/suggest’;
import { SuggestResponse } from ‘../models/api-suggest’;
import { MockSuggestResponse } from ‘../shared/mocks/suggestResponse.mock’;


  • Next, we are going to test if the undefined action doesn’t a cause change in the state and returns the initial state properties. We will be creating an action by const action = {} as any;  and call the reducer by const result = fromSuggestionResponse.reducer(undefined, action);. Now we will be making assertions with expect() block to check if the result is equal to initialState and all the initial state properties are returned

describe(‘SuggestReducer’, () => {
describe(‘undefined action’, () => {
it(‘should return the default state’, () => {
const action = {} as any;const result = fromSuggestionResponse.reducer(undefined, action);
expect(result).toEqual(fromSuggestionResponse.initialState);
});
});


  • Now, we are going to test SUGGEST_COMPLETE_SUCCESS and SUGGEST_COMPLETE_FAIL action and check if reducers change only the assigned state properties corresponding to the action in a correct way.  Here, we will be creating action as assigned to the const action variable in the code below. Our next step would be to create a new state object with expected new state properties as assigned to variable const expectedResult below. Now, we would be calling reducer and make an assertion if the individual state properties of the result returned from the reducer (by calling reducer) is equal to the state properties of the expectedResult (Mock state result created to test).

describe(‘SUGGEST_COMPLETE_SUCCESS’, () => {
it(‘should add suggest response to the state’, () => {
const ResponseAction = new suggestAction.SuggestCompleteSuccessAction(MockSuggestResponse);
const expectedResult: fromSuggestionResponse.State = {
metadata: MockSuggestResponse.suggest_metadata,
entities: MockSuggestResponse.queries,
valid: true
};const result = fromSuggestionResponse.reducer(fromSuggestionResponse.initialState, ResponseAction);
expect(result).toEqual(expectedResult);
});
});describe(‘SUGGEST_COMPLETE_FAIL’, () => {
it(‘should set valid to true’, () => {
const action = new suggestAction.SuggestCompleteFailAction();
const result = fromSuggestionResponse.reducer(fromSuggestionResponse.initialState, action);expect(result.valid).toBe(false);
});
});

Reference

Continue ReadingAdding Unit Test for Reducer in loklak search

Crawl Job Feature For Susper To Index Websites

The Yacy backend provides search results for Susper using a web crawler (or) spider to crawl and index data from the internet. They also require some minimum input from the user.

As stated by Michael Christen (@Orbiter) “a web index is created by loading a lot of web pages first, then parsing the content and placing the result into a search index. The question is: how to get a large list of URLs? This is solved by a crawler: we start with a single web page, extract all links, then load these links and go on. The root of such a process is the ‘Crawl Start’.”

Yacy has a web crawler module that can be accessed from here: http://yacy.searchlab.eu/CrawlStartExpert.html. As we would like to have a fully supported front end for Yacy, we also introduced a crawler in Susper. Using crawler one could tell Yacy what process to do and how to crawl a URL to index search results on Yacy server. To support the indexing of web pages with the help of Yacy server, we had implemented a ‘Crawl Job’ feature in Susper.

1)Visit http://susper.com/crawlstartexpert and give information regarding the sites you want Susper to crawl.Currently, the crawler accepts an input of URLs or a file containing URLs. You could customise crawling process by tweaking crawl parameters like crawling depth, maximum pages per domain, filters, excluding media etc.

2) Once crawl parameters are set, click on ‘Start New Crawl Job’ to start the crawling process.

3) It will raise a basic authentication pop-up. After filling, the user will receive a success alert and will be redirected back to home page.

The process of crawl job on Yacy server will get started according to crawling parameters.

Implementation of Crawler on Susper:

We have created a separate component and service in Susper for Crawler

Source code can be found at:

When the user initiates the crawl job by pressing the start button, it calls startCrawlJob() function from the component and this indeed calls the CrawlStart service.We send crawlvalues to the service and subscribe, to the return object confirming whether the crawl job has started or not.

crawlstart.component.ts:-

startCrawlJob() {
 this.crawlstartservice.startCrawlJob(this.crawlvalues).subscribe(res => {
   alert('Started Crawl Job');
   this.router.navigate(['/']);
 }, (err) => {
   if (err === 'Unauthorized') {
     alert("Authentication Error");
   }
 });
};


After calling startCrawlJob() function from the service file, the service file creates a URLSearchParams object to create parameters for each key in input and send it to Yacy server through JSONP request.

crawlstart.service.ts

startCrawlJob(crawlvalues) {
 let params = new URLSearchParams();
 for (let key in crawlvalues) {
   if (crawlvalues.hasOwnProperty(key)) {
     params.set(key, crawlvalues[key]);
   }

 }
 params.set('callback', 'JSONP_CALLBACK');


 let options = new RequestOptions({ search: params });
 return this.jsonp
   .get('http://yacy.searchlab.eu/Crawler_p.json', options).map(res => {
     res.json();
   });

}

Resources:

Continue ReadingCrawl Job Feature For Susper To Index Websites

Multiple Page Rendering on a Single Query in Susper Angular Front-end

Problem: Susper used to render a new results page for each new character input. It should render a single page for the final query as reported in issue 371. For instance, the browser’s back button shows five pages for each of the five characters entered as a query.

Solution: This problem was arising due to code:

this.router.navigate(['/search'], {queryParams: this.searchdata});

Before we have this one line in search-bar component which gets called on each character entry

Fix:To fix this issue we required calling router.navigate only when we receive results and not on each character input.

So, we first removed the line which was cause of this issue from search-bar component and replaced it with

this.store.dispatch(new queryactions.QueryServerAction(query));


This triggers a QueryServer action, and make a request to Yacy end point for search results.

Now in app.component.ts , we get subscribed to resultscomponentchange$ which gets called only when new search results are received and hence we navigate to a new page after the resultscomponentchange subscription is called.

this.resultscomponentchange$ = store.select(fromRoot.getItems);
this.resultscomponentchange$.subscribe(res => {
 if (this.searchdata.query.length > 0) {
   this.router.navigate(['/search'], {queryParams: this.searchdata});
 }

});
this.wholequery$ = store.select(fromRoot.getwholequery);
this.wholequery$.subscribe(data => {
 this.searchdata = data;
});
if (localStorage.getItem('resultscount')) {
 this.store.dispatch(new queryactions.QueryServerAction({'query': '', start: 0, rows: 10, search: false}));
}


Finally, this problem got fixed and now there is only one page being rendered for a valid search. Source code for this implementation is available in this pull.

Resources:

Continue ReadingMultiple Page Rendering on a Single Query in Susper Angular Front-end

Using RouterLink in the Susper Angular Frontend to Speed up the Loading Time

In Susper, whenever the user clicks on some links, the whole application used to load again, thereby taking more time to load the page. But in Single Page Applications (SPAs) we don’t need to load the whole application. In Fact, SPAs are known to load internal pages faster than traditional HTML web pages. To achieve this we have to inform the application that a link will redirect the user to an internal page. So that the application doesn’t reload completely and reinitializes itself. In angular, this can be done by replacing href with routerLink for the tag.

Routerlink when used with tag syntactically as

<a routerLink="/contact" routerLinkActive="active">Contact</a>

doesn’t load the whole page instead it asks the server for only the contact component and renders it in place of <router-outlet></router-outlet>

This happens through an ajax call to the server asking for only contact component, thereby reducing the time it takes and doesn’t show a whole complete reload of the page.

Below time graph shows requests made when a tag with href was clicked.

If you observe it takes more than 3 seconds to load the page.

But when you use [routerLink] as an attribute for navigation, you find the page being displayed in just a blink.

What we have done in Susper?

In Susper, on issue #167, @mariobehling has noticed that there are some links which are loading slowly. On looking at the issue and a test run of the issue, I found that the problem is with the loading of the whole page, thereby immediately checked with the tag and found that a “href” attribute was used instead of “[routerLink]” angular attribute. I made a pull changing href to “[routerLink]” thereby speeding up Susper to around 3x faster than before.

https://github.com/fossasia/susper.com/pull/234/files

References

Continue ReadingUsing RouterLink in the Susper Angular Frontend to Speed up the Loading Time

Continuous Deployment Implementation in Loklak Search

In current pace of web technology, the quick response time and low downtime are the core goals of any project. To achieve a continuous deployment scheme the most important factor is how efficiently contributors and maintainers are able to test and deploy the code with every PR. We faced this question when we started building loklak search.

As Loklak Search is a data driven client side web app, GitHub pages is the simplest way to set it up. At FOSSASIA apps are developed by many developers working together on different features. This makes it more important to have a unified flow of control and simple integration with GitHub pages as continuous deployment pipeline.

So the broad concept of continuous deployment boils down to three basic requirements

  1. Automatic unit testing.
  2. The automatic build of the applications on the successful merge of PR and deployment on the gh-pages branch.
  3. Easy provision of demo links for the developers to test and share the features they are working on before the PR is actually merged.

Automatic Unit Testing

At Loklak Search we use karma unit tests. For loklak search, we get the major help from angular/cli which helps in running of unit tests. The main part of the unit testing is TravisCI which is used as the CI solution. All these things are pretty easy to set up and use.

Travis CI has a particular advantage which is the ability to run custom shell scripts at different stages of the build process, and we use this capability for our Continuous Deployment.

Automatic Builds of PR’s and Deploy on Merge

This is the main requirement of the our CD scheme, and we do so by setting up a shell script. This file is deploy.sh in the project repository root.

There are few critical sections of the deploy script. The script starts with the initialisation instructions which set up the appropriate variables and also decrypts the ssh key which travis uses for pushing the repo on gh-pages branch (we will set up this key later).

  • Here we also check that we run our deploy script only when the build is for Master Branch and we do this by early exiting from the script if it is not so.
#!/bin/bash

SOURCE_BRANCH="master"
TARGET_BRANCH="gh-pages"

# Pull requests and commits to other branches shouldn't try to deploy.
if [ "$TRAVIS_PULL_REQUEST" != "false" -o "$TRAVIS_BRANCH" != "$SOURCE_BRANCH" ]; then
echo "Skipping deploy; The request or commit is not on master"
exit 0
fi


  • We also store important information regarding the deploy keys which are generated manually and are encrypted using travis.
# Save some useful information
REPO=`git config remote.origin.url`
SSH_REPO=${REPO/https:\/\/github.com\//git@github.com:}
SHA=`git rev-parse --verify HEAD`

# Decryption of the deploy_key.enc
ENCRYPTED_KEY_VAR="encrypted_${ENCRYPTION_LABEL}_key"
ENCRYPTED_IV_VAR="encrypted_${ENCRYPTION_LABEL}_iv"
ENCRYPTED_KEY=${!ENCRYPTED_KEY_VAR}
ENCRYPTED_IV=${!ENCRYPTED_IV_VAR}
openssl aes-256-cbc -K $ENCRYPTED_KEY -iv $ENCRYPTED_IV -in deploy_key.enc -out deploy_key -d

chmod 600 deploy_key
eval `ssh-agent -s`
ssh-add deploy_key


  • We clone our repo from GitHub and then go to the Target Branch which is gh-pages in our case.
# Cloning the repository to repo/ directory,
# Creating gh-pages branch if it doesn't exists else moving to that branch
git clone $REPO repo
cd repo
git checkout $TARGET_BRANCH || git checkout --orphan $TARGET_BRANCH
cd ..

# Setting up the username and email.
git config user.name "Travis CI"
git config user.email "$COMMIT_AUTHOR_EMAIL"


  • Now we do a clean up of our directory here, we do this so that fresh build is done every time, here we protect our files which are static and are not generated by the build process. These are CNAME and 404.html
# Cleaning up the old repo's gh-pages branch except CNAME file and 404.html
find repo/* ! -name "CNAME" ! -name "404.html" -maxdepth 1  -exec rm -rf {} \; 2> /dev/null
cd repo

git add --all
git commit -m "Travis CI Clean Deploy : ${SHA}"


  • After checking out to our Master Branch we do an npm install to install all our dependencies here and then do our project build. Then we move our files generated by the ng build to our gh-pages branch, and then we make a commit, to this branch.
git checkout $SOURCE_BRANCH
# Actual building and setup of current push or PR.
npm install
ng build --prod --aot
git checkout $TARGET_BRANCH
mv dist/* .
# Staging the new build for commit; and then committing the latest build
git add .
git commit --amend --no-edit --allow-empty


  • Now the final step is to push our build files to gh-pages branch and as we only want to put the build there if the code has actually changed, we make sure by adding that check.
# Deploying only if the build has changed
if [ -z `git diff --name-only HEAD HEAD~1` ]; then

echo "No Changes in the Build; exiting"
exit 0

else
# There are changes in the Build; push the changes to gh-pages
echo "There are changes in the Build; pushing the changes to gh-pages"

# Actual push to gh-pages branch via Travis
git push --force $SSH_REPO $TARGET_BRANCH
fi


Now this 70 lines of code handle all our heavy lifting and automates a large part of our CD. This makes sure that no incorrect builds are entering the gh-pages branch and also enabling smoother experience for both developers and maintainers.

The important aspect of this script is ability to make sure Travis is able to push to gh-pages. This requires the proper setup of Keys, and it definitely is the trickiest part the whole setup.

  • The first step is to generate the SSH key. This is done easily using terminal and ssh-keygen.
$ ssh-keygen -t rsa -b 4096 -C "your_email@example.com”


  • I would recommend not using any passphrase as it will then be required by Travis and thus will be tricky to setup.
  • Now, this generates the RSA public/private key pair.
  • We now add this public deploy key to the settings of the repository.
  • After setting up the public key on GitHub we give the private key to Travis so that Travis is able to push on GitHub.
  • For doing this we use the Travis Client, this helps to encrypt the key properly and send the key and iv to the travis. Which then using these values is able to decrypt the private key.
$ travis encrypt-file deploy_key
encrypting deploy_key for domenic/travis-encrypt-file-example
storing result as deploy_key.enc
storing secure env variables for decryption

Please add the following to your build script (before_install stage in your .travis.yml, for instance):

    openssl aes-256-cbc -K $encrypted_0a6446eb3ae3_key -iv $encrypted_0a6446eb3ae3_key -in super_secret.txt.enc -out super_secret.txt -d

Pro Tip: You can add it automatically by running with --add.

Make sure to add deploy_key.enc to the git repository.
Make sure not to add deploy_key to the git repository.
Commit all changes to your .travis.yml.


  • Make sure to add deploy_key.enc to git repository and not to add deploy_key to git.

And after all these steps everything is done our client-side web application will deploy on every push on the master branch.

These steps are required only one time in project life cycle. At loklak search, we haven’t touched the deploy.sh since it was written, it’s a simple script but it does all the work of Continuous Deployment we want to achieve.

Generation of Demo Links and Test Deployments

This is also an essential part of the continuous agile development that developers are able to share what they have built and the maintainers to review those features and fixes. This becomes difficult in a web application as the fixes and features are more often than not visual and attaching screenshots with every PR become the hassle. If the developers are able to deploy their changes on their gh-pages and share the demo links with the PR then it’s a big win for development at a faster pace.

Now, this step is highly specific for Angular projects while there are are similar approaches for React and other frameworks as well, if not we can build the page easily and push our changes to gh-pages of our fork.

We use @angular/cli for building project then use angular-cli-ghpages npm package to actually push to gh-pages branch of the fork. These commands are combined and are provided as node command npm run deploy. And this makes our CD scheme complete.

Conclusion

Clearly, the continuous deployment scheme has a lot of advantages over the other methods especially in the client side web apps where there are a lot of PR’s. This essentially eliminates all the deployment hassles in a simple way that any deployment doesn’t require any manual interventions. The developers can simply concentrate on coding the application and maintainers can just simply review the PR’s by seeing the demo links and then merge when they feel like the PR is in good shape and the deployment is done all by the Shell Script without requiring the commands from a developer or a maintainer.

Links

Loklak Search GitHub Repository: https://github.com/fossasia/loklak_search

Loklak Search Application: http://loklak.net/

Loklak Search TravisCI: https://travis-ci.org/fossasia/loklak_search/

Deploy Script: https://github.com/fossasia/loklak_search/blob/master/deploy.sh

Further Resources

Continue ReadingContinuous Deployment Implementation in Loklak Search

Fixing the scroll position in the Susper Frontend

An interesting problem that I encountered in the Susper frontend repository is the problem of the scroll position in SPAs (Single Page Applications). Since most websites now use Single page applications, such a hack, might prove useful to a lot of the readers.
Single page applications (SPAs) provide a better user experience. But, they are significantly harder to design and build. One major problem they cause is that they do not remember the scroll position on a page, like traditional browsers do. In traditional browsers, if we open a new page, by clicking on a link, it opens the page at the top.
Then on clicking back, it goes to not just to the previous link, but also the last position scrolled to on it. The issue we faced in Susper, was that when we opened a link, Susper being a SPA did not realise it was on a new page, and hence did not scroll to the top again. This was observed on every page, of the appliance.
Clicking on Terms on the footer for instance,

would open the bottom of the Terms page, which was not what we wanted.

FIX: Since all the pages required the fix, I ran a script in the main app component. Whenever an event occurs, the router instance detects it. Once the event has been identified as the end of a navigation action, I scroll the window to (0,0).
Here is the code snippet:

import {Component, OnInit} from '@angular/core';

import { RouterModule, Router, NavigationEnd } from '@angular/router';

@Component({

selector: 'app-root',

templateUrl: './app.component.html',

styleUrls: ['./app.component.css']

})

export class AppComponent implements OnInit {

title = 'Susper';

constructor(private router: Router) { }

ngOnInit() {

   this.router.events.subscribe((evt) => {

     if (!(evt instanceof NavigationEnd)) {

       return;

     }

     window.scrollTo(0, 0);

   });

 }

}

“NavigationEnd” is triggered on the end of a Navigation action, in Angular2. So if the “NavigationEnd” hasn’t been triggered, our function need not do anything else and can simply return.  If a Navigation action has just finished the window is made to scroll up to (0,0) coordinates.
Now, this is how the Terms page opens:


Done! Now every time a link is clicked it scrolls to the top.

Continue ReadingFixing the scroll position in the Susper Frontend