Setting up tests’ environment wasn’t easy
Have you ever tried to set up your tests’ environment using Protractor on Vagrant?
I must admit that it was a very difficult task for me. I have recently spent almost three days trying to prepare my tests’ environment for CommonsNet project, and read many different resources. Fortunately, I have finally done it, so now I want to share with you my experience and give you some tips how to do it.
Protractor
Firstly, I will explain you why I have decided to use Protractor. It is mainly because Proractor is especially designed for end-to-end testing AngularJS application. Protractor runs tests against your application running in a real browser, interacting with it as a user would.
Writing tests using Protractor is quite easy because you can find working examples in AngularJS docs. Each sample of AngularJS code is enriched by Protractor’s test. It’s amazing.
Selenium
Selenium is a browser automation library. It is most often used for testing web-applications, and may be used for any task that requires automating interaction with the browser. You can download it from here. You have to choose Selenium for a language you use. I have used Selenium for NodeJS.
Vagrant
You don’t have to necessary use Vagrant to run your tests, but I have implemented it, because I run my local environment on Vagrant and it’s more comfortable for me to use it.
Setting up testing environment
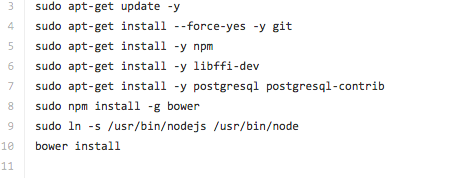
Now I will share with you how to run tests. So first all of, I have created a file called install.sh and put all necessary commends there. I have put there several commands. Please take a look at this file. It helps you to install all of these necessary dependencies using only one command instead of several ones.

Next, I have prepared provision folder, where I put files to install selenium standalone and chromium driver. You can copy these file from here
Then I have created a simple test case. It’s quite easy at the beginning. You just need two files first – conf. js and next- todo_spec.js Below, I will provide you with my conf.js As you can see it’s not complicated and really short. It’s a basic configuration file and of course you can adjust it to your needs. You can find many examples of conf.js file in Internet.

And finally a simple test, which I have placed in todo_spec.js file. It’s a ProtracotrJS example available on their website

Now, let me to write a step by step todo list now.
- Install Vagrant in your folder
vagrant up
- Connect to Vagrant
vagrant ssh
- Open your Vagrant folder
cd /vagrant
- Then run selenium file
sh selenium_install.sh
- Next open provision folder
cd provision
- Install java-jar
DISPLAY=:1 xvfb-run java -jar selenium-server-standalone-2.41.0.jar
Your selenium server should be up and running
- Then open a new terminal – remember not to close the first one!
- Open your CommonsNet repository again
cd CommonsNet
- Connect to Vagrant again
vagrant ssh
- Open Vagrant folder again
cd /vagrant
- Then open tests folder
cd tests
- And finally run Protractor test
protractor conf.js
That’s it. You should see a result of your test in a terminal.
