Implementation of Planned Actions in SUSI.AI Android Client

What do you understand by “Planned Actions”? Is it something required to do something according to plan? Is it something that needs to be done at a particular time? Yes, it is. “Planned Actions” is a feature present in the SUSI.AI android app that helps to schedule tasks. Yes, you heard it right! It helps to schedule the task. We can schedule some events like “setting an alarm after one minute”, “playing music after one minute”, etc. Such events require scheduling of different events at different point of time.

SUSI.AI is a smart assistant. It answers the queries that the user asks for, play music, etc. Additionally, the project also has a smart speaker part, which is very similar to Google Home. A smart speaker often has the ability to perform certain task other than answering normal queries at a scheduled time. During my GSoC period, I got the opportunity to implement such a feature of scheduling task in the SUSI.AI android app.

What is the scheduling of task or planned action?

Scheduling of task or planned actions is nothing but performing some kind of task at a scheduled time. Let’s consider “set alarm in one minute”. This means an alarm should be set that should ring up after one minute. 

Let’s see how it has been implemented in SUSI.

First of all, we need to have a skill that would respond to the query asked. Consider, the skill “rocket launch”. The response for this skill is:

{
  “query”: “rocket launch”,
  “client_id”: “aG9zdF8xNzIuNjguMTQ2LjE5MF80YTk0OGY4OA==”,
  “query_date”: “2019-08-19T17:31:53.670Z”,
  “answers”: [{
    “data”: [
      {
        “0”: “rocket launch”,
        “token_original”: “rocket”,
        “token_canonical”: “rocket”,
        “token_categorized”: “rocket”,
        “timezoneOffset”: “-330”,
        “language”: “en”
      },
      {
        “0”: “rocket launch”,
        “token_original”: “rocket”,
        “token_canonical”: “rocket”,
        “token_categorized”: “rocket”,
        “timezoneOffset”: “-330”,
        “language”: “en”
      }
    ],
    “metadata”: {“count”: 2},
    “actions”: [
      {
        “language”: “en”,
        “type”: “answer”,
        “expression”: “starting countdown”
      },
      {
        “expression”: “twelve”,
        “language”: “en”,
        “type”: “answer”,
        “plan_delay”: 1000,
        “plan_date”: “2019-08-19T17:31:54.679Z”
      },
      {
        “expression”: “eleven”,
        “language”: “en”,
        “type”: “answer”,
        “plan_delay”: 2000,
        “plan_date”: “2019-08-19T17:31:55.681Z”
      },
      {
        “expression”: “ten”,
        “language”: “en”,
        “type”: “answer”,
        “plan_delay”: 3000,
        “plan_date”: “2019-08-19T17:31:56.681Z”
      },
      {
        “expression”: “nine”,
        “language”: “en”,
        “type”: “answer”,
        “plan_delay”: 4000,
        “plan_date”: “2019-08-19T17:31:57.682Z”
      },
      {
        “expression”: “ignition sequence starts”,
        “language”: “en”,
        “type”: “answer”,
        “plan_delay”: 5000,
        “plan_date”: “2019-08-19T17:31:58.682Z”
      },
      {
        “expression”: “six”,
        “language”: “en”,
        “type”: “answer”,
        “plan_delay”: 7000,
        “plan_date”: “2019-08-19T17:32:00.682Z”
      },
      {
        “expression”: “five”,
        “language”: “en”,
        “type”: “answer”,
        “plan_delay”: 8000,
        “plan_date”: “2019-08-19T17:32:01.683Z”
      },
      {
        “expression”: “four”,
        “language”: “en”,
        “type”: “answer”,
        “plan_delay”: 9000,
        “plan_date”: “2019-08-19T17:32:02.683Z”
      },
      {
        “expression”: “three”,
        “language”: “en”,
        “type”: “answer”,
        “plan_delay”: 10000,
        “plan_date”: “2019-08-19T17:32:03.683Z”
      },
      {
        “expression”: “two”,
        “language”: “en”,
        “type”: “answer”,
        “plan_delay”: 11000,
        “plan_date”: “2019-08-19T17:32:04.684Z”
      },
      {
        “expression”: “one”,
        “language”: “en”,
        “type”: “answer”,
        “plan_delay”: 12000,
        “plan_date”: “2019-08-19T17:32:05.684Z”
      },
      {
        “expression”: “zero”,
        “language”: “en”,
        “type”: “answer”,
        “plan_delay”: 13000,
        “plan_date”: “2019-08-19T17:32:06.684Z”
      },
      {
        “expression”: “all engines running”,
        “language”: “en”,
        “type”: “answer”,
        “plan_delay”: 14000,
        “plan_date”: “2019-08-19T17:32:07.685Z”
      },
      {
        “expression”: “liftoff, we have a liftoff!”,
        “language”: “en”,
        “type”: “answer”,
        “plan_delay”: 16000,
        “plan_date”: “2019-08-19T17:32:09.685Z”
      }
    ],
    “skills”: [“/susi_skill_data/models/general/Novelty and Humour/en/Apollo_Countdown.txt”],
    “persona”: {}
  }],
  “answer_date”: “2019-08-19T17:31:53.685Z”,
  “answer_time”: 15,
  “language”: “en”,
  “session”: {“identity”: {
    “type”: “host”,
    “name”: “172.68.146.190_4a948f88”,
    “anonymous”: true
  }}
}

The response for the above skill can be received by querying “rocket launch” at https://api.susi.ai/  or you can get it by going directly to the following link https://api.susi.ai/susi/chat.json?timezoneOffset=-330&q=Rocket+Launch

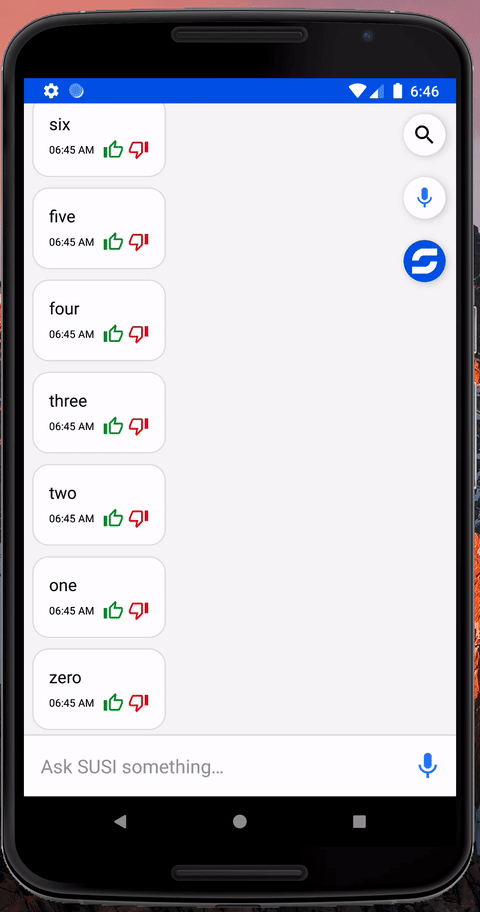
The skill acts as a count-down timer of rocket launch. Now, we have a skill, but how are we going to implement it in android app, so that the countdown timer works properly and the output appears at the proper scheduled time. Also, we need to take care that the other processes of the app doesn’t stop or hangs up when some events are scheduled. Going through all these problems and circumstances I came up with a solution. So, let’s have a look. I made use of Handler. 

Handler in Android helps to execute some tasks at a scheduled time. The tasks are executed in a different thread other than the Main UI thread. So, the other process in the app doesn’t stops and it runs smoothly.

Let’s have a look at the code:

for (i in 0 until actionSize) {

  if (susiResponse.answers[0].actions[i].plan_delay.toString().isNullOrEmpty()) {
      planDelay = 0L
  } else {
      planDelay = susiResponse.answers[0].actions[i].plan_delay
  }
  executeTask(planDelay, susiResponse, i, date)
  chatView?.hideWaitingDots()
}

The code above, loops through all the actions mentioned in the skill one by one. After parsing it, the data is passed to a function executeTask(). This function performs the task to schedule the events (plan actions).

handler = Handler()
try {
  handler.postDelayed({
      val parseSusiHelper = ParseSusiResponseHelper()
      parseSusiHelper.parseSusiResponse(susiResponse, i, utilModel.getString(R.string.error_occurred_try_again))
      var setMessage = parseSusiHelper.answer

      if (parseSusiHelper.actionType == Constant.TABLE) {
          tableItem = parseSusiHelper.tableData
      } else if (parseSusiHelper.actionType == Constant.VIDEOPLAY || parseSusiHelper.actionType == Constant.AUDIOPLAY) {
          // Play youtube video
          identifier = parseSusiHelper.identifier
          youtubeVid.playYoutubeVid(identifier)
      } else if (parseSusiHelper.actionType == Constant.ANSWER && (PrefManager.checkSpeechOutputPref() && check || PrefManager.checkSpeechAlwaysPref())) {
          setMessage = parseSusiHelper.answer
          try {
              var speechReply = setMessage
              Handler().post {
                  textToSpeech = TextToSpeech(context, TextToSpeech.OnInitListener { status ->
                      if (status != TextToSpeech.ERROR) {
                          val locale = textToSpeech?.language
                          textToSpeech?.language = locale
                          textToSpeech?.speak(speechReply, TextToSpeech.QUEUE_FLUSH, null)
                          PrefManager.putBoolean(R.string.used_voice, true)
                      }
                  })
              }
          } catch (e: Exception) {
              Timber.e(“Error occured while trying to start text to speech engine – ” + e)
          }
      } else if (parseSusiHelper.actionType == Constant.STOP) {
          setMessage = parseSusiHelper.stop
          removeCallBacks()
          chatView?.stopMic()
      }

      if (parseSusiHelper.answer == ALARM) {
          playRingTone()
      }

      try {
          databaseRepository.updateDatabase(ChatArgs(
                  prevId = id,
                  message = setMessage,
                  date = DateTimeHelper.getDate(date),
                  timeStamp = DateTimeHelper.getTime(date),
                  actionType = parseSusiHelper.actionType,
                  mapData = parseSusiHelper.mapData,
                  isHavingLink = parseSusiHelper.isHavingLink,
                  datumList = parseSusiHelper.datumList,
                  webSearch = parseSusiHelper.webSearch,
                  tableItem = tableItem,
                  identifier = identifier,
                  skillLocation = susiResponse.answers[0].skills[0]
          ), this)
      } catch (e: Exception) {
          Timber.e(“Error occured while updating the database – ” + e)
          databaseRepository.updateDatabase(ChatArgs(
                  prevId = id,
                  message = utilModel.getString(R.string.error_internet_connectivity),
                  date = DateTimeHelper.date,
                  timeStamp = DateTimeHelper.currentTime,
                  actionType = Constant.ANSWER
          ), this)
      }
  }, planDelay)
} catch (e: java.lang.Exception) {
  Timber.e(“Error while showing data – ” + e)
}

The variable planDelay determines the time after which the task needs to be executed. By default its value is 0, i.e, it gets executed at that moment only until any delay time is supplied by the skill.

In this way, planned actions have been implemented in SUSI.AI Android app.

Resources: 

Blogs: Handler, Handler Implementation

SUSI Skill: Rocket Launch

SUSI.AI Android App: PlayStore GitHub

Tags:SUSI.AI Android App, Kotlin, SUSI.AI, FOSSASIA, GSoC, Android, Handler, Planned Actions

Continue ReadingImplementation of Planned Actions in SUSI.AI Android Client

Displaying of Images using Picasso Library in SUSI.AI Android App

Displaying images is not so easy in an Android app without using a third-party library. Picasso is one of the most popularly used third-party libraries for android that is used to display images. It is a very simple and powerful library for image downloading and caching. SUSI.AI is a smart assistant app. We need the use of Picasso a lot to answer the queries put up by the users. Suppose if the user asks to show some pictures, we need to display it. In such a case we find Picasso very handy. So let’s know how to implement it, by going through the code base present in SUSI.AI android app.

Why use Picasso or another third-party library?

You might be thinking that why we should use a 3rd party library. You can achieve your task without using a 3rd party API as well. But if you will use the core method then it would take a larger amount of code. But if we will use a 3rd party library like Picasso then we will achieve our goal in fewer lines of code.  Also, we can easily cache the images using this libraries. Caching is really an important feature to speed up the application.

Adding Picasso Library to the Gradle file

Adding Picasso android library to your project is very easy. You just need to add the following line in the dependency block of your build.gradle file and replace ${rootConfiguration.picassoVersion} with the latest version of Picasso(for example 2.71828). Now sync your Gradle file. I am assuming that you have already added NETWORK permission in your project.

The simplest way of loading image is:

Picasso.with(this)
   .load("YOUR IMAGE URL HERE")
   .into(imageView);

Here, imageView is the reference to the imageView where you want to display the image.

This is how it is being implemented in the susi app. Here imageUrl is the URL of the image to be loaded. ImageView is the place where we need to display the loaded image. Now there is a chance that the imageUrl is actually not a URL of the image, or suppose Picasso fails to load the image due to some errors. In all such cases, a dummy image would be shown in the imageView. This dummy image is added by calling the error function of Picasso class and passing the reference of the image to it. The placeholder function displays a static image present inside the app until the actual image is being loaded.

Re-sizing and Rotating

We can also resize and rotate the image very easily.

Resources: 

Documentation: Picasso, Glide vs Picasso

Tutorial: Picasso Youtube Video

Library source code: Picasso Library source code

SUSI.AI Android App: PlayStore GitHub

Tags: SUSI.AI Android App, Kotlin, SUSI.AI, FOSSASIA, GSoC, Android, Picasso, Image loader..

Continue ReadingDisplaying of Images using Picasso Library in SUSI.AI Android App

Store data using Realm Database in SUSI.AI Android App

A large application always consists of some kinds of a database to keep a store of large chunks of data that it receives from the server. One such database is the Realm Database.

While working on SUSI.AI app (a smart assistant open-source app) I found the necessity to store room name in the database. These room names were used while configuring SUSI Smart Speaker using the app. Let me share how I implemented this in the app.

Before we proceed with the implementation, let’s go through the  prerequisites for using Realm with Android:

  • Android Studio version 1.5.1 or higher
  • JDK version 7.0 or higher
  • A recent version of the Android SDK
  • Android API Level 9 or higher (Android 2.3 and above)

First of all, you need to add the Gradle dependency at the app level.

Since we are going to do it in Kotlin, we need to add the following:

Since this is a database that is used throughout the application, we have to initialize the realm in the class that extends the Application class.

Once the realm is initialized, we set up a data model class. This model class contains the format of data to be stored. The model class should extend the RealmObject class. Also, the model class must use the keyword open. This makes it available for inheritance and allows it to be overridden. If we remove the open keyword here, we get an error stating: cannot inherit from the final model class. 

When the realm objects are initialized at the start, the default values of the variables are declared null (Concept of Function Default  Arguments in Kotlin).

Now to manipulate the database from the required files we need to create a reference to the Realm followed by getting the default instance of Realm.


To commit any operation with the database, the code must be written within beginTransaction and commitTransaction blocks. Below is an example where the room name is added to the database by using the model class mentioned above.

We use the above method to add data to the database. Now, if we can add data, we should be able to retrieve them too. Let’s go through the code snippet to retrieve data from the database.

The above snippet shows a function which extracts data from the database and stores them in an array list for displaying in a recycler view. 

Now, we all went through addition, display of data in the realm database. Is that sufficient?? No, if we can add data to the database, then there also should be a way to delete the data when needed. Clearing/removing data all at once from the database is very easy and can be simply done by :

Resources: 

Documentation: Realm

Reference: Realm Database

SUSI.AI Android App: PlayStore GitHub

Tags: SUSI.AI Android App, Kotlin, SUSI.AI, FOSSASIA, GSoC, Android, Realm, Database

Continue ReadingStore data using Realm Database in SUSI.AI Android App

Implementation of Shimmer Effect in Layouts in SUSI.AI Android App

The shimmer effect was created by Facebook to indicate the loading of data in pages where data is being loaded from the internet. This was created as an alternative for the existing ProgressBar and the usual loader to give better user experience with UI.

Let’s get started to see how we can implement it. Here, I am going to use SUSI.AI (a smart assistant app) as a reference app to show a code demonstration. I am working on this project in my GSoC period and while working I found the need to implement this feature in many places. So, I am writing this blog to share my experience with how, I implemented it in the app.

First of all, we need to add the shimmer dependency in the app level Gradle file.

Now, we need to create a placeholder layout simply by using views. This placeholder should resemble the actual layout. Usually, grey-colored is preferred in the placeholder background. A placeholder should not have any text written. It should be viewed only. Let’s consider the placeholder used in susi.

Now let’s have a glance at the actual items whose placeholders we have made.

Now, after the creation of the placeholder, we need to add this placeholder in the main layout file. It is done in the following way:

Here, I have added the placeholders 6 times so that the entire screen gets covered up. You can add it as many times as you want.

The next and the final task is to start and stop the shimmer effect according to the logic of the code. Here, the shimmer starts as soon as the fragment is created and stops when the data is successfully loaded from the server. Have a look at how to create the reference.

First of all, we need to create a reference to the shimmer. Then we use this reference to start/stop the shimmer effect. Here, in Kotlin we can directly use the id used in layout without creating any reference.

We start the shimmer effect simply by using startShimmer() function in the shimmer reference.

Similarly, we can stop it using stopShimmer() function in the reference.

Resources: 

Framework: Shimmer in Android

Documentation: ShimmerAndroid Design

SUSI.AI Android App: PlayStore GitHub

Tags:

SUSI.AI Android App, Kotlin, SUSI.AI, FOSSASIA, GSoC, Android, Shimmer

Continue ReadingImplementation of Shimmer Effect in Layouts in SUSI.AI Android App

Gestures in SUSI.AI Android

Gestures have become one of the most widely used features by a user. The user usually, expects that some tasks should be performed by the app when he or she executes some gestures on the screen.

A “touch gesture” occurs when a user places one or more fingers on the touch screen, and your application interprets that pattern of touches as a particular gesture. There are correspondingly two phases to gesture detection:

  1. Gather data about touch events.
  2. Interpret the data to see if it meets the criteria for any of the gestures your app supports.

There are various kinds of gestures supported by android. Some of them are:

  • Tap
  • Double Tap
  • 2-finger Tap
  • 2-finger-double tap
  • 3-finger tap
  • Pinch

In this post, we will go through the SUSI.AI android app (a smart assistant app) which has the “Right to left swipe” gesture detector in use. When such kind of gesture is detected inside the Chat Activity, it opens the Skill’s Activity. This makes the app very user-friendly. Before we start implementing the code,  go through the steps mentioned above in detail.

1st Step “Gather Data”: 

When a user places one or more fingers on the screen, this triggers the callback onTouchEvent() on the View that received the touch events. For each sequence of touch events (position, pressure, size, the addition of another finger, etc.) that is ultimately identified as a gesture, onTouchEvent() is fired several times.

The gesture starts when the user first touches the screen, continues as the system tracks the position of the user’s finger(s), and ends by capturing the final event of the user’s fingers leaving the screen. Throughout this interaction, the MotionEvent delivered to onTouchEvent() provides the details of every interaction. Your app can use the data provided by the MotionEvent to determine if a gesture it cares about happened.

2nd Step “Data Interpretation”:

The data received needs to be properly interpreted. The gestures should be properly recognized and processed to perform further actions. Like an app might have different gestures integrated into the same page live “Swipe-to-refresh”, “Double-tap”, “Single tap”, etc. Upon successfully differentiating this kind of gesture, further functions/tasks should be executed.

Let’s go through the code present in SUSI now.

First of all, a new class is created here “CustomGestureListener”. This class extends the “SimpleOnGestureListener” which is a part of the “GestureDetector” library of android. This class contains a function “onFling”. This function determines the gestures across the horizontal axis. event1.getX(), and event2.getX() functions says about the gesture values across the horizontal axis of the device. Here, when the value of X becomes getter than 0, it actually indicates that the user has swiped from right to left. This becomes active even in very minor change, which users might have presses accidentally, or has just touched the screen. So to avoid such minor impulses, we set a value that we will execute our task only when the value of X lies between 100 and 1000. This avoids minor gestures.

Inside the onCreate method, a new CustomGestureListener instance is created, passing through a reference to the enclosing activity and an instance of our new CustomGestureListener class as arguments. Finally, an onTouchEvent() callback method is implemented for the activity, which simply calls the corresponding onTouchEvent() method of the ScaleGestureDetector object, passing through the MotionEvent object as an argument.

Summary:

Gestures are usually implemented to enhance the user experience while using the application. Though there are some predefined gestures in Android, we can also create gestures of our own and use them in our application.

Resources: 

Documentation: Gestures

Reference: Gesture

SUSI.AI Android App: PlayStore GitHub

Tags:

SUSI.AI Android App, Kotlin, SUSI.AI, FOSSASIA,GSoC, Android, Gestures

Continue ReadingGestures in SUSI.AI Android

Creating an awesome ‘About Us’ page for the Open Event Organizer Android App

Open Event Organizer App (Eventyay Organizer App) is an Android app based on the Eventyay platform. It contains various features using which organizers can manage their events.

This article will talk about a library which can help you create great about pages for Android apps without the need of making custom layouts.

It is the Android About Page library.

Let’s go through the process of its implementation in the Eventyay Organizer App.

First add the dependency in the app level build.gradle file:

implementation 'com.github.medyo:android-about-page:1.2.5'

Creating elements to be added:

Element legalElement = new Element();
legalElement.setTitle("Legal");

Element developersElement = new Element();      
developersElement.setTitle(getString(R.string.developers));

Element shareElement = new Element();
shareElement.setTitle(getString(R.string.share));

Element thirdPartyLicenses = new Element();       
thirdPartyLicenses.setTitle(getString(R.string.third_party_licenses));

Setting image, description and adding items in the About Page:

AboutPage aboutPage = new AboutPage(getContext())
            .isRTL(false)
            .setImage(R.mipmap.ic_launcher)            
            .setDescription(getString(R.string.about_us_description))
            .addItem(new Element("Version " + BuildConfig.VERSION_NAME, R.drawable.ic_info))
            .addGroup("Connect with us")
            .addGitHub("fossasia/open-event-organizer-android")
            .addPlayStore(getContext().getPackageName())
            .addWebsite(getString(R.string.FRONTEND_HOST))
            .addFacebook(getString(R.string.FACEBOOK_ID))
            .addTwitter(getString(R.string.TWITTER_ID))
            .addYoutube(getString(R.string.YOUTUBE_ID))
            .addItem(developersElement)
            .addItem(legalElement)
            .addItem(shareElement);

if (BuildConfig.FLAVOR.equals("playStore")) {    
    aboutPage.addItem(thirdPartyLicenses);
}

View aboutPageView = aboutPage.create();

Now add the aboutPageView in the fragment.

To make the values configurable from build.gradle, add this is the defaultConfig:

resValue "string", "FACEBOOK_ID", "eventyay"
resValue "string", "TWITTER_ID", "eventyay"
resValue "string", "YOUTUBE_ID", "UCQprMsG-raCIMlBudm20iLQ"

That’s it! The About Page is now ready.

Resources:

Library used: Android About Page

Pull Request: #1904

Open Event Organizer App: Project repo, Play Store, F-Droid

Continue ReadingCreating an awesome ‘About Us’ page for the Open Event Organizer Android App

Mapbox implementation in Open Event Organizer Android App

Open Event Organizer Android App is used by event organizers to manage events on the Eventyay platform. While creating or updating an event, location is one of the important factors which needs to be added so that the attendees can be informed of the venue.

Here, we’ll go through the process of implementing Mapbox Places Autocomplete for event location in the F-Droid build variant.

The first step is to create an environment variable for the Mapbox Access Token. 

def MAPBOX_ACCESS_TOKEN = System.getenv('MAPBOX_ACCESS_TOKEN') ?: "YOUR_ACCESS_TOKEN"

Add the Mapbox dependency:

fdroidImplementation 'com.mapbox.mapboxsdk:mapbox-android-plugin-places-v8:0.9.0'

Fetching the access token in EventDetailsStepOne as well as UpdateEventFragment:

ApplicationInfo applicationInfo = null;
        try {
            applicationInfo = getContext().getPackageManager().getApplicationInfo(getContext().getPackageName(), PackageManager.GET_META_DATA);
        } catch (PackageManager.NameNotFoundException e) {
            Timber.e(e);
        }
        Bundle bundle = applicationInfo.metaData;

        String mapboxAccessToken = bundle.getString(getString(R.string.mapbox_access_token));

The app should not crash if the access token is not available. To ensure this, we need to put a check. Since, the default value of the access token is set to “YOUR_ACCESS_TOKEN”, the following code will check whether a token is available or not:

if (mapboxAccessToken.equals("YOUR_ACCESS_TOKEN")) {
    ViewUtils.showSnackbar(binding.getRoot(),                             R.string.access_token_required);
    return;
}

Initializing the PlacesAutocompleteFragment:

PlaceAutocompleteFragment autocompleteFragment = PlaceAutocompleteFragment.newInstance(
                mapboxAccessToken, PlaceOptions.builder().backgroundColor(Color.WHITE).build());

getFragmentManager().beginTransaction()
    .replace(R.id.fragment, autocompleteFragment)
    .addToBackStack(null)
    .commit();

Now, a listener needs to be set up to get the selected place and set the various fields like latitude, longitude, location name and searchable location name.

autocompleteFragment.setOnPlaceSelectedListener(new PlaceSelectionListener() {
                @Override
                public void onPlaceSelected(CarmenFeature carmenFeature) {
                    Event event = binding.getEvent();
                    event.setLatitude(carmenFeature.center().latitude());
                    event.setLongitude(carmenFeature.center().longitude());
                    event.setLocationName(carmenFeature.placeName());
                    event.setSearchableLocationName(carmenFeature.text());
                    binding.form.layoutLocationName.setVisibility(View.VISIBLE);
                    binding.form.locationName.setText(event.getLocationName());
                    getFragmentManager().popBackStack();
                }

                @Override
                public void onCancel() {
                    getFragmentManager().popBackStack();
                }
            });

This brings the process of implementing Mapbox SDK to completion.

GIF showing the working of Mapbox Places Autocomplete

Resources:

Documentation: Mapbox Places Plugin

Open Event Organizer App: Project repo, Play Store, F-Droid

Continue ReadingMapbox implementation in Open Event Organizer Android App

Implementation of Android App Links in Open Event Organizer App

Android App Links are HTTP URLs that bring users directly to specific content in an Android app. They allow the website URLs to immediately open the corresponding content in the related Android app.

Whenever such a URL is clicked, a dialog is opened allowing the user to select a particular app which can handle the given URL.

In this blog post, we will be discussing the implementation of Android App Links for password reset in Open Event Organizer App, the Android app developed for event organizers using the Eventyay platform.

What is the purpose of using App Links?

App Links are used to open the corresponding app when a link is clicked.

  • If the app is installed, then it will open on clicking the link.
  • If app is not installed, then the link will open in the browser.

The first steps involve:

  1. Creating intent filters in the manifest.
  2. Adding code to the app’s activities to handle incoming links.
  3. Associating the app and the website with Digital Asset Links.

Adding Android App Links

First step is to add an intent-filter for the AuthActivity.

<intent-filter>
    <action android:name="android.intent.action.VIEW" />

    <category android:name="android.intent.category.DEFAULT" />
     <category android:name="android.intent.category.BROWSABLE" />

     <data
         android:scheme="https"
         android:host="@string/FRONTEND_HOST"
         android:pathPrefix="/reset-password" />
</intent-filter>

Here, FRONTEND_HOST is the URL for the web frontend of the Eventyay platform.

This needs to be handled in AuthActivity:

@Override
protected void onNewIntent(Intent intent) {
    super.onNewIntent(intent);
    handleIntent(intent);
}
private void handleIntent(Intent intent) {
    String appLinkAction = intent.getAction();
    Uri appLinkData = intent.getData();

    if (Intent.ACTION_VIEW.equals(appLinkAction) && appLinkData != null) {
        LinkHandler.Destination destination = LinkHandler.getDestinationAndToken(appLinkData.toString()).getDestination();
        String token = LinkHandler.getDestinationAndToken(appLinkData.toString()).getToken();

        if (destination.equals(LinkHandler.Destination.RESET_PASSWORD)) {
            getSupportFragmentManager().beginTransaction()
            .replace(R.id.fragment_container,                     
                         ResetPasswordFragment.newInstance(token))
            .commit();
        }
    }
}

 Call the handleIntent() method in onCreate():

handleIntent(getIntent());

Get the token in onCreate() method of ResetPasswordFragment:

@Override
public void onCreate(@Nullable Bundle savedInstanceState) {
    super.onCreate(savedInstanceState);

    if (getArguments() != null)
        token = getArguments().getString(TOKEN_KEY);
}

Set the token in ViewModel:

if (token != null)
    resetPasswordViewModel.setToken(token);

The setToken() method in ViewModel:

if (token != null)
    resetPasswordViewModel.setToken(token);

LinkHandler class for handling the links:

package com.eventyay.organizer.utils;

public class LinkHandler {

    public Destination destination;
    public String token;

    public LinkHandler(Destination destination, String token) {
        this.destination = destination;
        this.token = token;
    }

    public static LinkHandler getDestinationAndToken(String url) {
        if (url.contains("reset-password")) {
            String token = url.substring(url.indexOf('=') + 1);
            return new LinkHandler(Destination.RESET_PASSWORD, token);
        } else if (url.contains("verify")) {
            String token = url.substring(url.indexOf('=') + 1);
            return new LinkHandler(Destination.VERIFY_EMAIL, token);
        } else
            return null;
    }

    public Destination getDestination() {
        return destination;
    }

    public String getToken() {
        return token;
    }

    public enum Destination {
        VERIFY_EMAIL,
        RESET_PASSWORD
    }
}

enum is used to handle links for both, password reset as well as email verification.

Finally, the unit tests for LinkHandler:

package com.eventyay.organizer.utils;

import org.junit.Test;
import org.junit.runner.RunWith;
import org.junit.runners.JUnit4;

import static org.junit.Assert.assertEquals;

@RunWith(JUnit4.class)
public class LinkHandlerTest {

    private String resetPassUrl = "https://eventyay.com/reset-password?token=12345678";
    private String verifyEmailUrl = "https://eventyay.com/verify?token=12345678";

    @Test
    public void shouldHaveCorrectDestination() {
        assertEquals(LinkHandler.Destination.RESET_PASSWORD,
            LinkHandler.getDestinationAndToken(resetPassUrl).getDestination());
        assertEquals(LinkHandler.Destination.VERIFY_EMAIL,
            LinkHandler.getDestinationAndToken(verifyEmailUrl).getDestination());
    }

    @Test
    public void shouldGetPasswordResetToken() {
        assertEquals(LinkHandler.Destination.RESET_PASSWORD,
            LinkHandler.getDestinationAndToken(resetPassUrl).getDestination());
        assertEquals("12345678",
            LinkHandler.getDestinationAndToken(resetPassUrl).getToken());
    }

    @Test
    public void shouldGetEmailVerificationToken() {
        assertEquals(LinkHandler.Destination.VERIFY_EMAIL,
            LinkHandler.getDestinationAndToken(verifyEmailUrl).getDestination());
        assertEquals("12345678",
            LinkHandler.getDestinationAndToken(verifyEmailUrl).getToken());
    }
}

Resources:

Documentation: Link

Further reading: Android App Linking

Pull Request: feat: Add app link for password reset

Open Event Organizer App: Project repo, Play Store, F-Droid

Continue ReadingImplementation of Android App Links in Open Event Organizer App

Implementation of scanning in F-Droid build variant of Open Event Organizer Android App

Open Event Organizer App (Eventyay Organizer App) is the Android app used by event organizers to create and manage events on the Eventyay platform.

Various features include:

  1. Event creation.
  2. Ticket management.
  3. Attendee list with ticket details.
  4. Scanning of participants etc.

The Play Store build variant of the app uses Google Vision API for scanning attendees. This cannot be used in the F-Droid build variant since F-Droid requires all the libraries used in the project to be open source. Thus, we’ll be using this library: https://github.com/blikoon/QRCodeScanner 

We’ll start by creating separate ScanQRActivity, ScanQRView and activity_scan_qr.xml files for the F-Droid variant. We’ll be using a common ViewModel for the F-Droid and Play Store build variants.

Let’s start with requesting the user for camera permission so that the mobile camera can be used for scanning QR codes.

public void onCameraLoaded() {
    if (hasCameraPermission()) {
        startScan();
    } else {
        requestCameraPermission();
    }
}
@Override
public void onRequestPermissionsResult(int requestCode, @NonNull String[] permissions, @NonNull int[] grantResults) {
    if (requestCode != PERM_REQ_CODE)
            return;

    // If request is cancelled, the result arrays are empty.
    if (grantResults.length > 0 && grantResults[0] == PackageManager.PERMISSION_GRANTED) {
        cameraPermissionGranted(true);
    } else {
        cameraPermissionGranted(false);
    }
}


@Override
public boolean hasCameraPermission() {
    return ContextCompat.checkSelfPermission(this, permission.CAMERA) == PackageManager.PERMISSION_GRANTED;
}

@Override
public void requestCameraPermission() {
    ActivityCompat.requestPermissions(this, new String[]{Manifest.permission.CAMERA}, PERM_REQ_CODE);
}


@Override
public void showPermissionError(String error) {
    Toast.makeText(this, error, Toast.LENGTH_SHORT).show();
}

public void cameraPermissionGranted(boolean granted) {
    if (granted) {
        startScan();
    } else {
        showProgress(false);
        showPermissionError("User denied permission");
    }
}

After the camera permission is granted, or if the camera permission is already granted, then the startScan() method would be called.

@Override
public void startScan() {
    Intent i = new Intent(ScanQRActivity.this, QrCodeActivity.class);
    startActivityForResult(i, REQUEST_CODE_QR_SCAN);
}

QrCodeActivity belongs to the library that we are using.

Now, the processing of barcode would be started after it is scanned. The processBarcode() method in ScanQRViewModel would be called.

public void onActivityResult(int requestCode, int resultCode, Intent intent) {

    if (requestCode == REQUEST_CODE_QR_SCAN) {
        if (intent == null)
            return;

        scanQRViewModel.processBarcode(intent.getStringExtra
            ("com.blikoon.qrcodescanner.got_qr_scan_relult"));

    } else {
        super.onActivityResult(requestCode, resultCode, intent);
    }
}

Let’s move on to the processBarcode() method, which is the same as the Play Store variant.

public void processBarcode(String barcode) {

    Observable.fromIterable(attendees)
        .filter(attendee -> attendee.getOrder() != null)
        .filter(attendee -> (attendee.getOrder().getIdentifier() + "-" + attendee.getId()).equals(barcode))
        .compose(schedule())
        .toList()
        .subscribe(attendees -> {
            if (attendees.size() == 0) {
                message.setValue(R.string.invalid_ticket);
                tint.setValue(false);
            } else {
                checkAttendee(attendees.get(0));
            }
        });
}

The checkAttendee() method:

private void checkAttendee(Attendee attendee) {
    onScannedAttendeeLiveData.setValue(attendee);

    if (toValidate) {
        message.setValue(R.string.ticket_is_valid);
        tint.setValue(true);
        return;
    }

    boolean needsToggle = !(toCheckIn && attendee.isCheckedIn ||
        toCheckOut && !attendee.isCheckedIn);

    attendee.setChecking(true);
    showBarcodePanelLiveData.setValue(true);

    if (toCheckIn) {
        message.setValue(
            attendee.isCheckedIn ? R.string.already_checked_in : R.string.now_checked_in);
        tint.setValue(true);
        attendee.isCheckedIn = true;
    } else if (toCheckOut) {
        message.setValue(
            attendee.isCheckedIn ? R.string.now_checked_out : R.string.already_checked_out);
        tint.setValue(true);
        attendee.isCheckedIn = false;
    }

    if (needsToggle)
        compositeDisposable.add(
            attendeeRepository.scheduleToggle(attendee)
                .subscribe(() -> {
                    // Nothing to do
                }, Logger::logError));
}

This would toggle the check-in state of the attendee.

Resources:

Library used: QRCodeScanner

Pull Request: feat: Implement scanning in F-Droid build variant

Open Event Organizer App: Project repo, Play Store, F-Droid

Continue ReadingImplementation of scanning in F-Droid build variant of Open Event Organizer Android App

Implementation of Role Invites in Open Event Organizer Android App

Open Event Organizer Android App consists of various features which can be used by event organizers to manage their events. Also, they can invite other people for various roles. After acceptance of the role invite, the particular user would have access to features like the event settings and functionalities like scanning of tickets and editing of event details, depending on the access level of the role.

There can be various roles which can be assigned to a user: Organizer, Co-Organizer, Track Organizer, Moderator, Attendee, Registrar.

Here we will go through the process of implementing the feature to invite a person for a particular role for an event using that person’s email address.

The ‘Add Role’ screen has an email field to enter the invitee’s email address and select the desired role for the person. Upon clicking the ‘Send Invite’ button, the person would be sent a mail containing a link to accept the role invite.

The Role class is used for the different types of available roles.

@Data
@Builder
@Type("role")
@AllArgsConstructor
@NoArgsConstructor
@JsonNaming(PropertyNamingStrategy.KebabCaseStrategy.class)
public class Role {

    @Id(LongIdHandler.class)
    public Long id;

    public String name;
    public String titleName;
}

The RoleInvite class:

@Data
@Builder
@Type("role-invite")
@AllArgsConstructor
@NoArgsConstructor
@JsonNaming(PropertyNamingStrategy.KebabCaseStrategy.class)
public class RoleInvite {

    @Id(LongIdHandler.class)
    public Long id;

    @Relationship("event")
    public Event event;

    @Relationship("role")
    public Role role;

    public String email;
    public String createdAt;
    public String status;
    public String roleName;
}

A POST request is required for sending the role invite using the email address of the recipient as well as the role name.

@POST("role-invites")
Observable<RoleInvite> postRoleInvite(@Body RoleInvite roleInvite);

On clicking the ‘Send Invite’ button, the email address would be validated and if it is valid, the invite would be sent.

binding.btnSubmit.setOnClickListener(v -> {
        if (!validateEmail(binding.email.getText().toString())){            
            showError(getString(R.string.email_validation_error));
            return;
        }
        roleId = binding.selectRole.getSelectedItemPosition() + 1;
        roleInviteViewModel.createRoleInvite(roleId);
});

createRoleInvite() method in RoleInviteViewModel:

public void createRoleInvite(long roleId) {

    long eventId = ContextManager.getSelectedEvent().getId();
    Event event = new Event();
    event.setId(eventId);
    roleInvite.setEvent(event);
    role.setId(roleId);
    roleInvite.setRole(role);

    compositeDisposable.add(
        roleRepository
            .sendRoleInvite(roleInvite)
            .doOnSubscribe(disposable -> progress.setValue(true))
            .doFinally(() -> progress.setValue(false))
            .subscribe(sentRoleInvite -> {
                success.setValue("Role Invite Sent");
            }, throwable -> error.setValue(ErrorUtils.getMessage(throwable).toString())));
}

It takes roleId as an argument which is used to set the desired role before sending the POST request.

We can notice the use of sendRoleInvite() method of RoleRepository. Let’s have a look at that:

@Override
public Observable<RoleInvite> sendRoleInvite(RoleInvite roleInvite) {
    if (!repository.isConnected()) {
        return Observable.error(new Throwable(Constants.NO_NETWORK));
    }

    return roleApi
        .postRoleInvite(roleInvite)
        .doOnNext(inviteSent -> Timber.d(String.valueOf(inviteSent)))
        .subscribeOn(Schedulers.io())
        .observeOn(AndroidSchedulers.mainThread());
}

Resources:

API Documentation: Roles, Role Invites

Pull Request: feat: Implement system of role invites

Open Event Organizer App: Project repo, Play Store, F-Droid

Continue ReadingImplementation of Role Invites in Open Event Organizer Android App