List all the Users Registered on SUSI.AI

In this blog, I’ll be telling on how SUSI admins can access list of all the registered users from SUSI-server. Following this, they may modify/edit user role of any registered user.

What is User Role?

A UserRole defines the servlet access right. Not all users are allowed to access all the data and services. For  example, To list all the users, minimal user role expected is ADMIN. This classification of users are inspired by the wikipedia User Access Levels, see https://en.wikipedia.org/wiki/Wikipedia:User_access_levels.While querying SUSI, Users are classified into 7 different categories, namely :

  • BOT
  • ANONYMOUS
  • USER  
  • REVIEWER
  • ACCOUNTCREATOR
  • ADMIN
  • BUREAUCRAT

* Please see that these are as of the date of publish of this blog. These are subject to change, which is very unlikely.

All the users who are not logged in but interacting with SUSI are anonymous users. These are only subject to chat with SUSI, login, signup or may use forgot password service. Once a user login to the server, a token is generated and sent back to client to maintain the identity, hence acknowledging them. Privileged users are those who have special rights with them. These are more like moderators with much special rights than any other user. At the top level of the hierarchy are the admins. These users have more rights than anyone. They can change role of any other user, override decision of any privileged user as well.

Let us now look at the control flow of this.

First things first, make a component of User List in the project. Let us name it ListUsers and since it has to be accessible by those users who possess ADMIN rights, you will find it enclosed in Admin package in components folder. Open up

index.js file, import Listusers component  and add route to it in the following way :

...//other import statements
import ListUser from "./components/Admin/ListUser/ListUser";
...//class definition and other methods
<Route path="/listUser" component={ListUser}/>
//other routes defined

Find a suitable image for “List Users” option and add the option for List Users in static appbar component along with the image. We have used Material UI’s List image in our project.

...// other imports

import List from 'material-ui/svg-icons/action/list';

Class and method definition

<MenuItem primaryText="List Users"
          onTouchTap={this.handleClose}
          containerElement={<Link to="/listUser" />}
                rightIcon={<List/>}
      />

...//other options in top right corner menu

Above code snippet will add an option to redirect admins to ‘/listUsers’ route. Let us now have a closer look at functionality of both client and server. By now you must have known what ComponentDidMount does. {If not, I’ll tell you. This is a method which is given first execution after the page is rendered. For more information, visit this link}. As mentioned earlier as well that this list will be available only for admins and may be even extended for privileged users but not for anonymous or any other user, an AJAX call is made to server in ComponentDidMount of ‘listuser’ route which returns the base user role of current user. If user is an Admin, another method, fetchUsers() is called.

let url;
        url = "http://api.susi.ai/aaa/account-permissions.json";
        $.ajax({
            url: url,
            dataType: 'jsonp',
            jsonpCallback: 'py',
            jsonp: 'callback',
            crossDomain: true,
            success: function (response) {
                console.log(response.userRole)
                if (response.userRole !== "admin") {
                    console.log("Not an admin")
                } else {
                    this.fetchUsers();
                    console.log("Admin")
                }
            }.bind(this),
});

In fetchUsers method, an AJAX call is made to server which returns username in JSONArray. The response looks something likes this :

{
	"users" : {
		"email:""test@test.com",
...
},
"Username":["test@test.com", "test@anothertest.com"...]
}

Now, only rendering this data in a systematic form is left. To give it a proper look, we have used material-ui’s table. Import Table, TableBody, TableHeader,

   TableHeaderColumn, TableRow, TableRowColumn from material-ui/table.

In fetchUsers method, response is catched in data Oblect. Now the keys are extracted from the JSON response and mapped with an array. Iterating through array received as username array, we get list of all the registered users. Now, popuulate the data in the table you generated.

return (
                        <TableRow key={i}>
                            <TableRowColumn>{++i}>
                            <TableRowColumn>{name}</TableRowColumn>
                            <TableRowColumn> </TableRowColumn>
                            <TableRowColumn> </TableRowColumn>
                            <TableRowColumn> </TableRowColumn>
                            <TableRowColumn> </TableRowColumn>
                        </TableRow>
                    )

Above piece of code may help you while populating the table. These details are returned from susi server which gets a list of all the registered in the following manner. First, it checks if base url of this user is something apart from admin. If not, it returns error which may look like this :

Failed to load resource: the server responded with a status of 401 (Base user role not sufficient. Your base user role is 'ANONYMOUS', your user role is 'anonymous')

Otherwise, it will generate a client identity, use to to get an authorization object which will loop through authorization.json file and return all the users encoded as JSONArray.

Additional Resources

  1. Official Material UI Documentation on Tables from marterial-ui
  2. Answer by Marco Bonelli on Stackoverflow on How to map JSON response in JavaScript?
  3. Answer by janpieter_z on Stackoverflow – on Render JSON data in ReactJS table
Continue ReadingList all the Users Registered on SUSI.AI

SUSI.AI User Roles and How to Modify Them

In this blog, I discuss what is ‘user-role’ in SUSI.AI, what are the various roles and how SUSI admins can modify/update a user’s roles.

What is User Role?

A UserRole defines the servlet access right. Not all users are allowed to access all the data and services. For  example, To list all the users, minimal user role expected is ADMIN. This classification of users are inspired by the wikipedia User Access Levels, see https://en.wikipedia.org/wiki/Wikipedia:User_access_levels.While querying SUSI, Users are classified into 7 different categories, namely :

  • BOT
  • ANONYMOUS
  • USER  
  • REVIEWER
  • ACCOUNTCREATOR
  • ADMIN
  • BUREAUCRAT

* Please see that these are as of the date of publish of this blog. These are subject to change, which is very unlikely.

If SUSI is active as a bot on some bot integrated platform (like line or kik), the user role assigned to it will be that of BOT. This user role just has technical access to the server.

All the users who are not logged in but interacting with SUSI are ANONYMOUS users. These are only subject to chat, login and signup. They may use forgot password service and reset password services as well.

Once a user login to the server, a token is generated and sent back to client to maintain the identity, hence acknowledging them as USER(s).

Users with role assigned as “REVIEWERS” are expected to manage the Skill CMS. There might be some dispute or conflict in a skill. REVIEWERS then take the access of skill data and finalise the conflict there itself for smooth functionality.

ADMIN users are those who have special rights with them. These are more like moderators with much special rights than any other user.

At the top level of the hierarchy are the BUREAUCRATS. These users have more rights than anyone. They can change role of any other user, override decision of any ADMIN user as well. Both admins and bureaucrats have the access to all the settings file on the server. They not only can look at the list, but also download and upload them. Now these users also have right to upgrade or downgrade any other user as well.

All these user roles are defined in UserRole.java file.

In each request received by the server, the user role of user making the request is compared with the minimal user role in getMinimalUserRole() method. This method is defined in AbstractAPIHandler which validates if a user is allowed to access a particular servlet or not.

private void process(HttpServletRequest request, HttpServletResponse response, Query query) throws ServletException, IOException {
	// object initialisation and comparsions
// user authorization: we use the identification of the user to get the assigned authorization
        Authorization authorization = DAO.getAuthorization(identity);

        if (authorization.getUserRole().ordinal() < minimalUserRole.ordinal()) {
        	response.sendError(401, "Base user role not sufficient. Your base user role is '" + authorization.getUserRole().name() + "', your user role is '" + authorization.getUserRole().getName() + "'");
			return;
        }
// evaluations based on other request parameters.
}

Now that we know about what User Roles actually are, let us look at how the servlet which allows the users {with at least ADMIN login} to change user role of some other user works.

In the request, 2 parameters are expected. These are :

  • user : email id of the user whose role has to be changed.
  • role : new role which will be assigned to this user.

Using a switch case, we identify the user role which is requested. If role is found to be null or any other value apart from “bot”, “anonymous”, “user”, “reviewer”, “accountcreator”, “admin” or “bureaucrat”, an error with error code 400 and error message “Bad User role” is thrown.

In the next steps, server generates client identity in order to get the corresponding Authorization object. If the user is not found in the database, again an error is thrown with error code 400 and error message “role not found

ClientCredential credential = new ClientCredential(ClientCredential.Type.passwd_login, userTobeUpgraded);
            ClientIdentity identity = new ClientIdentity(ClientIdentity.Type.email, credential.getName());
            if (!DAO.hasAuthorization(identity)) {
                throw new APIException(400, "Username not found");
            }

By now, server is clear with the user identity and new role to be assigned. Since the user role is defined in authorization.json file, we overwrite the existing user role and finally server sends back the new user role of the use

Authorization auth = DAO.getAuthorization(identity);
            try {
                auth.setUserRole(userRole);
            } catch (IllegalArgumentException e) {
                throw new APIException(400, "role not found");
            }

            // Print Response
            result.put("newDetails", auth.getJSON());
            result.put("accepted", true);
            result.put("message", "User role changed successfully!!");
            return new ServiceResponse(result);


Continue ReadingSUSI.AI User Roles and How to Modify Them

Automatic Signing and Publishing of Android Apps from Travis

As I discussed about preparing the apps in Play Store for automatic deployment and Google App Signing in previous blogs, in this blog, I’ll talk about how to use Travis Ci to automatically sign and publish the apps using fastlane, as well as how to upload sensitive information like signing keys and publishing JSON to the Open Source repository. This method will be used to publish the following Android Apps:

Current Project Structure

The example project I have used to set up the process has the following structure:

It’s a normal Android Project with some .travis.yml and some additional bash scripts in scripts folder. The update-apk.sh file is standard app build and repo push file found in FOSSASIA projects. The process used to develop it is documented in previous blogs. First, we’ll see how to upload our keys to the repo after encrypting them.

Encrypting keys using Travis

Travis provides a very nice documentation on encrypting files containing sensitive information, but a crucial information is buried below the page. As you’d normally want to upload two things to the repo – the app signing key, and API JSON file for release manager API of Google Play for Fastlane, you can’t do it separately by using standard file encryption command for travis as it will override the previous encrypted file’s secret. In order to do so, you need to create a tarball of all the files that need to be encrypted and encrypt that tar instead. Along with this, before you need to use the file, you’ll have to decrypt in in the travis build and also uncompress it for use.

So, first install Travis CLI tool and login using travis login (You should have right access to the repo and Travis CI in order to encrypt the files for it)

Then add the signing key and fastlane json in the scripts folder. Let’s assume the names of the files are key.jks and fastlane.json

Then, go to scripts folder and run this command to create a tar of these files:

tar cvf secrets.tar fastlane.json key.jks


secrets.tar will be created in the folder. Now, run this command to encrypt the file

travis encrypt-file secrets.tar


A new file secrets.tar.enc will be created in the folder. Now delete the original files and secrets tar so they do not get added to the repo by mistake. The output log will show the the command for decryption of the file to be added to the .travis.yml file.

Decrypting keys using Travis

But if we add it there, the keys will be decrypted for each commit on each branch. We want it to happen only for master branch as we only require publishing from that branch. So, we’ll create a bash script prep-key.sh for the task with following content

#!/bin/sh
set -e

export DEPLOY_BRANCH=${DEPLOY_BRANCH:-master}

if [ "$TRAVIS_PULL_REQUEST" != "false" -o "$TRAVIS_REPO_SLUG" != "iamareebjamal/android-test-fastlane" -o "$TRAVIS_BRANCH" != "$DEPLOY_BRANCH" ]; then
    echo "We decrypt key only for pushes to the master branch and not PRs. So, skip."
    exit 0
fi

openssl aes-256-cbc -K $encrypted_4dd7_key -iv $encrypted_4dd7_iv -in ./scripts/secrets.tar.enc -out ./scripts/secrets.tar -d
tar xvf ./scripts/secrets.tar -C scripts/


Of course, you’ll have to change the commands and arguments according to your need and repo. Specially, the decryption command keys ID

The script checks if the repo and branch are correct, and the commit is not of a PR, then decrypts the file and extracts them in appropriate directory

Before signing the app, you’ll need to store the keystore password, alias and key password in Travis Environment Variables. Once you have done that, you can proceed to signing the app. I’ll assume the variable names to be $STORE_PASS, $ALIAS and $KEY_PASS respectively

Signing App

Now, come to the part in upload-apk.sh script where you have the unsigned release app built. Let’s assume its name is app-release-unsigned.apk.Then run this command to sign it

cp app-release-unsigned.apk app-release-unaligned.apk
jarsigner -verbose -tsa http://timestamp.comodoca.com/rfc3161 -sigalg SHA1withRSA -digestalg SHA1 -keystore ../scripts/key.jks -storepass $STORE_PASS -keypass $KEY_PASS app-release-unaligned.apk $ALIAS


Then run this command to zipalign the app

${ANDROID_HOME}/build-tools/25.0.2/zipalign -v -p 4 app-release-unaligned.apk app-release.apk


Remember that the build tools version should be the same as the one specified in .travis.yml

This will create an apk named app-release.apk

Publishing App

This is the easiest step. First install fastlane using this command

gem install fastlane


Then run this command to publish the app to alpha channel on Play Store

fastlane supply --apk app-release.apk --track alpha --json_key ../scripts/fastlane.json --package_name com.iamareebjamal.fastlane


You can always configure the arguments according to your need. Also notice that you have to provide the package name for Fastlane to know which app to update. This can also be stored as an environment variable.

This is all for this blog, you can read more about travis CLI, fastlane features and signing process in these links below:

Continue ReadingAutomatic Signing and Publishing of Android Apps from Travis

Auto Updating SUSI Android APK and App Preview on appetize.io

This blog will cover the way in which the SUSI Android APK is build automatically after each commit and pushed to “apk” branch in the github repo. Other thing which will be covered is that how the app preview on appetize.io can be updated after each commit. This is basically for the testers who wish to test the SUSI Android App. There are four ways to test the SUSI Android App. One is to simply download the alpha version of the app from the Google PlayStore. Here is the link to the app. Join the alpha testing and report bugs on the github issue tracker of the repo. Other way is to build the app from Android Studio but you may need to set the complete project. If you are looking to contribute in the project, this is the advised way to test the app. The other two ways are explained below.

Auto Building of APK and pushing to “apk” branch

We have written a script which does following steps whenever a PR is merged:

  1. Checks if the commit is of a PR or a commit to repo
  2. If not of PR, configures a user whose github account will be used to push the APKs.
  3. Clones the repo, generates the debug and release APK.
  4. Deletes everything in the apk branch.
  5. Commits and Pushes new changes to apk branch.

This script is written for people or testers who do not have android studio installed in their computer and want to test the app. So, they can directly download the apk from the apk branch and install it in their phone. The APK is always updated after each commit. So, whenever a tester downloads the APK from apk branch, he will always get the latest app.

if [[ $CIRCLE_BRANCH != pull* ]]
then
    git config --global user.name "USERNAME"
    git config --global user.email "EMAIL"

    git clone --quiet --branch=apk https://USERNAME:$GITHUB_API_KEY@github.com/fossasia/susi_android apk > /dev/null
    ls
    cp -r ${HOME}/${CIRCLE_PROJECT_REPONAME}/app/build/outputs/apk/app-debug.apk apk/susi-debug.apk
    cp -r ${HOME}/${CIRCLE_PROJECT_REPONAME}/app/build/outputs/apk/app-release-unsigned.apk apk/susi-release.apk
    cd apk

    git checkout --orphan workaround
    git add -A

    git commit -am "[Circle CI] Update Susi Apk"

    git branch -D apk
    git branch -m apk

    git push origin apk --force --quiet > /dev/null
fi

Auto Updating of App Preview on appetize.io

The APKs generated in the above step can now be used to set up the preview of the app on the appetize.io. Appetize.io is an online simulator to run mobile apps ( IOS and Android). Appetize.io provides a nice virtual mobile frame to run native apps with various options like screen size, mobile, OS version, etc. Appetize.io provides some API to update/publish the app. In SUSI, we once uploaded the app on appetize.io and now we are using the API provided by them to update the APK everytime a commit is pushed in the repository.

API information (Derived from official docs of appetize.io):

You may upload a new version of an existing app, or update app settings.

Send an HTTP POST request to

https://APITOKEN@api.appetize.io/v1/apps/PUBLICKEY

Replace APITOKEN with your API token and PUBLICKEY with the public key of the app you’re updating. Your API token must be permissioned to the same account as was used to upload the app. The POST body must be a JSON object. To delete a previously set field, use a value of null.

Optional Fields

  1. url: (string) a publicly accessible link to your .zip, .tar.gz, or .apk file, used to upload a new version of your app.
  2. note: (string) a note for your own purposes, will appear on your management dashboard.

For the url parameter, we have used https://github.com/fossasia/susi_android/raw/apk/susi-debug.apk and note can be anything. We have used Update SUSI Preview.

curl https://$APPETIZE_API_TOKEN@api.appetize.io/v1/apps/mbpprq4xj92c119j7nxdhttjm0 -H 'Content-Type: application/json' -d '{"url":"https://github.com/fossasia/susi_android/raw/apk/susi-debug.apk", "note": "Update SUSI Preview"}'

Summary

This blog covered about how to implement an automatic structure to generate APKs for testing and using that APK to build a preview on websites like appetize.io and then using the APIs provided by them to update the APK after each PR merge in the repo. Check out the resources below to learn more about the topic. So, if you are thinking of contributing to SUSI Android App, this may help you a little in testing the app. But if not, then you can also use the similar technique for your android app as well and ease the life of testers.

Resources

  1. Docs of appetize.io to learn more about the API https://appetize.io/docs
  2. Tutorial on using curl to make API requests https://curl.haxx.se/docs/httpscripting.html
  3. Tutorial on writing basic shell scripts https://ryanstutorials.net/bash-scripting-tutorial/
Continue ReadingAuto Updating SUSI Android APK and App Preview on appetize.io

Creating GUI for configuring SUSI Linux Settings

SUSI Linux app provides access to SUSI on Linux distributions on desktop as well as hardware devices like Raspberry Pi. The settings for SUSI Linux are controlled with the use of a config.json file. You may edit the file manually, but to provide safe configurations, we have a config generator script. You may run the script to configure settings like TTS Engine, STT Engine, authentication, choice about the hotword engine etc. Generally, it is easier to configure application settings through a GUI. Thus, we added a GUI for it using PyGTK and Glade.

Glade is a GUI designer for GNOME based Linux systems. I wrote a blog about how to create user interfaces in Glade and access it from Python code in SUSI Linux. Now, for creating UI for Configuration screen, we need to choose an ideal layout. Glade provides various choices like BoxLayout, GridLayout, FlowBox, ListBox , Notebook etc. Since, we need to display only basic settings options, we select the BoxLayout for this purpose.

BoxLayout as the name suggests, forms a box like arrangement for widgets. You can arrange the widgets in either Landscape or Horizontal Layout. We select Application Window as a top-level container and add a BoxLayout container in it. Now, in each box of the BoxLayout, we need to add the widgets like ComboBox and Switch for user’s choice and a Label. This can be done by using a horizontal BoxLayout with corresponding widgets. After arranging the UI in above described manner, we have a GUI like below.

If you see the current window in the preview now, you will find that the ComboBox do not have any items. We need to define items in the ComboBox using a GTKListStore. You may refer to this video tutorial to see how this can be done.

Now, when we see the preview, our GUI is fully functional. We have options for Speech Recognition Service, Text to Speech Service in ComboBox. Other simple settings are available as switches.

Now, we need to add functionality to our UI. We want our code to be modular and structured, therefore, we declare a ConfigurationWindow class. Though the ideal way to handle such cases is inheriting from the Gtk.Window class, but reading the documentation of PyGTK+ 3, I could not find a way to do this for windows created through Glade. Thus, we will use composition for storing the window object. We add window and other widgets present in the UI as properties of ConfigurationWindow class like this.

class ConfigurationWindow:
   def __init__(self) -> None:
       super().__init__()
       builder = Gtk.Builder()
       builder.add_from_file(os.path.join("glade_files/configure.glade"))

       self.window = builder.get_object("configuration_window")
       self.stt_combobox = builder.get_object("stt_combobox")
       self.tts_combobox = builder.get_object("tts_combobox")
       self.auth_switch = builder.get_object("auth_switch")
       self.snowboy_switch = builder.get_object("snowboy_switch")
       self.wake_button_switch = builder.get_object("wake_button_switch")

Now, we need to connect the Signals from our configuration window to the Handler. We declare the Handler as a nested class in the ConfigurationWindow class because its scope of usage is inside the ConfigurationWindow object. Then you may connect signals to an object of the Handler class.

builder.connect_signals(ConfigurationWindow.Handler(self))

Since we may need to modify the state of the widgets, we hold a reference of the parent ConfigurationWindow object in the Handler and pass the self as a parameter to the Handler. You may read more about using the handlers in my previous blog.

In the Handler, we connect to the config.json file and change the parameters of the the file based on the user inputs on the GUI. We handle it for the Text to Speech selection comboBox in the following manner. We also declare two addition Dialogs for handling the input of credentials by the users for the Watson and Bing services.

def on_stt_combobox_changed(self, combo: Gtk.ComboBox):
   selection = combo.get_active()

   if selection == 0:
       config['default_stt'] = 'google'

   elif selection == 1:
       credential_dialog = WatsonCredentialsDialog(self.config_window.window)
       response = credential_dialog.run()

       if response == Gtk.ResponseType.OK:
           username = credential_dialog.username_field.get_text()
           password = credential_dialog.password_field.get_text()
           config['default_stt'] = 'watson'
           config['watson_stt_config']['username'] = username
           config['watson_stt_config']['password'] = password
       else:
           self.config_window.init_stt_combobox()

       credential_dialog.destroy()

   elif selection == 2:
       credential_dialog = BingCredentialDialog(self.config_window.window)
       response = credential_dialog.run()

       if response == Gtk.ResponseType.OK:
           api_key = credential_dialog.api_key_field.get_text()
           config['default_stt'] = 'bing'
           config['bing_speech_api_key']['username'] = api_key
       else:
           self.config_window.init_stt_combobox()

       credential_dialog.destroy()

Now, we declare two more methods to show and exit the Window.

def show_window(self):
   self.window.show_all()
   Gtk.main()

def exit_window(self):
   self.window.destroy()
   Gtk.main_quit()

Now, we may use the ConfigurationWindow class object anywhere from our code. This modularized approach is better when you need to manage multiple windows as you can just declare the Window of a particular type and show it whenever need in your code.

Resources

  • Glade usage Youtube tutorial: https://www.youtube.com/watch?v=vOGK3TveDDk
  • Creating GUI using PyGTK for SUSI Linux: https://blog.fossasia.org/making-gui-for-susi-linux-with-pygtk/
  • PyGObject Documentation: http://pygobject.readthedocs.io/en/latest/getting_started.html
Continue ReadingCreating GUI for configuring SUSI Linux Settings

Implementing Version Control System for SUSI Skill CMS

SUSI Skill CMS now has a version control system where users can browse through all the previous revisions of a skill and roll back to a selected version. Users can modify existing skills and push the changes. So a skill could have been edited many times by the same or different users and so have many revisions. The version control functionalities help users to :

  • Browse through all the revisions of a selected skill
  • View the content of a selected revision
  • Compare any two selected revisions highlighting the changes
  • Option to edit and rollback to a selected revision.

Let us visit SUSI Skill CMS and try it out.

  1. Select a skill
  2. Click on versions button
  3. A table populated with previous revisions is displayed

  1. Clicking on a single revision opens the content of that version
  2. Selecting 2 versions and clicking on compare selected versions loads the content of the 2 selected revisions and shows the differences between the two.
  3. Clicking on Undo loads the selected revision and the latest version of that skill, highlighting the differences and also an editor loaded with the code of the selected revision to make changes and save to roll back.

How was this implemented?

Firstly, to get the previous revisions of a selected skill, we need the skills meta data including model, group, language and skill name which is used to make an ajax call to the server using the endpoint :

http://api.susi.ai/cms/getSkillHistory.json?model=MODEL&group=GROUP&language=LANGUAGE&skill=SKILL_NAME

We create a new component SkillVersion and pass the skill meta data in the pathname while accessing that component. The path where SkillVersion component is loaded is /:category/:skill/versions/:lang . We parse this data from the path and set our state with skill meta data. In componentDidMount we use this data to make the ajax call to the server to get all previous version data and update our state. A sample response from getSkillHistory endpoint looks like :

{
  "session": {
    "identity": {
      "type": "",
      "name": "",
      "anonymous":
    }
  },
  "commits": [
    {
      "commitRev": "",
      "author_mail": "AUTHOR_MAIL_ID",
      "author": "AUTOR_NAME",
      "commitID": "COMMIT_ID",
      "commit_message": "COMMIT_MESSAGE",
     "commitName": "COMMIT_NAME",
     "commitDate": "COMMIT_DATE"
    },
  ],
  "accepted": TRUE/FALSE
}

We now populate the table with the obtained revision history. We used Material UI Table for tabulating the data. The first 2 columns of the table have radio buttons to select any 2 revisions. The left side radio buttons are for selecting the older versions and the right side radio buttons to select the more recent versions. We keep track of the selected versions through onCheck function of the radio buttons and updating state accordingly.

if(side === 'right'){
  if(!(index >= currLeft)){
    rightChecks.fill(false);
    rightChecks[index] = true;
    currRight = index;
  }
}
else if(side === 'left'){
  if(!(index <= currRight)){
    leftChecks.fill(false);
    leftChecks[index] = true;
    currLeft = index;
  }
}
this.setState({
  currLeftChecked: currLeft,
  currRightChecked: currRight,
  leftChecks: leftChecks,
  rightChecks: rightChecks,
});

Once 2 versions are selected and we click on compare selected versions button, we get the currently selected versions stored from getCheckedCommits function and we are redirected to /:category/:skill/compare/:lang/:oldid/:recentid where we pass the selected 2 revisions commitIDs in the URL.

{(this.state.commitsChecked.length === 2) &&
<Link to={{
  pathname: '/'+this.state.skillMeta.groupValue+
            '/'+this.state.skillMeta.skillName+
            '/compare/'+this.state.skillMeta.languageValue+
            '/'+checkedCommits[0].commitID+
            '/'+checkedCommits[1].commitID,
}}>
  <RaisedButton
    label='Compare Selected Versions'
    backgroundColor='#4285f4'
    labelColor='#fff'
    style={compareBtnStyle}
  />
</Link>
}

SkillHistory Component is now loaded and the 2 selected revisions commitIDs are parsed from the URL pathname. Once we have the commitIDs we make ajax calls to the server to get the code for that particular commit. The skill meta data is also parsed from the URL path which is required to make the server call to getFileAtCommitID.

http://api.susi.ai/cms/getSkillHistory.json?model=MODEL&group=GROUP&language=LANGUAGE&skill=SKILL_NAME&commitID=COMMIT_ID

We make the ajax calls in componentDidMount and update the state with the received data. A sample response from getFileAtCommitID looks like :

{
  "accepted": TRUE/FALSE,
  "file": "CONTENT",
  "session": {
    "identity": {
       "type": "",
       "name": "",
       "anonymous":
    }
  }
}

We populate the code of each revision in an editor. We used react-ace as our editor component where we use the value prop to populate the content and display it in read-only mode.

<AceEditor
  mode='java'
  readOnly={true}
  theme={this.state.editorTheme}
  width='100%'
  fontSize={this.state.fontSizeCode}
  height= '400px'
  value={this.state.commitData[0].code}
  showPrintMargin={false}
  name='skill_code_editor'
  editorProps={{$blockScrolling: true}}
/>

We then show the differences between the 2 selected versions content. To compare and highlight the differences, we used react-diff package which takes in the content of both the commits as inputA and inputB props and we compare character by character using the type chars prop. Here input A is compared with input B. The component compares and returns the highlighted element which we display in a scrollable div preventing overflows.

{/* latest code should be inputB */}
<Diff
  inputA={this.state.commitData[0].code}
  inputB={this.state.commitData[1].code}
  type='chars'
/>

Clicking on Undo then redirects to /:category/:skill/edit/:lang/:latestid/:revertid where latest id is the commitID of the latest revision and revert id is the commitID of the oldest commit ID selected amongst the 2 commits selected initially. This redirects to SkillRollBack component where we again parse the skill meta data and the commit IDs from the URL pathname and call getFileAtCommitID to get the content for the latest and the reverting commit and again populate the content in editor using react-ace and also show the differences using react-diff and finally load the modify skill component where an editor is preloaded with the content of the reverting commit and a similar interface like modify skill is shown where user can edit the content of the reverting commit and push the changes.

let baseUrl = this.getSkillAtCommitIDUrl() ;
let self = this;
var url1 = baseUrl + self.state.latestCommit;
$.ajax({
  url: url1,
  jsonpCallback: 'pc',
  dataType: 'jsonp',
  jsonp: 'callback',
  crossDomain: true,
  success: function (data1) {
    var url2 = baseUrl + self.state.revertingCommit;
    $.ajax({
      url: url2,
      jsonpCallback: 'pd',
      dataType: 'jsonp',
      jsonp: 'callback',
      crossDomain: true,
      success: function (data2) {
        self.updateData([{
        code:data1.file,
        commitID:self.state.latestCommit,
      },{
        code:data2.file,
        commitID:self.state.revertingCommit,
      }])
      }
    });
  }
});

Here, we make nested ajax calls to maintain synchronization and update state after we receive data from both the calls else if we make ajax calls in a loop, then the second ajax call doesn’t wait for the first one to finish and is most likely to fail.

This is how the skill version system was implemented in SUSI Skill CMS. You can find the complete code at SUSI Skill CMS Repository. Feel free to contribute.

Resources:

Continue ReadingImplementing Version Control System for SUSI Skill CMS

Making Skill Display Cards Identical in SUSI.AI Skill CMS

SUSI.AI Skill CMS shows all the skills of SUSI.AI. The cards used to display all the skills follow flexbox structure and adjust their height according to content. This lead to cards of different sizes and this needed to be fixed. This needed to fix as the cards looked like this:

The cards display following things:

  • Image related to skill
  • An example query related to skill in double quotes
  • Name of skill
  • Short description of skill

Now to get all these, we make an ajax call to the following endpoint:

http://api.susi.ai/cms/getSkillList.json?model='+ this.state.modelValue + '&group=' + this.state.groupValue + '&language=' + this.state.languageValue

Explanation:

  • this.state.modelValue: This is the model of the skill, stored in state of component
  • this.state.groupValue: This represents the group to which skill belongs to. For example Knowledge, Communication, Music, and Audio, etc.
  • this.state.languageValue: This represents the ISO language code of language in which skill is defined

Now the response is in JSONP format and it looks like:

Now we parse the response to get the information needed and return the following Card(Material UI Component):

<Link key={el}
     to={{
        pathname: '/' + self.state.groupValue + '/' + el + '/' + self.state.languageValue,
            state: {
                        url: url,
                        element: el,
                        name: el,
                        modelValue: self.state.modelValue,
                        groupValue: self.state.groupValue,
                        languageValue: self.state.languageValue,
                       }
           }}>
           <Card style={styles.row} key={el}>
                <div style={styles.right} key={el}>
                       {image ? <div style={styles.imageContainer}>
                        <img alt={skill_name}
                          src={image}
                          style={styles.image} />
                          </div> :
                         <CircleImage name={el} size='48' />}
                             <div style={styles.titleStyle}>{examples}</div>
                             </div>
                             <div style={styles.details}>
                                 <h3 style={styles.name}>{skill_name}</h3>
                                 <p style={styles.description}>{description}</p>
                             </div>
         </Card>
</Link>

Now the information that leads to non-uniformity in these cards is the skill description. Now to solve this we decided to put a certain limit to the description length and if that limit is crossed, then we will show the following dots: “”. The height and width of the cards were fixed according to screen size and we modified the description as follows:

if (skill.descriptions) {
      if (skill.descriptions.length > 120) {
          description = skill.descriptions.substring(0, 119) + '...';
      }
      else {
          description = skill.descriptions;
      }
}

This way no content was being cut and all the skill cards looks identical:

Resources:

Continue ReadingMaking Skill Display Cards Identical in SUSI.AI Skill CMS

Implementing Author’s Skill Page in SUSI.AI CMS

SUSI.AI Skill CMS is improving every day and we keep adding new features to it. Recently a feature was added to display all the skills by an author. This feature only showed the list of skills. The user might want to visit the skill page to see the description so we linked the skills on the list to skill page. The list looked like this:

We need to link skill name and image to respective skill page. Now since this is react based app, we do not have different URL for different skills due to SPA. The description, images and other relevant details of skills were being passed as props. We needed to have routes through which we can directly access the skill. This was done by implementing child routes for Skill CMS. Earlier the description, images, and other relevant data was being passed as props from the BrowseSkill component, but now we need to derive this from the URL:

let baseUrl = 'http://api.susi.ai/cms/getSkillMetadata.json';           
let modelValue = "general";
this.name = this.props.location.pathname.split('/')[2];
this.groupValue = this.props.location.pathname.split('/')[1];
this.languageValue = this.props.location.pathname.split('/')[3];
url = baseUrl + '?model=' + modelValue + '&group=' + this.groupValue +        '&language=' + this.languageValue + '&skill=' + this.name;

We now make an ajax call to this URL for fetching the data:

$.ajax({
               url: url,
               jsonpCallback: 'pc',
               dataType: 'jsonp',
               jsonp: 'callback',
               crossDomain: true,
               success: function (data) {
                   self.updateData(data.skill_metadata)
               }
           });

This updates the skill page with the description, image, author and other relevant details of the skills. Now all left to do is link the skills on the list to their respective links. This is done by following code:

We define skillURL as:

let skillURL = 'http://skills.susi.ai/' + parse[6] + '/' + parse[8].split('.')[0] + '/' + parse[7];

Here parse is an array which contains model, group and ISO language code of the skill. We updated the Image and text component as:

<a
   href={skillURL} >
   <Img
     style={imageStyle}
     src={[
           image1,
           image2
          ]}
     unloader={<CircleImage name={name} size="40"/>}
                          />
</a>
<a
   href={skillURL}
   className="effect-underline" >
    {name}
</a>

Now after proper styling, we had the following looking skill list by author:

Resources

Continue ReadingImplementing Author’s Skill Page in SUSI.AI CMS

Implementing Internationalization with Weblate Integration on SUSI Web Chat

SUSI Web Chat supports different browser languages on the Chat UI. The content used to render the date/time formats and the text is translated to the preferred language based on the language selected in the Language Settings.

To test it out on SUSI Web Chat, 

  1. Head over to http://chat.susi.ai
  2. Go to settings from the right dropdown.
  3. Set your preferred language inside Language Settings.
  4. Save and see the SUSI Chat render in the preferred language.

To achieve Internationalization, a number of important steps are to be followed –

  1. The best approach to follow would be to use po/pot files and get the translated string from the files. The format of the files can be used as follows. This is a JSON Structure for Javascript Projects. (File : de.json)
{
   "About":"About",
   "Chat":"Chat",
   "Skills":"Skills",
   "Settings":"Settings",
   "Login":"Login",
   "Logout":"Logout",
   "Themes": "Themes",
}


2. After creating the valid po/pot files in the right formats, we create a component which shall translate our text in the selected language and will import that particular string from that po file. To make it easier in Javascript we are using the JSON files that we created here.

3. Our Translate.react.js component is a special component which shall return us only a <span> text which shall get the User’s preferred language from the store and import that particular po/pot file and match the key as text which is being passed to it and give us the translated text. The following code snippet explains the above sentences more precisely.

changeLanguage = (text) => {
        this.setState({
            text:text
        })
  }
  // Here 'de' is the JSON file which we imported into this component
  componentDidMount() {
    let defaultPrefLanguage = this.state.defaultPrefLanguage;
    var arrDe = Object.keys(de);
    let text = this.state.text;
    if(defaultPrefLanguage!=='en-US'){
      for (let key=0;key<arrDe.length;key++) {
          if (arrDe[key]===text) {
              this.changeLanguage(de[arrDe[key]]);
          }
        }
    }
  } 
   render() {
        return <span>{this.state.text}</span>
     }

4. The next step is to bind all the text throughout our components into this <Translate text=” ”/> component which shall send us back the translated content. So any string in any component can be replaced with the following.

<Translate text="About" />

Here the text “About” is being sent over to the Translate.react.js component and it is getting us the German translation of the string About from the file de.json.

5. We then render the Translated content in our Chat UI. (File: Translate.react.js)


About Weblate

Weblate is a Web based translation tool with git integration supporting wide range of file formats and making it easy for translators to contribute. The translations should be kept within the same repository as source code and translation process should closely follow development. To know more about Weblate go to this link.

Integrating SUSI Web Chat with Weblate

  1. First, we deploy Weblate on our localhost using the installation guide given in these docs. I used the pip installation guide for Weblate as mentioned in this link. After doing that we copy weblate/settings_example.py to weblate/settings.py. Then we configure settings.py and use the following command to migrate the settings.
./manage.py migrate
  1. Next step is to create an admin using the following command.
./manage.py createadmin
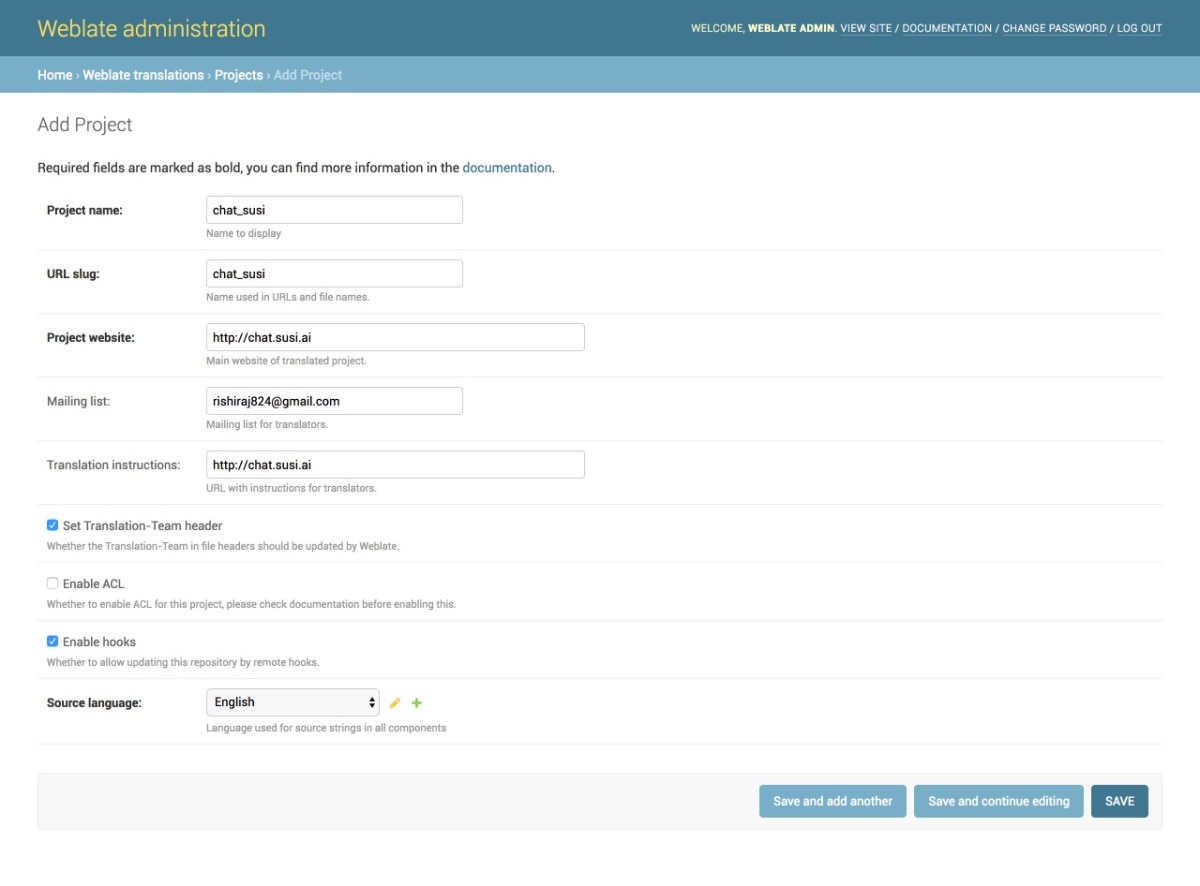
  1. We then add a project from our Admin dashboard by filling details in the following manner as shown in the image
  2. Once the project is added, we add the component to link our Translation files as shown in the image.
  3. Once the files are linked we will see our Overview Project Page and the Information. It can be seen in the image below. The screenshot shows a 100% translation that means all of our strings are translated correctly for German.
  4. To change any translation we make changes and push it to the repository where our SSH key generated from Weblate is added. A full guide to do that is mentioned in this link.
  5. We can push any changes to the repository by making changes in our local. This will generate a commit from the Weblate Admin in our repository as seen in the following screenshot.

Resources

  1. React Internationalization Library  – react-intl
  2. Official Docs about Weblate – Weblate docs.
  3. Format for po/pot files, JSON files etc. – https://docs.weblate.org/en/latest/formats.html#json-and-nested-structure-json-files
  4. Weblate – https://weblate.org
Continue ReadingImplementing Internationalization with Weblate Integration on SUSI Web Chat

Auto Deployment of SUSI Web Chat on gh-pages with Travis-CI

SUSI Web Chat uses Travis CI with a custom build script to deploy itself on gh-pages after every pull request is merged into the project. The build system auto updates the latest changes hosted on chat.susi.ai. In this blog, we will see how to automatically deploy the repository on gh pages.

To proceed with auto deploy on gh-pages branch,

  1. We first need to setup Travis for the project.
  2. Register on https://travis-ci.org/ and turn on the Travis for this repository.

Next, we add .travis.yml in the root directory of the project.

# Set system config
sudo: required
dist: trusty
language: node_js

# Specifying node version
node_js:
  - 6

# Running the test script for the project
script:
  - npm test

# Running the deploy script by specifying the location of the script, here ‘deploy.sh’ 

deploy:
  provider: script
  script: "./deploy.sh"


# We proceed with the cache if there are no changes in the node_modules
cache:
  directories:
    - node_modules

branches:
  only:
    - master

To find the code go to https://github.com/fossasia/chat.susi.ai/blob/master/.travis.yml

The Travis configuration files will ensure that the project is building for every change made, using npm test command, in our case, it will only consider changes made on the master branch.

If one wants to watch other branches one can add the respective branch name in travis configurations. After checking for build passing we need to automatically push the changes made for which we will use a bash script.

#!/bin/bash

SOURCE_BRANCH="master"
TARGET_BRANCH="gh-pages"

# Pull requests and commits to other branches shouldn't try to deploy.
if [ "$TRAVIS_PULL_REQUEST" != "false" -o "$TRAVIS_BRANCH" != "$SOURCE_BRANCH" ]; then
    echo "Skipping deploy; The request or commit is not on master"
    exit 0
fi

# Save some useful information
REPO=`git config remote.origin.url`
SSH_REPO=${REPO/https:\/\/github.com\//git@github.com:}
SHA=`git rev-parse --verify HEAD`

ENCRYPTED_KEY_VAR="encrypted_${ENCRYPTION_LABEL}_key"
ENCRYPTED_IV_VAR="encrypted_${ENCRYPTION_LABEL}_iv"
ENCRYPTED_KEY=${!ENCRYPTED_KEY_VAR}
ENCRYPTED_IV=${!ENCRYPTED_IV_VAR}
openssl aes-256-cbc -K $ENCRYPTED_KEY -iv $ENCRYPTED_IV -in deploy_key.enc -out ../deploy_key -d

chmod 600 ../deploy_key
eval `ssh-agent -s`
ssh-add ../deploy_key

# Cloning the repository to repo/ directory,
# Creating gh-pages branch if it doesn't exists else moving to that branch
git clone $REPO repo
cd repo
git checkout $TARGET_BRANCH || git checkout --orphan $TARGET_BRANCH
cd ..

# Setting up the username and email.
git config user.name "Travis CI"
git config user.email "$COMMIT_AUTHOR_EMAIL"

# Cleaning up the old repo's gh-pages branch except CNAME file and 404.html
find repo/* ! -name "CNAME" ! -name "404.html" -maxdepth 1  -exec rm -rf {} \; 2> /dev/null
cd repo

git add --all
git commit -m "Travis CI Clean Deploy : ${SHA}"

git checkout $SOURCE_BRANCH

# Actual building and setup of current push or PR.
npm install
npm run build
mv build ../build/

git checkout $TARGET_BRANCH
rm -rf node_modules/
mv ../build/* .
cp index.html 404.html

# Staging the new build for commit; and then committing the latest build
git add -A
git commit --amend --no-edit --allow-empty

# Deploying only if the build has changed
if [ -z `git diff --name-only HEAD HEAD~1` ]; then

  echo "No Changes in the Build; exiting"
  exit 0

else
  # There are changes in the Build; push the changes to gh-pages
  echo "There are changes in the Build; pushing the changes to gh-pages"

  # Actual push to gh-pages branch via Travis
  git push --force $SSH_REPO $TARGET_BRANCH
fi

This bash script will enable Travis CI user to push changes to gh pages, for this we need to store the credentials of the repository in encrypted form.

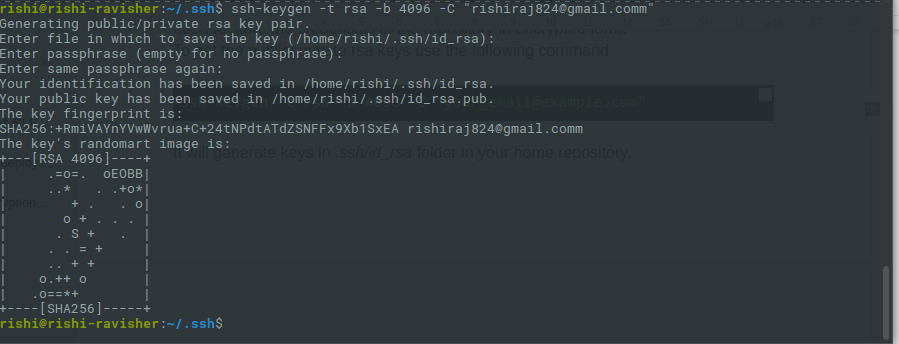
1. To get the public/private rsa keys we use the following command

ssh-keygen -t rsa -b 4096 -C "your_email@example.com"

2.  It will generate keys in .ssh/id_rsa folder in your home repository.

  1. Make sure you do not enter any passphrase while generating credentials otherwise Travis will get stuck at the time of decryption of the keys.
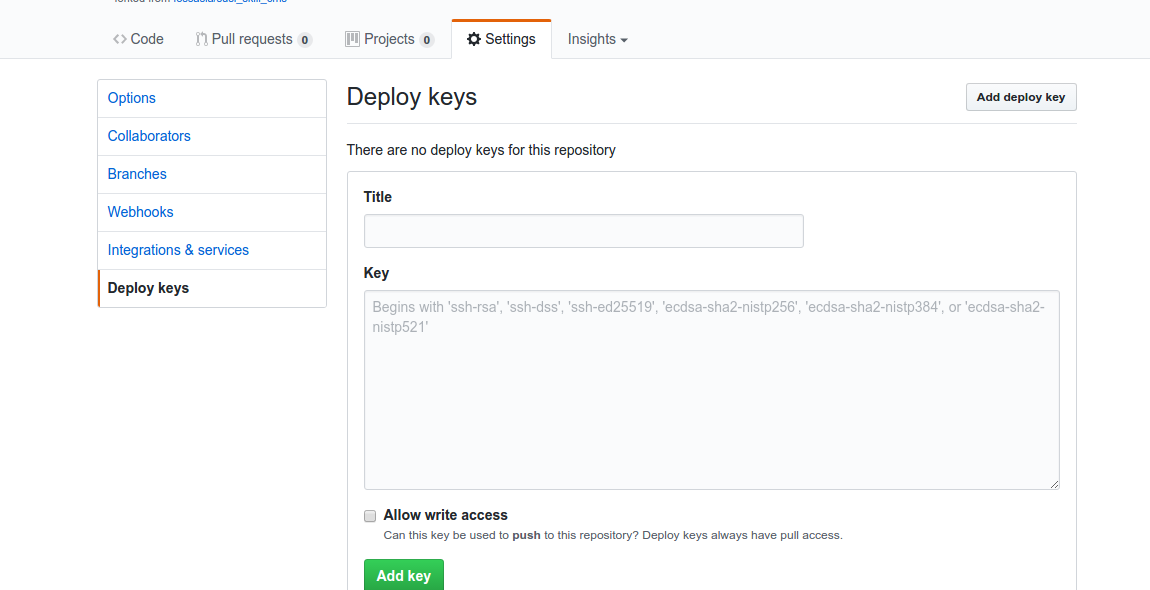
  2. Copy the public key and deploy the key to repository by visiting  

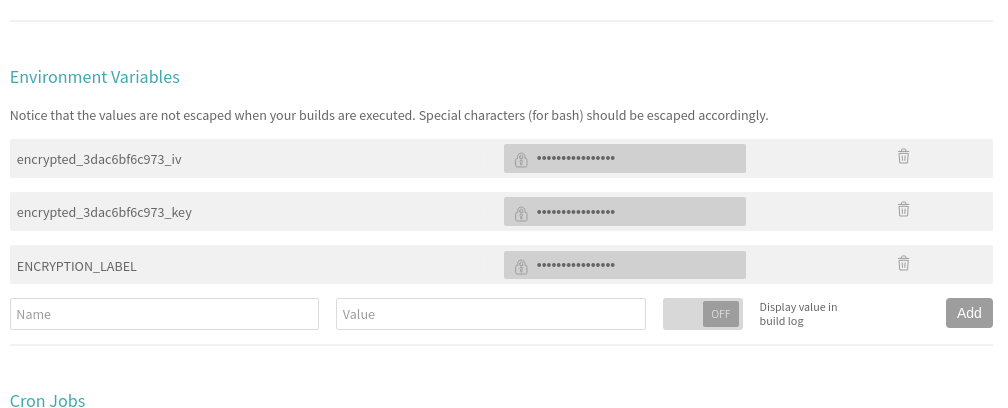
5. We also need to set the environment variable ENCRYPTED_KEY in Travis. Here’s a screenshot where to set it in the Travis repository dashboard.

6. Next, install Travis for encryption of keys.

sudo apt install ruby ruby-dev
sudo gem install travis

7. Make sure you are logged in to Travis, to login use the following command.

travis login

8. Make sure you have copied the ssh to deploy_key and then encrypt your private deploy_key and add it to root of your repository, use command –

travis encrypt-file deploy_key

9. After successful encryption, you will see a message

Please add the following to your build script (before_install stage in your .travis.yml, for instance):

openssl aes-256-cbc -K $encrypted_3dac6bf6c973_key -iv $encrypted_3dac6bf6c973_iv -in deploy_key.enc -out ../deploy_key -d
  1. Add the above-generated deploy_key in Travis and push the changes on your master branch. Do not push the deploy_key only the encryption file i.e., deploy_key.enc
  1. Finally, push the changes and create a Pull request and merge it to test the deployment. Visit Travis logs for more details and debugging.

Resources

Continue ReadingAuto Deployment of SUSI Web Chat on gh-pages with Travis-CI