GET and POST requests

If you wonder how to get or update page resource, you have to read this article.

It’s trivial if you have basic knowledge about HTTP protocol. I’d like to get you little involved to this subject.

So GET and POST are most useful methods in HTTP protocol.

What is HTTP?

Hypertext transfer protocol – allow us to communicate between client and server side. In Open Event project we use web browser as client and for now we use Heroku for server side.

Difference between GET and POST methods

GET – it allows to get data from specified resources

POST – it allows to submit new data to specified resources for example by html form.

GET samples:

For example we use it to get details about event

curl http://open-event-dev.herokuapp.com/api/v2/events/95

Response from server:

Of course you can use this for another needs, If you are a poker player I suppose that you’d like to know how many percentage you have on hand.

curl http://www.propokertools.com/simulations/show?g=he&s=generic&b&d&h1=AA&h2=KK&h3&h4&h5&h6&_

POST samples:

curl -X POST https://example.com/resource.cgi

You can often find this action in a contact page or in a login page.

How does request look in python?

We use Requests library to communication between client and server side. It’s very readable for developers. You can find great documentation  and a lot of code samples on their website. It’s very important to see how it works.

>>> r = requests.get('https://api.github.com/user', auth=('user', 'pass'))
>>> r.status_code
200

I know that samples are very important, but take a look how Requests library fulfils our requirements in 100%. We have decided to use it because we would like to communicate between android app generator and orga server application. We have needed to send request with params(email, app_name, and api of event url) by post method to android generator resource. It executes the process of sending an email – a package of android application to a provided email address.

data = {
    "email": login.current_user.email,
    "app_name": self.app_name,
    "endpoint": request.url_root + "api/v2/events/" + str(self.event.id)
}
r = requests.post(self.app_link, json=data)


Continue ReadingGET and POST requests

Allowing web-user on apache server to run scripts as root

Allowing web-user on apache server to run scripts as root

If you are new to this, you might be wondering, what the hell is a web user anyways?

So let’s say that you need a server which hosts a simple web page and does a particular task based on data entered into that web-page.

The normal way of doing this is to navigate to /var/www/html and place the web page you want to host here.

You also need to put your php script in this folder so that it is accessible from the website.
This php script will take in the data from your web-page and run the necessary commands that you need to be executed on the server.( I am assuming you are not using “The Real Dev Language” for now. :p )

I will be using a simple web page and script that I have made for this post.

<html>
<head>
  <title>Apk Generator</title>
  <meta charset="utf-8">
  <meta http-equiv="X-UA-Compatible" content="IE=edge">
  <meta name="viewport" content="width=device-width, initial-scale=1">
  <link href="https://maxcdn.bootstrapcdn.com/bootstrap/3.3.6/css/bootstrap.min.css" rel="stylesheet" integrity="sha384-1q8mTJOASx8j1Au+a5WDVnPi2lkFfwwEAa8hDDdjZlpLegxhjVME1fgjWPGmkzs7" crossorigin="anonymous">
  <link href='https://fonts.googleapis.com/css?family=Roboto:400,100' rel='stylesheet' type='text/css'>
  <link href="css/main.css" rel="stylesheet">
</head>
<body>
<div class="container"><br><br>
<form name="htmlform" id="form" enctype="multipart/form-data" class="col-md-offset-4 col-xs-offset-2 col-xs-8 col-md-4 form-group generator_form" >
  <label for="name">Email</label>
      <input type="email" class="form-control" id="Email" name="Email">
      <br>
      <input type="hidden" id="theme" name="theme" value="light">

      <label for="name">App's Name</label>
      <input type="text" class="form-control" id="App_Name" name="App_Name">
      <br>
      <label> Choose your data source </label>
      <ul style="list-style-type:none">
        <li><input type="radio" name="datasource" value="jsonupload"> Upload your own JSON files </input></li>
        <li><input type="radio" name="datasource" value="eventapi"> API endpoint of event on OpenEvent </input></li>
      </ul>
      <br>
      <section id="eventapi-input" style="display:none;">
        <label for="apiendpoint">Link to Open Event API endpoint</label>
        <input type="url" class="form-control"
        id="Api_Link" name="Api_Link">
      </section>
      <br>
      <section id="jsonupload-input" style="display:none;">
        <input type="file" name="uploadZip" id="uploadZip" class="form-control"/>
        <br>
      </section>
      <br>
      <input type="hidden" name="assetmode" value="download">
      <center>
        <br>
        <div id="status"></div>
        <br>
<tr>
 <td colspan="5" style="text-align:center">
  <button type="submit">Generate and Download app</button>
</td>
</tr>
</table>
</form>
<script src="https://www.gstatic.com/firebasejs/live/3.0/firebase.js"></script>
<script src="https://code.jquery.com/jquery-3.1.0.min.js"></script>
<script src="https://code.jquery.com/ui/1.12.0/jquery-ui.js"></script>
<script>
  $('input:radio[name="datasource"]').change(
  function() {
    if ($(this).is(':checked')) {

      if ($(this).val() === 'mockjson') {
        $('#jsonupload-input').hide(100);
        $('#eventapi-input').hide(100);
      }

      if ($(this).val() === 'jsonupload') {
        $('#jsonupload-input').show(100);
        $('#eventapi-input').hide(100);
      }

      if ($(this).val() === 'eventapi') {
        $('#eventapi-input').show(100);
        $('#jsonupload-input').hide(100);
      }
    }
  });
  var $ = jQuery;
  var timestamp = Number(new Date());
  var form = document.querySelector("form");
      form.addEventListener("submit", function(event) {
        event.preventDefault();
        var ary = $(form).serializeArray();
        var obj = {};
        for (var a = 0; a < ary.length; a++) obj[ary[a].name] = ary[a].value;
          console.log("JSON",obj);
        if(obj.Email == "" || obj.App_Name ==""){
          alert("It seems like you forgot to fill up your email address or the app's name");
          setTimeout("location.reload(true);", 1);
        }
        else{
	alert("Please wait while we generate the app, meanwhile you can stick around to directly download it.The app will also be emailed to you."); 
            $.ajax({
              type: "POST",
              url: "/test.php",
              data: { timestamp : timestamp },
              success: function(response){
                console.log("Success",response);
                window.location = response;
              }
            });
        }
      });
    </script>
    </div>
</body>
</html>

This is basically a web page with some inputText widgets which accept response and send it to a php file named test.php on the server via an AJAX post.

<?php
if(isset($_POST['timestamp']))
{
    $uid = escapeshellcmd($_POST['timestamp']);
    exec("sudo sh /var/www/email.sh $uid");
}
?>

This php script will call a bash script which in turns an email to me with the user’s timestamp as the subject.

Well, here is where the problem arises, as I am trying to run the bash file as root.

You might wonder as to why is this such a big issue?
Why can’t we do that?

Well, we can surely do that on the server but the point to be noted here is that we are not running this script directly from the server.

We are running it from a web page which is hosted on a server.

So our user here is a web user aka www-data rather than being a root user.

The web user is not provided root access by default, but there are ways to get this done.

Solution 1 :

Allow the web user to run only specific scripts as root.

Please note that this is not a ideal workaround.
Ideally your web user should not have root access in any case.
Since that’s cleared up, lets proceed.

This can be done by editing your sudoers list and adding www-data to it.
Open up your terminal and enter the following command.

sudo visudo

Next up, navigate to the end of the file and add the following command there

www-data = (root) NOPASSWD: /path/to/script.sh

In case you have to execute one script as root which in turn executes some more scripts as root, you don’t need to set the path to all of them over here.
Doing it only for the parent script will do the job.

Solution 2 :

Using SuExec

DigitalOcean blog has a very good article on how to execute python scripts as root via the web user through cgi.

You can go through the article here :https://www.digitalocean.com/community/tutorials/how-to-use-suexec-in-apache-to-run-cgi-scripts-on-an-ubuntu-vps

Well, that was all about my findings on properly handling sudo requirements for your web user on your apache server.

I’ll be adding more solutions as I find them along the way.
Meanwhile feel free to comment below your thoughts, suggestions and queries.

Cheers.

Continue ReadingAllowing web-user on apache server to run scripts as root

Dynamically marshalling output in Flask Restplus

Do you use Flask-Restplus ? Have you felt the need of dynamically modifying API output according to condition. If yes, then this post is for you.

In this post, I will show how to use decorators to restrict GET API output. So let’s start.

This is the basic code to create an API. Here we have created a get_speaker API to get a single item from Speaker model.

from flask_restplus import Resource, Model, fields, Namespace
from models import Speaker

api = Namespace('speakers', description='Speakers', path='/')

SPEAKER = Model('Name', {
	'id': fields.Integer(),
	'name': fields.String(),
	'phone': fields.String()
})

class DAO:
	def get(speaker_id):
		return Speaker.query.get(speaker_id)

@api.route('/speakers/<int:speaker_id>')
class Speaker(Resource):
    @api.doc('get_speaker')
    @api.marshal_with(SPEAKER)
    def get(self, speaker_id):
        """Fetch a speaker given its id"""
        return DAO.get(speaker_id)

Now our need is to change the returned API data according to some condition. Like if user is authenticated then only return phone field of the SPEAKER model. One way to do this is to create condition statements in get method that marshals the output according to the situation. But if there are lots of methods which require this, then this is not a good way.

So let’s create a decorator which can change the marshal decorator at runtime. It will accept parameters as which models to marshal in case of authenticated and non-authenticated cases.

from flask_login import current_user
from flask_restplus import marshal_with

def selective_marshal_with(fields, fields_private):
    """
    Selective response marshalling. Doesn't update apidoc.
    """
    def decorator(func):
        @wraps(func)
        def wrapper(*args, **kwargs):
            if current_user.is_authenticated:
                model = fields
            else:
                model = fields_private
            func2 = marshal_with(model)(func)
            return func2(*args, **kwargs)
        return wrapper
    return decorator

The above code adds a wrapper over the API function which checks if the user is authenticated. If the user is authenticated, fields model is used for marshalling else fields_private is used for marshalling.

So let’s create the private model for SPEAKER. We will call it SPEAKER_PRIVATE.

from flask_restplus import Model, fields

SPEAKER_PRIVATE = Model('NamePrivate', {
	'id': fields.Integer(),
	'name': fields.String()
})

The final step is attaching the selective_marshal_with decorator to the get() method.

@api.route('/speakers/<int:speaker_id>')
class Speaker(Resource):
    @api.doc('get_speaker', model=SPEAKER)
    @selective_marshal_with(SPEAKER, SPEAKER_PRIVATE)
    def get(self, speaker_id):
        """Fetch a speaker given its id"""
        return DAO.get(speaker_id)

You will notice that I removed @api.marshal_with(SPEAKER). This was to disable automatic marshalling of output by flask-restplus. To compensate for this, I have added model=SPEAKER inapi.doc. It will not auto-marshal the output but will still show the swagger documentation.

That concludes this. The get method will now switch marshal field w.r.t to the authentication level of the user. As you may notice, the selective_marhsal_with function is generic and can be used with other models and APIs too.


{{ Repost from my personal blog http://aviaryan.in/blog/gsoc/dynamic-marshal-restplus.html }}

Continue ReadingDynamically marshalling output in Flask Restplus

Sending mails using Sendgrid on Nodejs

The open-event webapp generator project needs to send an email to the user notifying him whenever generating the webapp is finished, containing the links to the preview and zip download.

For sending emails, the easiest service we found we could use was SendGrid  which provides upto 15000 free emails a month for students who have a Github Education Pack. (It anyway provides 10000 free emails to all users).

To use sendgrid, it’s best to use the sendgrid npm module that SendGrid officially builds. To get that installed just use the following command –

npm install --save sendgrid

Also, once you have made an account on Sendgrid, create an API key, and save it as an environment variable (so that your API key is not exposed in your code). For example in our project, we save it in the environment variable SENDGRID_API_KEY
To make it permanent you can add it to your ~/.profile file

export SEDGRID_API_KEY=xxxxxxxxxxxxxxxxxxx

The actual sending takes place in the mailer.js script in our project.

Basically we are using the mail helper class provided in the sendgrid module, and the bare minimum code required to send a mail is as follows

  var helper = require('sendgrid').mail
  from_email = new helper.Email('test@example.com')
  to_email = new helper.Email('test@example.com')
  subject = 'Hello World from the SendGrid Node.js Library!'
  content = new helper.Content('text/plain', 'Hello, Email!')
  mail = new helper.Mail(from_email, subject, to_email, content)
 
  var sg = require('sendgrid')(process.env.SENDGRID_API_KEY);
  var request = sg.emptyRequest({
    method: 'POST',
    path: '/v3/mail/send',
    body: mail.toJSON()
  });
 
  sg.API(request, function(error, response) {
    console.log(response.statusCode)
    console.log(response.body)
    console.log(response.headers)
  })

You need to replace the to and from emails to your requirements.

Also as you can see in our project’s code, if you want to send HTML formatted data, you can change the content type from text/plain to text/html and then add any html content (as a string) into the content.

Continue ReadingSending mails using Sendgrid on Nodejs

Testing Docker Deployment using Travis

Hello. This post is about how to setup automated tests to check if your application’s docker deployment is working or not. I used it extensively while working on the Docker deployment of the Open Event Server. In this tutorial, we will use Travis CI as the testing service.

To start testing your github project for Docker deployment, first add the repo to Travis. Then create a.travis.yml in the project’s root directory.

In that file, add docker to services.

services:
  - docker

The above will enable docker in the testing environment. It will also include docker-compose by default.

Next step is to build your app and run it. Since this is a pre-testing step, we will add it in the install directive.

install:
  - docker build -t myapp .
  - docker run -d -p 127.0.0.1:80:4000 --name myapp myapp

The 4000 in the above text is assuming your app runs on port 4000 inside the container. Also it is assumed that Dockerfile is in the root of the repo.

So now that the docker app is running, it’s time to test it.

script:
  - docker ps | grep -i myapp

The above will test if our app is in one of the running docker processes. It is a basic test to see if the app is running or not.

We can go ahead and test the app’s functionality with some sample requests. Create a file test.py with the following contents.

import requests

r = requests.get('http://127.0.0.1/')
assert 'HomePage' in r.content, 'No homepage loaded'

Then run it as a test.

script:
  - docker ps | grep -i myapp
  - python test.py

You can make use of the unittest module in Python to bundle and create more organized tests. The limit is the sky here.

In the end, the .travis.yml will look something like the following

language: python
python:
  - "2.7"

install:
  - docker build -t myapp .
  - docker run -d -p 127.0.0.1:80:4000 --name myapp myapp

script:
  - docker ps | grep -i myapp
  - python test.py

So this is it. A basic tutorial on testing Docker deployments using the awesome Travis CI service.

Feel free to share it and comment your views.


{{ Repost from my personal blog http://aviaryan.in/blog/gsoc/docker-test.html }}

Continue ReadingTesting Docker Deployment using Travis

Flask-SocketIO Notifications

In the previous post I explained about configuring Flask-SocketIO, Nginx and Gunicorn. This post includes integrating Flask-SocketIO library to display notifications to users in real time.

Flask Config

For development we use the default web server that ships with Flask. For this, Flask-SocketIO fallsback to long-polling as its transport mechanism, instead of WebSockets. So to properly test SocketIO I wanted to work directly with Gunicorn (hence the previous post about configuring development environment). Also, not everyone needs to be bothered with the changes required to run it.

class DevelopmentConfig(Config):
    DEVELOPMENT = True
    DEBUG = True

    # If Env Var `INTEGRATE_SOCKETIO` is set to 'true', then integrate SocketIO
    socketio_integration = os.environ.get('INTEGRATE_SOCKETIO')
    if socketio_integration == 'true':
        INTEGRATE_SOCKETIO = True
    else:
        INTEGRATE_SOCKETIO = False

    # Other stuff

SocketIO is integrated (in development env) if the developer has set the INTEGRATE_SOCKETIO environment variable to “true”. In Production, our application runs on Gunicorn, and SocketIO integration must always be there.

Flow

To send message to a particular connection (or a set of connections) Flask-SocketIO provides Rooms. The connections are made to join a room and the message is sent in the room. So to send message to a particular user we need him to join a room, and then send the message in that room. The room name needs to be unique and related to just one user. The User database Ids could be used. I decided to keep user_{id} as the room name for a user with id {id}. This information (room name) would be needed when making the user join a room, so I stored it for every user that logged in.

@expose('/login/', methods=('GET', 'POST'))
    def login_view(self):
        if request.method == 'GET':
            # Render template
        if request.method == 'POST':
            # Take email and password from form and check if 
            # user exists. If he does, log him in.
            login.login_user(user)

            # Store user_id in session for socketio use
            session['user_id'] = login.current_user.id

            # Redirect

After the user logs in, a connection request from the client is sent to the server. With this connection request the connection handler at server makes the user join a room (based on the user_id stored previously).

@socketio.on('connect', namespace='/notifs')
def connect_handler():
    if current_user.is_authenticated():
        user_room = 'user_{}'.format(session['user_id'])
        join_room(user_room)
        emit('response', {'meta': 'WS connected'})

The client side is somewhat similar to this:

<script src="{{ url_for('static', filename='path/to/socket.io-client/socket.io.js') }}"></script>
<script type="text/javascript">
$(document).ready(function() {
    var namespace = '/notifs';

    var socket = io.connect(location.protocol + "//" + location.host + namespace, {reconnection: false});

    socket.on('response', function(msg) {
        console.log(msg.meta);
        // If `msg` is a notification, display it to the user.
    });
});
</script>

Namespaces helps when making multiple connections over the same socket.

So now that the user has joined a room we can send him notifications. The notification data sent to the client should be standard, so the message always has the same format. I defined a get_unread_notifs method for the User class that fetches unread notifications.

class User(db.Model):
    # Other stuff

    def get_unread_notifs(self, reverse=False):
        """Get unread notifications with titles, humanized receiving time
        and Mark-as-read links.
        """
        notifs = []
        unread_notifs = Notification.query.filter_by(user=self, has_read=False)
        for notif in unread_notifs:
            notifs.append({
                'title': notif.title,
                'received_at': humanize.naturaltime(datetime.now() - notif.received_at),
                'mark_read': url_for('profile.mark_notification_as_read', notification_id=notif.id)
            })

        if reverse:
            return list(reversed(notifs))
        else:
            return notifs

This class method is used when a notification is added in the database and has to be pushed into the user SocketIO room.

def create_user_notification(user, action, title, message):
    """
    Create a User Notification
    :param user: User object to send the notification to
    :param action: Action being performed
    :param title: The message title
    :param message: Message
    """
    notification = Notification(user=user,
                                action=action,
                                title=title,
                                message=message,
                                received_at=datetime.now())
    saved = save_to_db(notification, 'User notification saved')

    if saved:
        push_user_notification(user)

def push_user_notification(user):
    """
    Push user notification to user socket connection.
    """
    user_room = 'user_{}'.format(user.id)
    emit('response',
         {'meta': 'New notifications',
          'notif_count': user.get_unread_notif_count(),
          'notifs': user.get_unread_notifs()},
         room=user_room,
         namespace='/notifs')
Continue ReadingFlask-SocketIO Notifications

Programmer principles

As programmers we develop our programming skills and learn something every single day. We write code and solve many troubles. But is our aim to simply write code? I am sure it is not. I think writing code just for doing it is not interesting, and it’s definitely not Open Event team’s objective. Personally, I like reading code like a poem. We should always try to eliminate bad practises and ugly code. There are a few principles how to do it. Let me share them with you now.

SOLID principle

SOLID  is a mnemonic acronym introduced by Michael Feathers, and it simply means five basic principles of object oriented programming. These principles, when applied together, make it more likely that a programmer will create a system that is easy to maintain and extend over time. They are guidelines that can be applied while working on software to remove code smells by causing the programmer to refactor the software’s source code.  It is also a part of an overall strategy of agile. So, here they are:

S – Single responsibility principle

This principle means that there should never be more than one reason for a class to change.

In other words, a class should have only one potential change in a software’s specification. You should not add everything into your class. The best practise here is to check if the logic you are introducing should be in this class or not. Responsibility is the heart of this principle, so to rephrase there should never be more than one responsibility per class. Use layers for a help. And try to divide big classes into smaller ones.

O – Open/closed principle

Software entities like classes, module and functions should be open for extension, but closed for modification.

All of them should be private by default.

To make an object behaving differently without modifying it use abstractions, or place behavior(responsibility) in derivative classes. If properties of the abstracted class need to be compared or organized together, another abstraction should handle this. This is the basis of the “keep all object variables private” argument.

L – Liskov substitution principle

Functions that use pointers or references to base classes have to be able to use objects of derived classes without knowing/alerting the correctness of a program

A great example you can find here. If you are using a method defined at a base class upon an abstracted class, the function must be implemented properly on the subtype class. A great example provided here http://williamdurand.fr/2013/07/30/from-stupid-to-solid-code/  you can find below.

“ A rectangle is a plane figure with four right angles. It has a width, and a height. Now, take a look at the following pseudo-code:

rect = new Rectangle();

rect.width  = 10;
rect.height = 20;

assert 10 == rect.width
assert 20 == rect.height

We simply set a width and a height on a Rectangle instance, and then we assert that both properties are correct. So far, so good.

Now we can improve our definition by saying that a rectangle with four sides of equal length is called a square. A square is a rectangle so we can create aSquare class that extends the Rectangle one, and replace the first line above by the one below:

rect = new Square();

According to the definition of a square, its width is equal to its height. Can you spot the problem? The first assertion will fail because we had to change the behavior of the setters in the Square class to fit the definition “

I – Interface segregation principle

Many client-specific interfaces are better than one general-purpose interface.

Implementing methods that you don’t use is not recommended in this way. The idea here is to keep your components focused and try to minimize the dependencies between them. Enforcing that principle gives you low coupling, and high cohesion.

D – Dependency inversion principle

This means that “one should depends upon abstractions, do not depend upon concretions”

Interfaces should depend on other interfaces. Don’t add concrete classes to method signatures of an interface. However, use interfaces in your class methods.

So, we can also say that rather than working with classes that are tight coupled, use interfaces. This reduces dependency on implementation specifics and makes code more reusable.

Why SOLID?

I hope all of you understand the importance of using SOLID principles in your everyday code practise. Finally, let me underline again the main arguments why you should starting following them now. The most important thing is that thanks to them you can create easy to maintain software, then you can reuse your code, and finally it helps you to test easier. Do you need anymore to be  persuaded  to do it? I think it’s that’s crucial advantages and they are enough.

Source:

https://pl.wikipedia.org/wiki/SOLID_(programowanie_obiektowe)

https://scotch.io/bar-talk/s-o-l-i-d-the-first-five-principles-of-object-oriented-design

http://williamdurand.fr/2013/07/30/from-stupid-to-solid-code/

http://www.codeproject.com/Articles/60845/The-S-O-L-I-D-Object-Oriented-Programming-OOP-Prin

Continue ReadingProgrammer principles

Mark Notifications Read on Click

Screenshot from 2016-08-01 07:31:22

Notification has become a really important way of informing users about the various activities related to them in web apps. There are different types of notification such as web app notification, email notification, desktop notification, push notification, etc. We are going to primarily talk about web app notification and mainly about how to mark them as read.

Create Notification

Creating a notification is plain and simple. You have a json or an object which stores the notification message corresponding to a particular activity. Whenever that activity occurs in the backend, you call the send notification module, which adds the information to the database and shows it in the notification page. As simple as that.

Screenshot from 2016-08-01 07:48:08

Marking Notification as Read

The main functioning of this is plain and simple as well. You have a URL, which on getting a request from the user, marks the notification as read in the database. That’s it.

Screenshot from 2016-08-01 07:48:17

We know how to do this using a button or a link. But the question here is how to mark a notification as read on clicking any part of the notification?? The obvious answer is, well, put the entire notification inside an anchor tag and you are done, right? Well, it would work in many cases. But what if the design structure is such that this doesn’t work somehow. Somehow enclosing the notification inside a particular anchor tag doesn’t solve the purpose. What do we do then?

Identify Whether Inside a DIV

The main problem here actually is how to identify whether the click is inside the enclosing div or somewhere else. Once we solve this problem, we can send an ajax request to the mark read URL and our job is done.

Screenshot from 2016-08-01 07:52:58

So, to identify that a click is indeed inside a div, we use the event.target property of the event clicked. The target event property returns the element that triggered the event. So we check whether event.target has the “notification” class in our case. If it does not have the “notification” class we check in all it’s parent nodes. We get the parent nodes using the “parent()” function and check whether any of that has notification. If either of the 2 occurs, we consider that the click is inside the div. And thus mark the notification as read.

Screenshot from 2016-08-01 07:51:09

So, once this is done, we mark the notification as read in the backend and our job is done…

Continue ReadingMark Notifications Read on Click

Ticketing System in Open-Event

So we implemented the ticketing system in the open-event. Basically we provide the user with two options – either add his/her own ticket url or use our own ticketing system. If the ticketing module is turned off then there is no option and the user has to add a Ticket URL.

1

2

Thus only Add Ticket URL is shown if the ticketing switch is turned off. However if the ticket switch is turned ON then we display our own ticketing system i.e. provide with an option to choose to the user.

3

Now the ticket feature can be either Free, Paid or by donation. If the ticket feature is free then just the normal ticketing details are entered by the user. However if Paid option is selected then a payment system is displayed to the user  where he/she has to choose the country and the currency in which the user will make the payment.

4

The user can pay through PayPal and we can also decide whether we want to add Tax to the event or not.

Continue ReadingTicketing System in Open-Event

Using Heroku pipelines to set up a dev and master configuration

The open-event-webapp project, which is a generator for event websites, is hosted on heroku. While it was easy and smooth sailing to host it on heroku for a single branch setup, we moved to a 2-branch policy later on. We make all changes to the development branch, and every week once or twice, when the codebase is stable, we merge it to master branch.

So we had to create a setup where  –

master branch –> hosted on –> heroku master

development branch –> hosted on –> heroku dev

Fortunately, for such a setup, Heroku provides a functionality called pipelines and a well documented article on how to implement git-flow


First and foremost, we created two separate heroku apps, called opev-webgen and opev-webgen-dev

To break it down, let’s take a look at our configuration. First step is to set up separate apps in the travis deploy config, so that when development branch is build, it pushed to open-webgen-dev and when master is built, it pushes to opev-webgen app. The required lines as you can see are –

https://github.com/fossasia/open-event-webapp/blob/master/.travis.yml#L25

https://github.com/fossasia/open-event-webapp/blob/development/.travis.yml#L25

Now, we made a new pipeline on heroku dashboard, and set opev-webgen-dev and opev-webgen in the staging and production stages respectively.

Screenshot from 2016-07-31 04-33-30 Screenshot from 2016-07-31 04-34-41

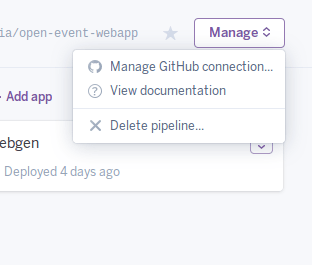
Then, using the “Manage Github Connection” option, connect this app to your github repo.

Screenshot from 2016-07-31 04-36-17

Once you’ve done that, in the review stage of your heroku pipeline, you can see all the existing PRs of your repo. Now you can set up temporary test apps for each PR as well using the Create Review App option.

Screenshot from 2016-07-31 04-37-38

So now we can test each PR out on a separate heroku app, and then merge them. And we can always test the latest state of development and master branches.

Continue ReadingUsing Heroku pipelines to set up a dev and master configuration