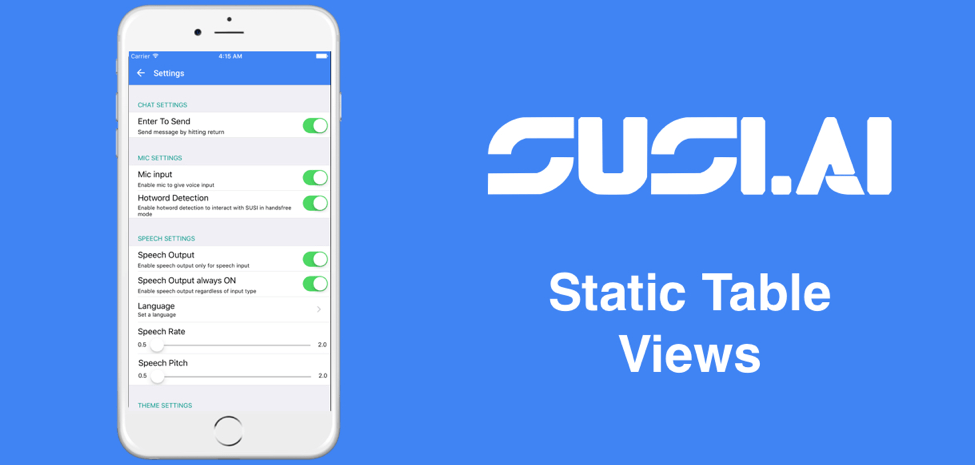
Settings Controller UI using Static Table View

Dynamic Table Views are used at places where there may be any kind of reusability of cells. This means that there would exist cells that would have the same UI elements but would differ in the content being displayed. Initially the Settings Controller was built using UICollectionViewController which is completely dynamic but later I realized that the cells will remain static every time so there is no use of dynamic cells to display the UI hence, I switched to static table view cells. Using Static Table View is very easy. In this blog, I will explain how the implementation of the same was achieved in SUSI iOS app.

Let’s start by dragging and dropping a UITableViewController into the storyboard file.

The initial configuration of the UITableView has content as Dynamic Prototypes but we need Static cells so we choose them and make the sections count to 5 to suit our need. Also, to make the UI better, we choose the style as Grouped.

Now for each section, we have the control of statically adding UI elements so, we add all the settings with their corresponding section headers and obtain the following UI.


After creating this UI, we can refer any UI element independently be it in any of the cells. So here we create references to each of the UISlider and UISwitch so that we can trigger an action whenever the value of anyone of them changes to get their present state.

To create an action, simply create a function and add `@IBAction` in front so that they can be linked with the UI elements in the storyboard and then click and drag the circle next to the function to UI element it needs to be added. After successful linking, hovering over the same circle would reveal all the UI elements which trigger that function. Below is a method with the @IBAction identifier indicating it can be linked with the UI elements in the storyboard. This method is executed whenever any slider or switch value changes, which then updates the UserDefaults value as well sends an API request to update the setting for the user on the server.

@IBAction func settingChanged(sender: AnyObject?) {
        var params = [String: AnyObject]()
        var key: String = ""

        if let senderTag = sender?.tag {
            if senderTag == 0 {
                key = ControllerConstants.UserDefaultsKeys.enterToSend
            } else if senderTag == 1 {
                key = ControllerConstants.UserDefaultsKeys.micInput
            } else if senderTag == 2 {
                key = ControllerConstants.UserDefaultsKeys.hotwordEnabled
            } else if senderTag == 3 {
                key = ControllerConstants.UserDefaultsKeys.speechOutput
            } else if senderTag == 4 {
                key = ControllerConstants.UserDefaultsKeys.speechOutputAlwaysOn
            } else if senderTag == 5 {
                key = ControllerConstants.UserDefaultsKeys.speechRate
            } else if senderTag == 6 {
                key = ControllerConstants.UserDefaultsKeys.speechPitch
            }

            if let slider = sender as? UISlider {
                UserDefaults.standard.set(slider.value, forKey: key)
            } else {
                UserDefaults.standard.set(!UserDefaults.standard.bool(forKey: key), forKey: key)
            }

            params[ControllerConstants.key] = key as AnyObject
            params[ControllerConstants.value] = UserDefaults.standard.bool(forKey: key) as AnyObject

            if let delegate = UIApplication.shared.delegate as? AppDelegate, let user = delegate.currentUser {
                params[Client.UserKeys.AccessToken] = user.accessToken as AnyObject
                params[ControllerConstants.count] = 1 as AnyObject

                Client.sharedInstance.changeUserSettings(params) { (_, message) in
                    DispatchQueue.main.async {
                        self.view.makeToast(message)
                    }
                }
            }
        }
    }

References

Continue ReadingSettings Controller UI using Static Table View

Making SUSI Alexa skill as an express app

Previously SUSI Alexa skill was deployed using AWS Lambda service (Refer to this blog). Each SUSI.AI Bot should be deployed on Google cloud using Kubernetes. To accomplish that, we need to remove the dependency of the SUSI Alexa skill from AWS Lambda service. We need to make it an express app, to be able to deploy it to Google cloud. Let’s start with on how to achieve it:

SUSI Alexa skill:

We require three files to make the skill as an express app. The main entry point for the skill would be server.js file, which will serve the incoming request using two helper files alexa.js and handlers.js.

Server.js:

This file acts as the main entry point for the incoming request. We handle two type of requests using it, that are:

  1. Launch request
  2. Intent request

Launch request is triggered when a person utters “Alexa, open susi chat” , “Alexa, start susi chat”, “Alexa, launch susi chat” etc. This request is responded with an introductory phrase about SUSI.AI. To catch this request:

if (type === "LaunchRequest") {
        var endpoint = "http://api.susi.ai/susi/chat.json?q="+"Welcome"; // ENDPOINT GOES HERE
        
        http.get(endpoint, (response1) => {
            var body = "";
            response1.on("data", (chunk) => { body += chunk; });
            response1.on("end", () => {
                var viewCount;
                viewCount = JSON.parse(body).answers[0].actions[0].expression;
                endpoint = "http://api.susi.ai/susi/chat.json?q="+"Get+started"; // ENDPOINT GOES HERE
                body = "";
                http.get(endpoint, (response2) => {
                    response2.on("data", (chunk) => { body += chunk; });
                    response2.on("end", () => {
                        viewCount += JSON.parse(body);.answers[0].actions[0].expression;
                        response.say(viewCount,false);
                    });
                });
            });
        });
    }

Intent request gets triggered, when any other phrase is uttered by the user except Launch related phrases. We check if the intent triggered has a corresponding handler to handle the request. If the handler is found in handlers.js file, we call it passing the required arguments to the handler function. Let’s see how handlers make this step possible.

Handler.js:

This file decides on what function to run when a particular type of intent is triggered. As we have just one intent for our SUSI Alexa skill i.e. callSusiApi, we have just one function in our handlers.js file. During its execution, the first step we do is extract the query value:

let query = slots.query.value;

Depending upon the query value, we run its corresponding code. For example, in case of a generic query (i.e. any query except stop, cancel and help):

var endpoint = "http://api.susi.ai/susi/chat.json?q="+query; // ENDPOINT GOES HERE

http.get(endpoint, (response1) => {
    var body = "";
    response1.on("data", (chunk) => { body += chunk; });
    response1.on("end", () => {
        var data = JSON.parse(body);
        if(data.answers[0].actions[1]){
            // handle rss and table type results
        }
        else
        {
            viewCount = data.answers[0].actions[0].expression;
        }
        response.say(viewCount,true);
    });
});

At the end of the function we respond to the user with an answer to his/her query using:

response.say(viewCount,true);

Alexa.js:

When we get a request from the user, we pass that request and response object to this file. This file helps us wrap the required request properties into an object and return that back to the server file, which was the entry point for the request. Now, we can easily extract the properties in server file and work with those:

We extract the properties like this:

let session = req.body.session,
        intent,
        slots;
session.attributes = session.attributes || {};

if (req.body.request.intent) {
    intent = req.body.request.intent.name;
    slots = req.body.request.intent.slots;
}

Then we return the object back at the end:

return {
        type: req.body.request.type,
        intent: intent,
        slots: slots,
        session: session,
        response: {
            say: (text, shouldEndSession) => say(text, shouldEndSession),
            ask: (text, shouldEndSession) => say(text, shouldEndSession)
        }
    };

Great, we have made the SUSI Alexa skill as an express app. The next step is to do some changes in the configuration tab of our skill:

  1. Instead of Amazon resource number, we fill our webhook address here: 

  2. A new property shows up that is SSL certificate. As we are using Heroku for webhook services, we select the second option as shown below: 

  3. It’s time to test the skill: 

    This repository by Salesforce helped me a lot in making the SUSI skill as an express app.

    Resources:

    1. Developing Alexa Skills Locally with Node.js by Josh Skeen from Bignerdranch.
    2. Amazon Alexa Skills: Create a Custom Skill by Simon Coope from SJCNET.
Continue ReadingMaking SUSI Alexa skill as an express app

Implementing Roles API on Open Event Frontend to Create Roles Using an External Modal

This blog article will illustrate how the roles are created via the external model  on the admin permissions page in Open Event Frontend, using the roles API. Our discussion primarily will involve the admin/permissions/index route to illustrate the process.The primary end point of Open Event API with which we are concerned with for fetching the permissions  for a user is

POST /v1/roles

First we need to create a model for the user-permissions, which will have the fields corresponding to the api, so we proceed with the ember CLI command:

ember g model role

Next we define the model according to the requirements. The model needs to extend the base model class, and has only two fields one for the title and one for the actual name of the role.

import attr from 'ember-data/attr';
import ModelBase from 'open-event-frontend/models/base';

export default ModelBase.extend({
 name           : attr('string'),
 titleName      : attr('string')
 });

Next we need to modify the existing modal to incorporate the API and creation of roles in it. It is very important to note here that using createRecord as the model will result in a major flaw. If createRecord is used and the user tries to create multiple roles, other than the first POST request all the subsequent requests will be PATCH requests and will keep on modifying the same role. To avoid this, a new record needs to be created every time the user clicks on Add Role.  We slightly modify the modal component call to pass in the name and titleName to it.

{{modals/add-system-role-modal  isOpen=isAddSystemRoleModalOpen
                                isLoading=isLoading
                                name=name
                                titleName=titleName
                                addSystemRole=(action 'addSystemRole')}}

Upon entering the details of the roles and successful validation of the form, if the user clicks the Add Role button of the modal, the action addSystemRole will be triggered. We will write the entire logic for the same in the respective controller of the route.

addSystemRole() {
     this.set('isLoading', true);
     this.get('store').createRecord('role', {
       name      : this.get('name'),
       titleName : this.get('titleName')
     }).save()
       .then(() => {
         this.set('isLoading', false);
         this.notify.success(this.l10n.t('User permissions have 
         been saved successfully.'));
         this.set('isAddSystemRoleModalOpen', false);
         this.setProperties({
           name          : null,
           roleTitleName : null
         });
       })
       .catch(()=> {
         this.set('isLoading', false);
         this.notify.error(this.l10n.t('An unexpected error has occurred.
         User permissions not saved.'));
       });
   },

At first the isLoading property is made true.This adds the semantic UI class loading to the the form,  and so the form goes in the loading state, Next, a record is created of the type role  and it’s properties are made equal to the corresponding values entered by the user.

Then save() is called, which subsequently makes a POST request to the server. If the request is successful the modal is closed by setting the isAddSystemRoleModalOpen property to false. Also, the fields of the modal are cleared for a  better user experience in case multiple roles need to be added one after the other.

In cases when  there is an error during the processing of the request the catch() block executes. And the modal is not closed. Neither are the fields cleared.

Resources

Continue ReadingImplementing Roles API on Open Event Frontend to Create Roles Using an External Modal

Export Sensor Data from the PSLab Android App

The PSLab Android App allows users to log data from the sensors connected to the PSLab hardware device. Sensor Data is stored locally but can be exported in various formats. Currently the app supports exporting data in .txt and .csv (comma-separated values) format. Exported data can be used by other users or scientists to study or analyze the data. Data can also be used by other softwares like Python, GNU octave, Matlab to further process it or visualise it in 3D. In this post, we will discuss how to export the locally stored realm data in .txt or .csv format. We will take the data of MPU6050 sensor as an example for understanding how locally logged data is exported.

Query Local Realm Data

We have attached a long click listener to sensor list view that detects which list item is selected. Clicking any sensor from sensor list for slightly longer than usual would result in a dialog popping up with the option to

  • Export Data: Results in exporting data in a format which is selected in App settings
  • Share Data: Shares sensor data with other users or on social media (yet to be implemented)
Source: PSLab Android App

As soon as the Export Data option is selected from the dialog, sensor data of the corresponding sensor is queried. The data model of the sensor and how it’s saved in the local realm database is discussed in the post Sensor Data Logging in the PSLab Android App.

RealmResults<DataMPU6050> results = realm.where(DataMPU6050.class).findAll();

Once we get the required data, we need to write it in .txt or .csv format depending on what the user has selected as a preference in App Settings.

Getting User Preference from App Settings

The format in which the sensor data should be exported is presented to the user as a preference in App Settings. Currently the app supports two formats .txt and .csv.

Source: PSLab Android App
private String format;
SharedPreferences preferences = PreferenceManager.getDefaultSharedPreferences(this);
String formatValue = preferences.getString("export_data_format_list", "0");
if ("0".equals(formatValue))
   format = "txt";
else
   format = "csv";

Export Data in .txt Format

To export the sensor data in .txt format, we need to create a .txt file in the external storage. folder variable is a path to PSLab Android folder in the external storage. If the folder doesn’t exist, it will be created.

File folder = new File(Environment.getExternalStorageDirectory() + File.separator + "PSLab Android");

After getting reference of the app folder in the external storage, we would create a text file in the PSLab Android folder. As soon as the text file is created, we initialize the FileOutputStream object to write data into the text file. The sensor data that was queried in the previous section is written into the text file just created. Finally after the complete sensor data is written, the stream is closed by stream.close() method.

FileOutputStream stream = null;
File file = new File(folder, "sensorData.txt");
try {
   stream = new FileOutputStream(file);
   for (DataMPU6050 temp : results) {
       stream.write((String.valueOf(temp.getAx()) + " " + temp.getAy() + " " + temp.getAz() + " " +
               temp.getGx() + " " + temp.getGy() + " " + temp.getGz() + " " + temp.getTemperature() + "\n").getBytes());
   }
} catch (IOException e) {
   e.printStackTrace();
} finally {
   try {
       if (stream != null) {
           stream.close();
       }
   } catch (IOException e) {
       e.printStackTrace();
   }
}

Export Data in .csv Format

Writing data in .csv format is similar to that in .txt format. As CSV stands for Comma Separated Values, which means each data value is separated by “,” (comma). It is similar to an excel sheet. The first row consists of labels that denote the type of value in that particular column. The other rows consist of the sensor data, with each row corresponding to a sample of the sensor data.

File file = new File(folder, "sensorData.csv");
PrintWriter writer;
try {
   writer = new PrintWriter(file);
   StringBuilder stringBuilder = new StringBuilder();
   stringBuilder.append("Ax,Ay,Ax,Gx,Gy,Gz,Temperature\n");
   for (DataMPU6050 temp : results) {
       stringBuilder.append(String.valueOf(temp.getAx()));
       stringBuilder.append(',');
       stringBuilder.append(String.valueOf(temp.getAy()));
       stringBuilder.append(',');
       stringBuilder.append(String.valueOf(temp.getAz()));
       stringBuilder.append(',');
       stringBuilder.append(String.valueOf(temp.getGx()));
       stringBuilder.append(',');
       stringBuilder.append(String.valueOf(temp.getGy()));
       stringBuilder.append(',');
       stringBuilder.append(String.valueOf(temp.getGz()));
       stringBuilder.append(',');
       stringBuilder.append(String.valueOf(temp.getTemperature()));
       stringBuilder.append('\n');
   }
   writer.write(stringBuilder.toString());
   writer.close();
} catch (FileNotFoundException e) {
   e.printStackTrace();
}

Resources

Continue ReadingExport Sensor Data from the PSLab Android App

Giving Offline Support to the Open Event Organizer Android App

Open Event Organizer is an Android Application for Event Organizers and Entry Managers which uses Open Event API Server as a backend. The core feature of the App is to scan a QR code to validate an attendee’s check in. The App maintains a local database and syncs it with the server. The basic workflow of the attendee check in is – the App scans a QR code on an attendee’s ticket. The code scanned is processed to validate the attendee from the attendees database which is maintained locally. On finding, the App makes a check in status toggling request to the server. The server toggles the status of the attendee and sends back a response containing the updated attendee’s data which is updated in the local database. Everything described above goes well till the App gets a good network connection always which cannot be assumed as a network can go down sometimes at the event site. So to support the functionality even in the absence of the network, Orga App uses Job Schedulers which handle requests in absence of network and the requests are made when the network is available again. I will be talking about its implementation in the App through this blog.

The App uses the library Android-Job developed by evernote which handles jobs in the background. The library provides a class JobManager which does most of the part. The singleton of this class is initialized in the Application class. Job is the class which is where actually a background task is implemented. There can be more than one jobs in the App, hence the library requires to implement JobCreator interface which has create method which takes a string tag and the relevant Job is returned. JobCreator is passed to the JobManager in Application while initialization. The relevant code is:

JobManager.create(this).addJobCreator(new OrgaJobCreator());

Initialization of JobManager in Application class

public class OrgaJobCreator implements JobCreator {
   @Override
   public Job create(String tag) {
       switch (tag) {
           case AttendeeCheckInJob.TAG:
               return new AttendeeCheckInJob();
           default:
               return null;
       }
   }
}

Implementation of JobCreator

public class AttendeeCheckInJob extends Job {
   ...
   ...
   @NonNull
   @Override
   protected Result onRunJob(Params params) {
       ...
       ...
       Iterable<Attendee> attendees = attendeeRepository.getPendingCheckIns().blockingIterable();
       for (Attendee attendee : attendees) {
           try {
               Attendee toggled = attendeeRepository.toggleAttendeeCheckStatus(attendee).blockingFirst();
               ...
           } catch (Exception exception) {
               ...
               return Result.RESCHEDULE;
           }
       }
       return Result.SUCCESS;
   }

   public static void scheduleJob() {
       new JobRequest.Builder(AttendeeCheckInJob.TAG)
           .setExecutionWindow(1, 5000L)
           .setBackoffCriteria(10000L, JobRequest.BackoffPolicy.EXPONENTIAL)
           .setRequiredNetworkType(JobRequest.NetworkType.CONNECTED)
           .setRequirementsEnforced(true)
           .setPersisted(true)
           .setUpdateCurrent(true)
           .build()
           .schedule();
   }
}

Job class for attendee check in job

To create a Job, these two methods are overridden. onRunJob is where the actual background job is going to run. This is the place where you implement your job logic which should be run in the background. In this method, the attendees with pending sync are fetched from the local database and the network requests are made. On failure, the same job is scheduled again. The process goes on until the job is done. scheduleJob method is where the related setting options are set. This method is used to schedule an incomplete job.

So after this implementation, the workflow described above is changed. Now on attendee is found, it is updated in local database before making any request to the server and the attendee is flagged as pending sync. Accordingly, in the UI single tick is shown for the attendee which is pending for sync with the server. Once the request is made to the server and the response is received, the pending sync flag of the attendee is removed and double tick is shown against the attendee.

Links:
1. Documentation for Android-Job Library by evernote
2. Github Repository of Android-Job Library

Continue ReadingGiving Offline Support to the Open Event Organizer Android App

How Switch Case improve performance in PSLab Saved Experiments

PSLab android application contains nearly 70 experiments one can experiment on using the PSLab device and the other necessary circuit components and devices. These experiments span over areas such as Electronics, Electrical, Physical and High school level. All these experiments are accessible via an android adapter in the repository named “PerformExperimentAdapter”. This adapter houses a tab view with two different tabs; one for the experiment details and the other for actual experiment and resultant graphs.

The adapter extends an inbuilt class FragmentPagerAdapter;

public class PerformExperimentAdapter extends FragmentPagerAdapter

This class displays every page attached to its viewpager as a fragment. The good thing about using fragments is that they have a recyclable life cycle. Rather than creating new views for every instance of an experiment, the similar views can be recycled to use once again saving resources and improving performance. FragmentPagerAdapter needs to override a method to display the correct view on the tab select by user.

@Override
public Fragment getItem(int position) {

}

Depending on the value of position, relevant experiment documentation and the experiment implementation fragments are displayed determined using the experiment title. Performance can be critical in this place as if it takes too long to process and render a fragment, user will feel a lag.

The previous implementation was using consecutive if statements.

@Override
public Fragment getItem(int position) {
   switch (position) {
       case 0:
           if (experimentTitle.equals(context.getString(R.string.diode_iv)))
               return ExperimentDocFragment.newInstance("D_diodeIV.html");
           if (experimentTitle.equals(context.getString(R.string.zener_iv)))
               return ExperimentDocFragment.newInstance("D_ZenerIV.html");
           ...
       case 1:
           if (experimentTitle.equals(context.getString(R.string.diode_iv)))
               return ZenerSetupFragment.newInstance();
           if (experimentTitle.equals(context.getString(R.string.zener_iv)))
               return DiodeExperiment.newInstance(context.getString(R.string.half_wave_rectifier));
           ...
       default:
           return ExperimentDocFragment.newInstance("astable-multivibrator.html");
   }
}

This setup was suitable for applications where there is less than around 5 choices to chose between. As the list grows, the elements in the end of the if layers will take more time to load as each of the previous if statements need to be evaluated false in order to reach the bottom statements.

This is when this implementation was replaced using switch case statements instead of consecutive if statements. The theory behind the performance improvement involves algorithm structures; Hash Tables

Hash Tables

Hash tables use a hash function to calculate the index of the destination cell. This operation on average has a complexity of O(1) which means it will take the same time to access any two elements which are randomly positioned.

This is possible because java uses the hash code of the string to determine the index where the target is situated at. This way it is much faster than consecutive if statement calls where in the worst case it will take O(n) time to reach the statement causing a lag in the application.

Current application uses switch cases in the PerformExperimentAdapter;

@Override
public Fragment getItem(int position) {
   switch (position) {
       case 0:
           switch (experimentTitle) {
               case "Diode IV Characteristics":
                   return ExperimentDocFragment.newInstance("D_diodeIV.html");
               case "Zener IV Characteristics":
                   return ExperimentDocFragment.newInstance("D_ZenerIV.html");
               case "Half Wave Rectifier":
                   return ExperimentDocFragment.newInstance("L_halfWave.html");
           }
       case 1:
           switch (experimentTitle) {
               case "Diode IV Characteristics":
                   return ZenerSetupFragment.newInstance();
               case "Zener IV Characteristics":
                   return ZenerSetupFragment.newInstance();
               case "Half Wave Rectifier":
                   return DiodeExperiment.newInstance(context.getString(R.string.half_wave_rectifier));
           }
       default:
           return ExperimentDocFragment.newInstance("astable-multivibrator.html");
   }
}

There is one downfall in using switch case in the context. That is the inability to use string resources directly as Java requires a constant literals in the evaluation statement of a case.

Resources:

Continue ReadingHow Switch Case improve performance in PSLab Saved Experiments

Coloring Waveforms in PSLab Charts

Charts are used to display set of data in an analytical manner such that an observer can easily come to a conclusion by just looking at it without having to go through all the numerical data sets. Legends are used to differentiate a set of data set from another set. Generally, different colors and different names are used to form a legend in a chart.

MPAndroidChart is an amazing library with the capability of generating different types of graphs in an Android device. In PSLab several user interfaces are implemented using LineCharts to display different waveforms such as readings from channels attached to PSLab device, logic levels etc.

When several data sets are being plotted on the same graph area, legends are used. In PSLab Android application, Oscilloscope supports four different type of waveforms to be plotted on the same graph. Logic Analyzer implements one to four different types of logic level waveforms on the same plot. To identify which is which, legends with different colors can be used rather than just the names. For the legends to have different colors, it should be explicitly set which color should be held by which data set. Otherwise it will use the default color to all the legends making it hard to differentiate data lines when there are more than one data set is plotted.

Assume a data set is generated from a reading taken from a probe attached to PSLab device. The set will be added as an Entry to an array list as follows;

ArrayList<Entry> dataSet = new ArrayList<Entry>();

The next step will be to create a Line Data Set

LineDataSet lineData = new LineDataSet(dataSet, "DataSet 1");

This LineDataSet will contain sample values of the waveform captured by the microprocessor. A LineDataSet object support many methods to alter its look and feel. In order to set a color for the legend, setColor() method will be useful. This method accepts an integer as the color. This method can be accessed as follows;

lineData.setColor(Color.YELLOW);

MPAndroidChart provides different sets of colors under ColorTemplate. This class has several predefined colors with five colors in each color palette are added by the developers of the library and they can be accessed using the following line of code by simply calling the index value of the palette array list.

set1.setColor(ColorTemplate.JOYFUL_COLORS[0]);

Set of color palettes available in the ColorTemplate class are;

  1. LIBERTY_COLORS
  2. JOYFUL_COLORS
  3. PASTEL_COLORS
  4. COLORFUL_COLORS
  5. VORDIPLOM_COLORS
  6. MATERIAL_COLORS

The following demonstrates how the above activities produce a line chart with three different data sets with different colored legends.

This implementation can be used to enhance the readability of the waveforms letting user being able to differentiate between one waveform from another in PSLab Android application.

Resources:

PSLab official web site: https://pslab.fossasia.org/

Continue ReadingColoring Waveforms in PSLab Charts

Resend SUSI.AI Account Verification Link

In this blog post, I’ll be telling on how to resend SUSI account verification link via SUSI-server.

Below given is a small code snippet from signup servlet.

String token = createRandomString(30);
			ClientCredential access_token = new ClientCredential(ClientCredential.Type.access_token, token);
			Authentication tokenAuthentication = DAO.getAuthentication(access_token);
			tokenAuthentication.setIdentity(identity);
			tokenAuthentication.setExpireTime(7 * 24 * 60 * 60);
			tokenAuthentication.put("one_time", true);

This piece of code generates a random string of length 30 characters, which is marked as token against the user who just signed up. Looking closely, the reader will realize that this token will expire after 7*24*60*60 seconds, i.e. 7 days later. As soon as a user signs up, they are registered in authentication file, hence signing up again is not an option in case token expires.

A user not verified will be using this feature, So minimal user role is defined as ANONYMOUS. Clients have to make a request at below given API endpoint to trigger resend verification link with e-mail id of the user as ‘emailid’ GET or POST parameter.

http://api.susi.ai/aaa/resendVerificatiionLink.json

As a first step, server checks if the request contains ‘emailid’ parameter with length  > 0 or if a blank parameter is sent. If any of the 2 is true, server responds with error code 422 and error message “No email id provided!”. Otherwise, a client identity is generated in the following manner.

ClientCredential credential = new ClientCredential(ClientCredential.Type.passwd_login, emailId);
        Authentication authentication = DAO.getAuthentication(credential);
        if (authentication.getIdentity() == null) {
            throw new APIException(422, "Invalid email id. Please Sign up!");
        }

Using the email id received, an object of ClientCredential class is made with credential type as passwd_login which in turn serves as a parameter to get an authentication object. This servlet is particularly for those users who have already signed up but are not verified. This means user email must be present in the database. The authentication object will look back into database and search if user exist or not. If user email id is absent, error code 422 with error message         “Invalid email id. Please Sign up!”. This is how the verification link looks like :

http://api.asksusi.com/aaa/signup.json?access_token={30 characters long token}&validateEmail={user email id}&request_session=true
  • access _token —> access token
  • validateEmail —> email id of the user
  • request_session —> boolean value to request a session

Server in the above similar manner generates client credential object, retrieves an authentication object and marks user as activated. Please look at the code below for better understanding.

if((auth.getIdentity().getName().equals(post.get("validateEmail", null)) && auth.getIdentity().isEmail()) || permissions.getBoolean("activate", false)) { 
//other required tests and conditions 
authentication.put("activated", true);
// JSON object to notify client				
return new ServiceResponse(result);
}

We will stick to the very basic requirements for this servlet. Next we need to check if user is already verified or not. If yes, throw an error to the client with error message as  “User already verified!”

if (authentication.getBoolean("accepted", false)) {
            throw new APIException(422, "User already verified!");
        }

If all the tests passed, by now server is sure that it is a valid request to resend account verification link. Server finally generates a random string which it marks as the new token for the user, set its new expiry time and an email is sent to user (with support from EmailHandler class )with new token encoded in it.

Additional Resources

  1. Email handler

Site : example code. Example post by anonymous user

  1. How to generate a random string in JAVA

Site : StackOverflow. Post by ꜱᴜʀᴇꜱʜ ᴀᴛᴛᴀ

  1. How to send email through java servlet

Site : Tutorials Point. Post by Tutorials Point

Continue ReadingResend SUSI.AI Account Verification Link

Creating A Dockerfile For Yacy Grid MCP

The YaCy Grid is the second-generation implementation of YaCy, a peer-to-peer search engine. A YaCy Grid installation consists of a set of micro-services which communicate with each other using a common infrastructure for data persistence. The task was to deploy the second-generation of YaCy Grid. To do so, we first had created a Dockerfile. This dockerfile should start the micro services such as rabbitmq, Apache ftp and elasticsearch in one docker instance along with MCP. The microservices perform following tasks:

  • Apache ftp server for asset storage.
  • RabbitMQ message queues for the message system.
  • Elasticsearch for database operations.

To launch these microservices using Dockerfile, we referred to following documentations regarding running these services locally: https://github.com/yacy/yacy_grid_mcp/blob/master/README.md

For creating a Dockerfile we proceeded as follows:

FROM ubuntu:latest
MAINTAINER Harshit Prasad# Update
RUN apt-get update
RUN apt-get upgrade -y# add packages
# install jdk package for java
RUN apt-get install -y git openjdk-8-jdk

#install gradle required for build
RUN apt-get update && apt-get install -y software-properties-common
RUN add-apt-repository ppa:cwchien/gradle
RUN apt-get update
RUN apt-get install -y wget
RUN wget https://services.gradle.org/distributions/gradle-3.4.1-bin.zip
RUN mkdir /opt/gradle
RUN apt-get install -y unzip
RUN unzip -d /opt/gradle gradle-3.4.1-bin.zip
RUN PATH=$PATH:/opt/gradle/gradle-3.4.1/bin
ENV GRADLE_HOME=/opt/gradle/gradle-3.4.1
ENV PATH=$PATH:$GRADLE_HOME/bin
RUN gradle -v

# install apache ftp server 1.1.0
RUN wget http://www-eu.apache.org/dist/mina/ftpserver/1.1.0/dist/apache-ftpserver-1.1.0.tar.gz
RUN tar xfz apache-ftpserver-1.1.0.tar.gz

# install RabbitMQ server
RUN wget https://www.rabbitmq.com/releases/rabbitmq-server/v3.6.6/rabbitmq-server-generic-unix-3.6.6.tar.xz
RUN tar xf rabbitmq-server-generic-unix-3.6.6.tar.xz

# install erlang language for RabbitMQ
RUN apt-get install -y erlang

# install elasticsearch
RUN wget https://artifacts.elastic.co/downloads/elasticsearch/elasticsearch-5.5.0.tar.gz
RUN sha1sum elasticsearch-5.5.0.tar.gz
RUN tar -xzf elasticsearch-5.5.0.tar.gz

# clone yacy_grid_mcp repository
RUN git clone https://github.com/nikhilrayaprolu/yacy_grid_mcp.git
WORKDIR /yacy_grid_mcp

RUN cat docker/configftp.properties > ../apacheftpserver1.1.0/res/conf/users.properties

# compile
RUN gradle build
RUN mkdir data/mcp-8100/conf/ -p
RUN cp docker/config-mcp.properties data/mcp-8100/conf/config.properties
RUN chmod +x ./docker/start.sh

# Expose web interface ports
# 2121: ftp, a FTP server to be used for mass data / file storage
# 5672: rabbitmq, a rabbitmq message queue server to be used for global messages, queues and stacks
# 9300: elastic, an elasticsearch server or main cluster address for global database storage
EXPOSE 2121 5672 9300 9200 15672 8100

# Define default command.
ENTRYPOINT [“/bin/bash”, “./docker/start.sh”]


We have created a start.sh file to start RabbitMQ and Apache FTP services. At the end, for compilation gradle run will be executed.

adduser –disabled-password –gecos ” r
adduser r sudo
echo ‘%sudo ALL=(ALL) NOPASSWD:ALL’ >> /etc/sudoers
chmod a+rwx /elasticsearch-5.5.0 -R
su -m r -c ‘/elasticsearch-5.5.0/bin/elasticsearch -Ecluster.name=yacygrid &’
cd /apacheftpserver1.1.0
./bin/ftpd.sh res/conf/ftpdtypical.xml &
/rabbitmq_server-3.6.6/sbin/rabbitmq-server -detached
sleep 5s;
/rabbitmq_server-3.6.6/sbin/rabbitmq-plugins enable rabbitmq_management
/rabbitmq_server3.6.6/sbin/rabbitmqctl add_user yacygrid password4account
echo [{rabbit, [{loopback_users, []}]}]. >> /rabbitmq_server-3.6.6/etc/rabbitmq/rabbitmq.config
/rabbitmq_server-3.6.6/sbin/rabbitmqctl set_permissions -p / yacygrid “.*” “.*” “.*”
cd /yacy_grid_mcp
sleep 5s;
gradle run


start.sh will first add username and then password. Then it will start RabbitMQ along with Apache FTP.  For username and password, we have created a separate files to configure their properties during Docker run which can be found here:

The logic behind running all the microservices in one docker instance was: creating each container for microservice and then link those containers with the help of docker-compose.yml file.

The Dockerfile which we have created was corresponding to one image. Another image was elasticsearch which was linked to this Dockerfile. The latest version of elasticsearch image was already available on their site: https://www.elastic.co/guide/en/elasticsearch/reference/current/docker.html

We configured the docker-compose.yml file according to the reference link provided above. The docker-compose file can be found here: https://github.com/yacy/yacy_grid_mcp/blob/master/docker/docker-compose.yml

The source code for the implementation of whole structure can be found here: https://github.com/yacy/yacy_grid_mcp/tree/master/docker

Resources


Continue ReadingCreating A Dockerfile For Yacy Grid MCP

How to Parse HTML Tags and Anchor Clickable Links in SUSI Android App

Html tags are used to define how contents of a webpage should be formatted and displayed. Sometimes the SUSI answer type response contains some html tags but showing these html tags without parsing would distort the normal text flow in SUSI Android.

For the query ‘Ask me something’ SUSI’s reply is

“data”: [
     {
      “question”: “Which soccer team won the Copa Am&eacute;rica 2015 Championship ? “,                                          
     }]

In SUSI Android this message looks like

As you can see that showing html tags without parsing distort the normal text flow. So we need to parse html tags properly. We use Html class for this purpose. Html class is present in android.text package and you can import it in the class where you want to use it.

import android.text.Html

fromHtml method of Html class is used to parse html tags. But for API level less than 24 and equal to or greater than 24 we use different parameters in fromHtml method.

For API level less than 24 we used

Html.fromHtml(model.getContent())

But for API level equal to or greater than 24 we have to use

Html.fromHtml(model.getContent(), Html.FROM_HTML_MODE_COMPACT)

Here the second parameter is legacy flags which decides how text inside a tag will be shown after parsing.

In case of Html.fromHtml(String string) legacy flag is by default FROM_HTML_MODE_LEGACY. It indicates that separate block-level elements with blank lines.

So after parsing html tags using fromHtml

But return type of fromHtml method is Spanned so if you need String then you have to convert it into string using toString() method.

Anchor action type in susi response contains link and text.

       “link”: “https://www.openstreetmap.org/#map=13/1.2896698812440377/103.85006683126556”,
       “text”: “Link to Openstreetmap: Singapore”

Here the text is the text we show in textview and link is used to show web content in the browser when user click on text. So first link and text are attached together like

“<a href=\”” +susiResponse.getAnswers().get(0).getActions().get(i).getAnchorLink() + “\”>”
+ susiResponse.getAnswers().get(0).getActions().get(1).getAnchorText() + “</a>”

Here text between the tag is description of link and after parsing we show this text in textview. It can be parsed using fromHtml method of Html class and textview is made clickable by

chatTextView.setMovementMethod(LinkMovementMethod.getInstance());

Resources

Continue ReadingHow to Parse HTML Tags and Anchor Clickable Links in SUSI Android App