Adding Check-in Attributes to Tickets

Recently, it was decided by the Open Event Orga App team that the event ticket API response from Open Event Server should have two additional attributes for specifying event check-in access. At first sight, it seemed that adding these options will only require changes in the orga app, but it turned out that the entire Ticket API from the server will need this addition.

Implementing these attributes turned out to be quite straightforward. Specifically, the fields to be added were boolean is_checkin_restricted and auto_checkin_enabled. By default, checkin is not automatic and is restricted. Therefore, the default values for these fields were chosen to be True and False respectively. To add them, the ticket model file was changed first – due to the addition of these two columns:

class Ticket(SoftDeletionModel):
    ...
    is_checkin_restricted = db.Column(db.Boolean)  # <--
    auto_checkin_enabled = db.Column(db.Boolean)  # <--
    ...
    def __init__(self,
        name=None,
        event_id=None,
        ...
        is_checkin_restricted=True,
        auto_checkin_enabled=False):

        self.name = name
        ...
        self.is_checkin_restricted = is_checkin_restricted
        self.auto_checkin_enabled = auto_checkin_enabled
        ...

Since the ticket database model was updated, a migration had to be performed. Following shell commands (at the open event server project root) did the migration and database update and a migration file was then generated:

$ python manage.py db migrate
$ python manage.py db upgrade

Here’s the generated migration file:

from alembic import op
import sqlalchemy as sa

revision = '6440077182f0'
down_revision = 'eaa029ebb260'

def upgrade():
    op.add_column('tickets', sa.Column('auto_checkin_enabled', sa.Boolean(), nullable=True))
    op.add_column('tickets', sa.Column('is_checkin_restricted', sa.Boolean(), nullable=True))

def downgrade():
    op.drop_column('tickets', 'is_checkin_restricted')
    op.drop_column('tickets', 'auto_checkin_enabled')

The next code change was required in the ticket API schema. The change was essentially the same as the one added in the model file – just these 2 new fields were added:

class TicketSchemaPublic(SoftDeletionSchema):
    ...
    id = fields.Str(dump_only=True)
    name = fields.Str(required=True)
    ...
    is_checkin_restricted = fields.Boolean(default=True)  # <--
    auto_checkin_enabled = fields.Boolean(default=False)  # <--
    event = Relationship(attribute='event',
    self_view='v1.ticket_event',
    self_view_kwargs={'id': '<id>'},
    related_view='v1.event_detail',
    related_view_kwargs={'ticket_id': '<id>'},
    schema='EventSchemaPublic',
    type_='event')
    ...

Now all that remained were changes in the API documentation, which were made accordingly. This completed the addition of these two checkin attributes in the ticket API, and eventually made way to the orga app. And, these can be requested as usual by the front-end and user app as well.


Resources and Links:

Continue ReadingAdding Check-in Attributes to Tickets

Adding Port Specification for Static File URLs in Open Event Server

Until now, static files stored locally on Open Event server did not have port specification in their URLs. This opened the door for problems while consuming local APIs. This would have created inconsistencies, if two server processes were being served on the same machine but at different ports. In this blog post, I will explain my approach towards solving this problem, and describe code snippets to demonstrate the changes I made in the Open Event Server codebase.

The first part in this process involved finding the source of the bug. For this, my open-source integrated development environment, Microsoft Visual Studio Code turned out to be especially useful. It allowed me to jump from function calls to function definitions quickly:

Screen Shot 2018-08-10 at 12.29.01 PM

I started at events.py and jumped all the way to storage.py, where I finally found out the source of this bug, in upload_local() function:

def upload_local(uploaded_file, key, **kwargs):
    """
    Uploads file locally. Base dir - static/media/
    """
    filename = secure_filename(uploaded_file.filename)
    file_relative_path = 'static/media/' + key + '/' + generate_hash(key) + '/' + filename
    file_path = app.config['BASE_DIR'] + '/' + file_relative_path
    dir_path = file_path.rsplit('/', 1)[0]
    # delete current
    try:
        rmtree(dir_path)
    except OSError:
        pass
    # create dirs
    if not os.path.isdir(dir_path):
        os.makedirs(dir_path)
        uploaded_file.save(file_path)
        file_relative_path = '/' + file_relative_path
    if get_settings()['static_domain']:
        return get_settings()['static_domain'] + \
    file_relative_path.replace('/static', '')
    url = urlparse(request.url)
    return url.scheme + '://' + url.hostname + file_relative_path

Look closely at the return statement:

return url.scheme + '://' + url.hostname + file_relative_path

Bingo! This is the source of our bug. A straightforward solution is to simply concatenate the port number in between, but that will make this one-liner look clumsy – unreadable and un-pythonic. We therefore use Python string formatting:

return '{scheme}://{hostname}:{port}{file_relative_path}'.format(
scheme=url.scheme, hostname=url.hostname, port=url.port,
file_relative_path=file_relative_path)

But this statement isn’t perfect. There’s an edge case that might give unexpected URL. If the port isn’t originally specified, Python’s string formatting heuristic will substitute url.port with None. This will result in a URL like http://localhost:None/some/file_path.jpg, which is obviously something we don’t desire. We therefore append a call to Python’s string replace() method: replace(‘:None’, ”)

The resulting return statement now looks like the following:

return '{scheme}://{hostname}:{port}{file_relative_path}'.format(
scheme=url.scheme, hostname=url.hostname, port=url.port,
file_relative_path=file_relative_path).replace(':None', '')

This should fix the problem. But that’s not enough. We need to ensure that our project adapts well with the change we made. We check this by running the project tests locally:

$ nosetests tests/unittests

Unfortunately, the tests fail with the following traceback:

======================================================================
ERROR: test_create_save_image_sizes (tests.unittests.api.helpers.test_files.TestFilesHelperValidation)
----------------------------------------------------------------------
Traceback (most recent call last):
File "/open-event-server/tests/unittests/api/helpers/test_files.py", line 138, in test_create_save_image_sizes
resized_width_large, _ = self.getsizes(resized_image_file_large)
File "/open-event-server/tests/unittests/api/helpers/test_files.py", line 22, in getsizes
im = Image.open(file)
File "/usr/local/lib/python3.6/site-packages/PIL/Image.py", line 2312, in open
fp = builtins.open(filename, "rb")
FileNotFoundError: [Errno 2] No such file or directory: '/open-event-server:5000/static/media/events/53b8f572-5408-40bf-af97-6e9b3922631d/large/UFNNeW5FRF/5980ede1-d79b-4907-bbd5-17511eee5903.jpg'

It’s evident from this traceback that the code in our test framework is not converting the image url to file path correctly. The port specification part is working fine, but it should not affect file names, they should be independent of port number. The files saved originally do not have port specified in their name, but the code in test framework is expecting port to be involved, hence the above error.

Using the traceback, I went to the code in the test framework where this problem occurred:

def test_create_save_image_sizes(self):
       with app.test_request_context():
           image_url_test = 'https://cdn.pixabay.com/photo/2014/09/08/17/08/hot-air-balloons-439331_960_720.jpg'

           image_sizes_type = "event"
           width_large = 1300
           width_thumbnail = 500
           width_icon = 75
           image_sizes = create_save_image_sizes(image_url_test, image_sizes_type)

           resized_image_url = image_sizes['original_image_url']
           resized_image_url_large = image_sizes['large_image_url']
           resized_image_url_thumbnail = image_sizes['thumbnail_image_url']
           resized_image_url_icon = image_sizes['icon_image_url']

           resized_image_file = app.config.get('BASE_DIR') + resized_image_url.split('/localhost')[1]
           resized_image_file_large = app.config.get('BASE_DIR') + resized_image_url_large.split('/localhost')[1]
           resized_image_file_thumbnail = app.config.get('BASE_DIR') + resized_image_url_thumbnail.split('/localhost')[1]
           resized_image_file_icon = app.config.get('BASE_DIR') + resized_image_url_icon.split('/localhost')[1]

           resized_width_large, _ = self.getsizes(resized_image_file_large)
           resized_width_thumbnail, _ = self.getsizes(resized_image_file_thumbnail)
           resized_width_icon, _ = self.getsizes(resized_image_file_icon)

           self.assertTrue(os.path.exists(resized_image_file))
           self.assertEqual(resized_width_large, width_large)
           self.assertEqual(resized_width_thumbnail, width_thumbnail)
           self.assertEqual(resized_width_icon, width_icon)


Obviously, resized_image_url.split(‘/localhost’)[1] will involve port number. So we have to change this line. But this means we also have to change the subsequent lines involving thumbnail, icon and large images. Instead of stripping the port for each of these, we can simply do this collectively at an earlier stage. So we redefine the image_sizes dictionary after the create_save_image_sizes() function call:

image_sizes = {
url_name: urlparse(image_sizes[url_name]).path
for url_name in image_sizes
} # Now file names don't contain port (this gives relative urls).

Now we can simplify the lines each of which earlier required port-stripping code:

resized_image_file = app.config.get('BASE_DIR') + resized_image_url
resized_image_file_large = app.config.get('BASE_DIR') + resized_image_url_large
resized_image_file_thumbnail = app.config.get('BASE_DIR') + resized_image_url_thumbnail
resized_image_file_icon = app.config.get('BASE_DIR') + resized_image_url_icon

We now do a similar modification in test_create_save_resized_image() test method as it also involves URL to file path conversion. We break the line

resized_image_file = app.config.get('BASE_DIR') + resized_image_url.split('/localhost')[1]

to 2 lines:

resized_image_path = urlparse(resized_image_url).path
resized_image_file = app.config.get('BASE_DIR') + resized_image_path

Now let’s run the tests (which failed earlier) again:

Screen Shot 2018-08-10 at 12.29.15 PM.pngFinally, the tests pass without errors! Now, we can add some extra convenience functionality: we can also strip the port when it corresponds with the protocol we’re using. For example, if we’re using https protocol, then we need not specify the port if it is 443, as 443 corresponds to that protocol. We can add this functionality by creating a mapping of such correspondence and checking for it before generating the URL. To do this, we now go back to storage.py and add the following:

SCHEMES = {80: 'http', 443: 'https'}

And add

# No need to specify scheme-corresponding port
port = url.port
if port and url.scheme == SCHEMES.get(url.port, None):
    port = None

just before

return '{scheme}://{hostname}:{port}{file_relative_path}'.format(
scheme=url.scheme, hostname=url.hostname, port=port,
file_relative_path=file_relative_path).replace(':None', '')

And that finishes our work! The tests again pass successfully, plus on top of that we have this new functionality of mentioning ports only when they don’t correspond with the URL scheme!


Resources:

Continue ReadingAdding Port Specification for Static File URLs in Open Event Server

Patching an Attribute Type Across a Flask App

Recently, it was discovered by a contributor that the rating attribute for event feedbacks in Open Event was of type String. The type was incorrect, indeed. After a discussion, developers came concluded that it should be of type Float. In this post, I explain how to perform this simple migration task of changing a data type across a typical Flask app’s stack.

To begin this change, we first, we modify the database model. The model file for feedbacks (feedback.py) looks like the following:

from app.models import db


class Feedback(db.Model):
"""Feedback model class"""
__tablename__ = 'feedback'
id = db.Column(db.Integer, primary_key=True)
rating = db.Column(db.String, nullable=False)  # ←-- should be float
comment = db.Column(db.String, nullable=True)
user_id = db.Column(db.Integer,
db.ForeignKey('users.id', ondelete='CASCADE'))
event_id = db.Column(db.Integer,
db.ForeignKey('events.id', ondelete='CASCADE'))

def __init__(self, rating=None, comment=None, event_id=None,                                        user_id=None):
self.rating = rating  # ←-- cast here for safety
self.comment = comment
self.event_id = event_id
self.user_id = user_id


The change here is quite straightforward, and spans just 2 lines:

rating = db.Column(db.Float, nullable=False)

and

self.rating = float(rating)

We now perform the database migration using a couple of manage.py commands on the terminal. This file is different for different projects, but the migration commands essentially look the same. For Open Event Server, the manage.py file is at the root of the project directory (as is conventional). After cd’ing to the root, we execute the following commands:

$ python manage.py db migrate

and then

$ python manage.py db upgrade

These commands update our Open Event database so that the rating is now stored as a Float. However, if we execute these commands one after the other, we note that an exception is thrown:

sqlalchemy.exc.ProgrammingError: column "rating" cannot be cast automatically to type float
HINT:  Specify a USING expression to perform the conversion.
'ALTER TABLE feedback ALTER COLUMN rating TYPE FLOAT USING rating::double precision'

This happens because the migration code is ambiguous about what precision to use after converting to type float. It hints us to utilize the USING clause of PostgreSQL to do that. We accomplish this manually by using the psql client to connect to our database and command it the type change:

$ psql oevent
psql (10.1)
Type "help" for help.

oevent=# ALTER TABLE feedback ALTER COLUMN rating TYPE FLOAT USING rating::double precision

We now exit the psql shell and run the above migration commands again. We see that the migration commands pass successfully this time, and a migration file is generated. For our migration, the file looks like the following:

from alembic import op
import sqlalchemy as sa


# These values would be different for your migrations.
revision = '194a5a2a44ef'

down_revision = '4cac94c86047'


def upgrade():
op.alter_column('feedback', 'rating',
existing_type=sa.VARCHAR(),
type_=sa.Float(),
existing_nullable=False)


def downgrade():
op.alter_column('feedback', 'rating',
existing_type=sa.Float(),
type_=sa.VARCHAR(),
existing_nullable=False)

This is an auto-generated file (built by the database migration tool Alembic) and we need to specify the extra commands we used while migrating our database. Since we did use an extra command to specify the precision, we need to add it here. PostgreSQL USING clause can be added to alembic migration files via the postgresql_using keyword argument. Thus, the edited version of the upgrade function looks like the following:

def upgrade():
op.alter_column('feedback', 'rating',
existing_type=sa.VARCHAR(),
type_=sa.Float(),
existing_nullable=False,
postgresql_using='rating::double precision')

This completes our work on database migration. Migration files are useful for a variety of purposes – they allow us to easily get to a previous database state, or a new database state as suggested by a project collaborator. Just like git, they allow for easy version control and collaboration.

We didn’t finish this work after database migration. We also decided to impose limits on the rating value. We concluded that 0-5 would be a good range for rating. Furthermore, we also decided to round off the rating value to the “nearest 0.5”, so if the input rating is 2.3, it becomes 2.5. Also, if it is 4.1, it becomes 4.0. This was decided because such values are conventional for ratings across numerous web and mobile apps. So this will hopefully enable easier adoption for new users.

For the validation part, marshmallow came to rescue. It is a simple object serialization and deserialization tool for Python. So it basically allows to convert complex Python objects to JSON data for communicating over HTTP and vice-versa, among other things. It also facilitates pre-processing input data and therefore, allows clean validation of payloads. In our case, marshmallow was specifically used to validate the range of the rating attribute of feedbacks. The original feedbacks schema file looked like the following:

from marshmallow_jsonapi import fields
from marshmallow_jsonapi.flask import Schema, Relationship

from app.api.helpers.utilities import dasherize


class FeedbackSchema(Schema):
"""
Api schema for Feedback Model
"""
class Meta:
"""
Meta class for Feedback Api Schema
"""
type_ = 'feedback'
self_view = 'v1.feedback_detail'
self_view_kwargs = {'id': '<id>'}
inflect = dasherize

id = fields.Str(dump_only=True)
rating = fields.Str(required=True)  # ← need to validate this
comment = fields.Str(required=False)
event = Relationship(attribute='event',
self_view='v1.feedback_event',
self_view_kwargs={'id': '<id>'},
related_view='v1.event_detail',
related_view_kwargs={'feedback_id': '<id>'},
schema='EventSchemaPublic',
type_='event')


To validate the rating attribute, we use marshmallow’s Range class:

from marshmallow.validate import Range

Now we change the line

rating = fields.Str(required=True)

to

rating = fields.Float(required=True, validate=Range(min=0, max=5))

So with marshmallow, just about 2 lines of work implements rating validation for us!

After the validation part, what’s remaining is the rounding-off business logic. This is simple mathematics, and for getting to the “nearest 0.5” number, the formula goes as follows:

rating * 2 --> round off --> divide the result by 2

We will use Python’s built-in function (BIF) to accomplish this. To implement the business logic, we go back to the feedback model class and modify its constructor. Before this type change, the constructor looked like the following:

def __init__(self, rating=None, comment=None, event_id=None, user_id=None):
self.rating = rating
self.comment = comment
self.event_id = event_id
self.user_id = user_id

We change this by first converting the input rating to float, rounding it off and then finally assigning the result to feedback’s rating attribute. The new constructor is shown below:

def __init__(self, rating=None, comment=None, event_id=None, user_id=None):
rating = float(rating)
self.rating = round(rating*2, 0) / 2  # Rounds to nearest 0.5

self.comment = comment
self.event_id = event_id
self.user_id = user_id

This completes the rounding-off part and ultimately concludes rating’s type change from String to Float. We saw how a simple high-level type change requires editing code across multiple files and the use of different tools in between. In doing so, we thus also learned the utility of alembic and marshmallow in database migration and data validation, respectively.


Resources

Continue ReadingPatching an Attribute Type Across a Flask App

Deploying a Postgres-Based Open Event Server to Kubernetes

In this post, I will walk you through deploying the Open Event Server on Kubernetes, hosted on Google Cloud Platform’s Compute Engine. You’ll be needing a Google account for this, so create one if you don’t have one.

First, I cd into the root of our project’s Git repository. Now I need to create a Dockerfile. I will use Docker to package our project into a nice image which can be then be “pushed” to Google Cloud Platform. A Dockerfile is essentially a text doc which simply contains the commands required to assemble an image. For more details on how to write one for your project specifically, check out Docker docs. For Open Event Server, the Dockerfile looks like the following:

FROM python:3-slim

ENV INSTALL_PATH /open_event
RUN mkdir -p $INSTALL_PATH

WORKDIR $INSTALL_PATH

# apt-get update and update some packages
RUN apt-get update && apt-get install -y wget git ca-certificates curl && update-ca-certificates && apt-get clean -y


# install deps
RUN apt-get install -y --no-install-recommends build-essential python-dev libpq-dev libevent-dev libmagic-dev && apt-get clean -y

# copy just requirements
COPY requirements.txt requirements.txt
COPY requirements requirements

# install requirements
RUN pip install --no-cache-dir -r requirements.txt 
RUN pip install eventlet

# copy remaining files
COPY . .

CMD bash scripts/docker_run.sh

These commands simply install the dependencies and set up the environment for our project. The final CMD command is for running our project, which, in our case, is a server.

After our Dockerfile is configured, I go to Google Cloud Platform’s console and create a new project:

Screen Shot 2018-08-09 at 7.37.34 PM

Once I enter the product name and other details, I enable billing in order to use Google’s cloud resources. A credit card is required to set up a billing account, but Google doesn’t charge any money for that. Also, one of the perks of being a part of FOSSASIA was that I had about $3000 in Google Cloud credits! Once billing is enabled, I then enable the Container Engine API. It is required to support Kubernetes on Google Compute Engine. Next step is to install Google Cloud SDK. Once that is done, I run the following command to install Kubernetes CLI tool:

gcloud components install kubectl

Then I configure the Google Cloud Project Zone via the following command:

gcloud config set compute/zone us-west1-a

Now I will create a disk (for storing our code and data) as well as a temporary instance for formatting that disk:

gcloud compute disks create pg-data-disk --size 1GB
gcloud compute instances create pg-disk-formatter
gcloud compute instances attach-disk pg-disk-formatter --disk pg-data-disk

Once the disk is attached to our instance, I SSH into it and list the available disks:

gcloud compute ssh "pg-disk-formatter"

Now, ls the available disks:

ls /dev/disk/by-id

This will list multiple disks (as shown in the Terminal window below), but the one I want to format is “google-persistent-disk-1”.

Screen Shot 2018-08-09 at 7.48.39 PM.png

Now I format that disk via the following command:

sudo mkfs.ext4 -F -E lazy_itable_init=0,lazy_journal_init=0,discard /dev/disk/by-id/google-persistent-disk-1

Finally, after the formatting is done, I exit the SSH session and detach the disk from the instance:

gcloud compute instances detach-disk pg-disk-formatter --disk pg-data-disk

Now I create a Kubernetes cluster and get its credentials (for later use) via gcloud CLI:

gcloud container clusters create opev-cluster
gcloud container clusters get-credentials opev-cluster

I can additionally bind our deployment to a domain name! If you already have a domain name, you can use the IP reserved below as an A record of your domain’s DNS Zone. Otherwise, get a free domain at freenom.com and do the same with that domain. This static external IP address is reserved in the following manner:

gcloud compute addresses create testip --region us-west1

It’ll be useful if I note down this IP for further reference. I now add this IP (and our domain name if I used one) in Kubernetes configuration files (for Open Event Server, these were specific files for services like nginx and PostgreSQL):

#
# Deployment of the API Server and celery worker
#
kind: Deployment
apiVersion: apps/v1beta1
metadata:
name: api-server
namespace: web
spec:
replicas: 1
template:
metadata:
labels:
app: api-server
spec:
volumes:
- name: data-store
emptyDir: {}
containers:
- name: api-server
image: eventyay/nextgen-api-server:latest
command: ["/bin/sh","-c"]
args: ["./kubernetes/run.sh"]
livenessProbe:
httpGet:
path: /health-check/
port: 8080
initialDelaySeconds: 30
timeoutSeconds: 3
ports:
- containerPort: 8080
protocol: TCP
envFrom:
- configMapRef:
name: api-server
env:
- name: C_FORCE_ROOT
value: 'true'
- name: PYTHONUNBUFFERED
value: 'TRUE'
- name: DEPLOYMENT
value: 'api'
- name: FORCE_SSL
value: 'yes'
volumeMounts:
- mountPath: /opev/open_event/static/uploads/
name: data-store
- name: celery
image: eventyay/nextgen-api-server:latest
command: ["/bin/sh","-c"]
args: ["./kubernetes/run.sh"]
envFrom:
- configMapRef:
name: api-server
env:
- name: C_FORCE_ROOT
value: 'true'
- name: DEPLOYMENT
value: 'celery'
volumeMounts:
- mountPath: /opev/open_event/static/uploads/
name: data-store
restartPolicy: Always

These files will look similar for your specific project as well. Finally, I run the deployment script provided for Open Event Server to deploy with defined configuration:

./kubernetes/deploy.sh create all

This is the specific deployment script for this project; for your app, this will be a bunch of simple kubectl create * commands specific to your app’s context. Once this script completes, our app is deployed! After a few minutes, I can see it live at the domain I provided above!

I can also see our project’s statistics and set many other attributes at Google Cloud Platform’s console:

Screen Shot 2018-08-09 at 7.49.42 PM.png

And that’s it for this post! For more details on deploying Docker-based containers on Kubernetes clusters hosted by Google, visit Google Cloud Platform’s documentation.

Resources

Continue ReadingDeploying a Postgres-Based Open Event Server to Kubernetes

Soft Deletion Support in Open Event Server

The Open Event Server enables organizers to manage events from concerts to conferences and meetups. It offers features for events with several tracks and venues. This blog post explains how the soft deletion support has been implemented in the project to allow the event admin to quickly restore the deleted events or users.

Idea

The idea is extremely simple. We can add a column deleted_at in all the soft deleted models. If that entry is None then we can be sure that this row wasn’t deleted or else we can conclude that the row was deleted by the user. In case we want to recover it later, we can simply set it back to None.

Approach

We had a lot of models that needed this support. Hence in order to obey the DRY principles, we created base model and schema classes which would be inherited by the models and schemas that need this support.

from marshmallow_jsonapi import fields
from marshmallow_jsonapi.flask import Schema


class SoftDeletionSchema(Schema):
    """
        Base Schema for soft deletion support. All the schemas that support soft deletion should extend this schema
    """
    deleted_at = fields.DateTime(allow_none=True)

from app.models import db


class SoftDeletionModel(db.Model):
    """
        Base model for soft deletion support. All the models which support soft deletion should extend it.
    """
    __abstract__ = True

    deleted_at = db.Column(db.DateTime(timezone=True))

Usage

We use the Flask-Rest-Json-API library in the project. We have modified it in order to support the soft deletion feature. By default all the models that support soft deletion are soft deleted. In order to specify hard deletion, an extra parameter permanent set to true needs to be passed in with the request.

DELETE

We check if the model supports soft deletion or not. If the model doesn’t support soft deletion then we permanently delete it otherwise we check if we have the parameter permanent and it is set to true. If it is set to true, then we permanently delete the row otherwise we update the deleted_at with the current time.

if 'deleted_at' not in self.schema._declared_fields or request.args.get('permanent') == 'true' or current_app.config['SOFT_DELETE'] is False:
            self._data_layer.delete_object(obj, kwargs)
else:
    data = {'deleted_at': str(datetime.now(pytz.utc))}
    self._data_layer.update_object(obj, data, kwargs)

GET

When we are returning one or more entry we offer the client the option to choose whether the soft deleted entries should be included or not. By default they aren’t. In order to get them a query parameter get_trashed should be passed along with the URL.

if request.args.get('get_trashed') == 'true':
    obj = self._data_layer.get_object(kwargs, get_trashed=True)
else:
    obj = self._data_layer.get_object(kwargs)

In case soft deleted entries are not required, then we filter the results for cases when deleted_at is None

try:
    if 'deleted_at' not in self.resource.schema._declared_fields or get_trashed or current_app.config['SOFT_DELETE'] is False:
         obj = self.session.query(self.model).filter(filter_field == filter_value).one()
    else:
         obj = self.session.query(self.model).filter(filter_field == filter_value).filter_by(deleted_at=None).one()

References

Continue ReadingSoft Deletion Support in Open Event Server

Implementing Custom Date and Time Picker with 2-way Data Binding Support

The Data binding library is one of the most popular libraries among the android developers. We have been using it in the Open Event Organiser Android app for building interactive UI’s for some time now. The Open Event Organiser Android App is the Event management app for organizers using the Open Event Platform. This blog explains how we implemented our own custom Date and Time picker with 2-way data binding support using the Data binding framework.

Why custom picker ?

One specific requirement in the app is to have a button, clicking on that button should open a DatePicker which would allow the user to select the date. A similar behaviour was required to allow the user to select the time as well. In order to handle this requirement we were using Binding Adapters on Button. For eg. the following Binding Adapter allowed us to define a property date on a button and set an Observable String as it’s value. We implemented a similar Binding Adapter for selecting time as well.

@BindingAdapter("date")
public static void bindDate(Button button, ObservableField<String> date) {
    String format = DateUtils.FORMAT_DATE_COMPLETE;

    bindTemporal(button, date, format, zonedDateTime ->
        new DatePickerDialog(button.getContext(), (picker, year, month, dayOfMonth) ->
                setPickedDate(
                    LocalDateTime.of(LocalDate.of(year, month + 1, dayOfMonth), zonedDateTime.toLocalTime()),
                    button, format, date),
                zonedDateTime.getYear(), zonedDateTime.getMonthValue() - 1, zonedDateTime.getDayOfMonth()));
  }

It calls the bindTemporal method which takes in a function along with the button, date and the format and does two things. First, it sets the value of the date as the text of the button. Secondly, it attaches a click listener to the button and applies the function passed in as the argument when clicked. Below is the bindTemporal method for reference:

private static void bindTemporal(Button button, ObservableField<String> date, String format, Function<ZonedDateTime, AlertDialog> dialogProvider) {
        if (date == null)
            return;

        String isoDate = date.get();
        button.setText(DateUtils.formatDateWithDefault(format, isoDate));

        button.setOnClickListener(view -> {
            ZonedDateTime zonedDateTime = ZonedDateTime.now();
            try {
                zonedDateTime = DateUtils.getDate(isoDate);
            } catch (DateTimeParseException pe) {
                Timber.e(pe);
            }
            dialogProvider.apply(zonedDateTime).show();
        });
    }

It was working pretty well until recently when we started getting deprecation warnings about using Observable fields as a parameter of Binding Adapter. Below is the full warning:

Warning:Use of ObservableField and primitive cousins directly as method parameters is deprecated and support will be removed soon. Use the contents as parameters instead in method org.fossasia.openevent.app.common.app.binding.DateBindings.bindDate

The only possible way that we could think of was to pass in regular String in place of Observable String. Now if we pass in a regular String object then the application won’t be reactive. Hence we decided to implement our own custom view to resolve this problem.

Custom Date and Time Picker

We decided to create an Abstract DateTimePicker class which will hold all the common code of our custom Date and Time pickers. It is highly recommended that you go through this awesome blog post first before reading any further. We won’t be going through the details already explained in the post.

Following are the important features of this Abstract class:

  1. It extends the AppCompatButton class.
  2. It stores an ObservableString named value and an OnDateTimeChangedListener as it’s field. We will discuss the change listener later in the article.
  3. It implements the three mandatory constructors and calls it’s super method. It also calls the init method which sets the current date and time as the default.
  4. It has a bindTemporal method which is the same as we discussed earlier.
  5. It has a setPickedDate method which sets the selected date/time as the text for the button so that users can see the selected date/time on the button itself. Moreover it notifies the change listener about the change in date if attached.
  6. It has an abstract method called setValue. It will be implemented in the sub classes and used to set the date or time value for the field named value.

You can check the full implementation here.

The OnDateTimeChangedListener which we mentioned above is an extremely simple interface. It defines a simple method onDateChanged which takes in the selected date as the argument.

public interface OnDateTimeChangedListener {
    void onDateChanged(ObservableString newDate);
}

Let’s have a look at the implementation of the DatePicker class. The key features of this class are:

  1. It extends the AbstractDateTimePicker class and implements the necessary constructors calling the corresponding super constructor.
  2. It implements the method setValue which sets the date or time passed in to the field value. It also calls the bindTemporal method of the super class.

public class DatePicker extends AbstractDateTimePicker {
    public DatePicker(Context context) {
        super(context);
    }

    public DatePicker(Context context, AttributeSet attrs) {
        super(context, attrs);
    }

    public DatePicker(Context context, AttributeSet attrs, int defStyle) {
        super(context, attrs, defStyle);
    }

  public void setValue(String value) {
        ObservableString observableValue = getValue();
        if (observableValue.get() == null || !TextUtils.equals(observableValue.get(), value)) {
            observableValue.set(value);
            String format = DateUtils.FORMAT_DATE_COMPLETE;

            bindTemporal(value, format, zonedDateTime ->
                new DatePickerDialog(this.getContext(), (picker, year, month, dayOfMonth) ->
                    setPickedDate(
                        LocalDateTime.of(LocalDate.of(year, month + 1, dayOfMonth), zonedDateTime.toLocalTime()), format),
                    zonedDateTime.getYear(), zonedDateTime.getMonthValue() - 1, zonedDateTime.getDayOfMonth()));
        }
    }
}

Next we discuss the BindingAdapter and the InverseBindingAdapter for the custom DatePicker which allows the data binding framework to set the action to be performed when date changes and get the date from the view respectively.

@BindingAdapter(value = "valueAttrChanged")
public static void setDateChangeListener(DatePicker datePicker, final InverseBindingListener listener) {
        if (listener != null) {
            datePicker.setOnDateChangedListener(newDate -> listener.onChange());
        }
    }

@InverseBindingAdapter(attribute = "value")
public static String getRealValue(DatePicker datePicker) {
    return datePicker.getValue().get();
}

Now in order to use our view, we can simply define it in the layout file as shown below:

<org.fossasia.openevent.app.ui.views.DatePicker
                    style="?attr/borderlessButtonStyle"
                    android:layout_width="wrap_content"
                    android:layout_height="wrap_content"
                    android:textColor="@color/purple_500"
                    app:value="@={ date }" />

The key thing to notice is the use of @= instead of @ which denotes two way data binding.    

Conclusion

The Android Data binding framework is extremely powerful and flexible at the same time. We can use it for our custom requirements as shown in this article.

References


Continue ReadingImplementing Custom Date and Time Picker with 2-way Data Binding Support

Implementation of Sponsors API in Open Event Organizer Android App

New contributors to this project are sometimes not experienced with the set of libraries and MVP pattern which this app uses. This blog post is an attempt to walk a new contributor through some parts of the code of the app by implementing an operation for an endpoint of the API. We’ll be implementing the sponsor endpoint.

Open Event Organizer Android app uses a robust architecture. It is presently using the MVP (Model-View-Presenter) architecture. Therefore, this blog post aims at giving some brief insights to the app architecture through the implementation Sponsor endpoint. This blog post will focus only on one operation of the endpoint – the list operation – so as to make the post short enough.

This blog post relates to Pull Request #901 of Open Event Organizer App.

Project structure:
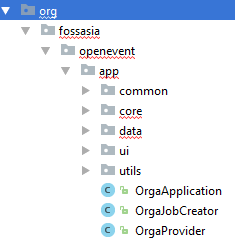
These are the parts of the project structure where major updates will be made for the implementation of Sponsor endpoint:

core

data

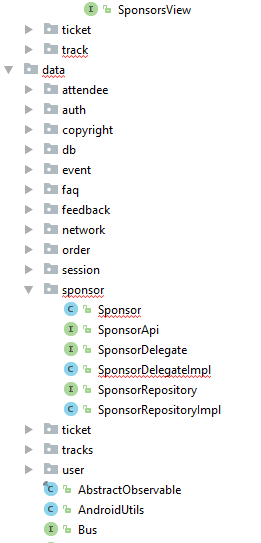
Setting up elements in the data module for the respective endpoint

Sponsor.java

@Data
@Builder
@Type(“sponsor”)
@AllArgsConstructor
@JsonNaming(PropertyNamingStrategy.KebabCaseStrategy.class)
@EqualsAndHashCode(callSuper = false, exclude = { “sponsorDelegate”, “checking” })
@Table(database = OrgaDatabase.class)
public class Sponsor extends AbstractItem<Sponsor, SponsorsViewHolder> implements Comparable<Sponsor>, HeaderProvider {

   @Delegate(types = SponsorDelegate.class)
   private final SponsorDelegateImpl sponsorDelegate = new         SponsorDelegateImpl(this);

This class uses Lombok, Jackson, RaizLabs-DbFlow, extends AbstractItem class (from Fast Adapter) and implements Comparable and HeaderProvider.

All the annotations processor help us reduce boilerplate code.

From the Lombok plugin, we are using:

Lombok has annotations to generate Getters, Setters, Constructors, toString(), Equal() and hashCode() methods. Thus, it is very efficient in reducing boilerplate code

@Getter,  @Setter, @ToString, @EqualsAndHashCode

@Data is a shortcut annotation that bundles the features of @Getter, @Setter, @ToString and @EqualsAndHashCode

The @Delegate is used for direct calls to the methods that are annotated with it, to the specified delegate. It basically separates the model class from other methods which do not pertain to data.

Jackson

@JsonNaming – used to choose the naming strategies for properties in serialization, overriding the default. For eg:  KEBAB_CASE, LOWER_CASE, SNAKE_CASE, UPPER_CAMEL_CASE

@JsonNaming(PropertyNamingStrategy.KebabCaseStrategy.class)

@JsonProperty – used to store the variable from JSON schema as the given variable name. So, “type” from JSON will be stored as sponsorType.

@JsonProperty(“type”)
public String sponsorType;

RaizLabs-DbFlow

DbFlow uses model classes which must be annotated using the annotations provided by the library. The basic annotations are – @Table, @PrimaryKey, @Column, @ForeignKey etc.

These will create a table named attendee with the columns and the relationships annotated.

SponsorDelegate.java and SponsorDelegateImpl.java

The above are required only for method declarations of the classes and interfaces that Sponsor.java extends or implements. These basically separate the required method overrides from the base item class.

public class SponsorDelegateImpl extends AbstractItem<Sponsor, SponsorsViewHolder> implements SponsorDelegate {

SponsorRepository.java and SponsorRepositoryImpl.java

A Repository mediates between the domain and data mapping layers, acting like an in-memory domain object collection. Client objects construct query specifications declaratively and submit them to Repository for satisfaction. Objects can be added to and removed from the Repository, as they can from a simple collection of objects, and the mapping code encapsulated by the Repository will carry out the appropriate operations behind the scenes.

public interface SponsorRepository {
  @NonNull
  Observable<Sponsor> getSponsors(long eventId, boolean reload);
}

Presently the app uses MVP architecture and the core package contains respective Views and their Presenters, whereas the data package contains the Model implementation.

To understand Observable, one will need to dive in RxJava. This video of a presentation by Jake Wharton can be a great start.

So, basically Observables represent sources of data, and whenever there is a change in our observable, i.e. our data, it fires an event and we get to know about it only if we have subscribed to it.

Setting up elements in core module (views and presenters)

Presently the app uses MVP architecture and the core package contains respective Views and Presenters for different properties of an event.

SponsorView.java

public interface SponsorsView extends Progressive, Erroneous, Refreshable, Emptiable<Sponsor> {
}

SponsorsFragment.java

This is a simple Fragment that extends BaseFragment (a generic fragment class predefined in the project) and implements SponsorView interface.

SponsorsListAdapter.java

A simple adapter for a RecyclerView.

SponsorsPresenter.java

The presenter is the middle-man between model and view. All your presentation logic belongs to it. A Presenter in a MVP architecture is responsible for querying the model and updating the view, reacting to user interactions and updating the model.

In this Presenter we have used the @Inject annotation and some RxJava code:

@Inject
public SponsorsPresenter(SponsorRepository sponsorRepository, DatabaseChangeListener<Sponsor> sponsorChangeListener) {
  this.sponsorRepository = sponsorRepository;
  this.sponsorChangeListener = sponsorChangeListener;
}

The @Inject annotation is used to request dependencies. It can be used on a constructor, a field, or a method. If you annotate a constructor with @Inject, Dagger 2 can also use an instance of this object to fulfill dependencies. Note that we are not instantiating any object here ourselves.

Some RxJava part, which is not in the scope of this blog.

private void listenChanges() {
  sponsorChangeListener.startListening();
  sponsorChangeListener.getNotifier()
      .compose(dispose(getDisposable()))
      .map(DbFlowDatabaseChangeListener.ModelChange::getAction)
      .filter(action -> action.equals(BaseModel.Action.INSERT))
      .subscribeOn(Schedulers.io())
      .subscribe(sponsorModelChange -> loadSponsors(false), Logger::logError);
}


public void loadSponsors(boolean forceReload) {
  getSponsorSource(forceReload)
      .compose(dispose(getDisposable()))
      .compose(progressiveErroneousRefresh(getView(), forceReload))
      .toList()
      .compose(emptiable(getView(), sponsors))
      .subscribe(Logger::logSuccess, Logger::logError);
}

Make changes to Dependency Injection modules

We are using Dagger for Dependency Injection, and therefore we need to update the modules that provide endpoint specific objects.

This video and this blog are a great start to learn about dependency injection using dagger.

Dependency injection is a technique whereby one object supplies the dependencies of another object. A dependency is an object that can be used (a service). An injection is the passing of a dependency to a dependent object (a client) that would use it. The service is made part of the client’s state. Passing the service to the client, rather than allowing a client to build or find the service, is the fundamental requirement of the pattern.(source)

Dependency Injection in built upon the concept of Inversion of Control. Which says that a class should get its dependencies from outside. In simple words, no class should instantiate another class but should get the instances from a configuration class.

Dagger 2 analyzes the dependencies for you and generates code to help wire them together.  It relies purely on using Java annotation processors and compile-time checks to analyze and verify dependencies. It is considered to be one of the most efficient dependency injection frameworks built to date.

@Provides is basically required to specify that the annotated method returns an object that should be available for injection to dependencies using @Inject

@Singleton annotation signals to the Dagger compiler that the instance should be created only once in the application.

@Binds annotation is a replacement for @Provides methods that simply returns an injected parameter. Its generated implementation is likely to be more efficient. A method annotated with @Binds must be: abstract.

ApiModule.java

@Provides
@Singleton
SponsorApi providesSponsorApi(Retrofit retrofit) {    return retrofit.create(SponsorApi.class);
}    

ChangeListenerModule.java

@Provides
DatabaseChangeListener<Sponsor> providesSponsorChangeListener() {
   return new DbFlowDatabaseChangeListener<>(Sponsor.class);
}

NetworkModule.java

@Provides
Class[] providesMappedClasses() {
   return new Class[]{Event.class, Attendee.class, Ticket.class, User.class,
   EventStatistics.class, Faq.class, Copyright.class, Feedback.class,           Track.class, Session.class, Sponsor.class};
   }

RepoModule.java

@Binds
@Singleton
abstract SponsorRepository bindsSponsorRepository(SponsorRepositoryImpl sponsorRepositoryImpl);

MainFragmentBuilderModule.java

@ContributesAndroidInjector
abstract SponsorsFragment contributeSponsorsFragment();

Also remember to make this change to FragmentNavigator.java

case R.id.nav_sponsor:
fragment = SponsorsFragment.newInstance(eventId);
break;

XML resources to be added:

  1. sponsors_item.xml
  2. sponsors_fragment.xml
  3. Make changes to activity_main_drawer.xml to include “sponsors” option.

Here’s what the result looks like:

References:

Lombok Plugin: https://blog.fossasia.org/using-lombok-to-reduce-boilerplate-code-in-open-event-android-app/

Jackson: https://blog.fossasia.org/shrinking-model-classes-boilerplate-in-open-event-android-projects/

RaizLabs DbFlow: https://blog.fossasia.org/persistence-layer-in-open-event-organizer-android-app/

Dependency Injection:
https://medium.com/@harivigneshjayapalan/dagger-2-for-android-beginners-di-part-i-f5cc4e5ad878

Continue ReadingImplementation of Sponsors API in Open Event Organizer Android App

Adding Multiple Select Checkboxes to Select Multiple Tickets for Discount Code in Open Event Frontend

This blog illustrates how we can add multiple select checkboxes to open event frontend using EmberJS.

Here we take an example of discount code creation in open event frontend. Since a discount code can be related to multiple tickets. Hence we should allow the organizer to choose multiple tickets from the event’s ticket list for which he/she wants the discount code to be applicable.

We start by generating a create route where we create a record for the discount code and pass the model to the template.

// routes/events/view/tickets/discount-codes/create.js

import Route from '@ember/routing/route';

export default Route.extend({
 titleToken() {
   return this.get('l10n').t('Create');
 },

 model() {
   return this.get('store').createRecord('discount-code', {
     event    : this.modelFor('events.view'),
     tickets  : [],
     usedFor  : 'ticket',
     marketer : this.get('authManager.currentUser')
   });
 }
});

We can see that we have a tickets relationship for new record of discount code which can accept multiple ticket as an array. We access this model in our template and create checkboxes for all tickets related to the event. So that the organizer can select multiple tickets for which he/she wants the discount code to be applicable.

// templates/components/forms/events/view/create-discount-code.hbs

{{t 'Select Ticket(s) applied to the discount code'}}
   {{ui-checkbox label='Select all Ticket types' name='all_ticket_types' value='tickets' checked=allTicketTypesChecked onChange=(action 'toggleAllSelection')}}

   {{#each data.event.tickets as |ticket|}}
     {{ui-checkbox label=ticket.name checked=ticket.isChecked onChange=(action 'updateTicketsSelection' ticket)}}
     <br>
   {{/each}}

This is part of the code that contain checkboxes for tickets. Full code can be seen here. We can see that first div contains the checkbox that allows us to select all the tickets at once. Once checked, this calls the action toggleAllSelection. This action is defined like this.

// components/forms/events/view/create-discount-code.js

toggleAllSelection(allTicketTypesChecked) {
     this.toggleProperty('allTicketTypesChecked');
     let tickets = this.get('data.event.tickets');
     if (allTicketTypesChecked) {
       this.set('data.tickets', tickets.slice());
     } else {
       this.get('data.tickets').clear();
     }
     tickets.forEach(ticket => {
       ticket.set('isChecked', allTicketTypesChecked);
     });
   },


In the toggleAllSelection action we loop over all the tickets of an event and set their isCheck property to either true or false depending on whether Select All checkbox was checked or unchecked. This is done to make all individual tickets checkboxes as checked or unchecked depending on whether we have selected all or unselected all. Also we set or unset the data.tickets array which contains all the tickets of discount-code record that were selected using checkboxes.

Going back to template in second div we render all the tickets individually with their checkbox. Each time a ticket is checked or unchecked we call updateTicketSelection action. Let us have a look at updateTicketSelection action.

// components/forms/events/view/create-discount-code.js

updateTicketsSelection(ticket) {
     if (!ticket.get('isChecked')) {
       this.get('data.tickets').pushObject(ticket);
       ticket.set('isChecked', true);
       if (this.get('data.tickets').length === this.get('data.event.tickets').length) {
         this.set('allTicketTypesChecked', true);
       }
     } else {
       this.get('data.tickets').removeObject(ticket);
       ticket.set('isChecked', false);
       this.set('allTicketTypesChecked', false);
     }
   },


In this action, we check if the ticket is checked or not. If it is checked we add it to the data.tickets array and further check if we have selected all the tickets or not. In case we have selected all the tickets then we also mark select all checkbox as checked through allTicketTypesChecked property. If it is unchecked we remove that ticket from the array. You can see full code here.

In this way, we implement multiple select checkboxes to select more than one data of a particular type through Ember.

Resources:

Continue ReadingAdding Multiple Select Checkboxes to Select Multiple Tickets for Discount Code in Open Event Frontend

Open Event Server – Export Attendees as CSV File

FOSSASIA‘s Open Event Server is the REST API backend for the event management platform, Open Event. Here, the event organizers can create their events, add tickets for it and manage all aspects from the schedule to the speakers. Also, once he/she makes his event public, others can view it and buy tickets if interested.

The organizer can see all the attendees in a very detailed view in the event management dashboard. He can see the statuses of all the attendees. The possible statuses are completed, placed, pending, expired and canceled, checked in and not checked in. He/she can take actions such as checking in the attendee.

If the organizer wants to download the list of all the attendees as a CSV file, he or she can do it very easily by simply clicking on the Export As and then on CSV.

Let us see how this is done on the server.

Server side – generating the Attendees CSV file

Here we will be using the csv package provided by python for writing the csv file.

import csv
  • We define a method export_attendees_csv which takes the attendees to be exported as a CSV file as the argument.
  • Next, we define the headers of the CSV file. It is the first row of the CSV file.
def export_attendees_csv(attendees):
   headers = ['Order#', 'Order Date', 'Status', 'First Name', 'Last Name', 'Email',
              'Country', 'Payment Type', 'Ticket Name', 'Ticket Price', 'Ticket Type']
  • A list is defined called rows. This contains the rows of the CSV file. As mentioned earlier, headers is the first row.
rows = [headers]
  • We iterate over each attendee in attendees and form a row for that attendee by separating the values of each of the columns by a comma. Here, every row is one attendee.
  • The newly formed row is added to the rows list.
for attendee in attendees:
   column = [str(attendee.order.get_invoice_number()) if attendee.order else '-',
             str(attendee.order.created_at) if attendee.order and attendee.order.created_at else '-',
             str(attendee.order.status) if attendee.order and attendee.order.status else '-',
             str(attendee.firstname) if attendee.firstname else '',
             str(attendee.lastname) if attendee.lastname else '',
             str(attendee.email) if attendee.email else '',
             str(attendee.country) if attendee.country else '',
             str(attendee.order.payment_mode) if attendee.order and attendee.order.payment_mode else '',
             str(attendee.ticket.name) if attendee.ticket and attendee.ticket.name else '',
             str(attendee.ticket.price) if attendee.ticket and attendee.ticket.price else '0',
             str(attendee.ticket.type) if attendee.ticket and attendee.ticket.type else '']

   rows.append(column)
  • rows contains the contents of the CSV file and hence it is returned.
return rows
  • We iterate over each item of rows and write it to the CSV file using the methods provided by the csv package.
writer = csv.writer(temp_file)
from app.api.helpers.csv_jobs_util import export_attendees_csv
content = export_attendees_csv(attendees)
for row in content:
   writer.writerow(row)

Obtaining the Attendees CSV file:

Firstly, we have an API endpoint which starts the task on the server.

GET - /v1/events/{event_identifier}/export/attendees/csv

Here, event_identifier is the unique ID of the event. This endpoint starts a celery task on the server to export the attendees of the event as a CSV file. It returns the URL of the task to get the status of the export task. A sample response is as follows:

{
  "task_url": "/v1/tasks/b7ca7088-876e-4c29-a0ee-b8029a64849a"
}

The user can go to the above-returned URL and check the status of his/her Celery task. If the task completed successfully he/she will get the download URL. The endpoint to check the status of the task is:

and the corresponding response from the server –

{
  "result": {
    "download_url": "/v1/events/1/exports/http://localhost/static/media/exports/1/zip/OGpMM0w2RH/event1.zip"
  },
  "state": "SUCCESS"
}

The file can be downloaded from the above-mentioned URL.

References

Continue ReadingOpen Event Server – Export Attendees as CSV File

Open Event Server – Export Orders as CSV File

FOSSASIA‘s Open Event Server is the REST API backend for the event management platform, Open Event. Here, the event organizers can create their events, add tickets for it and manage all aspects from the schedule to the speakers. Also, once he/she makes his event public, others can view it and buy tickets if interested.

The organizer can see all the orders in a very detailed view in the event management dashboard. He can see the statuses of all the orders. The possible statuses are completed, placed, pending, expired and canceled.

If the organizer wants to download the list of all the orders as a CSV file, he or she can do it very easily by simply clicking on the Export As and then on CSV.

Let us see how this is done on the server.

Server side – generating the Orders CSV file

Here we will be using the csv package provided by python for writing the csv file.

import csv
  • We define a method export_orders_csv which takes the orders to be exported as a CSV file as the argument.
  • Next, we define the headers of the CSV file. It is the first row of the CSV file.
def export_orders_csv(orders):
   headers = ['Order#', 'Order Date', 'Status', 'Payment Type', 'Total Amount', 'Quantity',
              'Discount Code', 'First Name', 'Last Name', 'Email']
  • A list is defined called rows. This contains the rows of the CSV file. As mentioned earlier, headers is the first row.
rows = [headers]
  • We iterate over each order in orders and form a row for that order by separating the values of each of the columns by a comma. Here, every row is one order.
  • The newly formed row is added to the rows list.
for order in orders:
   if order.status != "deleted":
       column = [str(order.get_invoice_number()), str(order.created_at) if order.created_at else '',
                 str(order.status) if order.status else '', str(order.paid_via) if order.paid_via else '',
                 str(order.amount) if order.amount else '', str(order.get_tickets_count()),
                 str(order.discount_code.code) if order.discount_code else '',
                 str(order.user.first_name)
                 if order.user and order.user.first_name else '',
                 str(order.user.last_name)
                 if order.user and order.user.last_name else '',
                 str(order.user.email) if order.user and order.user.email else '']
       rows.append(column)
  • rows contains the contents of the CSV file and hence it is returned.
return rows
  • We iterate over each item of rows and write it to the CSV file using the methods provided by the csv package.
writer = csv.writer(temp_file)
from app.api.helpers.csv_jobs_util import export_orders_csv
content = export_orders_csv(orders)
for row in content:
   writer.writerow(row)

Obtaining the Orders CSV file:

Firstly, we have an API endpoint which starts the task on the server.

GET - /v1/events/{event_identifier}/export/orders/csv

Here, event_identifier is the unique ID of the event. This endpoint starts a celery task on the server to export the orders of the event as a CSV file. It returns the URL of the task to get the status of the export task. A sample response is as follows:

{
  "task_url": "/v1/tasks/b7ca7088-876e-4c29-a0ee-b8029a64849a"
}</span

The user can go to the above-returned URL and check the status of his/her Celery task. If the task completed successfully he/she will get the download URL. The endpoint to check the status of the task is:

and the corresponding response from the server –

{
  "result": {
    "download_url": "/v1/events/1/exports/http://localhost/static/media/exports/1/zip/OGpMM0w2RH/event1.zip"
  },
  "state": "SUCCESS"
}

The file can be downloaded from the aabove-mentionedURL.

References

Continue ReadingOpen Event Server – Export Orders as CSV File