Adding Online Payment Support in Open Event Frontend via PayPal

Open Event Frontend involves ticketing system which supports both paid and free tickets. To buy a paid ticket Open Event provides several options such as debit card, credit card, cheque, bank transfer and onsite payments. So to add support for debit and credit card payments Open Event uses Paypal checkout as one of the options. Using paypal checkout screen users can enter their card details and pay for their ticket or they can use their paypal wallet money to pay for their tickets. Given below are some steps which are to be followed for successfully charging a user for ticket using his/her card. We create an application on paypal developer dashboard to receive client id and secret key. We set these keys in admin dashboard of open event and then while checkout we use these keys to render checkout screen. After clicking checkout button a request is sent to create-paypal-payment endpoint of open event server to create a paypal token which is used in checkout procedure. After user’s verification paypal generates a payment id is which is used by open event frontend to charge the user for stipulated amount. We send this token to open event server which processes the token and charge the user. We get error or success message from open event server as per the process outcome. To render the paypal checkout elements we use paypal checkout library provided by npm. Paypal button is rendered using Button.render method of paypal checkout library. Code snippet is given below. // app/components/paypal-button.js paypal.Button.render({ env: 'sandbox', commit: true, style: { label : 'pay', size : 'medium', // tiny, small, medium color : 'gold', // orange, blue, silver shape : 'pill' // pill, rect }, payment() { // this is used to obtain paypal token to initialize payment process }, onAuthorize(data) { // this callback will be for authorizing the payments } }, this.elementId);   After button is rendered next step is to obtain a payment token from create-paypal-payment endpoint of open event server. For this we use the payment() callback of paypal-checkout. Code snippet for payment callback method is given below: // app/components/paypal-button.js let createPayload = { 'data': { 'attributes': { 'return-url' : `${window.location.origin}/orders/${order.identifier}/placed`, 'cancel-url' : `${window.location.origin}/orders/${order.identifier}/placed` }, 'type': 'paypal-payment' } }; paypal.Button.render({ //Button attributes payment() { return loader.post(`orders/${order.identifier}/create-paypal-payment`, createPayload) .then(res => { return res.payment_id; }); }, onAuthorize(data) { // this callback will be for authorizing the payments } }, this.elementId);   After getting the token payment screen is initialized and user is asked to enter his/her credentials. This process is handled by paypal servers. After user verifies his/her payment paypal generates a paymentId and a payerId and sends it back to open event. After the payment authorization onAuthorize() method of paypal is called and payment is further processed in this callback method. Payment ID and payer Id received from paypal is sent to charge endpoint of open event server to charge the user. After receiving success or failure message from paypal proper message is displayed to users and their order…

Continue ReadingAdding Online Payment Support in Open Event Frontend via PayPal

Countrywise Usage Analytics of a Skill in SUSI.AI

The statistics regarding which country the skills are being used is quite important. They help in updating the skill to support the native language of those countries. SUSI.AI must be able to understand as well as reply in its user’s language. So mainly the server side and some client side (web client) implementation of country wise skill usage statistics is explained in this blog. Fetching the user’s location on the web client Add a function in chat.susi.ai/src/actions/API.actions.js to fetch the users location. The function makes a call to freegeoip.net API which returns the client’s location based on its IP address. So country name and code are required for country wise usage analytics. export function getLocation(){ $.ajax({ url: 'https://cors-anywhere.herokuapp.com/http://freegeoip.net/json/', success: function (response) { _Location = { lat: response.latitude, lng: response.longitude, countryCode: response.country_code, countryName: response.country_name }; }, }); } Send the location parameters along with the query while fetching reply from SUSI server in chat.json API. The parameters are country_name and country_code. if(_Location){ url += '&latitude='+_Location.lat+'&longitude='+_Location.lng+'&country_code='+_Location.countryCode+'&country_name='+_Location.countryName; } Storage of Country Wise Skill Usage Data on SUSI Server Create a countryWiseSkillUsage.json file to store the country wise skill usage stats and make a JSONTray object for that in src/ai/susi/DAO.java file. The JSON file contains the country name, country code and the usage count in that country. Modify the src/ai/susi/server/api/susi/SusiService.java file to fetch country_name and country_code from the query parameters and pass them SusiCognition constructor. String countryName = post.get("country_name", ""); String countryCode = post.get("country_code", ""); ... SusiCognition cognition = new SusiCognition(q, timezoneOffset, latitude, longitude, countryCode, countryName, language, count, user.getIdentity(), minds.toArray(new SusiMind[minds.size()])); Modify the src/ai/susi/mind/SusiCognition.java file to accept the countryCode and countryName in the constructor parameters. Check which skill is being currently used for the response and update the skill usage stats for that country in countryWiseSkillUsage.json. Call the function updateCountryWiseUsageData() to update the skill usage data. if (!countryCode.equals("") && !countryName.equals("")) { List<String> skills = dispute.get(0).getSkills(); for (String skill : skills) { try { updateCountryWiseUsageData(skill, countryCode, countryName); } catch (Exception e) { e.printStackTrace(); } } } The updateCountryWiseUsageData() function accepts the skill path , country name and country code. It parses the skill path to get the skill metadata like its model name, group name, language etc. The function then checks if the country already exists in the JSON file or not. If it exists then it increments the usage count by 1 else it creates an entry for the skill in the JSON file and initializes it with the current country name and usage count 1. for (int i = 0; i < countryWiseUsageData.length(); i++) { countryUsage = countryWiseUsageData.getJSONObject(i); if (countryUsage.get("country_code").equals(countryCode)) { countryUsage.put("count", countryUsage.getInt("count")+1); countryWiseUsageData.put(i,countryUsage); } } API to access the Country Wise Skill Usage Data Create GetCountryWiseSkillUsageService.java file to return the usage stats stored in countryWiseSkillUsage.json public ServiceResponse serviceImpl(Query call, HttpServletResponse response, Authorization rights, final JsonObjectWithDefault permissions) { ... // Fetch the query parameters JSONArray countryWiseSkillUsage = languageName.getJSONArray(skill_name); return new ServiceResponse(result); } Add the API file to src/ai/susi/server/api/susi/SusiServer.java services = new Class[]{ ... //Skill usage data GetCountryWiseSkillUsageService.class ... }   Endpoint : /cms/getCountryWiseSkillUsage.json Parameters…

Continue ReadingCountrywise Usage Analytics of a Skill in SUSI.AI

Open Event Server – Export Speakers as CSV File

FOSSASIA‘s Open Event Server is the REST API backend for the event management platform, Open Event. Here, the event organizers can create their events, add tickets for it and manage all aspects from the schedule to the speakers. Also, once he/she makes his event public, others can view it and buy tickets if interested. The organizer can see all the speakers in a very detailed view in the event management dashboard. He can see the statuses of all the speakers. The possible statuses are pending, accepted and rejected. He/she can take actions such as editing/viewing speakers. If the organizer wants to download the list of all the speakers as a CSV file, he or she can do it very easily by simply clicking on the Export As CSV button in the top right-hand corner. Let us see how this is done on the server. Server side - generating the Speakers CSV file Here we will be using the csv package provided by python for writing the csv file. import csv We define a method export_speakers_csv which takes the speakers to be exported as a CSV file as the argument. Next, we define the headers of the CSV file. It is the first row of the CSV file. def export_speakers_csv(speakers):   headers = ['Speaker Name', 'Speaker Email', 'Speaker Session(s)',              'Speaker Mobile', 'Speaker Bio', 'Speaker Organisation', 'Speaker Position'] A list is defined called rows. This contains the rows of the CSV file. As mentioned earlier, headers is the first row. rows = [headers] We iterate over each speaker in speakers and form a row for that speaker by separating the values of each of the columns by a comma. Here, every row is one speaker. As a speaker can contain multiple sessions we iterate over each session for that particular speaker and append each session to a string. ‘;’ is used as a delimiter. This string is then added to the row. We also include the state of the session - accepted, rejected, confirmed. The newly formed row is added to the rows list. for speaker in speakers:   column = [speaker.name if speaker.name else '', speaker.email if speaker.email else '']   if speaker.sessions:       session_details = ''       for session in speaker.sessions:           if not session.deleted_at:               session_details += session.title + ' (' + session.state + '); '       column.append(session_details[:-2])   else:       column.append('')   column.append(speaker.mobile if speaker.mobile else '')   column.append(speaker.short_biography if speaker.short_biography else '')   column.append(speaker.organisation if speaker.organisation else '')   column.append(speaker.position if speaker.position else '')   rows.append(column) rows contains the contents of the CSV file and hence it is returned. return rows We iterate over each item of rows and write it to the CSV file using the methods provided by the csv package. with open(file_path, "w") as temp_file:   writer = csv.writer(temp_file)   from app.api.helpers.csv_jobs_util import export_speakers_csv   content = export_speakers_csv(speakers)   for row in content:       writer.writerow(row) Obtaining the Speakers CSV file: Firstly, we have an API endpoint which starts the task on the server. GET - /v1/events/{event_identifier}/export/speakers/csv Here, event_identifier is the unique ID of the event. This endpoint starts a celery task on the server…

Continue ReadingOpen Event Server – Export Speakers as CSV File

Open Event Server – Export Sessions as CSV File

FOSSASIA‘s Open Event Server is the REST API backend for the event management platform, Open Event. Here, the event organizers can create their events, add tickets for it and manage all aspects from the schedule to the speakers. Also, once he/she makes his event public, others can view it and buy tickets if interested. The organizer can see all the sessions in a very detailed view in the event management dashboard. He can see the statuses of all the sessions. The possible statuses are pending, accepted, confirmed and rejected. He/she can take actions such as accepting/rejecting the sessions. If the organizer wants to download the list of all the sessions as a CSV file, he or she can do it very easily by simply clicking on the Export As CSV button in the top right-hand corner. Let us see how this is done on the server. Server side - generating the Sessions CSV file Here we will be using the csv package provided by python for writing the csv file. import csv We define a method export_sessions_csv which takes the sessions to be exported as a CSV file as the argument. Next, we define the headers of the CSV file. It is the first row of the CSV file. def export_sessions_csv(sessions):   headers = ['Session Title', 'Session Speakers',              'Session Track', 'Session Abstract', 'Created At', 'Email Sent'] A list is defined called rows. This contains the rows of the CSV file. As mentioned earlier, headers is the first row. rows = [headers] We iterate over each session in sessions and form a row for that session by separating the values of each of the columns by a comma. Here, every row is one session. As a session can contain multiple speakers we iterate over each speaker for that particular session and append each speaker to a string. ‘;’ is used as a delimiter. This string is then added to the row. The newly formed row is added to the rows list. for session in sessions:   if not session.deleted_at:       column = [session.title + ' (' + session.state + ')' if session.title else '']       if session.speakers:           in_session = ''           for speaker in session.speakers:               if speaker.name:                   in_session += (speaker.name + '; ')           column.append(in_session[:-2])       else:           column.append('')       column.append(session.track.name if session.track and session.track.name else '')       column.append(strip_tags(session.short_abstract) if session.short_abstract else '')       column.append(session.created_at if session.created_at else '')       column.append('Yes' if session.is_mail_sent else 'No')       rows.append(column) rows contains the contents of the CSV file and hence it is returned. return rows We iterate over each item of rows and write it to the CSV file using the methods provided by the csv package. writer = csv.writer(temp_file) from app.api.helpers.csv_jobs_util import export_sessions_csv content = export_sessions_csv(sessions) for row in content:   writer.writerow(row) Obtaining the Sessions CSV file: Firstly, we have an API endpoint which starts the task on the server. GET - /v1/events/{event_identifier}/export/sessions/csv Here, event_identifier is the unique ID of the event. This endpoint starts a celery task on the server to export the sessions of the event as a CSV file. It returns the URL of…

Continue ReadingOpen Event Server – Export Sessions as CSV File

Implementing Endpoint to Resend Email Verification

Earlier, when a user registered via Open Event Frontend, s/he received a verification link via email to confirm their account. However, this was not enough in the long-term. If the confirmation link expired, or for some reasons the verification mail got deleted on the user side, there was no functionality to resend the verification email, which prevented the user from getting fully registered. Although the front-end already showed the option to resend the verification link, there was no support from the server to do that, yet. So it was decided that a separate endpoint should be implemented to allow re-sending the verification link to a user. /resend-verification-email was an endpoint that would fit this action. So we decided to go with it and create a route in `auth.py` file, which was the appropriate place for this feature to reside. First step was to do the necessary imports and then definition: from app.api.helpers.mail import send_email_confirmation from app.models.mail import USER_REGISTER_WITH_PASSWORD ... ... @auth_routes.route('/resend-verification-email', methods=['POST']) def resend_verification_email(): ... Now we safely fetch the email mentioned in the request and then search the database for the user corresponding to that email: def resend_verification_email(): try: email = request.json['data']['email'] except TypeError: return BadRequestError({'source': ''}, 'Bad Request Error').respond() try: user = User.query.filter_by(email=email).one() except NoResultFound: return UnprocessableEntityError( {'source': ''}, 'User with email: ' + email + ' not found.').respond() else: ... Once a user has been identified in the database, we proceed further and create an essentially unique hash for the user verification. This hash is in turn used to generate a verification link that is then ready to be sent via email to the user: else: serializer = get_serializer() hash_ = str(base64.b64encode(str(serializer.dumps( [user.email, str_generator()])).encode()), 'utf-8') link = make_frontend_url( '/email/verify'.format(id=user.id), {'token': hash_}) Finally, the email is sent: send_email_with_action( user, USER_REGISTER_WITH_PASSWORD, app_name=get_settings()['app_name'], email=user.email) if not send_email_confirmation(user.email, link): return make_response(jsonify(message="Some error occured"), 500) return make_response(jsonify(message="Verification email resent"), 200) But this was not enough. When the endpoint was tested, it was found that actual emails were not being delivered, even after correctly configuring the email settings locally. So, after a bit of debugging, it was found that the settings, which were using Sendgrid to send emails, were using a deprecated Sendgrid API endpoint. A separate email function is used to send emails via Sendgrid and it contained an old endpoint that was no longer recommended by Sendgrid: @celery.task(name='send.email.post') def send_email_task(payload, headers): requests.post( "https://api.sendgrid.com/api/mail.send.json", data=payload, headers=headers ) The new endpoint, as per Sendgrid’s documentation, is: https://api.sendgrid.com/v3/mail/send But this was not the only change required. Sendgrid had also modified the structure of requests they accepted, and the new structure was different from the existing one that was used in the server. Following is the new structure: '{"personalizations": [{"to": [{"email": "example@example.com"}]}],"from": {"email": "example@example.com"},"subject": "Hello, World!","content": [{"type": "text/plain", "value": "Heya!"}]}' The header structure was also changed, so the structure in the server was also updated to headers = { "Authorization": ("Bearer " + key), "Content-Type": "application/json" } The Sendgrid function (which is executed as a Celery task) was modified as follows, to incorporate the changes…

Continue ReadingImplementing Endpoint to Resend Email Verification

Adding Port Specification for Static File URLs in Open Event Server

Until now, static files stored locally on Open Event server did not have port specification in their URLs. This opened the door for problems while consuming local APIs. This would have created inconsistencies, if two server processes were being served on the same machine but at different ports. In this blog post, I will explain my approach towards solving this problem, and describe code snippets to demonstrate the changes I made in the Open Event Server codebase. The first part in this process involved finding the source of the bug. For this, my open-source integrated development environment, Microsoft Visual Studio Code turned out to be especially useful. It allowed me to jump from function calls to function definitions quickly: I started at events.py and jumped all the way to storage.py, where I finally found out the source of this bug, in upload_local() function: def upload_local(uploaded_file, key, **kwargs): """ Uploads file locally. Base dir - static/media/ """ filename = secure_filename(uploaded_file.filename) file_relative_path = 'static/media/' + key + '/' + generate_hash(key) + '/' + filename file_path = app.config['BASE_DIR'] + '/' + file_relative_path dir_path = file_path.rsplit('/', 1)[0] # delete current try: rmtree(dir_path) except OSError: pass # create dirs if not os.path.isdir(dir_path): os.makedirs(dir_path) uploaded_file.save(file_path) file_relative_path = '/' + file_relative_path if get_settings()['static_domain']: return get_settings()['static_domain'] + \ file_relative_path.replace('/static', '') url = urlparse(request.url) return url.scheme + '://' + url.hostname + file_relative_path Look closely at the return statement: return url.scheme + '://' + url.hostname + file_relative_path Bingo! This is the source of our bug. A straightforward solution is to simply concatenate the port number in between, but that will make this one-liner look clumsy - unreadable and un-pythonic. We therefore use Python string formatting: return '{scheme}://{hostname}:{port}{file_relative_path}'.format( scheme=url.scheme, hostname=url.hostname, port=url.port, file_relative_path=file_relative_path) But this statement isn't perfect. There's an edge case that might give unexpected URL. If the port isn't originally specified, Python's string formatting heuristic will substitute url.port with None. This will result in a URL like http://localhost:None/some/file_path.jpg, which is obviously something we don't desire. We therefore append a call to Python's string replace() method: replace(':None', '') The resulting return statement now looks like the following: return '{scheme}://{hostname}:{port}{file_relative_path}'.format( scheme=url.scheme, hostname=url.hostname, port=url.port, file_relative_path=file_relative_path).replace(':None', '') This should fix the problem. But that’s not enough. We need to ensure that our project adapts well with the change we made. We check this by running the project tests locally: $ nosetests tests/unittests Unfortunately, the tests fail with the following traceback: ====================================================================== ERROR: test_create_save_image_sizes (tests.unittests.api.helpers.test_files.TestFilesHelperValidation) ---------------------------------------------------------------------- Traceback (most recent call last): File "/open-event-server/tests/unittests/api/helpers/test_files.py", line 138, in test_create_save_image_sizes resized_width_large, _ = self.getsizes(resized_image_file_large) File "/open-event-server/tests/unittests/api/helpers/test_files.py", line 22, in getsizes im = Image.open(file) File "/usr/local/lib/python3.6/site-packages/PIL/Image.py", line 2312, in open fp = builtins.open(filename, "rb") FileNotFoundError: [Errno 2] No such file or directory: '/open-event-server:5000/static/media/events/53b8f572-5408-40bf-af97-6e9b3922631d/large/UFNNeW5FRF/5980ede1-d79b-4907-bbd5-17511eee5903.jpg' It’s evident from this traceback that the code in our test framework is not converting the image url to file path correctly. The port specification part is working fine, but it should not affect file names, they should be independent of port number. The files saved originally do not have port specified in their name, but…

Continue ReadingAdding Port Specification for Static File URLs in Open Event Server

Multiple Languages Filter in SUSI.AI Skills CMS and Server

There are numerous users of SUSI.AI globally. Most of the users use skills in English languages while some prefer their native languages. Also,there are some users who want SUSI skills of multiple languages. So the process of fetching skills from multiple languages has been explained in this blog. Server side implementation The language parameter in ListSkillService.java is modified to accept a string that contains the required languages separated by a comma. Then this parameter is split by comma symbol which returns an array of the required languages. String language_list = call.get("language", "en"); String[] language_names = language_list.split(","); Then simple loop over this array language by language and keep adding the the skills’ metadata, in that language into the response object. for (String language_name : language_names) { // fetch the skills in this language. } CMS side implementation Convert the state variable languageValue, in BrowseSkill.js, from strings to an array so that multiple languages can be kept in it. languageValue: ['en'] Change the language dropdown menu to allow selection of multiple values and attach an onChange listener to it. Its value is the same as that of state variable languageValue and its content is filled by calling a function languageMenuItems(). <SelectField multiple={true} hintText="Languages" value={languageValue} onChange={this.handleLanguageChange} > {this.languageMenuItems(languageValue)} </SelectField> The languageMenuItems() function gets the list of checked languages as a parameter. The whole list of languages are stored in a global variable called languages. So this function loops over the list of all the languages and check / uncheck them based on the values passed in the argument. It build a menu item for each language and put the ISO6391 native name of that language into the menu item. languageMenuItems(values) { return languages.map(name => ( <MenuItem insetChildren={true} checked={values && values.indexOf(name) > -1} value={name} primaryText={ ISO6391.getNativeName(name) ? ISO6391.getNativeName(name) : 'Universal' } /> )); } While the language change handler gets the values of the selected languages in the form of an array, from the drop down menu. It simply assigns this value to the state variable languageValue and calls the loadCards() function to load the skills based on the new filter. this.setState({ languageValue: values }, function() { this.loadCards(); });  References Material UI Docs - https://material-ui.com/api/select/

Continue ReadingMultiple Languages Filter in SUSI.AI Skills CMS and Server

Implementation of Sponsors API in Open Event Organizer Android App

New contributors to this project are sometimes not experienced with the set of libraries and MVP pattern which this app uses. This blog post is an attempt to walk a new contributor through some parts of the code of the app by implementing an operation for an endpoint of the API. We’ll be implementing the sponsor endpoint. Open Event Organizer Android app uses a robust architecture. It is presently using the MVP (Model-View-Presenter) architecture. Therefore, this blog post aims at giving some brief insights to the app architecture through the implementation Sponsor endpoint. This blog post will focus only on one operation of the endpoint - the list operation - so as to make the post short enough. This blog post relates to Pull Request #901 of Open Event Organizer App. Project structure: 
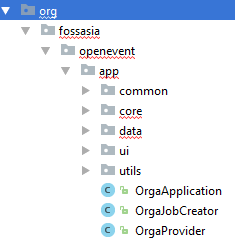
These are the parts of the project structure where major updates will be made for the implementation of Sponsor endpoint: core data 
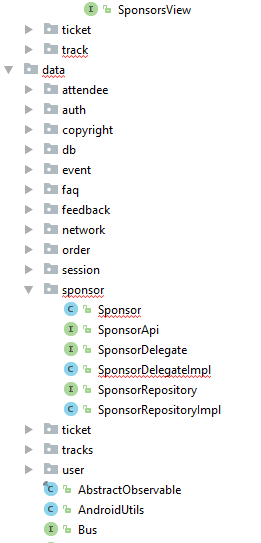
Setting up elements in the data module for the respective endpoint Sponsor.java @Data @Builder @Type("sponsor") @AllArgsConstructor @JsonNaming(PropertyNamingStrategy.KebabCaseStrategy.class) @EqualsAndHashCode(callSuper = false, exclude = { "sponsorDelegate", "checking" }) @Table(database = OrgaDatabase.class) public class Sponsor extends AbstractItem<Sponsor, SponsorsViewHolder> implements Comparable<Sponsor>, HeaderProvider {    @Delegate(types = SponsorDelegate.class)    private final SponsorDelegateImpl sponsorDelegate = new         SponsorDelegateImpl(this); This class uses Lombok, Jackson, RaizLabs-DbFlow, extends AbstractItem class (from Fast Adapter) and implements Comparable and HeaderProvider. All the annotations processor help us reduce boilerplate code. From the Lombok plugin, we are using: Lombok has annotations to generate Getters, Setters, Constructors, toString(), Equal() and hashCode() methods. Thus, it is very efficient in reducing boilerplate code @Getter,  @Setter, @ToString, @EqualsAndHashCode @Data is a shortcut annotation that bundles the features of @Getter, @Setter, @ToString and @EqualsAndHashCode The @Delegate is used for direct calls to the methods that are annotated with it, to the specified delegate. It basically separates the model class from other methods which do not pertain to data. Jackson @JsonNaming - used to choose the naming strategies for properties in serialization, overriding the default. For eg:  KEBAB_CASE, LOWER_CASE, SNAKE_CASE, UPPER_CAMEL_CASE @JsonNaming(PropertyNamingStrategy.KebabCaseStrategy.class) @JsonProperty - used to store the variable from JSON schema as the given variable name. So, "type" from JSON will be stored as sponsorType. @JsonProperty("type") public String sponsorType; RaizLabs-DbFlow DbFlow uses model classes which must be annotated using the annotations provided by the library. The basic annotations are – @Table, @PrimaryKey, @Column, @ForeignKey etc. These will create a table named attendee with the columns and the relationships annotated. SponsorDelegate.java and SponsorDelegateImpl.java The above are required only for method declarations of the classes and interfaces that Sponsor.java extends or implements. These basically separate the required method overrides from the base item class. public class SponsorDelegateImpl extends AbstractItem<Sponsor, SponsorsViewHolder> implements SponsorDelegate { SponsorRepository.java and SponsorRepositoryImpl.java A Repository mediates between the domain and data mapping layers, acting like an in-memory domain object collection. Client objects construct query specifications declaratively and submit them to Repository for satisfaction. Objects can be added to and removed from the Repository, as they can from a simple collection of objects, and the mapping code encapsulated by the…

Continue ReadingImplementation of Sponsors API in Open Event Organizer Android App

Enable web app generation for multiple API formats

          Open event server has two types of API (Application Programming Interface) formats, with one being generated by the legacy server and other one by the server side of decoupled development structure. The open event web app supported only the new version of API format, thus an error in read contents of JSON was thrown for the old version API format. To enable the support for both kind of API formats such that web app can be generated for each of them and there is no need to convert JSON files of version v1 to v2 we added an option field to the generator, where the client can choose the API version. Excerpts and description for difference between data formats of API v1 and v2 The following excerpt is a subprogram getCopyrightData in both versions v1 and v2. The key for getting licence details in v1 is ‘licence_details’ and in v2 is ‘licence-details’. Similarly the key for getting copyright details in v1 is ‘copyright’ and in v2 is ‘event-copyright’. So the data is extracted from the JSON files depending on the API version, the client has selected. API V1 function getCopyrightData(event) { if(event.licence_details) { return convertLicenseToCopyright(event.licence_details, event.copyright); } else { return event.copyright; } }   API V2 function getCopyrightData(event) { if(event['licence-details']) { return convertLicenseToCopyright(event['licence-details'], event['event-copyright']); } else { event['event-copyright'].logo = event['event-copyright']['logo-url']; return event['event-copyright']; } }   Another example showing the difference between the API formats of v1 and v2 is excerpted below. The following excerpt shows a constant ‘url’ containing the event URLs and the details. The version v1 uses event_url as a key for the main page url whereas v2 uses event-url for getting the same. A similar kind of structural difference is present for rest of the fields where the special character underscore has been replaced by hyphen and a bit of change in the name format for keys such as start_time, end_time. API v1 const urls= { main_page_url: event.event_url, logo_url: event.logo, background_url: event.background_image, background_path: event.background_image, description: event.description, location: event.location_name, orgname: event.organizer_name, location_name: event.location_name, };   API v2 const urls= { main_page_url: event['event-url'], logo_url: event['logo-url'], background_url: event['original-image-url'], background_path: event['original-image-url'], location: event['location-name'], orgname: event['organizer-name'], location_name: event['location-name'], }; How we enabled support for both API formats? To add the support for both API formats we added a options field on generator’s index page where the user chooses the type of API format for web app generation. <label>Choose your API version</label> <ul style="list-style-type:none"> <li id="version1"><input name="apiVersion" type="radio" value="api_v1"> API_v1</li> <li id="version2"><input name="apiVersion" type="radio" value="api_v2"> API_v2</li> </ul> The generator depending on the version of API format, chooses the correct file where the data extraction from the input JSON files takes place. The file names are fold_v1.js and fold_v2.js for extraction of JSON v1 data and JSON v2 data respectively. var type = req.body.apiVersion || 'api_v2'; if(type === 'api_v1') { fold = require(__dirname + '/fold_v1.js'); } else { fold = require(__dirname + '/fold_v2.js'); }   The excerpts of code showing the difference between API formats of v1 and v2…

Continue ReadingEnable web app generation for multiple API formats

Open Event Server – Export Attendees as CSV File

FOSSASIA‘s Open Event Server is the REST API backend for the event management platform, Open Event. Here, the event organizers can create their events, add tickets for it and manage all aspects from the schedule to the speakers. Also, once he/she makes his event public, others can view it and buy tickets if interested. The organizer can see all the attendees in a very detailed view in the event management dashboard. He can see the statuses of all the attendees. The possible statuses are completed, placed, pending, expired and canceled, checked in and not checked in. He/she can take actions such as checking in the attendee. If the organizer wants to download the list of all the attendees as a CSV file, he or she can do it very easily by simply clicking on the Export As and then on CSV. Let us see how this is done on the server. Server side - generating the Attendees CSV file Here we will be using the csv package provided by python for writing the csv file. import csv We define a method export_attendees_csv which takes the attendees to be exported as a CSV file as the argument. Next, we define the headers of the CSV file. It is the first row of the CSV file. def export_attendees_csv(attendees):   headers = ['Order#', 'Order Date', 'Status', 'First Name', 'Last Name', 'Email',              'Country', 'Payment Type', 'Ticket Name', 'Ticket Price', 'Ticket Type'] A list is defined called rows. This contains the rows of the CSV file. As mentioned earlier, headers is the first row. rows = [headers] We iterate over each attendee in attendees and form a row for that attendee by separating the values of each of the columns by a comma. Here, every row is one attendee. The newly formed row is added to the rows list. for attendee in attendees:   column = [str(attendee.order.get_invoice_number()) if attendee.order else '-',             str(attendee.order.created_at) if attendee.order and attendee.order.created_at else '-',             str(attendee.order.status) if attendee.order and attendee.order.status else '-',             str(attendee.firstname) if attendee.firstname else '',             str(attendee.lastname) if attendee.lastname else '',             str(attendee.email) if attendee.email else '',             str(attendee.country) if attendee.country else '',             str(attendee.order.payment_mode) if attendee.order and attendee.order.payment_mode else '',             str(attendee.ticket.name) if attendee.ticket and attendee.ticket.name else '',             str(attendee.ticket.price) if attendee.ticket and attendee.ticket.price else '0',             str(attendee.ticket.type) if attendee.ticket and attendee.ticket.type else '']   rows.append(column) rows contains the contents of the CSV file and hence it is returned. return rows We iterate over each item of rows and write it to the CSV file using the methods provided by the csv package. writer = csv.writer(temp_file) from app.api.helpers.csv_jobs_util import export_attendees_csv content = export_attendees_csv(attendees) for row in content:   writer.writerow(row) Obtaining the Attendees CSV file: Firstly, we have an API endpoint which starts the task on the server. GET - /v1/events/{event_identifier}/export/attendees/csv Here, event_identifier is the unique ID of the event. This endpoint starts a celery task on the server to export the attendees of the event as a CSV file. It returns the URL of the task to get the status of the export task. A sample response is as follows:…

Continue ReadingOpen Event Server – Export Attendees as CSV File