Displaying Proper Notification While Image is Being Uploaded in Phimpme

In this blog, I will explain how to display App Icon and appropriate text messages in the notification bar while the image is being uploaded on the various social media platform in Phimpme Android application.

Displaying Application icon in the Notification Bar

Whenever Phimpme application uses the notification the application icon should be present during the progress bar is showing and after the image has been uploaded to the social network website.

In the notification bar there are two types of the icon that can be set:

  • Small icon
  • Large Icon

In the small icon, we are putting the upload sign to tell the users that the image is being uploaded.

In the large icon, I am putting the logo of the Phimpme application. This way when the user exits the application while there is an upload process going on, he or she will know that the upload process is from the Phimpme application.

To set the app icon in the Notification bar:

.setLargeIcon(BitmapFactory.decodeResource(ActivitySwitchHelper.getContext().getResources(),
       R.mipmap.ic_launcher))

To set the small icon in the Notification bar:

.setSmallIcon(R.drawable.ic_cloud_upload_black_24dp)

Displaying appropriate account name while uploading the Image

While uploading an Image the notification bar should show the appropriate Account Name in which the account is being uploaded. For example, if the image is being uploaded on Google Plus then the Notification should display “Uploading the image on Google Plus”.

For this, we need to modify the NotificationHandler.make() function and make it accept String resource as a parameter. We can then modify setContentTitle() function to display the appropriate message.

public static void make(@StringRes int title){

//Display Notification code over here

}

setContentTitle() function in Phimpme to display the appropriate function:

mBuilder.setContentTitle(ActivitySwitchHelper.getContext().getString(R.string.upload_progress) + " " + ActivitySwitchHelper.getContext().getResources().getString(title))

Notification make() function after the changes:

public static void make(@StringRes int title){
   mNotifyManager = (NotificationManager) ActivitySwitchHelper.getContext().getSystemService(Context.NOTIFICATION_SERVICE);
   mBuilder = new NotificationCompat.Builder(ActivitySwitchHelper.getContext());
   mBuilder.setContentTitle(ActivitySwitchHelper.getContext().getString(R.string.upload_progress) + " " + ActivitySwitchHelper.getContext().getResources().getString(title))
           .setLargeIcon(BitmapFactory.decodeResource(ActivitySwitchHelper.getContext().getResources(),
                   R.mipmap.ic_launcher))
           .setContentText(ActivitySwitchHelper.getContext().getString(R.string.progress))
           .setSmallIcon(R.drawable.ic_cloud_upload_black_24dp)
           .setOngoing(true);
   mBuilder.setProgress(0, 0, true);
   // Issues the notification
   mNotifyManager.notify(id, mBuilder.build());
}

Conclusion

Notification makes any application more interactive and show live updates even when the application is in use. By following this method users can be aware of the upload functionality and in which account the image is beign uploaded.

Github

Resources


Continue ReadingDisplaying Proper Notification While Image is Being Uploaded in Phimpme

Export Sensor Data from the PSLab Android App

The PSLab Android App allows users to log data from the sensors connected to the PSLab hardware device. Sensor Data is stored locally but can be exported in various formats. Currently the app supports exporting data in .txt and .csv (comma-separated values) format. Exported data can be used by other users or scientists to study or analyze the data. Data can also be used by other softwares like Python, GNU octave, Matlab to further process it or visualise it in 3D. In this post, we will discuss how to export the locally stored realm data in .txt or .csv format. We will take the data of MPU6050 sensor as an example for understanding how locally logged data is exported.

Query Local Realm Data

We have attached a long click listener to sensor list view that detects which list item is selected. Clicking any sensor from sensor list for slightly longer than usual would result in a dialog popping up with the option to

  • Export Data: Results in exporting data in a format which is selected in App settings
  • Share Data: Shares sensor data with other users or on social media (yet to be implemented)
Source: PSLab Android App

As soon as the Export Data option is selected from the dialog, sensor data of the corresponding sensor is queried. The data model of the sensor and how it’s saved in the local realm database is discussed in the post Sensor Data Logging in the PSLab Android App.

RealmResults<DataMPU6050> results = realm.where(DataMPU6050.class).findAll();

Once we get the required data, we need to write it in .txt or .csv format depending on what the user has selected as a preference in App Settings.

Getting User Preference from App Settings

The format in which the sensor data should be exported is presented to the user as a preference in App Settings. Currently the app supports two formats .txt and .csv.

Source: PSLab Android App
private String format;
SharedPreferences preferences = PreferenceManager.getDefaultSharedPreferences(this);
String formatValue = preferences.getString("export_data_format_list", "0");
if ("0".equals(formatValue))
   format = "txt";
else
   format = "csv";

Export Data in .txt Format

To export the sensor data in .txt format, we need to create a .txt file in the external storage. folder variable is a path to PSLab Android folder in the external storage. If the folder doesn’t exist, it will be created.

File folder = new File(Environment.getExternalStorageDirectory() + File.separator + "PSLab Android");

After getting reference of the app folder in the external storage, we would create a text file in the PSLab Android folder. As soon as the text file is created, we initialize the FileOutputStream object to write data into the text file. The sensor data that was queried in the previous section is written into the text file just created. Finally after the complete sensor data is written, the stream is closed by stream.close() method.

FileOutputStream stream = null;
File file = new File(folder, "sensorData.txt");
try {
   stream = new FileOutputStream(file);
   for (DataMPU6050 temp : results) {
       stream.write((String.valueOf(temp.getAx()) + " " + temp.getAy() + " " + temp.getAz() + " " +
               temp.getGx() + " " + temp.getGy() + " " + temp.getGz() + " " + temp.getTemperature() + "\n").getBytes());
   }
} catch (IOException e) {
   e.printStackTrace();
} finally {
   try {
       if (stream != null) {
           stream.close();
       }
   } catch (IOException e) {
       e.printStackTrace();
   }
}

Export Data in .csv Format

Writing data in .csv format is similar to that in .txt format. As CSV stands for Comma Separated Values, which means each data value is separated by “,” (comma). It is similar to an excel sheet. The first row consists of labels that denote the type of value in that particular column. The other rows consist of the sensor data, with each row corresponding to a sample of the sensor data.

File file = new File(folder, "sensorData.csv");
PrintWriter writer;
try {
   writer = new PrintWriter(file);
   StringBuilder stringBuilder = new StringBuilder();
   stringBuilder.append("Ax,Ay,Ax,Gx,Gy,Gz,Temperature\n");
   for (DataMPU6050 temp : results) {
       stringBuilder.append(String.valueOf(temp.getAx()));
       stringBuilder.append(',');
       stringBuilder.append(String.valueOf(temp.getAy()));
       stringBuilder.append(',');
       stringBuilder.append(String.valueOf(temp.getAz()));
       stringBuilder.append(',');
       stringBuilder.append(String.valueOf(temp.getGx()));
       stringBuilder.append(',');
       stringBuilder.append(String.valueOf(temp.getGy()));
       stringBuilder.append(',');
       stringBuilder.append(String.valueOf(temp.getGz()));
       stringBuilder.append(',');
       stringBuilder.append(String.valueOf(temp.getTemperature()));
       stringBuilder.append('\n');
   }
   writer.write(stringBuilder.toString());
   writer.close();
} catch (FileNotFoundException e) {
   e.printStackTrace();
}

Resources

Continue ReadingExport Sensor Data from the PSLab Android App

Giving Offline Support to the Open Event Organizer Android App

Open Event Organizer is an Android Application for Event Organizers and Entry Managers which uses Open Event API Server as a backend. The core feature of the App is to scan a QR code to validate an attendee’s check in. The App maintains a local database and syncs it with the server. The basic workflow of the attendee check in is – the App scans a QR code on an attendee’s ticket. The code scanned is processed to validate the attendee from the attendees database which is maintained locally. On finding, the App makes a check in status toggling request to the server. The server toggles the status of the attendee and sends back a response containing the updated attendee’s data which is updated in the local database. Everything described above goes well till the App gets a good network connection always which cannot be assumed as a network can go down sometimes at the event site. So to support the functionality even in the absence of the network, Orga App uses Job Schedulers which handle requests in absence of network and the requests are made when the network is available again. I will be talking about its implementation in the App through this blog.

The App uses the library Android-Job developed by evernote which handles jobs in the background. The library provides a class JobManager which does most of the part. The singleton of this class is initialized in the Application class. Job is the class which is where actually a background task is implemented. There can be more than one jobs in the App, hence the library requires to implement JobCreator interface which has create method which takes a string tag and the relevant Job is returned. JobCreator is passed to the JobManager in Application while initialization. The relevant code is:

JobManager.create(this).addJobCreator(new OrgaJobCreator());

Initialization of JobManager in Application class

public class OrgaJobCreator implements JobCreator {
   @Override
   public Job create(String tag) {
       switch (tag) {
           case AttendeeCheckInJob.TAG:
               return new AttendeeCheckInJob();
           default:
               return null;
       }
   }
}

Implementation of JobCreator

public class AttendeeCheckInJob extends Job {
   ...
   ...
   @NonNull
   @Override
   protected Result onRunJob(Params params) {
       ...
       ...
       Iterable<Attendee> attendees = attendeeRepository.getPendingCheckIns().blockingIterable();
       for (Attendee attendee : attendees) {
           try {
               Attendee toggled = attendeeRepository.toggleAttendeeCheckStatus(attendee).blockingFirst();
               ...
           } catch (Exception exception) {
               ...
               return Result.RESCHEDULE;
           }
       }
       return Result.SUCCESS;
   }

   public static void scheduleJob() {
       new JobRequest.Builder(AttendeeCheckInJob.TAG)
           .setExecutionWindow(1, 5000L)
           .setBackoffCriteria(10000L, JobRequest.BackoffPolicy.EXPONENTIAL)
           .setRequiredNetworkType(JobRequest.NetworkType.CONNECTED)
           .setRequirementsEnforced(true)
           .setPersisted(true)
           .setUpdateCurrent(true)
           .build()
           .schedule();
   }
}

Job class for attendee check in job

To create a Job, these two methods are overridden. onRunJob is where the actual background job is going to run. This is the place where you implement your job logic which should be run in the background. In this method, the attendees with pending sync are fetched from the local database and the network requests are made. On failure, the same job is scheduled again. The process goes on until the job is done. scheduleJob method is where the related setting options are set. This method is used to schedule an incomplete job.

So after this implementation, the workflow described above is changed. Now on attendee is found, it is updated in local database before making any request to the server and the attendee is flagged as pending sync. Accordingly, in the UI single tick is shown for the attendee which is pending for sync with the server. Once the request is made to the server and the response is received, the pending sync flag of the attendee is removed and double tick is shown against the attendee.

Links:
1. Documentation for Android-Job Library by evernote
2. Github Repository of Android-Job Library

Continue ReadingGiving Offline Support to the Open Event Organizer Android App

How Switch Case improve performance in PSLab Saved Experiments

PSLab android application contains nearly 70 experiments one can experiment on using the PSLab device and the other necessary circuit components and devices. These experiments span over areas such as Electronics, Electrical, Physical and High school level. All these experiments are accessible via an android adapter in the repository named “PerformExperimentAdapter”. This adapter houses a tab view with two different tabs; one for the experiment details and the other for actual experiment and resultant graphs.

The adapter extends an inbuilt class FragmentPagerAdapter;

public class PerformExperimentAdapter extends FragmentPagerAdapter

This class displays every page attached to its viewpager as a fragment. The good thing about using fragments is that they have a recyclable life cycle. Rather than creating new views for every instance of an experiment, the similar views can be recycled to use once again saving resources and improving performance. FragmentPagerAdapter needs to override a method to display the correct view on the tab select by user.

@Override
public Fragment getItem(int position) {

}

Depending on the value of position, relevant experiment documentation and the experiment implementation fragments are displayed determined using the experiment title. Performance can be critical in this place as if it takes too long to process and render a fragment, user will feel a lag.

The previous implementation was using consecutive if statements.

@Override
public Fragment getItem(int position) {
   switch (position) {
       case 0:
           if (experimentTitle.equals(context.getString(R.string.diode_iv)))
               return ExperimentDocFragment.newInstance("D_diodeIV.html");
           if (experimentTitle.equals(context.getString(R.string.zener_iv)))
               return ExperimentDocFragment.newInstance("D_ZenerIV.html");
           ...
       case 1:
           if (experimentTitle.equals(context.getString(R.string.diode_iv)))
               return ZenerSetupFragment.newInstance();
           if (experimentTitle.equals(context.getString(R.string.zener_iv)))
               return DiodeExperiment.newInstance(context.getString(R.string.half_wave_rectifier));
           ...
       default:
           return ExperimentDocFragment.newInstance("astable-multivibrator.html");
   }
}

This setup was suitable for applications where there is less than around 5 choices to chose between. As the list grows, the elements in the end of the if layers will take more time to load as each of the previous if statements need to be evaluated false in order to reach the bottom statements.

This is when this implementation was replaced using switch case statements instead of consecutive if statements. The theory behind the performance improvement involves algorithm structures; Hash Tables

Hash Tables

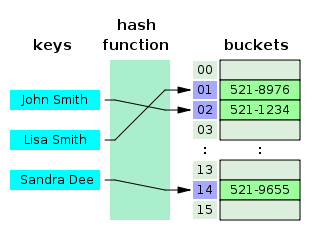
Hash tables use a hash function to calculate the index of the destination cell. This operation on average has a complexity of O(1) which means it will take the same time to access any two elements which are randomly positioned.

This is possible because java uses the hash code of the string to determine the index where the target is situated at. This way it is much faster than consecutive if statement calls where in the worst case it will take O(n) time to reach the statement causing a lag in the application.

Current application uses switch cases in the PerformExperimentAdapter;

@Override
public Fragment getItem(int position) {
   switch (position) {
       case 0:
           switch (experimentTitle) {
               case "Diode IV Characteristics":
                   return ExperimentDocFragment.newInstance("D_diodeIV.html");
               case "Zener IV Characteristics":
                   return ExperimentDocFragment.newInstance("D_ZenerIV.html");
               case "Half Wave Rectifier":
                   return ExperimentDocFragment.newInstance("L_halfWave.html");
           }
       case 1:
           switch (experimentTitle) {
               case "Diode IV Characteristics":
                   return ZenerSetupFragment.newInstance();
               case "Zener IV Characteristics":
                   return ZenerSetupFragment.newInstance();
               case "Half Wave Rectifier":
                   return DiodeExperiment.newInstance(context.getString(R.string.half_wave_rectifier));
           }
       default:
           return ExperimentDocFragment.newInstance("astable-multivibrator.html");
   }
}

There is one downfall in using switch case in the context. That is the inability to use string resources directly as Java requires a constant literals in the evaluation statement of a case.

Resources:

Continue ReadingHow Switch Case improve performance in PSLab Saved Experiments

Coloring Waveforms in PSLab Charts

Charts are used to display set of data in an analytical manner such that an observer can easily come to a conclusion by just looking at it without having to go through all the numerical data sets. Legends are used to differentiate a set of data set from another set. Generally, different colors and different names are used to form a legend in a chart.

MPAndroidChart is an amazing library with the capability of generating different types of graphs in an Android device. In PSLab several user interfaces are implemented using LineCharts to display different waveforms such as readings from channels attached to PSLab device, logic levels etc.

When several data sets are being plotted on the same graph area, legends are used. In PSLab Android application, Oscilloscope supports four different type of waveforms to be plotted on the same graph. Logic Analyzer implements one to four different types of logic level waveforms on the same plot. To identify which is which, legends with different colors can be used rather than just the names. For the legends to have different colors, it should be explicitly set which color should be held by which data set. Otherwise it will use the default color to all the legends making it hard to differentiate data lines when there are more than one data set is plotted.

Assume a data set is generated from a reading taken from a probe attached to PSLab device. The set will be added as an Entry to an array list as follows;

ArrayList<Entry> dataSet = new ArrayList<Entry>();

The next step will be to create a Line Data Set

LineDataSet lineData = new LineDataSet(dataSet, "DataSet 1");

This LineDataSet will contain sample values of the waveform captured by the microprocessor. A LineDataSet object support many methods to alter its look and feel. In order to set a color for the legend, setColor() method will be useful. This method accepts an integer as the color. This method can be accessed as follows;

lineData.setColor(Color.YELLOW);

MPAndroidChart provides different sets of colors under ColorTemplate. This class has several predefined colors with five colors in each color palette are added by the developers of the library and they can be accessed using the following line of code by simply calling the index value of the palette array list.

set1.setColor(ColorTemplate.JOYFUL_COLORS[0]);

Set of color palettes available in the ColorTemplate class are;

  1. LIBERTY_COLORS
  2. JOYFUL_COLORS
  3. PASTEL_COLORS
  4. COLORFUL_COLORS
  5. VORDIPLOM_COLORS
  6. MATERIAL_COLORS

The following demonstrates how the above activities produce a line chart with three different data sets with different colored legends.

This implementation can be used to enhance the readability of the waveforms letting user being able to differentiate between one waveform from another in PSLab Android application.

Resources:

PSLab official web site: https://pslab.fossasia.org/

Continue ReadingColoring Waveforms in PSLab Charts

Displaying essential features when the Phimpme Application starts

In this blog, I will explain how I implemented showcase View to display all the essential features of the Phimpme Android application when the application starts first. In this, the users will know which activity is used for what purpose.  

Importing material design Showcase View

I used material design showcase in Phimpme  Android application to take the benefit of the latest Android design and to add more text on the screen which is easily visible by the users. We need to add the following to our gradle.

compile 'com.github.deano2390:MaterialShowcaseView:1.1.0'

There is a very good repository in Github for material design Showcase view which we have used here.

Implementing Material design showcaseView on the desired activity

In Phimpme Android application we have three main activity on the home screen. Namely:

  • Camera
  • Gallery
  • Accounts Activity

Camera Activity and Gallery Activity is used to take pictures and select the picture respectively. Accounts Activity contains more than 10 accounts of various social media platforms and storage platform. When the application starts my aim is to display the function of all three activities in a showcase View. it is implemented in the following Steps:

Step 1

Import all the module from the Material showcase view we have used in the gradle.

import uk.co.deanwild.materialshowcaseview.MaterialShowcaseSequence;
import uk.co.deanwild.materialshowcaseview.MaterialShowcaseView;
import uk.co.deanwild.materialshowcaseview.ShowcaseConfig;

Step 2

Get the reference all the buttons you want to show the features. These buttons will be highlighted when the showcase View is displayed.

nav_home = (BottomNavigationItemView) findViewById(R.id.navigation_home);
nav_cam = (BottomNavigationItemView) findViewById(R.id.navigation_camera);
nav_acc = (BottomNavigationItemView) findViewById(R.id.navigation_accounts);

Step 3

In Phimpme Android application I have used to display the features of three navigation buttons. So, to display the features of more than one button or View we have to use MaterialShowcaseSequence class to display the features of the buttons in a sequence, that is one after the other.

In the onCreate activity, I am calling presentShowcaseSequence function. This function has a delay time. This delay time is required to wait for four seconds until the splash screen activity is over and the activity is started.

private void presentShowcaseSequence() {
   ShowcaseConfig config = new ShowcaseConfig();
   config.setDelay(4000); // half second between each showcase view
   MaterialShowcaseSequence sequence = new MaterialShowcaseSequence(this, SHOWCASE_ID);
   sequence.setOnItemShownListener(new MaterialShowcaseSequence.OnSequenceItemShownListener() {
       @Override
       public void onShow(MaterialShowcaseView itemView, int position) {
       }
   });
   sequence.setConfig(config);

Step 4

Set the initial target Button. This target button will be pointed first when the app is launched for the first time.

sequence.addSequenceItem(nav_home, getResources().getString(R.string.home_button), getResources().getString(R.string.ok_button));


Step 5

Add subsequent target buttons to display the features of that buttons. To add more subsequent target buttons we will use function addSequenceitem. To set the target we have specify the button which we want to focus in setTarget(Button). We need to display the text which will show the important features in regarding that activity in setContentText(text to be displayed). For a dismiss button we need to specify the a string in setDismissText(Dismiss button string)

sequence.addSequenceItem(
       new MaterialShowcaseView.Builder(this)
               .setTarget(nav_cam)
               .setDismissText(getResources().getString(R.string.ok_button))
               .setContentText(getResources().getString(R.string.camera_button))
               .build()
);
sequence.addSequenceItem(
       new MaterialShowcaseView.Builder(this)
               .setTarget(nav_acc)
               .setDismissText(getResources().getString(R.string.ok_button))
               .setContentText(getResources().getString(R.string.accounts_button))
               .build()
);
sequence.start();

Sequence.start is used to display the showcase.

Conclusion

Using this method users can easily have the knowledge of the functionality of the application and can navigate through the activities without wasting a lot of time in figuring out the functionality of the application.

Github

Resources


Continue ReadingDisplaying essential features when the Phimpme Application starts

Implementing Feedback Feature in SUSI Android App

Recently, on SUSI Server, a new servlet was added which is used to rate SUSI Skills either positive or negative. The server stores the rating of a particular skill in a JSON file. These ratings help in improving answers provided by SUSI. So, the server part is done and it was required to implement this in the SUSI Android App. In this blog, I will cover the topic of implementation of the Rating or Feedback feature in SUSI Android App. This will including all the cases when feedback should be sent, when it should not be sent, when to send positive feedback, when to send negative feedback, etc.

API Information

For rating a SUSI Skill, we have to call on  /cms/rateSkill.json providing 5 parameters which are:

  1. model: The model of SUSI Skill. (String)
  2. group: The Group under the model in which that particular skill resides. (String)
  3. language: The language of skill. (String)
  4. skill: This is skill name. (String)
  5. rating: This can be two strings, either “positive” or “negative”. String)

Basically, in the SUSI Skill Data repo (in which all the skills are stored), models, groups language etc are part of folder structure.

So, if a skill is located here

https://github.com/fossasia/susi_skill_data/blob/master/models/general/Knowledge/en/news.txt

This would mean

model = general

group = Knowledge

language = en

skill = news

rating = positive/negative

Implementation in SUSI Android App


So, when the like button on a particular skill is clicked, a positive call is made and when the dislike button is clicked, a negative call is made.

Let’s see example when the thumbs up button or like button is clicked.

There can be three cases possible:

  1. None of Like button or dislike button is clicked already: In this case, initially, both like and dislike button will be transparent/hollow. So, when like button is clicked, the like button will be colored blue and a call will be made with positive feedback.
  2. Like button is already clicked: In this case, like button is already clicked. So, it will already be blue. So, when user clicks again on positive button, it should get back to normal/hollow indicating rating which was sent is cancelled and a a call will be made with negative feedback thus cancelling or neutralizing the earlier, positive feedback.
  3. Dislike button is already clicked: In this case, the dislike button is already blue, indicating a negative call is already made. So, now when the like button is clicked, we need to cancel the earlier negative feedback call and sending another negative feedback call. Thus, sending two negative feedback calls. And after that coloring dislike button as blue.

Look at the code below. It is self explanatory. There are three if-else conditions covering all the above mentioned three cases.

thumbsUp.setOnClickListener(new View.OnClickListener() {
   @Override
   public void onClick(View view) {
       thumbsUp.setImageResource(R.drawable.thumbs_up_solid);
       if(!model.isPositiveRated() && !model.isNegativeRated()) {
           rateSusiSkill(Constant.POSITIVE, model.getSkillLocation(), context);
           setRating(true, true);
       } else if(!model.isPositiveRated() && model.isNegativeRated()) {
           setRating(false, false);
           thumbsDown.setImageResource(R.drawable.thumbs_down_outline);
           rateSusiSkill(Constant.POSITIVE, model.getSkillLocation(), context);
           sleep(500);
           rateSusiSkill(Constant.POSITIVE, model.getSkillLocation(), context);
           setRating(true, true);
       } else if (model.isPositiveRated() && !model.isNegativeRated()) {
           rateSusiSkill(Constant.NEGATIVE, model.getSkillLocation(), context);
           setRating(false, true);
           thumbsUp.setImageResource(R.drawable.thumbs_up_outline);
       }
   }
});

Similarly for when dislike button is clicked, the above three mentioned cases still hold resulting in this code snippet.

thumbsDown.setOnClickListener(new View.OnClickListener() {
   @Override
   public void onClick(View view) {
       thumbsDown.setImageResource(R.drawable.thumbs_down_solid);
       if(!model.isPositiveRated() && !model.isNegativeRated()) {
           rateSusiSkill(Constant.NEGATIVE, model.getSkillLocation(), context);
           setRating(true, false);
       } else if(model.isPositiveRated() && !model.isNegativeRated()) {
           setRating(false, true);
           thumbsUp.setImageResource(R.drawable.thumbs_up_outline);
           rateSusiSkill(Constant.NEGATIVE, model.getSkillLocation(), context);
           sleep(500);
           rateSusiSkill(Constant.NEGATIVE, model.getSkillLocation(), context);
           setRating(true, false);
       } else if (!model.isPositiveRated() && model.isNegativeRated()) {
           rateSusiSkill(Constant.POSITIVE, model.getSkillLocation(), context);
           setRating(false, false);
           thumbsDown.setImageResource(R.drawable.thumbs_down_outline);
       }
   }
});

Summary

So, this blog talked about how the Feedback feature in SUSI Android App is implemented. This included how a network call is made, logic for sending positive/negative feedback, logic to withdraw feedback etc. So, If you are looking forward to contribute to SUSI Android App, this can help you a little. But if not so, this may also help you in understanding and how rating mechanism in social media websites like Facebook, Twitter, Quora, Reddit, etc work.

References

  1. To know about servlets https://en.wikipedia.org/wiki/Java_servlet
  2. To see how to implement one https://www.javatpoint.com/servlet-tutorial
  3. To see how to make network calls in android using Retrofit https://guides.codepath.com/android/Consuming-APIs-with-Retrofit
  4. To see how to implement click listeners on button https://developer.android.com/reference/android/view/View.OnClickListener.html
Continue ReadingImplementing Feedback Feature in SUSI Android App

Performing Diode Clipping and Clamping Experiment in PSLab Android

We can perform experiments like diode clipping and clamping using PSLab Android. A circuit which removes the peak of a waveform is known as a clipper. Diode clipper cuts off the top half or lower half or both top and lower half of the input signal. 

Different types of clipping circuits listed below

Different Clipping Experiments

A clamper circuit adds the positive dc component to the input signal to push it to the positive side. Similarly, a clamper circuit adds the negative dc component to the input signal to push it to the negative side. It basically shifts the input signal without changing the shape of the signal.

Different Clamping Experiments

Apparatus

Diode, Resistance, Capacitor (only for diode clamping), Breadboard, Wires and PSLab

Adding Diode Clipping Experiment support in PSLab Android App

To support Diode Clipping Experiment we require generating a sine wave and a dc component. This can be done using W1 and PV1 pins in PSLab device. Both input and output signals can be read using CH1 and CH2. So, when the Diode Clipping Experiment needs to be performed the following code needs to be implemented

scienceLab.setSine1(5000);
scienceLab.setPV1(//progress of the seekbar);

The signals are recorded using Oscilloscope Activity.

Adding Diode Clamping Experiment support in PSLab Android App

Diode Clamping Experiment was implemented similarly to Diode Clipping Experiment. The following are the screenshots of the experiment.     

The following is a glimpse of Diode Clamping Experiment performed using PSLab device using PSLab Android App.

Resources

  1. Read more about Clipper Circuits –
  2. Read more information about Clamping Circuits –
Continue ReadingPerforming Diode Clipping and Clamping Experiment in PSLab Android

Adding EditText With Google Input Option While Sharing In Phimpme App

In Phimpme Android App an user can share images on multiple platforms. While sharing we have also included caption option to enter description about the image. That caption can be entered by using keyboard as well Google Voice Input method. So in this post, I will be explaining how to add edittext with google voice input option.

Let’s get started

Step-1 Add EditText and Mic Button in layout file

<ImageView
       android:layout_width="20dp"
       android:id="@+id/button_mic"
       android:layout_height="20dp"
       android:background="?android:attr/selectableItemBackground"
       android:background="@drawable/ic_mic_black"
       android:scaleType="fitCenter" />
</RelativeLayout>


Caption Option in Share Activity in Phimpme

In Phimpme we have material design dialog box so right now I am using getTextInputDialogBox(). It will prompt the material design dialog box to enter caption to share image on multiple platform.

Step-2

Now we can get caption from edittext easily using the following code.

if (!captionText.isEmpty()) {
  caption = captionText;
  text_caption.setText(caption);
  captionEditText.setSelection(caption.length());
} else {
  caption = null;
  text_caption.setText(caption);
}


Step – 3 (Now add option Google Voice input option)

To use google input option I have added a global function in Utils class. To use that method just call that method with proper arguments.

public static void promptSpeechInput(Activity activity, int requestCode, View parentView, String promtMsg) {
  Intent intent = new Intent(RecognizerIntent.ACTION_RECOGNIZE_SPEECH);
  intent.putExtra(RecognizerIntent.EXTRA_LANGUAGE_MODEL, RecognizerIntent.LANGUAGE_MODEL_FREE_FORM);
  intent.putExtra(RecognizerIntent.EXTRA_LANGUAGE, Locale.getDefault());
  intent.putExtra(RecognizerIntent.EXTRA_PROMPT, promtMsg);
  try {
      activity.startActivityForResult(intent, requestCode);
  } catch (ActivityNotFoundException a) {
      SnackBarHandler.show(parentView,activity.getString(R.string.speech_not_supported));
  }

}

Just pass the request code to receive the speech text in onActvityResult() method and passs promt message which will be visible to user.

Step – 4 (Set text to caption )

if (requestCode == REQ_CODE_SPEECH_INPUT && data!=null){
       ArrayList<String> result = data.getStringArrayListExtra(RecognizerIntent.EXTRA_RESULTS);
       String voiceInput = result.get(0);
       text_caption.setText(voiceInput);
       caption = voiceInput;
       return;

}

Now we can set the text in caption string right now I am adding text in existing caption i.e If the user enter some text using edittext and after that user clicked on mic button then the extra text will be added after the previous text.

So this is how I have used Google voice input method and made the function globally.

Resources:

Continue ReadingAdding EditText With Google Input Option While Sharing In Phimpme App

Creating Sajuno Filter in Editor of Phimpme Android

What is Sajuno filter?

Sajuno filter is an image filter which we used in the editor of Phimpme Android application for brightening the skin region of a portrait photo.

How to perform?

Generally in a portrait photo, the dark regions formed due to shadows or low lightning conditions or even due to tanning of skin contains more darker reds than the greens and blues. So, for fixing this darkness of picture, we need to find out the area where reds are more dominant than the greens and blues. After finding the region of interest, we need to brighten that area corresponding to the difference of the reds and other colors.

How we implemented in Phimpme Android?

In Phimpme Android application, first we created a mask satisfying the above conditions. It can be created by subtracting blues and greens from red. The intensity can be varied by adjusting the intensity of reds. The condition mentioned here in programmatical way is shown below.


bright = saturate_cast<uchar>((intensity * r - g * 0.4 - b * 0.4));

In the above statement, r,g,b are the reds, greens and blues of the pixels respectively. The coefficients can be tweaked a little. But these are the values which we used in Phimpme Android application. After the above operation, a mask is generated as below.


This mask has the values that correspond to the difference of reds and greens and difference of reds and blues. So, we used this mask directly to increase the brightness of the dark toned skin of the original image. We simply need to add the mask and the original image. This results the required output image shown below.


As you can see the resultant image has less darker shades on the face than the original image. The way of implementation which we used in Phimpme Android editor is shown below.


double intensity = 0.5 + 0.35 * val;     // 0 < val < 1
dst = Mat::zeros(src.size(), src.type());
uchar r, g, b;
int bright;

for (y = 0; y < src.rows; y++) {
   for (x = 0; x < src.cols; x++) {
       r = src.at<Vec3b>(y, x)[0];
       g = src.at<Vec3b>(y, x)[1];
       b = src.at<Vec3b>(y, x)[2];

       bright = saturate_cast<uchar>((intensity * r - g * 0.4 - b * 0.4));
       dst.at<Vec3b>(y, x)[0] =
               saturate_cast<uchar>(r + bright);
       dst.at<Vec3b>(y, x)[1] =
               saturate_cast<uchar>(g + bright);
       dst.at<Vec3b>(y, x)[2] =
               saturate_cast<uchar>(b + bright);
   }
}

Resources:

Continue ReadingCreating Sajuno Filter in Editor of Phimpme Android