Adding an option to hide map in browse events.

Open Event provides filtering while browsing events. These filters are present in a sidebar which also consists of a map. In this blog, I will describe how I implemented the feature to toggle the visibility of the map present in sidebar for mobile devices.

About the issue

This issue was part of improvements decided for the browse events section. Earlier the map in sidebar was shown irrespective of the user’s device. It is essentially not required to always show the map in mobile device and is a better choice to provide user with an option to view or hide the map.

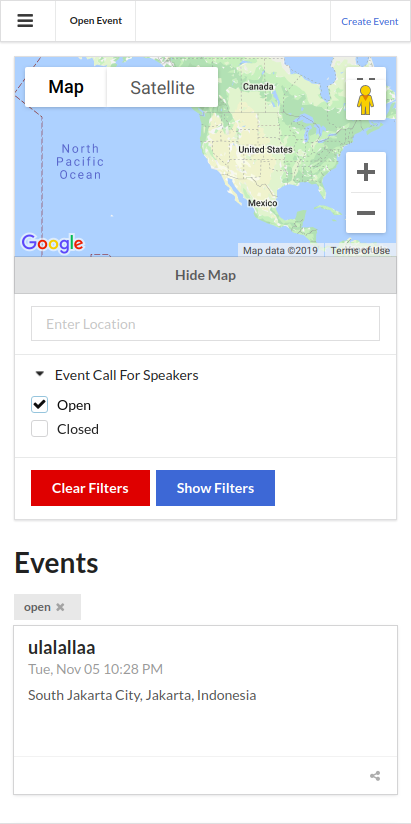
Sidebar as viewed from an android device before the fix was merged.

The Solution

A button is introduced in the mobile view which controls if the map should be visible or hidden. In the sidebar component (app/components/explore/side-bar.js), a variable “isMapVisible” which decides if the map should be visible (if it is true) or not (if it is false) at a particular instant. A new action “toggleMap” is written which changes the value of “isMapVisible” whenever the button is clicked.

isMapVisible = true;
@action
  toggleMap() {
    this.toggleProperty(‘isMapVisible’);
  }

In the handlebar file (app/templates/components/explore/side-bar.hbs), the map and associated text is changed as per the truthy or falsy value of the “isMapVisible” in the component.

<div class=”map item {{if (not isMapVisible) ‘mobile hidden’}}”>

{{#if device.isMobile}}
  <div class=”ui bottom attached button” role=”button” {{action ‘toggleMap’}}> {{if (not isMapVisible) ‘Show’ ‘Hide’}} Map </div>
{{/if}}

After making the changes, the sidebar looks as follows on the mobile devices

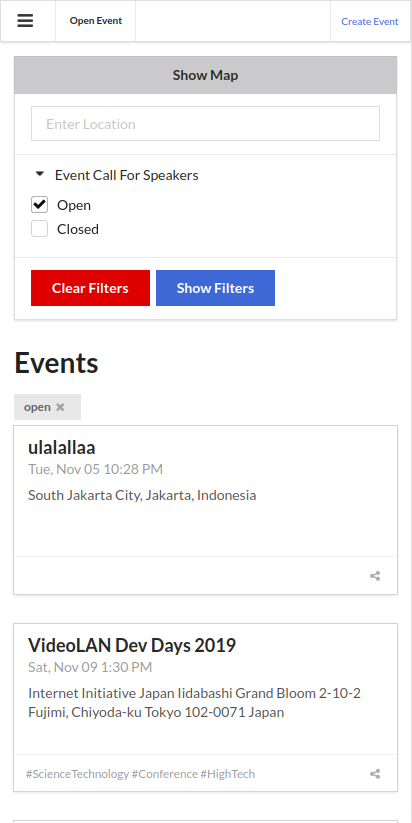
The above images are from an Android device.

Resources:

Issue: https://github.com/fossasia/open-event-frontend/issues/3122
Pull Request: https://github.com/fossasia/open-event-frontend/pull/3444

Ember Docs:https://guides.emberjs.com/v2.14.0/tutorial/simple-component/Toggle Component Tutorial: https://www.learnhowtoprogram.com/ember-js/ember-js/components-hide-show-image

Continue ReadingAdding an option to hide map in browse events.

Addition of new filters for event search

Open Event has an event search provided but it lacked two of the userful filters which will make searching for an event for a user easier than the current ecosystem. In this blog post, I describe how I implemented filtering of events on the basis of CFP status and Ticket Type.

About the issue

Addition of these two filters were subparts of improving the browse events page better. The browse events page currently functions in an optimal way but these improvements make it even better.

How the filters are added

For adding these two filters, it was required that the request sent to server to filter the event must contain ticket type and cfp so that the results from the server can be received. To achieve this, the frontend code needed the following changes:

  1. Passing of request variable into sidebar component present in app/templates/explore.hbs and addition of a clear filter for the same in the same file.e startDate=start_date endDate=end_date location=location ticket_type=ticket_type}
{{explore/side-bar model=model category=category sub_category=sub_category event_type=event_type startDate=start_date endDate=end_date location=location ticket_type=ticket_type}}
{{#if filters.ticket_type}}
  <div class=”ui mini label”>
    {{ticket_type}}
    <a role=”button” {{action ‘clearFilter’ ‘ticket_type’}}>
      <i class=”icon close”></i>
    </a>
  </div>
{{/if}}
  1. Adding UI for both the filters in app/templates/components/explore/side-bar.hbs. Accordion UI is used to achieve this.
  <div class=”item”>
    {{#ui-accordion}}
      <span class=”title”>
        <i class=”dropdown icon”></i>
        {{t ‘Ticket Type’ }}
      </span>
      <div class=”content menu”>
        <a href=”#”
          class=”link item {{if (eq ticket_type ‘free’) ‘active’}}”
          {{action ‘selectTicketType’ ‘free’}}>
          {{t ‘Free’}}
        </a>
        <a href=”#”
          class=”link item {{if (eq ticket_type ‘paid’) ‘active’}}”
          {{action ‘selectTicketType’ ‘paid’}}>
          {{t ‘Paid’}}
        </a>
      </div>
    {{/ui-accordion}}
  </div>
  1. Editing the routes (app/routes/explore.js) to make sure if the request has new filter parameter then it should be sent to server.
if (params.ticket_type) {
      filterOptions.push({
        name : ‘tickets’,
        op   : ‘any’,
        val  : {
          name : ‘type’,
          op   : ‘eq’,
          val  : params.ticket_type
        }
      });
    }
  1. Addition of new request parameter in the controller (app/controllers/explore.js)
queryParams  : [‘category’, ‘sub_category’, ‘event_type’, ‘start_date’, ‘end_date’, ‘location’, ‘ticket_type’],

ticket_type  : null,

if (filterType === ‘ticket_type’) {  this.set(‘ticket_type’, null);
}
  1. Editing the sidebar component to set the value of request parameter when the user interacts with the filter.
hideClearFilters: computed(‘category’, ‘sub_category’, ‘event_type’, ‘startDate’, ‘endDate’, ‘location’, ‘ticket_type’, function() {
    return !(this.category || this.sub_category || this.event_type || this.startDate || this.endDate || this.location || this.ticket_type !== null);
}),

selectTicketType(ticketType) {
  this.set(‘ticket_type’, ticketType === this.ticket_type ? null : ticketType);
},

this.set(‘ticket_type’, null);

Sidebar after the addition of filters.

Resources:

Issue: https://github.com/fossasia/open-event-frontend/issues/3098
Pull Requests:

Ticket Type: https://github.com/fossasia/open-event-frontend/pull/3158
CFS: https://github.com/fossasia/open-event-frontend/pull/3144

Specifying Query Params: https://guides.emberjs.com/release/routing/query-params/

UI Resources for the feature: https://semantic-org.github.io/Semantic-UI-Ember/#/modules/accordion

Continue ReadingAddition of new filters for event search

Open Event Frontend – Events Explore Page

This blog illustrates how the events explore page is implemented in the Open Event Frontend web app. The user can land on the events explore page by clicking on Browse Events button in the top panel on the home page, shown by the mouse tip in the following picture.

Here, the user can use the various filter options provided to search for the events as per his requirements, He/she can filter according to categories, sub-categories for each category, event type, and date range. A unique feature here is that the user can pick from the start date range options such as today, tomorrow, this week, this weekend, next week and many more. If neither of these fits his needs he can use custom dates as well. The user can also filter events using event location which is autocompleted using Google Maps API. Thus, searching for events is fast, easy and fun.

Let us see how this has been implemented.

Implementation

The explore routes has a method _loadEvents(params). Here, params is the various query parameters for filtering the events. This method forms the query, sends it to the server and returns the list of events returned by the server. The server uses Flask-REST-JSONAPI. It has a very flexible filtering system. It is completely related to the data layer used by the ResourceList manager. More information about this can be found here.

So, the filters are formed using syntax specified in the link mentioned above. We form an array filterOptions which stores the various filters. The default filter is that the event should be published:

let filterOptions = [
 {
   name : 'state',
   op  : 'eq',
   val  : 'published'
 }
];

Then we check for each filter option and check if it is present or not. If yes then we add it to filterOptions. An example as follows:

if (params.category) {
 filterOptions.push({
   name : 'event-topic',
   op  : 'has',
   val  : {
     name : 'name',
     op : 'eq',
     val : params.category
   }
 });
}

This is repeated for sub_category, event_type, location and start_date and end_date. An event is considered to fulfill the date filter if it satisfies any one of the given conditions:

  • If both start_date and end_date are mentioned:
    • Event start_date is after filter start date and before filter end date.
    • Or, event end date if after filter start date and before filter end date.
    • Or, event start date is before filter start date and event end date date is after filter end date.
  • If only start_date is mentioned, then if the event start date is after filter start date or event end date is after filter start date.

The code to this can be found here. For the date ranges mentioned above(today, tomorrow etc) the start dates and end dates are calculated using the moment.js library and then passed on as params.

The filteredEvents are passed in the route model.

async model(params) {
 return {
   eventTypes     : await this.store.findAll('event-type'),
   eventTopics    : await this.store.findAll('event-topic', { include: 'event-sub-topics' }),
   filteredEvents : await this._loadEvents(params)
 };
}

The variable is set in the controller and any change to the query params is observed for. The method _loadEvents is called whenever the query params change.

setupController(controller, model) {
 this._super(...arguments);
 controller.set('filteredEvents', model.filteredEvents);
 this.set('controller', controller);
},

actions: {
 async queryParamsDidChange(change, params) {
   if (this.get('controller')) {
     this.get('controller').set('filteredEvents', await this._loadEvents(params));
   }
 }
}

The template iterates over the filteredEvents and displays each one in a card.

Resources

Continue ReadingOpen Event Frontend – Events Explore Page

Implementing Search User Feature for Admins

The users tab of admin panel of SUSI.AI provides a list of all users registered on SUSI. This helps admins to get an overview of users and also provides the admins option like change user roles and delete accounts. The list of users is displayed in a table which also uses pagination to handle larger number of users. But to find a particular user can be a difficult task if the user base is large. Therefore a feature to search for users by their email has been implement which searches for users on SUSI server and then sends the searched users to the client. In this post we will discuss both about the server and client side implementation of this feature.

Continue ReadingImplementing Search User Feature for Admins

How search works on Susi Skill CMS

The SUSI Skill CMS is a central dashboard where the developers can add skills to make SUSI more intelligent. One of the major thing that was missing there was a search bar. So I recently added one that can search a skill based on:

  • Skill name
  • Skill description
  • Author name
  • Examples of the skill

How to add the search bar?

  1. Install the Material Search Bar component from the terminal.

npm i --save material-ui-search-bar


  1. Import this component in the BrowseSkill.js file.

import SearchBar from 'material-ui-search-bar'


  1. Create a state variables for the search query and initialize it to an empty string.

this.state = {
	...
	searchQuery:''
	...
};


  1. Add the search bar (UI Part) below the filters on CMS. Add a listener function to it that is called when the value of the search query changes.

<SearchBar
     onChange={this.handleSearch}
     value={this.state.searchQuery}
   />


  1. The search handler : Create a handler (handleSearch) to that listens to onChange events on the SearchBar. This function sets the value of searhQuery state variable and loads the card again based on the search filter.

handleSearch
  = (value) => {
    this.setState({searchQuery: value}, function () {
    this.loadCards();
    });
};


  1. The loadCards() function : The loadCards() function send a request to the Susi Server which in turn send a json response. Then this function makes cards for every skill and adds them to the CMS. Modify the loadCards() function to filter the cards array based on the search query. The javascript string function match() is used to check if the skill name, description, author’s name or examples match the search query. The filter() function adds the skill card to the filtered data if the match() function returns true (i.e., the skill is relevant to the search query).

How the filter works?

  1. First check if there’s something to search for. If the searchQuery.length is equal to zero then that means that there is nothing to search for.

self.state.searchQuery.length >0


  1. Then filter the related results based on
  • Skill name : The filter() function adds the skill card to the filtered data if the match function returns true (i.e., the skill is relevant to the search query). The match() function retuns true if the skill name matches the search query.

if (i.skill_name) {
    	result =  i.skill_name.toLowerCase()
        	.match( self.state.searchQuery.toLowerCase() );
    	if (result) {
        	return result;
    	}
}


Similarly, filter the cards on the basis of skill description and skill author’s name.

  • Skill examples: Loop over all the skill examples and check if any example matches the search query.

if (i.examples && i.examples.length>0) {
    	i.examples.map((el,j)=>{
      	result =  el.toLowerCase()
        	.match( self.state.searchQuery.toLowerCase() );
      	if (result) {
          	return result;
      	}
    	})
}

Example

Here the search query is “country”. The word “country” appears the skill description of the filtered cards.

Resources

Continue ReadingHow search works on Susi Skill CMS

Holding query search in Loklak

Continuously searching user’s input while the user kept typing is not good. It has certain drawbacks which result in continuous action dispatch and loading of the result page which depicts the site to be slow, but actually it is not. To prevent continuous loading and searching while user types a query in Loklak Search, it was important to keep hold on query until user completes typing and then start searching for the results. I am writing this blog post to emphasise a proper solution to constantly keep track of the query and search on an appropriate event.

Adding keypress event

First and foremost task would be to add keypress event to input tag on home and results page.

<input     
     

     (keypress)=“onEnter($event)” 
     [formControl]=“searchInputControl

/>


formControl will constantly keep track of the user input and will be stored in searchInputControl, while keypress event will activate onEnter() method firing an $event as an input to onEnter() method.

Adding onEnter() method

Note: Keeping track of special keypress event code 13 which is equivalent for an enter key press.

Add a new method onEnter() with event as an input which will execute its function only when the event’s keypress code is 13 (Enter key press). One point should be noted here that query to be searched should not be empty or containing leading and trailing spaces or should not contain only spaces (treated as an incomplete query to be searched).

onEnter(event: any) {  
   if (event.which === 13) {  

      if (this.searchInputControl.value.trim() !== ”) {

        // Actual work of query search will go here.

  }

}

Add query searching and migration code under onEnter()

Now comes the last part to shift query search and route migration code from setupSearchField() to the portion mentioned above in comments. We need to take one point in consideration that from now on we actually do not need to subscribe to formControl in ngOnInit() since now it depends on user query input.

Complete onEnter() in home component file

After completion, onEnter() method should be similar to:

onEnter(event: any) {
   if (event.which === 13) {
       if (this._queryControl.value.trim() !== ”) {
           this.store.dispatch(new 
               queryAction.RelocationAfterQuerySetAction());
           this.store.dispatch(new suggestAction
               .SuggestAction(this._queryControl.value.trim()));
           this.store.dispatch(new queryAction
               .InputValueChangeAction(this._queryControl.value.trim()
           ));
           this.router.navigate([`/search`],
               { queryParams: { query: this._queryControl.value.trim() }
               , skipLocationChange: true } );
           this.store.dispatch(new titleAction
           .SetTitleAction(this._queryControl.value.trim()
               +   Loklak Search’));
           this.getDataFromStore();
       }
   }
}


Since we are not depending on ngOnInit() therefore we also need to append getDataFromStore() to onEnter() method.

Complete onEnter() in feed-header component file

After completion, onEnter() method should be similar to:

onEnter(event: any) {
   if (event.which === 13) {
       if (this.searchInputControl.value.trim() !== '') {
           this.searchEvent.emit(this.searchInputControl
               .value.trim());
           this.setupSuggestBoxClosing();
       }
   }
}

Testing

Try typing different formats of query on home and results page of loklak.

Resources

Continue ReadingHolding query search in Loklak

Open Event Server: Creating/Rebuilding Elasticsearch Index From Existing Data In a PostgreSQL DB Using Python

The Elasticsearch instance in the current Open Event Server deployment is currently just used to store the events and search through it due to limited resources.

The project uses a PostgreSQL database, this blog will focus on setting up a job to create the events index if it does not exist. If the indices exists, the job will delete all the previous the data and rebuild the events index.

Although the project uses Flask framework, the job will be in pure python so that it can run in background properly while the application continues its work. Celery is used for queueing up the aforementioned jobs. For building the job the first step would be to connect to our database:

from config import Config
import psycopg2
conn = psycopg2.connect(Config.SQLALCHEMY_DATABASE_URI)
cur = conn.cursor()


The next step would be to fetch all the events from the database. We will only be indexing certain attributes of the event which will be useful in search. Rest of them are not stored in the index. The code given below will fetch us a collection of tuples containing the attributes mentioned in the code:

cur.execute(
       "SELECT id, name, description, searchable_location_name, organizer_name, organizer_description FROM events WHERE state = 'published' and deleted_at is NULL ;")
   events = cur.fetchall()


We will be using the the bulk API, which is significantly fast as compared to adding an event one by one via the API. Elasticsearch-py, the official python client for elasticsearch provides the necessary functionality to work with the bulk API of elasticsearch. The helpers present in the client enable us to use generator expressions to insert the data via the bulk API. The generator expression for events will be as follows:

event_data = ({'_type': 'event',
                  '_index': 'events',
                  '_id': event_[0],
                  'name': event_[1],
                  'description': event_[2] or None,
                  'searchable_location_name': event_[3] or None,
                  'organizer_name': event_[4] or None,
                  'organizer_description': event_[5] or None}
                 for event_ in events)


We will now delete the events index if it exists. The the event index will be recreated. The generator expression obtained above will be passed to the bulk API helper and the event index will repopulated. The complete code for the function will now be as follows:


@celery.task(name='rebuild.events.elasticsearch')
def cron_rebuild_events_elasticsearch():
   """
   Re-inserts all eligible events into elasticsearch
   :return:
   """
   conn = psycopg2.connect(Config.SQLALCHEMY_DATABASE_URI)
   cur = conn.cursor()
   cur.execute(
       "SELECT id, name, description, searchable_location_name, organizer_name, organizer_description FROM events WHERE state = 'published' and deleted_at is NULL ;")
   events = cur.fetchall()
   event_data = ({'_type': 'event',
                  '_index': 'events',
                  '_id': event_[0],
                  'name': event_[1],
                  'description': event_[2] or None,
                  'searchable_location_name': event_[3] or None,
                  'organizer_name': event_[4] or None,
                  'organizer_description': event_[5] or None}
                 for event_ in events)
   es_store.indices.delete('events')
   es_store.indices.create('events')
   abc = helpers.bulk(es_store, event_data)


Currently we run this job on each week and also on each new deployment. Rebuilding the index is very important as some records may not be indexed when the continuous sync is taking place.

To know more about it please visit https://gocardless.com/blog/syncing-postgres-to-elasticsearch-lessons-learned/

Related links:

Continue ReadingOpen Event Server: Creating/Rebuilding Elasticsearch Index From Existing Data In a PostgreSQL DB Using Python

Filtering List with Search Manager in Connfa Android App

It is a good practice to provide the facility to filter lists in Android apps to improve the user experience. It often becomes very unpleasing to scroll through the entire list when you want to reach a certain data point. Recently I modified Connfa app to read the list of speakers from the Open Event Format. In this blog I describe how to add filtering facility in lists with Search Manager.

First, we declare the search menu so that the widget appears in it.

<?xml version="1.0" encoding="utf-8"?>
<menu xmlns:android="http://schemas.android.com/apk/res/android">
    <item android:id="@+id/search"
        android:title="Search"
        android:icon="@drawable/search"
        android:showAsAction="collapseActionView ifRoom"
        android:actionViewClass="android.widget.SearchView" />
</menu>

In above menu item the collapseActionView attribute allows your SearchView to expand to take up the whole action bar and collapse back down into a normal action bar item when not in use. Now we create the SearchableConfiguration which defines how SearchView behaves.

<?xml version="1.0" encoding="utf-8"?>
<searchable
    xmlns:android="http://schemas.android.com/apk/res/android"
    android:label="@string/app_name"
    android:hint="Search friend">
</searchable>

Also add this to the activity that will be used with <meta-data> tag in the manifest file. Then associate searchable configuration with the SearchView in the activity class

@Override
public boolean onCreateOptionsMenu(Menu menu) {
    MenuInflater inflater = getMenuInflater();
    inflater.inflate(R.menu.search_menu, menu);

    SearchManager searchManager = (SearchManager)
                            getSystemService(Context.SEARCH_SERVICE);
    searchMenuItem = menu.findItem(R.id.search);
    searchView = (SearchView) searchMenuItem.getActionView();

    searchView.setSearchableInfo(searchManager.
                            getSearchableInfo(getComponentName()));
    searchView.setSubmitButtonEnabled(true);
    searchView.setOnQueryTextListener(this);

    return true;
}

Implement SearchView.OnQueryTextListener in activity, need to override two new methods now

@Override
public boolean onQueryTextSubmit(String searchText) {
  
  return true;
}

@Override
public boolean onQueryTextChange(String searchedText) {

   if (mSpeakersAdapter != null) {
       lastSearchRequest = searchedText;
       mSpeakersAdapter.getFilter().filter(searchedText);
   }
   return true;
}

Find the complete implementation here. In the end it will look like this,


References

Android Search View documentation – https://developer.android.com/reference/android/widget/SearchView.html

Continue ReadingFiltering List with Search Manager in Connfa Android App

Implementing Search Bar Using GitHub API In Yaydoc CI

In Yaydoc’s, documentation will be generated by typing the URL of the git repository to the input box from where user can generate documentation for any public repository, they can see the preview and if they have access, they can push the documentation to the github pages on one click. But In Yaydoc CI user can register the repository only if he has access to the specific repository, so I decided to show the list to the repository where user can select from the list but then it also has one problem that Github won’t give us all the user repository data in one api hit and then I made a search bar in which user can search repository and can register to the Yaydoc CI.

var search = function () {
  var username = $("#orgs").val().split(":")[1];
  const searchBarInput = $("#search_bar");
  const searchResultDiv = $("#search_result");

  searchResultDiv.empty();
  if (searchBarInput.val() === "") {
    searchResultDiv.append('<p class="text-center">Please enter the repository name<p>');
    return;
  }

  searchResultDiv.append('<p class="text-center">Fetching data<p>');

  $.get(`https://api.github.com/search/repositories?q=user:${username}+fork:true+${searchBarInput.val()}`, function (result) {
    searchResultDiv.empty();
    if (result.total_count === 0) {
      searchResultDiv.append(`<p class="text-center">No results found<p>`);
      styles.disableButton("btnRegister");
    } else {
      styles.disableButton("btnRegister");
      var select = '<label class="control-label" for="repositories">Repositories:</label>';
      select += '<select class="form-control" id="repositories" name="repository" required>';
      select += `<option value="">Please select</option>`;
      result.items.forEach(function (x){
        select += `<option value="${x.full_name}">${x.full_name}</option>`;
      });
      select += '</select>';
      searchResultDiv.append(select);
    }
  });
};

$(function() {
  $("#search").click(function () {
    search();
  });
});

In the above snippet I have defined search function which will get executed when user clicks the search button. The search function will get the search query from input box, if the search query is empty it’ll show the message as “Please enter repository name”, if it is not empty it’ll hit the GitHub API to fetch user repositories. If the GitHub returns empty array it’ll show “No results found”. In between searching time “Fetching data” will be shown.

$('#search_bar').on('keyup keypress', function(e) {
    var keyCode = e.keyCode || e.which;
    if (keyCode === 13) {
      search();
    }
  });

  $('#ci_register').on('keyup keypress', function(e) {
    var keyCode = e.keyCode || e.which;
    if (keyCode === 13) {
      e.preventDefault();
      return false;
    }
  });

Still we faced some problem, like on click enter button form is automatically submitting. So I’m registering event listener. In that listener I’m checking whether the key code is 13 or not. Key code 13 represent enter key, so if the key code is 13 then i’ll prevent the form from submitting. You can see the working of the search bar in the Yaydoc CI.

Resources:

Continue ReadingImplementing Search Bar Using GitHub API In Yaydoc CI

Search Functionalities in SUSI Android App Using Android SearchView Widget

Searching is a common feature that is required in most applications. But the problem in implementing searching functionality is that there is no common way to do that. People fight over whose way is best to implement search functionality. In this blog post we’ll be looking at how search functionality works in SUSI Android App and how is it implemented. We have used Android’s SearchView widget to do that. There are many other ways to do so but this one is best suited for our requirements. Let’s see how it works.

UI Components used for Searching

1. Search icon (magnifying glass icon)

In the action bar, you can see a small icon. Clicking on the icon initiates search.

2. Edit text

An Obvious requirement is an edit test to enter search query.

3. Up and Down arrow keys

Required to search through the whole app. Simply use the up and down arrow keys to navigate through the app and find out each occurrence of the word you want to search.


4. Cross Button

Last but not the least, a close or cross button to close the search action.

Implementation

We have used Android’s inbuilt Widget SearchView. According to official android documentation

A widget that provides a user interface for the user to enter a search query and submit a request to a search provider. Shows a list of query suggestions or results, if available, and allows the user to pick a suggestion or result to launch into.

This widget makes searching a lot easier. It provides all methods and listeners which are actually required for searching. Let’s cover them one by one.

  1. Starting the search: searchView.setOnSearchClickListener Listener simply activates when a user clicks on search icon in the toolbar. Do all your work which needs to be done at the starting of the search like, hiding some other UI elements of doing an animation inside the listener
searchView.setOnSearchClickListener({
   chatPresenter.startSearch()
})
  1. Stop the Search: searchView.setOnCloseListener Listener gets activated when a user clicks on the cross icon to close the search. Add all the code snippet you want which is needed to be executed when the search is closed inside this like maybe notify the adapter about data set changes or closing the database etc.
searchView.setOnCloseListener({
   chatPresenter.stopSearch()
   false
})
  1.  Searching a query:  searchView.setOnQueryTextListener Listener overrides 2 methods:

3.1 onQueryTextSubmit: As the name suggests, this method is called when the query to be searched is submitted.

3.2 onQueryTextChange: This method is called when query you are writing changes.

We, basically wanted same thing to happen if user has submitted the query or if he is still typing and that is to take the query at that particular moment, find it in database and highlight it. So, chatPresenter.onSearchQuerySearched(query) this method is called in both onQueryTextSubmit and onQueryTextSubmit  to do that.

 searchView.setOnQueryTextListener(object : SearchView.OnQueryTextListener {
 
      override fun onQueryTextSubmit(query: String): Boolean {
           //Handle Search Query
           chatPresenter.onSearchQuerySearched(query)
           recyclerAdapter.query = query
           return false
       }

       override fun onQueryTextChange(newText: String): Boolean {
           if (TextUtils.isEmpty(newText)) {
               modifyMenu(false)
               recyclerAdapter.highlightMessagePosition = -1
               recyclerAdapter.notifyDataSetChanged()
               if (!editText.isFocused) {
                   editText.requestFocus()
               }
           } else {
               chatPresenter.onSearchQuerySearched(newText)
               recyclerAdapter.query = newText
           }
           return false
       }
   })
   return true
}
  1. Finding query in database: Now we have a query to be searched, we can just use a database operation to do that. The below code snippet finds all the messages which has the query present in it and work on it. If the query is not found, it simply displays a toast saying “Not found”
override fun onSearchQuerySearched(query: String) {
   chatView?.displaySearchElements(true)
   results = databaseRepository.getSearchResults(query)
   offset = 1
   if (results.size > 0) {
       chatView?.modifyMenu(true)
       chatView?.searchMovement(results[results.size - offset].id.toInt())
   } else {
       chatView?.showToast(utilModel.getString(R.string.not_found))
   }
}

This is the database operation.

override fun getSearchResults(query: String): RealmResults<ChatMessage> {
   return realm.where(ChatMessage::class.java).contains(Constant.CONTENT,
           query, Case.INSENSITIVE).findAll()
}

  1. Highlighting the part of message: Now, we know which message has the query, we just want to highlight it with a bright color to display the result. For that, we used SpannableString to highlight a part of complete string.
String text = chatTextView.getText().toString();
SpannableString modify = new SpannableString(text);
Pattern pattern = Pattern.compile(query, Pattern.CASE_INSENSITIVE);
Matcher matcher = pattern.matcher(modify);
while (matcher.find()) {
   int startIndex = matcher.start();
   int endIndex = matcher.end();
   modify.setSpan(new BackgroundColorSpan(Color.parseColor("#ffff00")), startIndex, endIndex, Spannable.SPAN_EXCLUSIVE_EXCLUSIVE);
}
chatTextView.setText(modify);

Summary

The whole point of this blog post was to educate about SearchView widget of android and how it makes it easy to search queries. All the methods you need are already implemented. You just need to call them and add database operation.

Resources

  1. The link to official android documentation explaining about different methods in SearchView Class https://developer.android.com/reference/android/widget/SearchView.html
  2. Another tutorial about SearchView http://www.journaldev.com/12478/android-searchview-example-tutorial
Continue ReadingSearch Functionalities in SUSI Android App Using Android SearchView Widget